LaTeX入门手册(第4卷)
latex使用手册

latex使用手册LaTeX 使用手册一、LaTeX 简介与安装LaTeX 是一款强大的排版系统,基于TeX 编程语言开发。
它广泛应用于学术论文、书籍、报告等文档的撰写与排版。
安装LaTeX 系统后,用户可以利用各种编辑器(如TeXstudio、TeXworks 等)编写文档,并通过命令行或图形界面进行编译。
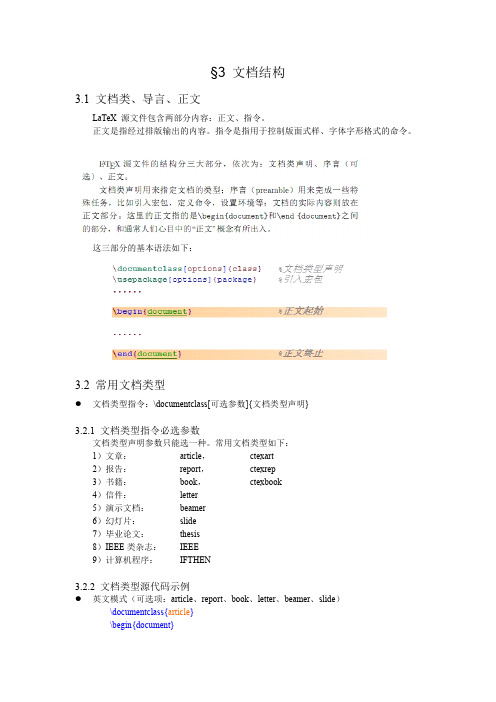
二、LaTeX 基本语法与结构1.文档结构:LaTeX 文档由一系列章节组成,每个章节具有独立的标题和内容。
2.标题:使用section、subsection、subsubsection 等命令创建不同级别的标题。
3.段落与换行:使用par 和ewline 命令创建段落和换行。
4.文本格式:使用textbf、textit、textsf 等命令设置文本格式。
三、文本格式与排版1.字体:使用fontfamily 命令选择字体。
2.字号:使用fontsize 命令设置字号。
3.行距:使用linespacing 命令设置行距。
4.间距:使用marginpar 命令设置页面四周的空白。
四、数学公式与符号1.数学公式:使用equation、align 等命令编写数学公式。
2.符号:使用symbol 命令插入特殊符号。
五、表格与图表1.创建表格:使用begin{tabular}、end{tabular} 命令创建表格。
2.修改表格:使用hline、multicolumn 等命令修改表格样式。
3.创建图表:使用begin{figure}、end{figure} 命令创建图表。
4.修改图表:使用caption、label 等命令修改图表属性。
六、目录与参考文献1.目录:使用tableofcontents 命令生成目录。
2.参考文献:使用bibliography 命令管理参考文献。
七、跨章节引用与链接1.交叉引用:使用label 和ef 命令实现章节间的引用。
2.内部链接:使用hyperlink 命令创建内部链接。
latex_手册
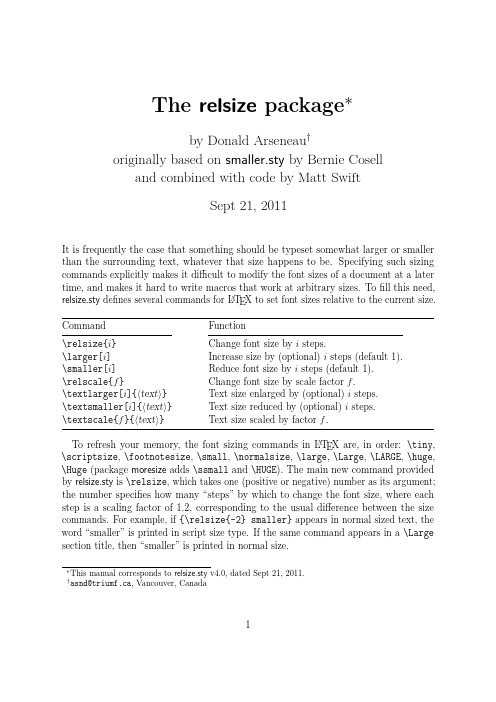
The relsize package∗by Donald Arseneau†originally based on smaller.sty by Bernie Coselland combined with code by Matt SwiftSept21,2011It is frequently the case that something should be typeset somewhat larger or smaller than the surrounding text,whatever that size happens to be.Specifying such sizing commands explicitly makes it difficult to modify the font sizes of a document at a later time,and makes it hard to write macros that work at arbitrary sizes.Tofill this need, relsize.sty defines several commands for L A T E X to set font sizes relative to the current size. Command Function\relsize{i}Change font size by i steps.\larger[i]Increase size by(optional)i steps(default1).\smaller[i]Reduce font size by i steps(default1).\relscale{f}Change font size by scale factor f.\textlarger[i]{〈text〉}Text size enlarged by(optional)i steps.\textsmaller[i]{〈text〉}Text size reduced by(optional)i steps.\textscale{f}{〈text〉}Text size scaled by factor f.To refresh your memory,the font sizing commands in L A T E X are,in order:\tiny, \scriptsize,\footnotesize,\small,\normalsize,\large,\Large,\LARGE,\huge, \Huge(package moresize adds\ssmall and\HUGE).The main new command provided by relsize.sty is\relsize,which takes one(positive or negative)number as its argument; the number specifies how many“steps”by which to change the font size,where each step is a scaling factor of1.2,corresponding to the usual difference between the size commands.For example,if{\relsize{-2}smaller}appears in normal sized text,the word“smaller”is printed in script size type.If the same command appears in a\Large section title,then“smaller”is printed in normal size.∗This manual corresponds to relsize.sty v4.0,dated Sept21,2011.†asnd@triumf.ca,Vancouver,Canada1There are also the commands\larger and\smaller,which normally changethe font size by one step in the obvious direction;\larger is an abbreviation for\relsize{+1},and\smaller is an abbreviation for\relsize{-1}.For example, {\large...\larger{WOW!}}prints“WOW!”in\Large type.You can also specify bigger steps as an optional argument for\larger and\smaller:\larger[3]isequivalent to\relsize{3}and\smaller[2]is\relsize{-2}.(Both\larger and\smaller accept negative arguments,but please don’t make things so obscure!)If you want to change size by several steps it is much better to give an increment than to string several\larger commands together;i.e.,\relsize{3}or\larger[3],but not\larger\larger\larger.Half-steps are possible,as in\relsize{-0.5}to change from10pt\normalsize to9pt\small,but other numbers are rounded to the nearest half-integer.All of the\relsize,\larger,and\smaller commands are“switches”just like theregular sizing commands.That is,they change the size for all following text until thescope is ended by a closing brace(or tabular cell,or environment...).There are alternateversions called\textlarger and\textsmaller that take some text as an argument andapply the size change to only that text:\textlarger{big}.Using the number of“magnification steps”to indicate font size can be confusing tosome people,and limiting in certain uses.There are commands with syntax\text-scale{〈factor〉}{〈text〉}and\relscale{〈factor〉}to select the size based on a scale factor,like\relscale{0.75}.If the size requested is too small or too large,a warning is given,and the sizewill only change as far as appropriate,typically\tiny or\Huge.These limits arecontrolled by the commands\RSsmallest and\RSlargest,which get set automat-ically when relsize.sty is loaded,but you can redefine them to other length values:\renewcommand\RSlargest{50pt}(do not use\setlength).Fine point:The combination\relsize{n}\relsize{−n}is not guaranteed to restore the current font size!That is because the increment n may be enough to overflow the range of sizes, depending on\RSsmallest,\RSlargest,and\RSpercentTolerance(below).You should use grouping to undo relative size changes because it is unsafe to counteract one change with an “equal”change in the opposite direction.Or just use the commands that take the text as arguments,like\textsmaller{this}.Typically,the font-size commands do not select fonts at precise regular size ratios(andsome commands give half-intervals).\relsize and the others will select,and execute,the command for the size closest to the desired size.Then,if the relative differencefrom the target size is more than\RSpercentTolerance a further font-size selection ismade.By default,\RSpercentTolerance is an empty macro,which causes automaticselection:“30”(30%)when the current“fontshape”definition is composed of onlydiscrete sizes,and“5”when the fontshape definition covers ranges of sizes.The highersetting for discrete fonts ensures only the pre-defined sizes get used.(By default L A T E Xuses Computer Modern fonts at discrete sizes;you get full coverage of sizes by using2\usepackage{type1cm}or various other font package.)For special uses,or when the font shape definitions are not parsed properly,you can redefine the percent tolerance: \renewcommand\RSpercentTolerance{10}.Define it as“0”(zero)to ensure the scaling is exactly as specified,regardless of the document’s standard font sizes.−×××−All of the commands described above are text commands;they cannot be used in math mode.There are special\mathsmaller and\mathlarger commands provided,but these do not use the same sizes that the text versions use.Instead,they step between the usual math“styles”which you can explicitly set using the commands\displaystyle, \textstyle,\scriptstyle,and\scriptscriptstyle.However,the\mathlarger command will also increase the size beyond regular\displaystyle by selecting a larger regular font size(using\larger).(Yes,this is a kludge,and doesn’t work very well,but it can still be useful.)If you want to use this to create big integral signs,then you must also load the package exscale so that math symbols can change size.The sizes selected are:Current style\mathsmaller gives\mathlarger gives\displaystyle\textstyle(similar)\displaystyle in\larger font \textstyle\scriptstyle\displaystyle(similar)\scriptstyle\scriptscriptstyle\textstyle\scriptscriptstyle\scriptscriptstyle\scriptstyleFor example,try$\frac{\mathlarger{E}}{E}$=EE .Note that,for most symbols,\displaystyle and\textstyle give the same size,so$N,\mathlarger{N}$=NN, showing two identical N’s,but\sum and\int do get bigger in display style,and fractionsare treated differently too:$\int\frac{1}{2}dN-\mathlarger{\int\frac{1}{2}dN}$= 12dN−12dN.As you might have guessed,\mathlarger and\mathsmaller should only be used in math mode.These commands will attempt to attach any superscripts and subscripts directly to the symbol within the braces,rather than how they would attach to a math sub-formula. On the other hand,math accents and the math spacing do behave as if the symbol is enclosed in braces(which it is).Operators should be explicitly declared to use the right operator type(\mathrel,\mathbin,\mathop)to get the correct spacing,e.g., \mathrel{\mathsmaller{=}}.Due to their oddities,the math larger/smaller commands should not be trusted very far,and they will not be useful in every instance.3。
latex使用手册
latex使用手册(最新版)目录tex 简介2.安装与配置 Latex3.基本语法与常用命令4.排版与格式设置5.插入图片与表格6.引用文献7.实战案例与应用正文Latex 是一种排版软件,常用于书籍、论文、报告等文档的排版。
它能够提供高质量的排版效果,并且易于使用。
下面我们将详细介绍如何使用 Latex。
首先,我们需要安装 Latex。
安装过程比较简单,只需下载安装包,然后按照提示进行安装即可。
安装完成后,我们需要配置 Latex。
这包括设置编译器、编辑器等。
配置完成后,我们就可以开始使用 Latex 了。
在编写 Latex 文档时,我们需要掌握一些基本语法和常用命令。
例如,我们可以使用documentclass 命令来设置文档的类型,使用section 命令来创建章节,使用item 命令来创建列表项等。
熟悉这些基本语法和命令,可以帮助我们更加高效地使用 Latex。
在排版和格式设置方面,Latex 提供了丰富的功能。
我们可以使用begin{align}命令来排版数学公式,使用begin{table}命令来插入表格,使用includegraphics 命令来插入图片等。
此外,我们还可以设置字体、字号、行间距等格式,以满足我们的排版需求。
当我们需要插入图片和表格时,可以使用上述提到的命令。
例如,我们可以使用includegraphics 命令来插入图片,使用begin{table}命令来插入表格。
在插入图片和表格时,我们需要注意图片和表格的尺寸,以及它们在文档中的位置。
在引用文献时,我们可以使用引用文献命令。
例如,我们可以使用quote 命令来引用一段文献,使用quotation 命令来引用多段文献。
在引用文献时,我们需要注意文献的格式,以及引用文献的顺序。
最后,我们可以通过实战案例来应用所学的 Latex 知识。
例如,我们可以编写一篇论文,然后使用 Latex 来排版。
在编写论文时,我们需要注意论文的结构,以及论文的内容。
LaTeX入门手册(第4卷)

LaTeX入门手册(第4卷)§7 盒子与粘连7.1 概述LaTeX在排版时,把每个对象都视为一个盒子。
一个符号,一个图形,一个表格,都能构成一个box 。
单个字符是盒子,若干个字符盒子排成一行构成大一点的行盒子,若干个行盒子堆叠成段落盒子或页盒子。
甚至box 中还有box情形。
LaTeX的排版过程实际就是在构造盒子和排列堆叠盒子。
盒子之间插入了可伸缩的弹性长度。
除了上述这些隐形的盒子,还有一些显式生成盒子的命令。
7.2 字符盒子每种盒子无论是带框的还是不带框的,都占据一个矩形区域。
\wd〈盒子变量〉\ht〈盒子变量〉\dp〈盒子变量〉分别得到盒子的宽度、高度和深度。
7.3 黑色盒子7.4 LR 盒子(默认0.4pt)例7.5 LR 盒子的升降例7.6 标尺盒子画线●支撑(支架)7.7 子段盒子(垂直盒子)与小页环境对于水平盒子,文字不能在其中分行分段(除非嵌套其他内容)。
而垂直盒子就没有这种限制。
●垂直盒子的语法:第一个也称为子段盒子,第二个称为小页环境。
例LaTeX 就象处理通常段落一样,将盒内的文本分行,然后堆叠成段(这是称为“竖直”盒子的缘由)。
当不使用可选位置时,盒子的中部与盒外基线对齐。
7.8 竖直摆放问题7.9 嵌套盒子7.10 有框的行间公式首先把公式放在一个适当宽度的\parbox 或minipage 中,然后再把它们放在\fbox 中以生成方框。
这里的问题在于需要经常多次尝试才可能找到合理的宽度。
然而,利用数学字体尺寸命令,还可以有另一种解决方法。
它不需要定义有框行间公式的宽度:7.11粘连。
latex使用手册
latex使用手册(实用版)目录tex 简介2.安装与配置 Latex3.基本语法与常用命令4.进阶技巧与高级应用5.常见问题与解决方案正文Latex 是一种排版软件,常用于书籍、论文、报告等文档的排版。
它具有强大的功能和灵活的语法,可以满足各种排版需求。
下面我们将详细介绍如何使用 Latex,包括安装与配置、基本语法与常用命令、进阶技巧与高级应用以及常见问题与解决方案。
一、Latex 简介Latex 是一种基于 TeX 的排版系统,由 Leslie Lamport 于 1985 年开发。
它具有易于使用、功能强大、格式统一等优点,被广泛应用于学术界和出版界。
Latex 的文件格式为.tex,通过编译器转换为.pdf 或.dvi 格式。
二、安装与配置 Latex安装 Latex 需要先安装 TeX 系统,TeX 系统包括 TeX 发行版、编译器、字体包等。
常见的 TeX 发行版有 TeX Live、MiKTeX 等。
安装好 TeX 系统后,需要配置 Latex。
可以通过命令行或 GUI 界面进行配置。
配置内容包括编译器路径、字体包路径、模板文件等。
三、基本语法与常用命令Latex 的基本语法包括文档结构、标题、段落、列表、引用等。
常用命令有documentclass、usepackage、section、subsection、item、quote 等。
熟悉这些基本语法和常用命令,可以轻松编写 Latex 文档。
四、进阶技巧与高级应用Latex 有很多进阶技巧和高级应用,例如自定义模板、样式、宏包等。
可以通过学习这些技巧和应用,提高 Latex 的使用水平。
五、常见问题与解决方案在使用 Latex 过程中,可能会遇到一些问题,例如编译错误、排版问题等。
针对这些问题,可以通过阅读文档、搜索网络资源、请教他人等途径寻求解决方案。
总之,Latex 是一种功能强大的排版软件,熟练掌握它的使用方法,可以提高我们的排版效率和质量。
LateX中文手册
Texmaker:用户手册1.配置Texmaker1.1配置编辑器1.2配置Latex相关的命令1.3配置拼写检查2.编辑TeX的文档2.1常用命令2.2设置一个TeX的文件的前序部分一个文件,2.3结构2.4浏览你的文档2.5格式化文本2.6的间距2.7插入列表2.8插入表格2.9插入一个“跳格”的环境2.10插入图片2.11交叉引用和注释2.12插入数学公式2.13使用“•”占位3.编译的文件3.1编译3.2日志文件3.3同步源PDF与Synctex4.其他功能4.1折叠/展开部分文档4.2关于在几个文件中分离出来的文件4.3参考书目4.4交友标签ANS工具4.5 Pstricks / Metapost / Tikz /渐近线支持4.6更改界面语言和外观4.7“恢复以前的会话”命令4.8“正向/反向搜索”与Texmaker4.9剧情简介texmaker命令4.10键盘快捷键4.11“源代码浏览器”面板4.12“使用'构建'子目录...”选项(PDF)Latex命令正则表达式4.13替换文本4.14使用Texmaker作为一个渐近线编辑器Texmaker:用户手册1.配置Texmaker使用Texmaker之前,您必须配置通过“配置Texmaker”命令,在“选项”菜单中的编辑器和Latex的相关命令(“首选项”下的MacOSX)。
1.1配置编辑器在编译你的第一个文件,你必须设置所用的编辑器的编码(“配置Texmaker” - >“编辑” - >“编辑字体编码”)。
然后,你应该使用相同的编码在你的TeX文件(例如:\ usepackage [拉丁] {} inputenc,如果使用“I SO-8859-1”编码编辑器)的序言注意:当打开一个文件,你警告说,如果该文件不能被正确使用的默认编码解码,该方案可以让您选择其他编码(没有修改默认的编码)。
1.2配置Latex相关的命令Texmaker不能编译你的文件,如果路径中的LaTeX相关的命令是错误的。
LaTeX入门手册(卷2)
于文档的注释,或者暂时不想包含到正文中去的内容,也有人把这部分叫做 postamble。
3.5 正文
夹在环境指令:\begin{document}……\end{document} 之间的部分,称为正文。
3.6 title page 资讯(标题、作者、日期等)
3.6.1 title page 资讯指令
4 5 � 可选项参数短标题
\paragraph{} \subparagraph{}
段落。 小段落。
�
带 * 号的章节命令
�
TeX 加有星号“*”的命令一般都不进行自动编号。但仍然会独立出一单独行来表标这 个标题。不编号的章节内容,当然也就不纳入目录里头。 \part 不影响章的序号。 \appendix 不带参量,只把章的序号改为字母标记(对 article 类文档改变节的序号) 。
3.2.2 文档类型源代码示例
� 英文模式(可选项:article、report、book、letter、beamer、slide) \documentclass{article} \begin{document}
�
�
�
�
... \end{document} 中文模式(1) (可选项:article、report、book、letter、beamer、slide) \documentclass{report} \usepackage{ctex} \begin{document} ... \end{document} 中文模式(2) (可选项:article、report、book、letter、beamer、slide) \documentclass{book} \usepackage{CJK} \begin{document} \begin{CJK*}{GBK}{kai} ... \end{CJK*} \end{document} 中文模式(3) (可选项:ctexart、ctexrep、ctexbook、 ) \documentclass{ctexbook} \begin{document} ... \end{document} 中文模式(4) (CCT 类型可选项:cctart,carticle, creport,cbook.) \documentclass[CJK]{creport} \begin{document} ... \end{document}
LaTeX教程4

设置默认字体族
设置主字体 设置衬线字体 设置等宽字体
\setmainfont{字体名} \setsansfont{字体名} \setmonofont{字体名}
其它
LaTeX制作演讲幻灯片
Beamer
End.
\documentclass{article} \usepackage{xltxtra} \begin{document} \fontspec{SimSun}你好!世界! \end{documrticle} \usepackage{xltxtra} \begin{document} \fontspec{SimSun}你好!世界! \end{document}
宋体
优势
可使用任何系统中的字体 Windows的字体一般存放在: c:\WINDOWS\Fonts CTeX也提供了一些自带字体
如何安装、使用字体
fc-cache(更新字体缓存,让系统找到字体) fc-list(列出所有XeLaTeX可用字体)
例
假设已有一些truetype字体文件(.ttf)文件 1. 拷贝至 c:\WINDOWS\Fonts 2. 命令行更新字体缓存: fc-cache --force -v 3. 根据字体文件名,字体信息确定字体名: fc-list
A L TEX 使用简介(4)
──中文及字体渲染技术 XL
中文处理前传
CJK宏包 缺点:字体有限
h1s sĢG
可使用truetype (或opentype)字体 可处理多国语言(unicode) 使用简单
h1s sĢG
\usepackage{xunicode,fontspec} 或 \usepackage{xltxtra}
如果无法确定字体名
- 1、下载文档前请自行甄别文档内容的完整性,平台不提供额外的编辑、内容补充、找答案等附加服务。
- 2、"仅部分预览"的文档,不可在线预览部分如存在完整性等问题,可反馈申请退款(可完整预览的文档不适用该条件!)。
- 3、如文档侵犯您的权益,请联系客服反馈,我们会尽快为您处理(人工客服工作时间:9:00-18:30)。
§7 盒子与粘连
7.1 概述
LaTeX在排版时,把每个对象都视为一个盒子。
一个符号,一个图形,一个表格,都能构成一个box 。
单个字符是盒子,若干个字符盒子排成一行构成大一点的行盒子,若干个行盒子堆叠成段落盒子或页盒子。
甚至box 中还有box情形。
LaTeX的排版过程实际就是在构造盒子和排列堆叠盒子。
盒子之间插入了可伸缩的弹性长度。
除了上述这些隐形的盒子,还有一些显式生成盒子的命令。
7.2 字符盒子
每种盒子无论是带框的还是不带框的,都占据一个矩形区域。
\wd〈盒子变量〉\ht〈盒子变量〉\dp〈盒子变量〉分别得到盒子的宽度、高度和深度。
7.3 黑色盒子
7.4 LR 盒子
(默认0.4pt)
例
7.5 LR 盒子的升降
例
7.6 标尺盒子
画线
●支撑(支架)
7.7 子段盒子(垂直盒子)与小页环境
对于水平盒子,文字不能在其中分行分段(除非嵌套其他内容)。
而垂直盒子就没有这种限制。
●垂直盒子的语法:
第一个也称为子段盒子,第二个称为小页环境。
例
LaTeX 就象处理通常段落一样,将盒内的文本分行,然后堆叠成段(这是称为“竖直”盒子的缘由)。
当不使用可选位置时,盒子的中部与盒外基线对齐。
7.8 竖直摆放问题
7.9 嵌套盒子
7.10 有框的行间公式
首先把公式放在一个适当宽度的\parbox 或minipage 中,然后再把它们放在\fbox 中以生成方框。
这里的问题在于需要经常多次尝试才可能找到合理的宽度。
然而,利用数学字体尺寸命令,还可以有另一种解决方法。
它不需要定义有框行间公式的宽度:
7.11粘连
§9 模式
§10 版式布局10.1 概述
【注】版边,在书法上称为“天地”。
10.2 版面图解
\oddsidemargin, \evensidemargin 奇数/偶数页, 纸张左边缘到页body左边缘的距离减去一英寸
\topmargin 纸张上边缘到页眉或body(无页眉时)的距离减去一英寸
建议
1)总把\oddsizemargin(奇数页的左边界)\evensidemargin(偶数页的左边界)
\topmargin(从上页边到页眉的距离)设为0cm。
2)如果没用页眉, 将\headheight(页眉高度),headsep(页眉基线到正文顶部的距离)设为0cm。
3)如果没用页脚, 将\footheight(已过时latex2e中已被去掉),\footskip(正文底部到页脚底部的距离)设为0cm,这样便于在输出时直接利用驱动程序的功能控制版心的位置。
例. 《LaTeX 入门》(刘海洋)一书的片面图解:
[注] 这里的“本书”是指《LaTeX 入门》(刘海洋)
geometry 宏包
10.3 版面控制指令(1)
(2)
为article,report 的缺省。
页脚为空。
也就是说,下一页自动恢复原设置。
10.4 页眉、页脚
10.4.1 页码设置
在正文中调用页码命令\pagenumbering{数字形式}。
其中数字形式可取值如下:arabic, 阿拉伯数字
roman, 小写罗马数字
Roman, 大写罗马数字
alpha, 小写拉丁字母
Alpha, 大写拉丁字母
10.4.2 页面样式
页面样式指令:\pagestyle{style}
改变当前页面样式命令:\thispagestyle{style}
其中style 参数可在下表四个参数中选一个,以确定页面样式(page style)。
在用LaTeX排版文章、书籍时,缺省定义了四种页眉页脚的格式:empty没有页眉和页脚
plain没有页眉,页脚居中放置页码。
headings 没有页脚,页眉包含章节名和页码。
myheadings没有页脚,页眉是页码和使用者所定义的信息。
fancyhdr 宏包
例
这里方括号中字母代表的意义为:E 偶数页
O 奇数页
L 页眉或页脚的左边部分
C 页眉或页脚的中间部分
R 页眉或页脚的右边部分
H 页眉
F 页脚
10.4.2 指定页眉内容
用\markboth 定义
例
10.5 页码
页码显示格式
10.6 横向空间
10.6.1 横向空间的调整指令
●指令\hapace{length} 若放在行首或行末使用,则会失效。
此时可以加个星号(*),例
如,
\hapace*{3em} 。
●指令\centering{} 对短文句很方便,是因为它不会影响后面的文字。
但是,它不会折行,
甚至加入换行符也无效。
因此,如果文句长度超过一行的行宽,就会超出边界,甚至连首尾的文字都看不见了。
●指令\thinspace 可以简化为“\,”。
主要是用在引号中又有引号时的情形,例如,
源代码:``\,`Superman',he said.''
生成图:“‘Superman’,he said.”
●给某些参数一个固定的值
☞在TeX 中的长度单位
☞水平间距
给某些参数增加一个长度
\addtolength{parameter}{length}
这个命令实际上比\setlength 命令更实用,因为可以相对于现有的设置来获得所需的结果。
为了给文本的宽度增加1厘米,将如下的命令放置到文档导言:。