3D计步器手表中文使用说明书
Suunto松拓_t3d_T3C中文说明书

• distance • average speed • maximum speed • lap time • time
Note: Additional views available depending on paired devices.
1 简介 . . . . . . . . . . . . . . . . . . . . . . . . . . . . . . . . . . . . . . . . . . . . . . . . . . . . . . . . . . . . . . . . . . . . . . . . . . . . . . . . . . 5 2 入门 . . . . . . . . . . . . . . . . . . . . . . . . . . . . . . . . . . . . . . . . . . . . . . . . . . . . . . . . . . . . . . . . . . . . . . . . . . . . . . . . . . 6 2.1 基本设置 . . . . . . . . . . . . . . . . . . . . . . . . . . . . . . . . . . . . . . . . . . . . . . . . . . . . . . . . . . . . . . . . . 6 2.2 模式和视图 . . . . . . . . . . . . . . . . . . . . . . . . . . . . . . . . . . . . . . . . . . . . . . . . . . . . . . . . . . . . . . 8 2.3 菜单导航 . . . . . . . . . . . . . . . . . . . . . . . . . . . . . . . . . . . . . . . . . . . . . . . . . . . . . . . . . . . . . . . . . 9 3 定义主设置 . . . . . . . . . . . . . . . . . . . . . . . . . . . . . . . . . . . . . . . . . . . . . . . . . . . . . . . . . . . . . . . . . . . . . . . . . 11 3.1 常规设置 . . . . . . . . . . . . . . . . . . . . . . . . . . . . . . . . . . . . . . . . . . . . . . . . . . . . . . . . . . . . . . . . . 11 3.2 个人设置 . . . . . . . . . . . . . . . . . . . . . . . . . . . . . . . . . . . . . . . . . . . . . . . . . . . . . . . . . . . . . . . . 13 3.2.1 最大心率 . . . . . . . . . . . . . . . . . . . . . . . . . . . . . . . . . . . . . . . . . . . . . . . . . . . . . 14 4 使用 TRAINING 模式 . . . . . . . . . . . . . . . . . . . . . . . . . . . . . . . . . . . . . . . . . . . . . . . . . . . . . . . . . . . . . . 15 4.1 佩戴心率传输带 . . . . . . . . . . . . . . . . . . . . . . . . . . . . . . . . . . . . . . . . . . . . . . . . . . . . . . . . 15 4.2 开始训练课程 . . . . . . . . . . . . . . . . . . . . . . . . . . . . . . . . . . . . . . . . . . . . . . . . . . . . . . . . . . . 16 4.3 训练过程 . . . . . . . . . . . . . . . . . . . . . . . . . . . . . . . . . . . . . . . . . . . . . . . . . . . . . . . . . . . . . . . . 16 4.4 训练之后 . . . . . . . . . . . . . . . . . . . . . . . . . . . . . . . . . . . . . . . . . . . . . . . . . . . . . . . . . . . . . . . . 17 4.4.1 查看训练日志 . . . . . . . . . . . . . . . . . . . . . . . . . . . . . . . . . . . . . . . . . . . . . . . . 17 4.4.2 查看训练总量 . . . . . . . . . . . . . . . . . . . . . . . . . . . . . . . . . . . . . . . . . . . . . . . 18 4.5 测定训练强度 . . . . . . . . . . . . . . . . . . . . . . . . . . . . . . . . . . . . . . . . . . . . . . . . . . . . . . . . . . . 19 4.6 使用 Training Effect(训练效果) . . . . . . . . . . . . . . . . . . . . . . . . . . . . . . . . 21 4.7 使用心率限制和心率区域 . . . . . . . . . . . . . . . . . . . . . . . . . . . . . . . . . . . . . . . . . . . . . 24 4.7.1 心率限制 . . . . . . . . . . . . . . . . . . . . . . . . . . . . . . . . . . . . . . . . . . . . . . . . . . . . . 24 4.7.2 心率区域 . . . . . . . . . . . . . . . . . . . . . . . . . . . . . . . . . . . . . . . . . . . . . . . . . . . . . 26 2
GARMIN DRIVE 53 AND LIVE TRAFFIC 详细的操作手册说明书

详细的操作手册© 2022 Garmin Ltd. 或其子公司保留所有权利。
根据版权法,未经 Garmin 的书面同意,不得复制此手册的全部或部分内容。
Garmin 保留更改或改善其产品并对此手册的内容进行更改的权利,但没有义务向任何人或任何组织通知此类变更或改善。
有关本产品的使用的最新更新和补充信息,请访问。
Garmin和 Garmin 徽标是 Garmin Ltd. 或其分公司在美国和其他国家/地区注册的商标。
未经 Garmin 明确许可,不得使用这些商标。
Garmin Drive™和 Garmin Express™是 Garmin Ltd. 或其子公司的商标。
未经 Garmin 明确许可,不得使用这些商标。
Android™是 Google LLC 的商标。
Apple、iPhone和Mac是 Apple Inc. 在美国和其他国家/地区的注册商标。
BLUETOOTH字标和徽标归 Bluetooth SIG, Inc. 所有,Garmin 使用这些字标和徽标前已获得许可。
Foursquare是 Foursquare Labs, Inc. 在美国和其他国家/地区的商标。
microSD和 microSDHC 徽标是 SD-3C, LLC 的商标。
Tripadvisor是 Tripadvisor LLC 的注册商标。
Windows是 Microsoft Corporation 在美国和其他国家/地区的注册商标。
目录使用入门 (1)Garmin Drive 53 设备概述 (1)安装注意事项 (1)在车中安装 Garmin Drive 设备并对其通电 (2)与您的智能手机配对 (3)打开或关闭设备 (3)获取 GPS 信号 (4)状态栏图标 (4)使用屏幕按钮 (4)调节音量 (4)使用音频混音器 (4)启用或禁用声音和音频源 (5)调整屏幕亮度 (5)驾驶员提醒功能和警报 (5)启用或禁用驾驶员警报 (5)查找和保存位置 (6)使用搜索栏查找位置 (6)查找地址 (6)位置搜索结果 (7)更改搜索区域 (8)兴趣点 (8)按类别查找位置 (8)Foursquare® (8)Tripadvisor (9)导航到地点中的兴趣点 (9)搜索工具 (9)查找路口 (9)查找加油站及价格 (10)使用经纬度查找位置 (10)停车场 (10)查找当前位置附近的停车场 (10)查找指定位置附近的停车场 (10)查看最近找到的位置 (10)清除最近找到的位置列表 (10)查看当前位置信息 (10)查找紧急服务和加油站 (11)得到您的当前位置的方向 (11)添加快捷方式 (11)删除快捷方式 (11)保存位置 (11)保存位置 (11)保存当前位置 (11)编辑保存的位置 (12)为已保存的位置分配类别 (12)删除已保存的位置 (12)遵循路线 (12)路线 (12)开始路线 (13)使用地图开始路线 (13)回家 (13)地图上的路线 (14)查看转弯和方向 (15)在地图上查看完整路线 (15)即将到达目的地 (15)目的地附近的停车场 (15)更改当前路线 (15)向路线添加位置 (15)描绘路线 (16)绕路行驶 (16)更改路线计算模式 (16)停止路线 (16)避开交通堵塞、收费道路和特定区域 (16)避过路线上的交通堵塞 (16)避让收费道路 (16)避开道路功能 (16)定制避让 (17)使用地图 (17)地图工具 (18)查看地图工具 (18)向前 (18)查看前方位置 (18)定制向前类别 (18)前方到达城市 (19)查看前方到达城市和出口服务区 (19)行程信息 (19)在地图上查看行程数据 (19)查看行程数据 (19)查看里程历史记录 (19)重置行程信息 (19)查看前方交通 (19)查看地图上的交通信息 (20)搜索交通事故 (20)定制地图 (20)定制地图图层 (20)更改地图数据字段 (20)更改地图视角 (20)实时服务、交通信息和智能手机功能 (20)断开 Bluetooth® 设备连接 (20)删除配对的手机 (20)交通 (21)使用智能手机接收交通数据 (21)启用交通 (21)查看地图上的交通信息 (21)搜索交通事故 (21)使用应用程序 (21)在设备上查看用户手册 (21)photoLive 交通摄像头 (21)查看和保存 photoLive 交通摄像头 (22)在地图上查看 photoLive 交通摄像头 (22)保存交通摄像头 (22)路线规划器 (22)规划路线 (22)编辑和重新排序路线中的位置 (23)更改一条路线的路线选项 (23)按照已保存的路线导航 (23)编辑和保存活动的路线 (23)无线摄像头 (23)将 BC 40 相机与Garmin导航设备配对 (24)将 BC 50 摄像头与 Garmin 导航设备配对 (24)查看无线摄像头 (24)查看之前的路线和目的地 (25)设置 (25)地图和车辆设置 (25)启用地图 (26)导航设置 (26)计算模式设置 (26)设置模拟位置 (26)无线网络设置 (27)驾驶员辅助设置 (27)接近报警设置 (27)备用摄像头设置 (27)显示设置 (27)交通设置 (27)单位和时间设置 (28)设置时间 (28)语言和键盘设置 (28)设备和隐私设置 (28)重置数据和设置 (28)设备信息 (29)查看电子标签的法规和合规信息 (29)规格 (29)给设备充电 (29)设备维护 (29)Garmin支持中心 (29)地图和软件更新 (29)连接至 Wi‑Fi 网络 (30)使用 Wi‑Fi 网络更新地图和软件 (30)使用 Garmin Express 更新地图和软件 (31)设备保养 (32)清洁外壳 (32)清洁触摸屏 (32)防窃 (32)重新启动设备 (32)取下设备、固定架和吸盘 (32)从固定架上取下设备 (32)从吸盘上取下固定架 (33)从挡风玻璃上取下吸盘 (33)常见问题解答 (33)我无法调整设备的屏幕亮度 (33)吸盘吸不住挡风玻璃 (33)我的设备无法获取卫星信号 (33)我的电池电量短时间内会耗完 (33)我的设备未连接到手机 (33)附录 (34)安装用于存储地图和数据的存储卡 (34)数据管理 (34)关于存储卡 (34)将设备连接至计算机。
宜准G3说明书(中文)

3.3 下载APP
手表的设置、运动数据的查看和保存均在“宜准运动”App 进 行。在iSO设备登录/ezonsport 或 从App Store下载安装“宜准运动”App。
支持设备: iPhone 4S及以上、iPad 3及以上、iTouch 5及以 上、iPad mini。
3.6 设置手表
建议运动前对手表进行相关设置。登录“宜准运动”App, 点击“设置”进行相关设置。如用户的个人信息,心率提醒(设 置过程中请保持手表蓝牙与APP保持连接状态)。
2
4.运动前准备
4.1 戴上心率带 从包装中取出心跳带配件 (发射器和弹性带);
用清水把弹性带的两个 黑胶电极用清水充分打湿;
A
D
按住[A] E
B
C
4.5.接收GPS信号的方法 请选择在空旷场所,手表的天线位置对天空,保持静
止,这样尽可能的缩短首次卫星定位时间,在空旷场所天线朝天静 止不动的情况下,1-2分钟内会搜索到GPS信号。
如果首次使用GPS、长时间未使用重新使用、不同的地区使 用GPS、周围有遮挡物,天气恶劣等情况下,定位花费的时间可能会 长些,后续使用定位花费时间会变短。
闹铃开启符号
B
C
12时制下午符号
低电压提示符号
3.2 按键功能 任意显示画面按[A]键可打开背景光。 在时间模式: 1.按住[A]键,打开GPS(GPS未开启); 2.按[B]键,切换显示时间、日期、星期、秒、剩余电量,按住 [B]键,进入设置模式;
3.按[C]键,进入记录模式; 4 按[D]键,进入跑表模式; 5 按[E]键,查看步数(GPS未开启)或者进入GPS模式
A
D
按[E]
按[E] E
按[E]
计步器使用说明书
计步器使用说明书
电池安装方法:
1. 边按电池盖,边向箭头方向移动;
2. 电池的⊕面朝上,放入电池糟,兽上电池盖;
3. 按一下REST键,出现“00000”的表示。
正确使用方法:
1.于皮带、裤子、裙子等。
标准位置是在裤腰线上。
2.操作:按RESET键,出现“00000”后开始走步。
日行标准:
日消耗200—300千卡热量,需走7000—100000步
一天走的目标:7000 ——10000步以上
一次走的步数:1000步以上
步行速度:100步以上/分钟
保养方法:
1.可用干净的软布,亦可沾少量中性洗剂擦拭后用干布擦干;
2.绝对禁止使用稀料、挥发汽油、喷雾或除污器等。
注意事项:
本产品是根据走路时腰部上下运动而自动测量,精确度很高。
如步法不当,会产生很大误差。
例如:
1.轻走,穿拖鞋,草鞋,在人多拥挤的地方走,上下坡等;
2.除行走以外的上下运动,反复站立,坐下,打球等激烈运动;放在腰部以外的地方,如有静电仪器会返回“00000”状态。
体育行业运动手表使用说明书

体育行业运动手表使用说明书欢迎您购买我们的体育行业运动手表。
为了更好地为您提供产品的使用指南,我们为您准备了本使用说明书。
阅读本说明书,您将了解如何正确使用和保养您的运动手表,以便获得更好的使用体验和持久的使用寿命。
一、产品简介我们的体育行业运动手表是专为运动爱好者和专业运动员设计的。
具有时尚外观和多项智能功能,可以满足您日常运动和训练的需求。
产品主要特点包括:1. 高精度定时功能,准确记录运动时间;2. 心率监测,实时监测心率变化;3. 运动模式选择,适应不同运动项目;4. 睡眠监测,分析您的睡眠质量;5. 防水设计,适应各种户外环境;6. 督促健康提醒,帮助您养成良好的生活习惯。
二、使用前准备在开始使用您的运动手表之前,请确保已完成以下准备工作:1. 充满电:将运动手表与充电器连接并充电,直到手表显示电池已满。
2. 下载APP:根据说明下载我们提供的APP,并将运动手表与手机连接。
3. 调整个性化设置:根据个人需求,在APP中设置您的身体信息、运动目标等。
三、基本操作方法1. 开关机:长按手表侧面的开关键,手表将开机或关机。
开机后,手表将自动显示时间。
2. 切换菜单:轻触手表屏幕,切换到不同的功能菜单。
3. 手势唤醒:在菜单界面,轻轻抬起手腕,手表将自动唤醒屏幕。
4. 返回主屏:在菜单界面,从屏幕底部向上滑动,手表将返回主屏。
5. 确认选择:在菜单界面,点击屏幕上的相应选项,进行确认选择。
四、功能介绍1. 时钟功能:手表显示当前时间,并具有闹钟、倒计时等功能。
在主屏上左右滑动可切换不同的时间界面。
2. 运动记录:选择运动模式后,手表将记录您的运动时间和运动轨迹,并可显示运动数据信息,如距离、速度、卡路里消耗等。
3. 心率监测:手表支持实时心率监测。
在运动过程中或在睡眠状态下,手表将自动监测您的心率变化,并生成心率曲线图供您查看。
4. 睡眠监测:手表可监测您的睡眠质量,并统计您的睡眠时长、深睡眠时间、浅睡眠时间等,以便您调整睡眠习惯。
Amazfit智能运动手表3使用手册
备注:Ultra 模式与普通模式的屏幕显示效果和功能会有所不同。
2.6 四种定位系统,三种定位服务组合 Amazfit 智能运动手表 3 支持四种不同的卫星定位系统, 进一步提升定位速度和轨迹精度。在手表“设置 > 通用 > 定位服务组合”中,有三种导航组合可以选择:GPS+ 北斗、 GPS+ GLONASS、GPS+ Galileo。 同时我们也新增了 AGPS 辅助定位功能,会自动提高定位 的速度和精度。如果您经常做户外运动,建议你在“设置 > 通用 > AGPS 过期提醒”打开 AGPS 过期提醒,手表 会在 AGPS 过期时提醒你连接手机进行同步。
02
在表盘界面向下划或按上键,进入快捷设置界面,点击中 间的按钮可以切换到长续航的 Ultra 模式。在 Ultra 模式 下,Amazfit 智能运动手表 3 的日常使用场景续航时间可 达 15 天。
你可以在表盘界面向下划或按上键,进入快捷设置界面, 点击中间的按钮切换到长续航的 Ultra 模式。在 Ultra 模 式下,Amazfit 智能运动手表 3 的日常使用场景续航时间 可达 15 天。
2.6 四种定位系统,三种定位服务组合 Amazfit 智能运动手表 3 支持四种不同的卫星定位系统, 进一步提升定位速度和轨迹精度。在手表“设置 > 通用 > 定位服务组合”中,有三种导航组合可以选择:GPS+ 北斗、 GPS+ GLONASS、GPS+ Galileo。
03
同时我们也新增了 AGPS 辅助定位功能,会自动提高定位 的速度和精度。如果您经常做户外运动,建议你在“设置 > 通用 > AGPS 过期提醒”打开 AGPS 过期提醒,手表 会在 AGPS 过期时提醒你连接手机进行同步。
Timex Ironman R300 GPS Watch快速入门指南说明书

TIMEX® Ironman R300 GPS Watch Quick Start Guide Revision 1.1WelcomeCongratulations on the purchase of your TIMEX® Ironman R300 GPS Watch. This Quick Start Guide will get you started with pairing your watch to your phone and setting up your app and profile to begin using your watch.TIMEX® Ironman R300 Features•Long battery life•Compatible with iOS and Android smartphones•GPS for accurate outdoor distance, pace and speed•Barometer for accurate elevation measurement•Highly accurate optical heart rate sensor•Daily activity tracking of steps, distance, calories & sleep•Supports multiple types of notifications (calls, text messages, inactivity)•Workout modes provides time, distance, heart rate, as well as pace, speed, cadence, calories and time of day•Workout coaching mode•Timing features: Alarms, Stopwatch & Timer•Music control of connected phone•Many watch faces to choose fromProduct OverviewChargingYour watch should be fully charged before using. Attach the magnetic charging cable to the watch’s charging port as shown below. Plug the USB end of the cable into any powered USB port or USB charger.Turning on WatchPush and hold the On/Off/Back button for 3 seconds to power on the watch WearingComfortably, but snugly, tighten the watch around your wrist, at least 1 finger width away from your wrist bone.Note: Wearing the watch too loosely may impact the accuracy of the heart rate measurement.ConnectingWhile the watch is charging, download and install the latest version of the TIMEX® Smart APP from the Google Play or Apple App Store.If the watch is off, power it on by pressing and holding the On/Off/Back button for three seconds. If the watch is on the charger it will remain powered on. When watch charging indicates FULLY CHARGED remove it from the charger. The watch will display the list of language options. Use the scroll keys to highlight your language choice and press the SELECT button to proceed.If the watch displays the time of day screen, rather than the language selection, you will need to factory reset the watch before connecting it to your phone. To do so press the SELECT button to get to the menu, press the Scroll Down button to get to settings, press the SELECT button to enter settings, press SELECT with DEVICE highlighted, press the Scroll Down button to get to FACTORY RESET, then press the SELECT button. Press the Scroll Down button to highlight the check mark on the “Are you sure” screen and press the SELECT bu tton to confirm. The watch will then reset and will reboot to the language selection screen.Note: Before launching the TIMEX® Smart app, make sure the Bluetooth is enabled on your phone by going to settings, Bluetooth and verifying that Bluetooth is on. Keep your watch close to your phone during the pairing process.Launch the TIMEX® Smart app and create your Timex Smart account. You can use your email address, phone number, Google, or Facebook account for setting up your account.Once your account is setup and you have logged into it, you will be prompted to enter your use profile information. Note that gender, age, height and weight data is used for calculation of calories burned and gender and height are used for calculating stride length for distance measurement for non-GPS workouts and daily activity distance.Once you have completed your user profile you will be prompted to select the watch to pair. After selecting the correct watch, press READY TO PAIR. Your phone will scan for available watches and will list all compatible watches found. Select your watch from the list. The watch will then prompt you to “ACCEPT PAIRING REQUEST?” Press the SELECT button to pair to the watch. Once paired, follow the screens in the mobile app to complete the setup of your watch.UsageAfter successfully pairing with your phone, the watch will start tracking and analyzing your daily activities and sleeping habits.You can access the functions of the watch via the buttons or via the touchscreen.The SELECT button and touching a selection on the screen have the same functionThe On/Off/Back button and swiping right have the same functionThe Scroll Up and swiping down have the same functionThe Scroll Down and swiping up have the same functionPress the SELECT button to light up the screen. Once the screen is illuminated you can access the following functions:Main Menu - Swipe left (or press the SELECT button). Once in the menu, you can scroll up or down and then can select the desired item.Status Screen - Swipe down (or press the Scroll Up button). This screen shows the status indicators and allows you to turn airplane mode and do not disturb mode on or off.Notifications Center - Swipe down (or press the Scroll Up button). Once in the notifications center, you can scroll up or down through your notifications and then can select the desired item to see more information.Shortcuts (Weather, World Time and Tide) – Swipe right (or press the On/Off/Back button)Swipe right (or press the On/Off/Back button) to return to return to previous page.To power the watch off (or restart it), after pressing SELECT to light up the screen, press and hold the On/Off/Back button for three seconds and the power options screen will be displayed.Compliance & RegulatoryWhen using the watch to measure your heart rate, please keep your wrist still as motion of the wrist will adversely affect the accuracy of heart rate measurement.Water ResistanceWARNING: TO MAINTAIN WATER RESISTANCE, DO NOT PRESS ANY BUTTONS UNDER WATER.•Your Timex Ironman R300 GPS watch is water resistant to a depth of 30 meters. The watch is water resistant only as long as lens, push buttons and case remain intact.•The watch is not a diver watch and should not be used for diving.•Rinse the watch with fresh water after exposure to salt water.The function of the buttons and touchscreen are not accessible during underwater use. When your watch comes in contact with water, use a soft cloth to wipe away excess water from its surface before using it.During daily use, avoid wearing the watch too tightly and try to keep its contact area dry. Please clean the wristband regularly with water. Please stop using the product immediately and seek medical assistance if the contact area on your skin shows signs of redness or swelling.FCC Notice (U.S.) / IC Notice (Canada):Warning: Changes or modifications to this unit not expressly approved by the party responsible for compliance could void the user’s authority to operate the equipment. NOTE: This equipment has been tested and found to comply with the limits for a Class B digital device,pursuant to Part 15 of the FCC Rules. These limits are designed to provide reasonable protection against harmful interference in a residential installation. This equipment generates, uses and can radiate radio frequency energy and,if not installed and used in accordance with the instructions,may cause harmful interference to radio communications. However, there is no guarantee that interference will not occur in a particular installation. If this equipment does cause harmful interference to radio or television reception, which can be determined by turning the equipment off and on, the user is encouraged to try to correct the interference by one or more of the following measures:-Reorient or relocate the receiving antenna.-Increase the separation between the equipment and receiver.-Connect the equipment into an outlet on a circuit different from that to which the receiver is connected.-Consult the dealer or an experienced radio/TV technician for help.This device complies with Part 15 of the FCC Rules. Operation is subject to the following two conditions: (1) this device may not cause harmful interference, and (2) this device must accept any interference received, including interference that may cause undesired operation.This device complies with Industry Canada licence-exempt RSS standard(s).•Operation is subject to the following two conditions: (1) this device may not cause interference, and(2)this device must accept any interference, including interference that may cause undesiredoperation of the device.•Le présent appareil est conforme aux CNR d'Industrie Canada applicables aux appareils radio exempts de licence. L'exploitation est autorisée aux deux conditions suivantes : (1) l'appareil nedoit pas produire de brouillage, et (2) l'utilisateur de l'appareil doit accepter tout brouillageradioélectrique subi, même si le brouillage est susceptible d'en compromettre le fonctionnement.•This equipment complies with Industry Canada radiation exposure limits set forth for an uncontrolled environment.•Cet équipement est conforme à l'exposition aux rayonnements Industry Canada limites établies pour un environnement non contrôlé.DECLARATION OF CONFORMITYManufacturers Name: Manufacturers Address:Anhui Huami Information Technology Co., Ltd.Room 1201, Building A4, National Animation Industry Base, No. 800 Wangjiang West Road, Gaoxin District, Hefei, Anhui, Chinadeclares that the product:Product Name: TIMEX® Ironman R300Product Description: SmartwatchModel Numbers: M04Fis in conformity with the relevant EU harmonized legislations. This declaration is issued under the sole responsibility of the manufacturer and conforms to the following:RED Directive 2014/53/EUStandards:ETSI EN 301 489-1: V2.2.0ETSI EN 301 489-17: V3.2.0EN 300 328: V2.1.1EN 62479: 2010LVD: 2014/35/EUStandards:EN 60950-1: 2006+A11:A1:A12:A2ANSI/UL 60950-1CSA C22.2 No. 60950-1IEC 60950-1Electromagnetic Compatibility (EMC) – Radio Frequency (RF)Standards:FCC 47CFR 15, Subpart B and CIC RSS GEN Issue 5 April 2018IC RSS 247; Issue 2 February 2017ICES-003; Issue 6 January 2016Agent:。
健步之星(Mio Stride Petite)使用说明书
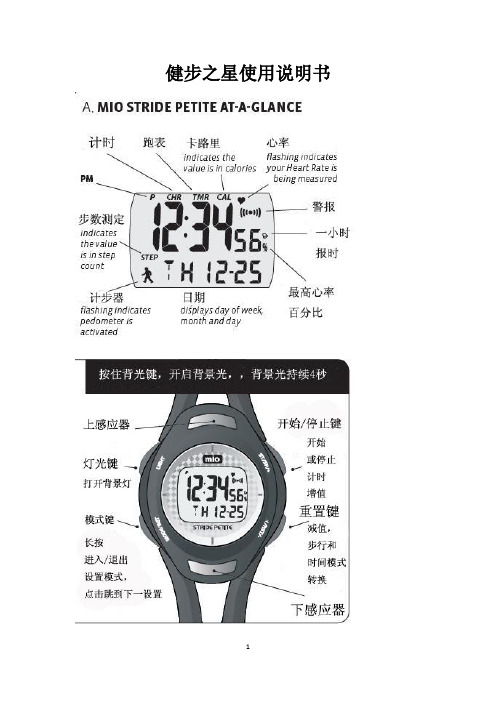
健步之星使用说明书C.设置时间和日期. 在时间模式,长按MODE(模式键)3秒钟直到显示屏开始闪烁. 点击MODE(模式键)在以下设置中转化:秒>分钟>小时>年>月>天>月/天格式>12/24 小时格式>主警报声. 编辑这些设置时,点击+或-键. 长按MODE(模式键)3秒钟,保存这些新设置D.设置双重时间. 在双重时间模式,长按MODE(模式键)3秒钟直到显示屏开始闪烁. 点击MODE(模式键)在以下设置中转化:小时>分钟. 编辑这些设置时,点击+或-键. 长按MODE(模式键)3秒钟,保存这些新设置E. 设置警报和每小时报时. 在报警模式,长按MODE(模式键)3秒钟直到显示屏开始闪烁. 点击MODE(模式键)在以下设置中转化:小时>分钟. 编辑这些设置时,点击+或-键. 长按MODE(模式键)3秒钟,保存这些新设置在报警模式,点击STR/STP(开始/停止键)开启/关闭警报;点击RESET(重置键)开启/关闭每小时报时声。
F.个人信息为了准确的计算您的最高心率,你必须输入自己的个人信息。
. 在心率目标区域模式,长按MODE(模式键)3秒钟直到显示屏开始闪烁. 点击MODE(模式键)在以下设置中转化:>(Hi)最高目标区域>(lo)最低目标区域>年龄>性别(男/女)>单位格式(英制/公制)>体重(磅/公斤)>高度(英尺/厘米)>每步行走长度(英尺/厘米). 长按MODE(模式键)3秒钟,保存这些新设置每步距离计算方法:行走10步,测量距离,然后除以10得到每步的平均行走距离。
8秒钟后,读书将会改变,请等待几分钟后再次阅读。
请确保:. 手表紧贴您的手腕。
. 按键时,请柔和地平按,不要敲击。
. 在启动心率测量模式时,请适量用力按住按键,过于用力将导致无法测量。
. 表的金属背面必须与您的皮肤紧贴. 你手腕和手指的皮肤必须清洁,没有油膏脂类。
- 1、下载文档前请自行甄别文档内容的完整性,平台不提供额外的编辑、内容补充、找答案等附加服务。
- 2、"仅部分预览"的文档,不可在线预览部分如存在完整性等问题,可反馈申请退款(可完整预览的文档不适用该条件!)。
- 3、如文档侵犯您的权益,请联系客服反馈,我们会尽快为您处理(人工客服工作时间:9:00-18:30)。
3D计步器手表使用说明书(中文版)
EL UP
MODE DOWN
A . 功能简介
1. 时间万年历功能:
时间范围:2000 年1 月1 日~2099 年12 月31 日;12/24 小时制选择;星期自动显示。
2. 2组闹铃功能:
响闹时间:1 分钟;整点报时i
3. 秒表功能:
最大值为:59' 59" 99;SPL 功能。
4. 倒计时功能:
最大值为:23:59.00
5. 计步功能:
7秒智能计步;三种计步模式显示:计步/时间显示模式→计步/运动时间显示模式→卡路里/里程显示模式;用户资讯设置:公制/英制→体重→步距→G-Sensor 灵敏度。
6. 50天自动记忆存步功能
7. 心跳测量功能:
心跳测量范围:30~200;通过接触式量测,显示动态脉搏次数。
8. 背光:EL
B . 按键说明
【MODE】按键
切换界面显示:时间模式→计步模式→记忆存步模式→心跳测试模式;长按进入设置模式;
切换设置项。
【UP】按键
上调加1,长按快调;在时间模式,短按循环顺序切换模式:闹铃1(AL1)→闹铃2(AL2)→秒表(STW)→倒计时(TMR);
在计步模式,短按循环顺序切换显示:计步/时间显示→计步/运动时间显示→卡路里/里程显示;向上查询历史运动记录;长按加锁/解除。
【DOWN】按键
下调减1,长按快调;快速开/关闹铃;开启/暂停秒表、倒计时;向下查询历史运动记录。
【EL】按键
点亮背光4 秒;开启/取消SPL 功能;短按返回默认值。
C、操作及显示说明
1、复位或上电默认显示:
上电/复位,点亮背光1 秒,全显2 秒,响“Bi”一声,进入时间显示模式。
上电默认值:12 小时制,12:00:00,FRI,2011-1-01。
时间模式显示界面
短按【UP】键可循环顺序切换模式:闹铃1(AL1)→闹铃2(AL2)→秒表(STW)→倒计时(TMR),如图所示:
按【UP】或【DOWN】键向上/下调整设置项的值,长按【UP】或【DOWN】键2 秒有快调功能。
调整年、月、日,星期自动更新。
在时间设置状态,30 秒无按键操作,自动退出设置状态,返回时间显示模式。
3、闹铃模式
在时间显示模式,按【UP】键切换至闹铃模式。
短按【DOWN】键可快速开/关闹铃,开启闹铃,在所有模式下,显示闹铃图标。
长按【MODE】键2 秒进入闹铃设定状态,短按【MODE】键切换设置项:时→分,如图所示:
按【UP】或【DOWN】键向上/下调整设置项的值,长按【UP】或【DOWN】键2 秒有快调功能。
闹铃时间到达,闹铃图标闪烁,1 分钟“BiBi”响闹提醒,按任意键可停止响闹。
30 秒无按键操作,自动退出闹铃设置状态,返回时间显示模式。
在闹铃显示模式,无按键操作,不会自动返回时间显示模式。
注:进入闹铃设定状态,自动开启闹铃,显示闹铃图标。
4、秒表模式
按【UP】键切换至秒表界面,显示秒表初始值:00′00″00。
短按【DOWN】键开启/暂停跑秒计时,在跑表暂停计时状态,按【EL】键清零数据。
在跑表计时状态,按【EL】键开启SPL 功能,界面上会闪烁显示“SPL”字样,跑表功能还在继续运行,再次按下【EL】键回到计时器。
跑表到达最大值(59′59″99)时,无响闹提示,继续重新开始跑表计时。
停止计时状态,无按键操作不会自动返回时间显示模式。
注:开启SPL,切换到其他功能显示界面,自动取消SPL 功能,跑表继续计时。
5、倒计时模式
倒计时显示开启倒计时显示 按【UP】键切换至倒计时界面,初始值显示为00:00.00。
长按【MODE】键2 秒进入倒计时设置状态,短按【MODE】键切换设置项:时→分,如图所示:
按【UP】或【DOWN】键向上/下调整设置项的值,长按【UP】或【DOWN】键2 秒有快调功能。
在倒计时为0 的情况下,不能启动倒计时;倒计时时间非0 时,按【UP】键开启/暂停倒计时。
在倒计时暂停状态,按【EL】键返回显示倒计时设置值。
开启倒计时,在所有模式下,闪烁显示倒计时图标;停止倒计时,倒计时图标消失。
倒计时结束,显示00:00.00,倒计时图标消失,1 分钟“DiDi”响闹提醒,按任意键停止响闹。
停止响闹,显示倒计时设置值。
倒计时结束时间与闹铃时间同时到达时,只响倒计时提示。
在倒计时设置状态,30 秒无按键操作,自动退出设置状态,返回倒计时模式。
在倒计时模式,无按键操作,不会自动返回时间显示模式。
注:进入倒计时设置状态,倒计时自动清零。
6、计步模式
按【MODE】键切换至计步模式,步数ii显示为0。
短按【UP】键循环顺序切换显示:计步/时间模式→计步/运动时间模式→卡路里/
里程模式,如图所示:
计步/时间模式计步/运动时间模式卡路里/里程模式 计步/时间模式:步数和时间同屏显示,LCD 上屏显示步数,下屏显示时间,最大步数为:999999 步;
计步/运动时间模式:计步和运动时间同屏显示,LCD 上屏显示步数,下屏显示运动时间,最大值为:999999 步/23 小时59 分59 秒;
卡路里/里程模式:卡路里和里程同屏显示,LCD 上屏显示卡路里,下屏显示里程,最大值为:99999.9 千卡/ 9999.99KM 或9999.99 Mile(卡路里显示1 位小数,里程显示2 位小数)。
在计步/时间模式或计步/运动时间模式,长按【MODE】键2 秒进入设置或查询用户资讯状态,默认:公制设置项闪烁。
在用户资讯设置状态,短按【MODE】键切换设置项:公制/英制→体重→步距→G-Sensor 灵敏度,如图所示:
公制或英制:默认为公制,按【UP】或【DOWN】键切换选择公制/英制。
调整公制/英制设置项,体重和步距自动恢复默认值;
设定体重:默认为60KG(132LB),可调范围:30-200KG/66-440LB;
设定步距:默认步距为70CM(28INCH),可调范围:30-150CM/12-59INCH ;
按【UP】或【DOWN】键向上/下调整设置项的值,长按【UP】或【DOWN】键2 秒有快调功能;
G-Sensor 灵敏度:默认为:MIDDLE,灵敏度等级选择:LOW→MIDDLE→HI。
在计步/时间模式,长按【EL】键2 秒,闪烁显示“ERASE”,提示是否要清零;短按【EL】键,步数、卡路里,距离的数值自动清零,如图所示:
在用户资讯设置状态,30 秒无按键操作,自动退出设置状态。
在计步清零模式,4 秒无按键操作或按任意键(除EL 键外),自动退出计步清零模式,返回计步显示模式。
注:在三种计步显示模式,均可计步。
7、记忆存步模式
按【MODE】键切换至记忆存步模式,默认显示:00。
上屏显示历史运动记录日期,下屏显示历史运动记录的步数、卡路里和距离并以
1 秒为周期自动切换显示(卡路里不显示小数位,里程显示
2 位小数),如图所示:
按【UP】或【DOWN】键向上/下查看历史运动记录。
长按【EL】键2 秒,闪烁显示“ERASE”,提示是否要清零所有记录数据;短按【EL】键,自动清空历史运动记录,如图所示:
在记忆清零状态,4 秒无按键操作或按任意键(除EL 键外),自动退出清除历史运动记录状态,返回记忆存步显示模式。
30 秒无按键操作,自动退出记忆存步模式,返回时间显示模式。
8、心跳测量模式
心跳模式显示
按【MODE】键进入心跳测量模式,显示“PULSE”字样和心形标志。
检测到心跳讯号后,心形标志开始跳动,心跳显示数值会同步心跳频率实时更新。
心跳频率显示
在心跳测量模式下,如果连续10 秒内侦测不到心跳讯号,则返回时间显示模式。
<<心跳测量注意事项>>
1.测量时手表要戴在手上,手指尽可能的覆盖测量点(感应片),保持力道均匀,并且避免抖动,以保证量测的准确性。
2.当气温较低或气侯比较干燥时,人体的阻抗会比较高,生理电信号比较弱,进而影响量测的结果,可借助磨擦双手的方法,使手温升高并保持湿润,再进行测量。
9、模式保护功能:
在手表模式或计步器模式下,长按【UP】键2 秒可开启/关闭锁定MODE 键切换到其他主界面,防止在手表模式误触发到计步器模式,导致耗电;
防止用户在测量计步时,退出计步模式,从而导致计步失败;
在计步器模式下,若取消加锁功能,10 分钟无动作自动返回时间模式;若开启加锁功能,则不会返回时间模式。
注:开启加锁功能,显示图标。