帅宝破壁料理机加热款说明书
多功能破壁料理机功能介绍

多功能破壁料理机功能介绍
惠尔普斯多功能破壁料理机集合了加热、预约、点动/清洗等功能,完全达到一机多用功能,能够刹时击破食物细胞壁,释放植物生化素的机械。
适合制作各类豆浆、米糊、营养粥、沙冰、果汁奶昔等,知足不同需求。
由于超高转速能刹时击破蔬果的细胞壁,有效地萃取植物生化素,从而取得破壁料理机的美名,是现代居家保健、养生首选家电产品。
一、加热功能:
从底部发烧,360°围绕立体加热。
将热量传递到整个杯身,从杯壁反复转热到杯内进行立体加热,热传递效率高,食材受热更均匀,保留营养物质,依照水温自动识别完成时刻。
二、预约功能:
用于预约功能的设置,最高为12小时预约,可依照自身情形和说明书的要求进行设置。
依照菜单显示区速度/时刻可调剂预约时刻,手动设置所需档位和工作时刻即可。
三、点动/清洗功能:
用于快速粉碎和翻转食材,快速清洗的功能设置。
采纳优质不锈钢刀片,点动开关按键使食物粉碎更完全,营养更易吸收。
可拆式设计;方便清洗。
破壁机说明书

破壁机说明书引言:现代社会的生活节奏越来越快,人们的工作职责和压力也越来越大,让压力在生活中的体现也越来越明显,对人们的身体和心理健康造成了不小的影响,而破壁机的出现解决了这个问题。
本篇文章将详细介绍破壁机的结构、工作原理、使用方法、注意事项以及清洁保养等方面,希望能帮助用户更好地了解和使用这一智能电器。
一、产品简介首先,破壁机是一种高端小家电,它可以将各种蔬菜、水果、坚果、谷物等食材进行精细破壁,将食材内部的营养成分释放出来,保留食材原本的纤维结构,让人们在享受美食的同时摄入更多的营养成分。
同时,破壁机还具备完美的自动保护功能,当破壁机在使用过程中出现异常,就会自动断电保护,从而提高用户的安全保障。
破壁机还具有智能化特点,用户只需要按下按钮,就可以自动完成破壁过程,方便快捷。
二、产品结构破壁机包括机身、破壁杯、刀具、容器等部件。
其中,机身采用优质塑料材料,重量轻、结构紧凑,方便用户进行携带和保存。
破壁杯采用食品级PC材料,具有优质耐酸碱性和高温抗冲击性,可耐受高温鲜榨汁的加工,保证安全健康。
刀具采用不锈钢材料,保证切割效果的精准和质量的稳定。
容器容积大,可以满足用户对不同口味饮品的需求。
三、产品特点破壁机具有以下几个特点:1、优质原料:机身、破壁杯等部件采用耐磨性好、耐温性高、防水性强等优质原料,保证产品的营养、环保、节能、健康等特性。
2、切割精确:刀具采用高质量不锈钢材料,保证切割效果的精确和稳定,让食材更容易被破壁,更容易提取其营养成分。
3、多功能:破壁杯容量大,集破碎、拌和、榨汁等功能于一体,可以帮助用户轻松解决不同的饮品需求,例如健康饮品、果汁、冰沙等。
4、电源安全:破壁机采用低电压直流马达,运行时较为安全,同时加入快速停止保护装置,使用户使用更加安心。
5、易于清洁:产品容易拆卸,清洗起来更加方便,不会繁琐复杂,还可全自动智能清洗。
四、产品使用方法1、选好食材:选择所需要的食材,切成小块或切碎,放入破壁杯内。
sansui破壁机ht-8002说明书
sansui破壁机ht-8002说明书1、sansui破壁机ht-8002使用前先检查破壁机的道具和过滤器是否安装牢固,确认之后才将杯体安装牢固并确认食物或者水果在榨汁之前,应该将其切成适合破壁机入口大小的块再放入破壁机。
2、sansui破壁机ht-8002将食物推进杯体内,保持匀速推进、避免过快过猛的动作,以免发生危险。
食物处理完毕后先拔下电源,再将处理好的食物倒出。
3、认真清洁sansui破壁机ht-8002内外各个组件,但要避免水流进入电机。
将破壁机放在阳光直射不到的通风处完全阴干即可。
4、sansui破壁机ht-8002集合了榨汁机、豆浆机、冰激凌机、料理机、研磨机等产品功能,完全达到一机多用功能,可以瞬间击破食物细胞壁,释放植物生化素的机器。
5、sansui破壁机ht-8002由于超高转速(22000转/分以上)能瞬间击破蔬果的细胞壁,有效地提取植物生化素,从而获得破壁料理机的美名,是现代居家保健、养生首选家电产品。
而最新一代的果汁机在则是集加热和搅拌于一体的更多功能的破壁料理机,不仅可以做蔬果汁、沙冰,还可以加热做豆浆、鱼汤、药材汤、粥品等。
采用低转速破壁,增强扭力的技术。
6、sansui破壁机ht-8002在进行使用的时候,整个产品的电功率相对来讲也是比较大的,转速也非常高,而且发热量同样也非常的大,所以说整个破壁机工作时间最好不要维持在太长,最好不要让在电机进行实际旋转的过程当中,连续性转动三分钟以上的时间。
需要连续使用的时候,应该保障他们的工作,最好能够做到三分钟之后让其冷却,然后再做启动工作,这样的话原本的一些模式就能够满足现有的加热需要,在破壁机进行实际制作的时候,每一次制作完成之后,就要让整个产品冷却15分钟,然后再重新重复工作,这样有利于对整个设备的保护。
7、sansui破壁机ht-8002在进行实际使用的时候,不要让机器处于一种干烧的状态,在制作的过程当中,最好能够结合实际情况来烹饪我们想要的食物,而且在烹饪食物的时候一定要加满水。
破壁怎么使用方法

破壁怎么使用方法
破壁机是用来榨汁和摇果泥的,使用方法如下:
1. 准备食材:新鲜水果、蔬菜或坚果,确保清洁并去除籽和皮。
2. 将食材切成小块,以便破壁机更容易榨出汁液或制作果泥。
3. 将食材放入破壁机的容器中,加入适量的水或其他液体。
4. 盖上破壁机的盖子,并确保盖子被锁定。
5. 根据需要,选择不同的榨汁或摇果泥的功能按钮,并设置合适的时间和速度。
6. 启动破壁机,等待一段时间,直到食材完全榨出汁液或制作成果泥为止。
7. 关闭破壁机,拔掉插头,打开盖子,然后将榨好的汁液倒出或果泥取出即可。
8. 清洁破壁机,以保持其清洁卫生。
注意:在使用破壁机时,要根据食材的硬度以及自己的口感偏好来调整时间和速度。
另外,使用破壁机时要注意安全,并避免将手或其他物品接触到刀片部分。
新飞加热破壁机使用方法
新飞加热破壁机使用方法新飞加热破壁机是一款家用电器,主要用于制作果汁、豆浆等饮品。
下面是新飞加热破壁机的使用方法。
1. 准备工作将新飞加热破壁机取出并检查是否完好无损。
将所有配件取出并清洗干净。
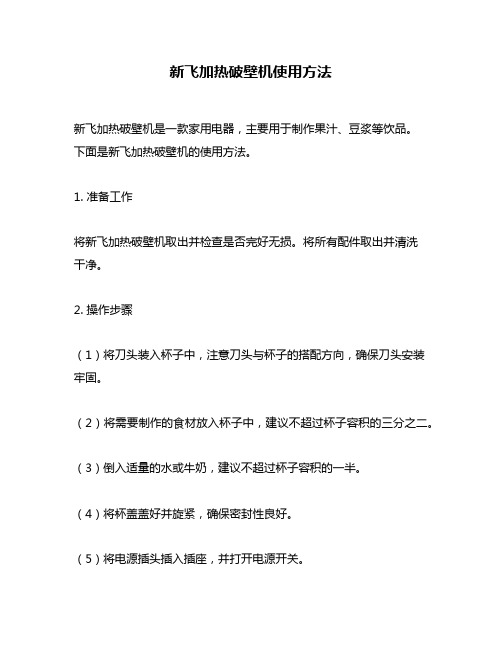
2. 操作步骤(1)将刀头装入杯子中,注意刀头与杯子的搭配方向,确保刀头安装牢固。
(2)将需要制作的食材放入杯子中,建议不超过杯子容积的三分之二。
(3)倒入适量的水或牛奶,建议不超过杯子容积的一半。
(4)将杯盖盖好并旋紧,确保密封性良好。
(5)将电源插头插入插座,并打开电源开关。
(6)根据需要选择不同的功能键进行操作。
例如,如果需要制作果汁,则按下果汁键;如果需要制作豆浆,则按下豆浆键等。
(7)等待加热破壁机自动完成操作。
通常情况下,操作时间为30秒至1分钟左右。
在操作过程中,请勿拔掉电源插头或打开杯盖。
(8)当加热破壁机自动停止运行后,将电源开关关闭,并拔掉电源插头。
(9)将杯盖取下,倒出制作好的饮品即可。
3. 注意事项(1)在使用加热破壁机之前,请先阅读产品说明书,并按照说明书中的提示进行操作。
(2)在制作饮品时,请勿超过杯子容积的三分之二,以免溢出。
(3)在加热破壁机运行时,请勿拔掉电源插头或打开杯盖。
(4)在清洗加热破壁机时,请先将电源插头拔掉,并等待加热破壁机完全冷却后再进行清洗操作。
(5)请勿将加热破壁机浸泡在水中或用水直接冲洗,以免损坏电器元件。
总之,新飞加热破壁机是一款实用且方便的家用电器。
只要按照正确的使用方法进行操作,并注意安全和清洗细节,就可以轻松制作出美味健康的饮品。
康宁破壁料理机说明书
康宁破壁料理机说明书
康宁破壁料理机的说明书可能包含以下内容。
请注意,这是一个示例,实际的产品说明书可能会有所不同。
请参考您购买的康宁破壁料理机附带的说明书。
康宁破壁料理机说明书
一、产品概述
康宁破壁料理机采用先进的破壁技术,能够在瞬间击破疏果的细胞壁,有效萃取防病抗癌植物生化素。
多功能一键操作,具备24小时定时预约功能,可加热且有效防止糊底。
精致的设计,让食物营养更丰富,口感更细腻。
二、主要特性
1.破壁功能:采用高转速和钝刀设计,瞬间击破细胞壁,释放更多营养。
2.多功能操作:一键操作,简单易用。
3.定时预约:24小时定时预约功能,方便用户安排自己的时间。
4.加热功能:可加热,且有效防止糊底,使食物烹饪更均匀。
5.一键清洗:只需装上清水,长按点动键即可完成自动清洗。
三、使用说明
1.将食材放入料理机中,注意不要超过最大容量线。
2.根据食材和烹饪需求,选择合适的功能和时间设置。
3.按下启动键开始烹饪过程。
4.烹饪完成后,料理机会自动停止。
此时,可以打开盖子取出食物。
5.使用后,及时进行清洗。
加入清水,长按点动键进行自动清洗。
四、注意事项
1.请勿将手指或其他异物伸入料理机内。
2.在使用过程中,请勿随意打开盖子。
3.清洗时,请确保电源已断开,并且料理机已完全冷却。
4.如有故障或异常情况,请立即停止使用,并及时联系售后服务中心。
以上示例说明书仅供参考,具体内容和操作请以您购买的康宁破壁料理机附带的说明书为准。
西屋破壁机料理机使用说明

西屋破壁机料理机使用说明
一、开箱检查:
1、确认是否包含主机和配件;
2、检查主机外观是否完好无损;
3、检查配件是否齐全。
二、准备工作:
1、选取适合的食材,如水果、蔬菜、谷物等;
2、清洗干净食材;
3、处理食材,如去皮、去核等。
三、基本操作:
1、将准备好的食材放入破壁杯内,不要超过最高标识线;
2、将破壁杯盖好,确保盖子紧密;
3、将破壁杯放入主机底座上;
4、根据需要选择合适的时间和速度设置;
5、按下启动按钮,开始搅拌。
四、注意事项:
1、破壁机使用时,避免将手指或其他物品伸入主机底座内;
2、避免将破壁杯底部接触到高温物体,以防破裂;
3、避免将破壁杯放入冰箱或冷藏室内;
4、使用时,保持破壁机放置在平稳的台面上;
5、长时间使用后,应停止使用,并等待机器冷却后再继续使用。
五、清洁与保养:
1、拆卸破壁杯,按照说明书清洗;
2、主机底座可以用湿布擦拭;
3、不要将主机底座浸入水中清洗;
4、定期检查机器零件是否损坏,如有损坏及时更换;
5、使用后,在干燥通风处存放。
六、常见问题及解决方法:
1、机器不能启动:检查电源是否接通,机器是否拧紧,破壁杯是否放置正确;
2、机器噪音大:检查搅拌杯是否放置平稳,食材是否过多;
3、机器不能工作或自动停止:检查机器是否过热,关闭机器冷却一段时间后再使用;
4、机器漏液:检查破壁杯是否放置正确,是否超过最高标识线。
Philips 食品加热器使用说明书
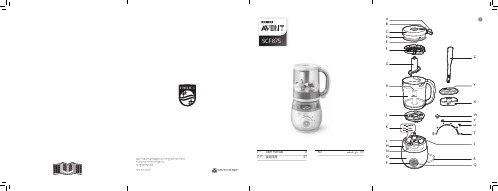
635272112MAX.21247101418811151959121620MAX.361317212223241225291233303431272628325ENGLISHContentsImportant 6Introduction11General description 11Before first use12Using the appliance12Ingredients and steaming time 19Cleaning and descaling 20Storage 22Recycling22Guarantee and service 22Troubleshooting22Technical specifications26Refer to the pictures on the folded pages at the front and back of theuser manual.6ENGLISHImportantRead this user manual carefully before you use the appliance and save it for future reference.Danger-Never immerse the main unit in water or any other liquid.Do not rinse it under the tap.Warning-Check that the voltage indicated on the appliance corresponds to the local mains voltage before youconnect the appliance.-Do not use the appliance if the plug, the power cord or the appliance itself is damaged. If the power cord isdamaged, you must have it replaced by Philips; a service center authorised by Philips or similarly qualified persons in order to avoid a hazard.-This appliance can be used by persons with reduced physical, sensory or mental capabilities or lack ofexperience and knowledge if they have been givensupervision or instruction concerning use of the appliance in a safe way and if they understand the hazards involved. -Children shall not play with the appliance (including the accessories).-This appliance shall not be used by children. Keep the appliance and its cord out of reach of children (including the accessories).-Cleaning and user maintenance shall not be made by children.-Do not touch the blades, especially when the appliance is plugged in. The blades are very sharp.-Take care when handling the sharp blades, emptying the jar, and during cleaning.-If the blades become stuck, unplug the appliance before you remove the ingredients blocking the blades.-The appliance gets hot during or shortly after steaming (especially surfaces with this symbol “”) and maycause burns when touched. Only lift the jar by its handle.ENGLISH7 -Hot steam comes out of the jar during steaming and when its lid is removed.-Beware of hot steam that comes out of the water tank when you open its lid.-When the steaming cycle is finished, hot steam will continue to come out of the steam outlet on the water tank lid and the steam hole in the jar for some time. Be careful when you lift the jar off the main unit.-If the appliance is used improperly, hot steam could escape from the edge of the water tank lid. Refer to the “Troubleshooting” chapter for preventing or resolvingthis.-Take extra caution when pouring hot liquid into the jar as the liquid may splash.-Always put previously blended food in the storage pot if you want to reheat or defrost food with this appliance.-Do not use this appliance to chop hard and sticky ingredients.-Never use bleach or chemical sterilizing solutions/tablets in the appliance.-Never use scouring pads, abrasive cleaners or aggressive liquids such as gasoline, acetone or alcohol to clean the appliance.-Always let the appliance cool down for 10 minutes after one steaming cycle before you start steaming again.-Do not let the appliance blend for more than 30 seconds at a time. If you have not finished blending after 30seconds, release the button to stop blending and waita few seconds before you continue. If the main unitbecomes hot, let it cool down for a few minutes before you continue.-Never put water or any other liquid in the jar for steaming to avoid damaging the appliance.-Always remove the storage pot lid before using the pot to heat up food in a microwave.8ENGLISHCaution-Never use any accessories or parts from other manufacturers or that Philips does not specificallyrecommend. If you use such accessories or parts, your guarantee becomes invalid.-Do not place the appliance on or near an operating or still hot stove or cooker.-Always switch off the appliance and disconnect from supply when it is left unattended and before assembling, disassembling, changing accessories, cleaning orapproaching parts that move in use.-Always unplug the appliance and let it cool down before you clean it.-Always turn the control knob to the off position (OFF) every time after steaming, reheating, or defrosting.-Never use the jar or any other part of the appliance (except the storage pots) in a microwave, as the metal parts of the jar handle and blade unit are not suitable for this use.-Never sterilize the jar or any other part of the appliance (except the storage pots) in a sterilizer or in a microwave, as the metal parts of the jar handle and blade unit are not suitable for this use.-This appliance is intended for household use only. If the appliance is used improperly or for professional or semi-professional purposes or if it is not used according to the instructions in the user manual, the guarantee becomes invalid and Philips refuses any liability for damagecaused.-Place the appliance on a stable, horizontal, and level surface. The appliance emits hot steam during use. Make sure there is enough free space around it to preventdamage to cabinets or other objects.-Do not use the appliance if it has fallen or is damaged in any way. Take it to an authorized Philips service center for repair.-Never use the steam function without water in the water tank.ENGLISH9 -Make sure that the water in the tank does not exceed the MAX water level marking on the side of the water tank(250 ml) or the MAX water level indication in the watertank.-Make sure the water tank lid is correctly locked before putting the jar on the main unit.-When you steam ingredients, make sure that you do not fill the jar beyond the top of the plastic part of blade unit (fig b).-When you blend liquids, do not exceed the MAX fill level indicated on the jar (720 ml) (fig. c).-Do not lift and move the appliance while it is in operation.-Do not insert any object into the steam outlet on the water tank lid or the steam inlet on the jar lid.-Never refill the water tank during steaming, as hot water and steam may come out of the appliance.-Always make sure that the jar lid has cooled down after steaming before you open it to add more ingredients for blending.-Never run this appliance’s power supply through an external switching device, such as a timer, or connect it to a circuit that is regularly switched on and off.-Always check the temperature of the cooked food on the back of your hand to make sure it is safe for your baby.-Always check the consistency of the food for your baby.For guidance on what food consistencies are appropriate for different ages, refer to the professional weaningadvice that comes with this appliance, or seek advicefrom a doctor or consultant.-Only use the provided spatula for taking food out of the jar.-Regular descaling prevents damage to the appliance.-The storage pot provided with this appliance is not a children feeding utensil. Do not feed children directlyfrom the storage pot.10ENGLISH-Before using the storage pot, clean it thoroughly, and then sterilize it with a Philips Avent sterilizer or placethe storage pot in boiling water for 5 minutes. This is to ensure hygiene. Make sure that there is enough waterin the container when using boiling water to sterilizethe storage pot, and that the pot does not contact the container for too long, to avoid heat deformation.-Make sure that the amount of food in the storage pot does not exceed the maximum scale marked on the side of the pot, otherwise the pot may leak.-When reheating or defrosting food, make sure that the storage pot lid is closed tightly before putting the storage pot in the jar, otherwise the pot may leak when you take it out of the jar.-Heating food with the provided storage pot in a microwave may produce localized high temperatures in the food and may affect its nutritional value. Always stir heated food to ensure even heat distribution and testthe temperature before serving.-Do not select the grill function if you use a combination microwave (with grill function) to reheat or defrost food with the storage pots. If you have just finished a grilling process, wait until the microwave has cooled downbefore putting the storage pots in it, as the residual heat can cause damage to the storage pots.Safety systemsFor your safety during use, this appliance is equipped with a built-in safety lock. This appliance will only function if all parts have been assembled correctly. Assembling all parts correctly will disarm the built-in safety lock.This appliance is also equipped with an overheat safety stop function. Overheating can occur if the time between two steaming cycles is too short. If the appliance’s overheat safety stop activates during a steaming cycle, turn the control knob back to the off position (OFF) and let the appliance cool down for a few minutes. After this, you can use the appliance again.Electromagnetic fields (EMF)This Philips appliance complies with all applicable standards and regulations regarding exposure to electromagnetic fields.ENGLISH11Congratulations on your purchase and welcome to Philips Avent! To fully benefit from the support that Philips Avent offers, register your product at/welcome.This 4-in-1 healthy baby food maker helps all parents in preparing nutritious meals for their babies with steaming and blending functions combined in one appliance. You can also use the baby food maker to defrost and warm up baby food.Product overview (fig. a)A Lid tabB Connector on the jar lidC Jar lidD Sealing ringE Locking pinF SieveG Blade unitH Blade unit holderI JarJ Water tank lidK Water level markingsL MAX water level indicationM Water tank (not detachable)N BoilerO Main unitP Control knobQ Blending buttonR Power cordS Locking area on the water tankControls overview (fig. a)T Defrost settingU Reheat setting for the 240 ml storage potV Reheat setting for the 120 ml storage potW Steaming lightAccessories (fig. a)X Storage potY Storage pot lidZ SpatulaStorage1 Empty the water tank before you store the appliance (Fig. ‚).2 Make sure all parts are clean and dry before you store the appliance (refer tothe chapter “Cleaning and descaling”).3 Store the appliance with the blade unit in the jar to prevent damage.4 Always make sure that the lids for both the water tank and the jar arecorrectly locked in place for storage.RecyclingDo not throw away the product with the normal household waste at the end of its life, but hand it in at an official collection point for recycling. By doing this, you help to preserve the environment.Follow your country’s rules for the separate collection of electrical and electronic products. Correct disposal helps prevent negative consequences for the environment and human health.Guarantee and serviceIf you need information or if you have problems, please visit the Philips websiteat www. p hilips. c om /a vent or contact the Philips Customer Care Center in your country (refer to the enclosed worldwide guarantee leaflet for details). If there is no Customer Care Center in your country, go to your local Philips dealer.TroubleshootingThis chapter summarizes the most common problems you could encounter with the appliance. If you are unable to solve the problem with the information below, contact the Consumer Care Center in your country.Problem Possible cause SolutionThe appliance does not work.This appliance isequipped with asafety lock. Thisappliance will notwork if the partsare not assembledcorrectly onto themain unit.Assemble all parts correctly. Beforesteaming, the jar should be placed onthe main unit vertically with the jar lid onthe bottom; before blending, put the jaron the main unit with the lid on the top,and lock the jar by turning it clockwise.The steaming light does not turn on.The appliance is notconnected to thepower supply.Put the plug in the outlet.23ENGLISH Problem Possible cause SolutionThe jar is not placed on the main unit correctly.Place the jar on the main unit correctly with the jar lid on the bottom.You have started a second steaming cycle immediately after the previous one has finished.Switch off the appliance and allow it to cool down for 10 minutes before you start a second steaming cycle.The control knob has not been turned to the off position (OFF) after the previous steaming cycle was finished.Turn the control knob to the off position (OFF) first, and then turn it again to choose the operating time.The water tank gives off an unpleasant smell during the first few times of use.You have not pre-washed the watertank before use.Refer to the chapter “Cleaning anddescaling” to clean the water tank, andthen finish a steaming cycle with anempty jar.The appliance does not generate steam.You have not putwater in the watertank.Switch off and unplug the appliance,and then add water to the water tank.There is too muchlimescale buildup inthe water tank.Descale the water tank. Refer to thesection “Descaling” in the chapter“Cleaning and descaling”.Steam is leaking from the water tank.The water tank lid isnot closed correctly.Close the water tank lid correctly. Makesure the icon on the water tank lid islined up with the icon on the watertank.The jar is notassembled correctlyon the main unit.Place the jar correctly on the main unit.The steam outleton the water tanklid is blocked bycontamination orlimescale buildup.Clean the steam outlet on the water tanklid.The steam inlet onthe jar lid is blockedby contamination.Clean the steam inlet on the jar lid.The ingredients are not completely heated through.The pieces in the jarare too big.Cut the food into smaller pieces (cubesno bigger than 1 cm).24ENGLISHProblem Possible cause SolutionThere is too muchfood in the jar.Decrease the amount of food in the jar.There is too much or too little water in the water tank.Add the correct amount of water according to the steaming time. Check the recipe booklet and/or the table in the chapter “Ingredients and steaming time” to make sure that you add the correct amount of water according to the steaming time for the ingredients you want to steam or the recipe you want to prepare.The steaming time is too short.Select a longer steaming time (30 minutes tops).The jar is not placed on the main unit correctly.Place the jar on the main unit correctly with the jar lid on the bottom.There is too much limescale buildup in the water tank.Descale the water tank. Refer to the section “Descaling” in the chapter “Cleaning and descaling”.The jar lid leaks.There is too muchfood in the jar.Switch off the appliance and process a smaller quantity.The jar lid is not locked onto the jar correctly.Place the jar lid on the jar and turn it clockwise to close it securely.The sealing ring around the jar lid is not assembled correctly or is not assembled. Make sure the sealing ring is correctly assembled around the jar lid with the flat side facing out.The blending function does not work.There is too muchfood in the jar.Switch off the appliance and process asmaller quantity. Raw food put in the jarshould not exceed top of the blade unit. The jar is not placedon the main unitcorrectly.Place the jar on the main unit with thelid on the top, align the icon on the jarwith the icon on the main unit, andturn the jar clockwise to securely lock itin place on the main unit.The jar lid is notlocked onto the jarcorrectly.Place the jar lid on the jar and turn itclockwise to close it securely.You are using theappliance to blendsticky food such ascheese.Check the recipe booklet and useappropriate ingredients to blend.25ENGLISH Problem Possible cause SolutionYou have been using the blending function continuously for more than 30 seconds.Stop blending and let the appliance cool down for a few seconds and then start blending again.The appliance makes a lot of noise, produces an unpleasant smell, is hot to touch, emits smoke, etc.There is too muchfood in the jar.Switch off the appliance and process asmaller quantity.You have been usingthe blending functionfor too long.Do not let the appliance blendcontinuously for more than 30 secondsat a time.The appliance produces a lot of noise and vibration during blending.The sieve is notattached to the jar lid.Make sure that the sieve is attached tothe jar lid.Temperature of the defrosted food is still low.There is too muchfood in the storagepot.Make sure that the amount of food inthe storage pot does not exceed themaximum scale marked on the side ofthe pot.Food in the storagepot is too viscous.Let the appliance cool down for 10minutes and defrost again.The storage pot leaks during reheating/ defrosting.The storage pot lid isnot closed correctly.Before putting the storage pot in the jarto reheat/defrost, make sure that the lidis closed correctly.Water in the water tank hasan unusual color when you pour it out of the water tank or when it enters the jar during steaming, or the water in the water tank has an unpleasant smell.Food particles haveentered the watertank during use.Clean the water tank according to theinstructions in the chapter “Cleaning anddescaling”. Use the appliance strictlyaccording to the instructions. Make sureyou do not overfill the water tank withwater (max. 250 ml) and that you do notoverfill the jar with food (do not fill thejar past the top edge of the plastic partof blade unit). Do not steam the sameingredients for more than 30 minutes oradd liquid to the jar to steam. After youhave put liquids in the jar, never put thejar in the steaming position with the jarlid on the bottom.26ENGLISHProblem Possible cause SolutionThere are white spots on the water tank, water tank lid, jar, jar lid and sieve.There is limescalebuildup on theseparts.This is normal. Remove the limescaleperiodically. Clean the water tank lid,jar, jar lid and sieve with a moist cloth.Descale the water tank. Refer to thesection “Descaling” in the chapter“Cleaning and descaling”.The surfaces that come into contact with food are discolored.Food colorings maydiscolor the parts thatcome into contactwith food.This is normal. All parts are still safe touse and will do no harm to the cookedfood.The appliance sounds 5 times and the steaming light flashes during steaming, reheating or defrosting.The jar is out ofposition or removedfrom the main unitduring processing.Turn the control knob to the off position(OFF), check the water amount in thewater tank, place the jar on the main unitcorrectly, and reselect the processingtime to start again.Water in the watertank is not enoughfor the selectedprocessing time.Turn the control knob to the off position(OFF), and add enough water for theselected processing time.There is too muchlimescale buildup inthe water tank.Descale the water tank. Refer to thesection “Descaling” in the chapter“Cleaning and descaling”.There are food residues in the inner layer at the bottom of the jar.Small food residueparticles get into theinner layer at thebottom of the jarduring cleaning.Remove the jar from the main unit. Removethe jar lid and blade unit from the jar.Flip the jar, align the small hole on thebottom to a tap and flush water into thesmall hole. Use warm water to achieve abetter cleaning result.Hold the jar handle and shake the jar forabout 15 seconds to mix the water withthe accumulated residues.Pour out the water from the small hole.Repeat above steps for several timesuntil the residues are cleaned.Technical specifications-Voltage/wattage: See type plate on the bottom of the appliance -Maximum water capacity of the water tank: 250 ml-Maximum capacity of the jar: 1050 ml-Operating temperature: 10°C to 40°C-Protection: Temperature-controlled heating system繁體中文27請參考用戶手冊正背面折疊頁上的圖片。