光纤快速连接器3.0mm使用说明书
Panduit SC 光纤连接器安装说明书

INSTALLATION INSTRUCTIONS © Panduit Corp. 2014FS092SC Fiber Optic ConnectorsField Polish Termination - Singlemode and Multimode1. COMPONENT IDENTIFICATIONREAD ALL INSTRUCTIONS COMPLETEL Y BEFORE PROCEEDING1.4 ITEMS REQUIRED FOR TERMINATION2. PRECAUTIONS2.1SAFETY GLASSESWARNING : Safety glasses have to be worn when handling the adhesive or primer used with the connector or when handling bare optical fiber. The bare fiber is very sharp and can easily damage the eye.2.2ISOPROPYL ALCOHOLWARNING : Isopropyl alcohol is flammable. Contact with the alcohol can cause irritation to the eyes. In case of contact with the eyes, flush with water for at least 15 minutes. Always use isopropyl alcohol with proper levels of ventilation. In case of ingestion, consult a physician immediately.2.3RECOMMENDED ADHESIVE AND PRIMERWARNING : The recommended adhesive (Panduit Part #FJPXY) may contain maleic acid and methacrylic ester. In case of eye contact, flush with water for 15 minutes and get medical attention. Wash after skin contact. Request M.S.D.S. for further safeguards. Check “Used By” date on bottle to ensure best performance.WARNING : The recommended primer (Panduit Part #FJPMR) may contain acetone. The primer is harmful if inhaled or swallowed. In case of contact with eyes or skin, flush with water. Get medical attention in case of ingestion or contact with eyes. Do not induce vomiting. Check “Used By” date on bottle to ensure best performance.2.4DISPOSAL OF BARE FIBERSWARNING : Pick up and discard all pieces of bare fiber with sticky tabs. Do not let cut pieces of fiber stick to clothing orFERRULE TERMINATIONTERMINATION PREPARATIONRemove the plunger from a syringe. Squeeze a b out 0.5 ml of FJPXY Anaero b ic Adhesive into the b ack of the syringe b arrel. Insert the plunger. Point opening upward, and squeeze any air out of the b arrel. Attach needle to syringe. Adhesive that is stored in a syringe may start to harden within 24 hours.Partially fill a second syringe with a b out 0.5ml of FJPMR Primer. Do this b y drawing primer up into the syringe b arrel rather than pouring it in through the b ack.3.0mm/2.0mm/1.6mm JACKET & 900µm BUFFER STRIPPINGRefer to Page 1 or appropriate Panduit laminated template for stripping dimensions.For jacketed duplex cable: Split the two ca b les approximately 6" (152mm) or as needed depending on desired jacket stripping length.Insert the fi b er end through the small end of the appropriate b oot for your specific fi b er type. Slide the b oot b ack out of the way. For jacketed cable only: To reduce wear on the jacket stripper b lades, do not slide the b lades along the aramid yarn. Instead, use the tool to cut through the jacket, then pull off the jacket b y hand. For 3.0mm jacketed fiber, use the third hole (marked “1.3MM” or #16AWG) from the tip of the jacket stripper. For 2.0mm/1.6mm jacketed fiber, use the first hole (marked “.80MM” or #20AWG) from the tip of the jacket stripper. Using the ca b le jacket stripper, strip therequired length of the jacket off of each fi ber according tothe stripping dimensions.For jacketed cable only: Insert the fi b er through thesmaller end of the crimp sleeve. Use the crimp sleeve tofold the aramid yarn b ack over the jacket, holding it out ofthe way.For jacketed cable only: Use the marking pen andstripping dimensions provided to mark the b uffer from theend of the jacket.3.2.6For 900µm buffered fiber only: Using the marking pen,place a mark 1" (25mm) from the end of the b uffer.3.3.5DROP OF PRIMER3.3.63.3FERRULE ATTACHMENTInstructions intended for anaerobic adhesive only.3.3.1Clean the b are fi b er using an alcohol (90% minimumconcentration) soaked lint-free wipe. The fi b ers should b e free of all coating and residue after cleaning. Insert fi b er without adhesive or primer into ferrule assem b ly to ensure a proper fit and to remove any de b ris which may b eb locking the ferrule hole. Remove fi b er, clean fi b er again, and proceed to the next step.3.3.2Apply primer onto the b are fi b er with the b rush from theprimer b ottle, and onto the first 1/8" (3.2 mm) of the b uffer next to the exposed fi b er. Set fi b er aside such that it will not collect de b ris while completing the next three steps.3.3.3Insert the needle of the adhesive filled syringe into theferrule assem b ly until the needle b ottoms against the rear of the ferrule. 3.3.4While pressing the needle firmly against the rear of theferrule, gently squeeze the syringe plunger until you see a small b ead of adhesive form on the front tip of the ferrule. Pull syringe out of the ferrule assem b ly. 3.3.5Carefully b ut quickly insert the b are fi b er through theferrule in a smooth forward motion. The fi b er is fully inserted when the b uffer b ottoms against the rear of the ferrule. The adhesive will b egin to set within seconds. Note: If adhesive oozes out the back of the assembly, you have injected too much. It is critical to the function of the connector that you wipe away all excess adhesive.3.3.6To speed hardening of the adhesive, apply a small drop ofprimer to the adhesive b ead on the ferrule tip using the primer filled syringe. Do not allow the primer to come in contact with the plastic housing of the ferrule assem b ly. A b sor b any primer and unhardened adhesive from the ferrule tip b y gently da bb ing it with the corner of a lint-free wipe. Be careful not to break the fiber.3.3.7Allow one minute for the adhesive to harden b eforecleaving.•Clean the b uffer stripper b lades after each strip b y holding the handles open, pulling the casings b ack away from the b lades, and letting them snap b ack against the b lades.CRIMPINGFor jacketed cable only .Note: Be careful not to break the bare fiber protruding from the ferrule during this step.Slide the crimp sleeve b ack, freeing the aramidyarn. The ca b le jacket should nearly touch the rear of the b ack b one of the ferrule assem b ly.Note: Do not press the cable jacket forward to touch the rear of the backbone. There should be a gap between the jacket and backbone.With the appropriate strength mem b er (aramidyarn) cutters, cut the aramid yarn even with the flange. Flare the aramid yarn evenly around the perimeterof the grooved area of the b ack b one of the ferrule assem b ly. For 2.0mm/1.6mm jacketed cable , use tweezers for b est results.Slide the crimp sleeve over the b ack b one, trappingthe aramid yarn b etween the crimp sleeve and the b ack b one. Make sure the crimpb one, crimp the large end of the crimp sleeve b le Align the frontThe front recessed edge of the crimp die b s.b one and crimp the crimp sleeve.b are fi b er just a b ove the endface b er away from the ferrule b s provided. A b of fi b er protruding from the tip of the b e visi b le when viewed through the4.15µm4.3DRY5µm4.5WET1µm DiamondA B C DA=Ideal. No b lemishes on core or cladding.B=Good. Cladding is chipped, b ut core isnot.C=Poor. Scratch across core. Tryrepolishing or else reterminate.D=Unaccepta b le. Fi b er has shattered.Reterminate. 4.6Ferrule Tip After 1µm Diamond Polish4.POLISHINGCarefully read this entire section before proceeding.4.1Hold a piece of the 5µm polishing film in the air and gently ru b thefi b er stu b against it in a circular motion until the height of the fi b erstu b is equal to or slightly less than its diameter. This is indicatedwhen the white trace on the film is no longer o b vious. Make surefingers are at the edge of the film, not directly b ehind fi b er.Note: Do not use the same 5µm film used in this step for anyof the following polishing steps.4.2Thoroughly clean polishing puck, puck hole, and pad with alcoholand cleaning swa b. Place a separate sheet of 5µm polishing filmon the soft side of the polishing pad. Set the polishing puck on thepolishing film.4.3Carefully insert the inner housing assem b ly into the puck hole untilthe ferrule/fi b er contacts the polishing film. While keeping the puckflat against the film, apply very light pressure on the ferruleassem b ly making figure eight motions with the puck. Graduallyincrease pressure until the fi b er stu b no longer leaves a white traceon the film (a b out 10 figure eights). At this point, the adhesive willb e gone.4.4Remove 5µm polishing film from polishing pad. Clean the ferruletip, pad, and b ottom of the puck with an alcohol soaked wipe.4.5Place a sheet of 1µm diamond polishing film onto the polishingpad. Place several drops of distilled water on the diamond film.Polish the fi b er endface with the puck using medium pressure forapproximately 10 figure eights.4.6Clean the ferrule tip and puck with an alcohol soaked lint-free wipe.Clean the 1µm diamond film using an alcohol soaked wipe afterevery 5 connectors.4.7Inspect the fi b er endface using a microscope. If scratches remain,repeat steps 4.5 and 4.6.WARNING: NEVER LOOK INTO THE END OF A FIBER WHICHMAY HAVE A LASER COUPLED INTO IT.Note: Each time a mating takes place, clean the ferruleendface thoroughly with an alcohol soaked lint-free wipe.4.8For singlemode only: Place a sheet of the .05µm lapping film onthe pad. Apply several drops of distilled water onto the center ofthe film.4.9For singlemode only: Place the puck in the center of the distilledwater on the film and pad. Keeping the puck flat against the filmand pad, apply even pressure for 4 figure eights.4.10For singlemode only: Wipe the ferrule, pad, and puck with a drywipe.4.11For singlemode only: Clean the ferrule with a distilled watersoaked wipe. Do not use alcohol to clean after using the .05µmlapping film.4.2UNIVERSAL POLISHING PUCKPOLISHING GUIDELINES•Keep the puck flat against the polishing film.•Figure eights should b e a b out 3" tall and 1.5" wide.•Always polish on a clean area of the 5µm (micron) polishing film, withfigure eights traversing the film as shown in Figure 4.3.•One sheet of 5µm (micron) polishing film will polish 2-4 ferrules.•One sheet of 1µm diamond polishing film will polish 100 ferrules.•One sheet of .05µm lapping film will polish approx. 18-20 ferrules.•Clean the polishing puck and pad with a clean wipe after each step.•DO NOT OVERPOLISH.Boot againstflange 6.1.36.FINAL CONNECTOR ASSEMBL Y 6.1Boot Installation6.1.1For jacketed cable only: Align the b oot so that the firstset of slots is aligned with the top of the inner housingassem b ly.6.1.2For jacketed cable only: Slide the b oot over the crimpsleeve and onto the b ack b one. Push the b oot over theflange towards the shoulder. The b oot should snap inplace onto the flange.Note: Ensure that the boot is oriented correctly inorder to ensure smooth connector movement whenthe outer housing is installed.6.1.3For 900µm buffered cable only: Push the b ootforward onto the grooved area of the b ack b one until it isagainst the flange.Top ofHousingFirst slot6.1.1ShoulderFlange6.1.2E-mail:***********************Phone: For Instructions in Local Languagesand Technical Support:Dust cap6.2.36.2.2ChamfersChamfersOuter HousingInner Housing Assem b ly6.2.16.2Outer Housing Installation6.2.1Align the chamfers on the front of the inner housing assem b ly with the chamfers at the front of the outer housing.6.2.2Push the inner housing assem b ly into the outer housing until it snaps into place. Once in place, the outer housing should b e a b le to move freely over the inner housing and b oot.6.2.3Clean the ferrule endface with an alcohol soaked wipe and put dust cap over the ferrule end.7.ATTACHING DUPLEX CLIP7.1Orient the connector as shown with the connector key facing upward in the same direction as the ‘A’, ‘B’ and ‘KEY’ markings on the duplex clip. Insert the connector into one side of the clip on a slight angle and rotate into place. The upper and lower legs of the clip slide over the connector and “snap” when the connector is in place. The connector is fully seated once the top and b ottom connector flanges are inside of the rectangular slots in the clip.7.2Repeat this procedure for the other connector, completing the duplexing step.Note: When making cable assemblies, be sure to follow the correct ‘A->B’ polarity cross-over between connectors.。
Panduit LC OptiCam 预拨光纤连接器说明书

LC OptiCam ® Pre-PolishedFiber Optic ConnectorsS P E C I F I C A T I O N S H E E Ta p p l i c a t i o n sLC fiber optic connectors are widely used in fiber optic backbone and horizontal applications forhigh-speed data transmission. Typical applications for LC OptiCam ® Connectors include maintenance or emergency restoration of fiber networks and retrofit/initial install in both behind-the-wall (BTW) and in the permanent side of panelized interconnect and cross-connect. LC OptiCam ®Connectors eliminate the need for end face polishing and adhesive providing easier, faster installation, especially in remote areas and confined spaces. The hand-held OptiCam ® Termination Tool gives installers the flexibility to terminate in very close proximity to the application without having to switch tools or find benchtop space.t e c h n i c a l i n f o r m a t i o nStandards requirements:TIA/EIA-604 FOCIS-10 compatible; exceeds TIA/EIA-568-B.3 requirementsFiber compatibility:62.5/125μm OM1, 50/125μm OM2, 10Gi g ™ 50/125μm laser optimized OM3/OM4 and 9/125μm OS1/OS2Fiber cable type:900μm tight-buffered cable onlyFiber cable size: 1.6mm – 2.0mm and 3.0mm jacketed cable with optional boots Ferrule type:Zirconia ceramic with a pre-polished fiber stub Insertion loss:Ceramic: 0.3dB average (multimode and singlemode)Return loss:Ceramic: >20dB (multimode), >26dB (10Gig ™ multimode),>50dB (singlemode)s p e c i f i c a t i o n sLC small form factor (SFF) pre-polished connectors with rear pivot latch shall be TIA/EIA-604 FOCIS-10 compatible and contain afactory-terminated fiber, eliminating field polishing and adhesive. LC pre-polished connectors shall have an average insertion loss of 0.3dB per mated pair for multimode and singlemode fiber. LC pre-polished connectors shall captivate fiber and buffer in one action allowing for up to two re-terminations with no degradation in performance.k e y f e a t u r e s a n d b e n e f i t sLC OptiCam ® Connectors Factory pre-polished fiber stub endfaceEliminates inconsistent and time-consuming field polishing to deliver required optical performance; reduces termination time (less than half the time of field polish connectors) and the number of installation tools requiredDual cam design withSecures both the fiber and the buffer during the camming step to facilitate consistent termination results; reduces the termination time compared to conventional termination methodsAllows up to two re-terminations to achieve optimum termination results; reduces the number of rejected connectors and terminations to provide yield rates approaching 100% for lower installed costs Translucenthousing assembly Facilitates inspection of the fiber termination quality; results in rapid installations, improved termination yields, and lower installed costs Non-optical disconnect Maintains data transmission under tensile loads for jacketed cable Mechanical cable retention Consistently provides higher than industry standard cable retention;requires no adhesive, speeding installation Zirconia ceramic ferrules Provide the highest durability for repeated matingsOptiCam ® Termination Tool Universal termination tool Secures both fiber and buffer in one action for all OptiCam ® Connectors with connector specific cradles (included); ensures fast, consistent, and optimal terminationsIntegrated visualtermination indicator (VTI)Provide the highest durability for repeated matings©2015 Panduit Corp.ALL RIGHTS RESERVED.FBSP19--WW-ENG3/2015 LC OptiCam® Pre-Polished Fiber Optic ConnectorsWORLDWIDE SUBSIDIARIES AND SALES OFFICESFor a copy of Panduit product warranties, log on to /warrantyPANDUIT CANADAMarkham, Ontario******************Phone: 800.777.3300PANDUIT EUROPE LTD.London, UK*******************Phone: 44.20.8601.7200PANDUIT JAPANTokyo, Japan********************Phone: 81.3.6863.6000PANDUIT SINGAPORE PTE. LTD.Republic of Singapore*****************Phone: 65.6305.7575PANDUIT AUSTRALIA PTY. LTD.Victoria, Australia******************Phone: 61.3.9794.9020PANDUIT LATIN AMERICAGuadalajara, Mexico*****************Phone: 52.33.3777.6000ContactCustomerServicebyemail:**************or by phone: 800.777.3300Visit us at For more informationDimensions are in inches [Dimensions in brackets are in millimeters].LC OptiCam® Pre-PolishedSimplex ConnectorLC OptiCam® Pre-PolishedDuplex Connector OptiCam® Termination Tool LC Lock-In Duplex ClipOCTT(Patch cords available separatelyor in termination kits)FLCCLIW-X。
快接使用说明书(预埋式)(2)

SC/UPC-APC-SC/UPC-C Optical Fiber Fast ConnectorOperating Instruction☆ 非常感谢您购买并使用本公司产品。
Thank you for your purchase and use of o☆ 为了正确的使用本产品,使用前务必阅读本说In order to use this product properly, p☆ 分析规格书Analysis Specification项目 Item插损 Insertion Loss回损 Return Loss光纤 Fiber拉力 Tension温度变化率 Temperature Alteration Ratio温度 Temperature☆ 操作工具Operating Tool☆ 操作尺寸Operating Dimension注意:标签尺度中所示光纤为接续所用预制光纤。
Note: the optical fiber shown on the label scale is a prefabricated fiber used for connecting.SC/UPC-C光纤快速连接器SC/UPC-C Optical Fiber Fast Connector ≤0.3dB(MA*0.5)≥50dB 2.0*3.0 蝶形光缆2.0*3.0 GJXH 20N≤0.5dB( -40℃~+85℃) -40℃~+85℃of our products.读本说明书。
ly, please be sure to read the instruction before use it.产品内容Product Content使 用 说 明 书Operating Instruction-APC-C光纤快速接续连接器PC-C Optical Fiber Fast Connector预埋式(Embedded Type)光纤。
on the label scale is a prefabricated fiber used for connecting.☆ 操作步骤Operating Steps注意:以下步骤中,必须保证产品及光纤清洁。
【推荐下载】光纤快速连接器怎么用 光纤快速连接器的性能

[键入文字]
光纤快速连接器怎么用光纤快速连接器的性能
光纤活动连接器,俗称活接头,一般称为光纤连接器,是用于连接两根光纤或光缆形成连续光通路的可以重复使用的无源器件,已经广泛应用在光纤传输线路、光纤配线架和光纤测试仪器、仪表中,是目前使用数量最多的光无源器件。
随着光纤通信技术不断的发展,特别是高速局域网和光接入网的发展,光纤连接器在光纤系统中的应用将更为广泛。
同时,也对光纤连接器提出了更多的、更高的要求,其主要的发展方向就是:外观小型化、成本低廉化,而对性能的要求却越来越高。
下面小编就给大家介绍一下光纤快速连接器的使用方法及性能,一起来看吧。
光纤快速连接器的性能
光纤连接器的性能,首先是光学性能,此外还要考虑光纤连接器的互换性、重复性、抗拉强度、温度和插拔次数等。
1、光学性能:对于光纤连接器的光性能方面的要求,主要是插入损耗和回波损耗这两个最基本的参数。
插入损耗(Insertion Loss)即连接损耗,是指因连接器的导入而引起的链路有效光功率的损耗。
插入损耗越小越好,一般要求应不大于0.5dB。
回波损耗(Return Loss, Reflection Loss)是指连接器对链路光功率反射的抑制能力,其典型值应不小于25dB。
实际应用的连接器,插针表面经过了专门的抛光处理,可以使回波损耗更大,一般不低于45dB。
1。
EDIMAX N300 Wi-Fi多功能無線訊號延伸器 EW-7438RPn Mini說明書说明书

EW-7438RPn Mini 是專為延伸跨樓層、多房間的無線Wi-Fi 訊號所設計的多功能迷你無線訊號延伸器,它能延伸家中現有的無線網路、有效減少訊號死角,大幅提昇上網品質。
同樣具備三合一功能設計,不同於前一代EW-7834RPn V2設計, EW-7834RPn Mini 除了擁有更好的傳輸效能,它巧妙運用簡約美學的工業設計,將體積縮減16%,不僅不會干擾鄰座電源插孔的使用,且減少塑料使用,讓環境少ㄧ些負擔,同時EW-7438RPn Mini 更提供免費EdiRange App (適用於無線訊號延伸模式Wi-Fi Extender Mode 下),無論 iOS 或Android 都適用,讓您能輕鬆操作和管理如無線排程及訪客網路等功能,化繁為簡的設計,省空間省體積但絕不會省效能。
EW-7438RPn Mini 萬用相容的設計,可適用各家廠牌的無線分享器,而挑戰全台最簡易的安裝設定方式和最方便的使用方式,EW-7438RPn Mini 更是當之無愧,不僅同時具備可快速與上層無線分享器連線的WPS 按鍵,也提供獨家iQ Setup 超簡易設定方式,讓找不到分享器WPS 按鍵的朋友(如使用中華電信所提供的家用無線路由器)也能安心輕鬆完成安裝連線。
延續前一代EW-7834RPn Mini 設計,EW-7438RPn Mini 不僅可做Wi-Fi 訊號延伸,還可當做AP(將有線訊號轉為無線訊號)或AP Client(將無線訊號轉為有線訊號)來使用,多功能設計優化您家中的無線環境,讓您隨時都能享受穩定、高品質的無線網路。
訊號強度指示燈設計,幫您找到最佳架 設地點, 優化Wi-Fi 覆蓋率© EDIMAX Technology Co., Ltd. All Rights Reserved.•獨家開發,唯一專為中華電信所提供家用無線分享器所設計的 iQSetup 快速設定•無線訊號延伸模式支援手機APP 管理,具備晚安模式,可夜間關機,次日早上自動啟動內建電源插頭,體積輕巧,易於安裝訊號強度指示燈N300 Wi-Fi 多功能無線訊號延伸器N300 Multi-function Wi-Fi Extender with EdiRange AppEW-7834RPn Mini2) iQ Setup 超簡易設定 :找不到分享器的WPS 按鍵,沒關係!只要使用iQ Setup ,不管家裏是哪個牌子的無線分享器,通通都能連,而且透過智慧型手機就可以設定,不開電腦也行。
FC皮线光纤快速接续连接器说明书-北
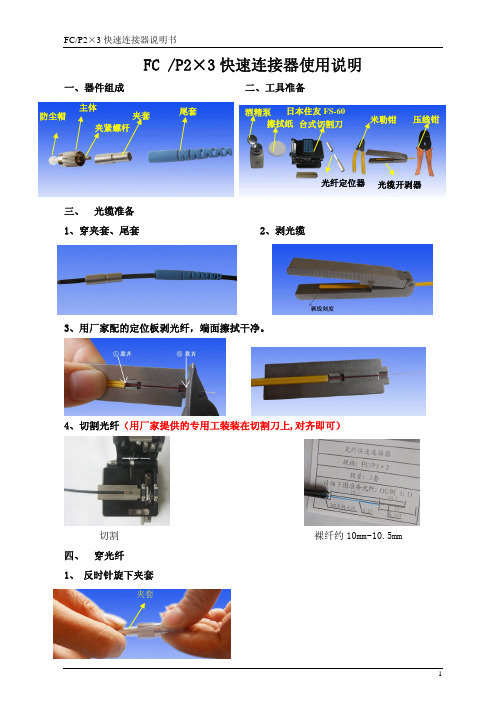
FC /P2×3快速连接器使用说明
一、器件组成 二、工具准备
三、 光缆准备
1、穿夹套、尾套
2、剥光缆
3、用厂家配的定位板剥光纤,端面擦拭干净。
4、切割光纤(用厂家提供的专用工装装在切割刀上,对齐即可)
切割 裸纤约10mm ~10.5mm 四、 穿光纤
1、 反时针旋下夹套
夹套
防尘帽
擦拭纸 日本住友FS-60
台式切割刀
米勒钳
压线钳
酒精泵 主体
夹紧螺杆
夹套
尾套
光纤定位器
光缆开剥器
2、 穿光纤
将光纤定位器压住,从另一端穿入光纤,直至不能穿入为止。
握住夹紧螺杆及光纤,另一手顺时针转动主体约180
度(半圈)夹紧光纤。
穿光纤 3、
装定位卡,拧紧夹套
拧夹套 拧紧后 五、
压紧光缆 六、装尾套(成品)
将尾套推入夹套内(如安装空间有限可不装尾套)
握住此夹紧螺杆
转动主体(半圈)。
FITEL Ninja 光纤连接器终端工具说明书

Features and Benefits•Enhanced Ease of Use - The Ninja features a wide splicing chamber for easier fiber loading. When compared with previous models, the Ninja offers 400% more space around the fiber holders.•Excellent Visibility: Three LED lights illuminate the entire operation chamber with more than 300 Lux. The intense bright light is critical aid for performing connector terminationsOverviewThe FITEL Ninja is a handheld connector termination tool that delivers fast and reliable splicer even under the toughest of situations. Combining portability in a ruggedized body, the Ninja offers powerful performance and accessibility needed in any MDU (Multi Dwelling Unit) and SFU (Single Family Unit) installation.This industry-first tool is dedicated for SOC solutions and is a must have for any splicing project. FITEL Ninja’s powerful motors and simple operation can guarantee high quality, repeatable results. The Ninja and SOC’s combine to provide optical loss performance and yield superior to mechanical connectors. It’s easy to see how this saves both time and money. With its large battery capacity, it can achieve 100 splice/heating cycles on a single charge giving you portability without sacrificing performance.Product DescriptionWhile the NINJA design is compact and low profile, its large battery capacity helps save on time by allowing 100 splicing and heating cycles in one charge. Offering consistent splicing and outstanding ease of use, the NINJA is suitable for use with all Metro, LAN and FTTx fibers (including ultra-bend insensitive fibers).in low-light environments which are commonly encountered during MDU/SFU installations.•Industry-First Patented Removeable V-Groove: The Ninja features adetachable V-groove for the field easy cleaning and optimal maintenance, which reduces downtime and achieve optimal performance with the industry’s only removeable v-groove! Clean in just minutes with no tools required.A Furukawa CompanyAuthorized Distributor of FITEL Products in the AmericasUnder Tough EnvironmentsDrop resistant – 76 cm drop tests from 5 different angles **S tandard operations could be properly carried out afterhaving conducted the above tests. These tests wereperformed at the Furukawa Electric Lab with no significant Compatible with Multiple Typesof Splice-on-Connectors and with the EZ!Fuse ™ Splice on Connector SystemFitel NinjaApplicable Fibers SM (ITU-T G.652), MM (ITU-T G.651), DSF (ITU-T G.653),NZD (ITU-T G655), BIF/UBIF (Bend Insensitive Fiber ITU-T G.657)Cladding Diameter125 μmCoating Diameter250 ~ 900 μmFiber Cleave Length 5 to 10 mm or 16 mmAverage Splice Loss SM: 0.05 dB, MM: 0.02 dB, DSF 0.08 dB, NZD 0.08 dB, BIF/UBIF: 0.05 dBSplice Time13 secondsHeat Time17 seconds (40 mm sleeve) , 20 seconds (60 mm sleeve) (Pre-heat mode)31 seconds (S922: 40 mm sleeve, S921: 60 mm sleeve) (Regular mode)Splice Programs Max. 150Heat Programs Max. 30Automatic Heating Start AvailableApplicable Sleeves20/40/60 mmFiber Holder Tight holder (Loose tube applicable) or Removal fiber holder systemTension Test 1.96 NSplice Return Loss60 dB or moreFiber Image Magnification58XSplice Memory Max. 1500Image Capture Capacity Last 100 images to be automatically captured + Up to 24 images to be stored permanentlyDimension 124W × 161D × 64.5H mm (not including rubber pad) 139W × 176D × 71H mm (including rubber pad)Weight970 g (with battery)Monitor 3.5” color LCD monitorPropulsion (motor)8 N (Designed value)Data Output USB ver. 2.0 miniBattery Capacity7Typically 100 splice/heat cyclesWind Protection Max. wind velocity of 15 m/s.Operating Temperature-10° to +50°C (without excessive humidity)Storage Temperature-40° to +60°C (without excessive humidity)Humidity0 to +95% RH (non condensing)Power Source AC input 100 to 240 V (50/60 Hz), DC Input 11 to 17 V without any change of hardwareFITEL Ninja | 3Code DescriptionNJ001-1-V1Splicer with 16 mm Fiber Holder S712T-016NJ001-2-V1Splicer with 10 mm Fiber Holder S712T-010 NJ001-3-EX-10-V1Splicer with cleaver, S712T-010 holder, S211B stripper, S943B battery, wipes and fluidNJ001-EX-900-V1Splicer with cleaver, S712S-250 and S712S-900 fiber holders, S211B stripper, S943B battery, wipes and fluidFitel Ninja4 | ItemP/NQuantityF ITEL NINJA NJ001 Main body (including battery)NJ001-X-A-00011Soft Carrying Case SCC-031Spare Electrodes ELR-01 1 pair AC Adapter S978A 1AC Cable Cord—1Electrode Sharpener D51111Cleaning Brush VGC-011User Manual (CD)UMC-011User ManualFTS - 3471ItemP/N Quantity Cooling Tray CTX-011USB Cable USB-011Battery PackS946116 mm Cleave length Tight Holder 10 mm Cleave len g th Tight Holder S712T-016S712T-010 1 pair 1 pair 160 µm coated Fiber Holder S712S-160 1 pair 250 µm coated Fiber Holder S712S-250 1 pair 500 µm coated Fiber Holder S712S-500 1 pair 900 µm coated Fiber HolderS712S-900 1 pair Loose Tube Fiber Holder (Left side)S712S-LT-L 1 pair Loose Tube Fiber Holder (Right side)S712S-LT-R 1 pair Drop/Indoor Cable HolderS712S-1SM-D 1 pair Low-friction Indoor Cable Holder S712S-1SM-ST 1 pair Cordage Common Fiber HolderS712F-CM 1 pair Ferrule Holder for AFL SOC (Holder for AFL SOC)S712-SOC-LC-AF 1Ferrule Holder for Sumi SC/FC (Holder for Sumi SOC)S712C-SOC-SF 1Cordage Holder for Both AFL & Sumi SC/LC (Holder for AFL/Sumi SOC)S712-SOC-ASC1Ring and slit tool for EZ!fuse SOC 2/3 mm SC/LC assemblies EZT-011Splicer Scissors/ Kevlar Shear SS-01 1 pair Removeable V-Groove NJA0004A 1Spare ElectrodesELR-011 pairEX-900-V1 PackageFITEL Ninja | 5ParameterDescriptionApplicable Fiber Type 250μm, 900μm, 2mm, 3mm Connector Type SC, LCPolishingUPC or APC (SM), PC (MM)Insertion Loss Typical 0.3dB (SM), 0.1dB (MM)Return Loss>60dB (SM/APC), >50dB (SM/UPC), >30dB (MM/PC)Operating Temperature- 40 °C to 75 °CPart Number DescriptionS712C-SGS9C-R-P SC type ferrule holder for FITEL splicer (Plastic)EZ!Fuse Product InformationProduct Code DescriptionFSOC-SC09-SM-U SC connector, SM UPC polishing for 250/900μm fiber 10 connectors One S712C-SGS9C-R-P is supplied with eachMOQ of 10 connectors.FSOC-SC23-SM-U SC connector, SM UPC polishing for 2/3mm cordage FSOC-SC09-SM-A SC connector, SM APC polishing for 250/900μm fiber FSOC-SC23-SM-A SC connector, SM APC polishing for 2/3mm cordage FSOC-SC09-M3-P SC connector, OM3 PC polishing for 250/900μm fiber FSOC-SC23-M3-P SC connector, OM3 PC polishing for 2/3mm cordage FSOC-SC09-M1-P SC connector, OM1 PC polishing for 250/900μm fiber FSOC-SC23-M1-P SC connector, OM1 PC polishing for 2/3mm cordage FSOC-SC48-SM-U SC connector, SM UPC polishing for 4.8mm cordage FSOC-SC48-SM-A SC connector, SM APC polishing for 4.8mm cordage FSOC-SC12-SM-U SC connector, SM UPC polishing for 1.2mm cordage FSOC-SC12-SM-A SC connector, SM APC polishing for 1.2mm cordage FSOC-LC09-SM-U LC connector, SM UPC polishing for 250/900μm fiber FSOC-LC20-SM-U LC connector, SM UPC polishing for 2mm cordage FSOC-LC09-SM-A LC connector, SM APC polishing for 250/900μm fiber FSOC-LC20-SM-A LC connector, SM APC polishing for 2mm cordage FSOC-LC09-M3-P LC connector, OM3 PC polishing for 250/900μm fiber FSOC-LC20-M3-P LC connector, OM3 PC polishing for 2mm cordage FSOC-LC09-M1-P LC connector, OM1 PC polishing for 250/900μm fiber FSOC-LC20-M1-P LC connector, OM1 PC polishing for 2mm cordage。
光纤快速连接器(直通)安装使用说明

(直通)
光纤快速连接器(直通)安装使用说明
1产品介绍
光纤快速连接器是用于现场组装使用的光纤连接器,广泛适用于光纤到户等场合。
2、组件清单
1)后盖开启工具
2)光纤连接器后盖
3)光纤连接器本体
4)插针保护帽
5)光纤连接器保护外套
3、安装说明
步骤1:光缆Байду номын сангаас剥
使用皮线光缆开剥钳,将皮线光缆开剥约60mm长度;
使用米勒钳,将0.25mm的被覆层开剥掉,留24mm左右;
用无水酒精擦拭干净;
用光纤切割刀切割光纤,保留长度约48mm;
步骤2:光纤定位及固定
步骤3:装配保护外套
组装完成
4、重复安装
步骤1:卸掉光纤连接器保护外套
步骤2:使用后盖开启工具,将光纤连接器后盖打开;
步骤3:将开启工具嵌入光纤连接器本体内,开启光纤的定位和固定装置;
步骤4:拔出原有光缆,插入新的光缆,重复上述光纤定位及固定步骤,即可完成。
- 1、下载文档前请自行甄别文档内容的完整性,平台不提供额外的编辑、内容补充、找答案等附加服务。
- 2、"仅部分预览"的文档,不可在线预览部分如存在完整性等问题,可反馈申请退款(可完整预览的文档不适用该条件!)。
- 3、如文档侵犯您的权益,请联系客服反馈,我们会尽快为您处理(人工客服工作时间:9:00-18:30)。
连接钮
SC 管
连接体胶尾Korea Optron Corp Photoelectron R&D Center
切割器
Korea Optron Corp Photoelectron R&D Center
剪刀光纤用钳子
Korea Optron Corp Photoelectron R&D Center
50m m
Korea Optron Corp Photoelectron R&D Center
(a)(b)
(c)
Korea Optron Corp Photoelectron R&D Center
Korea Optron Corp Photoelectron R&D Center
24mm (250um)10mm(125um)
0~4mm (900um)
光缆皮
Korea Optron Corp Photoelectron R&D Center
약0~4mm(900um)
24mm (250um)10mm (125um)
光缆外皮Korea Optron Corp Photoelectron R&D Center
34mm
jig
Korea Optron Corp Photoelectron R&D Center
光纤导入部(甲)纤维
Korea Optron Corp Photoelectron R&D Center 连接体
光缆固定部(乙
)
光缆前进
*** 光纤噗~一下的插进去。
(X)***
***光纤慢慢的约3秒插进去。
(O)***
光缆
(O) (X)
停止钮(2) Korea Optron Corp Photoelectron R&D Center
(2)
Korea Optron Corp Photoelectron R&D Center (3)
黄色
中央部大拇指向黄色的整个面按下。
(X)*** 绝对不可以!!!
大拇指向黄色的中心按下后再一次向下~按一下.(O)***
光缆柄
Korea Optron Corp Photoelectron R&D Center 按下状态
连接钮
***在没有按下黄色连接按钮的状态下拉直光缆。
(X)***
***用大拇指按下黄色的连接钮抓住并慢慢拉直光缆。
(O)***( X )
胶尾前进
螺旋部
Korea Optron Corp Photoelectron R&D Center ***将纤维全部剪断。
(X) ******将纤维整理到螺旋部的一个方向。
(X) ***
***将纤维全部放开后拧上胶尾。
(O) ***
Korea Optron Corp Photoelectron R&D Center
Korea Optron Corp Photoelectron R&D Center
Korea Optron Corp Photoelectron R&D Center
连接体
jig
开启盖(黄色)
a)Korea Optron Corp Photoelectron R&D Center
压
a)
抽出Korea Optron Corp Photoelectron R&D Center。