NGINX配置1.6一览表
nginx实战操作(常用命令及配置)

nginx实战操作(常⽤命令及配置)1. nginx介绍2. nginx常⽤命令验证配置是否正确: nginx -t查看Nginx的详细的版本号:nginx -V查看Nginx的简洁版本号:nginx -v启动Nginx:start nginx快速停⽌或关闭Nginx:nginx -s stop正常停⽌或关闭Nginx:nginx -s quit配置⽂件修改重装载命令:nginx -s reload3. nginx配置3.1 配置代码#user nobody;worker_processes 1;events {worker_connections 1024;}http {include mime.types;default_type application/octet-stream;sendfile on;keepalive_timeout 65;#1 startupstream linuxidc {server localhost:7071;server localhost:7072;server localhost:7073;}server {listen 7070;server_name localhost;location / {# root C:/ngtest2;# index index.html index.htm;proxy_pass http://linuxidc;}}# 1 end#2 startserver {listen 7071;server_name localhost;location / {root C:/ngtest1;# index index.html index.htm;#proxy_pass https://tms;#proxy_pass https:///;}}server {listen 7072;server_name localhost;location / {root C:/ngtest2;# index index.html index.htm;#proxy_pass https://tms;}}server {listen 7073;server_name localhost;location / {root C:/ngtest3;# index index.html index.htm;#proxy_pass https://tms;}}# 2 end#3 startserver {listen 8080;server_name localhost;#charset koi8-r;#access_log logs/host.access.log main; #location / {# root C:\ngtest;#index index.html index.htm;#proxy_pass https:///; # }location /baidu {#root html;#index index.html index.htm;proxy_pass https:///; }location /csdn {#root html;#index index.html index.htm;proxy_pass https:///;}error_page 500 502 503 504 /50x.html; location = /50x.html {root html;}# 3 end}}3.2 代码说明及效果图3.2.1 不同端⼝代理不同应⽤#2 startserver {listen 7071;server_name localhost;location / {root C:/ngtest1;# index index.html index.htm;#proxy_pass https://tms;#proxy_pass https:///;}}server {listen 7072;server_name localhost;location / {root C:/ngtest2;# index index.html index.htm;#proxy_pass https://tms;}}server {listen 7073;server_name localhost;location / {root C:/ngtest3;# index index.html index.htm;#proxy_pass https://tms;}}# 2 end3.2.2 效果图3.2.3 同⼀端⼝号代理不同应⽤#3 startserver {listen 8080;server_name localhost;#charset koi8-r;#access_log logs/host.access.log main; #location / {# root C:\ngtest;#index index.html index.htm;#proxy_pass https:///; # }location /baidu {#root html;#index index.html index.htm;proxy_pass https:///; }location /csdn {#root html;#index index.html index.htm;proxy_pass https:///;}error_page 500 502 503 504 /50x.html; location = /50x.html {root html;}# 3 end3.2.4 效果图3.2.5 负载均衡默认采⽤的轮询⽅式#1 startupstream linuxidc {server localhost:7071;server localhost:7072;server localhost:7073;}server {listen 7070;server_name localhost;location / {# root C:/ngtest2;# index index.html index.htm;proxy_pass http://linuxidc;}}# 1 end3.2.6 效果图。
nginx_配置详解

server 192.168.8.2:80 weight=1;
server 192.168.8.3:80 weight=6;
}
#设定虚拟主机
server {
listen 80;
server_name 192.168.8.1 ;
charset gb2312;
'"$http_referer" "$http_user_agent" '
'"$http_range" "$sent_http_content_range"';
#设定请求缓冲
client_header_buffer_size 1k;
large_client_header_buffers 4 4k;
root /data3/Html;
expires 24h;
}
#对 "/" 启用负载均衡
location / {
proxy_pass http://mysvr;
proxy_redirect off;
proxy_set_header Host $host;
Active connections: 328
server accepts handled requests
9309 8982 28890
Reading: 1 Writing: 3 Waiting: 324
第一行表示目前活跃的连接数
第三行的第三个数字表示Nginx运行到当前时间接受到的总请求数,如果快达到了上限,就需要加大上限值了。
'"$http_referer" "$http_user_agent" '
nginx详细配置
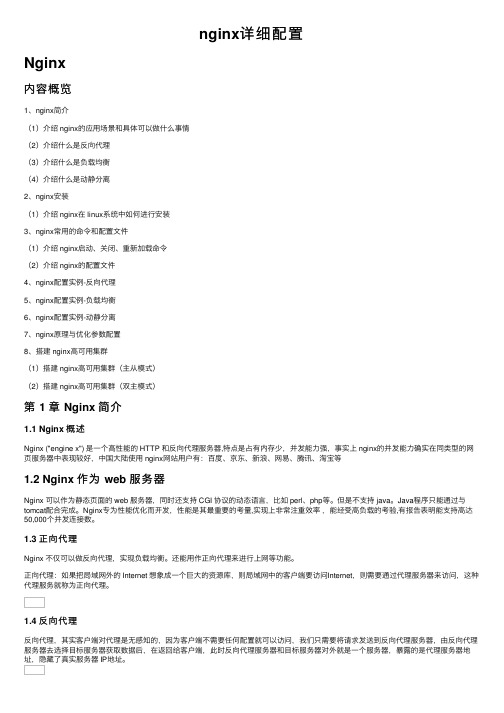
nginx详细配置Nginx内容概览1、nginx简介(1)介绍 nginx的应⽤场景和具体可以做什么事情(2)介绍什么是反向代理(3)介绍什么是负载均衡(4)介绍什么是动静分离2、nginx安装(1)介绍 nginx在 linux系统中如何进⾏安装3、nginx常⽤的命令和配置⽂件(1)介绍 nginx启动、关闭、重新加载命令(2)介绍 nginx的配置⽂件4、nginx配置实例-反向代理5、nginx配置实例-负载均衡6、nginx配置实例-动静分离7、nginx原理与优化参数配置8、搭建 nginx⾼可⽤集群(1)搭建 nginx⾼可⽤集群(主从模式)(2)搭建 nginx⾼可⽤集群(双主模式)第 1 章 Nginx 简介1.1 Nginx 概述Nginx ("engine x") 是⼀个⾼性能的 HTTP 和反向代理服务器,特点是占有内存少,并发能⼒强,事实上 nginx的并发能⼒确实在同类型的⽹页服务器中表现较好,中国⼤陆使⽤ nginx⽹站⽤户有:百度、京东、新浪、⽹易、腾讯、淘宝等1.2 Nginx 作为 web 服务器Nginx 可以作为静态页⾯的 web 服务器,同时还⽀持 CGI 协议的动态语⾔,⽐如 perl、php等。
但是不⽀持 java。
Java程序只能通过与tomcat配合完成。
Nginx专为性能优化⽽开发,性能是其最重要的考量,实现上⾮常注重效率,能经受⾼负载的考验,有报告表明能⽀持⾼达50,000个并发连接数。
1.3 正向代理Nginx 不仅可以做反向代理,实现负载均衡。
还能⽤作正向代理来进⾏上⽹等功能。
正向代理:如果把局域⽹外的 Internet 想象成⼀个巨⼤的资源库,则局域⽹中的客户端要访问Internet,则需要通过代理服务器来访问,这种代理服务就称为正向代理。
1.4 反向代理反向代理,其实客户端对代理是⽆感知的,因为客户端不需要任何配置就可以访问,我们只需要将请求发送到反向代理服务器,由反向代理服务器去选择⽬标服务器获取数据后,在返回给客户端,此时反向代理服务器和⽬标服务器对外就是⼀个服务器,暴露的是代理服务器地址,隐藏了真实服务器 IP地址。
linux下nginx1.6.0及其依赖库从源码编译安装、配置、启动、使用
linux下nginx1.6.0及其依赖库从源码编译安装、配置、启动、使用一、说明:这是一个自动化安装包,文件组织结构如下:/read_me.txt是此安装包的使用说明书。
/pack_repo/下包含的是所有需要用到的源码包,请自行下载。
/script_conf/*.sh是执行安装过程的脚本。
/script_conf/*.conf是配置文件。
大家只要还原出本安装包的内容,即可实现在任何linux发行版上一键安装nginx。
二、安装包中各文件内容A、/read_me.txt文件内容如下:1、安装:mkdir -p /usr/tmpx/install/nginx/复制pack_repo 和script_conf 下的所有文件到/usr/tmpx/install/nginx/下执行:sh /usr/tmpx/install/nginx/script_conf/install_nginx.sh即开始安装nginx安装过程的输出写入到日志文件/usr/tmpx/install/nginx/log.txt,同时也在控制台显示2、启动mv /usr/local/nginx-1.6.0/conf/nginx.conf /usr/local/nginx-1.6.0/conf/nginx_conf_original #备份原始nginx.confmv /usr/tmpx/install/nginx/script_conf/nginx.conf /usr/local/nginx-1.6.0/conf/nginx.conf #使用我们的配置mkdir -p /var/web_nginx_site_conf/mv /usr/tmpx/install/nginx/script_conf/site1.conf /var/web_nginx_site_conf/#注意如果nginx.conf中没有包含任何server,则nginx即使启动了,也不会监听80端口,因为没有应用。
Nginx配置文件详解
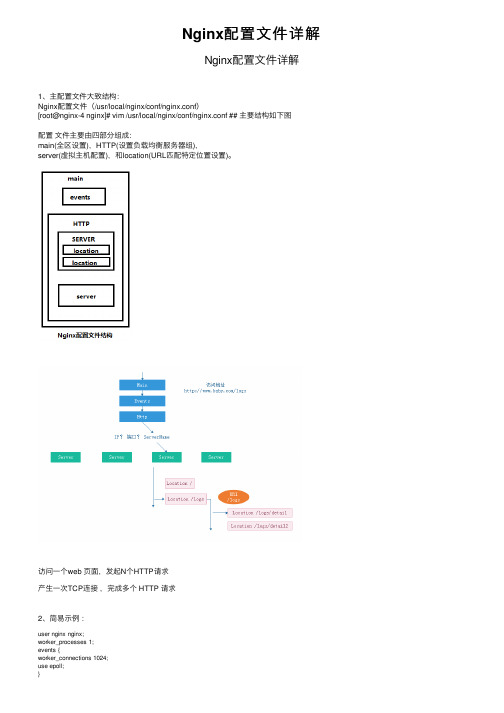
Nginx配置⽂件详解Nginx配置⽂件详解1、主配置⽂件⼤致结构:Nginx配置⽂件(/usr/local/nginx/conf/nginx.conf)[root@nginx-4 nginx]# vim /usr/local/nginx/conf/nginx.conf ## 主要结构如下图配置⽂件主要由四部分组成:main(全区设置),HTTP(设置负载均衡服务器组),server(虚拟主机配置),和location(URL匹配特定位置设置)。
访问⼀个web 页⾯,发起N个HTTP请求产⽣⼀次TCP连接,完成多个 HTTP 请求2、简易⽰例:user nginx nginx;worker_processes 1;events {worker_connections 1024;use epoll;}http{include mime.types;charset utf-8;keepalive_timeout 65;server {ServerName N1location{ }location{ }}server {ServerName N2location{ }location{ }}server {ServerName N3location{ }location{ }}}3、主配置⽂件解析:1)全局变量部分:#user nobody nobody; #Nginx的worker进程运⾏⽤户以及⽤户组worker_processes 1; #Nginx开启的进程数,建议设置为等于CPU总核⼼数。
#worker_processes auto; ## 多核⼼CPU设置。
## [root@server-21 ~]# cat /proc/cpuinfo 查看当前CPU 的信息。
#worker_processes 4 # 4核CPU#worker_cpu_affinity 0001 0010 0100 1000;#亲核##CPU亲核,设置⼯作进程与 CPU 绑定。
Nginx主配置参数详解,Nginx配置网站

Nginx主配置参数详解,Nginx配置⽹站1.Niginx主配置⽂件参数详解 a.上⾯博客说了在Linux中安装nginx。
博⽂地址为:/hanyinglong/p/5102141.html b.当Nginx安装完毕后,会有相应的安装⽬录,安装⽬录⾥的nginx.confg为nginx的主配置⽂件,nginx主配置⽂件分为4部分,main(全局配置)、server(主机配置)、upstream(负载均衡服务器设置)以及location(URL匹配特定位置的设置),这四者的关系是:server继承main,location继承server,upstream既不会继承其它设置也不会被继承。
c.Nginx是⼀个代理服务器,⼀般情况下,⽹站是不能部署在Nginx下的,⽐如⽤Java开发的JavaWeb程序,我们部署在tomcat下,然后使⽤Nginx代理将⽹址指向tomcat即可。
2.Nginx.conf配置⽂件详细说明(附备注)1# kencery 注释说明Nginx⽂件2# 时间:2016-1-193# 学习内容,只是来⾃互联⽹,有版权问题请联系我删除。
45######## Nginx的main(全局配置)⽂件6#指定nginx运⾏的⽤户及⽤户组,默认为nobody7#user nobody;89#开启的线程数,⼀般跟逻辑CPU核数⼀致10 worker_processes 1;1112#定位全局错误⽇志⽂件,级别以notice显⽰,还有debug,info,warn,error,crit模式,debug输出最多,crir输出最少,根据实际环境⽽定13#error_log logs/error.log;14#error_log logs/error.log notice;15#error_log logs/error.log info;1617#指定进程id的存储⽂件位置18#pid logs/nginx.pid;1920#指定⼀个nginx进程打开的最多⽂件描述符数⽬,受系统进程的最⼤打开⽂件数量限制21#worker_rlimit_nofile 655352223 events {24#设置⼯作模式为epoll,除此之外还有select,poll,kqueue,rtsig和/dev/poll模式25#use epoll;2627#定义每个进程的最⼤连接数,受系统进程的最⼤打开⽂件数量限制。
Nginx全面配置单及解释
Nginx全面配置单及解释1、#定义Nginx运行的用户和用户组2、user nginx nginx;#nginx进程数,建议设置为等于CPU总核心数3、worker_processes 1;4、#全局错误日志定义类型,[ debug | info | notice | warn | error | crit ]5、error_log logs/error.log info;#进程文件9、pid run/nginx/nginx.pid;#一个nginx进程打开的最多文件描述符数目,理论值应该是最多打开文件数(系统的值ulimit -n)与nginx进程数相除,但是nginx分配请求并不均匀,所以建议与ulimit -n的值保持一致。
13、worker_rlimit_nofile 65535;#工作模式与连接数上限events {#use epoll;#参考事件模型,use [ kqueue | rtsig | epoll | /dev/poll | select | poll ];epoll模型是Linux 2.6以上版本内核中的高性能网络I/O模型,如果跑在FreeBSD上面,就用kqueue模型。
window下不指定。
补充说明:与apache相类,nginx针对不同的操作系统,有不同的事件模型。
A)标准事件模型Select、poll属于标准事件模型,如果当前系统不存在更有效的方法,nginx会选择select或pollB)高效事件模型Kqueue:使用于FreeBSD 4.1+, OpenBSD 2.9+, NetBSD 2.0 和MacOS X.使用双处理器的MacOS X系统使用kqueue可能会造成内核崩溃。
Epoll:使用于Linux内核2.6版本及以后的系统。
/dev/poll:使用于Solaris 7 11/99+,HP/UX 11.22+ (eventport),IRIX 6.5.15+ 和Tru64 UNIX 5.1A+。
nginx安装升级及配置详解
nginx安装升级及配置详解1.简介2.安装配置3.配置⽂件介绍4.启动、停⽌、平滑重启、升级⼀、Nginx简介Nginx(engine x)是俄罗斯⼈Igor Sysoev编写的⼀款⾼性能的http和反向代理服务器。
在连接⾼并发的情况下,nginx是apache服务器不错的替代品,它能够⽀持50000个并发连接数的响应,⽽内存、cpu等系统资源资源消耗却⾮常低,运⾏⾮常稳定。
性能优势:作为web服务器,处理静态⽂件、索引⽂件及⾃动索引效率⾼作为代理服务器,快速⾼效反向代理作为负载均衡服务器性能,⽀持多并发的连接,占⽤低内存稳定,采⽤分段资源分配技术⾼可⽤,⽀持热部署,启动迅速其它特点:成本低廉;配置⽂件⾮常简单;⽀持Rewrite重写规则,能够根据域名、URL的不同,将http请求分到不同的后端服务器群组;内置健康检查功能,如果nginx proxy后端的某台web服务器宕机了,不会影响到前端的访问;节省带宽,⽀持gzip压缩;⼆、Nginx安装与配置编译安装1.⾸先下载gcc编译器以及nginx⼀些模块的依赖库,通常有pcre库(⽀持rewrite模块),zlib(⽀持gzip模块)库,openssl(⽀持ssl模块)库等。
这些库可以编译安装,也可以yum安装,这⾥选择yum安装。
# yum install -y gcc gcc-c++ pcre pcre-devel zlib zlib-devel openssl openssl-devel2.然后选择nginx版本下载源码并解压# tar –zxvf nginx-1.12.2.tar.gz –C /PATH3.使⽤configure脚本⾃动⽣成Makefile⽂件,nginx的configure脚本⽀持常⽤选项如下,但⾸先给出⼀个例⼦:./configure --prefix=/usr/local/nginx \--conf-path=/etc/nginx/nginx.conf \--error-log-path=/datadisk/data/log/nginx/error.log \--http-log-path=/datadisk/data/log/nginx/access.log \--pid-path=/var/run/nginx.pid \--lock-path=/var/run/nginx.lock \--http-client-body-temp-path=/var/cache/nginx/client_temp \--http-proxy-temp-path=/var/cache/nginx/proxy_temp \--http-fastcgi-temp-path=/var/cache/nginx/fastcgi_temp \--http-uwsgi-temp-path=/var/cache/nginx/uwsgi_temp \--http-scgi-temp-path=/var/cache/nginx/scgi_temp \--user=nginx \--group=nginx \--with-http_ssl_module \--with-http_realip_module \--with-http_addition_module \--with-http_sub_module \--with-http_dav_module \--with-http_flv_module \--with-http_mp4_module \--with-http_gunzip_module \--with-http_gzip_static_module \--with-http_random_index_module \--with-http_secure_link_module \--with-http_stub_status_module \--with-http_auth_request_module \--with-threads --with-stream \--with-stream_ssl_module \--with-http_slice_module \--with-file-aio \--with-http_v2_module \--with-ipv6然后make && make install即可。
部署新环境:编译nginx1.0.6
部分配置显示如下:
configuring additional modules
adding module in ../masterzen-nginx-upload-progress-module-c7c663f
+ ngx_http_uploadprogress_module was configured
--with-openssl-opt=OPTIONS - Set additional options for OpenSSL building
--add-module=PATH - Add in a third-party module found in directory PATH
可参考 ./configuare --help查看配置参数
nginx error log file: "/opt/nginx-1.0.6/logs/error.log"
nginx http access log file: "/opt/nginx-1.0.6/logs/access.log"
nginx http client request body temporary files: "client_body_temp"
adding module in ../vkholodkov-nginx-upload-module-2ec4e4f
+ ngx_http_upload_module was configured
checking for system md library ... not found
checking for system md5 library ... not found
Nginx配置手册(64)
[root@localhost /usr/local/src/mysql-5.1.49]# ./configure --prefix=/usr/local/webserver/mysql
--enable-assembler --with-extra-charsets=complex --enable-thread-safe-client --with-big-tables
19) suhosin-0.9.32.1.tar.gz 20) suhosin-patch-5.3.2-0.9.9.1.patch.gz 21) libxls.so.0.0.0 22) bise.so 23) libpdf_php.so 24) ZendGuardLoader.so
以下为文档 25) nginx.conf 26) php-fpm.conf 27) f 28) mysql
#优化执行 MySql 时间 #如果是 Inter 处理器,使用 pgcc 提高 1%性能 [root@localhost /usr/local/src/mysql-5.1.49]# CFLAGS="-O3" CXX=gcc CXXFLAGS="-O3 -felide-constructors -fno-exceptions -fno-rtti -fomit-frame-pointer -ffixed-ebp"
“ /etc/ld.so.conf 3L,” 52C
#将 /etc/ld.so.conf 列出的路径下的库文件 缓存到 /etc/ld.so.cache 以供使用 #修改 ld.so.conf 增加新的库路径后,需要运行一下 /sbin/ldconfig
#在任何目录下运行都可以 [root@localhost src]# /sbin/ldconfig