数码相机手册数码相机digital 摄像机手册camera Manual(41)说明书
数码相机 说明书
55-57
中文
步驟1:安裝網路視訊機驅動程式(與USB 驅動程式相同)
步驟2:將數位相機連接至電腦 步驟3:執行應用程式(即Windows
NetMeeting)
功能表選項 相機功能表 影片功能表 播放功能表 設定功能表
57-65
將相機連接到其他裝置上 66
規格
67
附錄 疑難排解指南 可能達到的相片拍攝數量 大約的錄製時間長度
警告
如有異物或液體進入相機中,請關閉電源、取出電池,並拔下AC電源變壓 器。 如果在這種情況下仍繼續使用相機,將會導致發生火災或電擊的危險。 詳 情請向您的經銷商洽詢。 如果相機摔落地面,或其外殼損壞,請關閉電源、取出電池,並拔下AC電 源變壓器。 如果在這種情況下仍繼續使用相機,將會導致發生火災或電擊的危險。 詳 情請向您的經銷商洽詢。 請勿拆解、修改或自行維修相機。 這將會導致發生火災或電擊的危險。 如需維修或檢查機體內部,請洽您的 經銷商。 請務必將內附的AC變壓器用於指定的供應電壓。 如果使用其他任何供應電壓,將會導致發生火災或電擊的危險。 請勿在近水處使用相機。 這將會導致發生火災或電擊的危險。 在下雨、下雪的天氣下,或在海灘或 接近海岸邊的地區時,請特別小心。 請勿將相機放置於傾斜或不穩的表面上。 這將可能導致相機摔落地面或傾倒,以致使人身遭受傷害。 請將電池保存於兒童不易接觸的位置。 吞下電池將可能導致中毒。 如果誤吞電池,請立即送醫。 當您在行走、駕車或騎乘機車時,請勿使用相機。 這將會使您摔倒,或導致發生交通意外。
-7-
中文
包裝內容物
請小心拆開包裝盒,並確定包裝盒內有以下項目。 若發現缺少任何項目,或任何不符或損 壞的項目,請立即與經銷商聯繫。
數位相機 影音傳輸線 使用手冊 快速入門指南 連接座 歐規轉美規AC電源轉接頭
小型数字相机用户指南说明书

Mini Digital CameraUser’s Guide1.INTRODUCTION1.1 Introduction of the Mini Digital CameraThis digital camera is a network digital camera, your close daily-life partner.The small casing makes it easy to carry around. It is easy to use, and capture sharp and real image. Besides taking photos, it carries video clips function features.process, photos-sending.The most convenient feature is that you can communicate with others face to face through Internet.The Mini Digital Camera makes your life more beautiful.1.2.SuppliesMini Digital Camera, USB Cable, One piece of AAA Battery, Installation CD 1.3.Part NamesButton Explanation:SNAP :Power Off Button, Snap ButtonMODE:Mode Button,Power On Button1.4.LCD Panel20: Normal modeOF : Power off modeS : Self-Timer shot modeC : Continuous shot modeCP : Compressed modeP : Non-compressed modeAI : Video function modeCL: Delete last photoCA: Delate all photosH: High-resolution formatL : Low-resolution formatF5 : 50Hz(~220v V oltage)F6 : 60Hz(~110v V oltage)1.5 SpecificationStorage memory size:16Mb SDRAMPhotos:non-compressedCIF (352*288): about 20 picturesQCIF (176*144): about 81 picturesUnder compressedCIF (352*288): about 60 picturesQCIF (176*144): about 243 picturesLens:1/4 inch fixed lensAperture.:2.8Exposure mode:AutoWhite balance:AutomaticSelf-timer delay:10 secondsCommunication port:USB standard portImage Sensor:1/4 inch CMOSImage Specification:352*288 pixel (CIF)、176*144 pixel (QCIF)Mode:Single/Self-timer/ continuous shot /set up AVI files(352*288/ 176*144 pixel A VI format)Shutter speed:1/60 second-1/1500 secondLCD panel:2 digit displaysFrame rate:12 frames per second6-8 frames per second (in video mode / in C mode) Power supply and management:A ) One piece of AAA alkaline batteryB ) Automatically power off in 30 seconds idle.C ) 10 hours continuous photo taking.D)Low battery alertWeight:about 27g(without battery)Dimensions:58.7 mm X 41.7mm X 15mmOperation System:WIN98/2000/ME/XP2. How to use the Mini Digital Camera2.1 Power On/OffPress MODE button when the camera is off. LCD panel shows"H",and then shows"20". "H" stands for CIF quality format, and "20" for normal mode and number of photo can be taken. When the Mini digital camera is idle for 30 seconds, it will automatically shut off.2.2 Normal Shot ModePress MODE button, LCD display normal mode.Press SNAP Button, a short sound from the buzzer shows thec ompletion of photo taking and the figure on LCD will automatically reduce .When reaching the capacity,LCD displays "00". Even you furtherpressing the SNAP Button, you will hear ‘di-di’ sound, the figure onLCD remains unchanged.When light is not enough, you will hear ‘di-di-di’ sound,and the figureon LCD remains unchanged.2.3 Self-timer Shot ModeP ress MODE Button to choose self-timer mode.Press SNAP Button to start self-timer,self-timer will delay 10 seconds.It finishes with a ‘di’ sound.After the completing of self timer, the figure on LCD will automatically reduce and back to normal mode.2.4 Continuous shot modePress MODE Button to choose continuous mode.Press SNAP Button to start continuous shot. It stops until release SNAP Button or the number of photos reaches the minimum value "00".2.5 A VI Function ModePress MODE Button to choose video function mode.Press SNAP Button to start,and LCD will flash.After starting taking video, it will stop when the SNAP Button is released or the minimum value "00" is shown on the LCD panel. Note : Please move slowly and steadily when taking video.3. Function Operation3.1 Delete single photo ( Only delete the last photo)Press MODE Button,LCD panel shows icon "CL"P ress S NAP Button to choose and LCD will flash,then press SNAP Button again to confirm. After the last photo is deleted. LCD shows the number of photos(could not be taken) increasing by one.3.2 Delete all photosPress MODE Button,LCD shows icon "CA ":Press SNAP Button to choose and LCD will flash,then press SNAPButton again to confirm, and all photos are deleted.3.3 CIF formatPress MODE Button,LCD shows icon"H"Press SNAP Button to confirm,LCD shows icon"H" when turn on the camera in this mode.3.4 QCIF formatPress MODE Button,LCD shows icon"L"Press SNAP Button to confirm,LCD shows icon"L" when turn on the camera in this mode.3.5 Compressed modePress MODE Button,LCD shows icon"CP "Press SNAP Button to confirm.Compressed mode under CIF format allows to take maximum of 60 photos.Compressed mode under QCIF format allows to take maximum of 243 photos.3.6 Non-compressed modePress MODE Button,LCD shows icon "P"Press Shutter Button to confirm.Non-compressed mode under CIF format allows to take a maximum of20 photos.Non-compressed mode under QCIF format allows to take a maximum81 photos3.7 Exposure light / AC voltage / frequency 50Hz modePress MODE Button,LCD shows icon "f5"Press SNAP Button to confirm.When exposure light is florescent lamp, AC voltage is 220V, frequencyi s 50Hz, please chose this mode.(factory setting is 220V and 50Hz)3.8 Exposure light / AC voltage / frequency 60Hz modePress MODE Button,LCD shows icon "f6"Press SNAP Button to confirm.When exposure light is fluorescent lamp,AC voltage is 110V,frequency is 60Hz, please chose this mode.Remark:50Hz/60Hz is the AC voltage/frequency of different regions and countries. 50Hz for china, 60Hz for European and American countries.4. Installation and Application of the software4.1 Software installationPut the included installation software into the CD ROM, run the setup. exe file and install the drive and application as per hints.Restart the computer after finishing the installation.4.2 Software UninstallThe software can be uninstalled by clicking the menu item of "Uninstall", or selecting the "Camera Driver" item in the "Add/Remove Programs"applet of control panel and remove it.4.3 Main Explanation of the Software' MenuSave Active ItemSave All ItemsStopPreviewCapture Single FramePC-CameraPhoto Album Mod4.4 Video Parameter settingChoose the video color space and video sizeDe-flicker:Set AC frequency of fluorescent light.AE Speed: Set the frame rate to capture videoLight Source:Select brightness environmentExposure:Set video exposureCapture Source:Select Capture deviceDevice Setting:Adjust various video settings, such as white balance, etc.Video FormatChoose the video color space and video size4.5 Download FileConnect the mini digital camera with your computer via USB cable, then double click shortcut on the computer desk, the following figures will pop up:Press button "YES", all photos will be transferred to your PC.4.6 Browse FileSelect the photo in application window right side, and then this photo will be shown in application window left side as actual size4.7 Save FilePress button to save one file which you have selectedPress button to save all files4.8 Play A VI FileAfter downloading video, below image shows(Download method is the same as that of photos)Click AVI play button to start (Computer should install multi-media software, e.g. Windows Media Player or Real Player Basic AVI play button)4.9 PC-CAMERAConnect the mini digital camera with your computer via USB cable, then double click the shortcut on your computer desk. The following interface will appear:Press button to work as PC-CameraPress button to stop PC cameraPress button to start preview video imagePress button to capture the current frame5 Photo Impression4.0Through the Photo Impression4.0 you can select to download photos and edit photos.6. Safety Notice1)Never get the product wet or put it in high humid environment toprevent unstable performance.2)Turn off the camera before changing batteries and finish it with in8 seconds to prevent data loss.。
digital camera Guide说明书

了解数码相机正面图1.快门键2.电源键3.状态指示灯4.闪光灯5.自拍指示灯6.麦克风7.镜头项目功能拍摄模式视频模式回放模式1.变焦广角远距变焦广角远距变焦2.菜单菜单菜单3.拍摄模式视频模式回放模式4.对焦自动>>>对焦自动>>向右旋转5.闪光灯Z>Y>X>W --下一个图像6.自拍关闭>10s>2s>10+2s 自拍关闭>10s>2s删除7.补偿>[--上一个图像8.设置情景模式设置设置准备1.连接相机吊带。
2.打开电池/存储卡盖。
3.4.插入 SD/SDHC 存储卡 (5.盖上电池/拍照模式拍摄照片您的相机配备一个 3.0" 全彩TFT液晶屏幕来帮助您构图、回放拍摄的相片/短片或调整菜单设置。
1.按下电源键打开电源。
状态指示灯亮绿光,表示相机启动。
2.将相机模式设置为[]。
3.在液晶屏幕中构图。
按下键拉近拍摄对象,然后在液晶屏幕中放大对象。
按下键进行广角拍摄。
使用脸部侦测技术进行拍照同时侦测出最多5张人脸。
1.将相机模式设置为[]。
2.按住m键直到[]图标出现在液晶显示屏上。
白色框被认作“最优先”面部(主对焦框),而周围其他面孔上会出现灰色框。
3.半按快门键以锁定焦距。
同时主对焦框会变成绿色。
如果“最优先”面部对焦不合适,屏幕上所有的框都将消失。
4.把快门键按到底就可以进行拍照。
短片模式录制短片1.将相机模式设置为2.构图。
3.按下快门键。
回放短片您可回放录制在相机上的短片。
1.将相机模式设置为 [x]。
屏幕上将显示最后一张影像。
2.使用e / f键选择要回放的短片。
3.按下SCN/SET键。
播放的过程中按下f / e键可快进/倒退。
如要停止回放短片,按下d键。
将停止回放并返回至短片的开始部分。
如要暂停回放短片,按下SCN/SET键。
将暂停短片回放。
要取消暂停,再次按下SCN/SET键。
回放模式回放静态图像您可在液晶屏幕上回放静态图像。
富士FUJIFILM FINPIX F480_J50数码相机digital camera user manual说明书

r 拍摄电影........................................................ 72 将相机设为 r 电影模式............................. 72 拍摄电影..................................................... 73
高级功能 — 回放
使用 [ 回放菜单 ] ................................................. 60 设置 [ 回放菜单 ] ......................................... 60
[ 回放菜单 ] ......................................................... 61 设置自动回放 ([ 幻灯片式播放 ])......... 61 DPOF 设置画面 ([ 打印预约 (DPOF)])........................ 61 保护图像 ([ 保护 ])............................... 65 复制图像 ([ 复制 ])............................... 66 旋转图像 ([ 图像旋转 ])........................ 69 裁剪图像 ([ 裁剪 ])............................... 70
Z 标志的含义 10 图形含义:此标识是适用于在中国境内销售的电子信息产品的环保使用期限。 此产品使用者只要遵守安全和使用上的注意事项,从生产之日起的十年期间不会对环境污染,也不会对人身和财产造成 重大影响。此年限是根据安全使用期限的相关法律得出的。
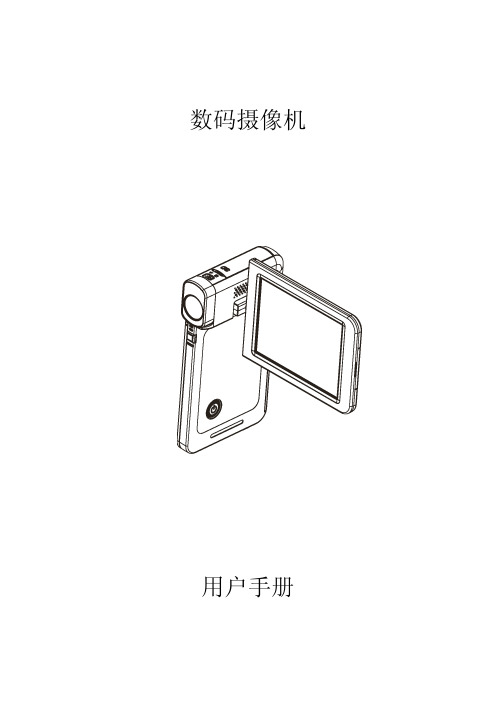
数码摄像机 说明书

MP4 播放器、录音和录音播放功能,自带 FLASH 存储器,支持 SD/MMC 卡. 拍照、摄像操作快捷、方便。本机既可以使用锂电池,也可以使用四节干 电池供电,使用更方便,LCD 屏可以实现 270 度旋转,图像角度自动调整,想 怎样拍就怎样拍. 1.1 系统需求 z 系统:Windows Vista/XP/2000/98 z CPU: Intel Pentium 4 2.8 GHz 处理器或以上 z 内存: 512MB 及以上 z 显卡:64MB 以上 z 接口:标准或 USB 1.1 以上 1.2 特点 .本相机提供多样的特点与功能,包括: .高画质数字摄影 .数码相机(可插值到 1 千 2 百万像素) .4 倍数码变焦,USB 移动磁盘,及 SD 卡存储. .电视输出显示 .即拍即看,多角度拍摄 1.3 包装和配件: 摄像机
按 键选择照片,按确认键浏览照片,按
键放大和缩
小浏览照片;图片放大后按确认键确认,然后按
键
来观看图片的各个角落,按菜单键返回正常浏览状态。
播放录像:开机后按模式键进入影音播放模式(即相片模式),
按
键选择录像文件,按确认键播放文件,再按
键调整音量,长按 键快退或快进`,再按确认键暂
停。
播放录音:开机后按模式键进入影音播放模式(即相片模式),
2.1 插入 SD 卡 1) 开启电池盖
2) 插入 SD 卡,确定金属接触面朝上.
3) 将电池盖向内推关紧
. 2.2 装入电池 本摄像机是针对使用可充电的锂电池而设计.请使用制造商或经销商提
供或建议使用的电池. (注:装入电池的方法错误可能导致本相机损坏并造成起火!)
1)打开电池盖.
2)按正确的极性放入电池.(电池的极性参照电池门上的标识)
数码摄像机digital video camera user manual说明书
用户手册
1
SC
目录
第1节 了解本机............................................... 2 第2节 入门................................................... 5 第3节 享受录制模式........................................... 7 第4节 享受播放模式.......................................... 18 第5节 设置你的数码摄像机.................................... 23 第6节 在TV上观看相片和影片.................................. 27 第7节 在PC上观看相片和影片.................................. 28 第8节 将录制的剪辑刻录到DVD................................. 29 第9节 上传视频到互联网...................................... 32 第10节 视频格式转换.......................................... 35 第11节 规格与系统要求........................................ 37 第12节 故障排除.............................................. 39
2. 再按一次,屏幕上出现灯光图像(
)。 照明灯将被打开并保持提供光源。
3. 按下“录制”键开始录制或者照相。
4. 再按一次左按钮,灯光消失。
数码相机说明书

1 2
2
DMW-BCG10GK
DE-A66B
3
4
3 4 5
K2CA2YY00130
K1HY08YY0017
5
6
6 7
• 使用说明书 腕带 触摸笔 原产地 : 日本
VF• 在本文中, SD 记忆卡、 SDHC 记忆
卡和 SDXC 记忆卡统称为记忆卡。
(SCH) VQT3U42
3
∫ 使用时的注意事项 (DMW-AVC1; 可选件) 。 • 请始终使用正品的 Panasonic AV 电缆 • 请始终使用正品的 Panasonic HDMI mini 电缆 (RP-CDHM15、
RP-CDHM30 ;可选件) 。 部件号 : RP-CDHM15 (1.5 m)、 RP-CDHM30 (3.0 m) • 请勿使用其他任何电缆, 只使用随机提供的 USB 连接电缆。
以免因过热而造 闭的空间里。请勿让窗帘或任何其他物体堵塞通风孔, 成触电或火灾的危险。 • 请勿让报纸、 桌布、 窗帘等类似物品堵塞住本机的通风孔。 • 请勿将诸如点燃的蜡烛等明火火源置于本机上。 • 处理废弃电池时请尽量采取不破坏环境的方式。 电池充电器处于待机状态。只要电源线和电源插座相 • 连接了 AC 电源线时, 连, 原电路就会始终 “带电” 。
8 VQT3U42 (SCH)
标准附件
在使用相机之前, 请确认包装内是否提供了以下所有附件。 产品号码以 2011 年 10 月时的为准。 此后可能会有变更。 1 电池组 (在本文中, 称为电池组或电池) 请在使用前给电池充电。 电池充电器 (在本文中, 称为电池充电器 或充电器) AC 电缆 USB 连接电缆 CD-ROM • 软件 :
佳能数码单反相机说明书

* The dimensions will not attain a perfect aspect ratio.
Approx. 3.72 µm square
3:2 (Horizontal: Vertical)
RGB primary color filters
Installed in front of the image sensor, non-detachable
(1) Dust Delete Data acquisition and appending • The coordinates of the dust adhering to the low-pass filter are detected by a test shot and appended to subsequent images. • The dust coordinate data appended to the image is used by the EOS software to automatically erase the dust spots.
(3) Manual reset • Resets the file number to 0001, and creates a new folder automatically.
sRGB/Adobe RGB
2
Picture Style
White Balance
Settings