简单解释一下android 中layout_gravity和gravity_华清远见
Android组件---四大布局的属性详解
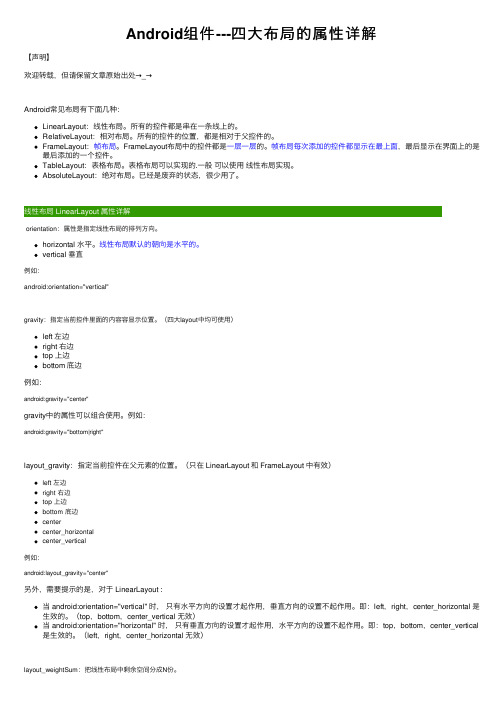
Android组件---四⼤布局的属性详解【声明】欢迎转载,但请保留⽂章原始出处→_→Android常见布局有下⾯⼏种:LinearLayout:线性布局。
所有的控件都是串在⼀条线上的。
RelativeLayout:相对布局。
所有的控件的位置,都是相对于⽗控件的。
FrameLayout:帧布局。
FrameLayout布局中的控件都是⼀层⼀层的。
帧布局每次添加的控件都显⽰在最上⾯,最后显⽰在界⾯上的是最后添加的⼀个控件。
TableLayout:表格布局。
表格布局可以实现的.⼀般可以使⽤线性布局实现。
AbsoluteLayout:绝对布局。
已经是废弃的状态,很少⽤了。
orientation:属性是指定线性布局的排列⽅向。
horizontal ⽔平。
线性布局默认的朝向是⽔平的。
vertical 垂直例如:android:orientation="vertical"gravity:指定当前控件⾥⾯的内容容显⽰位置。
(四⼤layout中均可使⽤)left 左边right 右边top 上边bottom 底边例如:android:gravity="center"gravity中的属性可以组合使⽤。
例如:android:gravity="bottom|right"layout_gravity:指定当前控件在⽗元素的位置。
(只在 LinearLayout 和 FrameLayout 中有效)left 左边right 右边top 上边bottom 底边centercenter_horizontalcenter_vertical例如:android:layout_gravity="center"另外,需要提⽰的是,对于 LinearLayout :当 android:orientation="vertical" 时,只有⽔平⽅向的设置才起作⽤,垂直⽅向的设置不起作⽤。
Android Tips---Android平台常见属性集合
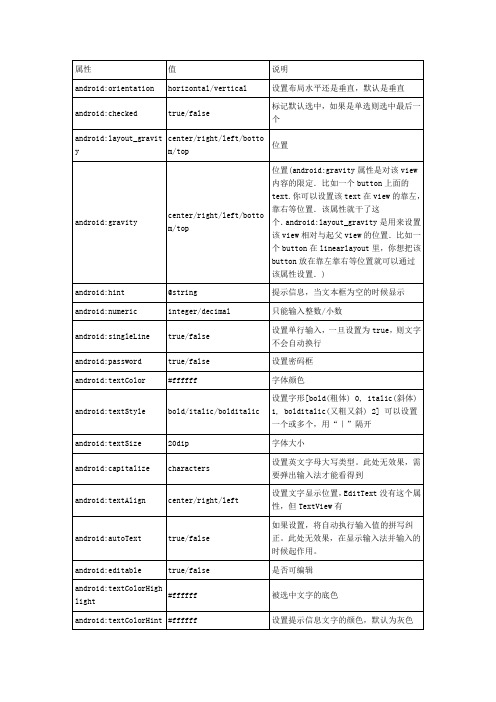
android:phoneNumber
true/false
设置为电话号码的输入方式。
android:privateImeOptions
提供额外的输入法选项(字符串格式)。
android:scrollHorizontally
true/false
设置文本超出TextView的宽度的情况下,是否出现横拉条。
android:fadingEdgeLength
设置边框渐变的长度。
android:linksClickable
设置链接是否点击连接,即使设置了autoLink
android:maxLines
设置文本的最大显示行数,与width或者layout_width结合使用,超出部分自动换行,超出行数将不显示
android:minLines
设置文本的最小行数
android:lineSpacingExtra
android:longClickable
true/false
view是否可以对长时间的click事件作出反应。
android:focusable
view是否能响应焦点事件
android:cacheColorHint
#00000000
滚动时,列表里面的view重绘时,用的依旧是系统默认的透明色,颜色值为#FF191919,要改变这种情况,只需要调用listView的setCacheColorHint(0),颜色值设置为0或者xml文件中listView的属性Android:cacheColorHint="#00000000"即可,滚动时,重绘View的时候就不会有背景颜色。
android:cursorVisible
true/false
framelayout参数

4. android:foreground :设置前景视图,在 FrameLayout 上显 示在所有子视图之上的额外视图。可以用来实现点击效果、按 下效果等。
5. android:background :设置背景颜色或背景图像。
这只是 FrameLayout 的一些常用参数,还有其他一些参数也可 以根据需要进行设置。请注意,参数的具体使用方式可能会与你的布 局需求和项目设置相关。
framelayout 参数
FrameLayout 是 AndreLayout 常用的一些参数:
1. android:layout_width :设置 FrameLayout 的宽度,可以使 用 具 体 的 像 素 值 ( 如 100dp ) 或 者 布 局 参 数 (如 match_parent 、 wrap_content )。
2. android:layout_height :设置 FrameLayout 的高度,可以使 用具体的像素值或者布局参数。
3. android:layout_gravity :设置 FrameLayout 内部视图的对 齐方式。可以使用的值有 top 、 bottom 、 left 、 right 、 center 等,可以单独使用或者结合使用(如 left|top )。
android layout_gravity 和 android gravity 的区别
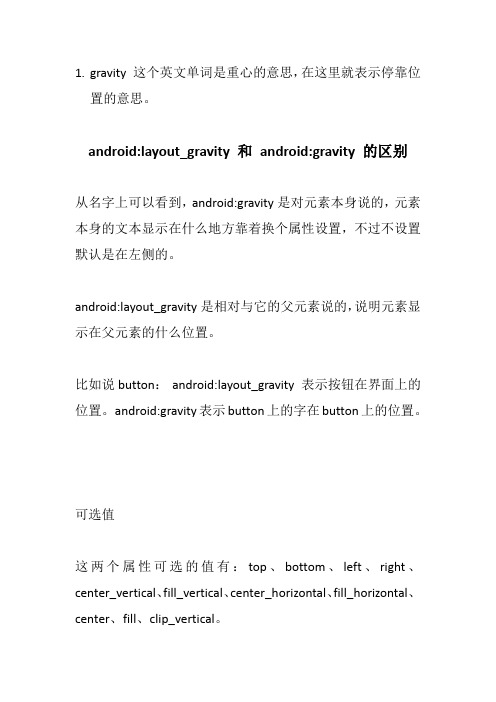
1.gravity 这个英文单词是重心的意思,在这里就表示停靠位置的意思。
android:layout_gravity 和android:gravity 的区别从名字上可以看到,android:gravity是对元素本身说的,元素本身的文本显示在什么地方靠着换个属性设置,不过不设置默认是在左侧的。
android:layout_gravity是相对与它的父元素说的,说明元素显示在父元素的什么位置。
比如说button:android:layout_gravity 表示按钮在界面上的位置。
android:gravity表示button上的字在button上的位置。
可选值这两个属性可选的值有:top、bottom、left、right、center_vertical、fill_vertical、center_horizontal、fill_horizontal、center、fill、clip_vertical。
而且这些属性是可以多选的,用“|”分开。
默认这个的值是:Gravity.LEFT对这些属性的描述:出自:/guide/topics/resources/drawable-res ource.html/reference/android/graphics/drawable /ClipDrawable.htmlValue Descriptiontop Put the object at the top of its container, not changing its size.将对象放在其容器的顶部,不改变其大小.bottom Put the object at the bottom of its container, not changing its size.将对象放在其容器的底部,不改变其大小.left Put the object at the left edge of its container, not changing its size.将对象放在其容器的左侧,不改变其大小.right Put the object at the right edge of its container, not changing its size.将对象放在其容器的右侧,不改变其大小.center_vertical Place object in the vertical center of its container, not changing its size.将对象纵向居中,不改变其大小.垂直对齐方式:垂直方向上居中对齐。
安卓期末考试知识总结
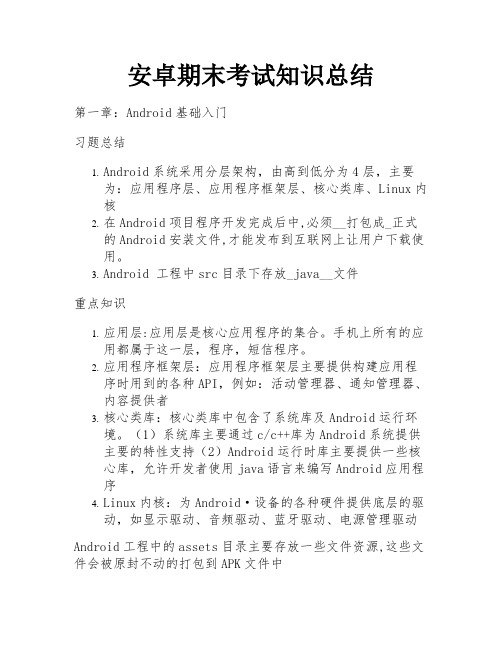
安卓期末考试知识总结第一章:Android基础入门习题总结1.Android系统采用分层架构,由高到低分为4层,主要为:应用程序层、应用程序框架层、核心类库、Linux内核2.在Android项目程序开发完成后中,必须__打包成_正式的Android安装文件,才能发布到互联网上让用户下载使用。
3.Android 工程中src目录下存放_java__文件重点知识1.应用层:应用层是核心应用程序的集合。
手机上所有的应用都属于这一层,程序,短信程序。
2.应用程序框架层:应用程序框架层主要提供构建应用程序时用到的各种API,例如:活动管理器、通知管理器、内容提供者3.核心类库:核心类库中包含了系统库及Android运行环境。
(1)系统库主要通过c/c++库为Android系统提供主要的特性支持(2)Android运行时库主要提供一些核心库,允许开发者使用java语言来编写Android应用程序4.Linux内核:为Android·设备的各种硬件提供底层的驱动,如显示驱动、音频驱动、蓝牙驱动、电源管理驱动Android工程中的assets目录主要存放一些文件资源,这些文件会被原封不动的打包到APK文件中更为细分的5层架构:应用程序层、应用程序框架层、核心类库、硬件抽象层 (HAL)、Linux内核硬件抽象层 (HAL) 提供标准界面,向更高级别的 Java API 框架显示设备硬件功能。
HAL 包含多个库模块,其中每个模块都为特定类型的硬件组件实现一个界面,例如相机或蓝牙模块。
当框架 API 要求访问设备硬件时,Android 系统将为该硬件组件加载库模块。
第二章:Android常见桌面布局&第三章:Android常见界面控件知识总结1.Android应用的界面是由View 对象和 ViewGroup 对象构建而成的。
ViewGroup继承自View,ViewGroup作为容器盛装界面中的其他控件Android应用的每个界面的根元素必须有且只有一个ViewGroup容器Android常见布局和特点:Android中常见的五种布局:相对布局(RelativeLayout)、线性布局(LinearLayout)、表格布局(TableLayout)、帧布局(FrameLayout)、约束布局(ConstraintLayout)1.相对布局(RelativeLayout):相对布局是一种基于相对位置的布局方式,可以通过设置组件相对于其他组件或父容器的位置来实现布局。
android中线性布局linearlayout的使用场合及简要介绍标准版文档
如果垂直排列,则每行仅包含一个界面元素 如果水平排列,则每列仅包含一个界面元素 属性android:orientation
• horizontal • vertical
3
即使组件超出屏幕,也不会自动换行
五种常见布局的使用场合及简要介绍 | 动态创建LinearLayout
4
动态创建线性布局
在将每一个View加入到这个Layout里边的时候,会传传递一组值,这组值封装在LayoutParams这个类当 中。在显示这个View的时候,它的容器会根据传进来的LayoutParams进行计算,来确认这个View显示的 大小和位置
五种常见布局的使用场合及简要介绍 | LinearLayout的layout_gravity属性
6
layout_gravity属性
相对于包含该元素的父元素来说的,设置该元素在父元素的什么位置
android:gravity:是对view控件本身来说的,是用来设置view本身的内容应该显示在view的什么 位置,默认值是左侧 。 android:layout_gravity:是相对于包含该元素的父元素来说的,设置该元素在父元素的什么位置
五种常见布局的使用场合及简要介绍 | LinearLayout的属性gravity
android:gravity:是对view控件本身来说的,是用来设置view本身的内容应该显示在view的什么位置,默认值是左侧 。
LayoutParams params = new LinearLayout.
可以同时指定多种对齐方式,如left|center_vertical表示出 现在屏幕左边,并且垂直居中
• layout_width - 宽 • layout_height - 高
Android开发自学笔记(AndroidStudio)—4.1布局组件
Android开发⾃学笔记(AndroidStudio)—4.1布局组件⼀、引⾔Android的界⾯是有布局和组件协同完成的,布局好⽐是建筑⾥的框架,⽽组件则相当于建筑⾥的砖⽡。
组件按照布局的要求依次排列,就组成了⽤户所看见的界⾯。
在Android4.0之前,我们通常说Android开发五⼤布局和四⼤组件,这五⼤布局就是:1. LinearLayout 线性布局2. FrameLayout 单帧布局,也有中⽂翻译为帧布局、框架布局。
3. RelativeLayout 相对布局4. AbsoluteLayout 绝对布局5. TableLayout 表格布局⽽在Android4.0之后⼜新增了⼀种GridLayout⽹格布局。
⼆、LinearLayout线性布局线性布局是Android开发中最常见的⼀种布局⽅式,它是按照垂直或者⽔平⽅向来布局,通过“android:orientation”属性可以设置线性布局的⽅向。
属性值有垂直(vertical)和⽔平(horizontal)两种。
线性布局的排列在某⾏或者某列并不会⾃动换⾏或换列,就是说如果采⽤⽔平布局,控件宽度超过屏幕显⽰的话,后⾯的控件都将被隐藏,不会⾃动换⾏。
常⽤的属性有:1. android:orientation:可以设置布局的⽅向2. android:id - 为控件指定相应的ID3. android:text - 指定控件当中显⽰的⽂字,需要注意的是,这⾥尽量使⽤string.xml4. android:gravity - 指定控件的基本位置,⽐如说居中,居右等位置5. android:textSize - 指定控件当中字体的⼤⼩6. android:background - 指定控件所⽤的背景⾊,RGB命名法7. android:layout_width - 指定控件的宽度8. android:layout_height - 指定控件的⾼度9. android:layout_weight - 指定控件的占⽤⽐例10. android:padding - 指定控件的内边距,也就是说控件当中的内容11. android:sigleLine - 如果设置为真的话,则将控件的内容显⽰在⼀⾏当中layout_weight属性以控制各个控件在布局中的相对⼤⼩。
AndroidGridLayout使用案例详解

AndroidGridLayout使⽤案例详解⽬录⼀、简介⼆、常⽤属性介绍三、平分问题四、⼩⽶计算器效果五、动态加载⼀、简介GridLayout是Android4.0引⼊的⽹格布局,使⽤它可以减少布局嵌套。
也算是常⽤,但⼀直没仔细看过,今天研究⼀下⼆、常⽤属性介绍GridLayout 使⽤属性属性作⽤android:columnCount最⼤列数android:rowCount最⼤⾏数android:orientation GridLayout中⼦元素的布局⽅向android:alignmentMode alignBounds:对齐⼦视图边界 alignMargins :对齐⼦视距内容,默认值android:columnOrderPreserved使列边界显⽰的顺序和列索引的顺序相同,默认是trueandroid:rowOrderPreserved使⾏边界显⽰的顺序和⾏索引的顺序相同,默认是trueandroid:useDefaultMargins没有指定视图的布局参数时使⽤默认的边距,默认值是falseitem属性属性作⽤android:layout_column指定该单元格在第⼏列显⽰android:layout_row指定该单元格在第⼏⾏显⽰android:layout_columnSpan指定该单元格占据的列数android:layout_rowSpan指定该单元格占据的⾏数android:layout_gravity指定该单元格在容器中的位置android:layout_columnWeight(API21加⼊)列权重android:layout_rowWeight(API21加⼊)⾏权重android:layout_gravity作⽤center不改变元素的⼤⼩,仅居中center_horizontal不改变⼤⼩,⽔平居中center_vertical不改变⼤⼩,垂直居中top不改变⼤⼩,置于顶部left不改变⼤⼩,置于左边bottom不改变⼤⼩,置于底部right不改变⼤⼩,置于右边start不改变⼤⼩,根据系统语⾔,置于开始位置end不改变⼤⼩,置于结尾fill拉伸元素控件,填满其应该所占的格⼦fill_vertical仅垂直⽅向上拉伸填充fill_horizontal仅⽔平⽅向上拉伸填充clip_vertical垂直⽅向上裁剪元素,仅当元素⼤⼩超过格⼦的空间时clip_horizontal⽔平⽅向上裁剪元素,仅当元素⼤⼩超过格⼦的空间时注意使⽤layout_columnSpan 、layout_rowSpan时要加上layout_gravity属性,否则没有效果;另外item在边缘时宽⾼计算会出现错误,需要我们⼿动设置宽⾼,否则达不到想要的效果三、平分问题GridLayout在API21时引⼊了android:layout_columnWeight和android:layout_rowWeight来解决平分问题那么在API21以前的,想要平分的话:引⽤兼容包compile 'com.android.support:gridlayout-v7:25.+'注意:1. 使⽤该控件,命名空间使⽤app2. 单独设置app:layout_columnWeight时,这⼀列的所有item都设置为这个属性,才能达到预期效果,否则这⼀列中设置了该属性的item,都会被隐藏,显⽰不出来3. 单独设置app:layout_rowWeight时,没有问题四、⼩⽶计算器效果<?xml version="1.0" encoding="utf-8"?><android.support.v7.widget.GridLayoutxmlns:android="/apk/res/android"xmlns:app="/apk/res-auto"xmlns:tools="/tools"android:id="@+id/grid_layout"android:layout_width="match_parent"android:layout_height="match_parent"android:background="#ece7e7"app:alignmentMode="alignBounds"app:columnCount="4"app:orientation="horizontal"app:rowCount="5"app:useDefaultMargins="false"tools:context="com.strivestay.gridlayoutdemo.MainActivity"><!-- 如果不使⽤ app:layout_gravity="fill",则实际下⾯这个textview的宽度只是wrap_content,实现不了想要的right|bottom效果;或者,⽤app:layout_columnWeight="1",效果等同,填充满--><TextViewandroid:gravity="right|bottom"android:text="0"app:layout_columnSpan="4"app:layout_rowWeight="3"app:layout_columnWeight="1"/><TextViewandroid:layout_margin="1dp"android:background="#ffffff"android:gravity="center"android:text="AC"android:textColor="#f68904"app:layout_columnWeight="1"app:layout_rowWeight="1"/><TextViewandroid:layout_margin="1dp"android:background="#ffffff"android:gravity="center"android:text="退格"app:layout_columnWeight="1"app:layout_rowWeight="1"/><TextViewandroid:layout_margin="1dp"android:background="#ffffff"android:gravity="center"android:text="/"app:layout_rowWeight="1"/> <TextViewandroid:layout_margin="1dp" android:background="#ffffff" android:gravity="center"android:text="*"app:layout_columnWeight="1" app:layout_rowWeight="1"/> <TextViewandroid:layout_margin="1dp" android:background="#ffffff" android:gravity="center"android:text="7"app:layout_columnWeight="1" app:layout_rowWeight="1"/> <TextViewandroid:layout_margin="1dp" android:background="#ffffff" android:gravity="center"android:text="8"app:layout_columnWeight="1" app:layout_rowWeight="1"/> <TextViewandroid:layout_margin="1dp" android:background="#ffffff" android:gravity="center"android:text="9"app:layout_columnWeight="1" app:layout_rowWeight="1"/> <TextViewandroid:layout_margin="1dp" android:background="#ffffff" android:gravity="center"android:text="—"app:layout_columnWeight="1" app:layout_rowWeight="1"/> <TextViewandroid:layout_margin="1dp" android:background="#ffffff" android:gravity="center"android:text="4"app:layout_columnWeight="1" app:layout_rowWeight="1"/> <TextViewandroid:layout_margin="1dp" android:background="#ffffff" android:gravity="center"android:text="5"app:layout_columnWeight="1" app:layout_rowWeight="1"/> <TextViewandroid:layout_margin="1dp" android:background="#ffffff" android:gravity="center"android:text="6"app:layout_columnWeight="1" app:layout_rowWeight="1"/> <TextViewandroid:layout_margin="1dp" android:background="#ffffff" android:gravity="center"android:text="+"app:layout_columnWeight="1" app:layout_rowWeight="1"/> <TextViewandroid:background="#ffffff"android:gravity="center"android:text="1"app:layout_columnWeight="1"app:layout_rowWeight="1"/><TextViewandroid:layout_margin="1dp"android:background="#ffffff"android:gravity="center"android:text="2"app:layout_columnWeight="1"app:layout_rowWeight="1"/><TextViewandroid:layout_margin="1dp"android:background="#ffffff"android:gravity="center"android:text="3"app:layout_columnWeight="1"app:layout_rowWeight="1"/><TextViewandroid:layout_margin="1dp"android:background="#f68904"android:gravity="center"android:text="="android:textColor="#ffffff"app:layout_columnWeight="1"app:layout_rowSpan="2"app:layout_rowWeight="1"/><TextViewandroid:layout_margin="1dp"android:background="#ffffff"android:gravity="center"android:text="%"app:layout_columnWeight="1"app:layout_rowWeight="1"/><TextViewandroid:layout_margin="1dp"android:background="#ffffff"android:gravity="center"android:text="0"app:layout_columnWeight="1"app:layout_rowWeight="1"/><TextViewandroid:layout_margin="1dp"android:background="#ffffff"android:gravity="center"android:text="."app:layout_columnWeight="1"app:layout_rowWeight="1"/></android.support.v7.widget.GridLayout>效果: 4.4.4模拟器五、动态加载1.xml引⽤GridLayout<?xml version="1.0" encoding="utf-8"?><android.support.v7.widget.GridLayoutxmlns:android="/apk/res/android" xmlns:app="/apk/res-auto"xmlns:tools="/tools"android:id="@+id/grid_layout"android:layout_width="match_parent"android:layout_height="match_parent"android:background="#ece7e7"app:orientation="horizontal"app:useDefaultMargins="false"app:alignmentMode="alignBounds"tools:context="com.strivestay.gridlayoutdemo.MainActivity"> </android.support.v7.widget.GridLayout>2.动态添加package com.strivestay.gridlayoutdemo;import android.graphics.Color;import android.os.Bundle;import android.support.v7.app.AppCompatActivity;import android.support.v7.widget.GridLayout;import android.view.Gravity;import android.widget.TextView;/*** GridLayout⽰例* @author StriveStay* @date 2018/3/27*/public class MainActivity extends AppCompatActivity {private String[] mStrings = {"0","AC","退格","/","*","7","8","9","—","4","5","6","+","1","2","3","=","%","0","."}; @Overrideprotected void onCreate(Bundle savedInstanceState) {super.onCreate(savedInstanceState);// xml布局// setContentView(yout.activity_main);// 动态添加setContentView(yout.activity_main2);GridLayout gridLayout = (GridLayout) findViewById(R.id.grid_layout);// 6⾏ 4列gridLayout.setColumnCount(4);gridLayout.setRowCount(6);for (int i = 0; i < mStrings.length; i++) {TextView textView = new TextView(this);youtParams params = new youtParams();params.width =0;params.height =0;if(i == 0){// 设置⾏列下标,所占⾏列,⽐重// 对应: layout_row , layout_rowSpan , layout_rowWeight// 如下代表: item坐标(0,0),占 1 ⾏,⽐重为 3 ;占 4 列,⽐重为 1params.rowSpec = GridLayout.spec(0,1,3f);params.columnSpec = GridLayout.spec(0,4,1f);textView.setGravity(Gravity.BOTTOM|Gravity.RIGHT);}else{// 设置⾏列下标,和⽐重params.rowSpec = GridLayout.spec((i+3)/4,1f);params.columnSpec = GridLayout.spec((i+3)%4,1f);// 背景textView.setBackgroundColor(Color.WHITE);// 字体颜⾊if("AC".equals(mStrings[i])){textView.setTextColor(Color.parseColor("#f68904"));}if("=".equals(mStrings[i])){textView.setBackgroundColor(Color.parseColor("#f68904"));textView.setTextColor(Color.WHITE);params.rowSpec = GridLayout.spec((i+3)/4,2,1f);}// 居中显⽰textView.setGravity(Gravity.CENTER);// 设置边距params.setMargins(2,2,2,2);}// 设置⽂字textView.setText(mStrings[i]);// 添加itemgridLayout.addView(textView,params);}}}效果和⽤xml中直接布局⼀样:注意:GridLayout.spec(); 这个⽅法是⼀个重点,需要好好看⼀下,⽽且由于它有⼏个重载⽅法,使⽤时也要注意。
- 1、下载文档前请自行甄别文档内容的完整性,平台不提供额外的编辑、内容补充、找答案等附加服务。
- 2、"仅部分预览"的文档,不可在线预览部分如存在完整性等问题,可反馈申请退款(可完整预览的文档不适用该条件!)。
- 3、如文档侵犯您的权益,请联系客服反馈,我们会尽快为您处理(人工客服工作时间:9:00-18:30)。
简单解释一下android 中layout_gravity和gravity
本篇文章的目的就是为大家简单解释android 中layout_gravity和gravity,希望看完对大家有帮助。
相信很多学习了android的人,都知道布局中存在两个很相似的属性:android :layout_gravity和android:gravity。
一般的都知道,
android :layout_gravity 是表示该组件在父控件中的位置
android:gravity 是表示该组件的子组件在自身中的位置
例子:
<LinearLayout xmlns:android="/apk/res/android" Xmlns:tools="/tools"
android:layout_width="match_parent"
android:layout_height="match_parent"
android:orientation="vertical"
>
<Text View
android:layout_width="200dp"
android:layout_height="wrap_content"
android:text="我在右边显示"
android:layout_gravity="right"
android:background="#00ff00"
/>
</LinearLayout>
如上的代码显示效果如下:
经管很明了,但是某些时候也会出现失效的情况,如下:
<LinearLayout xmlns:android="/apk/res/android" Xmlns:tools="/tools"
android:layout_width="match_parent"
android:layout_height="match_parent"
>
<Text View
android:layout_width="200dp"
android:layout_height="wrap_content"
android:text="我在右边显示"
android:layout_gravity="right"
android:background="#00ff00"
/>
</LinearLayout>
如上代码效果如下:
Why?
第二段代码和第一段代码唯一的区别,线性布局中
android:orientation="vertical"属性不存在,使用的是默认水平方向。
也说明当最为父布局的LinearLayout是android:orientation="vertical"的时候,
android:layout_gravity="right"才会生效。
我们在定义一个控件默认的位置是在屏幕左上方,线性布局是存在两个方向的,既然当水平方向为垂直的时候是,android:layout_gravity="right"才会生效。
那么当水平方向为默认的水平方向的时候,会不会对其他的属性有影响呢?答案是肯定的。
既然左右为一对的话,那么上下似乎应该为一对。
经过测试当LinearLayout是android:orientation="horizontal"的时候,android:layout_gravity="bottom"才会生效。
不再一一验证其他属性,做一个简单的总结如下:
当作为父layout的LinearLayout的属性为androidrientation="vertical" 的时候,android:layout_gravity="?"这里设为横向的时候才能生效。
比如:left,right,center_horizontal等
当作为父layout的LinearLayout的属性为androidrientation="horizental" 的时候,android:layout_gravity="?"这里设为纵向的时候才能生效。
比如:top,bottom,center_vertical等;
以上内容就是简单解释了android 中layout_gravity和gravity,更多精彩内容可以在华清远见官网获取,华清远见提供免费的学习资料供大家参考。
