NET新手指南:轻松自定义DataGridView控件
.NET4.0 使用GridView控件
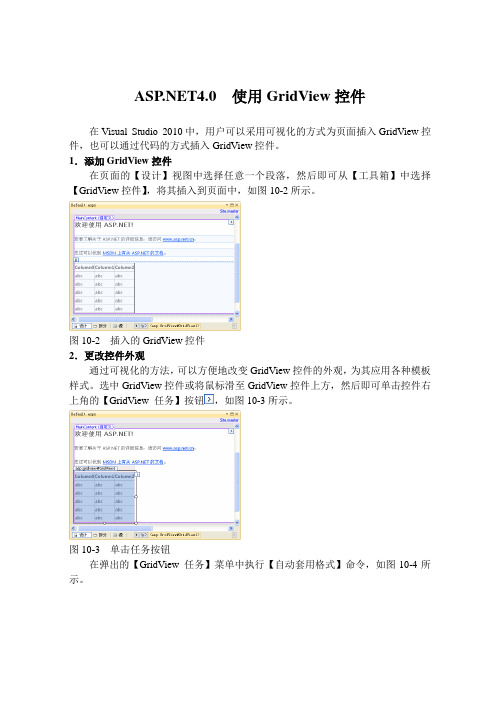
4.0 使用GridView控件在Visual Studio 2010中,用户可以采用可视化的方式为页面插入GridView控件,也可以通过代码的方式插入GridView控件。
1.添加GridView控件在页面的【设计】视图中选择任意一个段落,然后即可从【工具箱】中选择【GridView控件】,将其插入到页面中,如图10-2所示。
图10-2 插入的GridView控件2.更改控件外观通过可视化的方法,可以方便地改变GridView控件的外观,为其应用各种模板样式。
选中GridView控件或将鼠标滑至GridView控件上方,然后即可单击控件右上角的【GridView 任务】按钮,如图10-3所示。
图10-3 单击任务按钮在弹出的【GridView 任务】菜单中执行【自动套用格式】命令,如图10-4所示。
图10-4 执行【自动套用格式】命令然后,即可在弹出的【自动套用格式】对话框中选择GridView控件的格式架构,如图10-5所示。
图10-5 选择套用的格式3.添加数据源数据绑定控件的最大特点就是允许方便地与数据库中的数据进行绑定,快速显示数据内容。
用同样的方式选择GridView控件,单击其右上角的【GridView 任务】按钮,打开【GridView 任务】菜单。
如果当前的项目已绑定了数据源,则在该菜单中【选择数据源】的菜单中即可显示这些数据源。
否则,开发者可以在【选择数据源】的菜单中选择“<新建数据源>”选项,连接一个新的数据源,如图10-6所示。
图10-6 新建数据源在弹出的【数据源配置向导】对话框中选择对应的数据源类型,然后即可设置数据源的编号索引,单击【确定】按钮,如图10-7所示。
图10-7 选择数据源在弹出的【配置数据源】对话框中单击【新建连接】按钮,建立一个新的数据源连接,如图10-8所示。
图10-8 新建数据源连接在弹出的【添加连接】对话框中,输入数据库服务器的名称,并选择服务器安全的验证方式,如图10-9所示。
NET中DataGridView数据绑定方法详解
NET中DataGridView数据绑定方法详解
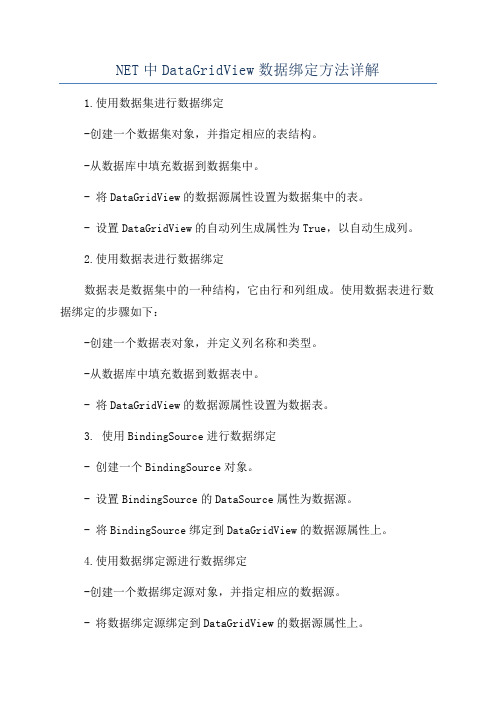
1.使用数据集进行数据绑定
-创建一个数据集对象,并指定相应的表结构。
-从数据库中填充数据到数据集中。
- 将DataGridView的数据源属性设置为数据集中的表。
- 设置DataGridView的自动列生成属性为True,以自动生成列。
2.使用数据表进行数据绑定
数据表是数据集中的一种结构,它由行和列组成。
使用数据表进行数据绑定的步骤如下:
-创建一个数据表对象,并定义列名称和类型。
-从数据库中填充数据到数据表中。
- 将DataGridView的数据源属性设置为数据表。
3. 使用BindingSource进行数据绑定
- 创建一个BindingSource对象。
- 设置BindingSource的DataSource属性为数据源。
- 将BindingSource绑定到DataGridView的数据源属性上。
4.使用数据绑定源进行数据绑定
-创建一个数据绑定源对象,并指定相应的数据源。
- 将数据绑定源绑定到DataGridView的数据源属性上。
5.自定义数据绑定
如果以上方法无法满足需求,还可以使用自定义数据绑定方法。
自定义数据绑定通常涉及以下几个方面:
- 创建一个数据源类,实现数据源接口,如IList、IBindingList或ICollectionView。
- 创建一个继承自DataGridView的自定义控件。
.NET4.0 通过代码添加控件

4.0 通过代码添加控件
GridView类是所有GridView控件的抽象,其可以用于创建GridView控件,也可以通过该类的字段和属性对GridView控件进行预定义,或通过该类的方法对控件进行操作。
之前介绍的使用代码创建GridView控件,事实上就是实例化了一个GridView类的对象。
1.在窗体页中添加代码
先在窗体中,添加GridView控件。
然后,在控件中,添加数据表字段内容。
同
2.构造GridView对象
双击Default.aspx.cs文件,并在代码中构造一个GridView控件对象,使用
3.添加GridView事件
用户除了在代码文件中,添加GridView控件对象以外,还可以添加一些对数据进行的操作事件。
例如,编辑数据、删除数据、选择数据记录等,正如在Default.aspx 窗体页中所添加的一些操作内容。
下面来看一下,Default.aspx.cs代码文件中,所有代码内容,并了解窗体页与代
通过GridView控件添加数据内容,可以在窗体页中显示数据表内容。
并且,用户还可以操作窗体页中的表格内容,以达到修改数据库中数据信息。
例如,单击工具栏中的【启动调试】按钮,即可在IE浏览器中显示数据库中数据表的数据信息,如图10-17所示。
图10-17 显示数据表内容
然后,用户可以单击第一条记录后面的【删除】链接,并弹出的“确定要删除吗?”信息,并单击【确定】按钮。
删除成功后,将提示“删除成功!”信息,否则提示“删除失败!”信息,如图10-18所示。
图10-18 删除记录。
课件:9-2 知识准备 - 9-2-9 GridView控件高级应用[4页]
![课件:9-2 知识准备 - 9-2-9 GridView控件高级应用[4页]](https://img.taocdn.com/s3/m/4a7a5f020975f46526d3e1db.png)
9.2.9 GridView控件高级应用GridView控件应用概述GridView控件在实际项目开发中应用很广,在上一章中我们已学习了GridView控件的初步使用方法,在这一节中我们进一步学习GridView控件的使用。
内容包括:•GridView以表格的形式显示数据•GridView控件的多个事件处理方法9.2.9 GridView控件高级应用GridView控件应用1、GridView以表格的形式显示数据(1)表格中的行与单元格GridViewRow类代表表格中的行,其RowType属性指定了行的类型,其值为DataControlRowType值之一。
RowType属性具体值见表。
行类型说明DataRow GridView控件中的一个数据行。
Footer GridView控件中的脚注行。
Header GridView控件中的表头行。
EmptyDataRow GridView控件中的空行。
当GridView控件中没有要显示的任何记录时,将显示空行。
Pager GridView控件中的一个页导航行。
Separator GridView控件中的一个分隔符行。
9.2.9 GridView控件高级应用GridView控件应用1、GridView以表格的形式显示数据(2)表格中的列GridView控件可以显示多种类型的表格列,具体如表所示:列字段类型说明BoundField以文本形式显示数据源中某个字段的值。
ButtonField 显示数据绑定控件中的命令按钮。
根据控件的不同,这允许您显示带有自定义按钮控件的行或列,如“添加”或“移除”按钮。
CheckBoxField 显示数据绑定控件中的复选框。
此数据控件字段类型通常用于显示带有布尔值的字段。
CommandField显示数据绑定控件中要执行编辑、插入或删除操作的内置命令按钮。
HyperLinkField将数据源中某个字段的值显示为超链接。
ImageField显示数据绑定控件中的图像。
【Winform-自定义控件】DataGridView多维表头
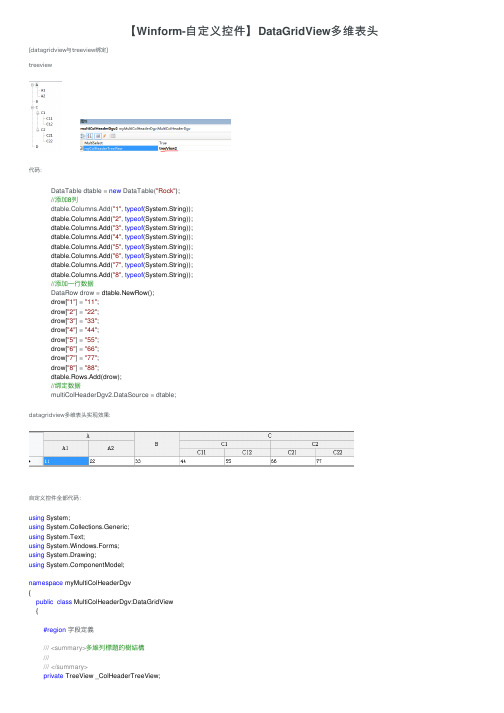
【Winform-⾃定义控件】DataGridView 多维表头[datagridview与treeview绑定]treeview代码:datagridview多维表头实现效果:⾃定义控件全部代码:DataTable dtable = new DataTable("Rock");//添加8列dtable.Columns.Add("1", typeof (System.String));dtable.Columns.Add("2", typeof (System.String));dtable.Columns.Add("3", typeof (System.String));dtable.Columns.Add("4", typeof (System.String));dtable.Columns.Add("5", typeof (System.String));dtable.Columns.Add("6", typeof (System.String));dtable.Columns.Add("7", typeof (System.String));dtable.Columns.Add("8", typeof (System.String));//添加⼀⾏数据DataRow drow = dtable.NewRow();drow["1"] = "11";drow["2"] = "22";drow["3"] = "33";drow["4"] = "44";drow["5"] = "55";drow["6"] = "66";drow["7"] = "77";drow["8"] = "88";dtable.Rows.Add(drow);//绑定数据multiColHeaderDgv2.DataSource = dtable;using System;using System.Collections.Generic;using System.Text;using System.Windows.Forms;using System.Drawing;using ponentModel;namespace myMultiColHeaderDgv{public class MultiColHeaderDgv:DataGridView{#region 字段定義/// <summary>多維列標題的樹結構////// </summary>private TreeView _ColHeaderTreeView;///<summary>樹的最⼤層數//////</summary>private int iNodeLevels;///<summary>⼀維列標題的⾼度//////</summary>private int iCellHeight;///<summary>所有葉節點//////</summary>private IList<TreeNode> ColLists = new List<TreeNode>();#endregion#region屬性定義///<summary>多維列標題的樹結構//////</summary>[Description("多維列標題的樹結構")]public TreeView myColHeaderTreeView{get { return _ColHeaderTreeView; }set { _ColHeaderTreeView = value; }}#endregion#region⽅法函數///<summary>遞歸計算樹最⼤層數,並保存所有葉節點//////</summary>///<param name="tnc"></param>///<returns></returns>private int myGetNodeLevels(TreeNodeCollection tnc){if (tnc == null) return0;foreach (TreeNode tn in tnc){if ((tn.Level + 1) > iNodeLevels)//tn.Level是從0開始的 {iNodeLevels = tn.Level+1;}if (tn.Nodes.Count > 0){myGetNodeLevels(tn.Nodes);}else{ColLists.Add(tn);//葉節點}}return iNodeLevels;}///<summary>調⽤遞歸求最⼤層數、列頭總⾼//////</summary>public void myNodeLevels(){iNodeLevels = 1;//初始為1ColLists.Clear();int iNodeDeep = myGetNodeLevels(_ColHeaderTreeView.Nodes);iCellHeight = this.ColumnHeadersHeight;this.ColumnHeadersHeight = this.ColumnHeadersHeight * iNodeDeep;//列頭總⾼=⼀維列⾼*層數 }///<summary>获得合并标题字段的宽度//////</summary>///<param name="node">字段节点</param>///<returns>字段宽度</returns>private int GetUnitHeaderWidth(TreeNode node){int uhWidth = 0;//获得最底层字段的宽度if (node.Nodes == null)return this.Columns[GetColumnListNodeIndex(node)].Width;if (node.Nodes.Count == 0)return this.Columns[GetColumnListNodeIndex(node)].Width;//获得⾮最底层字段的宽度for (int i = 0; i <= node.Nodes.Count - 1; i++){uhWidth = uhWidth + GetUnitHeaderWidth(node.Nodes[i]);}return uhWidth;}///<summary>获得底层字段索引//////</summary>///' <param name="node">底层字段节点</param>///<returns>索引</returns>///<remarks></remarks>private int GetColumnListNodeIndex(TreeNode node){for (int i = 0; i <= ColLists.Count - 1; i++){if (ColLists[i].Equals(node))return i;}return -1;}///<summary>绘制合并表头//////</summary>///<param name="node">合并表头节点</param>///<param name="e">绘图参数集</param>///<param name="level">结点深度</param>///<remarks></remarks>public void PaintUnitHeader(TreeNode node,System.Windows.Forms.DataGridViewCellPaintingEventArgs e,int level){//根节点时退出递归调⽤if (level == 0)return;RectangleF uhRectangle;int uhWidth;SolidBrush gridBrush = new SolidBrush(this.GridColor);SolidBrush backColorBrush = new SolidBrush(e.CellStyle.BackColor);Pen gridLinePen = new Pen(gridBrush);StringFormat textFormat = new StringFormat();textFormat.Alignment = StringAlignment.Center;uhWidth = GetUnitHeaderWidth(node);//与原贴算法有所区别在这。
DataGridView自定义控件类
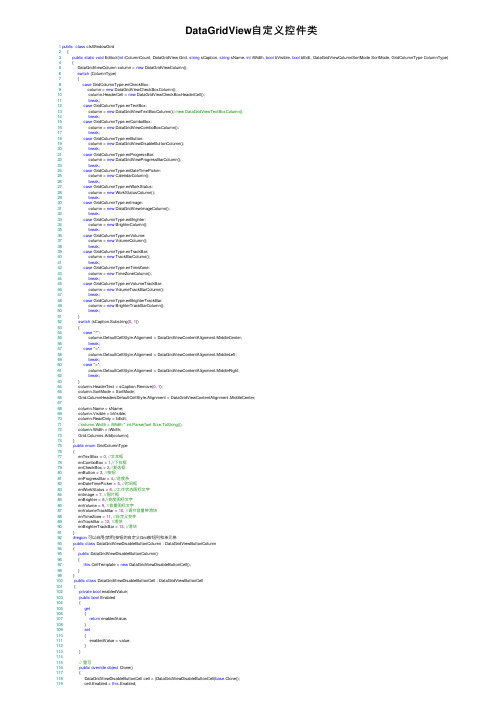
DataGridView⾃定义控件类1public class clsWindowGird2 {3public static void Editcol(int iColumnCount, DataGridView Grid, string sCaption, string sName, int iWidth, bool bVisible, bool bEdit, DataGridViewColumnSortMode SortMode, GridColumnType ColumnType)4 {5 DataGridViewColumn column = new DataGridViewColumn();6switch (ColumnType)7 {8case GridColumnType.enCheckBox:9 column = new DataGridViewCheckBoxColumn();10 column.HeaderCell = new DataGridViewCheckBoxHeaderCell();11break;12case GridColumnType.enTextBox:13 column = new DataGridViewTextBoxColumn();//new DataGridViewTextBoxColumn();14break;15case GridColumnType.enComboBox:16 column = new DataGridViewComboBoxColumn();17break;18case GridColumnType.enButton:19 column = new DataGridViewDisableButtonColumn();20break;21case GridColumnType.enProgressBar:22 column = new DataGridViewProgressBarColumn();23break;24case GridColumnType.enDateTimePicker:25 column = new CalendarColumn();26break;27case GridColumnType.enWorkStatus:28 column = new WorkStatusColumn();29break;30case GridColumnType.enImage:31 column = new DataGridViewImageColumn();32break;33case GridColumnType.enBrighter:34 column = new BrighterColumn();35break;36case GridColumnType.enVolume:37 column = new VolumeColumn();38break;39case GridColumnType.enTrackBar:40 column = new TrackBarColumn();41break;42case GridColumnType.enTimeZone:43 column = new TimeZoneColumn();44break;45case GridColumnType.enVolumeTrackBar:46 column = new VolumeTrackBarColumn();47break;48case GridColumnType.enBrighterTrackBar:49 column = new BrighterTrackBarColumn();50break;51 }52switch (sCaption.Substring(0, 1))53 {54case"^":55 column.DefaultCellStyle.Alignment = DataGridViewContentAlignment.MiddleCenter;56break;57case"<":58 column.DefaultCellStyle.Alignment = DataGridViewContentAlignment.MiddleLeft;59break;60case">":61 column.DefaultCellStyle.Alignment = DataGridViewContentAlignment.MiddleRight;62break;63 }64 column.HeaderText = sCaption.Remove(0, 1);65 column.SortMode = SortMode;66 Grid.ColumnHeadersDefaultCellStyle.Alignment = DataGridViewContentAlignment.MiddleCenter;6768 = sName;69 column.Visible = bVisible;70 column.ReadOnly = bEdit;71//column.Width = iWidth * int.Parse(font.Size.ToString());72 column.Width = iWidth;73 Grid.Columns.Add(column);74 }75public enum GridColumnType76 {77 enTextBox = 0, //⽂本框78 enComboBox = 1,//下拉框79 enCheckBox = 2,//复选框80 enButton = 3, //按钮81 enProgressBar = 4,//进度条82 enDateTimePicker = 5, //时间框83 enWorkStatus = 6, //⼯作状态图标⽂字84 enImage = 7, //图⽚框85 enBrighter = 8,//亮度图标⽂字86 enVolume = 9, //⾳量图标⽂字87 enVolumeTrackBar = 10, //调节⾳量带滑块88 enTimeZone = 11, //⾃定义控件89 enTrackBar = 12, //滑块90 enBrighterTrackBar = 13, //滑块91 }92#region可以启⽤(禁⽤)按钮的⾃定义Grid按钮列和单元格93public class DataGridViewDisableButtonColumn : DataGridViewButtonColumn94 {95public DataGridViewDisableButtonColumn()96 {97this.CellTemplate = new DataGridViewDisableButtonCell();98 }99 }100public class DataGridViewDisableButtonCell : DataGridViewButtonCell101 {102private bool enabledValue;103public bool Enabled104 {105get106 {107return enabledValue;108 }109set110 {111 enabledValue = value;112 }113 }114115// 重写120return cell;121 }122123// 默认情况下,按钮可⽤124public DataGridViewDisableButtonCell()125 {126this.enabledValue = true;127 }128129protected override void Paint(Graphics graphics,130 Rectangle clipBounds, Rectangle cellBounds, int rowIndex,131 DataGridViewElementStates elementState, object value,132object formattedValue, string errorText,133 DataGridViewCellStyle cellStyle,134 DataGridViewAdvancedBorderStyle advancedBorderStyle,135 DataGridViewPaintParts paintParts)136 {137// 判断是否被禁⽤,如果被禁⽤,这绘制不可⽤的按钮样式138if (!this.enabledValue)139 {140//绘制背景141if ((paintParts & DataGridViewPaintParts.Background) ==142 DataGridViewPaintParts.Background)143 {144 SolidBrush cellBackground =145new SolidBrush(cellStyle.BackColor);146 graphics.FillRectangle(cellBackground, cellBounds);147 cellBackground.Dispose();148 }149150// 绘制边框151if ((paintParts & DataGridViewPaintParts.Border) ==152 DataGridViewPaintParts.Border)153 {154 PaintBorder(graphics, clipBounds, cellBounds, cellStyle,155 advancedBorderStyle);156 }157158// 计算按钮的绘制区域,⼤⼩等159 Rectangle buttonArea = cellBounds;160 Rectangle buttonAdjustment =161this.BorderWidths(advancedBorderStyle);162 buttonArea.X += buttonAdjustment.X;163 buttonArea.Y += buttonAdjustment.Y;164 buttonArea.Height -= buttonAdjustment.Height;165 buttonArea.Width -= buttonAdjustment.Width;166167// 绘制不可⽤情况下的按钮168 ButtonRenderer.DrawButton(graphics, buttonArea,169 PushButtonState.Disabled);170171// 绘制按钮⽂本172if (this.FormattedValue is String)173 {174 TextRenderer.DrawText(graphics,175 (string)this.FormattedValue,176this.DataGridView.Font,177 buttonArea, SystemColors.GrayText);178 }179 }180else181 {182// 绘制可⽤情况下的按钮183base.Paint(graphics, clipBounds, cellBounds, rowIndex,184 elementState, value, formattedValue, errorText,185 cellStyle, advancedBorderStyle, paintParts);186 }187 }188 }189#endregion;190191#region Grid添加进度条192public class DataGridViewProgressBarColumn : DataGridViewTextBoxColumn 193 {194public DataGridViewProgressBarColumn()195 {196this.CellTemplate = new DataGridViewProgressBarCell();197 }198public override DataGridViewCell CellTemplate199 {200get201 {202return base.CellTemplate;203 }204set205 {206if (!(value is DataGridViewProgressBarCell))207 {208throw new InvalidCastException("DataGridViewProgressBarCell");209 }210base.CellTemplate = value;211 }212 }213///<summary>214/// ProgressBar最⼤値215///</summary>216public int Maximum217 {218get219 {220return ((DataGridViewProgressBarCell)this.CellTemplate).Maximum;221 }222set223 {224if (this.Maximum == value)225return;226 ((DataGridViewProgressBarCell)this.CellTemplate).Maximum = value; 227228if (this.DataGridView == null)229return;230int rowCount = this.DataGridView.RowCount;231for (int i = 0; i < rowCount; i++)232 {233 DataGridViewRow r = this.DataGridView.Rows.SharedRow(i);234 ((DataGridViewProgressBarCell)r.Cells[this.Index]).Maximum = value; 235 }236 }237 }238///<summary>243get244 {245return ((DataGridViewProgressBarCell)this.CellTemplate).Mimimum;246 }247set248 {249if (this.Mimimum == value)250return;251 ((DataGridViewProgressBarCell)this.CellTemplate).Mimimum = value;252if (this.DataGridView == null)253return;254int rowCount = this.DataGridView.RowCount;255for (int i = 0; i < rowCount; i++)256 {257 DataGridViewRow r = this.DataGridView.Rows.SharedRow(i);258 ((DataGridViewProgressBarCell)r.Cells[this.Index]).Mimimum = value;259 }260 }261 }262public int BarValue263 {264get265 {266return ((DataGridViewProgressBarCell)this.CellTemplate).BarValue;267 }268set269 {270if (this.BarValue == value)271return;272 ((DataGridViewProgressBarCell)this.CellTemplate).BarValue = value;273if (this.DataGridView == null)274return;275int rowCount = this.DataGridView.RowCount;276for (int i = 0; i < rowCount; i++)277 {278 DataGridViewRow r = this.DataGridView.Rows.SharedRow(i);279 ((DataGridViewProgressBarCell)r.Cells[this.Index]).BarValue = value;280 }281 }282 }283 }284///<summary>285/// ProgressBarDataGridView286///</summary>287public class DataGridViewProgressBarCell : DataGridViewTextBoxCell288 {289public DataGridViewProgressBarCell()290 {291this.maximumValue = 100;292this.mimimumValue = 0;293 }294295296private int mValue = 0;297public int BarValue298 {299get300 {301return this.mValue;302 }303set304 {305this.mValue = value;306 }307 }308309private int maximumValue;310public int Maximum311 {312get313 {314return this.maximumValue;315 }316set317 {318this.maximumValue = value;319 }320 }321322private int mimimumValue;323public int Mimimum324 {325get326 {327return this.mimimumValue;328 }329set330 {331this.mimimumValue = value;332 }333 }334public override Type ValueType335 {336get337 {338return typeof(int);339 }340 }341public override object DefaultNewRowValue342 {343get344 {345return0;346 }347 }348public override object Clone()349 {350 DataGridViewProgressBarCell cell = (DataGridViewProgressBarCell)base.Clone(); 351 cell.Maximum = this.Maximum;352 cell.Mimimum = this.Mimimum;353return cell;354 }355356protected override void Paint(Graphics graphics,357 Rectangle clipBounds, Rectangle cellBounds,358int rowIndex, DataGridViewElementStates cellState,359object value, object formattedValue, string errorText,360 DataGridViewCellStyle cellStyle,361 DataGridViewAdvancedBorderStyle advancedBorderStyle,366 intValue = (int)value;367if (intValue < this.mimimumValue)368 intValue = this.mimimumValue;369if (intValue > this.maximumValue)370 intValue = this.maximumValue;371if (mValue != 0)372 {373 intValue = mValue;374 }375double rate = (double)(intValue - this.mimimumValue) / (this.maximumValue - this.mimimumValue);376if ((paintParts & DataGridViewPaintParts.Border) == DataGridViewPaintParts.Border)377 {378this.PaintBorder(graphics, clipBounds, cellBounds,379 cellStyle, advancedBorderStyle);380 }381 Rectangle borderRect = this.BorderWidths(advancedBorderStyle);382 Rectangle paintRect = new Rectangle(383 cellBounds.Left + borderRect.Left,384 cellBounds.Top + borderRect.Top,385 cellBounds.Width - borderRect.Right,386 cellBounds.Height - borderRect.Bottom);387bool isSelected = (cellState & DataGridViewElementStates.Selected) == DataGridViewElementStates.Selected;388 System.Drawing.Color bkColor;389if (isSelected && (paintParts & DataGridViewPaintParts.SelectionBackground) == DataGridViewPaintParts.SelectionBackground) 390 {391 bkColor = cellStyle.SelectionBackColor;392 }393else394 {395 bkColor = cellStyle.BackColor;396 }397if ((paintParts & DataGridViewPaintParts.Background) == DataGridViewPaintParts.Background)398 {399using (SolidBrush backBrush = new SolidBrush(bkColor))400 {401 graphics.FillRectangle(backBrush, paintRect);402 }403 }404 paintRect.Offset(cellStyle.Padding.Right, cellStyle.Padding.Top);405 paintRect.Width -= cellStyle.Padding.Horizontal;406 paintRect.Height -= cellStyle.Padding.Vertical;407if ((paintParts & DataGridViewPaintParts.ContentForeground) == DataGridViewPaintParts.ContentForeground)408 {409 Rectangle barBounds = new Rectangle(410 paintRect.Left, paintRect.Bottom - 3*cellBounds.Height/4,411 paintRect.Width, cellBounds.Height/2);412 barBounds.Width = (int)Math.Round(barBounds.Width * rate);413//ProgressBarRenderer.DrawHorizontalChunks(graphics, barBounds);414415 graphics.FillRectangle(System.Drawing.Brushes.Green, barBounds);416 barBounds = new Rectangle(417 paintRect.Left, paintRect.Bottom - cellBounds.Height,418 cellBounds.Width, cellBounds.Height);419 graphics.DrawRectangle(Pens.Wheat, barBounds);420//if (ProgressBarRenderer.IsSupported)421//{422////是否完全采⽤进度条的样式,此处主要修改了进度条的边框样式423////ProgressBarRenderer.DrawHorizontalBar(graphics, paintRect);424// Rectangle barBounds = new Rectangle(425// paintRect.Left, paintRect.Bottom - 9,426// paintRect.Width, 9);427// barBounds.Width = (int)Math.Round(barBounds.Width * rate);428////ProgressBarRenderer.DrawHorizontalChunks(graphics, barBounds);429430// graphics.FillRectangle(System.Drawing.Brushes.Green, barBounds);431// barBounds = new Rectangle(432// paintRect.Left, paintRect.Bottom - 9,433// cellBounds.Width, 9);434// graphics.DrawRectangle(Pens.Wheat, barBounds);435//}436//else437//{438////采⽤控件的背景⾊439// System.Drawing.SolidBrush brush = new System.Drawing.SolidBrush(bkColor);440// graphics.FillRectangle(brush, paintRect);441////graphics.FillRectangle(Brushes.White, paintRect);442////graphics.DrawRectangle(Pens.Black, paintRect);443// Rectangle barBounds = new Rectangle(444// paintRect.Left + 1, paintRect.Top + 1,445// paintRect.Width - 1, paintRect.Height - 1);446// barBounds.Width = (int)Math.Round(barBounds.Width * rate);447// graphics.FillRectangle(System.Drawing.Brushes.BurlyWood, barBounds);448//}449 }450if (this.DataGridView.CurrentCellAddress.X == this.ColumnIndex &&451this.DataGridView.CurrentCellAddress.Y == this.RowIndex &&452 (paintParts & DataGridViewPaintParts.Focus) ==453 DataGridViewPaintParts.Focus &&454this.DataGridView.Focused)455 {456457 Rectangle focusRect = paintRect;458 focusRect.Inflate(-3, -3);459 ControlPaint.DrawFocusRectangle(graphics, focusRect);460 }461if ((paintParts & DataGridViewPaintParts.ContentForeground) == DataGridViewPaintParts.ContentForeground)462 {463if (value != null)464 {465//if (Math.Round(rate * 100) > 0 && Math.Round(rate * 100) <= 100)466//{467//string txt = string.Format("{0}%", Math.Round(rate * 100));468string txt = value.ToString();469 TextFormatFlags flags = TextFormatFlags.HorizontalCenter | TextFormatFlags.VerticalCenter;470 System.Drawing.Color fColor = cellStyle.ForeColor;471 paintRect.Inflate(-2, -2);472 TextRenderer.DrawText(graphics, txt, cellStyle.Font,473 paintRect, fColor, flags);474//}475 }476 }477if ((paintParts & DataGridViewPaintParts.ErrorIcon) ==478 DataGridViewPaintParts.ErrorIcon &&479this.DataGridView.ShowCellErrors &&480 !string.IsNullOrEmpty(errorText))481 {482 Rectangle iconBounds = this.GetErrorIconBounds(483 graphics, cellStyle, rowIndex);484 iconBounds.Offset(cellBounds.X, cellBounds.Y);490491#region Grid添加⼯作状态控件492public class WorkStatusColumn : DataGridViewTextBoxColumn493 {494public WorkStatusColumn()495 {496this.CellTemplate = new WorkStatusCell();497 }498public override DataGridViewCell CellTemplate499 {500get501 {502return base.CellTemplate;503 }504set505 {506if (!(value is WorkStatusCell))507 {508throw new InvalidCastException("DataGridViewVolumeCell"); 509 }510base.CellTemplate = value;511 }512 }513///<summary>514/// ProgressBar最⼤値515///</summary>516public int Maximum517 {518get519 {520return ((WorkStatusCell)this.CellTemplate).Maximum;521 }522set523 {524if (this.Maximum == value)525return;526 ((WorkStatusCell)this.CellTemplate).Maximum = value;527528if (this.DataGridView == null)529return;530int rowCount = this.DataGridView.RowCount;531for (int i = 0; i < rowCount; i++)532 {533 DataGridViewRow r = this.DataGridView.Rows.SharedRow(i); 534 ((WorkStatusCell)r.Cells[this.Index]).Maximum = value;535 }536 }537 }538///<summary>539/// ProgressBar最⼩値540///</summary>541public int Mimimum542 {543get544 {545return ((WorkStatusCell)this.CellTemplate).Mimimum;546 }547set548 {549if (this.Mimimum == value)550return;551 ((WorkStatusCell)this.CellTemplate).Mimimum = value;552if (this.DataGridView == null)553return;554int rowCount = this.DataGridView.RowCount;555for (int i = 0; i < rowCount; i++)556 {557 DataGridViewRow r = this.DataGridView.Rows.SharedRow(i); 558 ((WorkStatusCell)r.Cells[this.Index]).Mimimum = value;559 }560 }561 }562public int BarValue563 {564get565 {566return ((WorkStatusCell)this.CellTemplate).BarValue;567 }568set569 {570if (this.BarValue == value)571return;572 ((WorkStatusCell)this.CellTemplate).BarValue = value;573if (this.DataGridView == null)574return;575int rowCount = this.DataGridView.RowCount;576for (int i = 0; i < rowCount; i++)577 {578 DataGridViewRow r = this.DataGridView.Rows.SharedRow(i); 579 ((WorkStatusCell)r.Cells[this.Index]).BarValue = value;580 }581 }582 }583 }584///<summary>585///WorkStatusCell586///</summary>587public class WorkStatusCell : DataGridViewTextBoxCell588 {589public WorkStatusCell()590 {591this.maximumValue = 1;592this.mimimumValue = 0;593 }594595596private int mValue = 0;597public int BarValue598 {599get600 {601return this.mValue;602 }603set604 {605this.mValue = value;606 }607 }613 {614return this.maximumValue;615 }616set617 {618this.maximumValue = value;619 }620 }621622private int mimimumValue;623public int Mimimum624 {625get626 {627return this.mimimumValue;628 }629set630 {631this.mimimumValue = value;632 }633 }634public override Type ValueType635 {636get637 {638return typeof(int);639 }640 }641public override object DefaultNewRowValue642 {643get644 {645return0;646 }647 }648public override object Clone()649 {650 WorkStatusCell cell = (WorkStatusCell)base.Clone();651 cell.Maximum = this.Maximum;652 cell.Mimimum = this.Mimimum;653return cell;654 }655656protected override void Paint(Graphics graphics,657 Rectangle clipBounds, Rectangle cellBounds,658int rowIndex, DataGridViewElementStates cellState,659object value, object formattedValue, string errorText,660 DataGridViewCellStyle cellStyle,661 DataGridViewAdvancedBorderStyle advancedBorderStyle,662 DataGridViewPaintParts paintParts)663 {664int intValue = 0;665if (value is int)666 intValue = (int)value;667//if (intValue < this.mimimumValue)668// intValue = this.mimimumValue;669//if (intValue > this.maximumValue)670// intValue = this.maximumValue;671if (mValue != 0)672 {673 intValue = mValue;674 }675double rate = (double)(intValue - this.mimimumValue) / (this.maximumValue - this.mimimumValue);676if ((paintParts & DataGridViewPaintParts.Border) == DataGridViewPaintParts.Border)677 {678this.PaintBorder(graphics, clipBounds, cellBounds,679 cellStyle, advancedBorderStyle);680 }681 Rectangle borderRect = this.BorderWidths(advancedBorderStyle);682 Rectangle paintRect = new Rectangle(683 cellBounds.Left + borderRect.Left,684 cellBounds.Top + borderRect.Top,685 cellBounds.Width - borderRect.Right,686 cellBounds.Height - borderRect.Bottom);687bool isSelected = (cellState & DataGridViewElementStates.Selected) == DataGridViewElementStates.Selected;688 System.Drawing.Color bkColor;689if (isSelected && (paintParts & DataGridViewPaintParts.SelectionBackground) == DataGridViewPaintParts.SelectionBackground)690 {691 bkColor = cellStyle.SelectionBackColor;692 }693else694 {695 bkColor = cellStyle.BackColor;696 }697if ((paintParts & DataGridViewPaintParts.Background) == DataGridViewPaintParts.Background)698 {699using (SolidBrush backBrush = new SolidBrush(bkColor))700 {701 graphics.FillRectangle(backBrush, paintRect);702 }703 }704 paintRect.Offset(cellStyle.Padding.Right, cellStyle.Padding.Top);705 paintRect.Width -= cellStyle.Padding.Horizontal;706 paintRect.Height -= cellStyle.Padding.Vertical;707if ((paintParts & DataGridViewPaintParts.ContentForeground) == DataGridViewPaintParts.ContentForeground)708 {709//Rectangle barBounds = new Rectangle(710// paintRect.Left, paintRect.Bottom - cellBounds.Height,711// 40, cellBounds.Height);712if (intValue == 0)713 {714//graphics.DrawImage(Properties.Resources.btncheckoff, paintRect.X+cellBounds.Size.Width/4, paintRect.Bottom - 3*cellBounds.Height / 4 , 60,15);715 graphics.DrawImage(Properties.Resources.btncheckoff, paintRect.X + cellBounds.Size.Width / 4, paintRect.Bottom - cellBounds.Height, 60, cellBounds.Size.Height); 716717 }718else719 {720//graphics.DrawImage(Properties.Resources.btncheckon, paintRect.X + cellBounds.Size.Width / 4, paintRect.Bottom - 3 * cellBounds.Height / 4, 60, 15);721 graphics.DrawImage(Properties.Resources.btncheckon, paintRect.X + cellBounds.Size.Width / 4, paintRect.Bottom - cellBounds.Height, 60, cellBounds.Size.Height); 722 }723 }724if (this.DataGridView.CurrentCellAddress.X == this.ColumnIndex &&725this.DataGridView.CurrentCellAddress.Y == this.RowIndex &&726 (paintParts & DataGridViewPaintParts.Focus) ==727 DataGridViewPaintParts.Focus &&728this.DataGridView.Focused)729 {730735if ((paintParts & DataGridViewPaintParts.ContentForeground) == DataGridViewPaintParts.ContentForeground)736 {737if (value != null)738 {739740string txt = value.ToString();741//TextFormatFlags flags = TextFormatFlags.HorizontalCenter | TextFormatFlags.VerticalCenter;742 System.Drawing.Color fColor = cellStyle.ForeColor;743 paintRect.Inflate(-2, -2);744//TextRenderer.DrawText(graphics, txt, cellStyle.Font, paintRect, fColor, flags);745 }746 }747if ((paintParts & DataGridViewPaintParts.ErrorIcon) ==748 DataGridViewPaintParts.ErrorIcon &&749this.DataGridView.ShowCellErrors &&750 !string.IsNullOrEmpty(errorText))751 {752 Rectangle iconBounds = this.GetErrorIconBounds(753 graphics, cellStyle, rowIndex);754 iconBounds.Offset(cellBounds.X, cellBounds.Y);755this.PaintErrorIcon(graphics, iconBounds, cellBounds, errorText);756 }757 }758 }759#endregion760761#region Grid添加⽇期控件762public class CalendarCell : DataGridViewTextBoxCell763 {764public CalendarCell()765 : base()766 {767//使⽤简短⽇期格式.768this.Style.Format = "HH:mm:ss";769 }770public override void InitializeEditingControl(int rowIndex, object initialFormattedValue, DataGridViewCellStyle dataGridViewCellStyle) 771 {772//将编辑控件的值设置成当前单元格的值.773base.InitializeEditingControl(rowIndex, initialFormattedValue, dataGridViewCellStyle);774//775 CalendarEditingControl ctl = DataGridView.EditingControl as CalendarEditingControl;776try777 {778 ctl.Value = (DateTime)this.Value;779 }780catch (Exception)781 {782/*当数据库中对应⽇期为空(⽐如在添加数据时),在这⾥设置⽇期的默认值。
数据控件DataGridView添加、删除和修改数据库中的内容

数据控件DataGridView添加、删除和修改数据库中的内容作者:天涯来源:中国自学编程网发布日期:1214063638介绍一个数据控件DataGridView,它是 3.5中新增加的的重要控件。
它是一种网格形式的控件,能以表格的形式显示数据,它的优势是能多行显示数据,在数据库的操作中会经常用到。
(1)打开VS2008,在D:\C#\ch14目录下建立名为DataGridViewTest的Windows应用程序,打开工程,为当前窗体添加控件,如表14-2所示。
表14-2 添加控件列表控件名NameTextDataGridViewdataGridView1ButtonbtnRef更新设置ButtonbtnDelete删除(2)接下来需要设置DadaAdapter和DataSet,方法同上一节一样。
选中DataGridView的DataSource属性。
(3)单击“下一步”按钮,选择“数据连接”图标。
(4)最后一步需要选择数据库对象,本例是要操作StudentInf数据库中的表,所以选择“表”复选框。
(5)设置完毕后,整个程序界面就设置完了。
程序界面设计完毕后,接下来要做的工作就是通过修改dataGridView1中的数据来更新数据库中的内容。
它实现的原理很简单,通过studentInfDataSet把dataGridView1绑定到Class1表,studentInfDataSet处于中间位置,所以在dataGridView1中修改的数据必须要传递到studentInfDataSet后才能改变数据库中的内容。
(1)双击“更新设置”按钮,添加如下代码。
this.sqlDataAdapter1.Update(this.studentInfDataSet);该代码的功能是调用sqlDataAdapter1的Update()方法实现对studentInfDataSet的更新。
(2)按F5键,程序运行以后,对dataGridView1添加一行新的数据,然后单击“更新设置”按钮,完成后关闭程序再打开。
一个Winform下DataGridView控件外观的自定义类
⼀个Winform下DataGridView控件外观的⾃定义类⼀、关于起因最近⾮常频繁的使⽤DataGridView控件,VS提供的Winform下DataGridView的默认样式⾮常难看。
如果做美化处理的话,需要调整的地⽅⾮常多,且该控件的很多设置属性⾮常的晦涩,不是很⼈性化。
每次进⾏设置都煞费脑筋,并且需要设置的DataGridView控件⼜⽐较多,如果⼿⼯⼀个⼀个调整⾮常⿇烦。
如果在每个窗体⾥逐个⼀⾏⼀⾏的⽤代码来设置,会造成代码很凌乱、琐碎,因此我对DataGridView格式设置的常⽤项封装到⼀个Helper类,通过这个帮助类可以⼀步到位完成设置。
对DataGridView控件,我需要完成的⼀些基本的格式控制,包括以下⼀些内容:1、标题⾏背景⾊、前景⾊、字体设置、平⾯化样式、⾏⾼2、标题列宽度,平⾯化样式3、偶数⾏背景⾊、前景⾊4、奇数⾏背景⾊、前景⾊5、数据⾏⾼度、字体6、列宽度,对齐⽅式7、禁⽌编辑、添加、删除、调整⾏⾼、列宽、排序8、去除控件外边框最终处理过后的风格类似如下图所⽰⼆、CGridHelper类模块的调⽤最终我所希望的实现格式化DataGridView控件的形式是通过⼀⾏代码来实现,类似如下所⽰:1Dim mGridHelper As New CGridHelper(GridVersion, Color.FromArgb(250, 250, 250),2New Font("微软雅⿊", 10), 30, Color.FromArgb(159, 210, 235), Color.FromArgb(0, 0, 0), 24,3New Font("微软雅⿊", 9), 30, Color.FromArgb(250, 250, 250), Color.FromArgb(225, 225, 225), Color.FromArgb(0, 0, 0),4"0;80;70;595", "M;M;M;L")其中列宽的控制通过⼀个字符串来设置,⽤分号来分隔数字,各数字依次设置对应列的宽度;列的对齐⽅式也类似,不过左、中、右分别⽤字母L/M/R表⽰。
- 1、下载文档前请自行甄别文档内容的完整性,平台不提供额外的编辑、内容补充、找答案等附加服务。
- 2、"仅部分预览"的文档,不可在线预览部分如存在完整性等问题,可反馈申请退款(可完整预览的文档不适用该条件!)。
- 3、如文档侵犯您的权益,请联系客服反馈,我们会尽快为您处理(人工客服工作时间:9:00-18:30)。
.NET新手指南:轻松自定义DataGridView控件
.NET DataGridView是一个便于使用的数据绑定控件。
本文为.NET新手介绍了如何使用.NET配置向导VB Express自定义DataGridView控件。
只需非常简单的修改以及一两行代码,便可以轻松实现交替颜色行,自定义排序功能以及显示编辑行。
这样一个既可以浏览数据又可以编辑数据的窗体非常实用。
本文的目标读者是.NET新手。
首先讲述如何创建一个新连接,然后讲述如何自定义结果控件,使用Visual Basic Express(VB Express)配置向导,本文将描述如何填充DataGridView控件,然后按照以下步骤进行提高:
1、行的显示颜色交替,构成一个绿色条效果;
2、禁用掉DataGridView内置的单列排序功能;
3、执行这个窗体时显示编辑行。
开始
VB Express提供了许多方法检索和操作外部数据,例如,只需要运行VB Express的配置向导就可以建立一个到MS Access 示例数据库Northwind.mdb中Customers的连接:
1、启动VB Express,然后在标准工具栏上点击新建项目按钮,在弹出的对话框中选择Windows Form Application;
2、在名称控件处输入一个有意义的名字,点击确定按钮;
3、点击解决方案资源管理器右下角的数据源标签,如果没有看到这个标签,从“数据”菜单中选择显示数据源即可;
4、点击新建数据源按钮,启动新建数据源配置向导;
5、点击下一步,数据库选项保持默认设置;
6、在下一个面板中点击新建连接;
7、在弹出的新建连接对话框中,点击修改,从弹出的修改数据源对话框中选择Access数据库文件,然后点击确定按钮;
8、在新建连接对话框中点击浏览,找到Northwind.mdb的位置(在Office目录的Samples文件夹下),然后点击确定按钮;
9、点击测试连接,然后点击确定按钮清除确认消息;
10、如果连接工作正常,点击确定返回向导窗口,然后点击下一步继续;
11、VB Express会询问你是否要拷贝数据库,如果你选择“是”,将会把整个数据库拷贝到你的项目下,在这个例子中,我们选择“否”;
12、接下来的面板中让你将配置信息保存到配置文件中,默认是要保存,点击下一步即可(向导会检索数据库对象,并在源文件中显示它们,在这里你可以识别一下将要在.Net项目中检索和操作的数据);
13、点击“+”号展开表节点,选中Customers表,保留默认的NorthwindDataSet,VB Express的数据集;
14、点击完成,VB Express将会检索指定的数据。
创建好连接后,还需要一个窗体来显示数据,请跟着我做:
1、点击数据源标签;
2、点击Form1标签,然后从数据源标签拖动Customers数据集到窗体设计器中的Form1上,VB Express将会产生一个DataGridView控件并自动命名,图1显示了结果窗体和窗体设计器中的网格。
窗体和窗体设计器中的网格:配置向导创建的可以显示数据的控件
3、从文件菜单中选择保存所有,然后点击保存按钮。
至此,你已经有一个来自Northwind数据库的数据集,和一个显示该数据的DataGridView控件及控件所在的窗体,所有需要做的就是运行一下向导。
行显示颜色交替
第一个增强是,使用向导创建的控件可以通过修改行的颜色提高易读性,使用DataGridView时,可以很容易修改属性:
1、在窗体设计器中,选择DataGridView控件(不要双击,将会打开窗体的代码页);
2、在属性窗口中,打开AlternatingRowsDefaultCellStyle属性;
3、点击BackColor属性的下拉箭头,显示CellStyleBuilder对话框;
4、选择一个与当前颜色不同的颜色(默认是白色),在这个例子中,选择蓝色,如图2所示,然后点击确定按钮。
CellStyleBuilder对话框:选择一个交替的行颜色
5、按F5运行程序,图3显示了使用交替颜色填充的网格控件。
填充好的网格控件:行的颜色在蓝色和白色间交替使用
记住,只设置交替的一行的属性颜色就可以了,不是要设置所有行的属性,如果还想更多一点变化,相应设置BackColor和ForeColor即可。
控制排序顺序
最初,你产生的控件是按表的顺序填充的,因为还没有指定排序顺序,然而,DataGridView是天生就支持排序的,只需要点击标题栏,控件就会以该栏升序排序记录,再点击一次就按降序排序,对于大多数控件而言,在填充控件时你都可以排序数据:
1、在窗体设计器中,选择CustomersBindingSource组件,将会在相应的属性窗口中更新其项目;
2、在窗口的底部,找到sort属性,输入city,如图4所示。
找到Sort,输入City:指定一个排序列
3、按F5运行程序,正如你在图5中所看到的,控件按照City值以升序排序记录。
如果想降序排列的话,只需要加上DESC关键词就可以了,即输入City DESC。
控件排序记录:窗体通过City值排序记录
你可能会禁止这个原生态的排序功能,但你需要为每个禁止排序的列编写一小段代码,例如,为了禁止Contact Title列的排序功能,请跟着我做:
1、在设计视图窗体中,从视图菜单选择代码,或按F7;
2、开始输入代码,很快你就会发现智能感应不会显示控件包含的列名,相反,它是按照位置显示列名的,这不是引用列的最佳办法;
3、为了修改DataGridView控件的列的默认名称,必须修改控件本身的Columns集合,在设计视图中,双击网格(不是窗体),你可能需要稍微放大一下窗体,以便准确选中一个网格,当属性标题显示CustomersDataGridView 时,你就可以确定选中的是网格而不是窗体了;
4、定位Columns集合,然后点击Builder按钮,启动编辑列对话框,如图6所示。
点击Builder按钮:查看网格的Columns集合
5、在选择列控件中,选择ContactTitle;
6、在设计区域(右下角),这个控件的Name属性值是DataGridViewTextBoxColumn4,使用一个更有意义的名字替代它,这里我们输入DataGridViewTextBoxContactTitle,如图7所示。
对那些不想设置的隐形列,将其Visible 属性设置为false即可。
为Name属性输入一个有意义的名称
7、点击确定返回代码窗口(Form1.vb);
8、输入下面的代码:
1.Me.DataGridViewTextBoxContactTitle.SortMode = DataGridViewColumnSo
rtMode.NotSortable
这一次智能感应按名称而不是位置列出了列,如图8所示。
智能感应按名称列出了列:使用列名代替位置号
9、保存所做的修改;
10、按F5执行项目,在结果窗体中,点击ContactTitle的标题栏,这一次窗体不会排序记录了,这是因为输入的代码禁用了排序功能。
显示编辑行
目前,示例窗体显示了91条记录,此时如果用户想要插入一行记录,必须滚动窗体到编辑行,你可以通过编程让窗体自动显示编辑行,将下面的代码添加到窗体的Load事件中,如图9所示。
1.Me.CustomersDataGridView.FirstDisplayedScrollingRowIndex = Custome
rsDataGridView.Rows.Count - 1
在窗体的Load事件中添加代码:强制窗体在载入时显示编辑行
按F5运行这个窗体,正如你在图10中所看到的,这个窗体显示了一些记录和编辑行。
显示记录和编辑行的窗体:现在启动窗体,可以看到显示了编辑行这个语句从行数量减去一个1,这样可以防止异常发生,因为编辑行没有真正的索引,直到你点击了它,即使它影响了行的数量。
这个方法仅仅是确保最后一行是可见的,所有的记录仍然是可用的,现在窗体显示的记录条数与其容量紧密相关,代码不需要做任何修改。
通过禁用编辑行,这样就将窗体改为浏览窗体了,不能再插入新的行了,要禁用编辑行,只需要在窗体的Load 事件中添加一句:
1.DataGridView1.AllowUserToAddRows = False
将AllowUserToAddRows属性设置True就启用编辑行。
自定义控件使其更易用和灵活
自定义示例窗体并不需要花多少时间:
1、只需要简单的修改就可以实现交替颜色行;
2、只需要一行代码就可以禁用掉内置的排序功能;
3、只需要一行代码就可以显示编辑行。
如果你是从Access或SQL Server转过来的,当你见识了可以创建和实现一个既可以浏览数据又可以编辑数据的窗体时,你一定会感到满意。
原文:The .NET Newbie's Guide to Customizing the DataGridView Control。