
汽车产品备件手册(模版)
3
14
3
15
3
16
3
17
3
18
3
19
3
2
1
3
2
3
3
3
4
3
5
3
8100000E03 8108110E01 Q1840620F61 Q1840625F61 8108120E01 Q32006F61 8108130E01 8103110E01 Q18408100F61 8103120E03 Q1841025F61 8112110E01 Q2204813F31 8100110E01 Q140B0616F31L Q32008F31 8100111E01 8105110E01 Q1840630F61
六角头螺栓和平垫圈组合件
3
3
4
3
5
3
6
3
7
3
8
3
9
10
5205201E01 5205202A01 Q32008F31 5205203E01 5205204A01 5205003A01
左前雨刮臂 左前雨刮臂堵盖 六角法兰面螺母
右前雨刮臂 右前雨刮臂堵盖
前雨刮连杆 左雨刮片 右雨刮片
1
3
3703020E01
空调装置(英博尔动力) 压冷管
六角法兰面螺栓 六角法兰面螺栓
高压管 六角法兰面螺母
低压管 压缩机(集成控制器)
六角法兰面螺栓 压缩机支架
六角法兰面螺栓 空调控制面板
十字盘头自攻螺钉和平垫圈组合 HVAC(带PTC)
六角头螺栓和L型平垫圈组合件 六角法兰面螺母 外循环风道 冷凝器 六角法兰面螺栓 空调滤芯
六角法兰面自排屑螺栓 十字槽盘头自攻螺钉和平垫圈组合
2
1
3
2
3
3
3
4
3
5
3
6
3
7
3
8
3
9
3
4002100E01 4002101E01 Q1780616F61 4012010E01 4012020E01 4012030E01 4012040E01 4012050E01 4005010E01 4012060E01
2
1
3
2
3
3
3
4003100E01 4003101E01 Q1780616F61 Q2204825F31
仪表线束装置 仪表板线束总成 六角法兰面自排屑螺栓 十字槽盘头自攻螺钉和平垫圈组合
2
1
3
4003100E02 4003101E02
仪表线束装置 仪表板线束总成
2
3
3
3
Q1780616F61 Q2204825F31
零件名称
前舱线束装置 前舱线束
六角法兰面自排屑螺栓 蓄电池负极线束
六角法兰面自排屑螺栓 前舱保险丝盒支架
六角头螺栓和平垫圈组合件 六角头螺栓和平垫圈组合件
DCDC负极线束 六角法兰面螺栓 六角法兰面自排屑螺栓 电机壳体等电位线束 六角法兰面螺栓 六角法兰面自排屑螺栓 车身-托架负极搭铁 六角法兰面自排屑螺栓
车身线束装置 地板线束
六角法兰面自排屑螺栓 左前门线束 右前门线束 左后门线束 右后门线束 后背门线束 左顶棚线束 后围线束
2
1
3
2
3
3
3
4
3
5
3
6
3
7
3
8
3
9
3
4002100E02 4002101E02 Q1780616F61 4012010E01 4012020E01 4012030E01 4012040E01 4012050E02 4005010E01 4012060E01
车载终端装置 T-BOX
六角法兰面螺母 GPS天线 2G天线
2
1
3
2
3
3710100E01 3704301E01 Q1840616F61
低速报警装置总成 低速报警装置
六角法兰面螺栓
2
1
3
2
3
3
3
4
3
4121100A01
左前组合灯装置
4121101A01
左前组合灯
A0402095
Φ8子母扣/V8
Q174B0616+Q40206 十字槽凹穴六角头螺栓+大垫圈
车身线束装置 地板线束
六角法兰面自排屑螺栓 左前门线束 右前门线束 左后门线束 右后门线束 后背门线束 左顶棚线束 后围线束
2
1ቤተ መጻሕፍቲ ባይዱ
3
2
3
3820100E01 3820101E01 Q2714216F31
组合仪表装置 组合仪表
十字槽盘头自攻螺钉
2
1
3
2
3
3
3
4
3
5
3
6
3
7
3
8
3
9
3
10
3
11
3
12
3
13
5207100A01 5207101A01 Q1460620F61 5207201A01 5207202A01 5207302A01
洗涤装置 洗涤液壶 六角头螺拴、弹簧垫圈和平垫圈组 洗涤管路1 洗涤管路2 前洗涤喷嘴
2
1
3
2
3
5205100E01 5205101A01 Q1400625F61
前雨刮电机装置 前雨刮电机
2
1
3
2
3
3
3
4
3
5
3
6
3
7
3
8
3
9
3
10
3
11
3
12
3
13
3
14
3
15
3
4011100E04 4011101E04 Q1780616F61 4011102E01 Q1780616F61 4011103E01
Q1400516 Q1400616 4011104E01 Q1860816F61 Q1780816F61 4011105E01 Q1860612F61 Q1780816F61 4011106E01 Q1780616F61
前舱线束装置 前舱线束
六角法兰面自排屑螺栓 蓄电池负极线束
六角法兰面自排屑螺栓 前舱保险丝盒支架
六角头螺栓和平垫圈组合件 六角头螺栓和平垫圈组合件
DCDC负极线束 六角法兰面螺栓 六角法兰面自排屑螺栓 电机壳体等电位线束 六角法兰面螺栓 六角法兰面自排屑螺栓 车身-托架负极搭铁 六角法兰面自排屑螺栓
蓄电池(铅酸36Ah)
2
1
3
2
3
3774100E01 3774102A01 Q2140412F31
组合开关装置 组合开关
十字槽盘头螺钉
2
1
3
2
3
5825100E01 5825101E01 Q2140525F31
时钟弹簧装置 时钟弹簧
十字槽盘头螺钉
2
1
3
2
3
3
3
4
3
7913200E01 7913205E01 Q32004F31 7913207E01 7913206E01
Q1400630L 十字槽凹穴六角头螺栓+大垫圈组合
序号
级别
123456
2
1
3
2
3
3
3
4
3
5
3
6
3
7
3
8
3
9
3
10
3
11
3
12
3
13
3
14
3
15
3
零部件号
4011100E03 4011101E03 Q1780616F61 4011102E01 Q1780616F61 4011103E01
Q1400516 Q1400616 4011104E01 Q1860816F61 Q1780816F61 4011105E01 Q1860612F61 Q1780816F61 4011106E01 Q1780616F61
产品管理-江淮和悦产品手册

大大开拓您与家人的视野 为更符合驾乘的舒适感,每项设计都几经深思熟虑,每样细节也巧具细腻心
思,这一份尊重与体贴, 正是COROLLA EX花冠人性化理念的真实写照。
以无限活力,开启优质家庭生活 COROLLA EX花冠1.6L拥有超越同级车的澎湃动能, 其所搭载的是新型4缸 直列ZR发动机,采用双VVT-i技术,在强劲力量与超低油耗之间达到了绝佳 平衡,让你在畅享极致动力的同时尽享经济实用性,成为应对都市复杂交通
产品定位
目标客户
和悦RS目标人群
9 30-45岁,兼顾家庭生活、业务需要和商务活动的事业上升人士; 9企业白领、公务员、以及刚起步的创业人士。
客户特征
9为了事业发展而积极打拼,有明确的事业目标和生活理想; 9兼顾家庭,希望家庭成为事业的坚强后盾; 9向往自由自在,无拘无束的生活状态; 9将车作为生活和工作的工具,注重外观及实用性。
车型 A3 1.6 三厢 A3 1.8 三厢 A3 2.0 三厢 A3 1.6 两厢 A3 1.8 两厢 A3 2.0 两厢 F3R F31.5L三厢 F31.6L三厢 悦动1.6 MT 悦动1.6 AT 悦动1.8 MT 悦动1.8 AT 花冠EX 1.6 MT 花冠EX 1.6 AT 骊威MT 骊威AT 骊威劲锐版MT 骊威劲锐版AT
8.18-10.28 5.98-9.98
9.98-10.98
产品定位
和悦产品市场的产品定位区隔
和悦/和悦RS拥 有同级别车中 最大的空间, 同时拥有丰富 的配置和超高
的性价比
空间大 和悦/和悦RS
骊威
悦动
F3
价
F3的空间较
格
大,价格也相
低
对较低,但是
汽车用品说明手册说明书

CONTINUED....................................Accessories .113ACCESSORY (Ignition Key.......................................Position).62...............Accessory Power Socket .78....................Additives,Engine Oil .144...............................Airbag (SRS).9,20................Air Conditioning System age .84.......................Air Pressure,Tires .162.......................Alcohol in Gasoline .108AM/FM Stereo Radio.....................................Reception .89......................................Antifreeze .146Anti-lock Brakes (ABS)...............................Indicator . 47, 127...................................Operation .126.Anti-theft Steering Column Lock .61..........................Anti-theft System .102......................................Audio Panel .79..................................Audio System .86...Automatic Seat Belt Tensioners .18.............Automatic Speed Control .103........Back-up Light Replacement .156BatteryCharging System...........................Indicator .46,182............................Jump Starting .178..............................Maintenance .166............................Specifications .197..............................Before Driving .107....................................Belts,Seat .8,16.............................Beverage Holder .78..................................Booster Seats .37............................................Brakes .125...........Anti-lock System (ABS).126.............Break-in,New Linings .108...........................................Fluid .151.........................................Parking .75..........................System Design .126.................System Indicator .46,184........................Wear Indicators .126.............................Braking System .125.................Break-in,New Vehicle .108..Brightness Control,Instruments .58........................Brights,Headlights .57.........................Bulb Replacement .152..........................Back-up Lights .156.................................Headlights .152...........Side Turn Signal Lights .155............................Specifications .197............Turn Signal Lights .154,156..............................Bulbs,Halogen .152............................Capacities Chart .196.............Carbon Monoxide Hazard .40....................Cargo,How to Carry .115..............CAUTION,Explanation of .ii ...........................................CD Care .98.....................................CD Changer .98.....CD Changer Error Messages .100........................CD Error Messages .99.........................................CD Player .96........................Certification Label .194.................................Chains,Tires .165....................Changing a Flat Tire .171BACIChanging Oil........................................How to .144......................................When to .139...Charging System Indicator .46,182............Checklist,Before Driving .121.....................................Child Safety .28..............................Booster Seats .37...................................Child Seats .33.....Important Safety Reminders rger Children .36.......................Risk with Airbags .29.............................Small Children .32.......................................Child Seats .33.......................Cleaning Seat Belts .157.................................................Clock .54...................................Clutch Fluid .151........................CO in the Exhaust .201............Cold Weather,Starting in pact Spare Tire .170...............Consumer Information .206.............Controls,Instruments and .43..............................Convertible Top .70...............Convertible Top Cover .72..Lowering the Convertible Top .70................................Maintenance .74.....Raising the Convertible Top .73Coolant........................................Adding .146....................................Checking .112.........................Proper Solution .146...................Temperature Gauge .52Crankcase Emission Control........................................System .201................Cruise Control Indicator .47............Cruise Control Operation .103......................................Cup Holder .78.............Customer Service Office .206..............................Economy,Fuel .112..................................Emergencies .169.............Battery,Jump Starting .178...........Brake System Indicator .184................DANGER,Explanation of .ii ...................................Dashboard .3,44..............Dashboard Lower Pocket .79................Daytime Running Lights .57Daytime Running Lights.......................................Indicator .48.................................Dead Battery .178.........Defects,Reporting Safety .208................Defogger,Rear Window .59................Defrosting the Windows .85..........................Differential Fluid .150....................................Dimensions .196...............Dimming the Headlights .57Dipstick..................................Engine Oil .111..........................Directional Signals .57........Disc Brake Wear Indicators .126.....................Disposal of Used Oil .146...................Do Not Tow a Trailer .129Doors..............Locking and Unlocking .63.......................Monitor Indicator .47......................Power Door Locks .63........DOT Tire Quality Grading .198Downshifting,Manual.............................Transmission .123...........Driver and Passenger Safety .5...........................................Driving .119....................................Economy .112........................Driving Guidelines .120..................Dust and Pollen Filter .158DEIICONTINUED...............Gas Mileage,Improving .112..........................................Gasohol .108.........................................Gasoline .108...........................................Gauge .52.....................Low Fuel Indicator .49................Octane Requirement .108........................Tank,Refueling .109.............................................Gauges .51...Engine Coolant Temperature .52...............................................Fuel .52.....................................Fan,Interior .83...........................................Features .81....................Filling the Fuel Tank .109Filters.........................Dust and Pollen .158...............................................Oil .144.............Flashers,Hazard Warning .58...................Flat Tire,Changing a .171Fluids..........................................Brake .151.........................................Clutch .151..............Manual Transmission .149..................Windshield Washer .148..........................Four-way Flashers .58.................................................Fuel .108......................Fill Door and Cap .109...........................................Gauge .52.....................Low Fuel Indicator .49................Octane Requirement .108...............................Oxygenated .108........................Tank,Refueling .109...............................Fuel Economy .112..............Fuel Station Procedures .109.....................Fuses,Checking the .186................Changing a Flat Tire .171.....Charging System Indicator .182..................Checking the Fuses .186...Closing the Convertible Top .185.........Hazard Warning Flashers .57............................Jump Starting .178.....Low Oil Pressure Indicator .182...Malfunction Indicator Lamp .183..................Overheated Engine .179.......................................Towing .191...........................Emergency Brake .76......................Emergency Flashers .58......................Emergency Towing .191............Emergency Trunk Opener .64.......................Emissions Controls .201.............Emissions Testing,State .204Engine............Adding Engine Coolant .146....Coolant Temperature Gauge .52.........................If It Won’t Start .176Malfunction Indicatormp .47,183.......................Oil Life Indicator .133........Oil Pressure Indicator .46,182..............Oil,What Kind to Use .143...............................Overheating .179............................Specifications .196............................Speed Limiter .124...............................Start Button .122.......................................Starting .122......................Ethanol in Gasoline .108...Evaporative Emission Controls .201...............................Exhaust Fumes .40Expectant Mothers,Use of Seat........................................Belts by .14FGIIIGearshift Lever Positions..............Manual Transmission .124Gross Vehicle Weight Rating.............................(GVWR).116,196.............Halogen Headlight Bulbs .152..............Hazard Warning Flashers .58Headlights........................................Aiming .152............Daytime Running Lights .57..................High Beam Indicator .48...........................Reminder Tone .57........Replacing Halogen Bulbs .152...................................Turning on .57.........Heating and Cooling System .82............................High Beam Lever .57.......................Hood,Opening the .110..................................................Horn .55...........................Hydraulic Clutch .151................Jacking Up the Vehicle .172.......................................Jack,Tire .171................................Jump Starting .178..................................................Keys .60Identification Number,.......................................Vehicle .194Ignition..............................................Keys .60...........................................Switch .62............Timing Control System .201........................Immobilizer System .61.........Important Safety Precautions .6Indicators..............ABS (Anti-Lock Brake).47Brake (Parking and Brake............................System).47,184................Charging System .46,182.............................Cruise Control .47....................................Door-open .47DRL(Daytime Running......................................Lights).48EPS (Electrical Power..................................Steering).47...................................High Beam .48........Key (Immobilizer System).49......................................Low Fuel .49................Low Oil Pressure .46,182...............Maintenance Required .50Malfunction Indicatormp .47,183.......................................Seat Belt .46...............................................SRS .47..................................Trunk-open .47Turn Signal and Hazard...................................Warning .48..VSA (Vehicle Stability Assist).50.........Indicators,Instrument Panel .46...................Inflation,Proper Tire .161........Recommended Pressures .162...................................Inside Mirror .75.............................Inspection,Tire .162....................Installing a Child Seat .33............................Instrument Panel .45........Instrument Panel Brightness .58.................................Interior Lights .80........................................Introduction .iIJKHIV。
蓝图汽车备件产品说明书
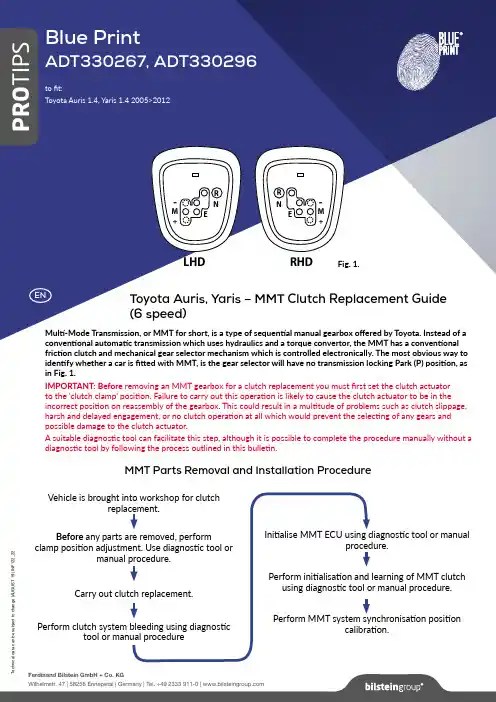
s u b j e c t t o c h a n g e |A U G U S T 19 | I N F 122_22ADT330267, ADT330296to the ‘clutch clamp’ position. Failure to carry out this operation is likely to cause the clutch actuator to be in the incorrect position on reassembly of the gearbox. This could result in a multitude of problems such as clutch slippage, harsh and delayed engagement, or no clutch operation at all which would prevent the selecting of any gears and possible damage to the clutch actuator.A suitable diagnostic tool can facilitate this step, although it is possible to complete the procedure manually without a diagnostic tool by following the process outlined in this bulletin.M -+ENR RHDFig. 1.MMT Parts Removal and Installation ProcedureVehicle is brought into workshop for clutchreplacement.Before any parts are removed, performclamp position adjustment. Use diagnostic tool ormanual procedure.Carry out clutch replacement.Initialise MMT ECU using diagnostic tool or manualprocedure.Perform clutch system bleeding using diagnostictool or manual procedurePerform initialisation and learning of MMT clutch using diagnostic tool or manual procedure.Perform MMT system synchronisation positioncalibration.s u b j e c t t o c h a n g e |A U G U S T 19 | I N F 122_2212345678910111213N E M +M +M +M +M E N8. Release the brake pedal.9. Press and release the brake pedal one time. A buzzer should now sound once. Note: If the buzzer does notsound, turn the ignition OFF and wait at least 15 seconds before starting the process from the beginning again.10. Pump the brake pedal (on>off) 3 times or more within a 2 second period. A buzzer should now sound twicewith an interval of 0.25 seconds.11. Depress the brake pedal and hold it down whilst shifting the gear lever into the ‘–’ position.12. Release the brake pedal.13. Turn the ignition OFF and wait at least 10 seconds.14. Disconnect the jumper wire from the 16 pin OBD diagnostic socket.The clutch is now in its clamped position and you can proceed with removing the transmission and replacing the clutch assembly.Note: If the clutch actuator cannot be set to the ‘clamp position’ due to a malfunction (sticking, etc.), then the clutch fluid pressure should be released from the bleeder plug to prevent the fluid from spraying.IMPORTANT: After you have replaced the clutch you will need to bleed the clutch system, initialise the MMT ECU and Clutch and perform the MMT system calibration.Clutch clamp position adjustment manual procedure (without diagnostic tool)1. Ensure the ignition is switched off, the gearselector is in the ‘N’ position and that the parking brake is applied.2. Use a jumper wire to connect terminals 4 and 13of the 16pin OBD diagnostic socket as shown in fig. 2. 3. With your foot OFF of the brake pedal, turn theignition switch to the ON position.4. Pump the brake pedal (on>off) 7 times or morewithin a 3 second period.5. A buzzer should now sound twice with an interval of 0.25 seconds.6. Depress the brake pedal and hold it down.7.Keeping the brake pedal held down, now shift the gear lever in the following sequence:Fig. 2.s u b j e c t t o c h a n g e |A U G U S T 19 | I N F 122_2212345678+M +M +M -N11. Confirm that the buzzer beeps 6 times.12. Pump the brake pedal (on>off) 3 or more times within 2 seconds.13. Confirm that the buzzer beeps twice.14. Remove the bleeder plug cap, connect a clear tube to the bleeder plug and loosen the bleeder plug.15. Move the shift lever to ‘-’ then back to ‘M’ and wait for 10 seconds or more.16. Move the shift lever to ‘+’ then back to ‘M’ and wait for 0.5 seconds or more.17. If the fluid runs free of air bubbles, tighten the bleeder plug.Note: If no fluid comes out, or if air bubbles are still present in the fluid, perform the following steps until the fluid coming out of the bleeder plug runs free of air bubbles.18. Move the shift lever to ‘-’ then back to ‘M’ and wait for 0.5 seconds or more. Then, move the shift lever to ‘+’back to ‘M’ and wait for 0.5 seconds. Then tighten the bleeder plug.19. Move the shift lever to ‘-’ then back to ‘M’ and wait for 0.5 seconds or more.20. Move the shift lever to ‘+’ then back to ‘M’ and wait for 0.5 seconds or more then loosen the bleeder plug. Ifthe fluid coming out of the bleeder plug now runs free of air bubbles then tighten the bleeder plug.Note: If air bubbles are still present in the fluid that comes out of the bleeder plug, repeat steps 18 through 20 again until the fluid runs free of air bubbles.21. Install the bleeder plug cap.22. Move the shift lever to ‘-’ then back to ‘M’ and wait for 0.5 seconds or more.23. Move the shift lever to ‘M’ then to ‘-’ then back to ‘M’ and wait for 0.5 seconds or more. Then, move the shift lever to ‘+’ then back to ‘M’ and wait for 0.5 seconds. Repeat this step at least 10 times.24. Move the shift lever to ‘N’. Then turn the ignition switch off.25. Wait for 20 seconds or more.Clutch system bleeding is Complete.Disconnect the jumper wire from 16 pin OBD diagnostic socket.Clutch System BleedingAfter replacement of the clutch assembly including the concentric slave cylinder,it will be necessary to bleed trapped air from the clutch hydraulic system. Before you start, remove the clutch master cylinder reservoir filler cap and fill the reservoir with brake/clutch fluid as necessary.1. Ensure the ignition is switched off and the gear selector is in the ‘N’ position.2. Re-connect the jumper wire as shown previously in Figure 2. 3. Turn the ignition switch to ON.4. Check that all electrical systems such as the air conditioning system, audio system and lighting system are off.5. Pump the brake pedal (on>off) 7 or more times within a 3 second period.6. Confirm that the buzzer beeps twice.7. Depress the brake pedal and hold it down.8. With the brake pedal held, move the shift lever to the ‘M’ position.9. Release the brake pedal.10. Move the shift lever through the following sequence and then depress the brake pedal.s u b j e c t t o c h a n g e |A U G U S T 19 | I N F 122_22123456789101112N E M +M -M +M -E N123456789101112N E M -M -M -M -E NInitialisation of the MMT ECU(All learned and calibrated values and DTC’s are cleared)1. Ensure the ignition is switched off and the gear selector is in the ‘N’ position.2. Re-connect the jumper wire as shown previously in figure 2.3. Wait at least 10 seconds and then turn the ignition to the ON position.4. Pump the brake pedal (on>off) at least 7 times within a 3 second period.5.A buzzer should now sound twice with an interval of 0.25 seconds.Now you are ready to initialise the ECU... 6. Depress the brake pedal and hold it down.7. Keeping the brake pedal held down, now shift the gear lever in the following sequence:8. Release the brake pedal.9. Press and release the brake pedal one time. A buzzer should sound twice with an interval of 0.5 seconds.Note: If the buzzer does not sound, turn the ignition OFF and wait at least 15 seconds before restarting the process from the beginning again.10. Pump the brake pedal (on>off) 3 times or more within a 2 second period. A buzzer should now sound twice withan interval of 0.25 seconds when initialising the ECU.11. Turn the ignition switch off and wait at least 10 seconds.12. Disconnect the jumper wire from 16 pin OBD diagnostic socket.Initialisation of the MMT ECU is complete.Initialisation of the clutch1. Ensure the ignition is switched off and the gear selector is in the ‘N’ position.2. Re-connect the jumper wire as shown previously in figure 2.3. Wait at least 10 seconds and then turn the ignition to the ON position.4. Pump the brake pedal (on>off) at least 7 times within a 3 second period. A buzzer should sound twice with aninterval of 0.25 seconds.Now you are ready to initialise the clutch... 5. Depress the brake pedal and hold it down.6. Keeping the brake pedal held down, now shift the gear lever in the following sequence:7. Release the brake pedal.8. Press and release the brake pedal one time. A buzzer should now sound 3 times to confirm initialisation of thetransmission. Note: If the buzzer does not sound, turn the ignition OFF and wait at least 15 seconds before restarting the process.9. Pump the brake pedal (on>off) 3 times or more within a 2 second period. A buzzer should now sound twice withan interval of 0.25 seconds.10. Turn the ignition switch to OFF and wait at least 10 seconds.11. Disconnect the jumper wire from 16 pin OBD diagnostic socket.Initialisation of the MMT clutch is complete.s u b j e c t t o c h a n g e |A U G U S T 19 | I N F 122_22MMT system synchronisation and position calibrationThe vehicle must now be road tested to allow the transmission to learn gear position and synchronisation.Drive the vehicle in the manual mode (gear position M) and move through all the gears leaving at least 2 seconds between changes.If after the synchronisation process the gear changes jolt or are not smooth, then perform the position calibration again.Please always abide by local speed limits.Gear Change Gear Position Vehicle SpeedUp-shift 1st →> 2nd Between 16.8-21.7 mph (27-35 km/h)2nd →> 3rdBetween 31.1-41.0 mph (50-66 km/h)3rd →> 4th Between 45.4-59.7 mph (73-96 km/h)4th >→ 5th Between 60.9-80.8 mph (98-130 km/h)5th >→ 6thBetween 60.9-110.0 mph (98-177 km/h)Down-shift2nd →> 1stBetween 16.8-21.7 mph (27-35 km/h)MMT system learningPerforming this procedure will ensure that the initialised clutch position and/or gear position is stored.1. Ensure the ignition is switched off and the gear selector is in the ‘N’ position.2. Turn the ignition to the ON position and wait at least 50 seconds. You will hear the gear shift and selectoractuator selecting gears.3. Turn the ignition to the OFF position and wait at least 15 seconds.4. Ensuring that the Shift lever is in the ‘N’ position, depress and hold down the brake pedal, turn the ignition on andstart the engine. The shift indicator on the instrument panel should blink when the engine is started.5. Wait at least 10 seconds, checking that the shift ‘N’ position indicator has stopped blinking and is oncontinuously.The MMT system learning is complete.。
汽车零部件说明书
保修及保养手册重要信息 (1)包修部分 (3)整车质量担保 (3)易损件质量担保 (6)保养部分 (8)保养目的 (8)保养计划 (9)车辆常规保养检修记录 (17)车辆非常规保养检修记录 (31)安全带预张紧器、安全气囊更换记录 (35)用户变更记录 (37)附件:上汽集团授权售后服务中心名单 (39)重要信息对您的建议我们建议您前往上汽集团授权售后服务中心保养和维修您的车辆。
因为只有上汽集团授权售后服务中心最了解您的汽车,并且在这里您可以得到上汽集团纯正的零部件和专业的技术。
我们的质量担保(车辆包修)也只有在上汽集团授权售后服务中心才能实现。
车辆的使用和注意事项我们的汽车使用了很多最先进的技术,因此请您在使用车辆前务必认真阅读《用户手册》,并遵从本手册和《用户手册》的要求进行保养和包修。
如果您对于如何使用、保养和包修本车存有疑问,请询问上汽集团授权售后服务中心。
请使用符合上汽集团技术规范和质量标准要求并适用本车的附件、零部件和车用油液,并按正确的操作程序保养和维修您的车辆,详情可咨询当地授权售后服务中心。
并请您尊重知识产权,使用正版的附件、零部件等,如果使用了侵犯知识产权的附件、零部件等,您将有可能承担相应的法律风险和法律后果。
免费更换发动机机油和机油滤清器服务上汽集团授权售后服务中心将为您提供一次免费的发动机机油和机油滤清器的更换服务,免费服务将包括材料和工时费用,免费服务的有效期同整车的包修期,免费更换服务只在上汽集团授权售后服务中心进行。
保养检修记录本手册中有两种保养检修记录表,分别记录“常规保养”和“非常规保养”的保养检修情况。
请务必保留保养检修记录表,它将为您和上汽集团授权售后服务中心提供分析失效原因的依据。
包修部分整车质量担保上汽集团将根据以下条款、条件和限制对整车提供包修服务。
除中国法律的强制性规定外,本手册规定了上汽集团对用户承担的包修责任。
■包修期上汽集团为新车提供了3年或10万公里(两者以先到达者为准)的包修期。
KF004_常用汽车标准件手册

常用汽车标准件手册
编制:审核:批准:
颁布日期:2011年12月8日实施日期:2011年12月10日
1.目的
为了方便管理公司产品所采用的汽车标准件以及与汽车厂家使用的汽车设计标准资料时间皮策接轨,便于沟通。
2.范围
本手册规定了本公司各类型产品上常用的汽车标准件。
本手册适用于本公司所有产品的图样和技术文件上应用的汽车标准件。
本手册列出了现有公司常用的标准件类型及规格,在以后的使用中优先选用本手册的规格尺寸,在本手册没有的类型和规格型号需使用的时候需要重新申请。
以便本手册备案。
3.常用汽车标准件清单(见下页)。
汽车配件商品说明书

汽车配件商品说明书尊敬的用户:感谢您选择本品牌的汽车配件产品。
本说明书将为您提供详尽准确的产品信息和使用指南,以确保您顺利使用和享受到本产品的高性能和优质服务。
1. 产品概述本产品是汽车保养和维修所需的配件,采用高质量材料制造,经过严格测试和质量控制,以确保产品的可靠性和耐用性。
我们始终以技术创新和用户需求为导向,致力于为广大用户提供优质的汽车配件产品。
2. 产品特点2.1 卓越的质量本产品采用优质原材料,严格按照国际标准制造,每个环节都经过全面检测和控制,以确保产品质量稳定可靠。
2.2 高性能本产品具有优异的性能表现,可以满足多种使用场景和需求,确保汽车的正常运行和安全性。
2.3 安装简便本产品设计合理,安装方便快捷,用户可以根据提供的安装指南轻松完成安装过程。
3. 使用说明3.1 安全注意事项请在使用本产品前仔细阅读和理解本说明书中提供的安全注意事项,确保您在使用过程中的安全和欣赏使用效果。
3.2 安装流程(在此处提供具体的安装步骤和图示,以帮助用户正确、顺利地安装本产品。
)3.3 使用方法(在此处介绍用户如何正确使用和保养本产品,包括但不限于正确使用场景、定期保养和注意事项。
)4. 常见问题解答为了解决用户使用过程中遇到的常见问题,我们整理了以下常见问题及解答,请您阅读并妥善处理。
Q1:如何保养本产品?A1:建议用户根据使用情况,定期进行清洁和润滑,确保产品的正常运行。
Q2:需不需要专业技术人员安装?A2:对于简单安装的产品,用户可以根据提供的安装指南自行安装,但对于复杂的安装,请咨询专业技术人员。
Q3:本产品有售后服务吗?A3:是的,我们为本产品提供售后服务,如有任何问题,请及时联系我们的客服,我们将竭诚为您解决。
5. 联系信息如果您在使用过程中遇到任何问题或有任何建议,欢迎联系我们的客服团队,我们将尽快为您解决。
客服电话:XXXX-XXXXXXX客服邮箱:*******************请在使用本产品之前仔细阅读本说明书,并根据说明书中的要求正确使用和保养本产品。
汽车原装件和配件说明书
1Juego de juntas, cárter de mando 2Junta, cárter de distribución 3Juego de juntas, camisa del cilindro 4Junta, radiador de aceite 5Juego de juntas, colector de admisión/escape 6Junta, colector de admisión/escape 7Junta, tensor de cadena de distribución 8Juego de juntas, compresor 9Junta, carcasa de colector de admisión 10Junta, depósito de aceite 11Juego de montaje, turbocompresor 12Juego de juntas, inyector 13Kit de reparación, unidad bomba-inyector 14Juego de juntas, radiador de aceite 15Junta, tamiz de aceite 16Junta, tubo de escape 17Clase de caja de cambios Caja de cambios manual 18Clase de caja de cambios Transmisión automática 19Material cárter Fundición de acero 20Material cárter Chapa de acero 21Material culata Fundición de acero 22Material culata Chapa de acero 23Equipamiento de vehículo para vehículos con climatizador 24Equipamiento de vehículo para vehículos sin aire acondicionado 25Equipamiento de vehículo para vehículos con regulación de nivel 26Equipamiento de vehículo para vehículos sin regulación de nivel 27Material culata Aluminio 28Material culata Fundición de aluminio 29Material culata Caucho 30Material culata Plástico31Material bloque motor Aluminio 32Material bloque motor Fundición de aluminio 33Material bloque motor Fundición gris 34kit de reparación, inyector 35Material cárter Plástico A exterior AS Lado de escape ES Lado de admisiónH posterior I interior L izquierda O arriba R derecha U debajo V delante ( ... x)Número de piezas necesariasNAnillo retén, árbol de levasJuego de juntas, bloque motor Varios Junta, culata Tornillo de culata Junta, tapa de culata de cilindro Escape / admisión Junta, cárter de aceite Retén de ejes。
汽车配件使用说明书
汽车配件使用说明书说明书第一章产品概述本说明书旨在提供关于汽车配件的正确安装和使用方法,以确保您的安全和车辆的正常运行。
在使用本产品之前,请务必仔细阅读本说明书,并按照要求进行操作。
第二章安装准备2.1 产品检查在安装之前,请确认所购买的配件是否完好无损。
仔细检查配件的外观以及与之配套的附件,确保没有任何磨损或损坏的情况。
2.2 工具准备安装过程中可能需要使用特定的工具,请根据说明书中的要求准备齐全,并确保工具的质量和适用性。
第三章安装步骤3.1 清洁工作在安装之前,请确保相关部位的清洁工作已完成。
清除旧有配件残留物,以保证新配件的安装质量。
同时,确保车辆处于停车状态,并采取相应的安全措施,如拉起手刹。
3.2 安装步骤根据产品的不同特点和种类,具体的安装步骤可能有所不同。
请根据附带的说明书和示意图,按照正确的顺序进行组装和安装。
第四章使用注意事项4.1 维护保养长期使用配件后,请定期检查其磨损情况,并根据需要进行维修和更换。
请按照附带的保养手册进行操作,并在规定的时间内进行保养维护工作。
4.2 安全驾驶配件的安装和使用不能影响驾驶的安全性能。
在使用配件的同时,请保持合理的行驶速度,并注意道路和交通情况,确保驾驶安全。
4.3 清洁和防护为了延长配件的使用寿命,请注意保持其清洁和防护工作。
避免使用酸碱性的清洁剂,以免损坏配件表面。
同时,在恶劣的气候条件下,使用相应的防护措施,如防雨罩等。
第五章故障排除5.1 常见问题以下是一些常见的故障情况及解决方法:- 配件松动或脱落:请检查安装是否牢固,并重新安装。
- 配件功能异常:请检查是否存在电路问题,如有需要,及时维修或更换相关配件。
5.2 联系方式如果您在使用过程中遇到任何问题或需要进一步的帮助,请随时联系我们的客户服务部门。
您可以在购买产品时获得我们的联系方式。
结束语本说明书提供了有关汽车配件的安装和使用方法,希望能对您的使用提供帮助。
如果有任何疑问或建议,请及时与我们联系。
汽车配件说明手册说明书
CONTINUEDAccessories.................................Installation .105...............Accessory Power Socket .70ACCESSORY (Ignition Key.......................................Position).53....................Additives,Engine Oil .130...............................Airbag (SRS).9,18..............................Air Conditioning .74.......................Air Pressure,Tires .146.............................Alarm,Anti-theft .53......................................Antifreeze .132Anti-lock Brakes (ABS)....................Indicator Light .41,118...................................Operation .117.Anti-theft Steering Column Lock .53............................Anti-theft System .94......................................Audio Panel .71..................................Audio System .78...............Automatic Speed Control .95............................Capacities Chart .180.............Carbon Monoxide Hazard .34........................Cargo,.107..............CAUTION,Explanation of .ii ...........................................CD Care .85........................CD Error Messages .86.....................................CD Changer .84.......CD Changer Error Messages .87.........................................CD Player .83........................Certification Label .178...................................Chains,.150Changing Oil........................................How to .130......................................When to .121....................Changing a Flat Tire .155...Charging System Indicator .40,166............Checklist,Before Driving .112........Back-up Light Replacement .141BatteryCharging System...........................Indicator .40,166............................Jump Starting .162..............................Maintenance .151............................Specifications .181................................Before Driving .99....................................Belts,Seat . 8 ,15.............................Beverage Holder .70..................................Booster Seats .31............................................Brakes .116...........Anti-lock System (ABS).117.............Break-in,New Linings .100...........................................Fluid .136.........................................Parking .67.................System Indicator .40,168..............Wear Indicators,Disc .117.............................Braking System .116.................Break-in,New Vehicle .100..Brightness Control,Instruments .49........................Brights,Headlights .48.........................Bulb Replacement .137..........................Back-up Lights .141.................................Headlights .137...........Side Turn Signal Lights .139............................Specifications .181............Turn Signal Lights .139,141..............................Bulbs, Halogen . 137how to carry tires IndexBACI..............................Economy,Fuel .104............Emergencies on the Road .153.............Battery,Jump Starting .162................Changing a Flat Tire .155.....Charging System Indicator .166..................Checking the Fuses .170.........Hazard Warning Flashers .49.....Low Oil Pressure Indicator .166...Malfunction Indicator Lamp .167..................Overheated Engine .163...........................Emergency Brake .67......................Emergency Flashers .49............Emergency Trunk Opener .55.......................Emissions Controls .185.....................................Child Safety .22..............................Booster Seats .31...................................Child Seats .26.....Important Safety Reminders rger Children .30......................Risk With Airbags .23.............................Small Children .26.......................................Child Seats .26Cleaning.................................Floor Mats .143...................................Seat Belts .143...................................Clutch Fluid .136........................CO in the Exhaust pact .154.............Controls,Instruments and .70..............................Convertible Top .61...............Convertible Top Cover .63..Lowering the Convertible Top .61................................Maintenance .65.....Raising the Convertible Top .64Coolant........................................Adding .132....................................Checking .103.........................Proper Solution .132...................Temperature Gauge .45Crankcase Emission Control........................................System .185..............Cruise Control Operation .95................Cruise Control Indicator .42......................................Cup Holder .70Customer Relationsrmation .192................DANGER,Explanation of .ii .......................................Dashboard .38................Daytime Running Lights .48Daytime Running Lights.......................................Indicator .42.................................Dead Battery .162............Defects,Reporting Safety .194................Defrosting the Windows .77....................................Dimensions .180...............Dimming the Headlights .48Dipstick..................................Engine Oil .103..........................Directional Signals .48........Disc Brake Wear Indicators .117.....................Disposal of Used Oil .132...................Do Not Tow a Trailer .118Doors..............Locking and Unlocking .54..............................Monitor Light .41......................Power Door Locks .54..........DOT Tire Quality Grading .182Downshifting,6-speed Manual.............................Transmission .114...........................................Driving .111....................................Economy .104spare tire IndexDEIICONTINUED.............Halogen Headlight Bulbs .137..............Hazard Warning Flashers .49Headlights............Daytime Running Lights .48..................High Beam Indicator .42...........................Reminder Tone .48........Replacing Halogen Bulbs .137...................................Turning on .48.........Heating and Cooling System .74.................High-Low Beam Switch .48................High Speed,Shifting at .115.............Emissions Testing,State .188Engine.......................................Coolant .132....Coolant Temperature Gauge .45Malfunction Indicatormp .41,167........Oil Pressure Indicator .40,166..............Oil,What Kind to Use .129...............................Overheating .163............................Specifications .180............................Speed Limiter .115.......................................Starting .113...................Engine,.160......................Ethanol in Gasoline .100...Evaporative Emission Controls .185...............................Exhaust Fumes .34Expectant Mothers,Use of Seat........................................Belts by .14.....................................Fan,Interior .75Features,Comfort and................................Convenience .73....................Filling the Fuel Tank .101Filters...............................................Oil .130.............Flashers,Hazard Warning .49...................Flat Tire,Changing a .155Fluids..........................................Brake .136.........................................Clutch .136..............Manual Transmission .134..................Windshield Washer .134..........FM Stereo Radio Reception .81..........................Four-way Flashers .49.................................................Fuel .100......................Fill Door and Cap .101...........................................Gauge .45................Octane Requirement .100........................Reserve Indicator .42........................Tank,Filling the .101..............Fuel Mileage,Improving .104..............Fuel Station Procedures .101.....................Fuses,Checking the .170.........................................Gasoline .100...............Fuel Reserve Indicator .42...........................................Gauge .45................Octane Requirement .100........................Tank,Filling the .101.............................................Gauges .44...Engine Coolant Temperature .45...............................................Fuel .45...............................Speedometer .44.................................Tachometer .44Gearshift Lever Positions 6-speed Manual.........................Transmission .114if it won’t start IndexFGHIII.................................... Hood Latch.135.......................Hood,Opening the.102...........................Hydraulic Clutch.136................Jacking Up the Vehicle.156.......................................Jack,Tire.155................................Jump Starting.162..................................................Keys.51......................... Label,Certification.78................. Lane Change,Signaling.48..................Lap/Shoulder Belts.12,15 Lights.................... Bulb Replacement.137....................................... Indicator.40.................................. Turn Signal.48..................................... Load Limit.108............................... Loading Cargo.107...... LOCK(Ignition Key Position).53 Locks....... Anti-theft Steering Column.53............................ Fuel Fill Door.101................................. Power Door.54 ........................................... Trunk.54........................ Low Coolant Level.103... Lower Gear,Downshifting to a.114......................... Low Fuel Indicator.42...Low Oil Pressure Indicator.40,166... Lubricant Specifications Chart.180............... Luggage,.107Identification Number,....................................... Vehicle.178 Ignition.............................................. Keys.51 ........................................... Switch.53............ Timing Control System.186 Indicator Lights,Instrument.........................................Panel.40.............. ABS(Anti-Lock Brake).41 Brake(Parking and Brake....................................System).40........................ Charging System.40............................. Cruise Control.42.................................... Door-open.41 DRL(Daytime Running......................................Lights).42 EPS(Electrical Power..................................Steering).41................................... High Beam.42........ Key(Immobilizer System).42......................................Low Fuel.42........................Low Oil Pressure.40...............Maintenance Required.43.......................................Seat Belt.40...............................................SRS.41..................................Trunk-open.41Turn Signal and Hazard...................................Warning.42...................Inflation,Proper Tire.146...................................Inside Mirror.66.............................Inspection,Tire.147............................Instrument Panel.39........Instrument Panel Brightness.49.................................Interior Lights.68........................................Introduction.istoring(cargo)IndexIJK LIVCONTINUED..............Panel Brightness Control .49.................................Parking Brake .67.................................Parking Lights .48.............................PGM-FI System .186Power..................................Door Locks .54..............Engine,Specifications .180.........................................Mirrors .66......................................Windows .59..........................Power Door Locks .54..................Power Socket Location .70..............................Power Windows .59.........Pregnancy,Using Seat Belts .14.........Protecting Adults and Teens .10...Additional Safety Precautions .15.....Advice for Pregnant Women .14........................Protecting Children .22.....................General Guidelines .22.......Protecting Larger Children .30.........Protecting Small Children .26..................................Maintenance .119Owner’s Maintenance...................................Checks .122........................................Record .125....................................Schedule .121..Maintenance Required Indicator .43.Malfunction Indicator Lamp .41,167...................Manual Transmission .114........Manual Transmission Fluid .134...............................Meters,Gauges .44..........................Mirrors,Adjusting .66...............Modifying Your Vehicle .106..................New Vehicle Break-in .100.....................Normal Shift Speeds .115..................NOTICE,Explanation of .ii ...............Numbers,Identification .178...Octane Requirement,Gasoline .100.........................................Odometer .44...............................Odometer,Trip .44Oil........................Change,How to .130......................Change,When to .121......................Checking Engine .103..............Pressure Indicator .40,166Selecting Proper Viscosity......................................Chart .130...........ON (Ignition Key Position).53.........................Opening the Trunk .54..............................Outside Mirrors .66....................Overheating,Engine .163...................Radiator Overheating .163.......................Radio Sound System .78...................Readiness Codes .167,188..Rear Lights,Bulb Replacement .141............................Rear View Mirror .66................Reclining the Seat-backs .58.......Recommended Shift Speeds .115Recovery Vehicle,Emergency.......................................Towing .176.............................Reminder Lights .40.......................Remote Transmitter .56IndexMNOPRVReplacement Information................ Engine Oil and Filter.130 .......................................... Fuses.170................................ Light Bulbs.137.................................... Schedule.121 ........................................... Tires.148............................. Wiper Blades.144 Replacing Seat Belts After a............................................ Crash.17............................... Restraint,Child.22................................ Rotation,Tire.148........................................ Safety Belts.8............ Safety Defects,Reporting.194............. Safety Labels,Location of.35............................... Safety Messages.ii.................................. Satellite Radio.88........................................... Seat Belts.8............... Additional Information.15..... Advice for Pregnant Women.14..................................... Cleaning.143...................... Lap/Shoulder Belt.16................................ Maintenance.17...... Reminder Light and Beeper.40...................System Components.15...............Use During Pregnancy.14........................Seats,Adjusting the.58...............................Serial Number.178...........................Service Intervals.121.............................Service Manual.195.........Service Station Procedures.101ShiftingThe6-speed Manual.........................Transmission.114Side Turn Signal,Bulb.........................Replacement in.140...............................Signaling Turns.486-speed Manual Transmission...............Checking Fluid Level.134................................Shifting the.114.....................................Snow Tires.149..................................Sound System.78Spare Tire......................................Inflating.154............................Specifications.181....................Specifications Charts.180..................................Speed Control.95...................................Speedometer.44..........SRS,Additional Information.18...Additional Safety Precautions.21....................Airbag Components.18.............................Airbag Service.21How the SRS Indicator.......................................Works.20...........How Your Airbags Work.18..................SRS Indicator Light.20,41.......................Starting the Engine.113................With a Dead Battery.162..............State Emissions Testing.188........Steam Coming from Engine.163Steering Wheel.............Anti-theft Column Lock.53.....................Stereo Sound System.78....................Storing Your Vehicle.152................................Stuck Vehicle.174Supplemental Restraint System......................................Servicing.21.........................SRS Indicator.20,41...............Tensioners,Seat Belts.16.....................................Tachometer.44......Taillights,Changing Bulbs in.141.Taking Care of the Unexpected.153IndexSTVICONTINUEDTechnical Descriptions......DOT Tire Quality Grading .182.....Emissions Control Systems .185Three Way Catalytic...............................Converter .187.......................Temperature Gauge .45...................Tensioners,Seat Belts .16..Three Way Catalytic Converter .187....................................Tire Chains .150.........Tire,How to Change a Flat .155.................................Tire Labeling .184...............................................Tires .145..............................Air Pressure .146...................................Balancing .148.........................Checking Wear pact Spare Tire .154......DOT Tire Quality Grading .182......................................Inflation .146..................................Inspection .147...................................Replacing .148......................................Rotating .148...........................................Snow .149............................Specifications .181...................Tools,Tire Changing .155Towing......................A Trailer,Do Not .118................Emergency Wrecker .176..................Trailer,Do Not Tow a .118TransmissionChecking Fluid Level,6-speed..........Manual Transmission .134...........................Fluid Selection .134..............Identification Number .178Shifting the 6-speed Manual.........................Transmission .114.....................................Treadwear .182.......................................Trip Meter .44................................................Trunk .54........Emergency Trunk Opener .55.................................Opening the .54...................Open Monitor Light .41....................................Turn Signals .48Unexpected,Taking Care..........................................of the .153....Uniform Tire Quality Grading .182........................Unleaded Gasoline ed Oil,How to Dispose of .132......................Vehicle Dimensions .180....Vehicle Identification Number .178.............................Vehicle Storage .152.................................................VIN .178..................................Viscosity,Oil .130.............WARNING,Explanation of .i i .........Warning Labels,Location of .35....................Warranty Coverages .193Washer,Windshield........Checking the Fluid Level .134.....................................Operation .47...........................................Wheels .149............Alignment and Balance .148......................................Wrench .155....Windows,Operating the Power .59Windshield.....................................Defroster .77.......................................Washers .47IndexUVWVIIWipers,Windshield.......................Changing Blades . 144.....................................Operation .47....................................Worn Tires .148.....Wrecker,Emergency Towing .176..........................XM Satellite Radio .88IndexXVIIIIX。
长安汽车经销商备件运营管理标准手册
长安汽车经销商备件运营管理标准手册长安汽车经销商备件运营管理标准手册第一章绪论1.1 编制目的1.2 适用范围1.3 术语和定义1.4 编制依据第二章经销商备件运营管理的原则2.1 客户至上2.2 品质第一2.3 高效运作2.4 诚信经营第三章经销商备件运营管理职责与权限3.1 部门职责划分3.2 职责与权限界定3.3 决策流程与授权第四章经销商备件采购管理4.1 供应商选择与筛选4.2 供应商评估与管理4.3 采购订单与供应商合同4.4 采购管理流程与责任第五章经销商备件库存管理5.1 库存分类与分级5.2 安全库存与补货策略5.3 库存周转与资金占用5.4 库存信息管理与系统应用第六章经销商备件物流管理6.1 物流流程与运输方式6.2 物流成本与效率分析6.3 仓储与配送管理6.4 物流系统应用与信息追踪第七章经销商备件销售与服务7.1 销售计划与目标7.2 产品推广与销售渠道7.3 销售数据分析与营销策略7.4 售后服务与技术支持第八章经销商备件质量管理8.1 质量管理体系建立8.2 质量检验与抽检机制8.3 不良品处理与追溯体系8.4 质量培训与改进措施第九章经销商备件信息管理9.1 数据采集与处理9.2 数据分析与决策支持9.3 信息安全与保密措施9.4 信息系统建设与应用第十章经销商备件运营管理的监督与改进10.1 运营绩效评估与考核10.2 运营管理风险与防范10.3 运营管理问题分析与改进10.4 经验总结与最佳实践分享第十一章附则11.1 法律法规遵循11.2 本手册修订与发布11.3 附件说明11.4 实施指导与培训本手册旨在为长安汽车经销商备件运营提供标准化的管理手册,从供应商选择、采购管理、库存管理、物流管理、销售与服务、质量管理、信息管理等方面进行详细的规范和要求。
通过合理的运营管理,实现备件的准时供应、品质保证和高效运作,提升客户满意度和经销商的竞争力。
编制手册时,根据长安汽车经销商备件运营的特点和实际需求,明确了经销商备件运营的原则和职责,规范了采购管理、库存管理、物流管理、销售与服务、质量管理和信息管理等各个环节。