4.11量测设备A.0
有机肥中铅、镉、铬、镍、铜、锌、砷和汞的测定电感耦合等离子体质谱法
有机肥中铅、镉、铭、银、铜、锌、碑和汞的测定电感耦合等离子体质谱法1范围本标准规定了有机肥中铅(Pb)、镉(Cd),铭(Cr)、锲(Ni)、铜(Cu),锌(Zn)、神(AS)和汞(Hg)测定的电感耦合等离子体质谱法。
本标准适用于有机肥中Pb、Cd、Cr.NixCu.Zn.AS和Hg含量的测定。
本方法定量限:Pb、Cr.Ni、AS为O.10mg/kg;Cd、Hg为O.OlOmg/kg;Cu、Zn为O.50mg∕kg,>2规范性引用文件下列文件对于本文件的应用是必不可少的。
凡是注日期的引用文件,仅注日期的版本适用于本文件。
凡是不注日期的引用文件,其最新版本(包括所有的修改单)适用于本文件。
GB/T6682分析实验室用水规格和试验方法3原理样品经硝酸-盐酸-过氧化氢微波消解后,测试液经过雾化由教气导入等离子体质谱仪,对于一定质荷比的待测离子,质谱信号响应值与进入质谱仪的离子数成正比,通过测量质谱信号计数确定样品中各元素浓度,根据标准曲线计算出各元素含量。
4试剂或材料除非另有说明,在分析中仅使用确认为优级纯或以上的试剂,水为GB/T6682规定的一级水。
4.1硝酸(HNO3)O4.2盐酸(HeL)。
4.3过氧化氢(30%)。
4.4硝酸溶液:取50疝硝酸(4.1)加水定容至IoOOmL04.5标准储备液:Pb、Cd、Cr.Ni、Cu、Zn.AS有证ICP-MS专用多元素混合标准溶液或有证单元素标准溶液,Hg.金(Au)有证单元素标准溶液。
4.6内标储备液:铳(SC)、锢(In)、钮(Bi)、错(Ge)有证单元素标准溶液。
4.7Pb、Cr、Ni、As、Cd、Cu、Zn混合标准工作溶液:分别准确移取适量标准储备液(4.5),用硝酸溶液(4.4)逐级稀释至以下浓度:Pb、Cr、Ni、AS均为500.Oug/L;Cd为100.Oug/L;Cu、Zn均为5000ug∕L<,4.8Hg、AU混合标准工作溶液:分别准确移取适量标准储备液(4.5),用硝酸溶液(4.4)逐级稀释至以下浓度:Hg›AU均为50.0ug/Lo4.9混合内标工作溶液:分别准确移取适量内标储备液(4.6),用硝酸溶液(4.4)逐级稀释至以下浓度:Sc、In、Bi、Ge均为100Oug∕L<,4.10质谱调谐液:仪器自备调谐液。
工地试验室检测项目及参数仪器设备一览表

2007/T0118-2007
天平
3
最大干密度
公路土工试验规程
多功能电动击实仪、 鼓风干燥箱 、电子天平
4
最佳含水量
公路土工试验规程JTG- E40- 多功能电动击实仪、 鼓风干燥箱
2007/T0131-2007
、电子天平
5
室内CBR试验
公路土工试验规程JTG-E40- 多功能电动击实仪、百分表、圆孔
规程JTG E30-2005/ T0527-2005
、标准筛
6
抗渗性
公路工程水泥及水泥混凝土试验 规程JTG E30-2005/ T0568-2005
水泥混凝土抗渗仪、试模、螺旋加 压器、鼓风干燥箱、电炉、密封材
料
7
表观密度
公路工程水泥及水泥混凝土试验 规程JTG E30-2005/ T0525-2005
回弹仪、标准钢钻
2
混凝土碳化深度
回弹法检测混凝土抗压强度规程 JGJ/T23-2011
碳化深度测量仪
3
钢筋位置及保护层厚度
混凝土结构工程施工质量验收规 范GB50204-2002
钢筋保护层测定仪
十
隧道工程
1
混凝土强度
回弹法检测混凝土抗压强度规程 JGJ/T23-2011
回弹仪、标准钢钻
2
锚杆拉拔力
岩土锚固与喷射混凝土支护工程 技术规范GB50086-2011
建筑砂浆基本性能试验方法标准 JGJ/T70-2009
压力机
六ቤተ መጻሕፍቲ ባይዱ
无机结合料稳定材料
1
最大干密度
公路工程无机结合料稳定试验规 多功能电动击实仪、 鼓风干燥箱
程JGJ E51-2009 / T0804-1994
电气火灾监控探测器 SCK600A 说明书

电气火灾监控探测器SCK600A用 户 手 册江 苏 斯 菲 尔 电 气 股 份 有 限 公 司感谢您选择江苏斯菲尔电气股份有限公司的SCK600A系列电气火灾监控探测器,为了方便您安全、正确、高效的使用本装置,请仔细阅读本说明书并在使用时务必注意以下几点:◆ 该装置必须由专业人员进行安装与检修◆ 在对该装置进行任何内部或外部操作前,必须隔离输入信号和电源◆ 提供给该装置的电参数需在额定允许范围内◆ 该装置不适用于TN-C系统,其剩余电流保护功能适用TN-C-S、TN-S及局部TT系统◆ 安装本装置时,严禁将N线与任意的PE线搭接混用◆ 严禁将不同支路的N线搭接混用本手册可以在本公司的主页上下载到最新版本,同时也提供一些相应的测试软件下载。
如果您需要纸质用户手册可以向本公司的技术服务部门申请。
(具体联系方式、网址见封底)目 录1. 产品概述 (1)2. 产品特点和技术参数 (1)2.1 产品特点 (1)2.2 主要技术指标 (1)3. 外形及安装尺寸 (1)3.1 控制器体外形尺寸及安装 (2)3.2 剩余电流互感器 (3)3.3 温度传感器 (3)4. 产品型号显示界面及按键操作 (4)4.1 显示区说明 (5)4.2 LED指示灯说明 (6)4.3 按键说明 (7)4.4 编程操作示例 (8)5. 功能说明 (9)5.1 保护功能 (9)5.2 事件记录功能 (11)5.3 通讯功能 (11)5.4 继电器输出 (14)6. 接线图及典型应用 (14)6.1 SCK600A系列一次接线图 (15)6.2 SCK600A系列二次接线图 (15)7.SCK600A电气火灾监控探测器操作流程 (16)1. 产品概述SCK600A系列电气火灾监控探测器(以下简称探测器)主要用于低压配电系统(0.4kV以下)的剩余电流、温度等参数监测并根据设定保护值作出相应故障提示和保护,同时可与消防系统联动,并可通过RS-485通讯实现远程监控,提高整个电气防火系统的安全性,把可能造成的电气火灾消灭在萌芽状态。
αβ测量仪简单操作流程
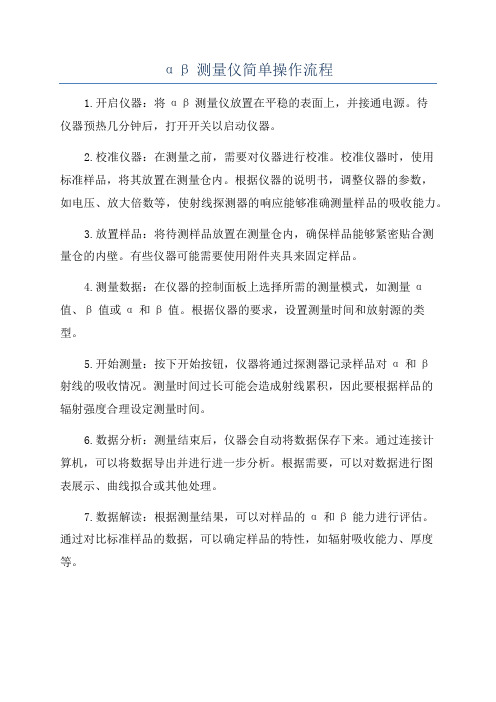
αβ测量仪简单操作流程1.开启仪器:将αβ测量仪放置在平稳的表面上,并接通电源。
待仪器预热几分钟后,打开开关以启动仪器。
2.校准仪器:在测量之前,需要对仪器进行校准。
校准仪器时,使用标准样品,将其放置在测量仓内。
根据仪器的说明书,调整仪器的参数,如电压、放大倍数等,使射线探测器的响应能够准确测量样品的吸收能力。
3.放置样品:将待测样品放置在测量仓内,确保样品能够紧密贴合测量仓的内壁。
有些仪器可能需要使用附件夹具来固定样品。
4.测量数据:在仪器的控制面板上选择所需的测量模式,如测量α值、β值或α和β值。
根据仪器的要求,设置测量时间和放射源的类型。
5.开始测量:按下开始按钮,仪器将通过探测器记录样品对α和β射线的吸收情况。
测量时间过长可能会造成射线累积,因此要根据样品的辐射强度合理设定测量时间。
6.数据分析:测量结束后,仪器会自动将数据保存下来。
通过连接计算机,可以将数据导出并进行进一步分析。
根据需要,可以对数据进行图表展示、曲线拟合或其他处理。
7.数据解读:根据测量结果,可以对样品的α和β能力进行评估。
通过对比标准样品的数据,可以确定样品的特性,如辐射吸收能力、厚度等。
8.数据记录:及时将测量结果记录下来,包括样品的标识、测量时间、测量模式、测量时间和吸收能力等信息。
可以使用电子表格软件或实验记录本进行记录。
9.仪器维护:测量结束后,将样品取出,并将αβ测量仪进行清洁和维护。
清洁探测器和测量仓,防止灰尘和污染物对测量结果的干扰。
定期检查仪器的电源和连接线,确保其正常工作。
10.数据验证:为了验证测量结果的准确性和可靠性,可以进行重复测量或与其他方法进行对比。
如果发现数据存在较大偏差,需要排除仪器故障或操作错误。
以上是αβ测量仪的简单操作流程。
在操作过程中,需要注意安全防护,减少辐射对人体的伤害。
根据仪器的说明书和实际需要,可能还需要进行其他操作步骤。
最重要的是熟悉仪器的使用方法,保证测量结果的准确性和可靠性。
Uni-Trend-Tech UT511 绝缘测试仪器 使用说明书

本仪器的设计、制造和检测均达到IEC61010安全标准(电子类测量产品安全要求),本手册包括确保仪器的安全使用及保证仪器的安全状态,使用者所必须遵守的警告和安全条例。
使用前请先阅读以下说明。
● 使用仪器前请先仔细阅读并理解本使用说明手册。
● 无论何时必须遵守手册的要求,并保存好手册,使 之随时能供作参考。
● 仪器测试时,错误的操作会导致事故及仪器的损坏。
本仪器上的标志 意思是指为了安全操作本仪器,请使用者参照使用手册的相关部分操作。
危险 为了避免在某些状态及操作下、有可能引起 的严重或致命的损害。
警告 表明避免遭受电击的危险。
注意 表明避免对仪器的损害和进行准确的测量。
危险● 切勿测量交流750V/直流1000V以上的电路。
● 请勿在易燃性场所测试,火花可能会引起爆炸。
● 如果仪器表面潮湿或操作者手是湿的请勿操作本仪器。
● 当测量时,不可接触测试笔导电部位。
● 当测试线短路连接在仪器上时,不要按下TEST键。
● 测量时请勿打开电池盖。
● 执行绝缘测量时,不可触摸待测线路。
警告● 如果仪器出现异常请停止使用。
例如:仪器破损或 裸露出金属部分。
● 在电压超过33Vrms,46.7Vacrms或70Vdc的状态下工作 时一定要小心谨慎。
此类电压可能引起电击。
● 在做完高阻测量之后,待测电路中的电荷储存必须 加以释放。
● 仪器于潮湿状态下请勿更换电池。
● 确定所有测试导线与仪器的测试端口连接牢固。
● 当打开电池盖时,确保仪器已关机。
一.安全警告警告注意● 在测量电阻前,待测电路必须完全放电,并且与电 源电路完全隔离。
● 如测试笔或电源适配器破损需要更换,必须换上同 样型号和相同电气规格的测试笔或电源适配器。
● 电池指示器批示电能耗尽()时,不要使用仪● 不要在高温、高湿、易燃、易爆和强电磁场环境中 存放或使用本仪器。
● 请使用湿布或清洁剂来清洁仪器外壳,请勿使用磨 擦物或溶剂。
● 仪器潮湿时,请先干燥后存储。
仪器校准管理PPT课件

29
.
哪些测量设备需要校准或检定
采用计量器具A、B、C管理法:
A类:量比较少,但比较重要,这类器具一般 要求周期性强检;
类:数量一般比较大,常用的的,可采用周期 性自检和送检;
C类:不需要周期性校准的;
30
.
应选择怎样的计量服务单位
针对某些测量设备,如果公司无能自行校验,则 应委托外部合格的校验机构进行校验。
合格合格出厂运输仓储入库验收60登记范例测量设备管理一览表设备编号设备名称型号规格验收日期日期测量范围分辨校准周期使用地点61校准合格证测量设备编号校准日期校准周期校准者校准状态标识范例62测量设备维修履历设备名称设备编号型号规格验收日期制造商使用部门主要技术参数随机附件及资历次校准记录维修记录备注63使用64落实责任制标识责任者65严格执行操作标准书测量设备培训考核合格正确操作66定期维护清扫污秽上防锈油日常点检活动部位加润滑油67防止不当的调整作适当的封印封印被破坏立即识别出及时得以调整68封印的形式涂料封印应能达到一经改变即明显可见的效果
这里规定的是误差极限值,所以实际上就 是计量性能所要求的最大允许误差。
最大允许误差是一个用来判定仪器是否合 格的要求。
24
.
强检计量器具
在我国《中华人民共和国计量法》指出: 县 级以上人民政府计量行政部门对:
社会公用计量标准器具; 部门和企业、事业单位使用的最高计量标准器具 以及用于贸易结算; 安全防护; 医疗卫生; 环境监测方面;
检定 法制 是否合法 检定规程 是否合格 检定报告
14
.
量值溯源
通过连续的比较链,使测量结果能够与有关的测 量标准,通常是国际或国家测量标准联系起来的 特性。
量值溯源是对测量设备最基本的要求之一。
Testo 112 NTC- Pt100 测量仪使用说明书
Instruction manual entesto 112NTC-/Pt100 measuring instrumentContentsGeneral notes ......................................................21.Safety advice........................................................32.Intended purpose ................................................43.Product description. (5)3.1Display and control elements ..........................................53.2Interfaces........................................................................63.3Voltage supply . (6)4.Commissioning ....................................................75.Operation (8)5.1Connecting a probe ........................................................85.2Switching the instrument on / off ....................................85.3Switching the display light on / off ..................................95.4Performing settings .. (9)6.Measuring..........................................................127.Care and maintenance ......................................148.Questions and answers......................................159.Technical data....................................................1610.Accessories/spare parts (17)1.888.475.5235*********************www.Testo-Direct .comGeneral notes2General notesThis chapter provides important advice on using this documentation.The documentation contains information that must beapplied if the product is to be used safely and efficiently.Please read this documentation through carefully andfamiliarise yourself with the operation of the product beforeputting it to use. Keep this document to hand so that youcan refer to it when necessary.Identificationachieved via the steps described.Where steps are numbered,you must always follow the order given!Condition A condition that must be met if an action is to be carried out as described.i ,1,2,...Step Carry out steps.Where steps are numbered,you must always follow the order given!TextDisplay text Text appears on the instrument display.Control buttonPress the button.-ResultDenotes the result of a previous step.ºCross-reference Refers to more extensive or detailedinformation.Button 1.888.475.5235*********************www.Testo-Direct .com1. Safety advice31.Safety adviceThis chapter gives general rules which must be followedand observed if the product is to be handled safely.Avoid personal injury/damage to equipmenti Do not use the measuring instrument and probes tomeasure on or near live parts.i Never store the measuring instrument/probes togetherwith solvents and do not use any desiccants.Product safety/preserving warranty claimsi Operate the measuring instrument only within theparameters specified in the Technical data.i Always use the measuring instrument properly and for itsintended purpose. Do not use force.i Do not expose handles and feed lines to temperatures inexcess of 70 °C unless they are expressly permitted forhigher temperatures.Temperatures given on probes/sensors relate only tothe measuring range of the sensors.i Open the instrument only when this is expresslydescribed in the documentation for maintenance andrepair purposes.Carry out only the maintenance and repair work that isdescribed in the documentation. Follow the prescribedsteps when doing so. For safety reasons, use onlyoriginal spare parts from Testo.Ensure correct disposali Take faulty rechargeable batteries/spent batteries to thecollection points provided for them.i Send the product back to Testo at the end of its usefullife. We will ensure that it is disposed of in an*********************environmentally friendly manner. 1.888.475.52352. Intended purpose42.Intended purposeThis chapter gives the areas of application for which theproduct is intended.Use the product only for those applications for which it wasdesigned. Ask Testo if you are in any doubt.testo 112 is a compact, accurate measuring instrument formeasuring temperatures by means of plug-in temperatureprobes. Thanks to the possibility of connecting not onlyNTC probes, but also Pt100 probes, the testo 112 coversa wide measurement range and at the same time providesa high level of measurement accuracy.The following components of the product are designed for continuouscontact with foodstuffs in accordance with the regulation(EC) 1935/2004:The measurement probe up to 1 cm before the probe handle or theplastic housing. If provided, the information about penetration depthsin the instruction manual or the mark(s) on the measurement probesshould be noted.The product was designed for the followingtasks/applications:·Food sector·Laboratories·Applications requiring official calibration (only relevant forGermany):The testo 112 is approved for official calibration by thePhysikalisch-Technisches Institut PTB (nationalmetrology institute in Germany).Approval mark:The product should not be used in the following areas:·Areas at risk of explosion·Diagnostic measurements for medical purposes*********************1.888.475.52353. Produktbeschreibung 53.Product descriptionThis chapter provides an overview of the components of the product and their functions.3.1Display and control elementsOverviewInfrared interface, probe socket Display Control buttons Battery compartment (rear)Button functionsButton Functions Switch instrument on; switch instrument off (press and hold)In configuration mode: 1.888.475.5235*********************www.Testo-Direct .com3. Production description6Important displayscharged3.2InterfacesInfrared interfaceMeasurement data can be sent to a Testo printer via theinfrared interface on the head of the instrument.Probe socketA plug-in measuring probe can be connected via the probesocket on the head of the instrument.3.3Voltage supplyVoltage is supplied by means of a 9V monobloc battery(included in delivery) or rechargeable battery. It is notpossible to run the instrument from the mains supply orcharge a rechargeable battery in the instrument.*********************1.888.475.52354. Commissioning7missioningThis chapter describes the steps required to commissionthe product.²Removing t t he p p rotective f f ilm o o n t t he d d isplay:i Pull the protective film off carefully.²Inserting a a b b attery/rechargeable b b attery:1To open the battery compartment on the rear of theinstrument, push the lid of the battery compartment inthe direction of the arrow and remove it.2Insert a battery/rechargeable battery (9V monobloc).Observe the polarity!3To close the battery compartment, replace the lid ofthe battery compartment in position and push itagainst the direction of the arrow.*********************1.888.475.52355. Operation85.OperationThis chapter describes the steps that have to be executed frequently when using the product.5.1Connecting a probePlug-in probesPlug-in probes must be connected before the measuringinstrument is switched on so that they are recognised bythe instrument.i Insert the connector of the probe into the probesocket.5.2Switching the instrument on /off²Switching tt he i i nstrument o o n: i Press .- A segment test is carried out: All LCD-segments inthe display briefly light up.- A function test of the instrument and the probe is carried out. The instrument tests the entire measurement channel regarding the adherence to allowed margins of error.The type of probe attached is displayed for approx.2s (NTC or Pt 100).An error is detected:-rEF Error is displayed for approx. 2s, then ----- is displayed. Please contact your dealer or Testo customer service.The function test was successful:-Measurement view is opened: The current reading is displayed.1.888.475.5235*********************www.Testo-Direct .com5. Operation9²Switching t t he i i nstrument o o ff:i Press and hold (for approx. 2s) until the displaygoes out.5.3Switching the displaylight on/off²Switching t t he d d isplay l l ight o o n/off:The instrument is switched on.i Press .5.4Performing settings1To o o pen c c onfiguration m m ode:The instrument is switched on and is in measurementview. Hold, Max or Min are not activated.i(for approx. 2s) until the displaychanges.-The instrument is now in configuration mode.(for approx. 2s) until thechanges that have already been made in configurationmode will be saved.2To s s et t t he a a larm f f unction:Configuration mode is opened, ALARM is lit.1/and confirm·oFF: Switches the alarm function off.·on: Switches the alarm function on.oFF was selected:ºContinue with objective T O SET THE MAX./MIN. PRINTFUNCTION.1.888.475.5235 *********************5. Operation10on was selected:2to set the value for the upper alarm3to set the value for the lower alarm3To s s et t t he m m ax./min. p p rint f f unction:MaxMin is flashing.i/and confirm·on: Maximum and minimum values are printed outas well when current or recorded readings areprinted.·oFF: Maximum and minimum values are not printedout as well when current or recorded readings areprinted.4To s s et A A uto O O ff:Configuration mode is opened, AutoOff is flashing.i/and confirm·on: The measuring instrument switches offautomatically if no button is pressed for 10min (Holdor Auto Hold is lit).·oFF: The measuring instrument does not switchitself off automatically.5To s s et t t he d d ate/time:Configuration mode is opened, YEAR is lit.1to set the current YEAR and confirm2to set the other values for the month() and time (TIME) and confirm each*********************1.888.475.52355. Operation116To s s et t t he u u nit o o f m m easurement:Configuration mode is opened, UNIT is lit.i/7To r r eset:Configuration mode is opened, RESET is lit.i and confirm·no: Instrument is not reset.·Yes: Instrument is reset. The instrument is reset tothe factory settings.The setting of date/time is not reset.-The instrument returns to measurement view.e1.888.475.5235 *********************6. Measuring126.MeasuringThis chapter describes the steps that are required toperform measurements with the product.²Taking a a m m easurement:The instrument is switched on and is in measurementview.i Put the probe in position and read off the readings.With the alarm function on and if the alarm thresholdis exceeded or undershot:-flashes and a signal tone is given.-The alarm goes out if the reading goes below theupper or above the lower threshold again.²Holding t t he r r eading, d d isplaying t t he m m aximum/minimumvalue:The current reading can be recorded. The maximum andminimum values (since the instrument was last switchedon) can be displayed.i several times until the desired value is-The following are displayed in turn:·Hold: the recorded reading·Max: Maximum value·Min: Minimum value·The current reading-In addition to the maximum or minimum readings,the 2nd reading line shows the current reading.*********************1.888.475.52356. Measuring 13²Resetting tt he m m aximum/minimum v v alues: The maximum/minimum values of all channels can be reset to the current reading.1several times until Max or Min lights up.2-All maximum or minimum values are reset to the current reading.²Printing rr eadings: The readings shown on the display (current reading,recorded reading or max./min. reading) can be printed out.A Testo printer is required (accessory part).With the Max./Min. print function switched on, the maximum and minimum values are printed out as well as the current reading or recorded reading.ºSee the chapter P ERFORMING SETTINGS .1Configure the instrument so that the value to beprinted is shown on the display.2-·The measurement value ·The date and timeOnly relevant for applications requiring official calibration in Germany:·A protocol line with the text:Der ausgedruckte Messwert stimmt mit der Anzeige des geeichten Messgeräts überein . (The printed measurement value corresponds to the display of the officially calibrated measuring instrument.)·A signature line1.888.475.5235*********************www.Testo-Direct .com7. Care and maintenance147.Care and maintenanceThis chapter describes the steps that help to maintain thefunctionality of the product and extend its service life.±Cleaning t t he h h ousing:i Clean the housing with a moist cloth (soap suds) if itis dirty. Do not use aggressive cleaning agents orsolvents!±Changing t t he b b attery/rechargeable b b attery:The instrument is switched off.1To open the battery compartment on the rear of theinstrument, push the lid of the battery compartment inthe direction of the arrow and remove it.2Remove the spent battery/rechargeable battery andinsert a new battery/rechargeable battery(9V monobloc). Observe the polarity!3To close the battery compartment, replace the lid ofthe battery compartment in position and push itagainst the direction of the arrow.*********************1.888.475.52358. Questions and answers15 8.Questions and answersThis chapter gives answers to frequently asked questions.Question Possible causes Possible solutionis lit (bottom right·Instrument battery is ·Replace instrumentin display).almost spent.battery.Instrument switches ·Auto Off function ·Switch function off.itself off automatically.is switched on.·Residual capacity ·Replace battery.of battery is too low.Display:-----·Probe is not plugged in.·Switch instrument off,connect probe andswitch instrumentback on again.·Probe break.·Please contact yourdealer or TestoCustomer Service.Display reacts slowly·Ambient temperature ·Raise ambientis very low.temperature.Display: uuuuu·Permitted measuring ·Keep to permittedrange was undershot.measuring range.Display: ooooo·Permitted measuring ·Keep to permittedrange was exceeded.measuring range.Display: rEF Error·Reference measurement·Please contact yourout of tolerance of dealer or Testo±0.1°C Customer Service.If we are unable to answer your question, please contactyour dealer or Testo Customer Service. Contact details canbe found on the guarantee card or on the Internet under.*********************1.888.475.52359. Technical data169.T echnical dataInstrumentCharacteristic ValueParameters Temperature (°C/°F)Measuring range Pt100 probe: -50...+300°C / -58...+572°FNTC probe: -50...+120°C / -58...+248°FResolution0.1°C / 0.1°FAccuracyºSee S YSTEM ACCURACYProbe1x mini DIN socket for Pt100 or NTC temperature probeMeasuring rate2/sOperating temperature range-20...+50°C / -4...+122°FStorage temperature-30...+70°C / -22...+158°FVoltage supply1x 9V monobloc battery/rech. batteryBattery life approx. 70hProtection class with TopSafe (accessory part) and probe connected:IP65EC Directive89/336/EECWarranty 2 yearsSystem accuracyMeasuring range Instrument Probe SystemMeasuring instrument + NTC temperature probe-50.0°C...-25.1°C±1%of reading±0.7%of reading±1.8%of reading-25.0...+40.0°C±0.2°C±0.2°C±0.5°C+40.1...+80.00°C±0.3°C±0.4°C±0.8°C+80.1...+120.0°C±0.5°C±0.6°C±1.2°CMeasuring instrument + Pt100 temperature probe-50.0...-25.1°C±0.2°C±0.3°C±0,6°C-25.0...+40.0°C±0.2°C±0.2°C±0.5°C+40.1...+140.0°C±0.2°C±0.4°C±0.7°C+140.1...+200.0°C±0.2°C±0.6°C±0.9°C+200.1...+300.0°C±0.3°C±0.8°C±1.2°C*********************1.888.475.523510. Accessories/spare parts17 10.Accessories/sparepartsName Part no.NTC probesWater-proof NTC immersion/penetration probe0613 1212Water-proof NTC surface probe for smooth surfaces0613 1912Efficient, robust air probe, NTC0613 1712Pt100 probesRobust, water-proof Pt100 immersion/penetration probe0609 1273Efficient, robust air probe, Pt1000609 1773MiscellaneousTopSafe testo 112, protects from impact and dirt particles0516 0221For a complete list of all accessories and spare parts,please refer to the product catalogues and brochures orlook up our website: *********************1.888.475.5235Notes18*********************1.888.475.5235Notes19*********************1.888.475.52350977.1121/02/T/dr/14.03.2006w w w .t e s t o .c o mtesto AGPostfach 1140, 79849 Lenzkirch Testo-Straße 1, 79853 Lenzkirch Telefon: (07653) 681-0Fax: (07653) 681-100E-Mail:*************Internet: 1.888.475.5235*********************www.Testo-Direct .com。
射线检测B级和AB级的区别
一、标准中涉及检测技术级别的条款在JB/T4730.2-2005标准中,规定了射线检测分为三级:A级——低灵敏度技术;AB级一一中灵敏度技术;B级一一高灵敏度技术。
在标准中涉及检测技术级别的条款概括起来有以下9条:1、第3.8条:射线检测技术等级选择;2、第3.2.2条:不同检测技术级别选择胶片的规定;3、第3.5条:不同检测技术级别选择增感屏的规定;4、第4.1.3条:不同检测技术级别对透照厚度比K的规定;5、第4.2.2条:不同检测技术级别对射线源的透照厚度范围的规定;6、第4.3.1条:不同检测技术级别对射线源全工件表面的最小距离的规定;7、第4.4.1条:不同检测技术级别对X射线照相最小曝光量的规定;8、第4.11.2条:不同检测技术级别对底片黑度D的规定;9、第4.11.3条:不同检测技术级别对底片的像质计灵敏度的规定。
二、射线检测技术等级的选择JB/T4730.2-2005标准第3.8条就有关射线检测技术等级选择的规定如下:3.8.1射线检测技术等级选择应符合制造、安装、在用等有关标准及设计图样规定。
承压设备对接焊接接头的制造、安装、在用时的射线检测,一般应采用AB级射线检测技术进行检测。
对重要设备、结构、特殊材料和特殊焊接工艺制作的对接焊接接头,可采用B级技术进行检测。
3.8.2由于结构、环境条件、射线设备等方面限制,检测的某些条件不能满足AB级(或B级)射线检测技术的要求时,经检测方技术负责人批准,在采取有效补偿措施(例如选用更高类别的胶片)的前提下,若底片的像质计灵敏度达到AB级(或B级)射线检测技术的规定,则可认为按AB级(或B级)射线检测技术进行了检测。
3.8.3承压设备在用检测中,由于结构、环境、射线设备等方面的限制,检测的某些条件不能满足AB级射线检测技术的要求时,经检测方技术负责人批准,在采取有效补偿措施(例如选用更高类别的胶片)后可采用A级技术进行射线检测,但应同时采用其他无损检测方法进行补充检测。
α能谱仪 仪器标准
α能谱仪仪器标准α能谱仪是一种用于测量物质中α粒子能量分布的仪器,广泛应用于核物理、材料科学、地质学等领域。
为了保证α能谱仪的准确性和可靠性,需要遵循一定的仪器标准。
以下是关于α能谱仪的一些基本标准:1. 性能指标:α能谱仪应具备高分辨率、高灵敏度、低本底噪声等性能指标。
这些指标可以通过实验或厂家提供的技术参数进行验证。
2. 能量范围:α能谱仪应能够测量一定范围内的α粒子能量,通常为几百keV至几十MeV。
能量范围的选择应根据实际应用领域和需求来确定。
3. 能量分辨率:α能谱仪的能量分辨率是指能够分辨的最小能量差。
能量分辨率越高,对α粒子能量的测量越精确。
能量分辨率的计算公式为:E = (ΔE)^2 / (E_0^2 + ΔE^2),其中E为能量分辨率,ΔE为能量差,E_0为入射α粒子的能量。
4. 灵敏度:α能谱仪的灵敏度是指探测器对α粒子的探测能力,通常用单位时间内探测到的α粒子数表示。
灵敏度越高,对低强度α粒子的探测能力越强。
5. 本底噪声:α能谱仪的本底噪声是指在没有待测样品的情况下,仪器本身产生的信号。
本底噪声越低,对测量结果的影响越小。
6. 稳定性:α能谱仪的稳定性是指仪器在长时间运行过程中,性能参数的变化程度。
稳定性越好,测量结果的可靠性越高。
7. 校准:α能谱仪应定期进行校准,以确保测量结果的准确性。
校准方法包括使用已知能量的标准源进行能量刻度,以及使用已知浓度的标准样品进行活度刻度。
8. 数据处理与分析:α能谱仪应具备数据存储、处理和分析功能,以便对测量结果进行进一步处理和分析。
总之,α能谱仪的仪器标准主要包括性能指标、能量范围、能量分辨率、灵敏度、本底噪声、稳定性、校准和数据处理等方面。
遵循这些标准,可以确保α能谱仪的准确性和可靠性,为科研工作提供有力支持。
MSA测量系统分析作业指导书
1、目的提供一种评定测量系统质量的方法,从而对必要的测量系统进行评估,以保证本公司所使用的测量系统均能满足于正常的质量评定活动。
2、范围适用于证实产品符合规定要求的所有测量系统。
3、职责品质部负责确定MSA项目,定义测量方法及对数据的处理和对结果的分析。
APQP小组负责协助质量管理员完成测量系统的分析和改进。
4、定义4.1测量设备:实现测量过程所必需的测量仪器,软件,测量标准,标准样品或辅助设备或它们的组合。
4.2测量系统:是对被测特性赋值的操作、程序、量具、设备、软件、环境以及操作人员的集合。
4.3偏倚:对相同零件上同一特性的观测平均值与真值(参考值)的差异。
4.4稳定性:经过一段长期时间下,用相同的测量系统对同一基准或零件的同一特性进行测量所获得的总变差。
4.5线性:在测量设备预期的工作(测量)量程内,偏倚值的差异。
4.6重复性:用一位评价人使用相同的测量仪器对同一特性,进行多次测量所得到的测量变差。
4.7再现性:不同评价人使用相同的测量仪器对同一产品上的同一特性,进行测量所得的平均值的变差。
4.8零件间变差:是指包括测量系统变差在内的全部过程变差。
4.9评价人变差:评价人方法间差异导致的变差。
4.10总变差:是指过程中单个零件平均值的变差。
4.11量具:任何用来获得测量结果的装置,包括判断通过/不通过的装置。
5、工作程序5.1 测量系统分析实施时机5.1.1新产品在生产初期,参见“产品实现策划控制程序”HNFH QP-08。
5.1.2控制计划中指定的检验项目每年需做MSA。
5.1.3客户有特殊要求时,按客户要求进行。
5.1.4测量系统不合格改善后需重新进行分析。
5.2测量设备的选择a) 有关人员在制定控制计划及作业指导书时,应选择适宜的测量设备,既要经济合理,又要确保测量设备具有足够的分辩率,使用测量结果真实有效。
b) 选择测量设备时,建议其可视分辩率应不低于特性的预期过程变差的十分之一(即可取过程公差的十分之一,例如:特性的变差为0.1,测量设备应能读取0.01的变化),关键特性可按此规定选择合适精度的测量设备。
- 1、下载文档前请自行甄别文档内容的完整性,平台不提供额外的编辑、内容补充、找答案等附加服务。
- 2、"仅部分预览"的文档,不可在线预览部分如存在完整性等问题,可反馈申请退款(可完整预览的文档不适用该条件!)。
- 3、如文档侵犯您的权益,请联系客服反馈,我们会尽快为您处理(人工客服工作时间:9:00-18:30)。
三,定义 无 流 程 图
N A B C 领回/送回 保管使用 损伤 Y 重校/送修 无法修复 N Y 报废/申购 记录存查 量规仪校 时机 制订/修订
N 审核 Y 通知 送回/取回 校正/外校 合格 N Y 登录标示 A B C
名翔恿线股份有限公司 制订日期:89 年 11 月 1 日 四,权责
技术组
量规仪器校正周期 表(MS-P4-1101) 年度计划表 (MS-P4-0906)
厂务部
3
审核
6.3.审核 6.3.1 厂务部主管审核周期表与计划表,若核可,进入流程 4 ,通知使用单 位,若未核可,则回到流程 2 ,修订校正周期与校正计划.
厂务部
4
通知
6.4 通知 6.4.1 技术组主管於各量规仪器校正周期届满日一周前,前往使用单位,於 量规仪器之"设备资料卡″(MS-P4-0908)如附件 3 上,填上送回校正 "设备资料卡″ 之日期,由该使用单位主管签名确认.
文件编号 页 次 七,参考文件
MS-P2-1101 第 4 页共 6 页 八,应用表单
格,若合格,进入流程 8 ,进行登录标示,若不合格,则进入流程 12,重新校正. 12 6.7.1.1 若量规仪器校正判定允收标准未说明者,得依校验机构提供之校正 标准视为判定基准. 6.7.2 外部校验机构判定量规仪器是否合格,若合格,进入流程 8 ,进行登 录标示,若不合格,则进入流程 12 12,重新校正. 技术组 8
登录标示
6.8 登录标示 不合格品管制程 6.8.1 打样员若测试合格,技术组主管须於量规仪器上标示`合格′标签, 序书 式样详见"标示标签一览表″(MS-P4-1104)如附表 1,若测试不合格,(MS-P2-1301) "标示标签一览表″ 则依【不合格品管制程序书】(MS-P2-1301)之相关规定处理. 进料检验程序书 不合格品管制程序书】 6.8.2 免校之量规仪器应贴上`免校′标签,式样详见"标示标签一览表″ (MS-P2-1001) "标示标签一览表″ (MS-P4-1104)如附表 1. 制程巡回检验程 6.8.3 量规仪器校正不合格时,使用单位主管应追溯至上一次校正日,此期 序书 间内之进料检验,制程巡回检验与成品检验之相关表单,待校正之变 (MS-P2-1002) 异因素排除后依【进料检验程序书】(MS-P2-1001), 制程巡回检验 成品检验程序书 【 进料检验程序书】 程序书】(MS-P2-1002)与【成品检验程序书】(MS-P2-1003)之相关规 (MS-P2-1003) 成品检验程序书】 程序书】 定,重新检测并判定是否合格,该期间所生产之成品,由技术组主管 通知业务员加强注意客户使用之情况与反应.
版次:A.1 版
技术组 校验机构
6
校正/ 校正/外校
6.6 校正/外校 采购管理程序书 6.6.1 若属厂内自行校正者,技术组主管於收件后,依各量规仪器操作及校 (MS-M2-0601) 正作业标准书进行校正,并将校正结果记录於"设备资料卡″(MS"设备资料卡″ P4-0908)如附件 3 之校正记录栏内. 6.6.2 若需外校之量规仪器,技术组主管於收件后,依【采购管理程序书】 采购管理程序书】 (MS-M2-0601)之相关规定提出校正申请,应寻求原量规仪器供应商或 经国家或国际认可之校验机构进行校正. 6.6.2.1 送校:量规仪器送校验机构进行校正后,由该校验机构於量规仪器 贴上该校验机构之校正标签及有效日期,并於量规仪器送回 时,由校验机构出示执行校正人员之资格证明影本与校正资 料,由技术组主管签收. 6.6.2.2 到厂校正:由校验机构之校正人员到厂后,应向技术组主管出示其 资格证明,执行校正后,於量规仪器贴上该校验机构之 校正标签及有效日期,并填具校正资料后,将校正资料 与校正人员之资格证明影本,由技术组主管签收. 6.6.2.3 技术组主管须於量规仪器送回公司时或经外校人员校正后,将校正 判定之结果,登录於"设备资料卡″(MS- P4-0908)如附件 3 中,并 "设备资料卡″ 将执行校正人员之资格证书影本及校正资料附於后 一并保存备查. ,
不合格品管制程 序书 (MS-P2-1301) 报废处理程序书 (MS-P2-1303)
设备资料卡 (MS-P4-0908)
(MS-P4-0908)如附件 3 上,标注报废,并重新开立"设备资料卡″ 采购管理程序书 "设备资料卡″ (MS-P4-0908)如附件 3. (MS-M2-0601)
厂务部
15
记录存查
6.15 记录存查 品质记录管制程 6.15.1 相关单位主管依【品质记录管制程序书】(MS-M2-1601)之相关规定,序书 品质记录管制程序书】 汇集所相关之表单记录并妥善保存. (MS-M2-1601)
�
设备资料卡 (MS-P4-0908)
技术组 校验机构
7
合格
6.7 合格 6.7.1 打样员依各量规仪器操作及校正作业标准书之允收标准,测试是否合
名翔恿线股份有限公司 制订日期:89 年 11 月 1 日 四,权责 五,作业流程 流程 单位 No
检验,量测与试验设备管理程序书 修订日期:89 年 12 月 1 日 六,作业内容 Who,When,Where,How to do,What 版次:A.1 版
6.1.2 上次校正使用期限届满时. 6.1.3 量规仪器之消耗品需汰换时. 6.1.4 采购新量规仪器时.
技术组
2
制订/ 制订/修订
6.2 制订/修订 6.2.1 技术组主管每年十二月,依各量规仪器所规定之校正周期,制订"量 " 规仪器校正周期表″ (MS-P4-1101)如附件 1 与 年度计划表″ (MS-P4规仪器校正周期表″ " 年度计划表″ 0906)如附件 2. 6.2.2 技术组主管依厂务部主管裁示,修订校正周期与校正计划.
技术组
5
送回/ 送回/取回
6.5 送回/取回 6.5.1 使用单位之主管於接获通知后,应尽速将量规仪器连同保护容器与 "设备资料卡″(MS-P4-0908)如附件 3,一并於期限内送回技术组, 设备资料卡″ 并注意避免量规仪器碰撞或掉落.
设备资料卡 (MS-P4-0908)
名翔恿线股份有限公司 制订日期:89 年 11 月 1 日 四,权责 五,作业流程 流程 单位 No
厂务部
11
损坏
技术组
12
重校/ 重校/送修
6.12 重校/送修 采购管理程序书 6.12.1 测试合格之量规仪器於使用期间或校正期间,因碰撞或掉落造成损 (MS-M2-0601) 伤者,技术组主管依本作业内容 6.6 之相关规定,再进行校正或维 修. 6.12.2 若经技术组主管校正后仍测试不合格或无法修复时,依本作业内容 6.6 之相关规定送至厂外校验机构校正或依【采购管理程序书】(MS采购管理程序书】
名翔恿线股份有限公司 制订日期:89 年 11 月 1 日 四,权责 五,作业流程 流程 单位 No
检验,量测与试验设备管理程序书 修订日期:89 年 12 月 1 日 六,作业内容 Who,When,Where,How to do,What
M2-0601)之相关规定提出维修申请. 6.12.3 量规仪器校正失效时,技术组主管需追溯至合格批,并填写"异常 " 处理联络单″ 处理联络单″(MS-G4-1401)如附件 4 中,以确定产品是否有异常. 6.12.4 技术组主管通知使用单位,送修前为防止被使用,须於量规仪器贴上 `暂停使用′标签,式样详见"标示标签一览表″(MS-P4-1104)如附 "标示标签一览表″ 表 1.
检验,量测与试验设备管理程序书 修订日期:89 年 12 月 1 日 六,作业内容 Who,When,Where,How to do,What
6.5.2 若未於期限内送回,逾期三日,则由技术组主管向该单位强制取回.
文件编号 页 次 七,参考文件
MS-P2-1101 第 3 页共 6 页 八,应用表单
文件编号 页 次 七,参考文件
MS-P2-1101 第 6 页共 6 页 八,应用表单
异常处理联络单 (MS-G4-1401) 标示标签一览表 (MS-P4-1104)
版次:A.1 版
技术组 校验机构
13
无法修复
6.13 无法修复 6.13.1 由技术组主管或校验机构判定是否可修复,若可修复,则回到流程 14,申请报废或采购. 8 ,进行登录标示,若无法修复,进入流程 14
确认后领回,或由技术组主管送交各使用单位主管签名确认. 6.9.2 如为送厂外校正者,则技术组主管应跟催校验机构尽速送回,由技术 组主管签收后,依本作业内容 6.9.1 之相关规定办理.
厂务部
10
保管使用
6.10 保管使用 6.10.1 各相关单位保管人与现场人员,依以下规定保管与使用. 6.10.1.1 除非量规仪器特性允许,一般储存於量规仪器储存柜中. 6.10.1.2 量规仪器储存环境不得超出量规仪器最大储存规定. 6.10.1.3 量规仪器储存地点不可有易燃物品,并远离震动源. 6.10.1.4 量规仪器储存前应实施保养或其他预防措施. 6.10.1.5 使用与保养依各量规仪器之操作与校正作业标准书处理. 6.11 损坏 6.11.1 量规仪器於使用期间或校正期间,如有碰撞或掉落,均应由各使用 单位主管或技术组主管测试量规仪器是否有损坏,如有损伤,进入 流程 12 12,进行重校或送校作业,如无损伤,则进入流程 9 ,进行 领回或送回作业.
检验,量测与试验设备管理程序书 修订日期:89 年 12 月 1 日 六,作业内容 版次:A.1 版
文件编号 页 次 七,参考文件
MS-P2-1101 第 2 页共 6 页 八,应用表单
五,作业流程
单位 No
Who,When,Where,How to do,What 流程 量规仪校时 6.1 量规仪校时机 1 6.1.1 量规仪器使用期限届满时. 机