分时租赁洗车机说明书
全自动洗车机操作流程

04
05
检查传送带驱动系统,调整 传送带张紧度,清除异物
06
安全注意事项及操作规范
遵守设备安全操作规程
在操作全自动洗车机之前,必须仔细阅读并理解 设备的安全操作规程。
确保了解设备的所有功能和操作步骤,以及相关 的安全警示和标志。
遵守设备制造商提供的所有安全指南和建议。
注意个人防护措施
1
在操作全自动洗车机时,必须穿戴适当的个人防 护装备,如防水衣物、防滑鞋和防护手套。
02
操作前准备工作
检查设备状态及安全性
检查洗车机的外观是 否完好,无明显损坏 或变形。
检查洗车机的安全保 护装置是否齐全、有 效。
检查各部件连接是否 紧固,无松动或脱落 现象。
确认水源和电源连接正常
确认水源连接正常,水管无漏 水现象,且水压稳定。
确认电源连接正常,电线无破 损或老化现象,且电压稳定。
清洗过程
车辆离开
启动全自动洗车机,按照设定程序对车辆 进行清洗,包括预洗、主洗、漂洗等环节 ,确保清洗效果达到预期。
清洗完成后,引导车辆离开洗车机,并进 行必要的检查和整理。
拓展延伸:如何提高洗车效率和质量
优化洗车程序
根据车辆的不同类型和清洗需求,对 全自动洗车机的清洗程序进行优化, 提高清洗效率和质量。
在操作过程中,始终保持对设备的监控,并随时准备采取紧急措施,如按 下急停按钮,以应对可能发生的异常情况。
07
总结回顾与拓展延伸
本次操作流程总结回顾
准备工作
车辆进入
确保全自动洗车机设备正常运行,清洗液 、水、电等供应充足,并对车辆进行预检 ,了解车辆状况和清洗需求。
引导车辆进入洗车机指定位置,确保车辆 停放准确,不会触碰到设备。
毎日自动洗车设备说明书

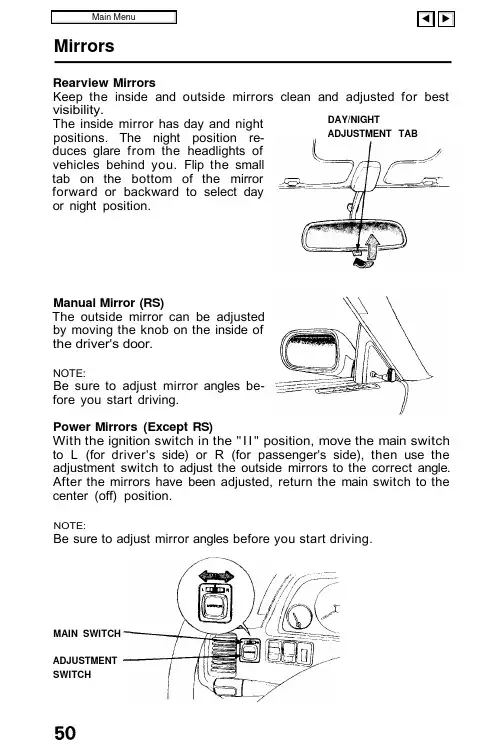
MirrorsDAY/NIGHTADJUSTMENT TAB Rearview MirrorsKeep the inside and outside mirrors clean and adjusted for best visibility.The inside mirror has day and nightpositions. The night position re-duces glare from the headlights ofvehicles behind you. Flip the smalltab on the bottom of the mirrorforward or backward to select dayor night position.Manual Mirror (RS)The outside mirror can be adjustedby moving the knob on the inside ofthe driver's door.NOTE:Be sure to adjust mirror angles be-fore you start driving.Power Mirrors (Except RS)With the ignition switch in the "I I" position, move the main switch to L (for driver's side) or R (for passenger's side), then use the adjustment switch to adjust the outside mirrors to the correct angle. After the mirrors have been adjusted, return the main switch to the center (off) position.NOTE:Be sure to adjust mirror angles before you start driving.ADJUSTMENTSWITCHMAIN SWITCHLights Turn Signals Push the turn signal lever down to signal a left turn, and up for a right turn. The indicator and appropriate signal lights will blink. The lever will return automatically to its original position when the steering wheel is returned to straight ahead.For lane changing, you can signal by pushing the lever part way up or down (to the first stop) and holding it there; the lever will return to its original position when you release it. If either turn signal indicator lights up but does not blink, blinks faster than usual or does not light up at all, check for a burned out bulb or fuse.Headlights Turn the light switch to the first position ( ) for taillights, side marker lights, position lights, license plate lights, and instrument panel lights. Turn to the second position ( ) to add the headlights.If the driver's door is opened when the light switch is turned to either "o n " position, a chime will sound to remind you to turn off your lights.High Beam/Low Beam Switch The headlights may be switched between low beam and high beam by pulling the turn signal lever toward you. The blue high beam indicator light will be on when the high beam is on.Headlight FlasherTo flash the headlights, pull lightly on the turn signal lever and release.(cont'd)Pull and release FIRST POSITION TurnSECOND POSITIONRIGHT TURNFIRSTSTOP FIRSTSTOPLEFT TURNLights (cont'd)Daytime Running Lights (Canadian Cars)With the ignition ON (position II) and the headlight switch OFF, the high beam headlights will come on at one-half power when the parking brake is released. This type of lighting is called "Daytime Running Lights" or DRL. The DRL turns off when you turn the ignition switch off.If the parking brake is reapplied without switching the ignition off,the "Daytime Running Lights" will remain on.Hazard Warning System This system should be used only when your car is stopped under emergency or hazardous conditions.To activate, push the hazard warn-ing switch ( ). The front and rearturn signals will blink simultaneously and both indicator lights will flash.Push the switch ( ) again to turnthe system off.Panel Brightness ControlWhen the light switch is in either ofthe two "ON" positions, the intensi-ty of the instrument lights can beadjusted by turning the panel bright-ness control dial.PushFog LightsPush the switch to operate the foglights. The fog lights will light onlywhen the headlights are on at lowbeam. The indicator will come onwhen the fog lights are on.NOTE:(RS)The fog light switch is located onthe left side of the steering column.Interior LightThe interior light has a three posi-tion switch. The light is off all thetime in the OFF position. In the mid-dle position, it goes on only when adoor is opened. In the ON position, itis on all the time.Map Lights (Except RS)The map lights are located abovethe rearview mirror. Push theswitch to turn the light on or off.Luggage Area LightThe luggage area light has a t w oposition switch. In the first positionit is OFF all the time, in the secondposition it goes ON only when thehatch is opened.Push ON OFFPushCruise Control (Except RS)Cruise Control Cruise control allows you maintain a set speed above 25 mph (40km'h) without keeping your foot on the accelerator pedal. It is not recommended for conditions such as city driving, winding roads,slippery roads, heavy rain, or bad weather. You should have full control of the car under those conditions.Improper use of the cruise control can lead to a e the cruise control only when traveling on open highways in good weather.CAUTION:The cruise control, as it operates, moves the accelerator pedal.You can damage your car's accelerator mechanism by resting your foot under the pedal and blocking the movement.To Set the Cruise Control:Push in the Cruise Control master switch to the left of the steering column. The indicator in the switch will light.Accelerate to the desired cruising speed above 25 mph (40 km/h).Press and hold the SET/decel button on the steering wheel until the CRUISE CONTROL light on the instrument panel comes on.This shows the system is now activated.The set speed may vary slightly, particularly on hills.Changing the Set SpeedTo increase the set cruising speed:Press and hold the RESUME/accel button. The car will accelerate slowly. Release the button whenthe desired speed is reached.Push on the accelerator pedal.Accelerate to the desired cruisingspeed and press the SET/decelbutton.PushPushTo decrease the set cruising speed:Press and hold the SET/decel button. The car will decelerate.Release the button when the desired speed is reached.Tap the brake or clutch pedal lightly with your foot. The CRUISECONTROL light on the instrument panel will go out. When the car slows to the desired speed, press the SET/decel button. The car will then maintain the desired speed.Even with the cruise control turned on, you can still use the accelerator pedal to speed up for passing. After completing the pass, take your foot off the accelerator pedal. The car will return to the set cruising speed.Resting you foot on the brake or clutch pedal will cause the cruise control to cancel.To Cancel the Cruise Control:Any of these actions cause the cruise control to cancel.Tap the brake or clutch pedal.Press the SET/decel and RESUME/accel buttons at the same time.Press the Cruise Control Master Switch.When you tap the brake or clutch pedal, or press the SET and RESUME buttons at the same time, the CRUISE CONTROL light on the instrument panel will go out and the car will begin to slow down. You can use the accelerator pedal in the normal way.If you use the brake or clutch pedal to cancel cruise control, the system retains the previously-set cruising speed. To return to that speed, accelerate to above 25 mph (40 km/h) and press the RESUME/accel button until the CRUISE CONTROL light comes on. The car will accelerate to the same cruising speed as before.If you cancel the CRUISE CONTROL by pressing the SET and RESUME buttons at the same time, the previously-set cruising speed is erased. To use the cruise control, accelerate to the desired cruising speed and press the SET/decel button.Pressing the Cruise Control Master Switch turns the system completely off and erases the previous cruising speed from memory. To use the system again, see page 54.Hood and Parking BrakeHoodTo open the hood, pull back onthe handle located under the dashon the driver's side.The hood latch is spring-loaded, so the hood will pop up slightly. Release the safety catch under the front center of the hood by pushing the rubber-tipped handle to your left.Lift the hood and prop it open with the support rod.To close, take the support rod down, place it back in its holder, lower the hood until it is approximately one foot from the closed position, then let it drop. Be sure the hood is securely latched before driving away.Parking BrakeTo apply the parking brake, pullup on the lever. To release it, pullup slightly, push the button, and lower the lever; when fully released, the BRAKE (US cars), or(Canadian cars) indicator will go out.Pull up SUPPORT RODPull to releasePower Windows (Except RS)The power windows can be oper-ated only when the ignition switch is in the "II" position.The operation of the windows is controlled by the main switch lo-cated in the master control panel on the driver's door. When the main switch is off, only the driver's door window can be opened and closed.When the main switch is on, both door windows can be opened and closed by the driver, using the appropriate switch in the master control panel, and the passenger window can be opened and closed by the passenger, using the switch located on the passenger door.When opening or closing a window,push and hold either the "u p " or "down" side of the switch until the window reaches the desired posi-tion, then release.NOTE:The driver's window can be openedfully, without the driver having tohold the switch down, simply bypushing the switch past the first"stop."Be sure, before closing any window, that all hands, arms and other obstructions are clear of the window frame and glass;severe personal injury could result.Always keep the main switch in the off position when children are in the car; injury may result from unintentional window operation.CloseOpen DRIVER'S WINDOWSWITCHMAIN SWITCHGlove Box and Clock Glove Box Open by pushing the knob.Close with a firm push.The glove box door can be locked by using the master key.(Except RS)The glove box light will go on whenthe glove box door is opened andthe headlights are on.Do not drive the car with the glovebox door open; it could cause injuryin an accident.Digital ClockThe time is displayed continuously when the ignition is switched to II or III. At all other times, push in on the lid to display the time.To adjust the time:1. Lower the lid.2. To set the minutes, push and holdthe MIN. button until the numbersadvance to the desired minute orminutes.3. To set the hour, push and hold the HOUR button until the houradvances to the desired hour.4. The RESET button allows you to synchronize your clock to the closest hour. If the time on the clock is before the half hour,pressing the RESET button will return the time to the previous hour. If the time is beyond the half hour, the RESET button will change the time to the next hour.NOTE:Be careful not to push the HOUR, MIN. or RESET buttons acciden-tally. Pushing any of them will change the clock's time setting.PushLIDCigarette Lighter and Ashtrays Cigarette Lighter Push in the lighter to heat up. It will automatically release when the element is hot. DO NOT hold it in while it is heating up, it may overheat and damage the lighter and the heating element.NOTE:The cigarette lighter will operate with the key in the "I " or "I I "position.Front Ashtray Open the ashtray by pulling its bot-tom edge toward you.To remove it, pull it out further while pushing down on the spring-loaded plate inside.Rear Ashtray The rear ashtray is located at the rear of the center console. It is opened by pulling out the top edge.To remove it, open the ashtray and release its bottom edge by pulling up,then out. To install, reverse the removal procedure.CAUTION:Do not use the ashtrays as trash containers; use them only for extinguished cigarettes. Putting lit cigarettes or matches in an ashtray with other combustible materials may cause a fire.To remove,pull up and out。
清洗机操作手册说明书

31.Activate thesetting mode for signal volume•1 step, the Press and +1 step, Set to •Button signalsInformation signalsSet the 1 stepSet the volume**you may need toselect the function several times.2.Set thevolume for ...skippage 10Detergent for main wash,water softener, bleach, stain remover fabric softener, starchdoor handleService flap**If the active Additional functions and options buttons Press WashingCancelling the programmeProgrammes at high temperatures:–Cool washing:–Press Programme selector for switching the machine on and off and for selecting the programme. Can be turned in either direction.All buttons are sensitive and need only to be touched lightly.Press and hold the option button for an automatic run8consumption consumptionTake care not to trap items of laundry between the washing machine door and the rubber seal.Laundry with varying degrees of soilinglight SoakingPour soaking agent/detergent into compartment selector to Starching Starching is possible in all wash programmes if liquid starch is used. Pour starch into the partment in accordance with the manufacturer's instructions (rinse first if necessary).10Cleaning the detergent drawer ...... if it contains detergent or fabric softener residues.ʑʑThis should not be necessary if the correct detergent dosage has been used. If it is necessary, however, proceed according to the descaling agent manufacturer's instructions. Suitable descalers can be obtained via our website or model-dependentDisconnect the mains plug .No solvents.11Detergent solution pumpTurn the programme selector to Drainage hose at the siphonTurn the programme selector to 1.2.Filter in the water supplyProduct number Production numberTrust the manufacturer's competence. Turn to us.You will thereby ensure that the repairs are performed by trained service personnel equipped with original spare parts.en operating instructionsWashing machine WAS32471SNObserve the safety instructions on page 8.Read these instructions and the separate installation instructions before operating the washing machine.page 10Detergent for main wash, water softener, bleach, stain removerfabric softener, starch3door handleService flap**If the active Additional functions and options buttons Press WashingCancelling the programmeProgrammes at high temperatures:–Cool washing:–Press Programme selector for switching the machine on and off and for selecting the programme. Can be turned in either direction.All buttons are sensitive and need only to be touched lightly.Press and hold the option button for an automatic run1.Activate thesetting mode forsignal volume• 1 step, the Press and + 1 step,Set to •Button signals Information signalsSet the 1 step Set the volume**you may need toselect the functionseveral times.2.Set thevolume for ...skipLaundry with varying degrees of soilinglightSoakingPour soaking agent/detergent into compartmentselector toStarchingStarching is possible in all wash programmes if liquid starch is used. Pour starch into thepartment in accordance with the manufacturer's instructions (rinse first if necessary).810Cleaning the detergent drawer ...... if it contains detergent or fabric softener residues.ʑʑThis should not be necessary if the correct detergent dosage has been used. If it is necessary, however, proceed according to the descaling agent manufacturer's instructions. Suitable descalers can be obtained via our website or model-dependentDisconnect the mains plug .No solvents.11Detergent solution pumpTurn the programme selector to Drainage hose at the siphonTurn the programme selector to 1.2.Filter in the water supplyProduct number Production numberTrust the manufacturer's competence. Turn to us.You will thereby ensure that the repairs are performed by trained service personnel equipped with original spare parts.en operating instructionsObserve the safety instructions on page 8.Read these instructions and the separate installationinstructions before operating the washing machine.。
分时租赁洗车机权利要求的一部分

权利要求书
1. 一种租赁用洗车机包括;一个柔性的、有扶持件规则其形变的、密封的水容器(a1),它被小车承载;对接此水容器(a1)实现注水,出水;以及包含一路电线,牵引小车的牵引管(a2);牵引用手抓柄(a3)位于牵引管(a2)的末端,它的上面有按钮用于控制水泵;还包括高压输水管(a4)将高压水流输送到喷洒器具(a5);
还包括固定在墙面的托举架子,小车被其托举,并且小车的接口与之吻合被充电并与之通信,这种吻合的导向得益于下述滑扣;
小车和此托举架子有彼此对应的滑扣,和锁扣;此滑扣和此锁扣共同实现小车的锁定;
还包括注水装置,与手抓柄(a3)上的水和电接口吻合,实现注水和通信。
2. 如权利要求1所述的租赁用洗车机,其特征在于:上述手抓柄(a3)可以和小车快速紧固,并且所述喷洒器具(a5)可以和手抓柄(a3)快速紧固;容器水空,两者均紧固置于托举架子上之后,水管呈现两个弯折计四段而悬垂。
3. 如权利要求1所述的租赁用洗车机,其特征在于:上述喷洒器具(a5)包括手柄和散射喷嘴构成的水枪,固态洗车肥皂,刷毛;固态洗车肥皂被加注在散射喷嘴和刷毛之间,受到高压水流的冲击之后形成皂液,皂液渗入刷毛之间;水枪和刷毛可快速紧固和快速脱离。
4. 如权利要求1所述的租赁用洗车机,其特征在于:上述水容器(a1)是一个全面柔软的水囊,其扶持件包括两个相向翻折装置和一个软棚构成的折叠帐篷,水囊位帐篷之中。
5. 如权利要求1所述的租赁用洗车机,其特征在于:对水容器(a1)的注水和出水,分别在所述注水装置,和小车上安置流量计,依据注水流量计控制电磁阀截流;依据小车上出水流量计来判断水容器(a1)水空与否。
1。
清洗机操作说明手册中文版

清洗机操作说明手册中文版一:清洗机的概述对于热处理零件,其表面的质量对热理质量会有一定的影响,零件表面越是清洁、无污垢,对热处理质量影响越小。
爱协林多用炉生产线中的清洗机正是为此目的而设计的。
清洗机的清洗可分前清洗与后清洗。
前清洗是零件在热处理前,为去除机加工过程残留的油污、铁屑,净化零件表面而进行的清洗过程;后清洗是零件在热处理后,为清除其表面未淋干的残油而进行的清洗过程。
二:清洗机的工作原理简介爱协林清洗机主要由喷淋室、水槽、升降台、油水分离器等几部分组成。
喷淋室内壁上布满了许多喷淋头,工作时,从喷淋头喷出高速水流再加上喷淋头的旋转从而达到净化零件表面的目的。
水槽又分清水槽与碱水槽,清水槽盛着的是自来水,用来清洗零件表面的碱液;碱水槽内盛着的是自来水和清洗液的混合物,用来清洗零件表面的油污、铁屑。
两个槽子的水温均由杆式恒温器来控制。
升降台在碱水槽和喷淋室之间上下运动,以达到碱水除残油和清水除残碱目的。
油水分离器安装在清洗机的后面,其作用是把碱水槽中碱水和油分离开,使碱水重新流回碱水槽,分离出来的油排入水沟。
清洗机的喷淋室和槽体上另外有控制补水和液位的检测系统,烘干系统、发泡系统、翻板机构等。
行走小车把清洗零件送入喷淋室,关闭炉门,启动程序后,升降台下降入碱水槽,开始碱水清洗。
这时发泡系统启动,靠它吹出的高压空气搅动碱液,使零件表面的油污脱离其表面浮在碱液表面上。
这些油污流入积油槽,通过油泵把它抽到油水分离器中进行油水分离后,分离的碱水依然流回碱水槽,油污则排入水沟。
碱水清洗结束后,升降台上升到淋水位,开始淋碱水。
淋碱水结束后,升降台上升到原始位置,这时清水喷淋泵启动,开始清水喷淋。
高速水流从喷头中喷出,将零件表面未淋干的碱液用清水清洗干净。
喷出的清水则通过翻板机构返回清水槽。
清水喷淋结束后,开始淋清水,烘干系统也同时启动。
通过洪干系统将零件表面的残水烘干。
当升降台回到原始位置,烘干启动后,补水监控系统也启动,这时它检测一下水槽中清水和碱水液位是否下降。
洗车机使用说明书

洗车机使用说明书尊敬的用户:感谢您购买我们的洗车机。
为了您能更好地使用洗车机,我们特别为您提供了以下使用说明。
一、产品介绍洗车机是一种自动化设备,可用于汽车的快速清洗和擦拭。
它具有高效、省时、省力等特点,能够为您提供便捷的洗车体验。
二、安全注意事项1. 在使用洗车机前,请务必仔细阅读本使用说明书,并按照说明进行操作。
2. 在使用洗车机时,请注意固定好车辆,确保其不会滑动或晃动。
3. 请勿在洗车机工作时放置任何不相关的物品,以免影响洗车效果或引发危险。
4. 防止儿童或宠物靠近洗车机,以免发生伤害事故。
三、使用步骤1. 将车辆停放在洗车机指定的位置,并确保车辆已熄火。
2. 打开洗车机的电源,按照显示屏上的指引选择洗车模式。
3. 确保车辆上的窗户和车门已经关闭,避免水流进入车内。
4. 按下开始按钮,洗车机将开始工作。
您可以根据需要选择自动模式或者手动模式。
5. 在洗车过程中,请注意观察洗车机的状态,以确保其正常运行。
6. 洗车结束后,关闭洗车机的电源,并等待车身完全干燥后移开您的车辆。
四、常见问题解答1. 洗车机无法启动怎么办?答:请检查电源是否连接稳固,是否有电源输入。
如有异常,请联系售后服务中心进行维修。
2. 洗车模式无法选择怎么办?答:请确认洗车机是否处于正常工作状态,如果问题仍然存在,请联系售后服务中心获得帮助。
3. 洗车机洗车效果不佳怎么办?答:首先,请检查洗车机的喷水口是否被堵塞。
如果是,清洁喷水口后再次尝试。
如果问题仍然存在,请联系售后服务中心解决。
五、保养维护1. 每次使用后,请及时清洁洗车机的喷水口和滚轮,以确保其正常工作。
2. 定期检查洗车机的电源线和接线是否正常,并避免使用受损的电源线。
3. 如遇到任何异常情况,请关闭电源,并联系售后服务中心进行维修。
六、注意事项1. 请勿将手伸入洗车机内部以免发生危险。
2. 在使用洗车机时,请勿将喷水口对准人体或动物,以免造成伤害。
3. 请勿在洗车机工作时使用任何化学清洁剂或溶剂,以免损坏洗车机。
汽车风屏风洗车设备说明书
1Wipers and Washers If the wipers stop operating due to an obstacle such as the build-up of snow, park the vehicle in a safe place. Rotate the wiper switch to OFF, and set the power mode to ACCESSORY or VEHICLE OFF (LOCK), then remove the obstacle.
Rainfall Sensor
Sensor sensitivity
Low sensitivity High sensitivity
NOTICE
AUTO should always be turned OFF before the following situations in order to prevent severe damage to the wiper system: • Cleaning the windshield • Driving through a car wash • No rain present
■ Wiper switch (OFF, INT*1/AUTO*2, LO, HI)
Move the lever up or down to change the wiper settings.
电动洗车机使用说明书
电动洗车机使用说明书[公司名称]电动洗车机使用说明书1. 产品介绍电动洗车机是一种便捷、高效的洗车设备,适用于各类车辆的清洗和保养。
本说明书旨在指导用户正确、安全地操作电动洗车机,以达到最佳的洗车效果。
2. 产品规格- 型号:[型号]- 输入电压:[电压]- 输入功率:[功率]- 最大工作压力:[工作压力]- 最大流量:[流量]- 外观尺寸:[尺寸]3. 安全须知为了确保您的安全,请在使用电动洗车机之前,仔细阅读并理解以下内容:- 请使用符合电压要求的电源,并确保接线正确可靠。
- 不要将电动洗车机浸入水中,以防触电或损坏机器。
- 使用前请确保电源插头的接地线连接可靠,并注意防水措施。
- 请勿长时间连续使用电动洗车机,以避免过热损坏设备。
- 在使用过程中,严禁将电动洗车机靠近人体或容易燃烧物品。
- 若出现异常或故障,请立即停止使用,并联系售后服务。
4. 使用方法正确使用电动洗车机可获得更好的洗车效果,遵循以下步骤操作:步骤1:连接电源- 将电动洗车机的电源线插头插入符合要求的电源插座,确保接线可靠。
- 安置电动洗车机在稳定平整的地面上,并确保设备牢固。
步骤2:连接喷枪和水管- 连接喷枪和高压水管。
- 请确保连接接头良好,防止漏水和松动。
步骤3:调整工作压力和流量- 通过电动洗车机上的调节旋钮,设置适合洗车的工作压力和流量。
- 工作压力和流量的设置应根据洗车对象的类型和污渍程度来确定。
步骤4:开始洗车- 按下喷枪开关,开始洗车。
- 从车辆顶部开始,逐渐向下清洗。
- 若遇到顽固污渍,可选择更高的工作压力和适当的喷嘴类型进行清洗。
步骤5:结束洗车- 洗车完成后,松开喷枪开关。
- 关闭电动洗车机的电源开关,拔掉电源插头。
5. 注意事项- 在使用电动洗车机时,不要将喷枪对准自己或他人。
- 请勿将喷水管放置在车轮周围,避免造成伤害或设备损坏。
- 使用后,建议将电动洗车机放置于干燥通风处,以延长其使用寿命。
- 定期清洁水过滤器,以保证电动洗车机的正常运行。
自助洗车机安装与操作指导书
再次用清水冲洗车身 用鹿皮巾、毛巾等擦干车身
13
常州途润机电科技有限公司 电话:0519-83812819
3.3 使用说明—— 洗车注意事项
1. 暂停使用水枪时,请按下相应的“暂停”按钮。 2. 投币时,须投足XX元才能启动机器;投币余额不能退
12
常州途润机电科技有限公司 电话:0519-83812819
3.2 使用说明—— 洗车操作步骤
9. 用鹿皮巾或者纤维毛巾等擦拭车身,吸干车身表面水分。 10. 如果刷卡后仍有余额,可将卡片再次放到刷卡区,余额
自动退回。
刷卡(投币XX 元) 选择“高压”模式 按下“清水/暂停”按钮
清水冲洗车身 按下“泡沫/暂停”按钮
地址:中国.江苏省常州市武进区花园街1号
邮编:277400
电话: (0519) 8381-2819
传真: (0519) 8633-9701
公司网站:
电子邮件:service@
3. 左下角:按钮区。自左至右分别是“清水/暂停”、 “泡沫/暂停”按钮,以及 “高压/常压”旋钮。
4. 左上角:显示屏。待机时,上行显示当前日期,下行显 示当前时间;启动机器后,上行显示洗车余额,下行显 示剩余水量(时间)。
11
常州途润机电科技有限公司 电话:0519-83812819
3.2 使用说明—— 洗车操作步骤
6
常州途润机电科技有限公司 电话:0519-83812819
1.3 结构与功能—— 功能介绍
9. 用水、用电量统计
本机内部配备了水表、电表等仪表,方便您对用水量 和用电量的统计和监控,也节省了您另行购买和安装 的时间精力。
清洗机使用说明书(最终版)_pdf
清洗机使用说明书 自动清洗机说明书All rights reserved未经许可,不得翻印Page 1 of 16 自动清洗机使 用说明书纳金 Nanometals 使用说明书 Operrating InstructionsNJ-QXJ-001 自动清洗机(工业用途) Automatic Cleaning Machine (Industial)感谢使用纳金科技清洗机产品 在安装、使用与维修前请仔细阅读本手册以期发挥最佳性能并维护安全All rights reserved未经许可,不得翻印Page 2 of 16 自动清洗机使 用说明书目录●安全注意事项 ●重要信息●清洗机主要规格参数 ●零部件名称和附图说明 ●显示屏附图说明及含义 ∙主界面 ∙手动画面 ∙参数设置 ●使用步骤 ∙触膜屏的设置 ∙锥形瓶的固定 ∙启动程序 ∙其他方面 ●维护及保养All rights reserved未经许可,不得翻印Page 3 of 16 自动清洗机使 用说明书安全注意事项●启动机器前,必须穿实验服,戴手套,带口罩,带上护目眼镜 (否则可能会导致轻微中毒,灼伤皮肤和眼睛) ●禁止将头伸入,通风橱里的机器中,以免发生意外 (否则可能会导致轻微中毒,或者头部会被夹伤) ●启动机器前,必须将通风橱的开关打开(否则可能会导致有害气体不能够及时排出,人体接触会轻微 腐蚀和中毒)●请把放锥形瓶的槽格都装满,装满后务必把固定盖板合上 (否则可能会导致部分强酸强碱,溅出水槽以外,腐蚀部分零 件,机器寿命变短)●严禁不戴手套直接用手触碰固定盖板 (否则可能会导致触碰的部位被轻微腐蚀) ●在机器运行时严禁将通风橱中的开关断开(否则可能会导致清洗中的有害气体不能及时排出实验室外) ●在机器运行时,出现紧急情况,立即断开电源 (否则可能会导致冒烟、起火、触电或腐蚀)All rights reserved未经许可,不得翻印Page 4 of 16 自动清洗机使 用说明书若工作中出现以下异常或故障 ∙喷头结构没有正常的上或下移动 ∙长形喷头没有正常的喷出液体 ∙旋转放置机构没有正常的左右翻转 ∙排液时电磁阀没有按照设定次序打开排液管 ∙电磁阀出现异常,不能止水或同时打开 ∙光电感应器异常亮起 ∙存在其他异常情况或故障请立即按掉显示屏上的“停止”开关,上述任一情况若依 然存在异常则立即按掉总电源,并与客户咨询服务中心联系进 行检查和修理。
- 1、下载文档前请自行甄别文档内容的完整性,平台不提供额外的编辑、内容补充、找答案等附加服务。
- 2、"仅部分预览"的文档,不可在线预览部分如存在完整性等问题,可反馈申请退款(可完整预览的文档不适用该条件!)。
- 3、如文档侵犯您的权益,请联系客服反馈,我们会尽快为您处理(人工客服工作时间:9:00-18:30)。
租赁用洗车机和管理方法技术领域[0001] 本发明涉及一种便携式的电动清洗工具,尤其是一种用于分时租赁的,清洗轿车外部的洗车机;以及用互联网对其进行租赁管理的方法。
背景技术[0002] 本发明是基于同发明人下述专利技术的再创新:《公用洗车装置》申请号:201810080947.6;《洗车装置与注水方法》申请号:201810340238.7;《可拖行清洗机》申请号:201810509987.8 ;上述技术,是为了实现这个目的:“效仿‘摩拜’共享单车,实现充电式自助洗车电动工具的分时租赁;让广大私家车主,在自己的车位里,利用晚饭后的闲暇时间自助洗车”;换句话说,就是自由的空间和自由的时间里,分时租赁电动工具,自己动手洗车。
然而我们在提交这些专利申请之前,没有足够的实践,也就是说上述技术多半是构思。
通过许多模型制作后的实践,对上述技术利弊总结如下。
[0003] 上述技术,创新优势突出点包括一. 水管的中段设计手柄(左手柄),其上的按钮控制水泵工作,效果突出,水管不憋压,摒弃了典型水枪上复杂的阀门,不但结构简单耐用、用户牵引时手感更好,还有利于水枪轻巧,充当刷子的柄。
[0004] 二. 左手柄上整合进水接头,也就是用于牵引小车的水管有两根,分别进水和出水。
这种设计效果好:用户将左手柄往注水台上一插,一个动作完成注水。
倘若模仿加油站的加油装置设计,注水口设计到水囊上,则用户不仅弯腰受累,还要找寻接口和关闭接口,或许难以一手完成。
[0005] 上述技术的不足,也是本发明要完善之处包括1.水管的收纳难题;水管的长度大约是两米,这么长的水管,且中段有手柄,用后如何规整、便捷的收纳之;使用中如何便利用户解放双手;上述技术里,没有具体结构设计上的体现。
CN201810080947所披露的小车底盘可翻折的技术方案,设想用户将水管细心卷曲后塞入小车内,再翻折底盘盖上。
实践之后发现这不现实,因为该过程需要耗费用户十分钟,且用户是蹲在地上操作的,且水管很肮脏、富有弹性,新用户第一次成功的收纳经历了至少三次的失败。
更头痛的是,收纳好之后,水管上、脚轮上的污渍在小车内淤积,用户体验糟糕。
[0006] 此外,用户在注水的时候,水枪无处安放,悬垂晃动容易磕坏。
换言之,需要设计一种结构简单可靠,使用便利的装置,它不但能实现收纳,更重要的是让各种用户体验有机结合,促使用户主动积极的去遵循既定的流程。
[0007] 2.水囊结构的难题;水囊必须有侧面扶持,防止其满水之后侧翻,这个扶持的装置,CN201810080947技术中是直接外露,和水囊紧固的。
如此,则水囊与扶持装置的紧固处,容易应力集中而疲劳破损。
在生产工艺上也会遇到难题,因为水囊是需要考虑密封防水的,难以使用铆钉,螺丝等寻常紧固件,只能依赖热塑等工艺。
也就是说CN201810080947技术里的水囊和扶持的结构,容易坏;且外形复杂缝隙多,容易积累污渍;成本高,拆解维护难。
[0008] 并且,CN201810080947技术里,如其附图所提示的,水囊的进出水接头,都露在外面,这就很不适合作为公共用品,因为管子容易被人拔掉,水管的弯折也容易导致进水受阻或者水管过早损坏。
繁杂的水囊外构造,也不利于印刷广告图案。
[0009] 换言之,此前的水囊设计思路,是模仿汽车轮胎,一层布料制作,既要考虑防水密封,又要考虑紧固,又要考虑耐磨防刮擦,还要防扎破。
[0010] 3.洗车机充电和存储的难题;前述技术给出的提示是采用网格柜子,对多台洗车机进行分别仓储,类似于邮政的快递柜,手机扫码开仓取件。
但是充电插孔要怎么去准确对接,没有具体结构设计;洗车机的脚轮必定有大量污渍,这个要怎么一个结构设计,便利清洁,也没有提示。
[0011] 并且,在实践中,我们发现居民社区的户外不适合布设柜子,因为很多居民楼靠近墙面的地方,地面是花坛或者水沟;柜子不但生产成本很高,且物业公司拒绝柜子摆设在户外,只许摆设在架空层下,场地费也高。
也就是说柜子仓储的技术方案并不实用。
[0012] 4.水枪,刷子和洗车液的难题;CN201810080947技术中,水枪和刷子一体化设计,洗车液葫芦与左手柄对接,它们被设想为用户私藏,使用时候插接。
实践中发现这样很繁杂,难以运营。
因为共享经济成功的关键点在于用户马上体验,例如共享单车,手机扫码之后立即开锁骑行。
然而CN201810080947这个设计意味着,用户要想体验,必须先网购一把水枪。
[0013] 这是明显的设计失误,不切实际!我们必须让用户,手机扫码租赁后,立即可以用高压水流冲洗车身,只有这样,他们才会进一步有兴趣购买刷子和洗车粉之类的耗材。
换言之,务实的设计要求是:水枪和出水管一体化。
[0014] 5.照明的难题;前述技术提示了,在左手柄设灯。
然而在清洗车身侧面的时候,尤其是清洗车身低矮之处(裙部)的时候,左手柄的单个光源,由上往下照明容易造成阴影;这是因为轿车的低矮处,通常设计成横截面倒梯形;偏偏此处污渍聚集最多,是清洗的重点。
[0015] 6.注水时候插接和身份鉴别的难题:左手柄对接后,如何鉴别身份,从而定量注水,甚至限制用户的注水速度。
左手柄和注水台,如何符合人机工学,既便利脱离又能准确插接;接口等装置具体的结构设计,前述技术没有提示。
[0016] 7.校验水囊里水是否放空的难题;前述设计没有细致的结构设计来提示,如何确保每一个用户在归还洗车机的时候,水囊都是放空的。
设计上,要实现水囊没有放空就拒绝上锁,并给与用户以提示。
[0017] 8.开锁之后误碰,导致借出的瞬间又上锁视为归还。
这种现象在江苏省昆山市的有桩公共单车“普信达”上频繁出现;在洗车机的锁定设计上也是一个难题。
[0018] 9.污渍的积累难题;工具用完后难免会沾染污渍,尤其是小车的脚轮和水管,所以定期冲洗机身是必不可少的维护工作,那么在设计上就要考虑到清洁机身的维护需求。
前述技术里的网格柜子方案,就不适合进行清洁维护。
例如工作人员使用高压水枪冲洗工具,那么工具以及充电装置,都要有合适的防水能力,类似“速递易”的网格柜子通常用钢板冲压焊接制成,这是容易生锈的,尤其是焊接处。
且每次冲洗都要开柜子门,也是麻烦的,对冲洗后的污渍疏导也是麻烦的。
[0019] 10.用户随时关注水量、电量,以及洗车机和手机APP有机结合的难题;需要让用户不必弯腰,稍微扭头就能持续知晓工具的电量(或/和)水量。
时刻知晓水量和电量,避免洗到一半,泡沫都没冲干净,水就空了。
[0020] “摩拜单车”的手机APP沦为纯粹的单车钥匙,收视率低导致广告收益少,前车之鉴,后事之师。
需要将手机APP和洗车设备有机结合,以合理的管理机制,赢得更多眼球。
[0021]本案技术,旨在解决上述难题,是制作了大量模型实践后的优选方案的总结。
实践中发现,租赁用的电动工具,相比贩卖用的电动工具,设计难度大多了,需要更多细致和全面的考虑用户体验、耐用度、生产成本和便捷维护。
[0022] 共享经济的关键点“用户到手就用,用完一丢,拍拍手就走;最好是用户免费,第三方付费”,本发明,就是要将此关键点落实到功能实现,和具体的结构设计上,解决上述技术里的难点,并且要实现各个优点有机结合,相辅相成。
[0023] 综合考虑了性价比,装配工艺,耐用度。
当前比较合适的的生产工艺例如:PVC布料热压缝合的水囊;PVC软胶注塑成型的水囊接口,与水囊热压粘合;帆布外套保护水囊;钣金冲压的墙上托架;尼龙加玻纤材质注塑成型的小车外壳,以及水枪;海绵结合PP塑料的刷子;形似绿豆的颗粒状洗车粉。
发明内容[0024] 基础方案:如附图8所示,洗车机包括;一个柔性的、有扶持件规则其形变的、密封的水容器(a1),它被小车承载;对接此水容器(a1)实现注水,出水;以及包含一路电线,牵引小车的牵引管(a2);牵引用手抓柄(a3)位于牵引管(a2)的末端,它的上面有按钮用于控制水泵;还包括高压输水管(a4)将高压水流输送到喷洒器具(a5)。
[0025] 还包括固定在墙面的托举架子,小车被其托举,并且小车的接口与之吻合被充电并与之通信,这种吻合的导向得益于下述滑扣;小车和此托举架子有彼此对应的滑扣,和锁扣;此滑扣和此锁扣共同实现小车的锁定;还包括注水装置,与手抓柄(a3)上的水和电接口吻合,实现注水和通信。
[0026] 更进一步的、一,上述手抓柄(a3)可以和小车快速紧固,并且所述喷洒器具(a5)可以和手抓柄(a3)快速紧固;容器水空,两者均紧固置于托举架子上之后,水管呈现两个弯折计四段而悬垂。
(参考附图1)二,上述喷洒器具(a5)包括手柄和散射喷嘴构成的水枪,固态洗车皂,刷毛;固态洗车皂被加注在散射喷嘴和刷毛之间,受到高压水流的冲击之后形成皂液,皂液渗入刷毛之间;水枪和刷毛可快速紧固和快速脱离。
(参考附图2)三,上述水容器(a1)是一个全面柔软的水囊,其扶持件包括两个相向翻折件和一个软棚构成的折叠帐篷,水囊位帐篷之中。
[0027]对于前述的几大难题,对应的发明内容如下:一、水管中段的左手柄,上面有快脱紧固件,和小车车身实现快速紧固和脱离;并且水枪上也有快脱紧固件,和左手柄实现快速紧固和脱离。
[0028] 如此一来,使用完毕后,水管实现了四个弯折而耷拉着,不必刻意收卷。
以水管总长度两米计算,四弯折后,悬垂长度仅半米。
水管的收卷难题被解决,水管外置也利于维护清洁时候,直接用高压水流冲洗水管外部的污渍。
[0029] 这个设计,不仅有助于使用完毕之后的整体收纳;同样有助于注水时用户解放双手,因为整机刚取用时,水枪就紧固在左手柄上,注水时,无需在意水枪的安放。
这样,用户可以在注水时暂时(注水耗时约几分钟)离开,进行其他活动(刷卡,再将刷子插接到贩卖机上购买洗车粉、观看视频广告等)。
[0030] 二、水囊和扶持装置不再直接紧固,而是将蓄水功能和防护需求剥离开来,类似于衣服的内衣搭配外套。
水囊的外面套一个外套,这个外套好似帆布帐篷,让水囊住进帐篷里享受防护,又能自由活动;换言之,扶持装置和外套共同扶持、并防护水囊免扎破,水囊的功能单纯为了蓄水。
[0031] 外套和扶持装置紧固,紧固工艺就简单多了,可以使用铆钉;拆解维护也简单多了,脱掉外套就能拽出水囊,进行替换;这样也更容易实现整机的简洁外观,便利印刷外部图案。
[0032] 三、摒弃网格柜子,采用墙上托架来存储小车,托架的表面贴近小车的腹部。
小车的腹部具有滑扣与托架紧固。
更进一步的,小车的尾部有充电插孔和锁扣,滑扣的滑动行程,适应锁扣和充电插孔的吻合。
[0033] 四、摒弃洗车液和瓶子,采用颗粒洗车粉,犹如绿豆、弹珠大小的颗粒,直接用高压水流冲刷这些颗粒,让其在狭小空间内弹跳碰撞,逐渐释放皂液。
基于颗粒状洗车粉,实现水枪和刷子的结构创新。
