
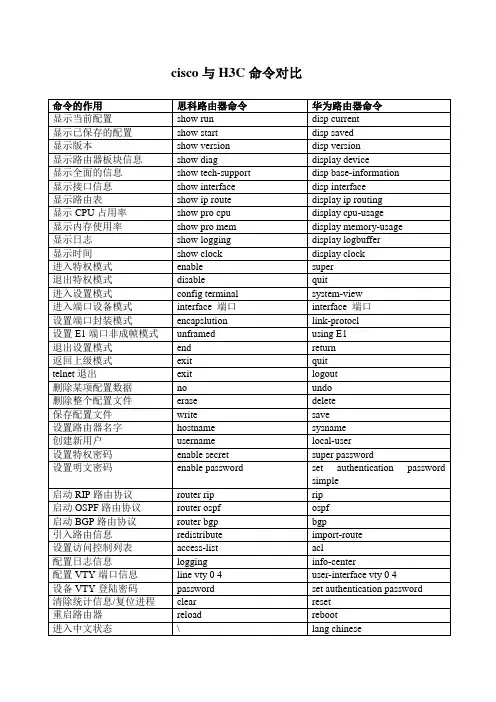
Cisco与H C 命令对比
show spanning-tree
路由部分
配置默认路由
ip route0.0.0.0
route-static0.0.0.0
配置静态路由
查看路由表
show ip route
display ip routing-table
启用rip、并宣告网段
router rip /network网段
rip /network网段
进入端口设备模式
interface端口
interface端口
设置端口封装模式
encapslution
link-protocl
设置E1端口非成帧模式
unframed
using E1
退出设置模式
end
return
返回上级模式
exit
quit
telnet退出
exit
logout
删除某项配置数据
no
undo
配置HSRP
standby group-number ipvirtual-ip
vrrp vrid number virtual-ip
配置HSRP优先级
standby group-number priority
vrry vrid number priority
配置HSRP占先权
standby group-number preempt
ip host
进入vlan配置
vlan database
vlan
设置成为骨干端口
vtp trunk
trunk
模式
mode
\
主干线
trunk
trunk
接口控制
switchport
port
访问
access
access
设置dhcp服务器功能
ip dhcp
dhcp
取消所有debug命令
no debug all
duplex(half|full|auto)
配置端口速率
speed(10|100|1000)
speed(10|100|1000)
配置trunk
switchport mode trunk
port link-type trunk
将端口加入vlan
switchport access vlan ID
port vlan ID
启用ospf
router ospf
ospf enable
配置ospf区域
network ip反码area area-id
ospf enable area area-id
配置rip v2水平分割
no auto-summary
rip split-horizon
查看路由协议
show ip protocol
show pro mem
display memory-usage
显示日志
show logging
display logbuffer
显示时间
show clock
display clock
进入特权模式
enable
super
退出特权模式
disable
quit
进入设置模式
config terminal
system-view
display ip protocol
标准访问控制列表
access-list 1-99 permit/deny ip
rule normal permit source IP
扩展访问控制列表
access-list 100-199 permit/deny protocol source IP+反码
rule normal|special permit|deny tcp|udp source
启动RIP路由协议
router rip
rip
启动OSPF路由协议
router ospf
ospf
启动BGP路由协议
router bgp
bgp
引入路由信息
redistribute
import-route
设置访问控制列表
access-list
acl
配置日志信息
logging
info-center
配置VTY端口信息
ctrl+d
交换部分
进入接口
interface type/number
port type/number
配置管理vlan地址
interface vlan 1
interface vlan 1
定义多个端口组
interface rang
interface ethID to ID
配置接口状态
duplex(half|full|auto)
vrrp vrid number preempt-mode
配置端口跟踪
standby group-number track
无
配置静态地址转换
ip nat inside source static
nat server global <ip> [port] inside <ip> port [protocol]
cisco与H3C命令对比
命令的作用
思科路由器命令
华为路由器命令
显示当前配置
showrun
disp current
显示已保存的配置
show start
disp saபைடு நூலகம்ed
显示版本
show version
disp version
显示路由器板块信息
show diag
display device
显示全面的信息
开启三层交换的路由功能
ip routing
默认开启
开启接口三层功能
no switchport
不支持
跨交换机的vlan动态注册
vtp domain
GVRP
stp配置根网桥
spanning-tree vlan ID root primary
配置网桥优先级
spanning-tree vlan ID root priority
添加/删除VLAN
vlan ID / no vlan ID
vlan ID / undo vlan ID
查看端口
show interface
display interface
查看vlan
show vlan id
display vlan id
链路聚合
channel-group 1 mode on
port link-aggregation group 1
删除整个配置文件
erase
delete
保存配置文件
write
save
设置路由器名字
hostname
sysname
创建新用户
username
local-user
设置特权密码
enable secret
super password
设置明文密码
enable password
set authentication password simple
line vty 0 4
user-interface vty 0 4
设备VTY登陆密码
password
set authentication password
清除统计信息/复位进程
clear
reset
重启路由器
reload
reboot
进入中文状态
\
lang chinese
host与ip名字对应
host
show tech-support
disp base-information
显示接口信息
show interface
disp interface
显示路由表
show ip route
display ip routing
显示CPU占用率
show pro cpu
display cpu-usage
显示内存使用率
Cisco与HC命令对比
vlan ID / no vlan ID
vlan ID / undo vlan ID
查看端口
show interface
display interface
查看vlan
show vlan id
display vlan id
链路聚合
channel-group 1 mode on
port link-aggregation group 1
开启三层交换的路由功能
ip routing
默认开启
开启接口三层功能
no switchport
不支持
跨交换机的vlan动态注册
vtp domain
GVRP
stp配置根网桥
spanning-tree vlan ID root primary
配置网桥优先级
spanning-tree vlan ID root priority
cisco与H3C命令对比
命令的作用
思科路由器命令
华为路由器命令
显示当前配置
showrun
disp current
显示已保存的配置
show start
disp saved
显示版本
show version
disp version
显示路由器板块信息
show diag
display device
显示全面的信息
show tech-support
disp base-information
显示接口信息
show interface
disp interface
显示路由表
show ip route
display ip routing
华为思科华三基本命令对比
super password
super password
设置特权口令
duplex (half|full|auto)
duplex (half|full|auto)
duplex (half|full|auto)
配置接口状态
speed (10/100/1000)
speed (10/100/1000)
ip route-static 0.0.0.0 0.0.0.0
ip route-static 0.0.0.0 0.0.0.0
配置默认路由
ip route 目标网段+掩码 下一跳
ip route-static 目标网段+掩码 下一跳
ip route-static 目标网段+掩码 下一跳
配置静态路由
show ip route
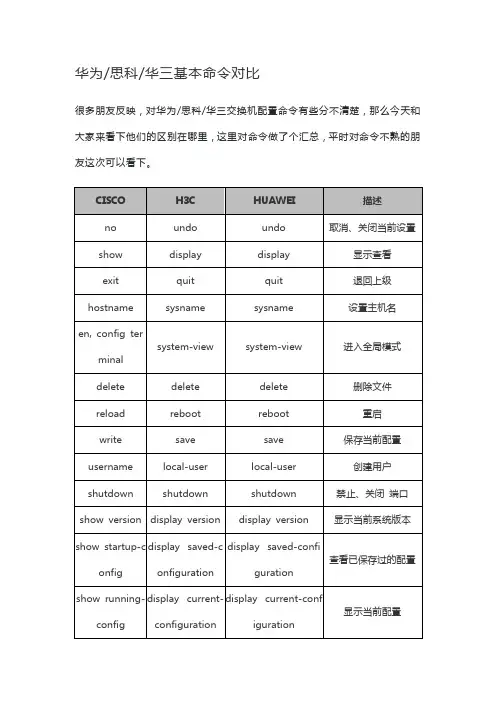
华为/思科/华三基本命令对比
很多朋友反映,对华为/思科/华三交换机配置命令有些分不清楚,那么今天和大家来看下他们的区别在哪里,这里对命令做了个汇总,平时对命令不熟的朋友这次可以看下。
CISCO
H3C
HUAWEI
描述
no
undo
undo
取消、关闭当前设置
show
display
display
显示查看
exit
line
user-interface
user-interface
进入线路配置(用户接口)模式
start-config
saved-configuration
saved-configuration
启动配置
running-config
current-configuration
思科 华为 华为3COM和锐捷之间的命令比较

CISCO 和锐捷基本上是一样的思科和H3C是完全不一样的Cisco 华为解释show display 显示no undo 删除/取消user local-user 新建用户end return 退回到系统视图exit quit 返回上级视图exit logout telnetr的退出router rip rip 启动rip router ospf ospf 启动ospf router bgp bgp 启动bgp hostname sysneme 设置主机名字access-list acl 控制访问列表write save 保存配置erase delete 删除配置0 simple 明文7 cipher 密文host ip host host名字和ip地址对应logging info-center 日志信息encapslution link-pro 封装链路层协议show version disp version 显示版本show run disp 显示当前配置current-configurationshow disp base-information 显示全面的信息tech-supportshow start disp saved-configuration 显示已保存的配置ctrl+z ctrl+z 退回到系统视图ctrl+p ctrl+p 上一条命令ctrl+n ctrl+n 下一条命令- ctrl+adisplay cur- ctrl+rdisplay ip routig-tableundebug all ctrl+d 取消所有debug命令cisco和华为命令2008-04-09 13:27CISCO交换机配置命令大全2006-2-28 14:33:001.在基于IOS的交换机上设置主机名/系统名:switch(config)# hostname hostname在基于CLI的交换机上设置主机名/系统名:switch(enable) set system name name-string2.在基于IOS的交换机上设置登录口令:switch(config)# enable password level 1 password在基于CLI的交换机上设置登录口令:switch(enable) set passwordswitch(enable) set enalbepass3.在基于IOS的交换机上设置远程访问:switch(config)# interface vlan 1switch(config-if)# ip address ip-address netmaskswitch(config-if)# ip default-gateway ip-address在基于CLI的交换机上设置远程访问:switch(enable) set interface sc0 ip-address netmask broadcast-address switch(enable) set interface sc0 vlanswitch(enable) set ip route default gateway4.在基于IOS的交换机上启用和浏览CDP信息:switch(config-if)# cdp enableswitch(config-if)# no cdp enable为了查看Cisco邻接设备的CDP通告信息:switch# show cdp interface [type modle/port]switch# show cdp neighbors [type module/port] [detail]在基于CLI的交换机上启用和浏览CDP信息:switch(enable) set cdp {enable|disable} module/port为了查看Cisco邻接设备的CDP通告信息:switch(enable) show cdp neighbors[module/port][vlan|duplex|capabilities|detail]5.基于IOS的交换机的端口描述:switch(config-if)# description description-string基于CLI的交换机的端口描述:switch(enable)set port name module/number description-string6.在基于IOS的交换机上设置端口速度:switch(config-if)# speed{10|100|auto}在基于CLI的交换机上设置端口速度:switch(enable) set port speed moudle/number {10|100|auto}switch(enable) set port speed moudle/number {4|16|auto}7.在基于IOS的交换机上设置以太网的链路模式:switch(config-if)# duplex {auto|full|half}在基于CLI的交换机上设置以太网的链路模式:switch(enable) set port duplex module/number {full|half}8.在基于IOS的交换机上配置静态VLAN:switch# vlan databaseswitch(vlan)# vlan vlan-num name vlaswitch(vlan)# exitswitch# configure teriminalswitch(config)# interface interface module/numberswitch(config-if)# switchport mode accessswitch(config-if)# switchport access vlan vlan-numswitch(config-if)# end在基于CLI的交换机上配置静态VLAN:switch(enable) set vlan vlan-num [name name]switch(enable) set vlan vlan-num mod-num/port-list9. 在基于IOS的交换机上配置VLAN中继线:switch(config)# interface interface mod/portswitch(config-if)# switchport mode trunkswitch(config-if)# switchport trunk encapsulation {isl|dotlq}switch(config-if)# switchport trunk allowed vlan remove vlan-listswitch(config-if)# switchport trunk allowed vlan add vlan-list在基于CLI的交换机上配置VLAN中继线:switch(enable) set trunk module/port [on|off|desirable|auto|nonegotiate] Vlan-range [isl|dotlq|dotl0|lane|negotiate]10.在基于IOS的交换机上配置VTP管理域:switch# vlan databaseswitch(vlan)# vtp domain domain-name在基于CLI的交换机上配置VTP管理域:switch(enable) set vtp [domain domain-name]11.在基于IOS的交换机上配置VTP 模式:switch# vlan databaseswitch(vlan)# vtp domain domain-nameswitch(vlan)# vtp {sever|cilent|transparent}switch(vlan)# vtp password password在基于CLI的交换机上配置VTP 模式:switch(enable) set vtp [domain domain-name][mode{ sever|cilent|transparent }][password password]12. 在基于IOS的交换机上配置VTP版本:switch# vlan databaseswitch(vlan)# vtp v2-mode在基于CLI的交换机上配置VTP版本:switch(enable) set vtp v2 enable13. 在基于IOS的交换机上启动VTP剪裁:switch# vlan databaseswitch(vlan)# vtp pruning在基于CL I 的交换机上启动VTP剪裁:switch(enable) set vtp pruning enable14.在基于IOS的交换机上配置以太信道:switch(config-if)# port group group-number [distribution {source|destination}] 在基于CLI的交换机上配置以太信道:switch(enable) set port channel moudle/port-range mode{on|off|desirable|auto} 15.在基于IOS的交换机上调整根路径成本:switch(config-if)# spanning-tree [vlan vlan-list] cost cost在基于CLI的交换机上调整根路径成本:switch(enable) set spantree portcost moudle/port costswitch(enable) set spantree portvlancost moudle/port [cost cost][vlan-list] 16.在基于IOS的交换机上调整端口ID:switch(config-if)# spanning-tree[vlan vlan-list]port-priority port-priority在基于CLI的交换机上调整端口ID:switch(enable) set spantree portpri {mldule/port}priorityswitch(enable) set spantree portvlanpri {module/port}priority [vlans]17. 在基于IOS的交换机上修改STP时钟:switch(config)# spanning-tree [vlan vlan-list] hello-time secondsswitch(config)# spanning-tree [vlan vlan-list] forward-time seconds` switch(config)# spanning-tree [vlan vlan-list] max-age seconds在基于CLI的交换机上修改STP时钟:switch(enable) set spantree hello interval[vlan]switch(enable) set spantree fwddelay delay [vlan]switch(enable) set spantree maxage agingtiame[vlan]18. 在基于IOS的交换机端口上启用或禁用Port Fast 特征:switch(config-if)#spanning-tree portfast在基于CLI的交换机端口上启用或禁用Port Fast 特征:switch(enable) set spantree portfast {module/port}{enable|disable}19. 在基于IOS的交换机端口上启用或禁用UplinkFast 特征:switch(config)# spanning-tree uplinkfast [max-update-rate pkts-per-second]在基于CLI的交换机端口上启用或禁用UplinkFast 特征:switch(enable) set spantree uplinkfast {enable|disable}[rate update-rate][all-protocols off|on]20. 为了将交换机配置成一个集群的命令交换机,首先要给管理接口分配一个IP 地址,然后使用下列命令: switch(config)# cluster enable cluster-name21. 为了从一条中继链路上删除VLAN,可使用下列命令:switch(enable) clear trunk module/port vlan-range22. 用show vtp domain 显示管理域的VTP参数.23. 用show vtp statistics显示管理域的VTP参数.24. 在Catalyst交换机上定义TrBRF的命令如下:switch(enable) set vlan vlan-name [name name] type trbrf bridgebridge-num[stp {ieee|ibm}]25. 在Catalyst交换机上定义TrCRF的命令如下:switch (enable) set vlan vlan-num [name name] type trcrf{ring hex-ring-num|decring decimal-ring-num} parent vlan-num26. 在创建好TrBRF VLAN之后,就可以给它分配交换机端口.对于以太网交换,可以采用如下命令给VLAN分配端口:switch(enable) set vlan vlan-num mod-num/port-num27. 命令show spantree显示一个交换机端口的STP状态.28. 配置一个ELAN的LES和BUS,可以使用下列命令:ATM (config)# interface atm number.subint multiointATM(config-subif)# lane serber-bus ethernet elan-name29. 配置LECS:ATM(config)# lane database database-nameATM(lane-config-databade)# name elan1-name server-atm-address les1-nsap-addressATM(lane-config-databade)# name elan2-name server-atm-address les2-nsap-addressATM(lane-config-databade)# name …30. 创建完数据库后,必须在主接口上启动LECS.命令如下:ATM(config)# interface atm numberATM(config-if)# lane config database database-nameATM(config-if)# lane config auto-config-atm-address31. 将每个LEC配置到一个不同的ATM子接口上.命令如下:ATM(config)# interface atm number.subint multipointATM(config)# lane client ethernet vlan-num elan-num32. 用show lane server 显示LES的状态.33. 用show lane bus显示bus的状态.34. 用show lane database显示LECS数据库可内容.35. 用show lane client显示LEC的状态.36. 用show module显示已安装的模块列表.37. 用物理接口建立与VLAN的连接:router# configure terminalrouter(config)# interface media module/portrouter(config-if)# description description-stringrouter(config-if)# ip address ip-addr subnet-maskrouter(config-if)# no shutdown38. 用中继链路来建立与VLAN的连接:router(config)# interface module/port.subinterfacerouter(config-ig)# encapsulation[isl|dotlq] vlan-numberrouter(config-if)# ip address ip-address subnet-mask39. 用LANE 来建立与VLAN的连接:router(config)# interface atm module/portrouter(config-if)# no ip addressrouter(config-if)# atm pvc 1 0 5 qsaalrouter(config-if)# atm pvc 2 0 16 ilnirouter(config-if)# interface atm module/port.subinterface multipoint router(config-if)# ip address ip-address subnet-maskrouter(config-if)# lane client ethernet elan-numrouter(config-if)# interface atm module/port.subinterface multipointrouter(config-if)# ip address ip-address subnet-namerouter(config-if)# lane client ethernet elan-namerouter(config-if)# …40. 为了在路由处理器上进行动态路由配置,可以用下列IOS命令来进行: router(config)# ip routingrouter(config)# router ip-routing-protocolrouter(config-router)# network ip-network-numberrouter(config-router)# network ip-network-number41. 配置默认路由:switch(enable) set ip route default gateway42. 为一个路由处理器分配VLANID,可在接口模式下使用下列命令:router(config)# interface interface numberrouter(config-if)# mls rp vlan-id vlan-id-num43. 在路由处理器启用MLSP:router(config)# mls rp ip44. 为了把一个外置的路由处理器接口和交换机安置在同一个VTP域中: router(config)# interface interface numberrouter(config-if)# mls rp vtp-domain domain-name45. 查看指定的VTP域的信息:router# show mls rp vtp-domain vtp domain name46. 要确定RSM或路由器上的管理接口,可以在接口模式下输入下列命令: router(config-if)#mls rp management-interface47. 要检验MLS-RP的配置情况:router# show mls rp48. 检验特定接口上的MLS配置:router# show mls rp interface interface number49. 为了在MLS-SE上设置流掩码而又不想在任一个路由处理器接口上设置访问列表:set mls flow [destination|destination-source|full]50. 为使MLS和输入访问列表可以兼容,可以在全局模式下使用下列命令:router(config)# mls rp ip input-acl51. 当某个交换机的第3层交换失效时,可在交换机的特权模式下输入下列命令:switch(enable) set mls enable52. 若想改变老化时间的值,可在特权模式下输入以下命令:switch(enable) set mls agingtime agingtime53. 设置快速老化:switch(enable) set mls agingtime fast fastagingtime pkt_threshold54. 确定那些MLS-RP和MLS-SE参与了MLS,可先显示交换机引用列表中的内容再确定:switch(enable) show mls include55. 显示MLS高速缓存记录:switch(enable) show mls entry56. 用命令show in arp显示ARP高速缓存区的内容。
Cisco和华为命令对比

Cisco和华为命令对比建立用户:Router(config)# username aaa password cisco[quidway]local-user aaa启动VTY验证:Router(config)#line vty 0 4[quidway]user-interface vty 0 4选择验证类型:Router(config-line)#login authentication[quidway-ui-vty0-4]authentication-modeVLAN:Switch(config)#vlan 10 name sale[quidway]vlan 10将端口加入vlan:Switch(config-if)#switchport access vlan 10[quidway-ethernet0/10]port access vlan 10将端口设置为trunk,允许所有vlan通过:Switch(config-if)#switchport mode trunkSwitch(config-if)#switchport trunk allowed vlan all[quidway-ethernet0/20]port link-type trunk[quidway-ethernet0/20]port trunk permit vlan all配置动态vlan发现协议:Switch (config)#vtp mode serverSwitch (config)#vtp domain cisco[quidway]gvrp enable配置端口汇聚:Switch(config-range)#interface range fastethernet 0/2[quidway]link-aggregation group 1 mode manual 先建立聚合组,再把端口加里面广域网协议配置:ppp的pap验证:router1(config-if)#encapsulation ppprouter1(config-if)#ppp authentication paprouter1(config-if)#ppp pap sent-username chen password cisco[quidway-serial0/1]link-protocol ppp[quidway-serial0/1] ppp authentication-mode pap[quidway-serial0/1] ppp pap local-user chen password simple cisco帧中继配置:router1(config)#frame-relay switchingrouter1(config-if)#frame-relay map ip 215.10.1.2 105 broadcastrouter1(config-if)#frame-relay lmi-type ansi[quidway]fr switching[quidway-serial0/1]fr map ip 215.10.1.1 dlci 501路由协议配置:静态路由:router1(config)#ip route 192.168.1.1 255.255.255.0 s0[quidway]ip route-static 192.168.1.1 255.255.255.0 s0RIP:router1(config)#router riprouter1(config-router)#version 2router1(config-router)#no auto-summaryrouter1(config-router)#network 192.168.1.0[quidway]rip[quidway-serial0/1]rip version 2 华为路由器是在接口模式下开启V2版本[quidway-rip]undo summary[quidway-rip] network 192.168.1.0OFPF:router1(config)#router ospf 1-65535router1(config-router)#network 192.168.1.0 0.0.0.255 area 0[quidway]ospf[quidway-ospf-1]area 0[quidway-ospf-1-area-0.0.0.0] network 192.168.1.0 0.0.0.255NAT :router1(config)#ip nat inside source static 192.168.1.1 10.1.1.1router1(config-if)#ip nat inside/outside[quidway-serial0/1]nat server protocol tcp global 202.10.1.150 inside 192.168.1.1 将内部ip转成外部ip地址访问控制列表:cisco基本访问列表数字标识:1-99,扩展访问列表是100-199;华为基本访问列表数字标识2000-2999,扩展访问列表是3000-3999基本访问列表:router1(config)#access-list 1 permit 10.1.1.0 0.0.0.255[quidway]acl number 2000[quidway-acl-2000]rule permit source 192.168.1.0 0.0.0.255扩展访问列表:router1(config)#access-list 100 permit tcp 192.168.1.0 0.0.0.255 any eq telnet[quidway]acl number 3000[quidway-acl-adv-3000]rule permit tcp source 192.168.1.0 0.0.0.255 destination any eq telnet应用访问控制列表:router1(config-if)#ip access-group 1 out/in[quidway]firewall enable 开启防火墙[quidway-serial0/1]firewall packet-filter 3000 inbound/outbound。
思科和H3C常用配置详细对比

cisco与华为命令比较功能Cisco命令华为命令进入全局模式#configure terminal <Quidway>system显示当前配置show running-config display current-configuration 显示版本信息show version display version显示vlan信息show vlan display vlan显示接口信息show interface接口display interface接口交换机路由器命名hostname主机名sysname主机名修改特权密码enable password密码(明文)enable secret密码(密文)super password密码进入接口模式interface接口interface接口进入vlan模式interface vlan vlan号interface vlan vlan号给接口配IP ip address <ip> <掩码> ip address <ip> <掩码>配telnet密码line vty 0 4password密码login user-interface vty 0 4authentication-mode passwordset authentication-mode password simple密码user privilege level 3激活端口no shutdown undo shutdown 关闭端口shutdown shutdown退出exit quit创建VLAN vlan vlan号vlan vlan号VLAN中增加端口port e0/1port e0/2 to e0/4当前端口加入到VLAN switchport access vlan vlan号port access vlan vlan号设置端口工switchport mode port link-type作模式trunk|access|dynamic trunk|access|hybrid设trunk允许的VLAN switchport trunk allowed vlanremove|add IDport trunk permit vlan ID|All指定镜像端口monitor session 1 destinationint接口monitor-port接口指定被镜像端口monitor session 1 source int接口 bothport mirror接口设置生成树启动与否spanning-tree vlan vlan号(默认开启)stp enable|disable(默认关闭)端口的聚合 interface range f0/1 – 4channel-group 1 mode on link-aggregation e0/1 to e0/4 ingress|bothundo link-aggregation e0/1|all设置主vlan isolate-user-vlan enable设置主vlan 包括的子vlan isolate-user-vlan<x> secondary <vlan-list>显示路由信息show ip route display ip route 绑定HDLC协议默认就是link-protocol hdlc设静态路由 ip route网络号掩码下一跳IP/接口ip route-static网络号掩码下一跳IP/接口启用RIP路由router rip riprip workrip inputrip output配置路由器的ID int loopback 0ip add IP地址掩码router id A.B.C.D启动OSPF协议router ospf进程号ospf enable配置OSPF区域net网络号反向掩码 area<area_id>int接口ospf enable area <area_id>标准ACL命令格式access-list列表号permit|deny源IP反向掩码acl <acl-number> [match-orderconfig|auto]rule[normal|special]{permit|deny}[source source-addrsource-wildcard|any]扩展ACL配置access-list列表号permit|deny协议源IP反向掩码目的IP反向掩码 eq端口号acl <acl-number> [match-orderconfig|auto]rule{normal|special}{permit|deny}{tcp|udp}source {<ipwild>|any}destination <ipwild>|any} eq服务名PPP设置encapsulation ppp link-protocol pppPap认证主认证方(config)#username用户名password密码(config)#int串口接口(config-if)#pppauthentication pap被认证方(config)#int串口接口(config-if)#ppp papsent-username用户名password密码主认证方local-user用户名password {simple|cipher}密码interface串口接口ppp authentication-mode pap被认证方interface串口接口ppp pap local-user用户名password {simple|cipher}密码Chap认证主认证方(config)#username客户端主机名 password密码主认证方local-user对方主机名password {simple|cipher}密码(config)#int 串口接口 (config-if)#ppp authentication(config-if)#ppp chap hostname服务器主机名 被认证方(config)#username 服务器主机名 password 密码 (config)#int 串口接口(config-if)#ppp chap hostname客户端主机名interface 串口接口ppp authentication-mode chapppp chap user 自己主机名被认证方 interface 串口接口local-user 对方主机名 password {simple|cipher}密码 ppp chap user 自己主机名静态nat (1)为内外部接口配IP 并激活; (2)在接口上启用NAT ; 内部接口:ip nat inside 外部接口:ip nat outside (3)建立静态地址转换(config)#ip nat inside sourcestatic 私有IP 公网IPinterface 接口nat server global <ip> [port] inside <ip> port [protocol]动态NAT (1)为内外部接口配IP 并激活; (2)在接口上启用NAT ; 内部接口:ip nat inside外部接口:ip nat outside(3)定义内网允许访问外网的ACL(config)#access-list 列表号 permit 源IP 反向掩码(1) 建立地址池nat address-group 公网起始IP 公网终止IP pool 1 (2)定义内网允许访问外网的ACLacl 列表号rule permit source 源IP 反向掩码 rule deny sourceany (3)实现地址转换(4)定义合法IP 地址池 (config)#ip nat pool 地址池名 公网起始IP 公网终止IP netmask 掩码(5)实现地址转换(config)#ip nat inside sourcelist 列表号 pool 地址池名int 公网接口nat outbound 列表号address-group pool 1调试命令 思科:Switch#show run 显示所有配置命令Switch#show ip inter brief 显示所有接口状态 Switch#show vlan brief 显示所有VLAN 的信息 Switch#show version 显示版本信息 华为:[Quidway]dis cur 显示所有配置命令[Quidway]display interfaces 显示所有接口状态 [Quidway]display vlan all 显示所有VLAN 的信息[Quidway]display version 显示版本信息 二、接口配置命令思科:Switch(config)#interface f0/8 进入接口视图 Switch(config-if)#no shut 此命令开启接口Switch(config-if)#description to server01 端口描述Switch(config-if)#ip add 192.168.1.100 255.255.255.0 设置接口IP 华为:[Quidway]interface e0/1 进入接口视图 [Quidway]undo shutdown 此命令开启接口[Quidway]description to server02 端口描述[Quidway]ip add 192.168.1.102 255.255.255.0 设置接口IP 三、VLAN 配置命令:思科:建立和删除VLANSwitch# vlan databaseSwitch(vlan)# vlan 20 name test20Switch(vlan)# no vlan 20Switch(vlan)# exit将端口分配给一个VLANSwitch(config)# interface f0/1Switch(config-if)# switchport mode accessSwitch(config-if)# switchport access vlan 20设置VLAN TRUNKSwitch(config)# interface f0/24Switch(config-if)# switchport mode trunkSwitch(config-if)#switchport trunk allow vlan {ID|All}Switch(config-if)# switchport trunk encapsulation dot1q华为:建立和删除VLAN[Quidway]vlan 30[Quidway]undo vlan 30将端口分配给一个VLAN[Quidway]int ethernet0/1[Quidway-Ethernet0/1]port access vlan 30( port default vlan 30)或[Quidway]vlan 30[Quidway-vlan3]port ethernet 0/1 在VLAN中增加端口[Quidway-vlan3]port ethernet 0/1 to ethernet 0/4 在VLAN中增加多个连续端口设置VLAN TRUNK[Quidway]int e0/24[Quidway-Ethernet0/24] port link-type trunk[Quidway-Ethernet0/24]port trunk permit vlan {ID|All}四、端口镜像配置思科:配置镜像源端口Switch(config)#monitor session 1 source interface gigabitEthernet 0/2 –5 rx上面命令最后一个参数:both 监听双向数据,默认为bothrx 接收tx 发送配置镜像目的端口Switch(config)#monitor session 1 destination interface gigabitEthernet 0/6删除镜像端口Switch(config)#no monitor session 1华为:将端口E0/2配置为监控端口[Quidway]monitor-port Ethernet 0/2端口E0/1配置为镜像端口[Quidway]port mirror Ethernet 0/1或者直接配置监控端口和镜像端口[Quidway]port mirror Ethernet 0/1 observing-port Ethernet 0/2删除镜像[Quidway]undo monitor-port五、冗余配置思科HSRP:Switch# interface Vlan20ip address 172.29.197.33 255.255.255.248standby 20 ip 172.29.197.53standby 20 priority 105 优先级standby 20 preempt 抢占standby 20 track GigabitEthernet0/25 decrement 10 跟踪端口如果DOWN 了优先级减10华为VRRP:[Quidway]interface Vlanif30ip address 172.29.197.9 255.255.255.248vrrp vrid 30 virtual-ip 172.29.141.11vrrp vrid 30 priority 150 优先级vrrp vrid 30 preempt-mode 抢占vrrp vrid 30 track interface GigabitEthernet0/0/18 reduced 60 跟踪端口如果DOWN了优先级减60六、设置安全远程访问思科设置vty安全访问:R1(config)# access-list 1 permit 192.168.2.5R1(config)# line vty 0 4R1(config)# access-class 1 in华为设置vty安全访问:[Quidway]acl number 2000rule 1 permit source 172.29.181.150 0rule 2 deny[Quidway]user-interface vty 0 4acl 2000 inbound七、NTP配置思科:Cisco6509#show clock 显示时间Cisco6509#clock set 14:00:00 30 Sep 2011 设置时间Cisco6509(config)#ntp server 202.198.0.102 设置与其他时间服务器同步Cisco6509(config)#clock timezone beijing +8 设置时区华为:[Quidway]dis clock 显示时间[Quidway]clock datetime 23:30:00 2011/11/16 设置时间[Quidway]ntp-service unicast-server 202.198.0.102 设置与其他时间服务器同步[Quidway]clock timezone E8 add 08:00:00 设置时区八、静态路由配置思科:ip route <目的网段> <目的网段掩码><下一跳>Cisco6509# ip route 0.0.0.0 0.0.0.0 10.65.1.2 静态路由Cisco6509#ip route 0.0.0.0 0.0.0.0 192.168.3.1 150 浮动静态路由管理距离为150华为:[Quidway] ip route-static 0.0.0.0 0.0.0.0 10.65.1.2[Quidway]ip route-static 0.0.0.0 0.0.0.0192.168.3.1 preference 150九、可网管配置思科:Switch(config)#snmp-server community sunion ro 配置本交换机的只读字串为sunionSwitch(config)#snmp-server community sunion rw 配置本交换机的读写字串为sunionSwitch(config)#snmp-server enable traps 允许交换机将所有类型SNMP Trap 发送出去Switch(config)#snmp-server host 192.168.190.1 traps sunion 指定交换机SNMP Trap的接收者为192.168.190.1,发送Trap时采用sunion作为字串华为:[Quidway]snmp-agent community read datanms 配置本交换机的只读字串为datanms[Quidway]snmp-agent community write datanms 配置本交换机的读写字串为datanms[Quidway]snmp-agent sys-info location BeiJing China 设置交换机的位置信息[Quidway]snmp-agent sys-info version all 设置交换机支持所有的SNMP协议版本[Quidway]snmp-agent target-host trap address udp-domain192.168.190.121 params securityname datanms 指定交换机SNMP Trap的接收者为192.168.190.121 ,发送Trap时采用datanms作为字串。
Cisco-H3C配置对比

更新:2008/12/15設定内容を取り消すno undo 設定内容確認(但しCiscoは特権モードからのみ)show display 動作中のプロセス再起動clearresetrunning-configを表示show running-config display current-configuration startup-configを表示show startup-config display saved-configuration running-configを保存write memory savestartup-configを消去write erase delete </flash:filename>稼働中のOSのVersionを表示show versiondisplay versionconfig及びソフト、ハード両方の詳細情報を表示show tech-support display diagnostic-information enableconfigure terminal インターフェース設定モードへ移行interface <int_id>interface <int_id>telnet に関する設定line vty user-interface vty consoleに関する設定line console user-interface aux 0ホスト名設定hostnamesysname時刻の設定clock set <HH:MM:SS DD Month YYYY>clock datetime <HH:MM:SS><YYYY/MM/DD>タイムゾーンの設定clock timezone <name>clock timezone <name><add |minus><HH:MM:SS>同期するNTPサーバの指定ntp server <ip address>ntp-service unicast-server <ip address>CDP(CiscoDiscoveryProtocol)有効化cdp run-NTDP有効化-ntdp enable LLDP有効化lldp runlldp enableInfo-Center有効化-info-center enableSyslogサーバの指定logging {Hostname |ip address }出力するログのレベル選択logging trapSNMPエージェント有効化snmp-server enable snmp-agent trap enable SNMPコミュニティ名設定snmp-server communitysnmp-agent communitySNMPのプロトコルバージョン指定snmp-agent sys-info version all SNMPトラップ送信先の設定snmp-agent target-host デバッグ情報の表示debugdebuggingデバッグの停止no debug allundo debugging all インターフェース設定モードへ移行interface <int_id>interface <int_id>VLANインターフェースの作成interface <vlan_id>interface <vlan_id>Loopbackインターフェースの作成interface loopback <id>interface loopback <id>IPアドレスの付与ip address ip address インターフェースのshutdown shutdown shutdownインターフェースのupno shutdown undo shutdown インターフェースの説明文を追加descriptiondescriptionインターフェース情報参照(L2)show interface {<int_id>}display interface {<int_id>}インターフェース情報参照(L3)show ip interface {<int_id>}display ip interface {<int_id>}VLAN作成vlan <vlan_id>vlan <vlan_id>VLAN削除no vlan <vlan_id>undo vlan <vlan_id>物理ポートをアクセスポートとして設定switchport mode access port link-type access 物理ポートをトランクポートとして設定switchport mode trunkport link-type trunkトランク時のカプセル化方式選択※4-1switchport trunk encapsulation <dot1q |isl >-port access vlan <vlan_id>(I/F-View)port <int_id>(Vlan-View)トランクポートへVLANを追加switchport trunk allowed vlan <vlan_id>port trunk permit vlan <vlan_id>トランクポートへPVIDを設定※4-2switchport trunk native-vlan <vlan_id>port trunk pvid vlan <vlan_id>STPを有効化spanning-tree enablestp enable STPを無効化※5-1no spanning-tree vlan <vlan_id>undo stpSTPの動作モード選択※5-2spanning-tree mode {pvst|rapid-pvst|mst}stp mode {stp|rstp|mst}STPインスタンスのPriority設定spanning-tree mst <id>priority stp instance <id>priority STPリージョン情報設定モードへ移行spanning-tree mst configuration stp region-configuration リージョン名設定name region-name リヴィジョン番号設定revisionrevision-levelインスタンスへVLANをマッピングinstance <id>vlan <vlan_id>instance <id>vlan <vlan_id>MSTリージョン情報の設定を有効化-active region configuration STP情報の参照show spanning-treedisplay stpinfo-center loghost <ip address>snmp-server host {hostname}version <no.>H3C-Cisco コマンド対比表(Configuration Commands)switchport access vlan <vlan_id>アクセスポートへVLANを追加VLANカテゴリCisco全般目的Interface管理system-viewユーザモード→特権モードへの移行H3CSTP更新:2008/12/15channel-group <id>mode {active |passive }link-aggregation group <id>mode static channel-protocol lacp port link-aggregation group <id>link-aggregation group <id>mode manual port link-aggregation group <id>channel-group <id>mode {auto |desirable }channel-protocol pagp LAG情報の参照show etherchanneldisplay link-aggregationトラック対象のインターフェースを指定するtrack <id>interface <int_id>line-protocol vrrp vrid <group_id>track interface <int_id>{reduced <value>}VRRP有効化及びグループID、VIP設定vrrp <group_id>ip <ip-address>vrrp vrid <group_id>virtual-ip <ip-address>VRRPのPriority設定vrrp <group_id>priority <value>vrrp vrid <group_id>priority <value>切り戻り(preempt)の所要時間を指定する※7-1vrrp <group_id>preempt {delay minimum <sec>}vrrp vrid <group_id>preempt-mode timer delay トラック対象のインターフェースがダウンしたらdecremantで指定した数値だけVRRPのPriorityを下げる。
思科与华为3com命令比较
思科Cisco 华为3COM 功能enable system-view 进入特权模式configure terminal \ 进入配置状态show display 显示show running-config display current 显示目前的运行配置show version disp version 显示版本show start disp saved 显示已保存的配置show tech-support disp base-information 显示全面的信息no undo 取消(删除)hostname sysname 更改机器名\ lang chinese 进入中文状态user local-user 新建修改用户end return 退回到系统视图exit quit 返回上级视图exit logout telnet退出router rip rip rip动态路由router ospf ospf ospf路由router bgp bgp bgp路由write save 保存配置erase delete 删除配置0 simple 明文7 cipher 密文access-list acl 控制访问列表host ip host host和ip名字对应logging info-center 日志信息encap link-protocol 封闭链路层协议no debug all ctrl+d 取消所有debug命令vlan database vlan 进入vlan的配置vtp trunk trunk 设置成为骨干端口mode \ 模式trunk 相同主干线switchport port 接口控制access 相同访问ip dhcp dhcp 设置dhcp服务器功能思科华为命令对照表思科华为show displayshow version disp versionno undoshow run disp current-configuration username local-userend returnshow start disp saved-configurationexit quitexit logoutctrl+z quitrouter rip riprouter ospf ospfrouter bgp bgphostname sysnameaccess-list aclwrite saveerase delete0 simple7 cipherlogging info-centerencapsulation link-protocol例子:sysname Huawei-R2831 \\设置主机名interface Ethernet 0/0 进入接口模式description T0 Switch-A \\接口描述ip address 192.168.10.222 255.255.255.0 \\配置接口IP地址undo shutdown \\启用接口local-user huawei \\建立用户名huaweipassword simple huawei \\设置密码为huaweiservice-type telnet \\服务类型为telnetuser-interface vty 0 4 \\进入telnet通道,设置5个用户可以同时登陆authentication-mode scheme \\设置telnet的模式为本地用户名与密码登陆user-interface console 0 设置console密码authentication-mode password 密码认证set authentication password simple huaweisuper password simple huawei \\设置super密码,display version \\查看VRP软件版本display current-configuration \\查看当前运行的配置display saved-configuration \\查看已保存过的配置display interface Ethernet 0/0 \\查看接品参数display brief interface \\查看接口基本状态sysname Huawei-R2831 \\设置主机名interface Ethernet 0/0 进入接口模式description T0 Switch-A \\接口描述ip address 192.168.10.222 255.255.255.0 \\配置接口IP地址undo shutdown \\启用接口local-user huawei \\建立用户名huaweipassword simple huawei \\设置密码为huaweiservice-type telnet \\服务类型为telnetuser-interface vty 0 4 \\进入telnet通道,设置5个用户可以同时登陆authentication-mode scheme \\设置telnet的模式为本地用户名与密码登陆user-interface console 0 设置console密码authentication-mode password 密码认证set authentication password simple huaweisuper password simple huawei \\设置super密码,display version \\查看VRP软件版本display current-configuration \\查看当前运行的配置display saved-configuration \\查看已保存过的配置display interface Ethernet 0/0 \\查看接品参数display brief interface \\查看接口基本状态。
Cisco和H3C命令对照
Cisco和H3C命令对照思科Cisco 华为3COM 功能enable system-view 进入特权模式configure terminal \ 进入配置状态show display 显示show running-config display current 显示目前的运行配置show version disp version 显示版本show start disp saved 显示已保存的配置show tech-support disp base-information 显示全面的信息no undo 取消(删除)hostname sysname 更改机器名\ lang chinese 进入中文状态user local-user 新建修改用户end return 退回到系统视图exit quit 返回上级视图exit logout telnet退出router rip rip rip动态路由router ospf ospf ospf路由router bgp bgp bgp路由write save 保存配置erase delete 删除配置0 simple 明文7 cipher 密文access-list acl 控制访问列表host ip host host和ip名字对应logging info-center 日志信息encap link-protocol 封闭链路层协议no debug all ctrl+d 取消所有debug命令vlan database vlan 进入vlan的配置vtp trunk trunk 设置成为骨干端口mode \ 模式trunk 相同主干线switchport port 接口控制access 相同访问ip dhcp dhcp 设置dhcp服务器功能思科华为命令对照表思科华为show displayshow version disp versionno undoshow run disp current-configurationusername local-userend returnshow start disp saved-configurationexit quitexit logoutctrl+z quitrouter rip riprouter ospf ospfrouter bgp bgphostname sysnameaccess-list aclwrite saveerase delete0 simple7 cipherlogging info-centerencapsulation link-protocol例子:sysname Huawei-R2831 \\设置主机名interface Ethernet 0/0 进入接口模式description T0 Switch-A \\接口描述ip address 192.168.10.222 255.255.255.0 \\配置接口IP地址undo shutdown \\启用接口local-user huawei \\建立用户名huaweipassword simple huawei \\设置密码为huaweiservice-type telnet \\服务类型为telnetuser-interface vty 0 4 \\进入telnet通道,设置5个用户可以同时登陆authentication-mode scheme \\设置telnet的模式为本地用户名与密码登陆user-interface console 0 设置console密码authentication-mode password 密码认证set authentication password simple huaweisuper password simple huawei \\设置super密码,display version \\查看VRP软件版本display current-configuration \\查看当前运行的配置display saved-configuration \\查看已保存过的配置display interface Ethernet 0/0 \\查看接品参数display brief interface \\查看接口基本状态delete flash:/config.cfg \\删除用SAVE保存过的配置delete flash:/main.bin \\删除VRP的映像文件(谨慎操作)save \\保存配置display 和ping 命令在任何视图下都可执行,不必切换到全局配置视图。
H3C与cisco交换机配置命令对比
Ruijie(config)#vlan 10
[H3C]vlan 10
删除指定VLAN(默认的VLAN1无法删除)
Ruijie(config)#no vlan 10
[H3C]undo vlan 10
指定一个以太网接口,并进入该接口的配置模式
Ruijie(config)#interface fastEthernet 0/1
[H3C-Vlan-interface1]ip address 192.168.1.1 255.255.255.0
设置VLAN名称
Ruijie(config-vlan)#name vlan10
[H3C-vlan10]name vlan10
将一个Access接口指派给一个VLAN
Ruijie(config-if-FastEthernet 0/1)#switchport access vlan 10
锐捷(或Cisco)系列交换机配置模式
H3C系列交换机配置视图
交换机基本命令和格式
功能
锐捷(或cisco)系列交换机
H3C系列交换机
配置模式
基本命令
配置视图
基本命令
ping主机
用户模式
Ruijie〉ping 192.168.1.1
任意视图
<H3C〉ping 192.168.1.1
telnet主机
Ruijie>telnet 192.168.1.1
[H3C-ui-vty0-4]set authentication password simple 123
列出命令的下一个关联的关键字或变量
配置帮助
?或命令?
配置帮助
Cisco与HC命令对比
undo
删除整个配置文件
erase
delete
保存配置文件
write
save
设置路由器名字
hostname
sysname
创建新用户
username
local-user
设置特权密码
enable secret
super password
设置明文密码
enable password
set authentication password simple
duplex (half|full|auto)
配置端口速率
speed(10|100|1000)
speed(10|100|1000)
配置trunk
switchport mode trunk
port link-type trunk
将端口加入vlan
switchport access vlan ID
port vlan ID
显示内存使用率
show pro mem
display memory-usage
显示日志
show logging
display logbuffer
显示时间
show clock
display clock
进入特权模式
enable
super
退出特权模式
disable
quit
进入设置模式
config terminal
开启三层交换的路由功能
ip routing
默认开启
开启接口三层功能
no switchport
不支持
跨交换机的vlan动态注册
vtp domain
GVRP