
迈拓维矩USB延长器说明书
迈拓维矩USB延长器说明书
迈拓维矩USB延长器是一种将USB接口的信号延长输送到某一距离的电脑周边设备。
可以延长的距离有10米、15米、20米、30米、50米、100米等。
延长距离长达50米以上的延长,只有一套信号发送和接收设备,中间距离的传输采用网线,减小信号在传输过程中的损耗、保证信号的高保真,而100米的USB延长器更是具有信号放大功能,让使用者不用再被距离所限制。
10米到30米的USB延长器也可以被称为USB延长线,因为延长器本身就带有相应长度的线材,使用者无须再另寻线材,不用担心线材与延长器的不匹配问题。
延长线具有超快传输、文件秒传等优点,提供高达480Mbps的超快数据传输速率。
50米USB延长器接口延长远达50米,支持USB2.0协议,兼容1.1。
可娱乐扩展好玩更方便:电脑接硬盘、U盘等不需要弯腰寻找接口、躺床上即可操作鼠标键盘等,怎么舒服怎么玩,同时享受极速传输的无穷体验,同时能有效保护电脑原装接口,解决接口损坏问题。
50米USB网线延长器具有体积小功能大的特点,体积比香烟盒还小,携带方便小东西好固定,好放置。
相比于50米USB网线延长器,100米USB单网线延长器就是其加强版。
除应用于普通用户桌面设备延长之外,还广泛应用于安防等相关行业适用于高清摄像头的远距离布控。
迈拓维矩KVM延长器功能说明

迈拓维矩KVM延长器功能说明
专业的KVM延长器在现在的互联网处理和应用当中成为了最重要的角色之一,企业可以通过一流的KVM延长器创造一个更好的作业环境,对于一些技术要求高的企业或者工厂来说,获得一款好的产品类型是一项极其关键的任务,下面讲解一下迈拓维矩的KVM延长器所具有的基本的优点,希望对使用者和消费者对此类KVM延长器有初步了解。
1.节能高效
迈拓维矩KVM延长器将所有使用到的主机放在一个相对安全和独立的场所当中可以方便相关的管理人员对于大数量的主机的维护,提高了维护主机的工作效率,高效的维护变相延长了主机的使用寿命,使得主机在恒温优越的环境当中工作,提高了设备在整个工程中最基本的稳定性。
借助价格划算的迈拓维矩KVM延长器可以做到最大程度降低工作终端的热量的排放,做到节能的效果,对于环保保护的意义很重大。
2.方便易用
迈拓维矩KVM延长器主要采用到了全模拟的功能,热插拔鼠标和键盘都可以完美支持,另外迈拓维矩KVM延长器还具有优质的兼容性,这样的结果就是就算鼠标、键盘随时更换不同规格及型号也可以完成制定目标;可支持鼠标,键盘,显示器,音频,RS232接口延长可达三百米或更远距离传输。
3.安全可靠
迈拓维矩KVM延长器设置了移动储存器的接口,这样可以最大程度保证数据的安全性,对于被盗的几率也可以降低。
以上三个主要的方面介绍了迈拓维矩KVM延长器所具有的基本优势,通过上面简短的介绍也可以分析得出迈拓维矩KVM延长器通过自身独特的优势得到了众多厂家的喜爱,通过这样的创新过程,相信在未来的发展空间内迈拓维矩KVM延长器的勃兴同样令人期待。
Maxtor OneTouch外置硬盘用户手册 Windows版说明书

• Push the Maxtor OneTouch button again on the front of your drive. Retrospect will open and the Maxtor OneTouch Setup screen will appear. Continue the setup process as documented in Step 6. Refer to Knowledge Base Article 1555 for more detail on setting up the Maxtor OneTouch button.
பைடு நூலகம்
• Go to
Maxtor OneTouch and Maxtor Personal Storage 5000
• In the box called Knowledge Base Quick Links, click on the link External Storage answers.
Follow all of the other steps as documented in the User’s Guide.
Copyright ©2003 Maxtor Corporation. All rights reserved. Maxtor is a registered trademark of Maxtor Corporation. Maxtor Personal Storage and Maxtor OneTouch are trademarks of Maxtor Corporation. Retrospect is a registered trademark of Dantz Development Corporation. Mac and the Mac logo are trademarks of Apple Computer, Inc., registered in the U. S. and other countries. Microsoft, Windows and the Windows logo are either registered trademarks or trademarks of Microsoft Corporation in the United States and/or other countries. Other trademarks are the property of their respective holders. Specifications subject to change without notice. Maxtor Corporation, 500 McCarthy Boulevard, Milpitas, CA 95035 8/03 P/N: 20247100
易拓 USB 延长器 Plus T R 设置指南说明书
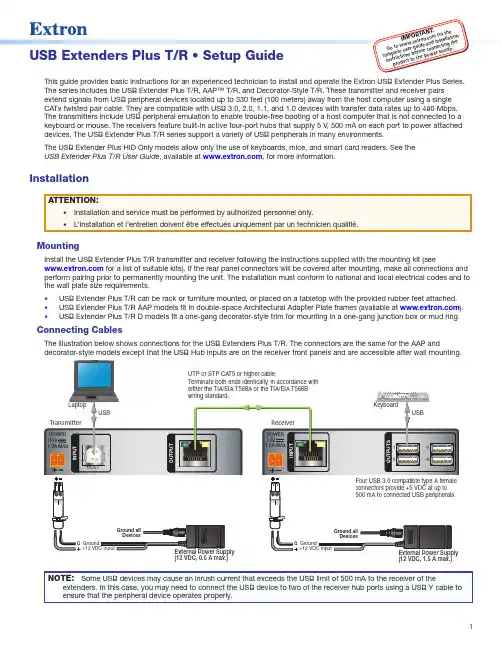
1USB Extenders Plus T/R • Setup GuideThis guide provides basic instructions for an experienced technician to install and operate the Extron USB Extender Plus Series.The series includes the USB Extender Plus T/R, AAP™ T/R, and Decorator-Style T/R. These transmitter and receiver pairs extend signals from USB peripheral devices located up to 330 feet (100 meters) away from the host computer using a single CATx twisted pair cable. They are compatible with USB 3.0, 2.0, 1.1, and 1.0 devices with transfer data rates up to 480 Mbps. The transmitters include USB peripheral emulation to enable trouble-free booting of a host computer that is not connected to a keyboard or mouse. The receivers feature built-in active four-port hubs that supply 5 V , 500 mA on each port to power attached devices. The USB Extender Plus T/R series support a variety of USB peripherals in many environments.The USB Extender Plus HID Only models allow only the use of keyboards, mice, and smart card readers. See the USB Extender Plus T/R User Guide , available at , for more information.InstallationMountingInstall the USB Extender Plus T/R transmitter and receiver following the instructions supplied with the mounting kit (see for a list of suitable kits). If the rear panel connectors will be covered after mounting, make all connections and perform pairing prior to permanently mounting the unit. The installation must conform to national and local electrical codes and to the wall plate size requirements. • USB Extender Plus T/R can be rack or furniture mounted, or placed on a tabletop with the provided rubber feet attached. • USB Extender Plus T/R AAP models fit in double-space Architectural Adapter Plate frames (available at ). •USB Extender Plus T/R D models fit a one-gang decorator-style trim for mounting in a one-gang junction box or mud ring.Connecting CablesI M P t o w ww .e x t r o n .c o g u i d e a n d i n s ta l l a t n e c t i n g t he2For information on safety guidelines, regulatory compliances, EMI/EMF compatibility, accessibility, and related topics, see the Extron Safety and Regulatory Compliance Guide on the Extron website.Connecting PowerEach unit is provided with a 12 VDC power supply. Connect a power supply to the 2-pole captive screw connector on the rear panels of the transmitter and receiver (see the illustration at right for wiring instructions). For the AAP and decorator-style models, do this before mounting the unit. The front panel Power LED (A ) lights.Connecting the Host (Transmitter)1. Connect a USB cable from a USB port on the PC or laptopcomputer to the transmitter Host port as shown in the Connecting Cables diagram on the previous page.2. Pair the transmitter with the receiver (see Pairing andUnpairing the Transmitter and Receiver ).3. Mount the extenders, if appropriate.4. Power on the computer. On the transmitter, theHost LED (C ) on the front panel and the green Activity LED on the rear panel RJ-45 LAN connector light when the computer recognizes the transmitter. When the transmitter and receiver are paired with each other, the front panel Link LEDs (E ) light on both the transmitter and receiver.Connecting the Hub (Receiver)1. Connect up to four USB cables from peripheral devicesto the receiver Hub ports. The order of connection does not matter. The Host LED on the receiver (C ) lights as communication between the USB transmitter and host is established.2. As each peripheral device is connected, the LED for its Hubport (D ) lights when the host PC has detected the device. The USB Extender Plus receiver supplies up to 0.5 A to each connected peripheral device.Pairing and Unpairing the Transmitter and ReceiverIn order to function together, the transmitter and receiver must be paired the first time they are used together. After they havebeen paired initially, they do not need to be paired again, even after a power cycle. However, if connecting either unit to a differenttransmitter or receiver, you must perform the pairing operation again.Unpairing the transmitter and receiver1. Using a small screwdriver or stylus, press and hold the Pair button (B ) on either the transmitter or the receiver until thetransmitter Link LED turns off and the Link LED on the receiver begins to blink (approximately 10 seconds).2. Release the Pair button and proceed with pairing the units (see Pairing the transmitter and receiver).Pairing the transmitter and receiver1. Connect both units together via their RJ-45 connectors.2. Using a stylus or small screwdriver, press the recessed transmitter Pair button (B in the USB Extender Plus T/R illustrationabove right or on the rear panel of the AAP and decorator-style models) and hold it for 1 second. The front panel Link LED on the transmitter (E ) blinks as pairing begins.3. Within 10 minutes of pressing the transmitter Pair button, press the receiver Pair button and hold it for 1 second. The LinkLED on the receiver front panel (E ) blinks.When the LEDs of both units have stopped blinking and remain lit steadily, the pairing is complete.© 2017-2018 Extron Electronics All rights reserved. All trademarks mentioned are the property of their respective owners. 68-2652-50 Rev. F10 18。
USB-EX75使用说明书

USB延长器使用说明书型号:USB-EX75德阳四星电子技术有限公司根据USB标准,USB电缆最大长度不能超过5米。
四星电子自主研发的USB延长器USB-EX75,也称为USB长线驱动器、USB长线收发器,它可以突破电脑主机对USB电缆长度的限制,将电脑主机的USB信号转换成适合远传的差分信号并用普通网线来传输,到远端再还原成标准的USB信号,可将USB通信长度延长到75米(全速)或300米(低速),并且无需改变原来的通信协议和软件。
该产品按工业标准设计,可广泛应用于工业自动化、计算机领域、USB数采器、银行证劵等诸多领域。
主要技术参数:● 支持12Mbps全速USB传输和1.5Mbps低速USB传输,兼容USB V2.0● 自动识别USB高速High-Speed和全速Full-Speed或者USB低速Low-Speed● 支持USB控制传输、批量传输、中断传输、同步/等时传输● 使用标准的5类网线、超5类网线或6类网线,12Mbps全速USB信号的最大传输距离为75米,1.5Mbps低速USB信号的最大传输距离为300米。
● 纯硬件解决方案,对USB协议完全实时和透明,不需要额外安装任何驱动程序,支持Windows98/ME/2000/XP/Vista/Server200X/64bit-Vista/Windows 7和Linux。
● 供电电源:取自电脑主机USB口,5VDC/20mA● 上下游USB端口均带有浪涌保护器● 工作温度:-40~+85℃● 相对湿度:0~95%(不冷凝)● 外形尺寸:60×26×26(长×宽×高,毫米)铝型材屏蔽外壳● 重量:100克(单个重量)USB-EX75的安装和使用: 一套USB-EX75延长器为二只,需成对使用,一只插入电脑主机的USB接口,另一只插入USB设备,二者之间用一条一对一的网线连接起来,连接后以后就如同将USB设备直接插入电脑主机的USB接口一样。
迈拓维矩8口USB自动KVM切换器使用说明书

迈拓维矩8⼝USB⾃动KVM切换器使⽤说明书迈拓维矩8⼝USB⾃动KVM切换器使⽤说明书迈拓维矩8⼝KVM切换器只需⼀套⿏标,键盘和显⽰器即可操作多台电脑,主要⼴泛应⽤于办公,教学,娱乐,军事。
信息等众多平台,它为你节省时间,⾦钱,设备,能源,⼤⼤提⾼你的⼯作效率,是你⼯作的好帮⼿。
产品特征:1、切换器外观精美,易于安装2、⽀持DOS,WIN3.X, WIN95/98/98SE/2K/ME/XP/NT, Apple,MAC Linux, Netware, Unix 等操作系统。
3、VGA带宽: 500MHz4、分辨率:1920X14405、机架式KVM切换器6、LED指⽰灯指⽰对应的当前状态的主机7、带主机⾃动扫描功能,扫描时间间隔可以⾃⾏设置8、多种切换⽅式可以⾃由选择:键盘热键或者⾯板按键切换⽅法:A、前⾯板上的按键主机1-8:直接按按键①-----⑧B、键盘上的热键:“SCROLL LOCK”,“SCROLL LOCK”,“1,2,3,4,5,6,7,8……”,例如:切换到第5台主机:“SCROLL”,“SCROLL”,“5”,“Enter”切换到第8台主机:“SCROLL LOCK”,“SCROLL LOCK”,“8”切换时,如果要切换到的⽬标主机端⼝,正好是当前操作的主机端⼝,那么切换不执⾏!例如:当前正在操作第五台主机,按下前⾯板上的数字⑤,或者按下键盘上的热键:“SCROLL LOCK”,“SCROLL LOCK”,“5”,那么切换动作都不会执⾏。
LED指⽰当前主机状态:LED上的三位数字中,最右边表⽰输出,此处恒为“1”,左边两位指⽰当前主机,例如:“03”表⽰当前是操作第三台主机,使⽤步骤:1)⽤配线将主机逐个和KVM切换器连接好配线中USB头,VGA头的⼀端连接主机配线中单个的VGA头连接到KVM的主机端⼝2)将⿏标,键盘,显⽰器,和KVM切换器的控制端连接好3)按顺序给各台主机上电,在⼀台主机完全启动后(⿏标键盘可以正常操作了之后),再接着启动另⼀台主机,直到所有的主机完全启动启动扫描⽅式:2)键盘热键:“SCROLL LOCK”,“SCROLL LOCK”,“空格键”,扫描顺序是从当前状态的主机开始,回到当前状态的主机结束,例如:当前是第5台主机,开始扫描时,到第6台主机,结束后回到第5台主机。
Mobile Broadband USB Stick 用户指南说明书

Thank you for choosing the Mobile Broadband USB Stick. With your USB Stick, you can access a wireless network at high speed.Note:This manual describes the appearance of the USB Stick, as well as the procedures for preparation, installation, and removal. For operation details about the management program, see the online help included in the management program.Getting to Know Your USB StickThe following figure shows the appearance of the USB Stick. It is provided only for your reference. The actual product may be different.❶USB ConnectorIt connects the USB Stick to a PC.❷Strap HoleYou can tie the cap and the USB Stick together by threading a strap through the strap holes, so that the cap will not be easily lost.❸IndicatorIt indicates the status of the USB Stick.●Green, blinking twice every 2s: The USB Stick is powered on.●Green, blinking once every 2s: The USB Stick is registering with a 2G network.●Blue, blinking once every 2s: The USB Stick is registering with a 3G/3G+ network.●Green, solid: The USB Stick is connected to a 2G network.●Blue, solid: The USB Stick is connected to a 3G network.●Cyan, solid: The USB Stick is connected to a 3G+ network.●Off: The USB Stick is removed.❹SIM Card SlotIt holds a Subscriber Identity Module (SIM) card.❺microSD Card SlotIt holds a microSD card.Getting Your USB Stick Ready1. Slide the cover to remove it from the USB Stick.2. Insert the SIM card and the microSD card into the corresponding card slots, as shown inthe following figure.3. Replace the cover and click it into place.Note:●The microSD card is an optional accessory. If it is not provided in the package, you canbuy one yourself.●Ensure that the beveled edge of the SIM card is properly aligned with that of the SIMcard slot and the microSD card is inserted according to the direction as labeled on the microSD card slot.●Do not remove the microSD or SIM card when the card is in use. Otherwise, the card aswell as your USB Stick may get damaged and the data stored on the card may becorrupted.Installation/Removal GuideThe procedure for installing the management program depends on the operating system (OS) installed on your PC. The following sections take Windows 7 as an example.Connecting the USB Stick to a PCPlug the USB Stick into the USB port of your PC.Installing the USB Stick Management Program1. Connect the USB Stick with the PC.2. The OS automatically detects and recognizes the new hardware and starts theinstallation wizard.Note:If the auto-run program does not respond, find the AutoRun Application in the driver path. Then double-click AutoRun Application to run the program.3. Follow the on-screen instructions of the installation wizard.4. After the program is installed, a shortcut icon for the management program appears onthe desktop.Starting the Management ProgramAfter being installed, the management program starts automatically. Then every time the USB Stick is connected to the PC, the management program starts automatically.You can also double-click the shortcut icon on the desktop to start the management program.Removing the USB Stick1. Click in the notification area.2. Select the corresponding hardware and then click Safely Remove Hardware and EjectMedia.3. Remove the USB Stick after a while.Uninstalling the Management Program1. Choose Start > Control Panel > Uninstall a program.2. Find the management program and double-click it to uninstall the managementprogram.Note:Exit the management program before uninstalling it.Version: V100R001_01 Part Number: 3101****。
ATEN UE250 USB 2.0延长线缆用户手册说明书
Manuals+— User Manuals Simplified.ATEN UE250 USB 2.0 Extender Cable User Manual Home » Aten » ATEN UE250 USB 2.0 Extender Cable User ManualContents1 ATEN UE250 USB 2.0 ExtenderCable2 Product Information3 Product Usage Instructions4 Package Contains5 FCC STATEMENT6 Overview7 System Requirements8 Components9 Installation10 Troubleshooting11 Specifications12 Limited Warranty13 Documents / ResourcesATEN UE250 USB 2.0 Extender CableProduct Information2. Plug the USB peripheral into the UE-250 socket.3. That’s all there is to it.2. Troubleshooting:Problem: The device operates erraticallyCause: Static electricity or insufficient power may cause the device to operate erratically.Solution: Reset the device by unplugging the cable and then plugging it back in or use external power to your linked devices.Limited Warranty: In no event shall the direct vendor’s liability exceed the price paid for the product from direct, indirect, special, incidental, or consequential damages resulting from the use of the product, disk, or its documentation. The direct vendor makes no warranty or representation, expressed, implied, or statutory with respect to the contents or use of this documentation and especially disclaims its quality, performance, merchantability, or fitness for any particular purpose. The direct vendor also reserves the right to revise or update the device or documentation without obligation to notify any individual or entity of such revisions or update. For further inquiries, please contact your direct vendor.User Manual: Read this manual thoroughly and follow the installation and operation procedures carefully to prevent any damage to the unit and/or any of the devices connected to it. This package contains: 1 UE-250 USB 2.0 Repeater Cable, 1 User Manual. If anything is damaged or missing, contact your dealer. All brand names and trademarks are the registered property of their respective owners.Note: When using the UE-250, make sure to reorient or relocate the receiving antenna, increase the separation between the equipment and receiver, connect the equipment into an outlet on a circuit different from that which the receiver is connected, or consult the dealer or an experienced radio/television technician for help.Read this manual thoroughly and follow the installation and operation procedures carefully to prevent any damage to the unit, and/or any of the devices connected to it.Package ContainsThis package contains1 UE-250 USB 2.0 Repeater Cable1 User ManualIf anything is damaged or missing, contact your dealer.FCC STATEMENTNOTE: This equipment has been tested and found to comply with the limits for a Class B digital device pursuant to Subpart J of Part 15 of FCC Rules. These limits are designed to provide reasonable protection against harmful interference in a residential installation. This equipment generates, uses and can radiate radio frequency energy and, if not installed and used in accordance with the instructions, may cause harmful interference to radio communications.However, there is no guarantee that interference will not occur in a particular installation. If this equipment does cause harmful interference to radio or television reception, which can be determined by turning the equipment offand on, the user is encouraged to try to correct the interference by one or more of the following measures: Reorient or relocate the receiving antenna.Built in cable with USB connection to USB port on PC or hub LED (green) indicates USB link3. Type A female USB port for connection from peripheral4. LED (red) indicates overcurrentInstallationInstallation is simply a matter of plugging in the cables:1. Plug the UE-250 USB cable into the computer’s USB port or a USB hub.2. Plug the USB peripheral into the UE-250 socket. That’s all there is to it. TroubleshootingProblem Cause SolutionDevice Static electricity or Reset the device by operates insufficient power unplugging the cable and erratically may cause the then plugging it back in ordevice to operate use the external power to yourerratically.linked devices.SpecificationsFunction Specification Power Supply Bus Powered Cable length (output) 5 m (16ft.)Connectors 1 Type A Male1 Type A FemaleUSB Specification 2.0 spec. for high, full and lowDriver Support Native Driver SupportOperating Temperature5° – 40° CStorage Temperature-20° – 60° CHumidity0% – 80% RH, NCWeight255gLimited WarrantyIN NO EVENT SHALL THE DIRECT VENDOR’S LIABILITY EXCEED THE PRICE PAID FOR THE PRODUCT FROM DIRECT, INDIRECT, SPECIAL, INCIDENTAL, OR CONSEQUENTIAL DAMAGES RESULTING FROM THE USE OF THE PRODUCT, DISK, OR ITS DOCUMENTATION.The direct vendor makes no warranty or representation, expressed, implied, or statutory with respect to the contents or use of this documentation, and especially disclaims its quality, performance, merchantability, or fitness for any particular purpose. The direct vendor also reserves the right to revise or update the device ordocumentation without obligation to notify any individual or entity of such revisions, or update. For furtherinquiries, please contact your direct vendor.© Copyright 2003 ATEN® International Co., Ltd.Manual Part No. PAPE-1240-100Printed in Taiwan 10/2003All brand names and trademarks are the registered property of their respective owners.Documents / ResourcesATEN UE250 USB 2.0 Extender Cable [pdf] User ManualUE250 USB 2.0 Extender Cable, UE250, USB 2.0 Extender Cable, Extender Cable, Cable Manuals+,。
迈拓维矩四口usb同步器使用说明
迈拓维矩四口usb同步器使用说明迈拓维矩四口USB同步器使用说明产品概述迈拓维矩四口USB同步器是一种便捷的USB设备管理工具,适用于同时连接多个USB设备的场景。
本文将对该产品的使用进行详细说明。
功能特点•支持多个USB设备同时连接•实现快速数据传输和充电•具备过载保护功能,保证设备安全•简单易用,插即可用,无需驱动安装使用步骤1.确保电脑或充电器提供足够的电源供应。
2.将迈拓维矩四口USB同步器插入电脑的USB接口或充电器的USB接口。
3.将需要连接的USB设备的数据线插入同步器的USB口。
4.检查设备连接状态,确保设备已被识别。
5.进行数据传输或充电操作。
注意事项•请勿将同步器暴露在潮湿或高温环境中,以免损坏设备。
•在连接多个USB设备时,建议使用电源适配器,以确保电源供应充足。
•如遇设备无法识别或连接不稳定等问题,可尝试更换其他USB口进行连接。
•请勿将同步器拆解或进行非法改装,以免损坏设备或引起安全问题。
常见问题解答Q: 无法识别连接的设备怎么办? A: 可尝试以下操作: - 检查USB设备是否正常工作。
- 更换其他USB口进行连接。
- 确保电脑或充电器提供足够的电源供应。
Q: 如何判断充电是否完成? A: 建议根据USB设备的充电指示灯或充电状态进行判断,也可通过设备的电量显示来确认。
Q: 是否支持快速充电? A: 是的,迈拓维矩四口USB同步器支持快速充电,但需确保设备支持快速充电的特性才能实现。
以上是对迈拓维矩四口USB同步器使用说明的详细介绍,希望能帮助您更好地使用该产品。
如有更多疑问,请查阅产品相关手册或联系客服进行咨询。
迈拓维矩:了解KVM延长器的应用领域
迈拓维矩:了解KVM延长器的应用领域
随着市场经济的迅猛发展,在各行业领域已在广泛使用KVM延长器,迈拓维矩力求使得专业的KVM延长器能够走进更多的领域,为更多的用户创造得益和价值,迈拓维矩的产品伴随着市场经济的发展而不断的突破更新,让KVM延长器更加低完美符合各个行业领域的用户需求,得到了众多用户的认可与赞赏。
下面,由迈拓维矩为大家介绍一下KVM延长器的应用行业。
1.企业安全管理
对于企业而言,商业机密资料是极其重要的,若直接通过电脑主机上的USB插口、软盘和串口来进行资料的拷贝和传输,极易造成商业机密的大范围泄漏和不可估量的损失。
使用迈拓维矩KVM延长器,企业可以将服务器放置一个比较安全的地方,利用一套鼠标、键盘和显示器对电脑主机进行管理、操作及维护,可保证企业商业机密资料的绝对安全性。
2.家庭电脑
在家庭仲,电脑的应用也越来越频繁,使用过程中,所造成的主机辐射、发热以及噪音成为一个对人的生活环境及安全性造成了影响,通过使用迈拓维矩KVM延长器,将电脑主机放置一个安全的位置,桌面放置显示器,可以避免以上辐射和噪音等问题。
3.数据中心
数据中心通过使用KVM延长器对服务器进行集中管理、操作和维护,大力地提高管理维护人员的工作效率。
迈拓维矩14年来专注研发生产KVM切换器、矩阵切换器、分配器、转换器、延长器等一系列产品,在业内遥遥领先,为了提供更好更强的产品和服务,迈拓维矩品牌顺应市场的发展,突破了固有模式,不断地研发出极具市场竞争力的各款产品,品质好,性能强,使用户能大大地提高工作效率和管理效果。
迈拓维矩品牌产品充分满足个人用户、SOHO族群、大中小企业各行业领域的需求。
lcdkvm切换器16口操作方法_kvm一体机使用方法
lcdkvm切换器16口操作方法_kvm一体机使用方法在第一次使用本产品之前,请务必仔细阅读本说明及随机配送的相关资料,并按照说明书使用说明及安装,维护和保养。
迈拓维矩已对本说明书进行了严格仔细校勘和核对,但不能保证说明书完全没有文字描述错误和疏漏。
本说明书图片仅供参考,如个别图片与产品实际显示不符,请以实际产品为主,我们保留随时对说明书和产品进行改进/修改的权利。
产品调整后,恕不另行通知。
请务必妥善保管好产品造成的其他损失,在法律允许的最大范围内,本公司概不承担责任。
本说明书内容受法律版权的保护,未经书面许可,不得以任何形式进行复制和传播。
目录1 功能与规格 (1)1.1 概述 (1)1.1.1 前视图 (1)1.1.2 侧视图 (1)1.1.3 后视图 (1)1.2 基本特性 (2)1.3 详细规格 (2)1.4 结构尺寸 (3)2 安装 (5)2.1 机架安装 (5)2.2 线缆连接 (6)3 使用 (7)3.1 操作步骤 (7)3.2 显示最佳效果调节 (8)3.2.1 LCD OSD 菜单功能说明 (8)3.2.2 LCD OSD 菜单操作 (8)3.3 OSD 切换器菜单操作 (8)4 常见故障处理 (15)5 使用保养 (16)6 附件清单 (16)7 产品使用环境 (16)1功能与规格1.1 概述KVM是Keyboard、Video、Mouse的缩写,即集键盘、鼠标、显示于一体的智能切换控制平台。
KVM主机切换系统,即用单台或数台KVM将多台主机连接在一起,实现单用户使用单控制平台(一套键盘、鼠标、显示器)来控制多台主机的功能。
本系列KVM控制平台具有提高效率、使用简单、易于管理、节约成本、远程管理、环保节能等特点,其高度为标准 1U,符合 19〞上架结构,节省机柜85%以上使用空间。
本系列KVM控制平台支持SUN,IBM,HP,DELL,宝德,浪潮,曙光,联想等原装服务和研华、研祥、CRESUN、大众、威达、艾讯等各类工控机,支持DOS、Windows9x、NT、Win2000、Win7、LINUX、NOVELL等多种操作系统。