HZGPS全球卫星同步时钟技术说明书
YJD-2000 卫星同步时钟系统说明书-上海申贝科技发展有限公司

上海申贝科技发展有限公司产品说明书目录一整体概述 (3)一.1系统简介 (3)一.2具备功能 (3)一.3功能特点 (4)一.4引用标准 (4)一.5整机指标 (5)二系统组成模式 (6)二.1组成及配置原则 (6)二.2其他模式 (6)二.3典型配置组屏图. (7)三技术指标 (8)三.1主控模块 (8)三.2输出模块 (9)三.3特需模块 (10)一整体概述一.1系统简介在电力系统运行过程中,电网的运行状态瞬息万变,电网调度实行分层多级管理,调度管理中心远离现场。
为保证电网安全和经济运行,各种以计算机技术和通信技术为基础的自动化装置被广泛应用,如调度自动化系统、故障录波装置、微机继电保护装置、事件顺序记录装置、变电站计算机监控系统、电能量计费系统、火电厂机组自动控制系统、雷电定位系统及输煤、除灰、脱硫等控制装置等。
随着电厂、变电站自动化水平的提高,电力系统对全站统一时钟的要求愈来愈迫切,有了统一时钟,既可实现全站各系统在统一时间基准下的运行监控,也可以通过各开关动作的先后顺序来分析事故的原因及发展过程。
因此电力系统的安全、稳定、可靠运行对时钟的基准统一及精度的要求进一步提高,在电力系统的电厂、变电站及调度中心等建立全站统一时间同步系统已经显得十分迫切和必要。
另外,各站往往有不同的装置需要接收时钟同步信号,其接口类型繁多,装置的数量也不等,所以在实际应用中常感到卫星对时装置的某些类型接口数量不够或缺少某种类型的接口,其结果就是全站中有些装置不能实现时钟同步,或者需要再增加一台甚至数台卫星对时装置,而这往往受到资金不足或没有安装位置等限制。
YJD-2000 卫星同步时钟是我公司根据电力系统现在的需要及将来的发展要求基础上,自主开发的具有国内先进水平的授时产品。
YJD-2000 卫星同步时钟结合美国GPS、中国北斗、俄罗斯格罗娜丝等技术特点并考虑了各种涉及国家安全的关联因素,实现了输入多源头(GPS、北斗、格罗娜丝、高精度守时、IRIG-B 码基准等)、输出多制式(TTL、空接点、IRIG-B、差分、串口、网络、光纤等)、满足多设备(系统输出可以任意扩展,可以满足任何规模、任何方式的时间信号需求)的要求,可为电力、煤炭、轨道交通、石油化工、航道水运、邮电电信及相关领域的系统中需要接收时钟同步信号的装置及系统提供高精度、高稳定、高安全,高可靠的时间基准信号。
CT-GPS25全球卫星同步时钟《使用说明书》 精品
CT-GPS25全球卫星同步时钟使用说明书目录一、装置简介 (2)二、技术指标 (2)1、环境条件 (2)2、电气条件 (2)3、性能指标 (3)4、串行接口 (3)5、脉冲输出 (3)6、重量 (3)7、外形尺寸 (3)三、装置的原理框图 (4)四、装置的结构 (4)1、装置的前面板 (4)2、装置的后面板 (5)五、装置的安装和使用 (6)1、天线的架设 (6)2、装置的安装位置 (6)3、装置的整定 (6)4、装置的投入及运行 (7)5、装置的串行输出接口 (7)6、装置的故障与维修 (8)附录: (9)一、装置简介CT-GPS25全球卫星同步时钟(以下简称CT-GPS25)利用GPS(全球定位系统)卫星发送的秒同步时间信号,向电力系统及其它行业的各种自动化装置提供精确的同步时间信号。
CT-GPS25主要应用于以下几个方面:(1).为电网自动化装置如故障录波器、微机继电保护及安全自动装置、远动及微机监控系统、事件记录仪等设备提供时间信号。
(2).用于频率监视的标准时钟,即调度上通过工频钟与标准时间的差异来比较系统频率误差积累情况.(3).用于相位测量的同步时钟,利用CT-GPS25来同步采样脉冲,同步误差很小,可以保证相位测量的准确性。
(4).用于继电保护装置试验,检验线路纵联保护(高频相差保护装置)。
(5).用于故障测距,特别为研制双端行波测距原理的装置创造了条件。
CT-GPS25主要有以下特点:(1).时间精度高,输出的秒脉冲精度达微秒级。
(2).开机或关机对输出无任何影响。
(3).信号接收可靠性高,不受电站等地域条件的限制。
(4).可设定的秒、分钟、小时同步脉冲输出,并可经串行口输出时间信息,可方便地由各种自动化装置选用(5). 装置的所有信号输出均经光电隔离,抗干扰能力强,符合《静态继电保护装置及安全自动装置通用技术条件》标准的要求。
(6). 装置具有多种串行信息输出与交互方式,以满足不同用户不同的信号利用需求。
卫星时钟GPS说明书

编制:刘千里审核:侯东京批准:赵峰南京讯汇科技发展有限公司2011-6一、装置简介..........................................................................................................................................................................22二、主要技术指标..........................................................................................................................................................44三、装置结构及接口说明..................................................................................................................................99四、GPS 时钟的相关输出接口的测试方法...................................13五、卫星天线安装说明......................................................................................................................................1717六、装箱清单(标准配置)..........................................................17附录一NTP 网络时钟报文协议的应用......................................18附录二IRIG-B 码码元定义及波形 (21)一、装置简介GPS-TG(K)3300系列卫星同步时钟,专门为电磁环境恶劣的工业现场应用而设计,适用于电力、铁路、水利、矿业、银行、石油化工等多种领域,为自动化控制、生产管理、安全管理、信息管理、网络管理等系统提供精确、稳定的授时服务。
GPS卫星对时装置调试说明及对时方案简介说明文档

GPS对时专题介绍说明文档文件名称GPS对时专题介绍文件说明无版本记录GPS对时介绍说明文档一、GPS装置介绍我们常用的都是烟台恒宇的GPS卫星同步时钟1、前面板说明:(图1)(1)液晶显示屏,主要显示当前时间、接收到卫星信号的个数。
(2)POWER: 电源指示灯,接通电源即亮。
(3)PPS: 秒脉冲指示灯,每秒闪亮。
接通电源, PPS指示灯(绿)长亮,表示GPS正在搜索卫星,尚不能提供精确的时间, 秒脉冲输出接口无输出。
当GPS 跟踪上卫星后,PPS灯每秒闪亮一次。
(4)PPM: 分脉冲指示灯,每分钟闪亮。
(5)PPH: 时脉冲指示灯,每小时闪亮。
(6)GPS: 定位指示灯,系统处于定位状态时亮。
(7)ALARM: 报警指示灯,没有卫星信号时此灯会亮。
2、后面板说明1 2 3 4 5 6 7 8(图2)(1)电源开关(2)电源插座(AC/DC85~265V) (3)保险管座(4)COM1、COM2:RS232串口 (5)COM3、COM4:RS422串口(6)PPS / PPM:空节点方式的秒/分脉冲输出接口,+ 端为C 极,- 端为E 极,C 、E 间外接电压Vce<30V,允许电流Ice<50mA(7)IRIG-B:TTL 方式的IRIG-B 码输出,芯 — 信号,外壳 — 地 (8)GPS 天线输入接口3、通信接口输出引脚示意图:RS-232 RS-422/4853456789123456789122---RXD 2---T+ 3---TXD 3---T-5---GND 5---GND(图3)4、常见故障处理(1)打开电源开关,若液晶无任何显示,请检查电源是否有电,电源线、电源插座及保险管等接触是否良好。
(2)串口无信息输出时,请检查串口线引脚是否正常,接口与装置连接状态是否良好,通信格式及波特率设定是否正确。
(3)长时间不定位,请检查天线安装是否正确,天线接口与装置连接是否牢固。
(4)PCI 板卡的简单故障排除●PPS指示灯不亮,请检查板卡是否插紧, 微机是否上电。
全球位置系统(GPS)导航系统时间设置指南说明书

After you set the day information,pressing the SET button again will cancel this setting mode and the system shows the adjusted display.The system will also automatically return to the normal display about 10seconds after you stop adjusting a mode.The navigation system receives signals from the global positioning system (GPS),and the displayed time is updated automatically by the GPS.Refer to the navigation system manual for how to adjust the time.4.On models with navigation systemSetting the Clock and Calendar232Press the REAR PWR button.The indicator on the REAR PWR button will come on,as well as the indicator on the FRONT SOURCE button.The rear seat passengers can then operate the rear system from the control panel in the ceiling.The rear control panel can also be detached and used as a remote control,by pushing the RELEASE button,and pulling the remote toward you.When you turn on the system,the rear speakers are automatically turned off if the rear system selects a different entertainment source than the front system.You will see the Rear Speakers Off icon both in the audio display and the overhead screen.The sound for the rear system is sent to the wireless headphones.The ignition switch must be in the ACCESSORY (I)or the ON (II)position to operate the rear entertainment system.With this system,the rearpassengers can enjoy a different entertainment source (radio,disc changer,DVD player,XM Radio,or optional CD changer/tape player)than the front seat occupants.The audio is broadcast through the supplied wireless headphones.Your vehicle is equipped with a rear entertainment system that includes a DVD player for the enjoyment of the rear passengers.Pressing the REAR CTRL OFF button disables rear control.The indicator in the button comes on and your passengers can no longer operate the system with the rear control panel.When the button is pressed,the ‘‘CTRL OFF’’message appears in the overhead screen to let your passengers know that the control panel is disabled.The rear system selects the source it was last set to.If that source has been removed (the DVD has been ejected from the player,for example),you will see ‘‘DVD EJECT’’in the display.You should select another source or insert a DVD.If you want to turn the rear speakers on again,press and hold the REAR PWR button until the Rear Speakers Off icon goes off.The rear speakers are connected to the front system,so they will always play the source that the front system is set to.CONTINUEDAvailable on U.S.Entertainment Package and Canadian Elite Package modelsTo Turn On the SystemRear SpeakersRear Entertainment SystemFeatures233NOTE:Rear Entertainment System234Open the overhead screen by pushing the OPEN button.The screen will swing down part-way.Pivot the screen the rest of the way.If you pivot the screen too farforward,past the second detent,the display will turn off.Pivot the screen back to the second or first detent to turn the display back on.To close the screen,pivot it up until it latches.To operate the rear entertainment system from the front panel,press the REAR SOURCE button.You will hear two beeps and the indicator in the button comes on to show that the control panel is enabled.The DVD player in your rearentertainment system can play DVD video discs,audio CDs MP3/WMA discs and DTS CDs.If you do not operate the rearentertainment system from the front panel within 10seconds,theindicator goes off and the FRONT SOURCE indicator comes on automatically.To play the radio,the buttons for the front entertainment system have the same functions.If discs are loaded in the discchanger of the upper part,select the 6DISC button.If a disc is loaded in the lower player,select the DVD button.CONTINUEDTo Select Rear Entertainment from the Front Control Panel Operating the DVD Player from the Front Control Panel Rear Entertainment SystemFeatures235。
全球定位系统导航系统的时间设置说明书
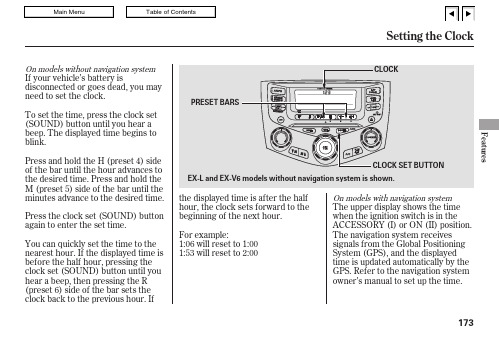
The upper display shows the time when the ignition switch is in the ACCESSORY (I)or ON (II)position.The navigation system receives signals from the Global Positioning System (GPS),and the displayed time is updated automatically by the GPS.Refer to the navigation system owner’s manual to set up the time.To set the time,press the clock set (SOUND)button until you hear a beep.The displayed time begins to blink.Press and hold the H (preset 4)side of the bar until the hour advances to the desired time.Press and hold the M (preset 5)side of the bar until the minutes advance to the desired time.Press the clock set (SOUND)button again to enter the set time.You can quickly set the time to the nearest hour.If the displayed time is before the half hour,pressing the clock set (SOUND)button until you hear a beep,then pressing the R (preset 6)side of the bar sets the clock back to the previous hour.Ifthe displayed time is after the half hour,the clock sets forward to the beginning of the next hour.For example:1:06will reset to 1:001:53will reset to 2:00If your vehicle’s battery isdisconnected or goes dead,you may need to set the clock.On models without navigation systemOn models with navigation systemSetting the ClockFeatures173With the system set,you can still open the trunk with the remote transmitter without triggering the alarm.The alarm will sound if the trunk lock is forced,or the trunk is opened with the trunk release handle or the emergency trunk opener.The security system will not set if the hood,trunk,or either door is not fully closed.Before you leave the vehicle,make sure the doors,trunk,and hood are securely closed.To see if the system is set after you exit the vehicle,press the LOCK button on the remotetransmitter within 5seconds.If the system is set,the horn will beep once.Do not attempt to alter this system or add other devices to it.The security system automatically sets 15seconds after you lock the doors,hood,and trunk.For thesystem to activate,you must lock the doors from the outside with the key,lock tab,door lock switch,or remote transmitter.The security system indicator on the instrument panel starts blinking immediately to show you the system is setting itself.The security system helps to protect your vehicle and valuables from theft.The horn sounds and a combination of headlights (low beam),parking lights,side marker lights,andtaillights flash if someone attempts to break into your vehicle or remove the radio.This alarm continues for 2minutes,then it stops.To reset an alarming system before the 2minutes have elapsed,unlock the driver’s door with the key or the remote transmitter.All models except LXSecurity System174NOTE:Cruise control allows you to maintain a set speed above 25mph (40km/h)without keeping your foot on the accelerator pedal.It should be used for cruising on straight,openhighways.It is not recommended for city driving,winding roads,slippery roads,heavy rain,or bad weather.Press and release the SET/DECEL button on the steering wheel.The CRUISE CONTROL indicator on the instrument panel comes on to show the system is now activated.Cruise control may not hold the set speed when you are going up and down hills.If your speed increases going down a hill,use the brakes to slow down.This will cancel cruise control.To resume the set speed,press the RES/ACCEL button.The indicator on the instrument panel will come back on.When climbing a steep hill,the automatic transmission may downshift to hold the set speed.3.Cruise ControlFeatures175You can increase the set cruising speed in any of these ways:Press and hold the RES/ACCEL button.When you reach thedesired cruising speed,release the button.Push on the accelerator pedal until you reach the desired cruising speed,then press the SET/DECEL button.Even with cruise control turned on,you can still use the accelerator pedal to speed up for passing.After completing the pass,take your foot off the accelerator pedal.The vehicle will return to the set cruising speed.Resting your foot on the brake or clutch pedal causes cruise control to cancel.To increase your speed in very small amounts,tap the RES/ACCEL button.Each time you do this,the vehicle will speed up about 1mph (1.6km/h).Changing the Set SpeedCruise Control176Tap the brake or clutch pedal.Push the CANCEL button on the steering wheel.When you push the CANCEL button,or tap the brake or clutch pedal,the system will remember thepreviously-set cruising speed.To return to that speed,accelerate to above 25mph (40km/h),then press and release the RES/ACCEL button.The CRUISE CONTROL indicator comes on,and the vehicle will accelerate to the same cruising speed as before.You can cancel cruise control in any of these ways:Push the CRUISE button on the steering wheel.Pressing the CRUISE button turns the system off and erases the previous cruising speed.Resuming the Set SpeedCancelling Cruise ControlCruise ControlFeatures177If you are training HomeLink to operate a garage door or gate,you should unplug the motor for that device during training.Repeatedly pressing the remote control button could burn out the motor.They do not have the safety feature that causes the motor to stop and reverse if an obstacle is detected during closing,increasing the risk of injury.HomeLink stores the code in a permanent memory.There should be no need to retrain HomeLink if your vehicle’s battery goes dead or is disconnected.If your garage door opener was manufactured before April 1982,you may not be able to program HomeLink to operate it.The HomeLink universaltransceiver built into your vehicle can be programmed to operate up to three remotely controlled devices around your home,such as garage doors,lighting,or home security systems.For quick and accurate training,make sure the remote transmitter for the device (garage door,automatic gate,security system,etc.)has a fresh battery.If you just received your vehicle and have not trained any of the buttons inHomeLink before,you should erase any previously learned codes before training the first button.If you are training the second or third buttons,go directly to step 1.Unplug the garage door opener motor from the electrical outlet.Hold the end of the garage door opener remote 2to 5inches from HomeLink.Make sure you are not blocking your view of the red indicator in HomeLink.Always refer to the operatinginstructions and safety information that came with your garage door opener or other equipment youintend to operate with HomeLink.If you do not have this information,contact the manufacturer of the equipment.To do this,press and hold the two outside buttons on the HomeLink transceiver for about 20seconds,until the red indicator flashes.2.1.On EX-V6modelGeneral InformationImportant Safety Precautions Training HomeLinkBefore you begin HomeLink Universal Transceiver178step 1.Release the buttons,then gotosecond.If the button works,programming is complete.If the button does not work go to step 6.Pressand hold the remote transmitter button and one of the HomeLink buttons at the same time.If the red indicator in HomeLink begins to flash slowly at first,then rapidly, release both buttons, and go to step 5.Repeatthese steps to train the other two HomeLink buttons to operate any other compatible remotely controlled devices around your home (lighting,automatic gate, security system,etc.).If the indicator flashes rapidly for 2seconds then stays on,you have a rolling code transmitter:go to ‘‘Training with a Rolling Code System’’(see page ).If the indicator stays on or flashes slowly,repeat steps 2thru 5.Push and hold the HomeLink button for a few seconds,then watch the red indicator on HomeLink.3. 6.7.180HomeLink Universal TransceiverFeatures179For security purposes,newer garage door opening systems use a ‘‘rolling’’or variable rmation from the remote control and the garage door opener are needed before HomeLink can operate the garage door opener.The ‘‘Training HomeLink’’procedure trains HomeLink to the proper garage door opener code.The following proceduresynchronizes HomeLink to the garage door opener so it sends and receives the correct codes.Make sure you have properly completed the ‘‘Training HomeLink’’procedure.Press and hold the button on HomeLink for 3to 4seconds.Press and hold the HomeLink button again for 3to 4seconds.This should turn off the training indicator on the garage door opener unit.(Some systems may require you to press the button up to three times.)Press the HomeLink button again for about 1second.It should operate the garage door.Find the ‘‘training’’button on your garage door opener unit.The location will vary,depending on the manufacturer.6.2. 4.5.1.Training With a Rolling Code SystemHomeLink Universal Transceiver180As required by the FCC:This device complies with Part 15 of the FCC rules. Operation is subject to the following two conditions: (1) This device may not cause harmful interference, and (2) this device must accept any interference received, including interference that may cause undesired operation.Changes or modifications not expressly approved by the party responsible for compliance could void the user’s authority to operate the equipment.This device complies with Industry Canada Standard RSS-210.Operation is subject to the following two conditions: (1) this device may not cause interference, and (2) this device must accept any interference that may cause undesired operation of the device.You should erase all three codes before selling the vehicle.To erase the codes stored in all three buttons, press and hold the two outside buttons until the red indicator begins to flash, then release the buttons.If you want to retrain a programmed button for a new device, you do not have to erase all button memory.You can replace the existing memory code using this procedure:Press and hold the HomeLink button to be trained until the HomeLink indicator begins to flash slowly.If a rolling code transmitter was previously programmed, the indicator will flash rapidly for 2seconds, and then stay on for about 23 seconds.1.Erasing CodesRetraining a Button HomeLinkUniversal TransceiverFeatures181。
GPS卫星同步时钟说明书16K-(2)解析

GPS卫星同步时钟说明书烟台国芯电子科技有限公司选型手册型号配置说明机箱结构TD-2000 2路RS-232串口,2路RS-485串口,天线长30米,智能型1U19〞上架式优质铝合金机箱TG-2000B8 2路RS-232串口,2路RS-485串口,8路IRIG-B码输出,天线长30米,智能型1U19〞上架式优质铝合金机箱TG-2000B16 2路RS-232串口,2路RS-485串口,16路IRIG-B码输出,天线长30米,智能型2U19〞上架式优质铝合金机箱TG-2000B24 2路RS-232串口,2路RS-485串口,24路IRIG-B码输出,天线长30米,智能型2U19〞上架式优质铝合金机箱TG-2000B32 2路RS-232串口,2路RS-485串口,32路IRIG-B码输出,天线长30米,智能型2U19〞上架式优质铝合金机箱TG-2000B40 2路RS-232串口,2路RS-485串口,40路IRIG-B码输出,天线长30米,智能型2U19〞上架式优质铝合金机箱TG-2000B48 2路RS-232串口,2路RS-485串口,48路IRIG-B码输出,天线长30米,智能型2U19〞上架式优质铝合金机箱TG-2000M8 2路RS-232串口,2路RS-485串口,8路脉冲输出,天线长30米,智能型1U19〞上架式优质铝合金机箱一.简介TD系列GPS卫星同步时钟系选用美国专业公司制造的GPS 卫星信号接收机,经二次开发研制的高科技产品。
产品广泛应用于电力、民航、铁路、交通调度、数字电视、实时通信网络等需要授时或校时领域。
因采用卫星星载原子钟作为时间标准,无累积误差,所以是当今世界首选的高精度对时设备(相当于原子钟)。
系统采用12通道高品质GPS接收机,具有并行跟踪12颗卫星的能力,一旦初始化完成,即使锁定一颗卫星也能实现授时功能,因此系统具有强大的抗干扰能力。
产品设计符合《静态继电保护装置及安全自动装置通用技术条件》、《华东电网时间同步系统技术规范》、《广东电网变电站GPS时间同步系统技术规范》及《电力系统的时间同步系统技术规范》。
GPS网络对时设置详细版

GPS网络对时设置详细版GPS网络对时装置IP地址的说明使用前请详细阅读本说明以免造成设备损坏本GPS装置(全球卫星定位系统)将获取的标准时钟信号信息在网络中传输,网络中需要时间信号的设备如计算机,控制器等设备就可以与标准时钟信号同步,实现网络授时功能。
标准的时钟信息通过TCP/IP网络传输,本网口支持多种流行的时间发布协议,如NTP,time/UDP。
本装置使用非常简单,将本装置网络口接于HUB上,整个网络就能时间同步了。
对于Win9x,Winme Win2000客户,系统不带网络校时服务,可用我们提供支持SNTP协议的授时客户端软件,对于Win NT,WinXP,Win7,UNIX,LINUX,操作系统自带网络校时服务,只需启动校时服务即可。
本对时装置设备可以以太网口远程登陆进行设置模块的IP地址及工作方式。
注意: a 本装置的网络模块在使用前必须获得唯一的IP地址才能进行远程设置和正常工作b对于使用Win9x,Winme Win2000操作系统的用户必须使用我们提供的第三方对时软件方可正确对时c 如果遇到无法正确对时,请先试着在运行处ping一下分配给模块的IP 地址d在对时过程钟如果遇到报告RPC错误,请按如下步骤操作后再尝试能否正确对时:控制面板——管理工具——服务——Windows Time——将“启动类型”改为自动,“服务状态”改为已启动XP下NTP模块设置说明在XP中对NTP模块进行设置前,首先要在管理中打开windows time的服务。
如图所示:右键点击我的电脑,选择“管理”,进入界面选择“服务”,然后找到windows time,右键启动此项服务。
本产品IP和MAC的地址都必须为静态的,首先应设置客户端的IP地址,打开“本地连接”选择“属性”进入后选择“Internet协议(TCP/IP)”的“属性”,设置一个客户端的IP地址(此地址由客户提供),确定退出即可。
然后我们开始设置NTP参数:打开“开始——附件——命令提示符”,如下图:1.首先arp –s IP地址(客户自定) MAC地址(由厂家提供),举个例子:arp –s192.168.1.123 00-03-b9-71-3e-2d;2.运行arp –a命令,查看是否定义成功,成功后如图所示:图中第一行即为刚刚设置成功的对应地址;3.键入telnet 192.168.1.123 1,此时应很快给出错误信息,可以不用理会;4.继续键入telnet 192.168.1.123 9999,应看到下图再按下回车键进入下面所示的设置菜单5.选择“0 server configuration”(服务器配置),键入第一步设置的IP地址,如下图:入,否则直接回车;设置,一般是回车直接跳过;Change telnet config password(更改telnet设置密码),根据情况自定,否则直接回车;6.设置完毕,选择“9 Save and exit”保存后退出,如图所示;7.打开“更改日期和时间”,进入“Internet时间”,勾选“与Internet时间服务器同步”,将输入框中的服务器改为NTP对应的IP 地址,点击“立即更新”提示与192.168.1.123同步成功,说明设备对时功能可以实现,确定退出即可。
- 1、下载文档前请自行甄别文档内容的完整性,平台不提供额外的编辑、内容补充、找答案等附加服务。
- 2、"仅部分预览"的文档,不可在线预览部分如存在完整性等问题,可反馈申请退款(可完整预览的文档不适用该条件!)。
- 3、如文档侵犯您的权益,请联系客服反馈,我们会尽快为您处理(人工客服工作时间:9:00-18:30)。
八、GPS 卫星同步时钟的通信参数
串口输出8 位数据位,1 位起始位,1 位停止位,无校验, 缺省状态下发送 波特率是4800BPS。
设备缺省状态下是北京时间,既UTC 时间+8 小时。
六、装置结构
1.外形尺寸
1U19"上架式机箱长446mm×高45mm×深240mm 主电路板卡长230mm×宽136mm。 COM板卡长150mm×宽50mm。
2.装置的前面板及各功能的使用
HZGPS 卫星同步时钟
1PPH 1PPM 1PPS 运行 同步 电源
长沙华能自控集团有限公司
图 2 1U19"上架式机箱 GPS 时钟前面板式意图
点
N/S
dd dd dd mm mm 2E mm mm mm mm Lo II DD FF
↑↑↑↑↑↑↑↑↑↑↑↑↑↑
经经经经经小经经经经经有校结
度度度度度数度度度度度效验束
点
E/W 性 码 码
例如:
现在是 99 年 6 月 20 号 07 点 53 分 41 秒,北纬 30°37.4459ˊ东经 104°02.3462ˊ,则 发送信息格式为:
1.工作条件 ...................................................................................................... 2 2.主要性能指标.............................................................................................. 2 六、装置结构 ....................................................................................................... 2 1.外形尺寸 ...................................................................................................... 2 2.装置的前面板及各功能的使用 ................................................................. 2 3.装置的后面板及各部分的使用 ................................................................. 2 七、安装调试及操作说明................................................................................... 4 八、GPS 卫星同步时钟的通信参数.................................................................. 5 九、GPS 卫星同步时钟的后台监控.................................................................. 5 十、GPS 时钟通信协议 ..................................................................................... 6 十一、故障排除 ................................................................................................... 7
四、应用领域及范围
1.为电网自动化设备、民航、铁路等调度统一时钟。 2.为广播电视系统及实时通信网络系统等进行授时、校时。
长沙华能自控集团
1
HZGPS 型 全球卫星同步时钟技术说明书
五、主要技术指标
1.工作条件
功耗:≤5W 环境温度:-20℃—+55℃ 相对湿度:20%—80%(40℃) 工作电源:AC185V—260V 交流 直流220V±15%
长沙华能自控集团
HZGPS 型 全球卫星同步时钟技术说明书
一、 简介
HZGPS系列GPS 卫星同步时钟系选用美国专业公司制造的GPS OEM 部件作为 卫星信号接收机,经二次开发研制的高科技产品。产品广泛应用于电力、民航、铁路、 交通调度、数字电视、实时通信网络系统等需要授时、校时领域。因采用卫星星载原子 钟作为时间标准,无累积误差,所以是当今世界首选的高精度对时设备(相当于原子钟)。
EB 90 30 37 35 33 34 31 32 30 30 36 39 39 33 30 33 37 2E 34 34 35 39 4E 31 30 34 30 32 2E 33 34 36 32 45 56 62 FF
6
长沙华能自控集团
HZGPS 型 全球卫星同步时钟技术说明书
注:1、有效性指输出时间是否为同步时间,如为 A,表示装置取得同步,输出时 间有效;如为 V,表示装置未取得同步,输出时间无效。
系统采用12 通道高品质GPS 接收机,具有并行跟踪12 颗卫星的能力,一旦初始 化完成,即使锁定一颗卫星也能实现授时功能,因此系统具有强大的抗干扰能力。
产品设计符合《静态继电保护装置及安全自动装置通用技术条件》及《中电联标准 化中心时间同步系统技术规范051222》。装置软硬件采用多项抗干扰措施,符合电磁兼 容标准。
EB 90 HD LD HM LM HY LY HH LH HM LM HS LS dd dd mm mm 2E mm mm mm mm La
↑↑↑↑↑↑↑↑↑↑↑↑↑↑↑↑↑↑↑↑↑↑↑↑
帧帧时时分分秒秒日日月月年年纬纬纬纬小纬纬纬纬纬
头头十个十个十个十个十个十个度度度度数度度度度度
位位位位位位位位位位位位
天线安装应尽量远离大功率微波及高频天线,减少其通信信号的串扰。在多 雷地区,天线的架设位置应避开雷击多发地带,同时要采取多种避雷措施。天线电缆长 度是根据天线增益严格设计的,不得剪断延长、缩短或加装接头,否则将严重影响接收 效果,甚至收不到信号。
4
长沙华能自控集团
HZGPS 型 全球卫星同步时钟技术说明书
长沙华能自控集团
3
HZGPS 型 全球卫星同步时钟技术说明书
图5.脉冲空接点对时示意图
七、安装调试及操作说明
GPS 机箱的机械尺寸如图6所示:
图6.GPS机箱示意图
天线的安装:GPS 接收天线是一个很小又易于安装的天线,它是保证GPS 接 收机与卫星同步的关键部件,它的架设正确与否直接关系到GPS 时钟的性能。天 线安装时必须头朝上,牢固地固定在建筑物顶部,要求可视天空范围开阔,以确 保天线能够收到足够强的卫星信号。(见图7)
a. 自左向右 1 ~ 8 为 PPS 秒脉冲输出,9 ~ 16 为 PPM 分脉冲输出,17 ~ 24 为 PPH 时脉冲输出,每两个接点为一对输出端子,其中奇数(例如:1、3 等)为 E 输出端,偶数(例如:2、4 等)为 C 输出端,输出为光隔输出端,正脉冲输出, 上升沿同步,脉冲宽度 100ms,秒脉冲前沿与北京时间秒的零时刻同步。脉冲 光隔输出端对时 C、E 间外接工作电压 5 至 24V,允许电流 ICE<50mA。由于脉 冲输出采用纯硬件实现,因此保证时间精度达到 500 纳秒。脉冲与串口组合对 时,精度可达微秒级。分脉冲端子在每分钟到时,输出一个分脉冲,当脉冲到 来时,光电耦合器的输出三极管导通。时脉冲端子在每小时到时,输出一个时 脉冲,输出方式与分脉冲相同。使用时被对时的接收设备应有直流电源,并注 意极性不要接反,否则不能对时。
九、GPS 卫星同步时钟的后台监控
长沙华能自控集团
5
HZGPS 型 全球卫星同步时钟技术说明书
图8.后台监控示意图 采用GPS时钟定位程序可以接收到由GPS全球卫星同步时钟发送的时间及经度纬度 等信息。(如图8)
十、GPS 时钟通信协议
a. 通讯波特率: 4800 b. 数据格式:信息位 8 位,一位起始位,一位停止位,无校验,ASCII 码 c. 信息格式:每秒发送一次,格式为:
CHANGSHA HUANENG
状态 编号 密级
HZGPS 型 全球卫星同步时钟
技术说明书
1.0 版
编制:万 旭 校核: 审定: 批准:
长沙华能自控集团
HZGPS 型 全球卫星同步时钟技术说明书
目录
一、 简介 .............................................................................................................. 1 二、产品主要功能............................................................................................... 1 三、产品主要特点............................................................................................... 1 四、应用领域及范围........................................................................................... 1 五、主要技术指标............................................................................................... 2