特权口令设置
神州数码交换机命令

交换机基本状态:hostname> ;用户模式hostname# ;特权模式hostname(config)# ;全局配置模式hostname(config-if)# ;接口状态交换机口令设置:switch>enable ;进入特权模式switch#config terminal ;进入全局配置模式switch(config)#hostname ;设置交换机的主机名switch(config)#enable secret xxx ;设置特权加密口令switch(config)#enable password xxa ;设置特权非密口令switch(config)#line console 0 ;进入控制台口switch(config-line)#line vty 0 4 ;进入虚拟终端switch(config-line)#login ;允许登录switch(config-line)#password xx ;设置登录口令xxswitch#exit ;返回命令交换机VLAN设置:switch#vlan database ;进入VLAN设置switch(vlan)#vlan 2 ;建VLAN 2switch(vlan)#no vlan 2 ;删vlan 2switch(config)#int f0/1 ;进入端口1switch(config-if)#switchport access vlan 2 ;当前端口加入vlan 2 switch(config-if)#switchport mode trunk ;设置为干线switch(config-if)#switchport trunk allowed vlan 1,2 ;设置允许的vlan switch(config-if)#switchport trunk encap dot1q ;设置vlan 中继switch(config)#vtp domain ;设置发vtp域名switch(config)#vtp password ;设置发vtp密码switch(config)#vtp mode server ;设置发vtp模式switch(config)#vtp mode client ;设置发vtp模式交换机设置IP地址:switch(config)#interface vlan 1 ;进入vlan 1switch(config-if)#ip address ;设置IP地址switch(config)#ip default-gateway ;设置默认网关switch#dir Flash: ;查看闪存交换机显示命令:switch#write ;保存配置信息switch#show vtp ;查看vtp配置信息switch#show run ;查看当前配置信息switch#show vlan ;查看vlan配置信息switch#show interface ;查看端口信息switch#show int f0/0 ;查看指定端口信息完了最最要的一步。
实验一 配置交换机和路由器的telnet密码和特权模式密码

实验一配置交换机和路由器的telnet密码和特权模式密码实验拓扑图一、配置交换机的telnet密码和特权模式密码【准备知识】1、交换机工作模式切换(1)登陆交换机,进入用户模式。
连接交换机并且登陆。
请注意现在交换机上的显示符号。
显示如下:Switch>(2)使用help命令,使用help命令(?)查看在用户模式下路有器所支持的命令。
(3)进入特权模式,输入(enable)命令,进入特权模式。
如果交换机有密码保护那么此时需要输入确认密码。
注意现在所显示符号和用户模式时的差别。
显示如下:Switch#(4)使用help命令,使用help命令(?)查看在特权模式下路有器所支持的命令。
注意和用户模式下的区别。
(5)进入全局配置模式,输入命令(configure terminal or config t)进入全局配置模式。
注意现在所显示符号以及命令提示。
显示如下:Switch(config) #(6)使用help命令,使用help命令(?)查看在全局配置模式下路有器所支持的配置命令。
(7)退出全局配置模式,使用快捷键(Ctrl+Z)退出全局配置模式,进入特权模式。
也可以使用命令(exit)退出全局配置模式。
(8)退出特权模式,使用命令(disable)从特权模式会到用户模式。
(9)退出交换机,使用命令(exit)退出交换机。
这个命令可以用来从特权模式中退出交换机。
2、交换机名称、口令设置命令格式(1)通过超级终端进入交换机,并进入全局模式,键入命令:Switch(config)#hostname switch2950Switch2950 (config)#你会发现交换机的命令提示行的名称由Switch更改为Switch2950。
(2)全局模式下,设定明文口令cisco,此口令可以限制对特权模式的访问。
在配置文件中可以看见口令。
注意:口令一般不应以较为简单或有明显特征的单词,不过在实验的过程中可以采用象cisco这样的单词。
锐捷交换机配置手册完整
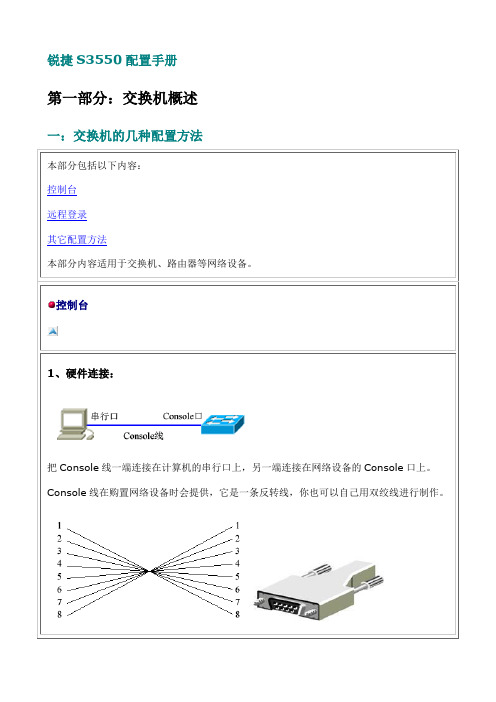
锐捷S3550配置手册第一部分:交换机概述一:交换机的几种配置方法控制台远程登录通过一台连接在网络中的计算机,用Telnet命令登录网络设备进行配置。
其它配置方法除了控制台和远程登录之外,还有其它一些配置方法配置网络设备。
二:命令行(CLI)操作命令模式交换机和路由器的命令是按模式分组的,每种模式中定义了一组命令集,所以想要使用某命令模式的切换交换机和路由器的模式大体可分为四层:用户模式→特权模式→全局配置模式→其它配置CLI命令的编辑技巧CLI(命令行)有以下特点。
常见CLI错误提示% Ambiguous command: "show c"使用no 和default 选项很多命令都有no 选项和default 选项。
三:交换机的初始化配置交换机的初始化配置setup命令四:配置文件的保存、查看与备份查看配置文件模式:特权配置模式。
保存配置文件就是把running-config 保存为startup-config。
删除配置文件删除配置文件就是把NVRAM中的startup-config 删除。
通常我们把配置文件备份到TFTP服务器上,在需要时可以再从TFTP服务器上把配置文五:文件系统文件系统概述交换机和路由器用一个并行Flash作为辅助存储器存储文件,Flash是一个可读可写的存文件操作所有文件操作都是在特权模式下进行。
目录操作Flash中的文件可以使用树形的目录结构,文件可以存放在不同的子目录中,也可以在目六:系统文件的备份与升级搭建环境在备份和升级时需要搭建通信环境,让设备和计算机间可以传输文件。
有三个方案:用TFTP传输文件准备工作:用Xmodem传输文件准备工作:ROM监控模式进入ROM监控模式有两种方法:七:密码丢失的解决方法第二部分:交换机的基本配置一:配置主机名主机名用于标识交换机和路由器,通常它会作为提示符的一部分显示在命令提示符的前二:配置口令配置控制台口令控制台口令是通过控制台登录交换机或路由器时设置的口令。
神州数码路由器配置相关命令
一、路由器工作模式:用户模式:Router>特权模式:Router #全局配置模式:Router (config)#接口配置模式:Router (config-if)#路由配置模式:Router(config-router)#Line配置模式:Router(config-line)#二、路由器口令设置:Router>enable;进入特权模式Router#configterminal;进入全局配置模式Router(config)#hostname xxx;设置路由器的主机名Router(config)#enable secret level 15 0 xxx ;设置特权明文加密口令xxx Router (config)#enable password xxx;设置特权非密口令Router(config)#line console 0;进入控制台口Router(config-line)#line vty 0 4;进入虚拟终端Router(config-line)#login;允许登录Router(config-line)#password xx ;设置登录口令xxRouter#exit;返回命令三、路由器VLAN设置:配置WAN接口选择接口:Router(config)#i nterface s0/0/0配置IP地址Router(config-if)#ip address 192.168.10.1 255.255.255.0设置时钟频率:Router(config-if)#clock rate 64000(另一端无需配置)启用端口:Router(config-if)#no shutdown四、路由协议设置:静态路由:Router(config)#ip route network 目标网络网络掩码下一跳IP Router(config)#ip route 192.168.1.0 255.255.255.0 10.1.1.1默认路由:Router(config)#ip route 0.0.0.0 0.0.0.0 10.1.1.1开启RIP协议:Router(config)#router rip指定版本协议:Router(config-router)#version 2声明直连网络号:Router(config-router)#network 直连网段Router(config-router)#network 192.168.1.0开启进程号为1的ospf协议:Router(config)#router ospf1声明直连网络号Router(config-router)#network直连网段反掩码area区域号Router(config-router)#network 192.168.1.0 0.0.0.255 area 0查看路由表:Router#showip route配置路由访问控制命令格式:Router(config)#access-list 列表号permit源IP地址反掩码配置允许:Router(config)#access-list 1 permit 192.168.10.1 0.0.0.255配置拒绝访问:Router(config)# access-list 1 deny 192.168.20.0 0.0.0.255配置允许其他:Router(config)#access-list 1 permit any端口绑定命令:进入相应端口:Router(config)#interface fa0/1配置列表防止位置:Router(config-if)#ip access-group 1 outRouter(config-if)#配置路由DHCP服务开启dhcp服务:Router(config)#service dhcp设置地址池:Router(config)#ipdhcp pool 172.16.12.0设置网段:Router(dhcp-config)#network 172.16.12.0 255.255.255.0设置默认网关:Router(dhcp-config)#default-router 172.16.12.200Router(dhcp-config)#exit设置排除地址:Router(config)#ipdhcp excluded-address 172.16.12.151 172.16.12.254 进入网关端口:Router(config)#interface g0/0设置网关IP:Router(config-if)#i p address 172.16.12.200 255.255.255.0配置路由NAT静态NATRouter1(config)#ipnat inside source static 192.168.11.2 200.200.200.3Router1(config)#interface fa0/0Router1(config-if)#ipnat insideRouter1(config)#interface Serial0/0/0Router1(config-if)#ipnat outside动态NATRouter1(config)#ipnat pool NAT 200.200.200.3 200.200.200.4 network 255.255.255.0//定义内部全局IP地址池NAT Router1(config)#access-list 1 permit 192.168.11.00.0.0.255 //定义可转换内部本地IP地址Router1(config)#ipnat inside source list 1 pool NAT //配置动态NAT映射Router1(config)#interface fa0/0 //定义内部接口Router1(config-if)#ipnat insideRouter1(config)#interface Serial0/0/0 //定义外部接口Router1(config-if)#ipnatoutsideRouter1(config-if)#no shutdown路由器显示命令:Router#dir Flash: ;查看闪存Router#write;保存配置信息Router#show run;查看当前配置信息Router#show ip access-list //查看ACL配置信息Router#clean ipnat translation //清除动态NA T转换列表信息Route#show ipnat statistics //查看NA T转换统计信息Route#clean ipnat statistics //清除NA T转换统计信息完了最最要的一步。
配置口令
配置口令作者:风林来源:风林的家本部分包括以下内容:配置控制台口令配置远程登录口令配置特权口令口令(密码)可用于防范非法人员登录到交换机或路由器上修改设备的配置。
我们可以在几个不同位置设置口令,以达到多重保护的目的。
控制台口令:当我们从连接在Console口的控制台登录设备时,需要输入控制台口令。
由于控制台是一种本地配置方式,所以不设置这个口令影响也不大。
远程登录口令:当我们从网络中的计算机通过Telnet命令登录设备时,需要输入远程登录口令。
远程登录是一种远程配置方式,这个口令应该设置。
在锐捷设备中,没有设置远程登录口令的设备是不能用Telnet命令登录的。
特权口令:当我们登录设备后,从用户模式进入特权模式,需要输入特权口令。
由于特权模式是进入各种配置模式的必经之路,在这里设置口令可有效防范非法人员对设备配置的修改。
在锐捷设备中,特权模式可设置多个级别,每个级别可设置不同的口令和操作权限,你可以根据情况让不同人员使用不同的级别。
在锐捷设备中,没有设置特权口令的设备也不能用Telnet 命令登录。
在实际应用中,一般特权口令和远程登录口令是必需的,设置的口令不应该太简单,不同位置的口令也不应该相同。
配置控制台口令控制台口令是通过控制台登录交换机或路由器时设置的口令。
1、设置控制台口令模式:线路配置模式。
配置命令:Ruijie(config)#line console 0Ruijie(config-line)#loginRuijie(config-line)#password passwordline console 0 命令表示配置控制台线路,0是控制台的线路编号。
login 命令用于打开登录认证功能。
password password为控制台线路设置口令。
说明:设置的口令长度最大长度为25个字符。
口令中不能有问号和其他不可显示的字符。
如果口令中有空格,则空格不能位于最前面,只有中间和末尾的空格可作为口令的一部分。
交换机口令周期
交换机口令周期1、设置控制台密码:(打开交换机进入用户模式的密码)switch (config)#line console 0 (进入0号控制台)switch (config-line)#password 111 (设置控制台密码为111)switch (config-line)#login (开启密码)switch (config-line)#exit2、设置进入特权密码:switch (config)#enable password 111 (设置进入特权模式的明文密码为111)switch (config)#enable secret 111 (设置进入特权模式的加密密码为111) switch (config-line)#exit注:实际上如果Password和Secret同时设定,只需要输入Secret密码即可,Password 密码失效;3、设置Telnet密码:switch (config)#line vty 0 4 (设置0-4(共5个)用户可以进行Telnet登录)switch (config-line)#password 111 (设置Telent远程登录的密码为111) switch (config-line)#login (开启密码)switch (config-line)#exit4、开启加密服务:switch (config)#services password-encryption5、终端空闲5分钟自动Logoutswitch (config)#line vty 0 4 (设置0-4(共5个)用户可以进行Telnet登录)switch (config-line)#exec-timeout 5 0 (设置终端空闲5分钟自动Logout)6、清除类似“*Mar 1 00:10:25.515: %LINK-5-CHANGED: Interface FastEthernet0/0...”的提示:switch (config)#line vty 0 4switch (config-line)#logging synchronous7、密码取消:switch (config)#line console 0 (进入0号控制台)switch (config-line)#no password (设置控制台密码为111)switch (config)#no enable password (取消进入特权模式的明文密码为)switch (config)#no enable secret (取消进入特权模式的加密密码为)switch (config)#line vty 0 4 (设置0-4(共5个)用户可以进行Telnet登录)switch (config-line)#no password (取消Telent远程登录的密码)switch (config-line)#no login (不进行密码检查)8、恢复出厂设置:switch #delete config.text (删除配置文件config.text) switch #reloadswitch #erase startup-confit (清除Flash卡配置文件) switch #reload。
思科交换机配置常用命令
Cisco三层交换机配置命令及解释(2011-07-11 08:54:50)标签:分类:IT资讯cisco杂谈基本配置S> enable 进入特权模式S# configure terminal 进入全局配置模式S(config)# hostname name 改变交换机名称S(config)# enable password level level_# password 设置用户口令〔level_#=1)或特权口令〔level_#=15)S(config)# line console 0 进入控制台接口S(config-line)# password console_password 接上一条命令,设置控制台口令S(config)# line vty 0 15 进入虚拟终端S(config-line)# password telnet_password 接上一条命令,设置Telnet口令S(config-line)# login 允许Telnet登录S(config)# enable password|secret privilege_password 配置特权口令〔加密或不加密〕S(config)# interface ethernet|fastethernet|gigabitethernet slot_#/port_# 进入接口子配置模式S(config-if)# [no] shutdown 关闭或启用该接口〔默认启用〕S(config)# ip address IP_address sunbet_mask 指定IP地址S(config)# ip default-gateway router's_IP_address 指定哪台路由器地址为默认网关S# show running-config 查看当前的配置S# copy running-config startup-config 将RAM中的当前配置保存到NVRAM中S> show interface [type slot_#/port_#] 查看所有或指定接口的信息S> show ip 显示交换机的IP配置〔只在1900系列上可用〕S> show version 查看设备信息S# show ip interface brief 验证IP配置S(config-if)# speed 10|100|auto 设置接口速率S(config-if)# duplex auto|full|half 设置接口双工模式S> show mac-address-table 查看CAM表S# clear mac-address-table 清除CAM表中的动态条目1900(config)# mac-address-table permanent MAC_address type [slot_#/]port_# 在CAM表中创建静态条目2950(config)# mac-address-table static MAC_address vlan VLAN_# interface type [slot_#/] port_# 在CAM表中创建静态条目1900(config)# mac-address-table restricted static MAC_address source_portlist_of_allowed_interface 设置静态端口安全措施1900(config-if)# port secure 启用粘性学习1900(config-if)# port secure max-mac-count value 设置粘性学习特性能够学到的地址数量〔默认132,取值范围是1-132〕1900(config)# address-violation suspend|ignore|disable 改变安全选项1900> show mac-address-table security 验证端口安全措施2950(config)# switchport mode access 定义接口为主机端口而不是中继端口2950(config)# switchport port-security 启用端口安全措施2950(config)# switchport port-security maximum value 指定可与此接口相关的设备的最大数量2950(config)# switchport port-security violation protect|restrict|shutdown 指定出现安全违规时应该发生的事2950(config)# switchport port-security mac-address MAC_address 指定允许与此接口相关确实切的MAC地址2950(config)# switchport port-security mac-address sticky 启用粘性学习特性2950(config)# show port interface type [slot_#/] port_# 验证接口配置2950(config-if) description name 设置接口描述信息2950# show buffers 查看系统缓存的大小1900# copy nvram tftp:// IP_address_of_TFTP_server/ file_name 将配置文件备份到TFTP服务器上1900# copy tftp:// IP_address_of_TFTP_server/ file_name nvram 从TFTP服务器上恢复配置到NVRAM1900# delete nvram 删除配置文件2950# erase startup-config 删除配置文件3550# show tcam qos TCAM_ID statistics 查看TCAM剩余容量4000> enable 进入特权模式4000>(enable) set password 设置用户模式密码4000>(enable) set enablepass 设置授权密码4000>(enable) set interface sc0 IP_address mask 配置IP地址4000>(enable) set port enable|disable slot_#/port_# 启用/禁用接口4000>(enable) show port [slot_#/port_#] 显示接口信息4000>(enable) set port name slot_#/port_# name 设置交换机接口描述信息4000>(enable) set port speed slot_#/port_# 4|10|16|100|auto 设置交换机接口速率4000>(enable) set port duplex slot_#/port_# full|half 设置交换机接口双工模式4000>(enable) clear config all 删除NVRAM中的配置信息4000>(enable) erase all 删除FLASH中的内容4000>(enable) show flash 显示FLASH中的内容4000>(enable) show cam [count] dynamic|static|permanent|system [vlan_#] 显示CAM表VLAN 1900(config)# vtp domain VTP_domain_name 定义交换机域名1900(config)# vtp server|client|transparent 定义交换机VTP模式〔默认服务器〕1900(config)# vtp password VTP_password 配置VTP口令1900(config)# vtp pruning enable|disable 启用/禁用修剪〔默认启用〕1900(config)# vtp trap enable 启用SNMP陷阱〔默认启用〕1900# show vtp 验证VTP配置2950# vtp database 访问VLAN和VTP配置〔以下均是在前用,后全是在全局配置模式下〕2950(vlan)# vtp domain VTP_domain_name 定义交换机域名2950(vlan)# vtp server|client|transparent 定义交换机VTP模式〔默认服务器〕2950(vlan)# vtp password VTP_password 配置VTP口令2950(vlan)# vtp pruning 启用/禁用修剪〔默认启用〕2950(config)# snmp-server enable traps vtp 启用SNMP陷阱〔默认启用〕2950# show vtp status 检查VTP配置2950# show vtp counters 显示与VTP消息发送与接收相关的VTP统计信息1900(config-if)# trunk on|off|desirable|auto 指定中继类型1900# show trunk A|B 验证接口中继〔A是fa0/26,B是fa0/27〕2950(config-if)# switchport mode trunk|dynamic desirable|dynamic auto|nonegotiate 指定中继类型(默认自动协商〕2950(config-if)# switchport trunk native|allowed|pruning vlan VLAN_# 配置中继2950(config-if)# switchport trunk pruning vlan remove VLAN_# 清除不希望消减的VLAN 2950# show interfaces [type 0/port_#] switchport|trunk 验证接口中继1900(config)# vlan VLAN_# [name VLAN_name] 创建VLAN1900(config-if)# vlan-membership static VLAN_# 将该接口静态地分配给一个VLAN1900# show vlan 验证VLAN1900# show vlan-membership 查看VLAN成员关系1900# show spantree [VLAN_#] 查看VLAN的STP信息2950# vlan database 进入VLAN数据库〔前用〕2950(vlan)# vlan VLAN_# [name VLAN_name] 创建VLAN2950(config)# vlan VLAN_# 进入VLAN数据库〔后用〕2950(config-vlan)# name VLAN_name 创建VLAN2950(config-if)# switchport mode access 指定连接是接入链路连接2950(config-if)# switchport access vlan VLAN_# 指定VLAN是接入链路连接4000>(enable) set vlan VLAN_# name VLAN_name 配置VLAN4000>(enable) set vlan VLAN_# slot_#/port_#-port_# 为VLAN分配端口4000>(enable) set trunk slot_#/port_# [on|off|desirable|auto|nonegotiate] [VLAN_#][isl|dot1q|dot10|lane|negotiate] 配置中继4000>(enable) clear trunk slot_#/port_# VLAN_# 删除VLAN4000>(enable) show trunk slot_#/port_# 验证中继端口4000>(enable) set vtp v2 enable 配置VTPv24000>(enable) set vtp [domain name] [mode client|server|transparent] [passwd password] [pruning enable|disable] [v2 enable|disable] 设置VTP4000>(enable) show vtp domain 验证VTP域的信息4000>(enable) show vtp statistics 显示发出或收到的VTP通告信息的摘要内容4000>(enable) set vtp pruneeligible VLAN_# 设置VTP消减4000>(enable) clear vtp pruneeligible VLAN_# 清除不希望消减的VLANSTP 4000>(enable) set spantree enable|disable VLAN_# 启用/禁用STP〔默认启用〕2950(config)# [no] spanning-tree vlan VLAN_# 启用/禁用STP〔默认启用〕4000>(enable) show spantree [VLAN_#] 验证STP状态2950# show spanning-tree 验证STP状态4000>(enable) set spantree root [secondary] VLAN_# [dia network_diameter] [hello hello_time] 设置主根节点桥、备份节点桥、最大桥数量〔2-7〕、持续时间〔1-10,默认2〕4000>(enable) set spantree portcost slot_#/port_# cost_# 设置端口开销2950(config-if)# spanning-tree cost cost_# 设置端口开销4000>(enable) set spantree portpri slot_#/port_# priority_# 设置端口优先级4000>(enable) set spantree portvlanpri slot_#/port_# priority_# [VLAN_#] 改变VLAN的优先级设置2950(config-if)# spanning-tree vlan VLAN_# port-priority priority_# 设置端口优先级4000>(enable) set spantree fwddelay delay_# [VLAN_#] 设置从侦听状态到学习状态再到转发状态的时间间隔〔默认15秒,取值范围是4-30秒〕4000>(enable) set spantree hello interval_time [VLAN_#] 设置根节点交换机发送BPDU的时间间隔〔默认2秒,取值范围是1-10秒〕4000>(enable) set spantree maxage agingtime [VLAN_#] 设置交换机持有BPDU的时间〔默认20秒,取值范围是6-40秒〕2950(config)# spanning-tree vlan VLAN_# forward-time forward_time 设置从侦听状态到学习状态再到转发状态的时间间隔〔默认15秒,取值范围是4-30秒〕2950(config)# spanning-tree vlan VLAN_# hello-time hello_time 设置根节点交换机发送BPDU的时间间隔〔默认2秒,取值范围是1-10秒〕2950(config)# spanning-tree vlan VLAN_# max-age maxage 设置交换机持有BPDU的时间〔默认20秒,取值范围是6-40秒〕4000>(enable) set port channel slot_#/port_# on 建立以太通道集合4000>(enable) show port capabilities slot_#/port_# 查看端口的配置4000>(enable) show port channel 验证以太通道集合的配置2950(config-if)# channel-group group_number mode auto|desirable|on 建立以太通道集合2950# show etherchannel group_number|brief|detail|load-balance|port|port-channel|summary 验证以太通道集合的配置4000>(enable) set spantree portfast slot_#/port_# enable 配置PortFast2950(config-if)# spanning-tree portfast 配置PortFast4000>(enable) set spantree uplinkfast enable|disable [rate station_update_rate] [all-protocolsoff|on] 启用/禁用UplinkFast4000>(enable) show spantree uplinkfast 验证UplinkFast配置2950(config)# spanning-tree uplinkfast [max_update_rate] 启用/禁用UplinkFast2950# show spanning-tree uplinkfast 验证UplinkFast配置4000>(enable) set spantree backbonefast enable|disable 启用/禁用BackboneFast4000>(enable) show spantree backbonefast 验证BackboneFast配置2950(config)# spanning-tree backbonefast 启用BackboneFast虚拟网间路由2600(config)# interface type slot_#/port_#.subint_number 配置子接口2600(config-subif)# encapsulation dot1q|isl|sde|tr-isl VLAN_# 配置封装类型4000>(enable) show module 查看交换机的硬件配置4000>(enable) session module_# 访问L3SML3SM(config-if)# mac-address mac_address 分配MAC地址MLS 2600(config)# mls rp ip 启动MLS2600(config-if)# mls rp vtp-domain domain_name 分配路由器接口到VTP域中2600(config-if)# mls rp vlan-id VLAN_# 向接口分配VLAN2600(config-if)# mls rp management-interface 指定该接口为管理接口2600# show mls rp 提供全局MLS信息2600# show mls rp interface type slot_#/port_# 提供指定接口的MLS信息2600# show mls rp vtp-domain domain_name 提供VTP域的MLS信息6500>(enable) set mls enable 在MLS-SE上启动MLS6500>(enable) set mls include rp_ip_address 告诉交换机哪一个IP地址是正确的6500>(enable) show mls include 显示外部路由处理器的IP地址列表6500>(enable) set mls flow [destination|destination-source|full] 告诉MLS交换机要缓存候选数据包的哪些信息6500>(enable) show mls entry 显示第三层缓存表6500>(enable) set mls agingtime aging_time 改变缓存的衰老时间〔默认256秒,取值范围是8-2032秒中的8的倍数值〕6500>(enable) set mls agingtime fast fast_aging_time pkt_threshold 改变快速衰老周期和数据包门限值6500>(enable) show mls ip 验证MLS-SE的配置6500>(enable) clear mls entry [destination IP_address] [source IP_address] [flow protocol] [source_port] [destination_port] [all] 删除所有或指定MLS缓存记录3550(config)# ip routing 启动IP路由3550(config)# ip cef 启动CEF3550(config-if)# no switchport 将第二层接口转换为第三层接口3550(config-if)# ip route-cache cef 在接口上启动CEF3550# show ip cef 验证CEF组播3640(config)# ip multicast-routing 启动路由器上的组播服务3640(config-if)# ip pim dense-mode 将接口设置为PIM密集模式3640(config-if)# ip pim sparse-mode 将接口设置为PIM稀疏模式3640(config-if)# ip pim sparsed-dense-mode 将接口设置为PIM稀疏-密集模式3640(config)# ip pim rp-address IP_address group_ACL_# [override] 手工配置RP3640(config)# ip pim send-rp-announce type slot_#/port_# scope ttl_value group-list ACL_# 通告RP组的分配3640(config)# ip pim send-rp-discovery scope ttl_value 配置RP映射代理3640(config-if)# ip multicast ttl-threshold ttl_value 设置TTL门限值3640(config-if)# ip igmp join-group group_address 加入组播组3640# show ip mroute 查看组播信息3640# ping 验证RP之间或其他组播路由器之间的连接3640# mtrace source_IP_address [destination_IP_address] [group] 组播traceroute3640(config-if)# ip cgmp 配置CGMP路由器4000>(enable) set cgmp enable 启动CGMP4000>(enable) show cgmp statistics 查看CGMP统计信息4000>(enable) show multicast group cgmp 查看交换机了解到的组播组信息4000>(enable) set cgmp leave enable 检查由客户端产生的IGMPv2的离开信息4000>(enable) set igmp enable 启动IGMP4000>(enable) ip igmp snooping 启动IGMP探听4000>(enable) set igmp fastleave enable 启动快速离开过程4000>(enable) show igmp statistics 显示交换机上IGMP探听的状态信息QoS 2950(config)# wrr-queue cos-map queue_ID cos_value 建立队列2950(config)# wrr-queue bandwidth bandwidth_value 设置队列门限2950(config)# class-maps name 定义对信息传输分类时的匹配标准2950(config-cmap)# match access-group ACL_# 识别被分类的信息传输2950(config)# policy-map name 确定为接入信息传输所设置的分类标准2950(config-pmap)# class name2950(config-pmap-c)# set ip dscp number2950(config-if)# service-policy input name 对该接口应用策略3550(config)# mls qos 启动QoS3550(config-if)# auto qos voip 在接口上启动自动服务质量3550(config)# priority-list priority_queue_# protocol protocol high|medium|normal|low [list ACL_#] 为优先级队列定义信息流3550(config)# priority-list priority_queue_# queue-limit limit_# 定义特定优先级队列的最大队列空间3550(config-if)# priority-group priority_queue_# 向特定输出接口分配优先级队列3550(config)# queue-list queue_list_# interface type slot_#/port_# queue_number 为一个特定的定制队列定义信息流3550(config)# queue-list queue_list_# queue queue_number byte-count size_in_bytes [limit number_of_queue] 为特定的定制队列定义队列的最大空间3550(config-if)# custom-queue-list custom_queue_number 为特定的输出接口分配优先级队列4840(config)# ip slb serverfarm serverfarm_name 配置SLB冗余4840(config-slb-sfarm)# real IP_address [port_#] 指定虚拟IP地址4840(config-slb-sfarm)# inservice 启动服务器4840(config)# virtual IP_address [network_mask] tcp|udp [port_number|wsp|wsp-wtp|wsp-wtls|wsp-wtp-wtls] [service service_name] 建立虚拟服务器IP地址。
神州数码交换机路由器“Telnet”配置
(设置Telnet登陆名和口令)用户名、密码用户随意设置
“DCS-3926S”特权口令配置:
Switch(config)#enable password level admin(开启管理级别)
Switch(config)#authentication line console local
Switch(config)#authentication line vty login local
特权口令配置:
Switch(config)#enable password123456(密码)
神州数码三层交换机Telnet和特权口令配置
特权口令配置:
Switch(config)#enable password123456(密码)
神州数码路由器Telnet和特权口令配置
Telnet配置:
Router_config#aaa authentication default(开启3a认证)
Router_config#line vty 0 4
Router_config#enable password 0123456(密码)
注:请仔细看各个配置在什么模式下进行的配置
Current password:原始密码
New password:新密码
Confirm new password:再次输入新密码
二层交换Telnet和特权口令配置
Telnet配置:
Switch(config)#telnet-server enable(开启Telnet功能)
Switch(config)#usernameXX(用户名)password 0123456(密码)(设置Telnet登陆名和口令)
交换机的基本管理设置
实验2 以太网交换机配置任务一、交换机的基本管理设置在PC0的桌面、终端进行配置1、进入全局配置模式Switch>enableSwitch#config terminal2、将交换机的主机名设为:labb0701Switch(config)#hostname labbb07013、给交换机指定管理IP地址:192.168.0.254labb0701(config)#interface vlan 1labb0701(config-if)#ip address 192.168.0.254 255.255.255.0labb0701(config-if)#no shutdown4、设置console 口令:c123Line console 0LoginPassword c1235、设置5个虚拟终端,并设置虚拟终端的登录口令为:v123Line vty 0 4LoginPassword v1236、设置特权模式口令:e123,特权加密口令为:s123先退回到特权模式:labb0701(config-if)#exitlabbb0701(config)#enable password e123labbb0701(config)#enable secret s1237、在特权模式下查看运行配置文件:running-configlabbb0701(config)#exitlabbb0701#show running-config8、在特权模式下将当前运行配置文件保存到启动配置文件:startup-configlabb0701#copy running-config startup-config 9、重新启动路由器labb0701#reload10、通过console连接交换机,以特权模式口令进入特权模式计算机通过终端线连接console登录。
Password c123 进入用户模式Password s123 进入特权模式11、通过虚拟终端方式连接交换机,以特权口令进入特权式。
2.2-Console口和特权模式密码配置
2.2 Console口和特权模式密码配置预备知识:交换机的管理可分为带内管理和带外管理两种,所谓带内管理指的是这种管理方法占用一定的网络带宽,一般通过网络连接到交换机,如telnet和web管理;带外管理则指的是管理时不占用网络带宽,如最常用的通过Console口管理交换机。
这种方式使用交换机配置的专用配置线缆一边连接计算机的串口(RS232),另一边连接交换机的Console口,通过windows系统的超级终端进入交换机进行命令行配置,由于交换机出厂时没有进行任何配置,所以这种管理方式也是首次配置交换机的方式。
通过Console口配置交换机时只需连接好线缆即可进入交换机进行配置,对于安装在交换机楼道里的交换机是不安全的,我们可以通过给Console口配置连接密码,只有经过密码认证才能连接交换机进入交换机的一般配置模式。
而通过设置特权密码可设置进入更高配置模式进行再一次密码验证。
Console口密码和特权密码可设置为不一样的密码.一、实训目的1、了解Console口的作用。
2、掌握Console口和特权模式密码配置命令。
二、应用环境由于交换机出厂时没有设置管理IP地址,所以可管理交换机上都配有一个Console口(配置口),交换机第一次配置必须通过交换机配备的专用配置线连接交换机的Console口和计算机的COM口,通过超级终端进入交换机进行配置。
三、实训要求1.设备要求:1)2950—24交换机一台、PC机一台.2)配置线一条。
2.实训拓扑图3.配置要求:1)交换机配置要求:设置特权密码和配置口密码。
4.实训效果:使用配置口进入交换机配置时需要输入密码,经过认证才能进入交换机,同样进入特权模式需要输入密码,认证。
四、实训步骤1、配置交换机特权密码。
2、进入线路配置模式配置Console口密码。
五、详细步骤1、按拓扑图添加一台2950-24交换机和一台PC机。
(略)2、在设备类型选择区选择“线缆",在右边的线缆中选择“配置线”,如下图所示.3、选择配置线后,使用它连接交换机的console口与PC机的RS232口,如下图所示.4、连接好配置线后,点击PC0计算机,在“桌面"选项卡下点击“终端”进入计算机的超级终端,如下图所示.5、在终端配置窗口,设置如下参数后点击“确定”按钮即可通过配置线进入交换机的命令行配置界面,如下图所示.6、通过终端进入交换机配置界面后提示按回车键,系统显示当前进入的是一般用户配置模式,如下图所示7、进入全局配置模式,配置特权密码为“qwe123”,密码为加密方式。
- 1、下载文档前请自行甄别文档内容的完整性,平台不提供额外的编辑、内容补充、找答案等附加服务。
- 2、"仅部分预览"的文档,不可在线预览部分如存在完整性等问题,可反馈申请退款(可完整预览的文档不适用该条件!)。
- 3、如文档侵犯您的权益,请联系客服反馈,我们会尽快为您处理(人工客服工作时间:9:00-18:30)。
实验三设置交换机特权口令
实验题目:掌握交换机特权模式密码的配置方法
掌握交换机的命令模式
实验目的:掌握交换机的管理特性,学会配置交换机的基本方法,熟悉各种视图及常用命令。
实验步骤:
1、通过Console口连接交换机;
(1)、搭建实验环境
(2)、在仿真软件上登录超级终端
在PC上点击【桌面】——【终端】
(3)进入命令行接口视图
☞在全局配置模式下更改交换机的名字
Switch> (进入特权模式)
Switch # (进入进入全局配置模式)
Switch(config)# (设置交换机名字
xiaohua)
☞在全局配置模式下配置特权模式的密码
xiaohu> (进入特权模式)
xiaohu # (进入进入全局配置模式)
xiaohu (config)# (设置特权模式的明文密码xiaohua123)
xiaohu (config)# (设置特权模式的密文密码xiaohua456)
☞在特权模式下查看当前配置,并截图
xiaohu (config)# (退回到特权模式)
xiaohu # (在特权模式下查看当前运行配置)
☞关掉交换机,查看是否配置还在?
☞保存交换机的当前配置
xiaohu # (保存当前配置)
☞删除配置
xiaohu # (删除配置)
实验总结:
1.
2.。