蓝鲸_BW3200
高频率游戏内存条评测

高频率游戏内存条评测游戏内存条是许多游戏玩家所关注和追求的硬件配件之一。
在高频率游戏中,内存条的性能直接关系到游戏的流畅度和稳定性。
本文将对几款高频率游戏内存条进行评测,帮助读者选择适合自己的内存条。
一、三星DDR4-3200内存条评测三星是一家知名的半导体制造商,在内存条领域一直以高品质和稳定性闻名。
本次评测的是三星的DDR4-3200内存条,主要针对高频率游戏需求。
这款内存条采用了DDR4标准,频率达到3200MHz,拥有8GB的容量。
通过对多个游戏进行测试,我们发现,在高频率下,三星DDR4-3200内存条具备出色的读写速度和响应时间,游戏加载速度明显提升,流畅度也有所增加。
同时,这款内存条的稳定性也非常好,长时间运行不易出现卡顿和崩溃现象。
二、金士顿HyperX Predator DDR4-3600内存条评测金士顿是内存条市场的领导者之一,其产品以高性能和稳定性著称。
本次评测的是金士顿的HyperX Predator DDR4-3600内存条,适用于高频率游戏需求。
这款内存条采用了DDR4标准,频率高达3600MHz,容量为16GB。
经过测试,我们发现,在这款内存条的加持下,游戏加载速度明显加快,画面流畅度提升明显,同时也能保持较低的延迟。
对于一些大型的游戏来说,这款内存条可以提供出色的表现,让玩家享受更加流畅的游戏体验。
三、美商海盗船VENGEANCE LPX DDR4-4000内存条评测美商海盗船是知名的游戏硬件品牌,其内存条一直备受游戏玩家的青睐。
本次评测的是美商海盗船VENGEANCE LPX DDR4-4000内存条,适合追求终极性能的游戏玩家。
这款内存条的频率高达4000MHz,容量为32GB,采用了DDR4标准。
通过测试,我们发现,这款内存条在高频率下表现出色,游戏加载速度明显提升,能够满足一些对于极致性能追求的游戏玩家。
同时,这款内存条也拥有较低的延迟和稳定性,不易出现游戏卡顿或崩溃问题。
MOXA MD-200系列海洋显示器系列说明书

P/N: 1802002260012 *1802002260012*MD-200 SeriesQuick Installation GuideVersion 2.1, January 2021Technical Support Contact Information/support2021 Moxa Inc. All rights reserved.OverviewThe MD-200 marine display series is designed for durably reliable service as an ECDIS display component. The MD-200 series offers full range dimming and optional optical bonding, making it well-suited not only for ECDIS applications, but also for a variety of other bridge applications. The MD-200 series features both AC and DC power inputs, and can be conveniently installed on any bridge, without the need for extra hardware.Moxa’s marine displays are compliant with the most important industrial marine standards, including IEC 60945, DNV, and IACS-E10, giving strong assurance of their suitability for marine applications.The following lists the models in the MD-200 series:•MD-226X: 26-inch display with 16:10 aspect ratio.•MD-224X/MD-224Z: 24-inch display with 16:9 aspect ratio.•MD-219X/MD-219Z: 19-inch display with 5:4 aspect ratio. Package ChecklistBefore installing the MD-200 series, verify that the package contains the following items:•MD-200 series display•VGA cable•DVI-D cable•2-pin terminal block x 1•5-pin terminal block x 2•Quick installation guide (printed)•Warranty cardNOTE: Please notify your sales representative if any of the above items are missing or damaged.Hardware InstallationAppearanceMD-226/224MD-219SavvyTouch Display Control ButtonsThe following table describes the SavvyTouch display controls on the front surface of the MD-200 series. These intelligent controls will light up with a simple wave of your hand over the area of the screen where they are located.NameDisplayColorControl Function/Color LegendMenu/PowerGreen Display is powered on and functioningnormally. Touch the button to show theOSD settings menuRed No input signal detected. Display standby Off Power is down and the display is offBrightness White +: To increase brightness of panel -: To decrease brightness of panelInfoOffAC/DC power is functioning normallyDisplay modeWhiteSwitch between DAY/DUSK/NIGHTbrightness modesOff Panel brightness out of default rangeInstalling the MD-200 SeriesDesktopThe MD-200 series comes with optional brackets that allow you to installthe display on a horizontal surface, such as a desktop. Three round screws are required for each bracket. See the figure for detailed screw specifications and their torque values.Place your MD-200 series display on a clean, flat, well-ventilated desktop. To protect the computer from overheating, leave some ventilation space between the MD-200 series and other equipment.Do NOT place equipment or objects on the panel, as this might damage internal components.Panel MountingThe MD-200 series comes with 14 optional clamp mounts for installation on a wall (where space has been cut out to accommodate the rest of the hardware) or into computing stations where a flush mount is desired. The maximum thickness of the surface to which the computer can be clamped is 11 mm. For a secure mounting, all 14 clamps must be used.The clamp arms are fastened into slots on all four sides of the MD-200 series. Use the short M4 SUS screws to fasten the clamp arms to the MD-200 series mounting slots, as shown in the following magnified inset in the diagram. Next, use the clamps to fasten the MD-200 series to its mounting point; please note the torque value as shown in the figure.VESA MountingThe MD-200 series also comes with an optional VESA mounting kit. Six flat screws and four round screws are required to fasten the VESA mounting bracket. See the following figure for detailed screw specifications and torque values.An additional four screws (not included in the kit) are required to mount the display on a VESA rack. For this purpose, use M6 screws that are between 10 and 12 mm in length.Connector DescriptionExtending the DisplayThe MD-200 series comes with both standard VGA and DVI-D interfaces on the bottom panel. It automatically detects whether the input video source is from the VGA or DVI-D interface. Configuring the Display via the Serial PortThe MD-200 series has two serial ports. The RS-232 port uses a DB9 connector, and the RS-422/485 port uses a terminal block connector. Either serial port can be used to modify the display parameters using UART commands. For information on serial port configuration, see the MD-200 Series Hardware Manual.The pin assignments for the ports are shown in the following table: Pin RS-232 1 DCD 2 RxD 3 TxD 4 DTR 5 GND 6 DSR 7 RTS 8CTSRS-422/485 (Terminal Block) PinoutsPin RS-422 RS-485 (4-wire) RS-485 (2-wire)1 RxDB(+) RxDB(+) –2 RxDA(-) RxDA(-) –3 TxDB(+) TxDB(+) DataB(+)4 TxDA(-) TxDA(-) DataA(-) 5GNDGNDGNDPowering on/off the MD-200 SeriesTo power on the MD-200 series, connect the unit to an AC power source, a DC power source, or both. Touch the MENU button for 1 second to turn on the display. Touch the MENU button for 4 seconds to turn off the display.Grounding the MD-200 SeriesProper grounding and wire routing help to limit the effects of noise from electromagnetic interference (EMI). Run the ground connection from the ground screw to the grounding surface prior to connecting the power source.For detailed configuration of the MD-200 Series, refer to the MD-200 Series Hardware Manual.。
黑脉 黑Armor NAS 220 小型企业级网络附属存储设备说明书

The BlackArmor® NAS 220 server is a small-business-specific network attached storage solution designed toprovide centralized storage and data backup, helping to deliver business continuity for up to 20 PCs. Automaticallybackup business-critical data with RAID 1 mirroring, full-system backup, SafetyDrill+™ bare metal recoverysoftware and powerful hardware-based encryption.Highlights• Designed to provide centralized storage and data backup for up to 20 PCs.• Enables automatic data mirroring with RAID 1 configuration.• Help protect network connected PCs with incremental and full-system, automatic backup.*• Time Machine® software compatible, for Mac® computer backup• Functions as an FTP server for remote file access.• Stream media to DLNA® compliant devices and computers running iTunes® software.• Includes two reliable, user-replaceable Seagate® hard drives.• Connect external drives, share a printer or utilize an uninterrupted power supply with the two USB 2.0 ports.• Secure files with powerful hardware-based encryption.• Microsoft® Active Directory 2003/2008 support for populating users and groups.• Multi-volume management.• Event email notification.• 3-year limited warranty.© 2010 Seagate Technology LLC. All rights reserved. Seagate, Seagate Technology, the Wave logo, Barracuda, Global Access and BlackArmor are trademarks or registered trademarks of Seagate Technology LLC or one ofits affiliated companies in the United States and/or other countries. All other trademarks or registered trademarks are the property of their respective owners. When referring to hard drive capacity, one terabyte, or TB, equalsone thousand billion bytes. Your computer’s operating system may use a different standard of measurement and report a lower capacity. In addition, some of the listed capacity is used for formatting and other functions andwill not be available for data storage. The export or re-export of hardware or software containing encryption may be regulated by the U.S. Department of Commerce, Bureau of Industry and Security (for more information,visit ) and controlled for import and use outside of the U.S. Actual data rates may vary depending on operating environment and other factors. Seagate reserves the right to change, without notice, productofferings or specifications. Seagate Technology LLC, 920 Disc Drive, Scotts Valley CA 95066 U.S.A. DS1691.3-1010 AMERVisit for more information about these and other Seagate retail products.Perfect for when you need to:• S tore and access files from acentral, secure location.• A ccess and manage filesremotely.• S tream media with DLNA oriTunes®.• A utomatically perform full-system backups on networkconnected PC and Mac®computers.*• S ecure files with hardware-based encryption.• S hare a USB printer withnetwork connected PCs andMacs.Interface 10/100/1000 Ethernet, USB 2.0Capacities2TB, 4TB, 6TBSoftware Requirements PC On Network• Pentium® III, 500MHz equivalent processor or higher• Microsoft Windows® XP or Vista®• I nternet Explorer® 6.0 or later, or Firefox™ 2.X or later(for management interface and web access)• 256MB RAMMac On Network• Mac OS® X 10.4.11 or later• Apple® Safari® 3.1 or laterSystem Requirements• Local area network (LAN)• Internet connection (for system updates and web access)• W ired or wireless router with an available 10/100/1000Ethernet port• USB printer or USB disk drive (optional)Inside the Box • BlackArmor NAS 220 storage server• 2M – RJ45 cable• AC power cord• Quick Start Guide• DVD-ROM with– BlackArmor® Discovery Software for Windows® OS– BlackArmor® Discovery Software for Mac® OS– BlackArmor® Backup Software for Windows (5 licenses*)– Online registration link– Warranty information card*Additional licenses available for purchase at Connectivity• O ne Ethernet port for localnetwork connection, web-based management and remoteaccess.• T wo USB 2.0 ports for externaldrives, printers and uninterruptedpower supplies (UPS).• Two internal SATA II ports.* Includes data backup software licenses for 5 PCs. Additional licenses available for purchase at .Product Dimensions Horiz x Vert x Depth - 6.30”x 8.15” x 10.59” (160mm x 207mm x 269mm)Weight: 13.60lbs (6.16kg)Retail Packaging Specs Box dimensions: Horiz x Vert x Depth – 14.37” x 9.29” x 9.5” (277mm x 156mm x 279mm)Box weight: 16.6lbs (7.62Kg)Master carton dimensions: Horiz x Vert x Depth – 19.33” x 15.00” x 10.20” (322mm x 288mm x 301mm)Master carton weight: 36.05lbs (8.39Kg)Master carton quantity: 2Master cartons per pallet: 36Pallet dimensions: Horiz x Vert x Depth – 47.25” x 39.37” x 47.10” (1,016mm x 1,219.20mm x 1,030mm)Pallet weight: 718.85 lbs (326.06 kg)Pallet layers: 3Technical Specifications ConnectivityNetwork ProtocolsNetwork AuthenticationFile Sharing ProtocolsFile System ManagementVolume ManagementDisk ManagementBackup ManagementEvent ManagementMedia StreamingDownload ServerRemote Access• 2 internal SATA II ports• 2 USB 2.0 host portsCIFS, NFS, HTTP, HTTPS, FTP, Bonjour®RAID 0, 1, JBOD• Share management• Volume level encryption• Multi-volume management• SMART status monitor• L ocal backup(USB device to NAS, NAS to USB device)• Network NAS to NAS replicationEvent email notification• iTunes® server• DLNA® compliant digital media serverDownloader (HTTP and FTP)Seagate Global Access™ service• 1 RJ45 Ethernet port (Gigabit)• Share/folder-level access control list (ACL) support• Quotas setting• Drive standby mode• C lient system backup, Bare MetalRestore(full-system recovery) over network• Time Machine® software compatibleMicrosoft Windows® Server Active Directory 2000/2003/2008 integration for population of users and groups.CIFS, NFS, HTTPS, FTP over SSL/TLS, FTP, Bonjour, Microsoft RallyExpansionThe two rear-mounted USB 2.0 ports allow you to connectexternal USB hard drives for additional storage, easily share a USB printer with your network connected computers or connect an uninterrupted power supply (UPS) to safeguard from power failure.Business-grade ProtectionSoftware plays an important role in achieving business continuity and with the BlackArmor storage server, you can expect nothing less than business-grade protection. To help protect your critical data, our software package provides automatic, incremental and full-system backup. In the event of PC hardware failure, you can utilize the SafetyDrill+™ bare metal restore software feature to recover your entire system, including the operating system, programs and settings. The included software also allows you to secure your files with powerful hardware-based encryption. Furthermore, the two internal drives can be configured to RAID 1, which automatically mirrors your data.You’re in ControlIn addition to the included software, the web-based management interface and BlackArmor ® Discovery Tool are also straightforward to use. The BlackArmor Discovery Tool allows you to get up and running quickly by displaying all of the BlackArmor NAS products connected to your network. From the Discovery Tool, with a single click, you can view or map shared volumes to your computer, access the web-based management interface or back up the PC you are working from. The BlackArmor NAS 220 storage server can also be managed remotely with DDNS, which can be configured from the web-based management interface or back up the PC you are working from. Mac ® computers can be backed up by using Time Machine ® software, which offers full-system, incremental backup over the network.The BlackArmor ® NAS 220 storage server can also function as an FTP server, allowing remote access to files. Using the web-basedmanagement interface, you can designate user access manually or integrate with Microsoft ® Active Directory to populate users and groups..Moreover, the BlackArmor NAS 220 storage server can stream media files to DLNA ® compliant devices or computers running iTunes ® software, allowing you to centralize media in your office and display content simultaneously on multiple devices.Designed to provide centralized storage and data backup.Performance that Keeps Pace with Your Business The BlackArmor ® NAS 220 storage server makes no compromises when it comes to hardware, with Seagate ® Barracuda ® drives, 800 MHZ processor, 128 MB RAM and Gigabit Ethernet port, you will experience incredible performance – including read speeds of up to 70 MB/s in RAID 1 configuration*.The BlackArmor NAS 220 storage server includes two energy efficient, reliable Seagate hard drives, which are user-replaceable, allowing you to upgrade to larger capacity drives as your business grows.* Read performance obtained with CrystalDiskMark 3.0 on a Windows ® 7 x64 system.。
精选-中科蓝鲸视频存储解决方案解析

解析: 1、流媒体+IP-SAN部署模式,未进入云存储技术范畴 2、无集群化或弱集群化设计,系统性能无法提升。 3、容量仅简单叠加,无虚拟化整合容量调整只能扩大很难缩小。 4、数据存储/读取仅支持设备级(前端存储范围划定在一台设备上),不支持系
统级读写压力。 5、前端支撑偏弱,单系统前端承载仅为500路以内; 6、仅保证存储,无应用化扩展;
基于虚拟化的存储容量分配策略,可进 行扩大、缩小灵活调整,调整过程业务 不中断
对比分析表
存储类型 对比项 可靠性
面向应用
服务
成本
中科蓝鲸SkySAN
海康视频云存储
RAID技术、部件级冗余
仅负责数据存储,无视频应用支撑
任务不可分割,局限于单台设备 需部署大量流媒体服务器,综合成 本高
系统级,RAID技术,单/多点故障自动 切换,业务不中断 具有视频、图片定制化应用功能,如I 帧存储、数据循环覆盖等。 存储任务和分析任务分割,数据可跨多 设备。 综合成本低,可节省大量录像服务器投 入
视频数据性能
面向应用 行业支撑 组网架构 管理
通用云存储
海康视频云存储
DFS,文件分片较小一般 流式文件系统。分片可定义,适合视频流数
4KB。适合文件系统。
据持续存储和读取。
文件云存储适合文件存储, 优化存储系统存储顺序,提供高并发存储、
存储顺序无优化;对于视 读取功能。针对视频云存储系统而设计能承
解析: 1、规模偏低,前端300路以内的支持规模,非视频云存储竞争对象。其容
量和前端支持数目可以使用CVR进行支撑。 2、扩展性差,不适用于较大规模视频存储。
中科蓝鲸- 单IP-SAN方案
规模范围: 存储容量:100~1000TB,摄像头数量≦500路,保存周期1个月~3
阿尔法冷 Eisbaer 200 CPU 黑色水暖器说明书
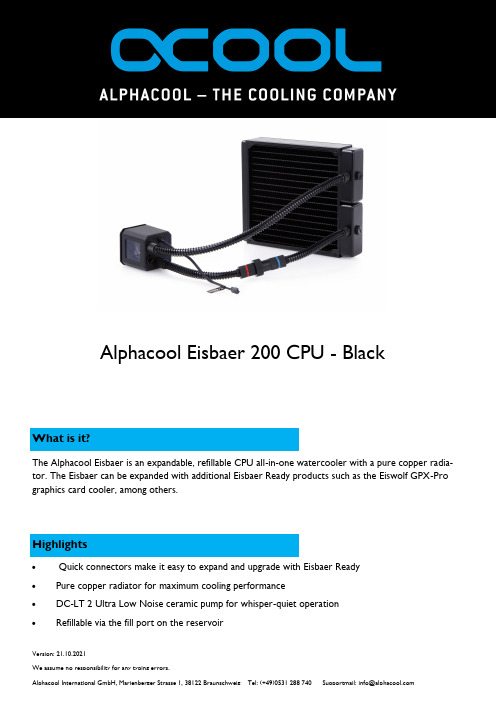
What is it?Alphacool Eisbaer 200 CPU - BlackHighlightsThe Alphacool Eisbaer is an expandable, refillable CPU all-in-one watercooler with a pure copper radia-tor. The Eisbaer can be expanded with additional Eisbaer Ready products such as the Eiswolf GPX-Pro graphics card cooler, among others.•Quick connectors make it easy to expand and upgrade with Eisbaer Ready• Pure copper radiator for maximum cooling performance• DC-LT 2 Ultra Low Noise ceramic pump for whisper-quiet operation •Refillable via the fill port on the reservoirArticle textWith the “Eisbaer”, Alphacool is fundamentally revolutionizing the AIO cooler market. Where traditional AIO CPU-coolers are disposable products which are neither upgradeable nor refillable, the Alphacool “Eisbaer” is modularly built and can be upgraded, rebuilt or refilled at any time. This means that the “Eisbaer” is not only an AIO, but also fully built on classic water cooling components. That means it is quieter and more powerful than the average AIO solution.RadiatorAlphacool depends on a radiator made of pure copper. The base of the radiator is the popular Alphacool NexXxoS series, which is well-loved around the world. The pure copper construction raises the cooling performance enormously compared to the usual aluminium radiators used in classic AIOs. The slight thickness of the fins ensures enormous cooling power in fans with low rotational speed. This ensures that the performance of the “Eisbaer” when adjusting the fans down decreases much more slowly than in radi-ators with higher fin thickness.HosesThe flexible PVC hoses make installing the “Eisbaer” easy. These hoses are easier to arrange and move into the right position. So the hoses don’t bend and stop the flow of the water, both hoses have been fit-ted with anti-kink springs. The 11/8 mm size is also a standard in the water cooling field, alongside the13/10 and 16/10.Quick-lock closureThe “Eisbaer” was designed with expandability directly in mind. This is why you’ll find a quick-lock closure on one of the hoses. This quick-lock mechanism is compatible with Alphacool HF quick-lock closures (1010383, 1010394, 1010395, 1010442), with which the circuit can easily be expanded to include anything from a radiator to a graphics card cooler. Furthermore, the “Eisbaer” is compatible with the upcoming Alphacool GPX-Pro graphics card AIO, which will use identical quick-lock closures.ConnectorsAll connectors are based on the classic G1/4 inch thread, the standard thread in the water cooling field. This way, all attachments can be switched out for others any time as desired. This also means that, for example, you could later decide to switch to thicker hoses or even HardTubes and set your system uniquely apart.All these features make the “Eisbaer” cooler into something extraordinary. Its enhanced appearance from the illuminated logo and the illuminated reservoir, which also contains the pump, lets the interior of your PC shine in a whole new way. The soft-touch surface of the pump case is a further visual highlight.With the “Eisbaer”, you get an all-around perfect product that is not only extremely high-powered but also works very quietly.PumpsThe basis of the pumps is the Alphacool DC-LT 2 Ceramic, also available separately. The pump runs ex-tremely quietly and can be regulated to between 7 and 12V. It can also be regulated through the mother-board. If the “Eisbaer” is being run alone, the 7V setting will still have next to no performance loss, as shown in diverse test results. The insulated pump case further perfects the noise generation and ensures that vibrations are almost completely absorbed.The smooth and shiny polished copper base of the cooler ensures optimal heat absorption and can relay the heat over the fine slit structure of the cooler to the water quickly and efficiently.To operate the Alphacool Eisbaer 200 CPU - Black at least one 200 mm fan is required. There are NO fans included in delivery!。
AC3200 WiFi 电缆模式路由器 C7500 X4 LED 指示灯描述说明书

LED DescriptionPower• Solid white: Power is supplied to the modem router.• Red: Power is cut off due to a thermal error caused by heat. Move the unit to awell-ventilated area and power-cycle the unit.• Off: No power is supplied to the modem router.Downstream• Solid amber: One downstream channel is locked.• Solid white: Two or more downstream channels are locked.• Blinking white: The modem router is scanning for a downstream channel.• Off: No downstream channel is locked.Upstream• Solid amber: One upstream channel is locked.• Solid white: Two or more upstream channels are locked.• Blinking white: The modem router is scanning for an upstream channel.• Off: No upstream channel is locked.Online• Solid white: The modem router is online.• Blinking white: The modem router is synchronizing with the cable provider’scable modem termination system (CMTS).• Slow blinking amber and white: The modem router reached the traffic meterlimit. (For more information, see the user manual.)• Off: The modem router is offline.2.4 GHz radio • Solid white: The 2.4 GHz WiFi radio is on.• Blinking white: There is WiFi activity on the 2.4 GHz band.• Off: The 2.4 GHz WiFi radio is off.5 GHz radio• Solid white: The 5 GHz WiFi radio is on.• Blinking white: There is WiFi activity on the 5 GHz band.• Off: The 5 GHz WiFi radio is off.USB 1 and USB 2• Solid white: A USB device is connected and ready.• Off: No USB device is connected, or someone clicked the Safely Remove Hardware button and it is now safe to remove the attached USB device.Ethernet• Solid white: A powered-on device is connected to an Ethernet port.• Blinking white: The Ethernet port is sending or receiving traffic.• Off: No device is connected to an Ethernet port.WiFi On/Off button with LED Pressing this button for two seconds turns the WiFi radios in the modemrouter on and off. If this LED is lit, the WiFi radios are on. If this LED is off,the WiFi radios are turned off and you cannot use WiFi to connect to themodem router.Cable InternetProviderSupport and Activation Contact InformationCox https:///residential/support/home.htmlhttps:///activate1-888-556-1193Mediacom https://1-855-Mediacom (1-855-633-4226)Optimum https:///support/contact-ushttps:///JointInstall1-877-810-6750Sparklight https://1-877-692-2253Spectrum https:///contact-ushttps://1-833-267-6094Xfinity https:///internetsetupUse the Xfinity app for Xfinity activation and then follow the steps inthis document for modem router installation.Visit /support to get your questions answered and access the latestdownloads.You can also check out our NETGEAR Community for helpful advice at.Customer-owned cable devices might not be compatible with certain cablenetworks. Check with your cable Internet provider to confirm that this NETGEARcable device is allowed on your cable network.If you are experiencing trouble installing your modem router, contact NETGEARat 1-866-874-8924.Support and CommunityPackage contentsModem routerLED DescriptionWPS buttonwith LEDThis button lets you use WPS to join the WiFi network without typing theWiFi password. The WPS LED blinks during this process and then lightssolid.January 2021Before you begin: •Collect this cable Internet service provider (ISP) account information: your account mobile phone number, user name, password, and account number. •Collect this modem router information: the model number, which is C7500, and the MAC address and serial number from the modem router label.•If you use Xfinity, download the Xfinity app from the App store or from Google Play™. If you already have the Xfinity app, make sure you have updated to the latest version.Connect your modem router1. Turn off and disconnect existing modems and routers.If you are replacing a modem that is currently connected in your home, unplug the modem and plug the new modem router into the same outlet.2. Connect a coaxial cable.Use a coaxial cable to connect the coaxial cable connector on the modem router to the cable wall outlet. Make sure the cable is tightly connected.If you must share the connection, use a 3.5dB (1 to 2) splitter.3. adapter into an electrical outlet.Install the modem router4. Wait for the Online LED to light solid white for at least one minute.This process might take up to ten minutes and the modem router might reset several times.Note: When the Online LED lights, your modem router is still not connected to the Internet. You must activate your modem router with your ISP .If after ten minutes, the LED is still not solid white, verify that the cable outlet is working, or call your ISP to make sure you have a connection.Set up and activate your modem router with Xfinity1. If your current modem is leased from Xfinity, call Xfinity support to removeyour leased modem from your Xfinity service.2. Make sure that your mobile device is using an LTE Internet connection. Do notconnect to a WiFi network.3. Open the Xfinity app and sign in with your Xfinity ID.4. Follow the steps to get online.5. The activation process takes about five minutes.6. On your mobile device, launch a web browser and enter or192.168.0.1 in the address field.7. Follow the prompts to:• Agree to the terms and conditions.• Change your modem router’s admin credentials and set up security questions.•Review your WiFi network name and password.Set up your modem router with another cable Internet service provider1. Connect your computer or mobile device to the modem router with WiFi orEthernet:WiFi : Use the WiFi network name (SSID) and password on the modem router label to connect.Ethernet : Use an Ethernet cable to connect a computer to an Ethernet port on the modem router. (Your computer must have an Ethernet port.)Regulatory and LegalFor regulatory compliance information including the EU Declaration of Conformity, visit https:///about/regulatory/.See the regulatory compliance document before connecting the power supply.For NETGEAR’s Privacy Policy, visit https:///about/privacy-policy .By using this device, you are agreeing to NETGEAR’s Terms and Conditions athttps:///about/terms-and-conditions . If you do not agree, return the device to your place of purchase within your return period.For 6 GHz devices: The operation of this device is prohibited on oil platforms, cars, trains, boats, and aircraft, except that operation of this device is permitted in large aircraft while flying above 10,000 feet. Operation of transmitters in the 5.925-7.125 GHz band is prohibited for control of or Communications with unmanned aircraft systems.NETGEAR, Inc.350 East Plumeria Drive San Jose, CA 95134, USANETGEAR INTERNATIONAL LTD Floor 1, Building 3University Technology Centre Curraheen Road, Cork, T12EF21, Ireland2. Launch a web browser and enter or 192.168.0.1 in theaddress field.3. Follow the prompts to:• Agree to the terms and conditions.• Change your modem router’s admin credentials and set up security questions.•Review your WiFi network name and password.When the Basic Home page displays, you are ready to activate your Internet service. Contact your cable Internet service provider.Note to CATV system installer: This reminder is provided to call the CATV systems installer’s attention to Section 820-93 of the National Electrical Code, which provides guidelines for proper grounding and, in particular specifies that coaxial cable shield shall be connected to the grounding system of the building as close to the point of cable entry as practical.© NETGEAR, Inc., NETGEAR and the NETGEAR Logo are trademarks of NETGEAR, Inc. Any non-NETGEAR trademarks are used for reference purposes only.。
浩瀚天空 ST-8300 摄像机与 FW5-8300 FW8-8300 过滤轮安装指南说明书
1.Installing the FW5-8300 / FW8-8300 Filter Wheel Remove the front plate of the ST-8300 Camera by removing the 4socket head screws in the corners ofthe front plate. Figure 1.Note the position of the round cut-out inside the front plate that allowsfor the height of the shutter spindle.Figure 2. You will need to orientthis cover the same way in the eventthat you should remove the filterwheel and replace the camera's frontcover. There is a similar cut-out inthe filter wheel back plate that willreplace this front cover and it mustbe oriented the same way.Set the camera front plate aside andsave the four socket head screws.You will use then to attach the filterwheel.Remove the front cover of the filterwheel by removing the four Phillipshead screws in the recessed holes inthe four corners of the cover.Figure 3.Remove the filter carousel byremoving the 3 button head screwsclosest to the center of the carouselwith a 1/16 hex wrench. Figure 4Lift the carousel from the central bearing being careful of the optical sensor at the edge of the carousel.Once free of the central bearing, tilt the carousel slightly to slide it away from the optical sensor. Figure 5. Removing the carousel exposes two of the four mounting holes. The other two are already exposed.Place the filter wheel back plate withits curved electronics board onto theST-8300 camera so that the end of thefilter wheel with the curved electronicsboard is flush with the side of thecamera body that has the two longvents and the 1/4-20 threaded tripodmounting hole. Figure 6. The cameraside of the filter wheel's back plate hasa slight relief the same shape as theopening of the camera body so itshould naturally slip into place onceyou get it close. Check the orientation.The filter wheel motor cover should beon the same side of the camera as theSBIG logo.Use the 4 socket head screws that youremoved from the front plate in step 1to attach the filter wheel back plate tothe camera body. Figure 7.Replace the filter carousel with thewhite numerals facing up. First insertone edge of the carousel into theoptical sensor and then seat thecarousel on the central shaft. Orientthe 3 screw holes around the central bearing so that they are aligned with the three holes in the carousel as it is seated. Once fully seated with one edge resting firmly against the motor shaft and one edge in the optical sensor, fasten the carousel with the 3 button head screws to hold the carousel in place.2.Installing FiltersStart by removing the 5 Phillips headscrews around the middle of the carousel(8 screws on the FW8-8300). Figure 8.Remove the filter retainer. If there areany o-rings in the filter cells, removethem as well. Figures 9 and 10.Drop 36mm round unmounted filtersinto the empty cells. Place the o-ringson top of the filters if you are usingfilters that are 1mm - 2mm thick, butleave them out if you are using filtersthat are 3mm - 5mm thick. Note thatthe carousel is marked for each filterposition 1-5 (or 1-8). You can arrangethe filters any way you like. The defaultin CCDOPS, starting with position 1 is:Red, Green, Blue, Clear and Lunar. Youcan change these to any designation youlike. Keep in mind that CCDOPS willdefault to position 4 at startup assumingyou wish to start with the clear filter.When all the filters are installed, replacethe filter retainer and secure it with the 5(or 8) Phillips head screws. Do nottighten these screws more than isnecessary to keep the filters fromrattling in their cells. Over-tightening may damage the filters. Replace the filter wheel's front cover being careful to tuck in any loose wires so that they are not pinched and check that the cable retainer is tucked inside the bottom cover to prevent the cable from being pulled out the slot. Figure 11.3.Setting Up the Filter WheelAfter the drivers have beeninstalled on your computer, plugthe short pig-tail into the ST-8300's I2C port. Figure 12.Start CCDOPS, plug in power toyour camera, and attach the USBcable from the camera to yourcomputer.Once you establish a connection with the camera, go to the Filter Menu in CCDOPS and select Filter Set Up and then select the CFW9 filter wheel as shown in the screen shot at left. (The FW5-8300 uses the same electronics and commands as the CFW9 filter wheel). If you are using CCDSoftV5 select the camera as "ST-402" and filter wheel as "CFW9" as shown in the screen shot below.SBIG Astronomical Instruments, A Division of Diffraction Limited.59 Grenfell Crescent, Unit B, Ottawa, ON Canada, k2G 0G3Tel:613.225.2732|Fax:225.225.9688|E-mail:*****************| © 2015 Diffraction Limited. All rights reserved. The SBIG wordmark and logo are trademarks ofDiffraction Limited, All other trademarks, service marks and tradenames appearing in this brochure are the property of their respective owners.。
VNXe3200
最新VNXe 3200介绍(上)转载请在文首保留原文出处:EMC中文支持论坛https:///go/chinese介绍美国当地时间2014年4月30日,EMC发布了最新一代的VNXe存储,VNXe3200。
这次发布的VNXe3200简直就是一个强大的多功能小型存储阵列。
那就让我们来详细了解一下最新的VNXe3200吧。
更多信息亮点:VNXe3200支持FC新VNXe针对入门级阵列使用了一个全新的架构。
它的架构类似于VNX,但管理系统却非常小。
两个存储处理器(SP)都包含在由12或25个磁盘组成的数据处理器机箱(DPE)里面。
为了减少物理尺寸,SP没有被单独拆分出来,而是将SP建立在第一磁盘架。
整体规格包括:∙最大驱动器数–初期为50个(2014年内可达150个)∙总系统内存 - 48GB(每个SP 24GB)∙驱动支持的类型 - 2.5”或 3.5”SAS,NL-SAS以及闪存(Flash)∙协议支持 - SMB,NFS,iSCSI和光纤通道(FC)物理端口 - 4个10GBase-T端口和4个8Gb光纤端口它运行MCx操作环境,就像当前的VNX。
这一点很重要,因为它拥有与VNX相同的多核性能增强,以及许多相同的功能,例如FAST VP。
软件功能的增强像当前的VNX一样,新VNXe的软件更新也非常显著。
MCx可以更好的利用新式的多核CPU,并拥有一些非常强大的软件功能。
相信之前是从未见过这种规模和价格的阵列。
FAST VPFAST VP(Fully Automated Storage Tiering Virtual Provisioning,全自动存储分层虚拟资源调配)可以允许你创建一个包含不同类型磁盘的池。
根据需要,在池中,阵列将“向上”或“向下”移动数据来加快(SSD)或减慢(NL-SAS)磁盘。
我们可以清楚的看到一个池由SSD,SAS和NL-SAS构成,并让阵列进行处理将数据放在正确的层。
“土豪”们的大面子!四款超大屏幕液晶电视体验对比
“土豪”们的大面子!四款超大屏幕液晶电视体验对比梁景裕【期刊名称】《消费电子》【年(卷),期】2015(000)005【总页数】10页(P54-63)【作者】梁景裕【作者单位】【正文语种】中文对于很多家庭消费者而言,家里的液晶电视就如同自己的“面子”一样屏幕越大越好。
尤其是很多收入水平达到“土豪”级别的消费者,50英寸的液晶电视已经满足不了他们对“面子”的需求。
于是,各大品牌都纷纷推出80英寸以上的超大液晶电视,本期《消费电子》评测室就选出了四款目前市面上主流的超大液晶电视进行体验对比,看看这些“土豪级”液晶电视的表现如何。
夏普LCD-90LX740A是目前行业里最大的90英寸液晶电视。
它的面积是60英寸的2.3倍、70英寸的1.7倍,同时也搭载各种先进技术,是一款拥有超高性价比的机型。
90英寸超大屏幕搭配超薄机身外观方面,夏普LCD-90LX740A虽然有着90英寸的超大屏幕,不过却拥有超薄的机身,搭载的侧入式LED背光源技术让整体机身厚度非常薄。
底座方面,这款夏普电视采用了传统的底座设计,确保了电视放置的稳固性。
在细节方面,夏普LCD-90LX740A电视的设计非常用心,电视机身前部的LOGO 不仅是机身品牌身份的象征,而且给人画龙点睛之感,在灯光的照耀下更显眼。
而作为一款数字电视一体机,夏普LCD-90LX740A不仅支持WiFi、DLNA等网络连接,还支持OPC自动亮度调节,拥有3个USB接口、4个HDMI接口、D-sub接口等丰富扩展空间。
除了HDMI和USB,它还支持MHL连接。
拥有这些,用户便可以在90英寸的大屏幕上浏览手夏普LCD-90LX740A 12万元机、硬盘、电脑、蓝光机等各种设备的内容,实现丰富的扩展体验。
另外,在节能环保方面夏普也没有怠慢,由于融合了X超晶面板和直下式的背光源,本机型的目标是取得能效等级1级。
百视通合作智能系统界面先进的智能界面和强大点播功能等智能体验也同样是LCD-90LX740A的一大亮点。
环宇3200说明书
环宇3200说明书一、产品概述环宇3200是一款高性能的多功能智能设备,具备多种功能和特点,能够满足用户的多样化需求。
二、外观和结构环宇3200外观简洁大方,采用优质材料制作而成,手感舒适。
其结构紧凑,便于携带和使用。
三、产品特点1. 高性能处理器:环宇3200配备了先进的处理器,运行速度快,响应迅速,能够快速处理各种任务。
2. 大容量存储:环宇3200内置大容量存储空间,可以存储大量的文件和数据,方便用户的使用和管理。
3. 多功能操作系统:环宇3200采用了多功能操作系统,支持多种应用程序和软件的运行,满足用户的不同需求。
4. 高清显示屏:环宇3200配备了高清显示屏,色彩鲜艳,显示效果清晰,用户可以更好地观看影片、图片等多媒体内容。
5. 长续航时间:环宇3200的电池容量大,续航时间长,可以满足用户长时间使用的需求。
6. 多种接口:环宇3200配备了多种接口,包括USB、HDMI等,方便用户与其他设备的连接和数据传输。
7. 高速网络连接:环宇3200支持高速网络连接,可以实现快速的上网和下载,满足用户对网络的需求。
8. 安全性能强:环宇3200具备良好的安全性能,采用了多种安全技术,保障用户的数据和隐私安全。
四、使用方法1. 开机:长按电源键,待屏幕亮起即可。
2. 连接网络:在设置界面中选择无线网络,输入密码即可连接。
3. 安装应用程序:打开应用商店,搜索并下载需要的应用程序。
4. 存储文件:将文件拷贝到环宇3200的存储空间中,或通过USB 连接传输。
5. 观看影片:打开影片播放器,选择要播放的影片文件,即可开始观看。
6. 拍照和录像:打开相机应用,点击拍照或录像按钮进行拍摄。
7. 连接外设:通过USB或HDMI接口,连接外设,如打印机、投影仪等。
8. 关机:长按电源键,选择关机即可。
五、注意事项1. 使用环宇3200时,请遵守当地相关法律法规。
2. 使用时请保持环境清洁,避免灰尘和污垢进入设备。
- 1、下载文档前请自行甄别文档内容的完整性,平台不提供额外的编辑、内容补充、找答案等附加服务。
- 2、"仅部分预览"的文档,不可在线预览部分如存在完整性等问题,可反馈申请退款(可完整预览的文档不适用该条件!)。
- 3、如文档侵犯您的权益,请联系客服反馈,我们会尽快为您处理(人工客服工作时间:9:00-18:30)。
–
•
相同SAN网络环境下,容灾等级最高的 文件共享解决方案。
支持异构平台共享
• 兼具异构平台应用级数据共享与卓越的性能
简单、易用性
典型环境下性能测试数据
900 800 700 600 500 400 300 200 100 0 1AS 2AS 裸设备 读 BWFS 读 3AS NAS 读 4AS
•
• • • • •
BWFS 把下层带宽发 挥到
90%
450
一台中低端盘阵 2*4Gb端口 16块SATA硬盘 4台客户端 4Gb HBA卡 1M粒度 顺序测试
注:这是一个非线性 编辑制作的典型环境测试 性能数据;BWFS的性能取 决于下面块层的速度,块 层带宽利用率一般在90% 以上。例如最近在Rorke Data的测试单客户端性能 600MB/s
文件级盘阵实时容灾解决方案
• BWmirror 功能可实现支持将两组盘阵配置成冗余模式,当任意一个盘阵整体出现故 障不能正常工作时,文件系统仍然能正常访问,其上正在运行的业务不会中断。
文件级盘阵实时容灾解决方案
• 与传统基于文件复制的方案相比:
– 对应用完全透明,客户端只有单一盘符, 故障发生后不需要显示在客户端切换盘 符; 盘阵无缝切换,不需人工干预,业务没 有中断; 盘阵间数据实时同步,没有文件复制窗 口,没有任何数据丢失; 基于应用的复制需要应用自己实现,难 度大,成本高; 基于应用的复制方案没有办法修改文件 系统,难以处理诸如缓存一致性的问题; 盘阵整体 故障业务 不中断 对应用完 全透明使 用方便 – –
BWStor BW2000特点
支持576T跨平台文件共享的统一命名空间,同时还可提供 数据块级的存储服务 可平滑扩展,按需购买有利于控制成本,降低TCO 跨盘柜跨盘组性能聚合实现高性能文件共享 智能故障诊断 支持整合用户原有存储设备
BWStor BW3200
• 元数据控制器 • BWStor硬件存储设备 • 光纤NAS单元
• 高可靠,容错能力强 • 故障恢复对系统影响低 • 系统无缝扩展
BWStor BW3200其它特点
• • • • • • • 系统的存储单元支持横向和纵向扩展,性能随着存储主柜单元的增加而 增加 系统容量可以从TB级扩展到PB级 支持单个2PB的巨型文件,支持上亿规模的目录和文件数量 标准NAS服务单元支持按需扩展,提供的性能与之增加 提供性能计数器和监控工具,方便监控应用使用存储的情况 存储单元可以方便添加到系统中 灵活的故障记录和报警机制,支持事件日志记录,支持邮件报警、报警 灯等
• BWFS有效解决数据共享、文 件共享,以及性能需求等问 题: – 提供数据集中存储,所有 客户机都可共享存储空间, 其文件共享的能力与网络 文件系统相同 – 文件系统中数据I/O并发访 问SAN存储设备或盘阵设 备,其读写性能与并发直 接读写的性能相当 – 元数据性能从元数据控制 器获取,对系统性能影响 甚微
蓝鲸案例分享
• 蓝鲸介绍 • 产品线
– BWStor CSA5000 – BWStor BW2000 – BWStor BW3200
• 典型案例
河南省电视台新闻网存储方案
江苏省电视台制作网存储案例
广东电子工业研究院、国云科技云计算 公共平台存储
以色列国家有线电视网络存储案例
全国职业教育资源共享平台试点项目
蓝鲸产品介绍
• 蓝鲸介绍 • 产品线
– BWStor CSA5000 – BWStor BW2000 – BWStor BW3200
• 典型案例
相关产品概述
BWStor集群存储系统
集群存储软件+标准硬件平台 大容量单一命名空间 高聚合带宽 高可靠 按需扩展 适当成本
BW2000
可靠性
BW3200
横向扩展
存储单 元主柜
元数据控制器
纵向扩展
光纤NAS单元 存储单 元扩展 柜
BWStor 3200
光纤盘阵
BWStor BW3200的产品形态
在线平滑扩展
媒体数据存储系统挑战
• 数据量迅速膨胀
• 海量存储空间 • 容量的按需扩展
• 数据访问量大
• 高并发高带宽低时延 • 性能的按需扩展
• 业务连续性要求高
中科蓝鲸产品介绍
李正 产品经理 (010)59851155-2607 Email:lizheng@
关于蓝鲸—目录
• 蓝鲸介绍 • 产品线
– BWStor CSA5000 – BWStor BW2000 – BWStor BW3200
• 典型案例
蓝鲸名称由来
中科院计算所
前瞻中心
蓝鲸产品应用
• 行业 – 数字媒体 – 模拟仿真 – 石油 – 视频监控 – 遥感 – 云应用 – 其他高性能计算
国内用户
数字媒体 国家广电总局卫星电视监测网 几十家电视台、广播电台 中国2010上海世博会 第十一届全运会 广州亚运会 水晶石数字科技有限公司 中共中央党校 … 平安城市 武汉市武昌区平安城市 武汉市江岸区平安城市 新疆乌鲁木齐天山区平安城市 … 互联网 高等学校教师网络培训系统 全国职业教育资源共享平台试 点项目 搜房网 卓卓网 …
XX大规模地理信息云系统存储案例
水晶石动漫制作创意云
典型用户分享
典型用户-音视频编缉
谢谢!
遥感 中国科学院对地观测与数字地 球科学中心 中国资源卫星应用中心 总参某部 …
国外用户
Jump Studios (美国) Hasbro (美国) Deluxe (美国) Legend3D (美国) Meteomedia (美国) Notch (美国) Chamaeleon (美国) Frame (美国) Screen Scene (美国) Graphic Systems Group (美国) Gravity (美国) Sony Pictures(新加坡) TV Espaniol(西班牙) PBS Idaho(美国) Turner Broadcast (香港) MBC(毛里塔尼亚) NTV(土耳其) CUDO(韩国) KBS (韩国) Cablevision(美国) Verizon (美国) DPG(英国) …
BWStor BW2000
• • • • • BW2000 SM/DM 1台 BW2000 控制器可扩展3台 BW2000 磁盘柜可扩展20台 集成核心文件系统—BWFS 能整合用户原有iSCSI存储设备
横向扩展
纵向扩展
BW2000 SM/DM
BW2000 SS/DS
BW2000 SJ/DJ BWStor BW2000集群存储系统
作为中科院计算所在国内的唯一的存储技术产业化基地继承了计算所存储中心已 有的丰厚存储技术积累与相关产权,并继承蓝鲸品牌
中科院计算所
飞康软件
天津海泰
天津中科蓝鲸
蓝鲸的优势
• 研发实力
– 国内最大的网络存储专业研发团队 (160余人) – 863、973、国家自然科学基金等国家重 点科技计划存储项目支持 – 合理的人才结构(员工、研究生、博士 后)确保技术的先进性和产品的实用性 – 已有丰厚的存储领域技术与知识产权积 累 • 产业化实力 – 专业化的测试、生产体系 – 良好的服务体系 – 丰富的各行业成功案例
智能信息处理研 究部
系统结构研究 部
网络科学与技术 研究部
普适计算中心
系统结构重点实 验室
编译技术 智能中心 微处理器中心 工程中心 存储中心 实验室
空间信息处理技术 实验室
曙光
龙芯
蓝鲸
中科蓝鲸公司组成结构
中科院国有控股的中美合资技术型存储厂商
作为中国科学院与天津市政府院地合作示范项目,由中科院计算技术研究所、天 津海泰控股、美国飞康软件等单位共同出资成立
400
350 300 250 200 150 100 50 0 1AS 2AS 裸设备 写 BWFS 写 3AS NAS 写 4AS
性能优势
其它特点
同时支持FC(4Gb、8Gb)、以太网(1Gb、10Gb)接入 等丰富接入方式 提供统一命名空间下文件级跨平台共享、同时还提供 数据块级的存储服务 既具备先进的存储架构与未来接轨,又兼容现有成熟 的SAN存储架构 可平滑扩展,按需购买有利于控制成本,降低TCO 具备海量存储能力、支持64ZB,满足计划内的未来需 求 系统聚合带宽高,整体传输能力强 管理简便易用
•
与基于应用复制的方案相比:
– –
容灾等级 最高的SAN 文件共享 解决方案
文件层实 现性价比 高
盘阵整体 故障数据 不丢失
Байду номын сангаас
•
与基于盘阵的复制方案相比:
– 盘阵复制是在设备底层服务,需要配置 高端盘阵,并且盘阵型号必须一致,成 本非常高; 在文件系统下层,所以在切换之前备用 盘阵都不能使用,也无法确实文件是否 一致;
BWFS+CSA
BW1000-NAS
BW1000
性能、可扩展性
BWStor CSA5000
• • • • 成对的元数据控制器 客户端软件 核心文件系统—BWFS 能与各种通用存储设备配合成方案
MDC 元数据控制器
BWFS 客户端软件
各种通用存储设备
BWStor CSA SAN 文件系统网关
优秀的新型文件系统--BWFS