“外星人”的“大师兄”戴尔XPS15笔记本电脑
戴尔 Studio XPS 笔记本电脑设置指南说明书

设置指南型号 PP17S注、注意和警告注:“注”表示可以帮助您更好地使用计算机的重要信息。
注意:“注意”表示可能会损坏硬件或丢失数据,并且告诉您如何避免此类问题。
警告:“警告”表示可能会导致财产损失、人身伤害或死亡。
__________________本说明文件中的信息如有更改,恕不另行通知。
© 2008-2009 Dell Inc. 版权所有,翻印必究。
未经 Dell Inc. 书面许可,严禁以任何形式对这些材料进行复制。
本文件中使用的商标:Dell、DELL徽标、XPS和DellConnect是 Dell Inc. 的商标;Intel是 Intel Corporation 的注册商标,Core是 Intel Corporation 在美国和/或其他国家或地区的商标;Microsoft、Windows、Windows Vista 和Windows Vista 开始按钮徽标是 Microsoft Corporation 在美国和/或其他国家或地区的商标或注册商标;Blu-ray Disc是 Blu-ray Disc Association 的商标;Bluetooth是 Bluetooth SIG, Inc. 所有的注册商标,Dell 经许可使用。
本说明文件中述及的其他商标和商品名称是指拥有相应标记和名称的公司或其制造的产品。
Dell Inc. 对不属于自己的商标和商品名称不拥有任何所有权。
2009 年 1 月 P/N P505C Rev. A02设置 Studio XPS™膝上型电脑 . . . . . . 5设置计算机之前. . . . . . . . . . . . . . . . . . 5连接交流适配器. . . . . . . . . . . . . . . . . . 6检查无线控件. . . . . . . . . . . . . . . . . . . . 7连接网络电缆(可选) . . . . . . . . . . . . . 8按电源控件 . . . . . . . . . . . . . . . . . . . . . 9设置 Windows Vista®. . . . . . . . . . . . . 10连接至 Internet(可选). . . . . . . . . . . 10设置 5.1 音频连接 . . . . . . . . . . . . . . . 12取出和装回电池. . . . . . . . . . . . . . . . . 13使用 Studio XPS™ � � � � � � � � � � � � � � � � � � �14设备状态指示灯. . . . . . . . . . . . . . . . . 14右侧功能键 . . . . . . . . . . . . . . . . . . . . 16左侧功能键 . . . . . . . . . . . . . . . . . . . . 20显示屏功能键. . . . . . . . . . . . . . . . . . . 22媒体、无线和电源控制 . . . . . . . . . . . . 23计算机主机和键盘功能键 . . . . . . . . . . 24可选的图形处理器功能 . . . . . . . . . . . . 26软件功能. . . . . . . . . . . . . . . . . . . . . . 26解决问题. . . . . . . . . . . . . . . . . . . . 29网络问题. . . . . . . . . . . . . . . . . . . . . . 29电源问题. . . . . . . . . . . . . . . . . . . . . . 30内存问题. . . . . . . . . . . . . . . . . . . . . . 31锁定和软件问题. . . . . . . . . . . . . . . . . 31使用支持工具. . . . . . . . . . . . . . . . . 33 Dell 支持中心. . . . . . . . . . . . . . . . . . . 33系统信息. . . . . . . . . . . . . . . . . . . . . . 34硬件故障排除. . . . . . . . . . . . . . . . . . . 35 Dell 诊断程序 . . . . . . . . . . . . . . . . . . 36目录3系统还原选项. . . . . . . . . . . . . . . . . 37系统还原. . . . . . . . . . . . . . . . . . . . . . 37 Dell Factory Image Restore . . . . . . . . . 38操作系统重新安装 . . . . . . . . . . . . . . . 40获得帮助. . . . . . . . . . . . . . . . . . . . 42技术支持和客户服务. . . . . . . . . . . . . . 43 DellConnect™. . . . . . . . . . . . . . . . . . . 43在线服务. . . . . . . . . . . . . . . . . . . . . . 43 AutoTech 服务 . . . . . . . . . . . . . . . . . . 44产品信息. . . . . . . . . . . . . . . . . . . . . . 45根据质保返回商品维修或退款. . . . . . . 45致电之前. . . . . . . . . . . . . . . . . . . . . . 46与 Dell 联络. . . . . . . . . . . . . . . . . . . . 47更多信息和资源. . . . . . . . . . . . . . . 48基本规格. . . . . . . . . . . . . . . . . . . . 50索引. . . . . . . . . . . . . . . . . . . . . . . 594设置 Studio XPS™本节提供了设置 Studio XPS 1340 和连接外围设备的信息。
Dell XPS M1530拆解详细教程要点

Dell XPS M1530拆解详细教程!(官方)还是照例,先看看该笔记本的整体外貌:建议的工具本说明文件中的步骤可能需要以下工具:∙∙小型平口螺丝刀∙∙梅花槽螺丝刀∙∙小塑料划片∙∙快擦写 BIOS 更新(请参阅 Dell 支持 Web 站点)保存并关闭所有打开的文件,退出所有打开的程序。
1.2.依次单击开始、箭头,然后单击“关机”。
确保计算机和所有连接的设备均已关闭。
如果关闭操作系统时,计算机和连接的设备未自动关闭,请按住电源按钮至少 8 至 10 秒钟直至计算机关闭。
1.拆装计算机内部组件之前遵循以下安全原则有助于防止您的计算机受到潜在损坏,并有助于确保工作表面平整和清洁,以防止刮伤计算机外壳。
1.2.关闭计算机(请参阅关闭计算机)。
断开所有电话线或网络电缆与计算机的连接。
1.2.断开计算机和所有连接的设备与各自电源插座的连接。
将计算机翻转过来。
1.2.将电池从电池槽中滑出。
将计算机正面朝上翻转过来,并打开显示屏,然后按电源按钮以导去系统板上的残留电量。
1.2.从 ExpressCard 插槽(请参阅卸下 ExpressCard 或挡片)和八合一存储卡读取器(请参阅卸下存储卡或挡片)中卸下所有已安装的插卡。
卸下硬盘驱动器按照开始之前中的步骤进行操作。
1.2.拧下四颗 M3 x 3 mm 螺钉并滑动硬盘驱动器使其脱离托架。
更换硬盘驱动器拆开新驱动器的包装。
1.将硬盘驱动器滑入托架中。
1.2.根据需要,为您的计算机安装驱动程序和公用程序(请参阅重新安装驱动程序和公用程序)。
将硬盘驱动器退回 Dell请使用原来的或类似的泡沫包装将旧硬盘驱动器退回 Dell。
否则,运送过程中可能会损坏硬盘驱动器。
卸下中心控制护盖和铰接护盖按照开始之前中的步骤进行操作。
1.2.将计算机翻转过来,拧下固定中心控制护盖的三颗 M2 x 2 mm 螺钉。
翻转计算机使其正面朝上,然后将显示屏打开到最大程度。
1.2.使用塑料划片松动中心控制护盖,直至看到将电缆连接至系统板的电缆连接器。
戴尔Vostro15体验评测

戴尔Vostro15体验评测关于戴尔Vostro 15体验评测本次评测的戴尔Vostro成就15 5000的具体参数为:15-5568,具体硬件配置为:intel Core i5-7200U处理器、4GB内存、1TB机械硬盘、NVIDIA GeForce 940MX独立显卡、15.6英寸1366×768分辨率的显示屏,预装Windows 10家庭版操作系统和Office 家庭与学生版2016套件,具备指纹识别模块、具备键盘背光灯,整体性能主流。
机身外观戴尔Vostro成就15 5000机身共有蓝色和银色两种外壳可选,本次我们拿到的为蓝色版本。
材质方面,机身外壳为铝合金材质,表面还拥有细腻的喷砂处理,手感十分出色,且不易粘留指纹,能够长时间保持机身的整洁。
同时,蓝色的外壳看上去更具质感,沉稳且时尚,适合多年龄层的人群选择。
该机采用了一块15.6英寸大尺寸显示屏,屏幕采用了雾面屏设计,在光线直射时能有效提升观看舒适度,避免因光线直射带来的影响,对于经常户外使用电脑的朋友来讲尤为重要。
屏幕的分辨率为1366×768,可视角度较广,显示效果还算理想,日常办公足够使用,另外还有1920×1080全高清分辨率屏幕可供选择。
为了延续整机的统一的设计风格,该机的D面同样也为蓝色设计,而且依旧设计简约,散热进风孔的设计延续戴尔的经典设计。
此外,底部两个顶角斜切面分别拥有一个扬声器,这个斜切角更利于声音的传播,让立体声输出效果更出色。
机身重量机身重量方面,Vostro成就15 5000的裸机重量为1.97kg,而加上电源适配器的旅行重量为2.31kg,作为一台15英寸的笔记本,该机的重量控制还是比较出色的。
同时机身也较为轻薄,机身厚度仅为25.2mm,整体便携性比较出色。
操控手感Vostro成就15 5000轻装造梦笔记本采用了经典的巧克力键盘,键帽表面拥有舒适的类肤涂层,触摸相对舒适且不易粘留指纹。
戴尔XPS超极本重装映像“操作指南”说明书

Dell XPS Ultrabook Reimage“How-To”GuideRevision1.0A01Dec.27th,2016Contents1Overview (3)2“How-To” (4)2.1Auto Installation Application (4)2.2Manual Installation Order (4)Appendix A How to create and use the Dell Windows recovery image (7)Appendix B Intel Rapid Storage Technology (9)Appendix C DELL Command Suite (11)Appendix D Dell Dock(WD15)&Dell Thunderbolt Dock(TB16)information and specifications (12)1OverviewThis document is a quick guidance for re-image OS on Dell XPS Ultrabook notebooks.Failure to install drivers and applications in this document may result in undesirable performance.These drivers are required to enable new technologies and features.Reinstalled images should be built from Windows clean installation then following steps in this guide.Dell does not recommend starting from an image built on previous generations of products or other computer systems.This“How-To”guide applies to following Systems,and support Windows OS list in below2“How-To”2.1Auto InstallationApplicationDell highly recommends Dell Command |Update application (DCU)to automate the installation of BIOS,firmware,driver and critical updates specific to your system.The application is availabletodownloadon Dell SupportWebsiteDriver&Downloadspage .Pick your system type from the list or enter the service tag of your system to get the right version for your computer.The DCU is supported on Precision,XPS and Latitude notebooks.The Dell Command |Update toolallows you to keep your system up to date without you having to know every driver or update needed.It will automatically interrogate your system and compare it to the available updates on /support for your specific system.Read here for more detail about How to use Dell Command |Update to update all drivers BIOS and firmware for yoursystem2.2Manual InstallationOrderAlternatively,Dell recommends installing the following BIOS,firmware and drivers step-by-step in the prescribed order to ensure optimal performance.Search for your system model name under Select a Product selection,or enter the service tag of your system to locate Drivers &Downloads page on the Dell Support Website.Change the Operating System to view all available updates for your system.NOTE :Older BIOS versions and drivers could result in your computer or not functioning optimally.NOTE :Dell highly recommends that you install BIOS,firmware,driver and critical updates via Microsoft Windows Update (in session 1)and Dell Command I Update application (in session 2.1).Manual installation is only recommends when you have internet connection problem.NOTE :Dell recommends restarting your system between each driver,firmware installation.onboard CommunicationAppendixAppendix AHow to create and use the Dell Windows recovery imageAfter you download the Windows recovery image file,follow these instructions to create a bootable USB drive or DVD,copy the recovery image onto your bootable media,and then use the media to reinstall Windows on your Dell device.Warning:These advanced steps are intended primarily for system administrators and those familiar with command line and/or comfortable following technical tutorials.Note:To print this document,expand the required section before you click the printer icon at the top of this document.How to create Windows10installation mediaCreate USB installation mediaStep1:Format your USB drive as a bootable driveMake sure that you use8GB or larger USB drive(32GB Maximum)and backup any important data on it.When the drive is formatted,all existing data will be deleted.1.Connect the USB drive to the PC where you'll be creating the installationmedia.2.Open the Command Prompt window by right-clicking the Start button and then select CommandPrompt(Admin)to run in administrator mode.3.At the command prompt,type diskpart and press Enter.4.Next,type list volume and press Enter.5.From the list,determine which volume number is the connected USB drive.The volume type shouldbe marked as Removable.6.Type select volume X,where X is the number obtained in the previous step.For example,selectvolume9.7.Type clean and press Enter.8.Type create partition primary and press Enter.9.Type format fs=fat32label='OS install'quick and press Enter.10.Type active and press Enter.11.To close the Command Prompt window,type exit and press Enter.Step2:Copy the recovery image to your bootable USB drive1.Go to the location where you saved the recovery image.2.Right-click the recovery image file(.iso)and on the options menu,select Mount.3.Windows will open the contents of the image in File Explorer.4.Copy the contents of the image to your bootable device.Create DVD installation media1.Insert the DVD into the disc drive of the PC where you’ll be copying the recovery image toDVD.Make sure that the disc drive has burning capabilities.2.Navigate to the folder where you saved the recovery image and double-click the isofile.3.Either the Windows ISO media creation tool or installed third-party disc burning software willopen.4.Follow the on-screen instruction to burn the ISO to the DVD.When the process completes,you willhave created bootable installation media.Using the USB or DVD installation media to reinstall Windows101.Connect the installation media you created to the Dell system where you want to installWindows.2.Restart the system and when the Dell logo screen appears,tap the F12key until you see Preparingone time boot menu in the top-right corner of the screen.3.On the boot menu,under UEFI boot,select your media type(USB or DVD)and enter your language.4.On the Choose an option screen,select Troubleshoot,and then select Recover from a drive.5.Follow the on-screen instructions to finish installing Windows.The installation process will takesome time and your computer will restart.Appendix BIntel®Rapid Storage TechnologyIntel®Rapid Storage Technology offers greater levels of performance,responsiveness,and expandability than ever before.Whether you are using one or multiple serial ATA(SATA)or PCIe drives,you can take advantage of enhanced performance and lower power consumption from the latest storage technologies. Additionally,you can rest easy knowing you have added protection against data loss in the event of a hard drive failure.∙Unleash the Performance of Your Solid-State DriveIntel®Rapid Storage Technology has added support for next generation PCIe storage devices with transfer speeds up to1GB/s that maximizes storage performance and improves response time for everyday usages like photo editing,video loading,and office productivity.Dynamic storage accelerator accelerates the performance of your SSD by dynamically adjusting system power management policies to deliver up to15 percent faster performance1during heavy multitasking compared to default power management.∙Fast Access to the Files and Applications You Use MostIntel®Smart Response Technology is a feature of Intel Rapid Storage Technology that recognizes and automatically stores your most frequently used applications and data into a high performance SSD while giving you full access to the large storage capacity of a hard disk drive(HDD).This enables a lower-cost, small-capacity SSD to be used in conjunction with a high-capacity HDD.Intel Smart Response Technology enables your system to perform faster than a system with just a HDD.Also supports solid-state hybrid drives(SSHDs).Intel Smart Response Technology boosts SSHD performance by informing the drive which data you use the most so it can store it into the built-in SSD,so your most frequently used data and applications are instantly accessible.∙Performance with Protection:RAID TechnologyMost of us don’t plan backup storage well in advance.Hard drive failure can be devastating,because it results in irretrievable content.Intel Rapid Storage Technology offers features that improve performance and data reliability for disk-intensive retrieval applications such as editing home video.For the fastest performance,Intel Rapid Storage Technology can combine from two to six drives in a configuration known as RAID0,so data can be accessed on each drive simultaneously,speeding up response time.For the best reliability,Intel Rapid Storage Technology RAID support includes the following levels of performance and reliability:RAID level0(Striping)RAID level1(Mirroring)RAID level5(Striping with parity)RAID level10(Striping and mirroring)Multiple drives in a PC can also provide added protection from disastrous hard drive failures by mirroring all data among two or more drives.This configuration is known as RAID1.RAID5and10provide additional reliability by mirroring all data among three and four drives respectively.Appendix CDell Client Command SuiteThe Dell Client Command Suite is the new name of our industry leading Client Systems Management tools. These tools make Dell commercial client systems the world's most manageable client devices.Click on a link below for more detailsDell Command|MonitorDell Command|ConfigureDell Command|DeployDell Command|Update CatalogDell Command|UpdateDell Command|Power ManagerAppendix DDell Dock(WD15)&Dell Thunderbolt Dock(TB16)information and specificationsThe Dell Thunderbolt Dock TB16is a device that links all your electronic devices to your laptop computer using Thunderbolt™3(Type-C)cable interface.When you connect the laptop to the docking station,you can gain accessto all your peripherals such as the mouse,keyboard,stereo speakers,external hard drive,and large-screen displays without having to plug each one into the laptop.Key Features:∙Supports up to three FHD displays or two4K displays@60Hz∙Supports faster data transfer of up to40Gbps,ideal for largefiles.∙Common docking experience across platforms with USB-C port(s)having data,video,and power capabilities.∙Single cable for power and data(up to130w on supported computers only).For more information about USB Type-C,refer to the knowledgebase article USB Type-C-Frequently Asked Questions.。
面面俱到戴尔XPS139310二合一笔记本
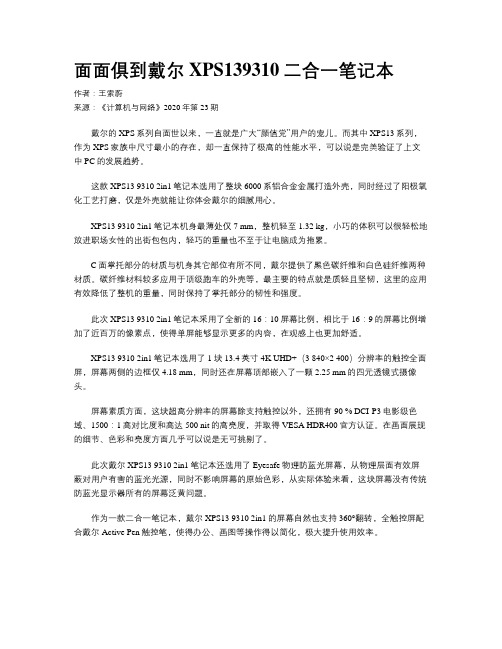
面面俱到戴尔XPS139310二合一笔记本作者:王索蔚来源:《计算机与网络》2020年第23期戴尔的XPS系列自面世以来,一直就是广大“颜值党”用户的宠儿。
而其中XPS13系列,作为XPS家族中尺寸最小的存在,却一直保持了极高的性能水平,可以说是完美验证了上文中PC的发展趋势。
这款XPS13 9310 2in1笔记本选用了整块6000系铝合金金属打造外壳,同时经过了阳极氧化工艺打磨,仅是外壳就能让你体会戴尔的细腻用心。
XPS13 9310 2in1笔记本机身最薄处仅7 mm,整机轻至1.32 kg,小巧的体积可以很轻松地放进职场女性的出街包包内,轻巧的重量也不至于让电脑成为拖累。
C面掌托部分的材质与机身其它部位有所不同,戴尔提供了黑色碳纤维和白色硅纤维两种材质。
碳纤维材料较多应用于顶级跑车的外壳等,最主要的特点就是质轻且坚韧,这里的应用有效降低了整机的重量,同时保持了掌托部分的韧性和强度。
此次XPS13 9310 2in1笔记本采用了全新的16:10屏幕比例,相比于16:9的屏幕比例增加了近百万的像素点,使得单屏能够显示更多的内容,在观感上也更加舒适。
XPS13 9310 2in1笔记本选用了1块13.4英寸4K UHD+(3 840×2 400)分辨率的触控全面屏,屏幕两侧的边框仅4.18 mm,同时还在屏幕顶部嵌入了一颗2.25 mm的四元透镜式摄像头。
屏幕素质方面,这块超高分辨率的屏幕除支持触控以外,还拥有90 % DCI-P3电影级色域、1500:1高对比度和高达500 nit的高亮度,并取得VESA HDR400官方认证。
在画面展现的细节、色彩和亮度方面几乎可以说是无可挑剔了。
此次戴尔XPS13 9310 2in1笔记本还选用了Eyesafe物理防蓝光屏幕,从物理层面有效屏蔽对用户有害的蓝光光源,同时不影响屏幕的原始色彩,从实际体验来看,这块屏幕没有传统防蓝光显示器所有的屏幕泛黄问题。
Dell XPS 15-9570设置与规格说明书

XPS 15Setup and SpecificationsNotes, cautions, and warningsNOTE: A NOTE indicates important information that helps you make better use of your product.CAUTION: A CAUTION indicates either potential damage to hardware or loss of data and tells you how to avoid the problem.WARNING: A WARNING indicates a potential for property damage, personal injury, or death.© 2018 Dell Inc. or its subsidiaries. All rights reserved. Dell, EMC, and other trademarks are trademarks of Dell Inc. or its subsidiaries. Other trademarks may be trademarks of their respective owners.2018 - 09Rev. A021 Set up your computer (4)2 Create a USB recovery drive for Windows (6)3 Views (7)Front (7)Left (7)Right (8)Base (9)Display (10)Bottom (10)4 Specifications (11)Computer model (11)System information (11)Dimensions and weight (11)Operating system (11)Memory (11)Ports and connectors (12)Communications (12)Wireless (12)Audio (12)Storage (13)Media-card reader (13)Keyboard (13)Camera (13)Touchpad (14)T ouchpad gestures (14)Power adapter (14)Battery (14)Display (15)Fingerprint reader (15)Video (16)Computer environment (16)5 Keyboard shortcuts (17)6 Getting help and contacting Dell (19)Self-help resources (19)Contacting Dell (19)Contents3Set up your computer1Connect the power adapter and press the power button.NOTE: To conserve battery power, the computer might enter into power save mode. Connect the power adapter and pressthe power button to turn on the computer.2 Finish Windows setup.Follow the on-screen instructions to complete the setup. When setting up, Dell recommends that you:•Connect to a network for Windows updates.NOTE:If connecting to a secured wireless network, enter the password for the wireless network access when prompted.•If connected to the internet, sign-in with or create a Microsoft account. If not connected to the internet, create an offline account.•On the Support and Protection screen, enter your contact details.3 Locate and use Dell apps from the Windows Start menu—Recommended Table 1. Locate Dell apps14Set up your computerDell UpdateUpdates your computer with critical fixes and latest device drivers as they become available.Dell Digital DeliveryDownload software applications, which are purchased but not pre-installed on your computer.4 Create recovery drive for Windows.NOTE: It is recommended to create a recovery drive to troubleshoot and fix problems that may occur with Windows.For more information, see Create a USB recovery drive for Windows.Set up your computer5Create a USB recovery drive for Windows Create a recovery drive to troubleshoot and fix problems that may occur with Windows. An empty USB flash drive with a minimum capacity of 16 GB is required to create the recovery drive.NOTE: This process may take up to an hour to complete.NOTE: The following steps may vary depending on the version of Windows installed. Refer to the Microsoft support site forlatest instructions.1 Connect the USB flash drive to your computer.2 In Windows search, type Recovery.3 In the search results, click Create a recovery drive.The User Account Control window is displayed.4 Click Yes to continue.The Recovery Drive window is displayed.5 Select Back up system files to the recovery drive and click Next.6 Select the USB flash drive and click Next.A message appears, indicating that all data in the USB flash drive will be deleted.7 Click Create.8 Click Finish.For more information about reinstalling Windows using the USB recovery drive, see the Troubleshooting section of your product's Service Manual at /support/manuals.6Create a USB recovery drive for WindowsViews Front1Left microphoneProvides digital sound input for audio recording and voice calls.2Battery-status lightIndicates the battery-charge status.Solid amber—Battery charge is low.Blinking amber—Battery charge is critical.Solid white—Battery is charging.Off—Battery is fully charged.3Right microphoneProvides digital sound input for audio recording and voice calls.Left1Power-adapter portConnect a power adapter to provide power to your computer and charge the battery.2USB 3.1 Gen 1 port with PowerShareConnect peripherals such as external storage devices and printers.Provides data transfer speeds up to 5 Gbps. PowerShare enables you to charge your USB devices even when your computer is turned off.NOTE: If the charge on your computer’s battery is less than 10 percent, you must connect the power adapter to chargeyour computer, and USB devices connected to the PowerShare port.Views7NOTE: If a USB device is connected to the PowerShare port before the computer is turned off or in hibernate state, you must disconnect and connect it again to enable charging.NOTE: Certain USB devices may not charge when the computer is turned off or in sleep state. In such cases, turn on the computer to charge the device.3HDMI portConnect to a TV or another HDMI-in enabled device. Provides video and audio output.4Thunderbolt 3 (USB 3.1 Gen 2 T ype-C) port with Power deliverySupports USB 3.1 Gen 2, DisplayPort 1.2, Thunderbolt 3 and also enables you to connect to an external display using a display adapter.Provides data transfer rates up to 10 Gbps for USB 3.1 Gen 2 and up to 40 Gbps for Thunderbolt 3. Supports Power Delivery that enables two-way power supply between devices. Provides up to 5V/3A power output that enables faster charging.NOTE: Adapters (sold separately) are required to connect standard USB and DisplayPort devices.5Headset portConnect headphones or a headset (headphone and microphone combo).Right1SD-card slotReads from and writes to the SD card.2USB 3.1 Gen 1 port with PowerShareConnect peripherals such as external storage devices and printers.Provides data transfer speeds up to 5 Gbps. PowerShare enables you to charge your USB devices even when your computer is turned off.NOTE: If the charge on your computer’s battery is less than 10 percent, you must connect the power adapter to charge your computer, and USB devices connected to the PowerShare port.NOTE: If a USB device is connected to the PowerShare port before the computer is turned off or in hibernate state, you must disconnect and connect it again to enable charging.NOTE: Certain USB devices may not charge when the computer is turned off or in sleep state. In such cases, turn on the computer to charge the device.3Battery-charge status lights (5)Turn on when the battery-charge status button is pressed. Each light indicates approximately 20% charge.4Battery-charge status buttonPress to check the charge remaining in the battery.5Security-cable slot (for Noble locks)Connect a security cable to prevent unauthorized movement of your computer.8ViewsBase1Power button with optional fingerprint readerPress to turn on the computer if it is turned off, in sleep state, or in hibernate state.When the computer is turned on, press the power button to put the computer into sleep state; press and hold the power button for10 seconds to force shut-down the computer.If the power button has a fingerprint reader, place your finger on the power button to log in.NOTE: You can customize power-button behavior in Windows. For more information, see Me and My Dell at / support/manuals.NOTE: The power-status light on the power button is available only on computers without the optional fingerprint reader.Computers shipped with the fingerprint reader integrated on the power button will not have the power-status light on the power button.2Right-click areaPress to right-click.3T ouchpadMove your finger on the touchpad to move the mouse pointer. Tap to left-click and two finger tap to right-click.4Left-click areaPress to left-click.Views9Display1Camera-status lightTurns on when the camera is in use.2CameraEnables you to video chat, capture photos, and record videos.3Left speakerProvides audio output.4Right speakerProvides audio output.Bottom1Service T ag labelThe Service T ag is a unique alphanumeric identifier that enables Dell service technicians to identify the hardware components in your computer and access warranty information.2Regulatory labelContains regulatory information of your computer.10Views4Specifications Computer modelXPS 15-9570System informationT able 2. System informationProcessor8th Generation Intel Core i5/i7/i9Chipset CM246Dimensions and weightT able 3. Dimensions and weightOperating system•Windows 10 Home (64-bit)•Windows 10 Professional (64-bit)MemoryT able 4. Memory specificationsSlots T wo SODIMM slotsT ype Dual-channel DDR4Speed2666 MHzConfigurations supportedPer memory module slot 4 GB, 8 GB, and 16 GBT otal memory 4 GB, 8 GB, 16 GB, and 32 GBSpecifications11Ports and connectorsT able 5. Ports and connectorsT able 6. Ports and connectorsCommunicationsT able 7. Supported communicationsWireless•Wi-Fi 802.11a/b/g/n/ac•Bluetooth 4.2 WirelessT able 8. WirelessTransfer rate (maximum)867 MbpsFrequency bands 2.4 GHz/5 GHzEncryption•64-bit/128-bit WEP•AES-CCMP•TKIPAudioT able 9. Audio specificationsController ALC3266-CG with Waves MaxxAudio Pro Speakers T woSpeaker output•Average: 2 W12Specifications•Peak: 2.5 WMicrophone Dual-array microphonesStorageT able 10. Storage specificationsMedia-card readerT able 11. Media-card reader specificationsT ype One SD-card slotCards supported•SD card•SD High Capacity (SDHC)•SD Extended Capacity (SDXC)KeyboardT able 12. Keyboard specificationsCameraT able 13. Camera specificationsResolutionCamera•Still image: 0.92 megapixel (HD)Specifications13•Video: 1280 x 720 (HD) at 30 fpsDiagonal viewing angleCamera75 degreesTouchpadT able 14. TouchpadResolution:Horizontal1219Vertical919Dimensions:Width105 mm (4.13 in)Height80 mm (3.15 in)Touchpad gesturesFor more information about touchpad gestures for Windows 10, see the Microsoft knowledge base article 4027871 at .Power adapterT able 15. Power adapter specificationsT ype130 WDimensions (connector) 4.50 mmInput voltage100 VAC–240 VACInput frequency50 Hz–60 HzInput current (maximum) 1.80 AOutput current (continuous) 6.67 ARated output voltage19.50 VDCT emperature range:Operating0°C to 40°C (32°F to 104°F)Storage–40°C to 70°C (–40°F to 158°F) BatteryT able 16. Battery specificationsT ype3-cell lithium ion (56 WHr)6-cell lithium ion (97 WHr) Dimensions:Width71.80 mm (2.83 in)71.80 mm (2.83 in) 14SpecificationsDisplayT able 17. Display specificationsFingerprint readerT able 18. Fingerprint readerSensor technology T ouchSensor resolution108 pixels x 88 pixelsSpecifications15Sensor area 5.5 mm x 4.5 mm VideoT able 19. Video specificationsComputer environmentAirborne contaminant level: G1 as defined by ISA-S71.04-1985T able 20. Computer environment* Measured using a random vibration spectrum that simulates user environment.† Measured using a 2 ms half-sine pulse when the hard drive is in use.‡ Measured using a 2 ms half-sine pulse when the hard-drive head is in parked position.16SpecificationsKeyboard shortcuts NOTE: Keyboard characters may differ depending on the keyboard language configuration. Keys used for shortcuts remain the same across all language configurations.T able 21. List of keyboard shortcuts5Keyboard shortcuts1718Keyboard shortcutsGetting help and contacting Dell Self-help resourcesYou can get information and help on Dell products and services using these self-help resources:T able 22. Self-help resourcesInformation about Dell products and services Dell Help & Support appAccessing help In Windows search, type Help and Support, and press Enter. Online help for operating system /support/windowsTroubleshooting information, user manuals, setup instructions,product specifications, technical help blogs, drivers, softwareupdates, and so on./supportDell knowledge base articles for a variety of computer concerns.1Go to /support.2T ype the subject or keyword in the Search box.3Click Search to retrieve the related articles.Learn and know the following information about your product:•Product specifications•Operating system•Setting up and using your product•Data backup•Troubleshooting and diagnostics•Factory and system restore•BIOS information See Me and My Dell at /support/manuals.To locate the Me and My Dell relevant to your product, identify your product through one of the following:•Select Detect Product.•Locate your product through the drop-down menu under View Products.•Enter the Service T ag number or Product ID in the search bar.Contacting DellT o contact Dell for sales, technical support, or customer service issues, see /contactdell.NOTE:Availability varies by country and product, and some services may not be available in your country.NOTE: If you do not have an active internet connection, you can find contact information on your purchase invoice, packing slip, bill, or Dell product catalog.6Getting help and contacting Dell19。
DELL外星人系列,15寸带独显电路图
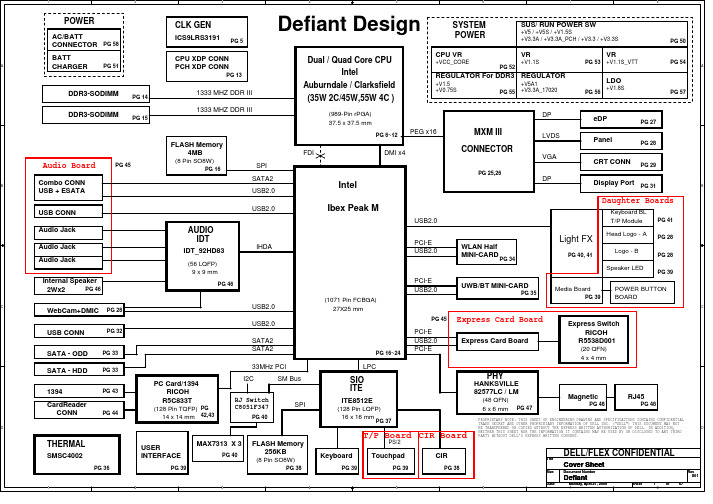
27 28 29 30 31 32 33 34
C
V V V V V V V V
35 36 37 38 39 40,41
C
V
V
V
V
define define V V
define
V V
V V
define WOLdefine WOLdefine WOL
By Albert
D
D
PROPRIETARY NOTE: THIS SHEET OF ENGINEERING DRAWING AND SPECIFICATIONS CONTAINS CONFIDENTIAL TRADE SECRET AND OTHER PROPRIETARY INFORMATION OF DELL INC. ("DELL") THIS DOCUMENT MAY NOT BE TRANSFERRED OR COPIED WITHOUT THE EXPRESS WRITTEN AUTHORIZATION OF DELL. IN ADDITION, NEITHER THIS SHEET NOR THE INFORMATION IT CONTAINS MAY BE USED BY OR DISCLOSED TO ANY THIRD PARTY WITHOUT DELL'S EXPRESS WRITTEN CONSENT.
A
SA_CK0 SA_CK1
2 333MHz MAX 2
?MHz
BCLK_ITP BCLK_ITP#
SO-DIMM 1
PROPRIETARY NOTE: THIS SHEET OF ENGINEERING DRAWING AND SPECIFICATIONS CONTAINS ONFIDENTIAL TRADE SECRET AND OTHER PROPRIETARY INFORMATION OF DELL INC. ("DELL") THIS DOCUMENT MAY NOT BE TRANSFERRED OR COPIED WITHOUT THE EXPRESS WRITTEN AUTHORIZATION OF DELL. IN ADDITION, NEITHER THIS SHEET NOR THE INFORMATION IT CONTAINS MAY BE USED BY OR DISCLOSED TO ANY THIRD PARTY WITHOUT DELL'S EXPRESS WRITTEN CONSENT.
看新贵如何打动你__戴尔XPS_13_和华硕UX32VD_对比评测

看新贵如何打动你戴尔XPS 13 和华硕UX32VD 对比评测图/文:陈标华超极本作为笔记本的一种延伸和创新,想要传达的可不仅仅是轻薄的概念,其目标是要在轻薄平台上全方位的发展,也就是说超极本绝对不会放弃对于性能的追逐。
因此,对于那些在轻薄和性能同样看重的消费者来说,小编将要介绍的戴尔XPS 13和华硕UX32VD这两款超极本或许就是很好的选择。
产品名称戴尔XPS 13(XPS13D-2501) 华硕UX32KI3517VD 参考价格¥9999元¥9500元屏幕尺寸13.3英寸 1366x76813.3英寸 1920x1080CPU型号Intel 酷睿i5 2467MIntel 酷睿i7 3517UCPU主频1.6GHz1.9GHz内存容量4GB DDR3 1333MHz4GB DDR3 1600MHz硬盘容量128GB SSD固态硬盘24GB+500GB SSD+SATA显卡芯片Intel GMA HD 3000NVIDIA GeForce GT 620M+Intel GMA HD 4000摄像头集成130万像素摄像头集成摄像头无线网卡支持802.11a/g/n无线协议支持802.11b/g/n无线协议笔记本重量1.36Kg1.45Kg蓝牙支持,蓝牙3.0模块支持,蓝牙4.0模块有线网卡1000Mbps以太网卡1000Mbps以太网卡上市时间2012年05月2012年06月产品定位轻薄便携本,Ultrabook笔记本轻薄便携本,Ultrabook笔记本核心类型Sandy BridgeIvy Bridge三级缓存3MB4MB戴尔 XPS 13(XPS13D-2501)华硕 UX32KI3517VDI 评 测 Evaluation & Testing外观篇戴尔新推出的XPS 13,初露头角便已经展现出独一无二的亮点:相当于11.6 英寸笔记本的机身配上13.3 英寸的显示屏,超窄的屏幕边框设计,舒适的键盘手感,高档的碳纤维与阳极氧化铝材质,底部进气背部散热的散热体系,每一个细节设计都似乎告诉世人,戴尔走在了这个科技浪潮的前头。