RF手持终端配置手册
无线及RF设置步骤
无线及RF设置步骤一、无线AP设置1,把NETGEAR(也就是无线AP)连接到我们的内部网络中。
2,先设置一台电脑的ip 为:192.168.0.210,子网掩玛设置为:255.255.255.03,在IE浏览器中输入:192.168.0.229。
其中192.168.0.229为设备的默认ip地址,根据提示输入用户名和密码。
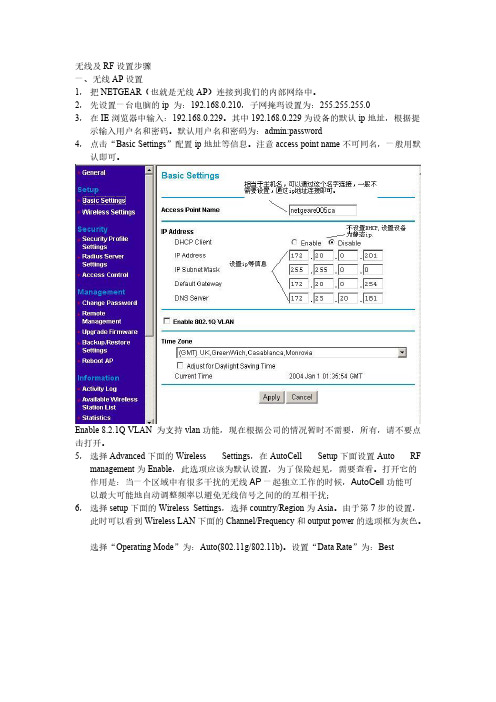
默认用户名和密码为:admin:password4,点击“Basic Settings”配置ip地址等信息。
注意access point name不可同名,一般用默认即可。
Enable 8.2.1Q VLAN 为支持vlan功能,现在根据公司的情况暂时不需要,所有,请不要点击打开。
5,选择Advanced下面的Wireless Settings,在AutoCell Setup下面设置Auto RF management为Enable,此选项应该为默认设置,为了保险起见,需要查看。
打开它的作用是:当一个区域中有很多干扰的无线AP一起独立工作的时候,AutoCell功能可以最大可能地自动调整频率以避免无线信号之间的的互相干扰;6,选择setup下面的Wireless Settings,选择country/Region为Asia。
由于第7步的设置,此时可以看到Wireless LAN下面的Channel/Frequency和output power的选项框为灰色。
选择“Operating Mode”为:Auto(802.11g/802.11b)。
设置“Data Rate”为:Best7,选择security下面的security profile,选择security profile中的第一行,SSID为NETGEAR – 0,然后选择“编辑”。
记得” Security Profile Name”和“SSID”,确认”Broadcast Wireless Network Name (SSID)”为”YES”。
摩托罗拉RF枪说明书

目录1 手持终端介绍1.1 MOTOROLA MC31902 手持终端日常操作2.1 充电方法2.2 开关机、热启动、冷启动3 手持终端无线网络配置3.1 无线网络配置4 手持终端联机PC机4.1 概述4.2 同步工具安装4.3 手持终端中文字库安装5 手持终端键盘功能设置6手持终端机故障分析1 手持终端介绍1.1 MOTOROLA MC3190Motorola 讯宝symbol MC3190数据采集终端作为Symbol MC3090手持终端的升级替代产品,MC3190是构建于成功的MC3090之上,MC3190采集器系列分为3100批处理盘点机和包含无线局域网WiFi的MC3190条码采集器两款。
新的摩托罗拉MC3190系列可为公司内部的按键应用提供成本高效的移动性和用户舒适度。
符合人体工程学的耐用型MC3190 提供先进的计算能力以及数据采集能力、增强的安全性以及企业级的运动传感能力。
Motorola 讯宝symbol MC3190数据采集终端性能参数:数据采集选项-1D 激光扫描仪、1D/2D 成像仪、DPM内存(Flash/RAM)-128MB RAM/256 MB Flash 或128MB RAM/512MB Flash处理器(CPU)-Marvell PXA320 @ 624 MHz操作系统(OS)-Microsoft Windows Mobile 6.1 Classic,Microsoft Windows CE 6.0 Pro无线数据通讯:WPAN(支持蓝牙技术)-II 级、v2.1 增强数据速率(EDR), 集成天线WLAN-三重模式IEEE®802.11a/b/g;经过CCXv4 认证;支持IPv6;经过FIPS140-2 认证(仅限MC3190)线性一维条码扫描器:光学分辨率-最小元素宽度 4 Mil扫描速率-104(+/- 12)次扫描/秒(双向)使用环境:环境密封-IP54(2 类)工作温度--4°至122°F/-20°至50° C跌落规格-在工作温度范围内,多次从 4 英尺/1.2 米高处跌至水泥地面;满足并超过MIL-STD 810G滚落规格-根据IEC 68-2-32,在室温条件下,500 次从 1.64 英尺/0.5 米高滚落(1,000 次)2.1 充电方法摩托罗拉的每个手持终端都配了两粒电池,同时配了四位充电座。
数字手持终端 DIGITAL PORTABLE RADIO 使用说明书

DIGITAL PORTABLE RADIO数字手持终端OWNER’S MANUAL使用说明书Copyright InformationHytera is the trademark or registered trademark of Hytera Communications Corporation Limited (the Company) in PRC and/or other countries or areas. The Company retains the ownership of its trademarks and product names. All other trademarks and/or product names that may be used in this manual are properties of their respective owners.The product described in this manual may include the Company’s computer programs stored in memory or other media. Laws in PRC and/ or other countries or areas protect the exclusive rights of the Company with respect to its computer programs. The purchase of this product shall not be deemed to grant, either directly or by implication, any rights to the purchaser regarding the Company’s computer programs. Any of the Company’s computer programs may not be copied, modified, distributed, decompiled, or reverse-engineered in any manner without the prior written consent of the Company.DisclaimerThe Company endeavors to achieve the accuracy and completeness of this manual, but no warranty of accuracy or reliability is given. All the specifications and designs are subject to change without notice due to continuous technology development. No part of this manual may be copied, modified, translated, or distributed in any manner without the prior written consent of the Company.We do not guarantee, for any particular purpose, the accuracy, validity, timeliness, legitimacy or completeness of the Third Party products and contents involved in this manual.If you have any suggestions or would like to learn more details, please visit our website at: .FCC StatementThis equipment has been tested and found to comply with the limits for a Class B digital device, pursuant to part 15 of FCC Rules. These limits are designed to provide reasonable protection against harmful interference in a residential installation. This equipment generates and can radiate radio frequency energy and, if not installed and used in accordance with the instructions, may cause harmful interference to radio communications. However, there is no guarantee that interference will not occur in a particular installation. If this equipment does cause harmful interference to radio or television reception, which can be determined by turning the equipment off and on, the user is encouraged to try to correct.The interference by one or more of the following measures:●Reorient or relocate the receiving antenna. Increase the separationbetween the equipment and receiver.●Connect the equipment into an outlet on a circuit different from thatto which the receiver is connected.●Consult the dealer or an experienced radio/TV technician for help. Operation is subject to the following two conditions: 1. This device may not cause harmful interference, and 2. This device must accept any interference received, including interference that may cause undesired operation.Note: Changes or modifications to this unit not expressly approved by the party responsible for compliance could void the user’s authority to operate the equipment.Compliance with RF Exposure StandardsHytera’s portable radio complies with the following RF energy exposure standards and guidelines:●United States Federal Communications Commission, Code of FederalRegulations; 47 CFR § 1.1307, 1.1310 and 2.1093●American National Standards Institute (ANSI) / Institute of Electricaland Electronic Engineers (IEEE) C95. 1:2005; Canada RSS102 Issue5 March 2015.●Institute of Electrical and Electronic Engineers (IEEE) C95.1:2005EditionRF Exposure Compliance and Control Guidelines and Operating InstructionsT o control your exposure and ensure compliance with the occupational/ controlled environment exposure limits always adhere to the following procedures.Guidelines:●Do not remove the RF Exposure Label from the device.●User awareness instructions should accompany device whentransferred to other users.●Do not use this device if the operational requirements described hereinare not met.Operating Instructions:●Transmit no more than the rated duty factor of 50% of the time. T otransmit (talk), push the Push-T o-T alk (PTT) button. T o receive calls, release the PTT button. Transmitting 50% of the time, or less, isimportant because this radio generates measurable RF energy exposure only when transmitting (in terms of measuring for standards compliance).●Hold the radio in a vertical position in front of face with the microphone(and the other parts of the radio, including the antenna) at least one inch (2.5 cm) away from the nose. Keeping the radio at the proper distance is important because RF exposures decrease with distance from the antenna. Antenna should be kept away from eyes.●When worn on the body, always place the radio in a Hytera’s approvedclip, holder, holster, case, or body harness for this product. Using approved body-worn accessories is important because the use of Hytera’s or other manufacturer’s non-approved accessories may result in exposure levels, which exceed the FCC’s occupational/controlled environment RF exposure limits.●If you are not using a body-worn accessory and are not using theradio in the intended use position in front of the face, then ensure the antenna and the radio are kept at least 2.5 cm (one inch) from the body when transmitting. Keeping the radio at the proper distance is important because RF exposures decrease with increasing distance from the antenna.●Use only manufacturer’s name approved supplied or replacementantennas, batteries, and accessories. Use of non-manufacturer-name approved antennas, batteries, and accessories may exceed the FCC RF exposure guidelines.●Contact your local dealer for the optional accessories of the product. IC StatementThe device has been tested and compliance with SAR limits, users canobtain Canadian information on RF exposure and complianceAprès examen de ce matériel aux conformité aux limites DAS et/ou aux limites d’intensité de champ RF, les utilisateurs peuvent sur l’exposition aux radiofréquences et la conformité and compliance d’acquérir les informations correspondantesThis device complies with Industry Canada license-exempt RSS standard(s). Operation is subject to the following two conditions:(1) this device may not cause interference, and(2) this device must accept any interference, including interference thatmay cause undesired operation of the device.Le présent appareil est conforme aux CNR d’Industrie Canada applicables aux appareils radio exempts de licence. L’exploitation est autorisée aux deux conditions suivantes: (1) l’appareil ne doit pas produire de brouillage, et (2) l’utilisateur de l’appareil doit accepter tout brouillage radioélectrique subi, même si le brouillage est susceptible d’en compromettre le fonctionnementEU Regulatory ConformanceAs certified by the qualified laboratory, the product is in compliance with the essential requirements and other relevant provisions of the following directives:●1999/5/EC or 2014/53/EU●2006/66/EC●2011/65/EU●2012/19/EUPlease note that the above information is applicable to EU countries only.Items in the Package ----------------------------------------1 Product Overview --------------------------------------------2 Product Controls ---------------------------------------------------2 LED Indication ------------------------------------------------------3 Before Use ------------------------------------------------------3 Attaching the Antenna --------------------------------------------3 Attaching the Battery ----------------------------------------------3 Attaching the Belt Clip --------------------------------------------4 Attaching the Audio Accessories -------------------------------4 Charging the Battery ----------------------------------------------4 Checking the Battery Power ------------------------------------4 Basic Operations ---------------------------------------------5 Call Services ---------------------------------------------------5 Call on Digital Channel -------------------------------------------5 Call on Analog Channel (Without Signaling) ----------------5 Optional Features --------------------------------------------6 Troubleshooting ----------------------------------------------7Care and Cleaning -------------------------------------------8 Optional Accessories ---------------------------------------8Contents2LED IndicationLED Indicator Radio Status Flashes green Being turned on.Glows green Receiving.Glows red Transmitting.Flashes orange slowly Scanning.Glows orange Call hang time: No voice is beingtransmitted or received on the channelduring a call. Within such a period, youcan hold down the PTT key to speak.Attaching the Antenna1.Place the antenna in its receptacle.2.Rotate the antenna clockwise.Do not hold the radio by its antenna; otherwise, theradio performance may be reduced and the life span ofthe antenna may be shortened.Attaching the Battery1.Slide the battery latch to the unlock position, and remove the batterycover.2.Align the battery contacts with the contacts in the batterycompartment, and press the battery into place.3.Insert the two protrusions at the top of the battery cover into the radio,and press the cover into palce.4.Slide the battery latch to the lock position.To remove the battery, make sure that the radio isturned off, remove the battery cover, and lift the bottomof the battery.Caution3Attaching the Belt Clip1.Unfasten the two screws on the back of the radio.2.Align the screw holes on the belt clip with those on the back of theradio.3.Tighten the screws.Attaching the Audio Accessories1.Open the accessory connector cover.2.Plug the accessory into the accessory connector.3.Rotate the accessory plug clockwise into place.Charging the BatteryBe sure to charge the battery fully before initial use, since reduction of state of charge (SoC) may lead to low battery alarm. It is recommended that your radio remain powered off during charging.To charge the battery, insert the USB plug of the power adapter into the USB connector of the radio, and then connect the power adapter to the main supply.The charging indicator on the radio shows the charging status. For details, see the following table.Charging Indicator Charging StatusGlows red The battery is charging.Glows green The battery is fully charged.Checking the Battery PowerYou can check the current battery power by holding down the Battery Power Indicator key programmed by your dealer, and release the key to exit. The following table lists battery power indications:LED Indicator Alert Tone Battery PowerGlows green Three beeps HighGlows orange Two beeps MediumGlows red One beep LowFlashes red Low battery toneUnder the low batterythreshold. Pleaserecharge or replace thebattery.4If you want to…Do this…Turn on/off the radio Press the On-Off key.Increase the volume Press the Volume Up key. Decrease the volume Press the Volume Down key. Select a channel Rotate the Channel Selector knob.Call on Digital ChannelOn the digital channel, you can initiate or respond to a group call or private call. A group call is a call from an individual user to a group of users. A private call is a call from an individual user to another individual user.Initiating a Call1.Select the required channel.2.Hold the radio vertically 2.5 to 5 cm from your mouth.3.Hold down the PTT key and speak when the radio is in standby mode.Receiving and Responding to a CallWhen receiving a call, you can listen to it without any operation. You can hold down the PTT key to respond within the preset time period.Call on Analog Channel (Without Signaling)A call on analog channel is from an individual user to all users on the channel. The operations are the same as the call on digital channel.5The following features need to be programmed by your dealer. Please contact your dealer for detailed operations.Type Feature DescriptionRadio Feature ZoneAllows you to select a zone. Theradio supports up to 3 zones, with amaximum of 16 channels per zone.PowerLevelAllows you to switch the transmit powerlevel between high and low.ScanAllows the radio to scan all channelsin the scan list programmed for thecurrent channel.EmergencyAlarmAllows you to initiate an emergencyalarm or call at any time to ask for helpin case of emergencies.BusyChannelLockoutPrevents the radio from transmitting ona busy channel.Time-out Timer(TOT)Terminates transmission when thepreset time period expires.BatterySaveAllows the radio to automatically enterthe battery save mode when detectingno activity or operation within a certaintime period.DigitalFeatureOne TouchCallAllows you to press one key to call thepredefined private or group contact.All CallAllows you to initiate a call to all userson the channel.TDMADirectModeAllows the radio to operate on achannel with two time slots.AnalogFeatureSquelch OffAllows the radio's speaker to alwayskeep unmuted.SquelchLevelAllows you to adjust the squelchthreshold required for the radio tounmute.MonitorAllows the radio to monitor activities onthe channel.CTCSS/CDCSSAllows you to prevent unwanted callson the same frequency.6To guarantee optimal performance as well as a long service life of the product, please follow the tips below.Product Care●Do not pierce or scrape the product.●Keep the product far away from substances that can corrode thecircuit.●Do not hold the product by its antenna or earpiece cable.●Close the accessory connector cover when no accessory is in use.Product Cleaningcleaning.●Clean up the dust and fine particles on the product surface andcharging piece with a clean and dry lint-free cloth or a brush regularly.●Use neutral cleanser and a non-woven fabric to clean the keys, knobsand front case after long-time use. Do not use chemical preparations such as stain removers, alcohol, sprays or oil preparations, so as to avoid surface case damage.●Make sure the product is completely dry before use. Contact your local dealer for the optional accessories of the product.Use the accessories specified by the Company only;otherwise, the Company shall not be liable for anyloss or damage arising out of use of unauthorizedaccessories.CautionCaution8版权信息Hytera为海能达通信股份有限公司(以下简称“我司”)在中华人民共和国和世界其他国家和/或地区的商标或注册商标。
RF手持终端使用规范
RF手持终端使用规范1.目的1.1 规范仓储运作中手持终端的使用守则,发挥其最大效用。
2.范围2.1 适用于义乌OFC仓库。
3.术语和定义3.1 手持终端广泛运用于仓储管理中,条码管理极大提高了仓库的运作效率,体现在实时进出库信息采集,盘库信息采集,货物状态实时查询。
4.职责和权限4.1仓库主管负责做好每日库内手持终端使用、存放的监控和管理。
4.2仓管员应按照手持终端的使用要求进行配用。
4.3仓库主管负责检查手持终端的使用状况。
5.流程图暂无6.流程说明6.1手持终端的领用6.1.1仓储主管(DC 经理、仓储经理、仓储负责人)统计仓库所需手持终端数量,向总部IT 部门申购。
6.1.2仓储主管(DC 经理、仓储经理、仓储负责人)领用手持终端并存放在仓库,自行管理。
6.1.3手持终端由经过专项培训的人员使用,使用前需填写领用时间和用途,仓储主管(DC 经理、仓储经理、仓储负责人)监督和检查安使用情况。
6.1.4每天下班,仓储主管(DC 经理、仓储经理、仓储负责人)负责回收发手持终端,查看使用记录,并检查有没有损坏。
6.1.5手持终端出现损坏,由仓储主管(DC经理、仓储经理、仓储负责人)鉴定是否人为损坏。
如果是人为损坏,应由损坏人赔偿;如属正常老化,由仓库主管向分公司经理申请补充。
6.2 手持终端的使用规定6.2.1 使用手持终端的操作人员必须经过严格的培训,熟练掌握使用方法内容主要包含设备特点,使用方法和维护方法。
6.2.2使用人员领用手持终端需要登记姓名,领用时间,归还时间及用途。
6.2.3手持终端只可用于本公司仓储作业工作流程中,不可带离仓库。
6.2.4手持终端使用时要轻拿轻放,不可有扔、摔等野蛮操作的情况出现。
6.2.5如果仓库作业人员没有按要求使用手持终端,第一次仓储主管(DC 经理、仓储经理、仓储负责人)口头警告,并写检讨书,第二次将书面警告。
6.2.6非指定人员不得使用手持终端。
6.2.7手持终端需爱护使用,定期保养,如出现严重问题时,需由IT 部门给与解决方案。
Bird SignalHawk 手持通用RF测试解决方案说明书

S PECTRUM ANALYZER / VNAThe SignalHawk™Series of Spectrum Analyzers and VNA is the most user-friendly and accurate hand-held test solution available for installing, maintaining and troubleshooting all segments of RF communication systems. Field engineers, technicians, wireless equipment manufacturers, service providers, contractors, tower erectors and military field personnel alike have come to trust the efficiency andprecision results of SignalHawk.P ROBLEMS S OLUTIONSLow fault location resolution-42 dB directivity and -135 dBmnoise floor allows 11,265 points,or 20x the distance window(1488’) at the same 1.6” resolution Low frequency resolution More than 50% greater freq resolution(705 vs. 461 points) than others Slow sweeps More than 2x faster sweep timesthan the competition (705 pts in1.1s vs. 517 pts in 1.8s)Poor lighting or bright light Large 34 sq in high-resolution,full-color display for indoor oroutdoor viewingCross platform compatibility Compatible with several sensorsfor additional apps at nearly halfthe cost of alternativesCable loss masking effect Ability to add offsets to minimizecable loss masking effect Laptop requirement Work orders can be viewed right onthe instrument with a .pdf/.docviewer. Can upload customuserwritten WordPad help file Lack of access to AC40% longer battery life (5.5 hoursper charge), with field-replaceablebatteryLack of universal connectivityand data storageUSB drive stores up to 90,000tracesVarying field tech skill levels Easy-to-use, intuitive menus withone-button setup and on-boardhelp five ways to look at mismatch Physically demandingoperationsRugged unit, drop tested permilitary and European standardsSignalHawk SpecificationsDisplay 8.4”, TFT, 800 x 600 pixel Battery 5.5 hour, field replaceable Drop Test 1 meter per EN 61010-1Transit Drop Test 10 drops per MIL-PRF-28800F Explosive Atmosphere Per MIL-PRF-28800F 4.5.6.3CE Compliant YesRF Input, N(F) +20 dBm (100 mW) max USB Connectivity PC; USB drive and accessories Size and Weight 11.5” x 10.5” x 3.8”, 7.8 lbs Saved Trace Storage 300 internal; 90,000 USB drive Win CE Viewers Word, Excel, PPT, PDF, Image Power Meter 5012, 5010B, 5010T, 5011, 5011-EF, 5016 and 5017 External Sensors, OptionalSpectrum Analyzer SpecificationsFrequency Range 100 kHz to 3.6 GHz Frequency Resolution 1 Hz Frequency Uncertainty ± 1 ppm Reference Aging ± 1 ppm / year Temperature Drift ± 1 ppm / °C Data Points 705 displayed Spectral Purity –85 dBc @ 30 kHzSweep Time 2.2 s, full span; 1 ms, zero span Resolution Bandwidth 100 Hz to 1 MHz RBW Video Bandwidth 10 Hz to 300 kHz VBW Amplitude Accuracy ± 1.0 dB typ, ± 1.5 dB max Dynamic Range 66 dB, intermod-free Noise Floor –135 dBm DANLAttenuator 0, 10, 20, or 30 dB; internal Pre-Amplifier +24 dB gain, internalSingle-Button Occ BW, Channel Power, ACPR, Measurements Field Strength, AM/FM Demod, C/IVNA SpecificationsFrequency Range 1.6 MHz to 3.6 GHzFrequency +/-2 ppm uncertainty, 40 kHz res Data Points 705 default, 12 to 11265 selectable Sweep Time 0.6 s with 705 data points RF Output, N(F) -40 dBm to +10 dBm, 1 dB steps Interference Immunity +13 dBm on frequency Directivity -42 dB calibrated1-Port VNA Measurements Match (VSWR & Return Loss dB)Distance-to-Fault (DTF), Cable Loss 2-Port VNA Loss/Gain -90 to +50 dB, 12/24 V Int Bias-Tee 2-Port VNA Measurements Gain & Loss (Amplifier Gain,Insertion Loss, Antenna Isolation)ApplicationsCellular, PCS, DCS, 2G, 3G, 4G, CDMA, cdmaOne, CDMA 2000,1x, 1x EV-DO, GSM, GPRS, EDGE, UMTS, HSDPA, W-CDMA,TDMA, AMPS as well as 802.11, Bluetooth, Broadcast, Emer-gency, Fire, GPS, HDTV, IBOC, In-Building, Lab, Microwave,NPSPAC, Paging, Police, Private, Project 25, Public Safety, Tac-tical Military, Telematics, Tetra, Trunking, Utilities, WiMAX,WLAN and WLL.Power Meter Option:compatible with Models 5012, 5010B, 5010T,5011, 5011-EF, 5016 and 5017 power sensors. These external power sensors provide ± 5% (± 0.2 dB)accuracy, with NIST Traceability.Model Spectrum AnalyzerOptional Accessories 4240-500-10 Field Strength Antenna Adapter, N(M) to SMA(F)*Recommended for field strength antennas.ANT-100 Field Strength Antenna, 136 to 221 MHz,SMA(M)*ANT-400 Field Strength Antenna, 400 to 512 MHz,SMA(M)*ANT-800 Field Strength Antenna, 824 to 894 MHz,SMA(M)*ANT-900 Field Strength Antenna, 890 to 960 MHz,SMA(M)*ANT-1800 Field Strength Antenna, 1710 to 1880MHz, SMA(M)*ANT-1900 Field Strength Antenna, 1850 to 1990MHz, SMA(M)*ANT-2400 Field Strength Antenna, 2400 to 2500MHz, SMA(M)*100-SA-MFN-40 Attenuator, 100 W, 40 dB, N(M) to N(F),2.4 GHz50-A-MFN-30 Attenuator, 50 W, 30 dB, N(M) to N(F), 4 GHz25-A-MFN-30 Attenuator, 25 W, 30 dB, N(M) to N(F), 4 GHz10-A-MFN-30 Attenuator, 10 W, 30 dB, N(M) to N(F), 4 GHz5-A-MFN-20 Attenuator, 5 W, 20 dB, N(M) to N(F), 4 GHz2-A-MFN-20 Attenuator, 2 W, 20 dB, N(M) to N(F), 4 GHz5A2746-1 HeadphonesModel VNA Optional AccessoriesCAL-MN-C Calibration Combo, Open/Short/Load, N(M)CAL-FN-C Calibration Combo, Open/Short/Load, N(F)CAL-ME-C Calibration Combo, Open/Short/Load,7/16 DIN(M)CAL-FE-CCalibration Combo, Open/Short/Load,7/16 DIN(F)2-T-MN Load, 2 W, N(M)2-T-FN Load, 2 W, N(F)5A2264-09-MF-10 RS-232 Cable, 10 ft, 9-pin, (M) to (F) Model Standard Accessories7002A220-1Soft Carry Case920-SH36-OPS OPS Operators Manual920-SH36-REFStart-Up Instructions5A2653-10 USB Cable, 10 ft, USB A (M) to USB B (M)5A2743-1 AC Adapter/Charger5A2238-3 Car Adapter/Charger5A2720-2 Internal Li-Ion Battery, Field Replaceable 7002A210 PC Tool Software and Manual CD’s5A2745-1 USB Drive, Win CE CompatibleSpare standard accessories are available as optional accessories. Manuals and soft/firmware updates available at .WATERFALL (SPECTROGRAPH)M ODEL O PTIONAL A CCESSORIES7002A222-1 GPS Sensor7002A225-1 Hard Transit Case, Watertight7002A221 Connector CoverUSB-MOUSE USB Mouse, Ultra-Portable, Optical USB-HUB USB Hub, 4-Port, MicroTC-MNFN-1.5 Test Cable, 1.5 m, N(M) to N(F)TC-MNFN-3.0 Test Cable, 3.0 m, N(M) to N(F)TC-MNMN-1.5 Test Cable, 1.5 m, N(M) to N(M)TC-MNMN-3.0 Test Cable, 3.0 m, N(M) to N(M)TC-MNFE-1.5 Test Cable, 1.5 m, N(M) to 7/16 DIN(F) TC-MNFE-3.0 Test Cable, 3.0 m, N(M) to 7/16 DIN(F) TC-MNME-1.5 Test Cable, 1.5 m, N(M) to 7/16 DIN(M) TC-MNME-3.0 Test Cable, 3.0 m, N(M) to 7/16 DIN(M) PA-MNME Adapter, N(M) to 7/16 DIN(M)PA-FNME Adapter, N(F) to 7/16 DIN(M)PA-MNFE Adapter, N(M) to 7/16 DIN(F)PA-FNFE Adapter, N(F) to 7/16 DIN(F)4240-550 Adapter Kit, 7/16 DIN4240-500-1 Adapter, N(F) to N(F)4240-500-6 Adapter, N(M) to N(M)4240-500-10 Adapter, N(M) to SMA(F)*4240-401 Interseries Adapter Kit, N/SMA/T/BNC *Recommend N(M) to SMA(F) adapter (model 4240-500-10) for field strength antennas.M ODEL O PTIONAL E XTERNALP OWER S ENSORS5012A Wideband Power Sensor, 350 MHz to 4GHz, 150 mW to 150 W Avg, 400 W Peak.Measures fwd/rfl avg, VSWR, return loss(dB), peak, burst avg, crest, CCDF. For-ward average power accuracy is 4% (0.2dB)5010B Directional Power Sensor, 2 to 2700 MHz,100 mW to 10 kW, requires elements.Measures fwd/rfl avg, VSWR, return loss(dB), and peak. Forward average poweraccuracy is 5% (0.2 dB)5010T Directional Power Sensor, Tetra Version,2 to 2700 MHz, 100 mW to 10 kW, reqelements. Measures fwd/rfl avg, VSWR,return loss (dB), and peak. Forward aver-age power accuracy is 5% (0.2 dB)5011 Terminating Power Sensor, 40 MHz to 4GHz, 10μW to 10 mW (-20 dBm to +10dBm). Measures forward average power.Accuracy is 5% (0.2 dB)5011-EF Terminating Power Sensor, 40 MHz to 12GHz,10μW to 10 mW (-20 to +10 dBm)Measures forward average power.Accuracy is 5% (0.2 dB)5016 Wideband Power Sensor, 350 MHz to 4 GHz,25 mW to 25 W Avg, 400 W Peak.Measures fwd/rfl avg, VSWR, return loss(dB), peak, burst avg, crest, CCDF. Forwardaverage power accuracy is 4% (0.2 dB) 5017Wideband Power Sensor, 25 MHz to 1 GHz,500 mW to 500 W Avg, 400 W Peak.Measures fwd/rfl avg, VSWR, return loss(dB), peak, burst avg, crest, CCDF. Forwardaverage power accuracy is 4% (0.2 dB)。
RF枪手持操作手册
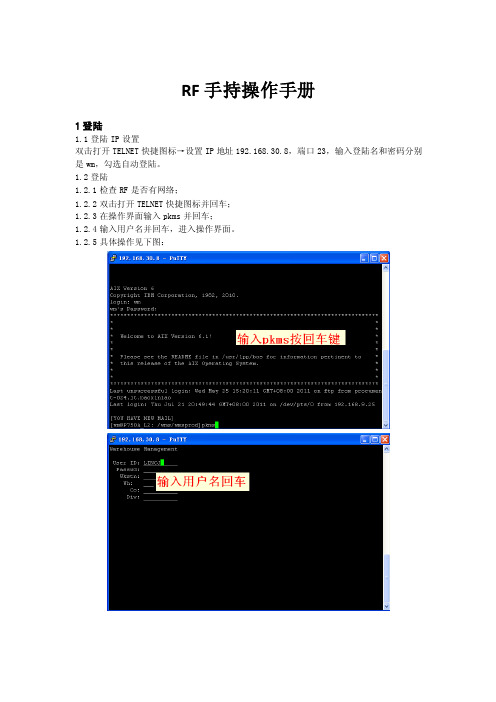
RF手持操作手册1登陆1.1登陆IP设置双击打开TELNET快捷图标→设置IP地址192.168.30.8,端口23,输入登陆名和密码分别是wm,勾选自动登陆。
1.2登陆1.2.1检查RF是否有网络;1.2.2双击打开TELNET快捷图标并回车;1.2.3在操作界面输入pkms并回车;1.2.4输入用户名并回车,进入操作界面。
1.2.5具体操作见下图:2、功能键定义2.1功能键设定点击登陆→选择配置→功能键设置区选择SELF→选择功能键如:F1,下面转换区输入\x+转换字符如CTRL-W对应17。
2.2具体功能键设置表如下:3、入库操作3.1叠装收货3.1.1入库功能键表如下:3.1.23.1.2.1按F1(CTRL-W);3.1.2.2输入101并回车;注:后期将通过用户名设定相应用户显示界面及权限,因此入库组人员无需切换任务组并且仅能进行入库操作。
3.2.2叠装按箱收货3.2.2.1选择叠装按箱收货(输入相应数字)并回车;3.2.2.2扫描ASN(预到货通知)号码;3.2.2.3扫描货箱码;3.2.2.4扫描SKU条形码并输入SKU数量并回车;注:收货可通过WMS系统有两种设置,一种是扫描SKU输入总数量,另一种是逐件扫描核对数量;货箱不允许混SKU。
3.2.2.5按以上方法接着收其它货箱的货品;3.2.2.6具体操作界面见下图:3.2.3货箱组盘3.2.3.1选择货箱组盘(输入相应数字)并回车;3.2.3.2扫描托盘码;3.2.3.3逐一扫描货箱码;3.2.3.4按F3(CTRL+O)结束组盘动作;3.2.3.5继续按以上步骤组盘直至所有货箱组盘完成;3.2.3.6具体操作界面见下图:3.2.4叠装按托盘上架3.2.4.1选择叠装按托盘上架(输入相应数字)并回车;3.2.4.2扫描托盘码;3.2.4.3扫描立库中转库位条码;3.2.4.4按以上步骤继续收剩余托盘直至全部完成;3.2.4.5将托盘送至立库入库口;3.2.4.6具体操作界面见下图:3.3叠装按箱上架3.3.1选择叠装按箱上架(输入相应数字)并回车;3.3.2扫描货箱;3.3.3扫描中转库位;3.3.4将货箱放于输送带上;3.4叠装补货3.4.1选择叠装补货(输入相应数字)并回车;3.4.2扫描货箱;3.4.3扫描拣货位;3.4.4对应入库;4、在线拣货4.1在线拣货功能键如下表:4.2切换任务组(103在线拣货)4.2.1按F9(CTRL-T);4.2.2输入103并回车;4.3执行任务,按F4(CTRL-E);4.4在线拣货4.4.1扫描集装箱(托盘上的条形码);4.4.2扫描货箱码;4.4.2.1若为整箱,扫描打印机,打印机出条形码,再次扫描货箱,把条形码覆盖于货箱条形码,扫描REP01码,将货箱置于输送带,条形码那边朝外;4.4.2.2若为补货箱,直接将货箱置于输送带,条形码那边朝外;4.4.3按以上步骤循环操作直至扫描托盘时提示无任务;4.5托盘回库,按机器绿色键;5、叠装组车补货5.1叠装组车补货功能键如下表:5.25.2.1按F9(CTRL-T);5.2.2输入104并回车;5.3叠装组车补货5.3.1选择叠装组车补货(输入相应数字)并回车;5.3.2扫描货箱码并置于车上;5.3.3重复5.3.2步骤直至车上装满货箱;5.3.4按F8(CTRL-A)结束组车;5.3.5推车按RF机界面找出零拣位并扫描;5.3.6扫描对应的车上的货箱,之后对应入库;5.3.7重复循环5.3.5和5.3.6步骤直至车上货箱全部入库;6、关联周转箱6.1关联周转箱功能键如下表:6.26.2.1选择关联周转箱(输入相应数字)并回车;6.2.2扫描carton出库箱单号;6.2.3扫描周转箱号;6.3将周转箱放于输送带上;7、周转箱组车7.1周转箱组车功能键如下表:7.27.2.1按F9(CTRL-T);7.2.2输入105并回车;7.3周转箱组车7.3.1选择周转箱组车(输入相应数字)并回车;7.3.2手动输入拣选区;7.3.3扫描拣选车;7.3.4扫描周转箱,放于拣选车上,直至拣选车满;7.3.5按F4(CTRL-E)结束组车;7.3.6扫描库位;7.3.7扫描SKU,输入数量;7.3.8扫描周转箱;7.3.9将衣物对应入库;7.3.10循环7.3.6 -> 7.3.9直至提示无任务;7.4将周转箱放回输送带;8、复核包装8.1周转箱组车功能键如下表:8.2出库复核8.2.1选择出库复核(输入相应数字)并回车;8.2.2扫描出库箱;8.2.3扫描SKU;8.2.4逐件扫描以确认数量;8.2.5按F4结束;8.3装箱,贴条码,放输送带;注:整箱的直接放输送带。
手持移动数据终端 用户手册说明书
手持移动数据终端用户手册(V1.00)目录第一章产品介绍 (4)1.1 产品技术参数 (4)1.2 外部结构 (7)1.3 键盘说明 (9)1.4 随机配件 (10)1.5 可选配件 (10)第二章使用入门 (12)2.1更换电池 (12)2.2安装TF卡 (13)2.3安装SIM卡 (14)2.4 手柄拆装 (15)2.4 电池充电 (15)2.5 TF卡使用 (16)2.6 休眠与唤醒 (16)2.7 任务栏 (17)2.8桌面 (18)2.9 设备复位 (19)第三章系统设置 (20)3.1Internet选项 (22)3.2PC连接 (24)3.3存储管理器 (25)3.4电源管理设置 (25)3.5键盘属性 (26)3.6区域设置 (27)3.7日期和时间设置 (28)3.8删除程序 (29)3.9输入面板 (30)3.10鼠标 (30)3.11所有者(设备使用者私人信息) (31)3.12网络连接和拨号 (32)3.13系统信息设置 (33)3.14显示及背光设置 (34)3.15音量和声音 (36)3.16拨号设置 (37)3.17证书管理 (37)3.18笔针 (38)3.20 蓝牙管理器 (39)3.21 USB同步修复 (39)3.22 HMS模块电源管理 (40)第四章键盘及输入法 (41)4.1软件盘的使用 (41)4.2输入法 (42)第五章网络连接 (43)5.1WIFI网络连接 (43)5.2GPRS拨号连接 (45)5.2.1 GPRS配置说明 (45)5.2.2 GPRS拨号操作 (50)第六章手持移动数据终端与电脑同步连接 (52)6.1 同步软件安装说明 (52)第七章功能使用 (57)7.1 扫描器的使用 (57)7.2 RFID的使用 (58)7.3 GPS (60)7.4拍照 (60)7.5蓝牙 (61)第八章故障排除 (62)8.1 设备及系统故障 (62)8.2扫描故障 (62)8.3RFID故障 (63)8.4 网络及通讯故障 (63)8.5 WIFI连接故障 (63)8.6 其它故障 (64)第九章保养维护 (64)第一章产品介绍本设备将“ALL IN ONE”的设计理念贯穿其中,它将图像获取、无线通讯、条码扫描、RFID读写器等功能集成一身。
项目六了解RF手持终端设备课件

数据处理技术包括数据存储、 数据传输、数据安全等方面, 需要保证数据的完整性和安全 性。
数据处理技术的选择和实方 式需要根据实际应用场景和数 据处理需求进行设计。
电源管理技术
电源管理技术是RF手持终端设备中至关重要的部分,负责设备的供电和节能管理。
电源管理技术需要选用高效、稳定的电源模块,确保设备在各种工作状态下都能获 得充足的电力供应。
零售行业应用案例
总结词
提升客户体验、增强竞争力
详细描述
在零售行业中,RF手持终端设备主要用于商品管理、库存查询和销售等方面。通过使用RF手持终端设备,零售 商能够快速获取商品信息,为客户提供更准确、全面的服务。此外,RF手持终端设备还能帮助零售商实现快速结 账和移动支付等功能,提升客户购物体验,增强企业竞争力。
性和安全性。
软件更新
及时更新设备的驱动程序和软 件,以保证设备的正常运行和
安全性。
备份重要数据
定期备份设备中的重要数据, 以防数据丢失或设备损坏导致
数据损坏。
06
RF手持终端设备案例分析
物流行业应用案例
总结词
提高效率、降低成本
详细描述
RF手持终端设备在物流行业应用广泛,主要用于仓库管理、货物跟踪和配送管理 等环节。通过使用RF手持终端设备,物流企业能够实现快速、准确的货物信息录 入和传输,减少人工操作误差,提高工作效率,降低运营成本。
THANK YOU
感谢聆听
同时,电源管理技术还需要实现节能管理功能,通过智能控制和优化电源配置来降 低设备能耗,延长设备使用寿命。
04
RF手持终端设备优势与挑战
优势
高效性
RF手持终端设备利用无线射频技术进行数据传 输,能够快速、准确地完成信息的采集、处理和 传输,提高了工作效率。
- 1、下载文档前请自行甄别文档内容的完整性,平台不提供额外的编辑、内容补充、找答案等附加服务。
- 2、"仅部分预览"的文档,不可在线预览部分如存在完整性等问题,可反馈申请退款(可完整预览的文档不适用该条件!)。
- 3、如文档侵犯您的权益,请联系客服反馈,我们会尽快为您处理(人工客服工作时间:9:00-18:30)。
RF手持终端配置手册
一、手持终端配置操作
一起按住键盘上的‘7’、‘9’以及键盘右下角的红色休眠按钮为‘热重起’,即重启之后,所有的程序都在,如果需要恢复出厂设置,则一起按住键盘上的‘1’、‘9’以及键盘右下角的红色休眠按钮,即‘冷重起’,此时所有安装的程序及配置全部清除,需要重新配置。
1、开机
开机后,画面进入屏幕校准界面,使用触屏笔点击十字标中心位置,校准完成后,如下图:
此时不要使用触屏笔点击屏幕,按键盘上的ENT按键即可进入,如下图:
进入之后点击红色框内的Exit图标,进入桌面如下图。
(如果未出现此画面,直接跳过此步)
2、扫描安装配置
双点击桌面上的Install Samples图标,如下图:
然后点击红框内的Exit图标退出,如图:
双击桌面上的‘我的设备’图标,进入后双击Application图标,如图:
进入后双点击Samples.C文件夹,并拉至最下面,然后双击ScanWedge图标,如图:
双击开启后,在长按该图标,点击复制,然后关闭该文件夹,回到桌面上,在空的地方使用触屏笔长按,点击‘粘贴快捷方式’,即可在桌面上生成快捷方式图标,以后如果无法使用扫描,双击桌面扫描快捷方式图标即可。
使用触屏笔点击桌面右下角隐藏的扫描图标点击出现的config,然后点击setup,如下图:
进入之后点击下图红框标示的地方,然后点ok,即可开启扫描后自动‘回车’的功能。
3、网络配置
首先开启网络,点击桌面右下角带八叉的无线图标,如图,出现选项列表,然后点击‘Enable Radio’以开启网络;
此时无线网络图标变成带叹号的,再点点击,弹出选项列表,选择第一个‘Find WLANS’,弹出网络搜索列表
使用触屏笔点击需要连接的网络,并长按,弹出选项框后,点击‘Create profile’开始设置网络;
第一步,出现选择的网络名称,点击NEXT,如下图
再点击NEXT,什么都不用设置,如下图:
然后选择安全模式,在‘Security Mode’的下拉菜单中选择如下图,选择完毕后,点击next;
然后在Encryption Type的下拉选项中点击TKIP,点击完毕后,在下面的选择中,选择Pass-phraseh,如下图,然后点击next;
进入输入无线密码界面,在Key 中输入密码,在Confirm 再输入一遍密码,如下图,然后点击next ;
进入网络IP 配置,点击掉第一个选项,如下图,然后点next ;
密码:hx1123456
开始配置IP,在第一行中输入192.168.1.*(*是指可以随便设置,但是数值必须在1至255之间,且不能与别的设备IP重复,一旦设置完毕后,最好在背面贴张标签,写上该RF的IP地址,下次出现问题再次设置时可以继续使用当前IP地址),在第二行中输入255.255.255.0,这个是固定的,如下图,然后点击next;
然后一直点击NEXT,什么也不用设置,最后点Save,即可,然后
设备开始自动连接网络,关闭页面即可。
4、程序安装
首先,是RF手持终端连接上电脑,然后将RF程序文件夹,然后在电脑上打开‘我的电脑’或者‘计算机’,进入后点击RF磁盘,如下图,
进入后双击‘Application’盘,进入后将RF程序文件夹复制到该目录下;
在RF手持终端上双击桌面上的‘我的设备’,进入后双击‘Application’盘,如下图
进入后双击RF文件夹,选中一个文件,长按,出现列表,选择属性,然后点击‘只读’,再点击右上角的‘ok’,所有RF文件里面的文件都要进行该操作,操作完毕后,长按‘albderf’点击复制,然后在RF手持终端桌面上‘粘贴快捷方式’,然后再次回到该目录下,双击安装‘RFApplication_PPC.WCE420X86’程序,然后点击‘是’,再点击右上角的‘ok’即可完成安装。
然后在桌面上再次点击‘我的设备’,进入‘Program Files’文件夹,然后点击进入‘RFApplication’文件夹,进入后,长按RFApplication程序,点击复制,然后在桌面上‘粘贴快递方式’即可完成。