开博尔q2说明书
NETGEAR Push2TV 快速入门指南说明书

Getting StartedUpdate Your Push2TVNETGEAR recommends that you update Push2TV as newupdates may support even more wireless display devices.1. Use your laptop or mobile device to visit/ptv and download new firmware.2. Press and hold the Push2TV side button for 7 seconds.3. On your laptop or mobile device, find and connect to thePush2TV WiFi network name (SSID).4. Open a browser and type http://192.168.3.1 in the URL bar.5. Upload the firmware and install it.For information about updating Intel Wireless Display software on your laptop, visit /go/wirelessdisplayupdate.23Getting to Know Push2TVWirelessly mirror your Wi-Fi CERTIFIED Miracast™ or Intel WiDi enabled laptop, smartphone, or tablet. Now you can enjoy photos,videos, music, or any websites on your big-screen TV.4USB power cablePush2TV adapterPower adapter(varies by country)Connect Push2TV to your TV and plug in the power adapter.56Connect with Intel WiDiTo connect with Miracast devices, go to page 11.Step 1Turn on your TV andselect the correct HDMIinput source.The Ready forconnection screendisplays on your TV.7Step 2On your laptop, launch the Intel WiDi software.8Step 3Use the Intel WiDi software to find and connect to Push2TV.9Step 4The first time that you connect your laptop to Push2TV, enter thesecurity code on the TV in the Intel WiDi software on your laptop.10CongratulationsYou are now displaying your laptop screen wirelessly on your TV.11Connect with MiracastTo connect with Intel WiDi, go to page 6.Step 1Turn on your TV andselect the correct HDMIinput source.The Ready forconnection screendisplays on your TV.12Step 2Find the wireless display app on your Wi-Fi CERTIFIED Miracast smartphone, laptop, or tablet.The name and location of the app might differ by device.13Step 3Use the wireless displaysoftware to find and connectto Push2TV.14Step 4Follow the instructions on your TV to do one of the following:Enter a security code. ORPress the Push2TVside button.15CongratulationsYou are now displaying your smartphone screen wirelessly on your TV.Tips for Enjoying Push2TV•To display different content on the TV while you use your laptop, change the screen display setting on your laptop toextend mode.•You can mute your laptop and still watch videos with sound.•You can stop your laptop from going to sleep when you close the lid while you use wireless display.From Windows, select Start > Search, type closing lid in thesearch field, and change the setting to do nothing.16FAQsQ Why can’t I play some DVD and Blu-ray discs?Many discs have copy protection mechanisms that prevent playback on Intel Wireless Display software version v2.1.0.0 and earlier. Personal content that you burn to a disc does play.Q What should I do if the TV stops showing my laptop screen? Use Intel Wireless Display software to check the wireless connection and reconnect to Push2TV. Also, try moving yourlaptop closer to the adapter or to a location with a clear line ofsight to the adapter.17Qthe••18Thank you for selecting NETGEAR products. After installing your device, locate the serial number on the label and use it to register your product at https://.You must register your product before you can use NETGEAR telephone support.For product updates and web support, visit .The user manual is available at . NETGEAR, the NETGEAR logo, and Connect with Innovation aretrademarks and/or registered trademarks of NETGEAR, Inc. and/or its subsidiaries in the United States and/or other countries. Information issubject to change without notice. © NETGEAR, Inc. All rights reserved.For the current EU Declaration of Conformity, visit:/app/answers/detail/a_id/11621/.Intended for indoor use only in all EU member states, EFTA states, and Switzerland.19350 E. Plumeria Drive201-15460-06San Jose, CA 95134-1911 USA May 2013。
Samsung BD-P2700 Blu-ray Player 用户手册说明书

2Einschalten des Recorders oder Umschalten in den Standby-ModusTV/VIDEOUmschalten zwischen der Wiedergabe von den zusätzlichen Geräten (die über die Buchse EXT2 AUX I/O angeschlossen sind) und der Wiedergabe vom Recorder.DVDUmschalten in den DVD-Modus VideorecorderUmschalten in den Videorecordermodus SOURCEAuswählen der Eingangsquelle für den Recorder (EXT1, EXT2, TUNER, CAM1, DV).Auswählen einer DVD-Untertitelsprache. Umschalten des Aufnahmemodus: HQ, SP, SPP, LP, EP oderSLP.Diese Option bestimmt die Qualität der Aufnahme und die Aufnahmedauer, die Sie auf einer beschreibbaren DVD aufzeichnen können.Öffnen oder Schließen des Timer-Aufzeichnungsmenüs.Drücken Sie die Taste SETUPAm Fernsehbildschirm wird dasmenü - Allgemein), und drücken Sie die Taste X, um das Menü aufzurufen.CountryOn Screen Display LanguageScreen SaverReset Menu SettingsWählen Sie mit den TastenOn Screen Display Languag Sprache) aus, und drücken Sie die Taste} (Einst.menü - Kanal-Setup), und drücken Sie die Taste Setup Menu - Channel SetupChannel SearchModify Channel Information Sort ChannelsWählen Sie und drücken Sie die Taste Die automatische Suche der TV-Kanäle l } (Einst.menü - Allgemein), und , um das Menü CountryOn Screen Display Language Screen Saver Reset Menu SettingsWählen Sie { Sie die Tastedie Option} (Einst.menü - Uhr), und drücken Sie zur Bestätigung die Taste X.Setup Menu - ClockDate (dd / mm / yy)Time (hh : mm : ss)Date-Time SettingWählen Sie die Option {- Aufnahme), und drücken Sie zur Bestätigung die TasteAuto Chapter MarkerSystem Recording SourceDVD Default Recording ModeVCR Default Recording ModeWählen Sie mit den Tastenändernde Einstellung aus, und drücken Sie zur Bestätigung die TasteWiedergabe vonLegen Sie eine beschriebene DVD±R/±RW inNavigieren Sie mit den Tasten verschiedenen Optionen, und wählen Sie sie mit der TasteAnweisungen und Erläuterungen zu denDrücken Sie auf der Fernbedienung die TasteCountryOn Screen Display LanguageScreen SaverReset Menu SettingsSiehe dieses Kapitel unter …Einstellungen des Menüs GENERAL (Allgemein)“.TV Aspect RatioVideo Output FormatDigital Audio OutputShow DivX®Setup Menu - PlaybackSiehe dieses Kapitel unter …Einstellungen des Menüs PLAYBACK (Wiedergabe)“.Setup Menu - RecordAuto Chapter MarkerSystem Recording SourceDVD Default Recording ModeVCR Default Recording ModeSiehe Kapitel …Aufnahme – Einstellungen des Menüs RECORD (Aufnahme)“.Setup Menu - DVDDefault Disc Menu LanguageDefault Subtitle LanguageDefault Audio LanguageParental Rating LevelSiehe dieses Kapitel unter …Einstellungen des Menüs DVD“.Setup Menu - Channel SetupChannel SearchModify Channel InformationSort ChannelsSiehe dieses Kapitel unter …Einstellungen des Menüs CHANNEL SETUP (Kanal-Setup)“.Setup Menu - ClockDate (dd / mm / yy)Time (hh : mm : ss)Date-Time SettingSiehe dieses Kapitel unter …Einstellungen des Menüs CLOCK (Uhr)“.Bei manchen DVDs kann der ganzen Disc oder bestimmten Szenen auf der Disc eine Kindersicherungsbewertung zugewiesen sein. Diese。
Philips 52PFL5432 高清电视产品说明书
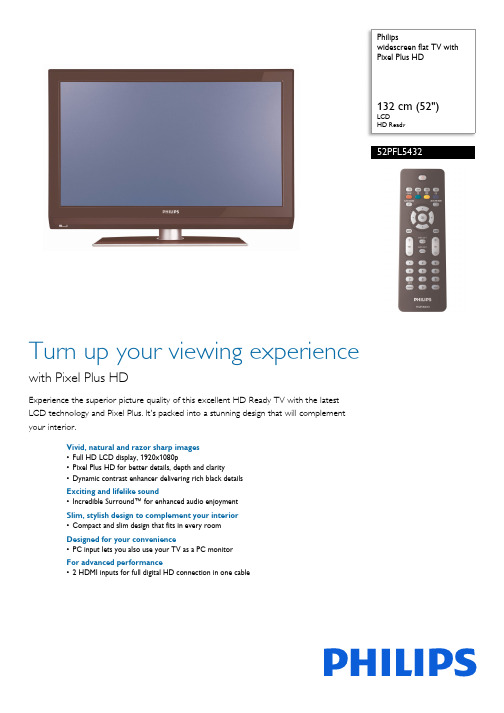
Philipswidescreen flat TV with Pixel Plus HD132 cm (52")LCDHD Ready52PFL5432Turn up your viewing experiencewith Pixel Plus HDExperience the superior picture quality of this excellent HD Ready TV with the latest LCD technology and Pixel Plus. It's packed into a stunning design that will complement your interior.Vivid, natural and razor sharp images •Full HD LCD display, 1920x1080p•Pixel Plus HD for better details, depth and clarity•Dynamic contrast enhancer delivering rich black details Exciting and lifelike sound•Incredible Surround™ for enhanced audio enjoyment Slim, stylish design to complement your interior •Compact and slim design that fits in every room Designed for your convenience•PC input lets you also use your TV as a PC monitor For advanced performance•2 HDMI inputs for full digital HD connection in one cableHighlightsFull HD LCD display 1920x1080pThis display has a resolution that is referred to as Full HD. The state-of-the-art LCD screen technology has the full high-definition widescreen resolution of 1080 progressive lines, each with 1920 pixels. This allows the best possible picture quality for HD input signals with up to 1080 lines. It produces brilliant flicker-free progressive scan pictures with optimum brightness and superb colors. This vibrant and sharp image will provide you with an enhanced viewing experience.Pixel Plus HDPixel Plus HD is a picture processing technology that enables viewers to watch content that is vivid, natural, and real. The result means superbly life-like pictures with incredible details and depth from any HD source.Dynamic contrast enhancerYou want the LCD flat display with the highest contrast and most vibrant images even at wide viewing angle. The Philips dynamic contrastenhancer uses video processing and uniquedimming backlight technology. This deliversdeep rich black levels with increased detail.The dimming backlight increases the contrastup to 5 times*, and at the same time improvesthe viewing angle. It gives a bright, lifelikepicture with high contrast and vibrant colors,(* factor between 2 and 5, screen type andpicture content dependant).Incredible Surround™Incredible Surround is an audio technologyfrom Philips that dramatically magnifies thesound field to immerse you in the audio. Usingstate-of-the-art electronic phase shifting,Incredible Surround mixes sounds from leftand right in such a way that it expands thevirtual distance between the two speakers.This wider spread greatly enhances the stereoeffect and creates a more natural sounddimension. Incredible Surround allows you toexperience total surround with greater depthand width of sound, without the use ofadditional speakers.2 HDMI inputsHDMI makes an uncompressed digital RGBconnection from the source to the screen. Byeliminating conversion to an analog signal, itdelivers an unblemished image. The non-degraded signal reduces flicker and leads to aclearer picture. HDMI intelligentlycommunicates the highest output resolutionwith the source device. The HDMI input is fullybackward compatible with DVI sources butincludes digital audio. HDMI uses HDCP copyprotection. With 2 HDMI inputs you canconnect multiple HD sources, for instance anHD settop box, and a Blu-ray player. Your TVis fully prepared for the HD future.PC inputWith PC input you can connect your TV to acomputer and use the TV as a PC monitor.Issue date 2019-06-28 Version: 2.0.1312 NC: 8670 000 30984 EAN: 87 12581 34194 7© 2019 Koninklijke Philips N.V.All Rights reserved.Specifications are subject to change without notice. Trademarks are the property of Koninklijke Philips N.V. or their respective owners.SpecificationsPicture/Display•Color cabinet: Black Cabinet with Black Hi Gloss deco Frame•Aspect ratio: 16:9, Widescreen •Brightness: 500 cd/m²•Dynamic screen contrast: 7500:1•Response time (typical): 8 ms•Viewing angle (H / V): 170 / 170 degree •Diagonal screen size: 52 inch / 132 cm •Display screen type: LCD Full HD W-UXGA Act. matrix•Panel resolution: 1920x1080p•Picture enhancement: Pixel Plus HD, Dynamic contrast enhancement, Contrast Plus, 3/2 - 2/2 motion pull down, 3D Combfilter, Digital Noise Reduction, Progressive scan•Screen enhancement: Anti-Reflection coated screenSupported Display Resolution •Computer formatsResolution Refresh rate640 x 480 60, 72, 75, 85Hz720 x 400 70Hz1024 x 768 60, 70, 75, 85Hz•Video formatsResolution Refresh rate480i 60Hz480p 60Hz576i 50Hz576p 50Hz720p 50, 60Hz1080p 24, 50, 60HzSound•Equalizer: 7-bands•Output power (RMS): 2 x 10W•Sound Enhancement: Auto Volume Leveller, Incredible Surround•Sound System: Stereo, SAPLoudspeakers•Built-in speakers: 2•Loudspeaker types: Front Speakers, Dome tweeterConvenience•Child Protection: Child Lock•Clock: On main display, Sleep Timer, Wake upClock•Ease of Installation: Auto Program Naming,Autostore, Fine Tuning, Program Name, Sorting•Ease of Use: 8 channel smart surf list, Auto VolumeLeveller (AVL), AutoPicture, AutoSound, ProgramList, Side Control, Closed Captioning Full Text•On-Screen Display languages: English, Portuguese,Spanish•Remote Control: TV•Remote control type: RC2023606/01•Screen Format Adjustments: 4:3, Movie expand14:9, Movie expand 16:9, Subtitle Zoom, SuperZoom, WidescreenTuner/Reception/Transmission•Aerial Input: 75 ohm F-type•TV system: NTSC, PAL N, PAL M•Video Playback: NTSC, PAL (all versions)•Tuner bands: Hyperband, S-Channel, UHF, VHF•Number of Preset Channels: 125•Tuner Display:PLLConnectivity•AV 1: Audio L/R in, YPbPr•AV 2: Audio L/R in, YPbPr•AV 3: Audio L/R in, CVBS in, S-Video in•AV4:HDMI•AV5:HDMI•Number of AV connections: 7•Front/Side connections: Audio L/R in, CVBS in,Headphone Out, S-video in•Other connections: Monitor out, CVBS, L/R(cinch), PC Audio in, PC-In VGAPower•Ambient temperature: 5 °C to 40 °C•Mains power: 100-240V, 50/60Hz•Power consumption: 340 W•Standby power consumption: <1WAccessories•Included accessories: Power cord, Quick startguide, User Manual, Registration card, Warrantycertificate, Remote Control, Batteries for remotecontrolDimensions•Set dimensions(W x H x D):1289 x 835 x 124 mm•Set dimensions with stand (W x H x D):1289 x 909 x 325 mm•Product weight: 40 kg•Product weight (+stand): 50 kg•Box dimensions(W x H x D):1385 x 927 x 277 mm•Weight incl. Packaging: 58 kg•VESA wall mount compatible: 600 x 400 mm*Avoid extensive use of the set in a volume higher than 85 decibelbecause this may damage your hearing.。
LG ProBeam DLP投影仪 BF60PST-GL 使用说明书
用户手册DLP 投影仪使用产品前请阅读使用说明。
保留备用。
BF50NST-GLBF60PST-GLP/NO : SAC37813575 (2112-REV00)版权 © 2021 乐金电子(中国)有限公司版权所有。
2中文目录许可证 3开源软件提示信息 4安全预防措施 5准备工作 17安装 25遥控器 34连接设备 37规格 43标志 49故障排除 503中文许可证不同型号所支持的许可证可能会有所不同。
有关许可证的详细信息,请访问 。
HDMI、HDMI高清晰度多媒体接口以及HDMI标志是HDMI Licensing Administrator, Inc.在美国和其他国家的商标或注册商标。
本产品经过杜比实验室的许可而制造。
杜比, 杜比视界,杜比音效,杜比全景声,和双 D 符号是杜比实验室的注册商标。
有关 DTS 专利,请参阅 。
在获得 DTS Licensing Limited 许可的条件下制造。
DTS、符号、DTS 与符号同时出现、DTS 2.0 Channel、DTS 2.0+Digital Out、DTS-HD 和 DTS Virtual:X 是 DTS, Inc. 在美国和/或其他国家/地区的注册商标或商标。
© DTS, Inc. 保留所有权利。
注意• 所示的图像可能与您的投影仪有所不同。
• 投影仪的 OSD(在屏显示)可能与此手册的显示略有不同。
4中文开源软件提示信息为取得本产品内搭载的 GPL、LGPL、MPL 及其他开源证书下的源代码,请您访问 https:// 。
除源代码以外,所有相关的许可条款、免责声明和版权通知均可供下载。
LG Electronics 也可以 CD-ROM 的形式为您提供开源代码,如有需要,请发送电子邮件至******************,仅收取执行配送的费用(如介质费用、运输费和手续费)。
此报价从该产品出厂之日起,三年内有效。
此报价对收到本信息的任何人有效。
L20000UNL L20002UNL 投影机快速参考卡说明书
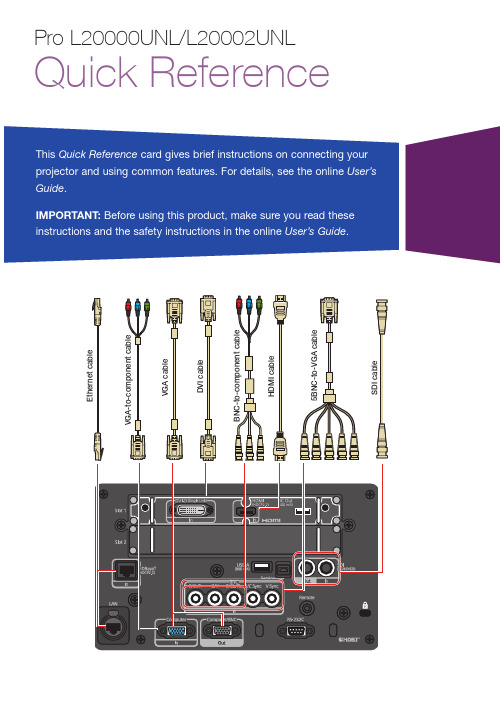
This Quick Reference card gives brief instructions on connecting your projector and using common features. For details, see the online User’s Guide.IMPORTANT: Before using this product, make sure you read theseinstructions and the safety instructions in the online User’s Guide.Changing the Projection ModeYou can change the projection mode to flip the image over top-to-bottom or left-to-right using the projector menus.1. P ress the Menu button.2. S elect Extended > Projection .3. Select a projection mode.4. W hen you’re done, press the Menubutton to exit. You can also flip the image over top-to-bottom by pressing the Shutter button on the remote control for about five seconds.Note: To rotate the menu display, change the OSD Rotation setting in the Extended > Display menu.Switching Between Image SourcesPress the Search button (remote control) or one of the source buttons (remote control or projector).Changing the Screen Type SettingSet the Screen Type setting to the screen’s aspect ratio. 1. P ress the Menu button.2. S elect Extended > Display >Screen > Screen Type .Turning the Projector On1. T urn on your computer or imagesource.2. R emove the lens cover.3. P ress the On button. After thestatus light stays blue, the projector is ready.Note: If the Direct Power On function is enabled, you can turn the projector on without pressing the On button; just plug it in or flip the switch controlling the outlet to which the projector is connected. To turn on this feature, see the online User’s Guide .If the projector does not turn on, make sure the power switch on the back of the projector is turned on.If your image does not appear, see“Switching Between Image Sources” or “Troubleshooting.”Changing the Language of the Projector MenusThe default language of the projector’s menu system is English, but you can change it as necessary.1. P ress the Menu button to acess theprojector’s menu system.2. S elect Extended > Language .3. S elect your language.4. W hen you’re done, press the Menubutton to exit.2. P ress the or arrow buttons tomake the adjustment. 3. P ress the Esc button to finish theadjustment.Correcting Image ShapeIf your image is uneven on the sides, you can use the projector’s distortion correction features, such asH/V-Keystone and Quick Corner ®, to adjust the shape. See the online User’s Guide .Making Other Image AdjustmentsFor help on using the projector’sfeatures to improve the image quality, see the online User’s Guide . You can also view information on how to adjust the image color, position, and edges (Edge Blending) when projecting from multiple projectors to create one seamless widescreen image.Turning the Projector OffPress the Standby button to turn the projector off. If you see a confirmation message, press the Standby button again.Note: If the Direct Power On function isenabled, you can unplug the projector or flip the switch controlling the outlet to which the projector is connected instead. To turn on this feature, see the online User’s Guide .With Epson’s Instant Off ® technology, you don’t have to wait for the projector to cool down; just turn it off or unplug it when you’re done.3. S elect the screen’s aspect ratio.Note: The displayed image should matchthe screen’s size and shape.4. W hen you’re done, press the Menubutton to exit.Note: After changing the screen type, you may need to change the aspect ratio of the projected image depending on the input signal. Press the Aspect button on the remote control to change the aspect ratio, if necessary.Adjusting Image Position1. P ress the Lens Shift button on theremote control or projector.2. P ress the arrow buttons to adjustthe position of the projected image.3. W hen you’re done, press the Escbutton to finish the adjustment.If the projector is on a table, you can level the image by turning any of the projector’s adjustable feet.Focusing and ZoomingPress the Focus or Zoom buttons on the remote control to adjust the image.You can also focus and zoom using the projector buttons.1. P ress the Focus or Zoom button onthe projector.TroubleshootingIf you see a blank screen or the message No signal• M ake sure the status light on the projector is blue and not flashing,and the lens cover is removed.• M ake sure the cables are connected correctly. See the online User’sGuide.• Y ou may need to change the image source. See “Switching BetweenImage Sources.” Also make sure the source device is turned on.If the projector and the notebook don’t display the same image Windows®Press the function key on your keyboard that lets you display on an external monitor. It may be labeled CRT/LCD or have an icon such as . You may have to hold down the Fn key while pressing it (such as Fn + F7). Wait a moment for the display to appear. You may need to press the keys again to display the image on both devices.On Windows 7 or later, hold down the Windows key and press P at the same time, then click Duplicate.MacOpen System Preferences and select Displays. Click the Arrangementtab and select the Mirror Displays checkbox.Where to Get HelpManualsFor more information about using the projector, you can view or download the online manuals from the Epson website, as described below.Internet supportVisit /support (U.S.) or www.epson.ca/support (Canada) and search for your product to download software and utilities, view manuals, get FAQs and troubleshooting advice, or contact Epson.Speak to a support representativeTo use the Epson® PrivateLine® Support service, call (800) 637-7661. This service is available for the duration of your warranty period. You may also speak with a projector support specialist by dialing (562) 276-4394 (U.S.) or (905) 709-3839 (Canada).Support hours are 6 am to 8 pm, Pacific Time, Monday through Friday and 7 am to 4 pm, Pacific Time, Saturday.Days and hours of support are subject to change without notice. Toll or long distance charges may apply.Purchase supplies and accessories You can purchase an air filter(V13H134A58), screens, and other accessories from an Epson authorized reseller. To find the nearest reseller,call 800-GO-EPSON (800-463-7766).Or you can purchase online at (U.S. sales) or www.epsonstore.ca (Canadian sales).Illuminate buttons temporarily Change the aspect ratioOpen menus assigned by userCorrect image distortionCalibrate the lens Display a test patternPort to connect remotecontrol cableControl one or multiple projectorsHold down and use numeric keysto select projector to control Hold down and use numeric keys to enter numbers Select color modes Turn the projector offSelect a sourceNavigate through menu settings;move pointerFreeze the image Open projector menusSelect menu settings;left mouse buttonCancel current operation or return to previous menu; right mouse buttonAdjust the image positionSwitch image sourcesSave and apply presets Reset menu settings to their default valueDisplay the Info menu Remote Control MapTemporarily turn off displayShow or hide on-screen menusand messagesAdjust keystonedistortionAdjust the image size Adjust the focusChanges the displayed test pattern; move to the next or previous image when projecting from a computer over the networkTurn the projector on Automatically adjustcomputer imageEPSON, Instant Off, and Quick Corner are registered trademarks and EPSON Exceed Your Vision is a registered logomark of Seiko Epson Corporation. PrivateLine is a registered trademark of Epson America, Inc.Windows is a registered trademark of Microsoft Corporation in the United States and/or other countries. Mac is a trademark of Apple Inc., registered in the U.S. and other countries.HDBaseT and the HDBaseT Alliance logo are trademarks of the HDBaseT Alliance.General Notice: Other product names used herein are for identification purposes only and may be trademarks of their respective owners. Epson disclaims any and all rights in those marks. This information is subject to change without notice.© 2019 Epson America, Inc., 7/19CPD-56225。
Philips Fidelio SoundHub 2.1 家庭电影院系统说明书
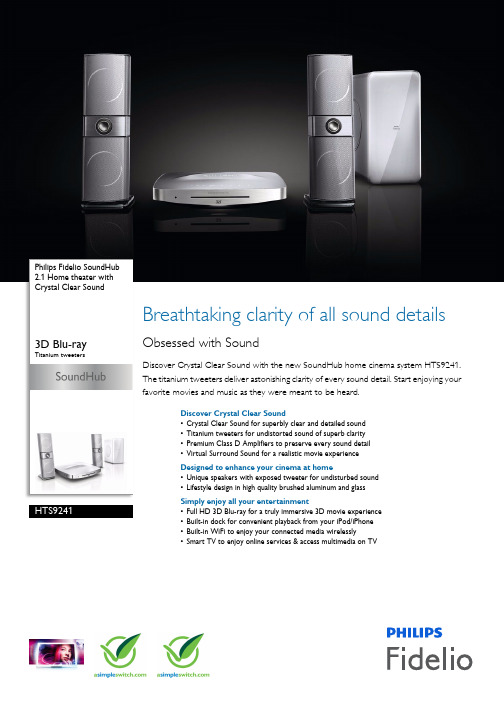
Philips Fidelio SoundHub2.1 Home theater withCrystal Clear Sound3D Blu-rayTitanium tweetersHTS9241Breathtaking clarity of all sound detailsObsessed with SoundDiscover Crystal Clear Sound with the new SoundHub home cinema system HTS9241.The titanium tweeters deliver astonishing clarity of every sound detail. Start enjoying yourfavorite movies and music as they were meant to be heard.Discover Crystal Clear Sound•Crystal Clear Sound for superbly clear and detailed sound•Titanium tweeters for undistorted sound of superb clarity•Premium Class D Amplifiers to preserve every sound detail•Virtual Surround Sound for a realistic movie experienceDesigned to enhance your cinema at home•Unique speakers with exposed tweeter for undisturbed sound•Lifestyle design in high quality brushed aluminum and glassSimply enjoy all your entertainment•Full HD 3D Blu-ray for a truly immersive 3D movie experience•Built-in dock for convenient playback from your iPod/iPhone•Built-in WiFi to enjoy your connected media wirelessly•Smart TV to enjoy online services & access multimedia on TVHighlightsTitanium tweetersThe co-developed tweeters, crafted intitanium, are very rigid and light to guarantee undistorted sound. Their incredible resistance to distortion and resonance through the whole audible frequency range guarantees superb clarity of all sound details.Premium Class D AmplifiersThe Philips proprietary Premium Class-D Amplifiers are designed to preserve theoriginal sound source for greater audio signal accuracy, thus allowing acoustic details in music and movies to be delivered exactly as the artist or director intended.Full HD 3D Blu-rayBe enthralled by 3D movies in your own living room on a Full HD 3D TV. Active 3D uses the latest generation of fast switching displays for real life depth and realism in full 1080x1920 HD resolution. By watching these images through special glasses with right and left lenses that are timed to open and close insynchrony with alternating images, the full HD 3D viewing experience is created in your home cinema. Premium 3D movie releases on Blu-ray offer a wide, high quality selection of content. Blu-ray also delivers uncompressed surround sound for an unbelievably real audio experience.Built-in dock for iPod/iPhoneA built-in dock for iPod/iPhone lets you play movies, music and photos from your iPod/iPhone. What's more, you can charge and control the iPod/iPhone and browse through its contents on your TV screen - all with the home theater's remote. Doing away with cumbersome cables and connections, the integrated dock brings portable entertainment into your home - with absolute ease.Smart TVPhilips home theater systems with Smart TV offer you an array of enhanced features,including Net TV, DLNA and MyRemote. Net TV brings a wide range of online information and entertainment to your TV. Simply select Net TV in the Home Menu and to start browsing for services like, video-on-demand stores* for the latest releases in HD, and Catch-up TV. With DLNA, you can access photos, music and movies stored on your PC from the comfort of your couch. Can't find theremote control? Simply use your smart phone or tablet PC to control your home theater viathe Philips MyRemote app.Matches Philips DesignLine Edge TV*Matches Philips DesignLine Edge TVThe perfect match for this home theater is the Philips DesignLine Edge TV. The combined set features a beautiful lifestyle design to fit your living room. Pixel Precise HD and LED TV pictures together with Ambilight bring an immersive TVexperience to your living room. Both TV and home theater can be operated with only one remote control and thecombined set ensures the best picture and sound performance with Philips Easylinkvia HDMI. In addition they are bothdesigned with same materials and finishingfor a perfect visual match!Philips Green LogoPhilips Green Products can reduce costs,energy consumption and CO2 emissions. How? They offer a significantenvironmental improvement in one ormore of the Philips Green Focal Areas – Energy efficiency, Packaging, Hazardous substances, Weight, Recycling anddisposal and Lifetime reliability.Issue date 2019-02-12 Version: 11.2.912 NC: 8670 000 71829 EAN: 87 12581 58166 4© 2019 Koninklijke Philips N.V.All Rights reserved.Specifications are subject to change without notice. Trademarks are the property of Koninklijke Philips N.V. or their respective owners.SpecificationsSound•Equalizer settings: Gaming, Movie, Music, News, Original•Sound Enhancement: Dialog Enhancement, DoubleBass, FullSound, Night Mode, Treble, Mid and Bass Control•Sound System: Dolby Digital 5.1, Dolby Digital Plus, Dolby True HD, DTS Digital Surround, DTS-HD High Resolution Audio•Satellite speaker output power: 135 W x2•Subwoofer output power: 230 W•Total Power RMS @ 30% THD: 500 W Loudspeakers•Loudspeaker types: 2 x Satellite speakers •Drivers per Satellite speaker: 1 x 1" Titanium tweeter, 2 x 3" full range woofers•Satellite speaker freq range: 150 - 20k Hz •Satellite speaker impedance: 5 ohm •Subwoofer type: Active•Subwoofer driver: 1 x 6.5" woofer •Subwoofer freq range: 20 - 150 Hz •Subwoofer impedance: 3 ohmConnectivity•Smart TV: DLNA, MyRemote, Net TV•Front / Side connections: Music iLINK, USB •Integrated Connections: Dock for iPod/iPhone, Wi-Fi•Rear Connections: AUX IN 1, AUX IN 2, Composite video (CVBS) output, Digital coaxial in, Digital optical in, Ethernet, FM Antenna Socket, HDMI 1.4 output (ARC), Mini Easy-Fit Speaker Jacks, SD/SDHC Card slot, Subwoofer out Convenience•EasyLink (HDMI-CEC): 21:9 format subtitle support, Audio Return Channel, Automatic audio input mapping, Dynamic Lipsync, One touch play, One touch standby, Remote Control-Passthrough •HDMI Features: 3D, Audio Return Channel (ARC), Content Type, Deep colorTuner/Reception/Transmission •RDS: Station Name•Tuner Bands: FM•Number of Preset Channels: 40Optical Playback Media•Playable Discs: AVCHD, BD, BD R / BD RE, CD, CDDA, CD-R/CD-RW, DVD, DVD +R/+RW, DVD -R/-RW, SVCD, VCD File Format•Audio: aac, mka, mp3, wav, wma•Picture: GIF, JPEG, JPG•Video: asf, avi, divx, mkv, mp4, mpeg, mpg, wmvAudio Playback•Compression format: AAC, MP3, WAV, WMA•MP3 bit rates: 32 - 320kbpsVideo Playback•Compression formats:AVCHD, DivX Plus HD,MPEG1, MPEG2, MPEG4, WMV HD, WMV SDStill Picture Playback•Compression format: GIF, JPEG, JPEG HD, JPEGProgressive, PNG•Picture Enhancement: Rotate, Slideshow withmusic playback, ZoomPicture/Display•Picture enhancement: HD (720p, 1080i, 1080p/24fps), Progressive scan, Video upscalingPower•Power consumption: 135 W•Power supply: 220-240V, 50Hz•Standby power consumption: < 0.5 WSustainability•Packaging: 80% recycled corrugated board,Electronic User Manual, No polyfoam, Soya basedinkDimensions•Main Unit (W x H x D): 307 x 66 x 304 mm•Main Unit Weight: 3.87 kg•Satellite Speaker (W x H x D): 131 x 334 x 99 mm•Satellite Speaker Weight: 1.2 kg•Satellite Speaker Cable length: 3 m•Subwoofer (W x H x D): 196 x 397 x 342 mm•Subwoofer Weight: 5.3 kg•Subwoofer cable length: 3 m•Packaging (W x H x D): 570 x 413 x 400 mm•Weight incl. Packaging: 16.6 kgAccessories•Included accessories: 2 x AAA Batteries, FMantenna, Power cord, Quick start guide, RemoteControl, Safety & Legal Leaflet, Trademarks Sheet,World Wide Warranty leafletMatching Philips Televisions*•DesignLine Edge: 32PDL7906, 42PDL7906*The home theater can also be matched with all other Philips TVs.*To check whether Video on Demand is available in your country,please visit /blu-ray.。
SMSL SP300 II 光纤电视电视盒文档说明书
输入接口 .........................................................................XLR , RCA , BT THD+N ......................................................................................0.008%信噪比 ............................................................................................90dB 通道分离度 ..................................................................................... 88dB 输出功率 ..........................................................80Wx2(4Ω) / 40Wx2(8Ω)消耗功率 ...........................................................................35W(正常音量)待机功率 ...................................................................................... <0.5W 体积......................................................................185x40x125mm (WxHxD)重量(带包装).........................................................................................1.2kg德国英飞凌新型碳化硅数字功率放大器芯片, 更高质的同时 , 效率高达92% , 进一步降低能耗;使用了日本NJRC公司电子音量控制芯片NJW1194,精准的音量控制和超低的失真度;真正全平衡设计, 从平衡输入到喇叭输出均为平衡, 大大降低信号传输时造成的失真;内置SMSL SDB专利音效和高/低音调节功能,轻松匹配各种喇叭和音乐;新款蓝牙5.0接收, 更好的音质, 更远的传输距离;全铝合金CNC加工工艺,采用阳极氧化技术,做工精细,触感一流;OLED显示屏和人性化操作系统简单易懂,配备全功能遥控功能;具备满足欧盟最新ErP2标准的低功耗待机功能;大量采用发烧级音频元件以提升主观听感;高品质镀金输入、输出端子;完善的过热,过流等保护电路;音频专用的高品质电源适配器。
Compaq iPAQ Personal Audio Player PA-2 说明书
Compaq iPAQ Personal Audio Player PA-2 Ad SpecsDigital audio for your active lifestyle.Main Selling Points>At the size of a pager, it’s small and durable enough to take almost anywhere.>Stores up to two hours of skip-free audio.>Open expansion slot allows up to 128 MB memory for up to 4 hours of music.>Download tunes in a flash with a USB connection. >Up to 14 hours of continuous playback.Standard Features>64 MB MultiMedia Card (MMC) Memory – with open expansion to 128 MB for up to 4 hours of music >Record and transfer songs from your PC using your choice of Windows Media™Player 7 or MusicMatch Jukebox 6.0 software>Supports MP3 and WMA audio formats>Rugged aluminum face plate and high-impact plastic shell>Convenient fold-up earphones>Extended battery life – up to 14 hours>Backlit LCD panel>Powered USB connection port>Easy Access controls>No moving parts>Fully upgradable>Removable belt clip>Supports Microsoft®Windows® 98, 2000 or MEDoc. No. 005A/0401RCP CPQ 559 ©2001 Compaq Computer CorporationAll hardware and software specifications subject to change without notice. Compaq Computer Corporation shall not be liable for technical, pictorial or editorial errors or omissions contained herein. The information in this document is provided “as is” without warranty of any kind and is subject to change without notice. The warranties for Compaq products are set forth in the express limited warranty statements accompanying such products. Nothing herein should be construed as constituting an additional warranty. Compaq and the Compaq logo Registered in the U.S. Patent and Trademark Office. iPAQ and Inspiration Technology are trademarks of Compaq Information Technologies Group, L.P., in the United States and other countries. Microsoft, Windows and Windows Media are trademarks of Microsoft Corporation in the United States and other countries. All other product names mentioned herein may be trademarks and/or registered trademarks of their respective companies. Printed in the U.S.A.Image Doc. No. 583A/0401RCPDoc. No. 005A/0401RCP CPQ 559 ©2001 Compaq Computer Corporation 24X Max CD-ROM drive data transfer rates may vary from 1500 Kbps to 3600 Kbps. Certain restrictions and exclusions apply. For warranty details, consult the Compaq Product Information Center, 1-800-345-1518 (U.S.). All hardware and software specifications subject to change without notice. Compaq Computer Corporation shall not be liable for techni-cal, pictorial or editorial errors or omissions contained herein. The information in this document is provided “as is” with-out warranty of any kind and is subject to change without notice. The warranties for Compaq products are set forth in the express limited warranty statements accompanying such products. Nothing herein should be construed as consti-tuting an additional warranty. Compaq and the Compaq logo are registered in the U.S. Patent and Trademark paq iPAQ and Inspiration Technology are trademarks of Compaq Information Technologies Group, L.P., in the United States and other countries. Microsoft, Windows and Windows Media Player are registered trademarks of Microsoft Corporation. S-Link is a trademark of Sony Electronics, Inc. Other product names mentioned herein may be trademarks and/or registered trademarks of their respective companies. Printed in the U.S.A.Compaq iPAQ Personal Audio Player PA-2 Quick SpecsModelCompaq iPAQ™Personal Audio Player PA-2Compaq P/N: 168795-004 UPC: 720591768829Dimensions & Weights (L x W x H)>Unit: 2.7" x 2.2" x 0.8" (3 oz.)>Package: 10.4" x 7.5" x 2.5"Standard Features>64 MB MultiMedia Card (MMC) Memory –with open expansion to 128 MB for up to 4 hours of music>Record and transfer songs from your PC using your choice of Windows Media™ Player 7 or MusicMatch Jukebox 6.0 software>Supports MP3 and WMA audio formats >Rugged aluminum face plate and high-impact plastic shell>Convenient fold-up earphones>Extended battery life – up to 14 hours >Backlit LCD panel>Powered USB connection port >Easy Access controls>No moving parts, for skip-free playback >Fully upgradable >Removable belt clip>Supports Microsoft® Windows® 98, 2000 or MESkip-free digital audio>With no moving parts, the iPAQ PA-2 delivers skip-free audio, virtually anywhere.>Solid aluminum face plate and high-impact plastic construction is ultra-durable. Drop the iPAQ PA-2 and never miss a beat.Digital music anywhere>Small and lightweight. Travels anywhere, for music without bulky cassettes or CDs.>Compact, snug-fitting earphones deliver high-fidelity sound.>Belt clip lets you fasten the iPAQ PA-2 to your belt or backpack.>Features the smallest and most rugged 64 MB memory card available. Ready to expand with your audio collection.Customize your music collection>Popular MusicMatch Jukebox 6.0 and Windows Media™ Player 7 software let you easily manage your music.>Easily create, organize and manage playlists on your PC and transfer them to the iPAQ PA-2. No more fumbling with LPs, cassettes and CDs.>Add songs to your library in three different ways: record from a CD; download digital tracks from the Web; or add song files stored on your hard drive.>Create your own musical categories and easily locate specific songs, albums or playlists.Included digital formats deliver CD-quality sound>Compressed CD-quality sound is delivered with a >85db signal-to-noise ratio.>Holds two hours of digital-quality tracks.Choice of compression ratio makes for longer listening time with little sacrifice in sound quality.>Supports MP3 and WMA audio files – the most popular online formats.System Requirements>Microsoft® Windows® 98, minimum >233 MHz processor or higher >100 MB free hard disk space>Internet connection for downloading Web content >64 MB RAM>24X Max CD-ROM drive 1>1 available USB portWarranty>1-year U.S. Limited Warranty 2Compaq Extra Mile Service and Support The best approach to customer service, delivered just the way you want it:>For the faster path to the right answers, go FIRST to/consumersupport >Technical support 24 hours a day, 7 days a week at 1-888-302-7358Packaging>Clamshell 30 mil with perimeter heat seal>Sensomatic and checkpoint source tagging>Ready to hang on shelf720591768829。
SmartAVI SDX-2P产品说明书
3. Connect a USB source (computer) to the USB port on the SDX-TX2P.
Pins 1 & 2 Pins 3 & 6 Pins 4 & 5 Pins 7 & 8
Connectors: RJ-45
Capacitance:
14 pf/ft (46.2 pf/m)
Conductor Gauge:
24 AWG
Impedance:
100 +/- 15 ohms
What’s in the Box?
PART NO.
QTY DESCRIPTION
SDX-TX2P
1 Dual DVI-D , USB 1.1, Dual RS232 , Audio, CAT5/5e/6 Transmitter
SDX-RX2P
1 Dual DVI-D , USB 1.1, Dual RS232 , Audio, CAT5/5e/6 Receiver
SDX-TX2P Front
SDX-TX2P Back
SDX-RX2P Front
SDX-RX2P Back
The following is the wiring standard for terminating UTP/STP cable using RJ-45 connector:
Pair 1 Pair 2 Pair 3 Pair 4
SmartAVI, Inc. / Twitter: smartavi 11651 Vanowen St. North Hollywood, CA 91605
Philips 55PFL5922 5000系列 Chromecast 内置 UHD 电视说明书
Philips5000 series Chromecast built-in UHDTV55" class4K UHD 2160p HDRWireless LAN 802.11ac MIMO55PFL5922Chromecast built-in™ TVCast your favorite entertainment from mobileChromecast built-in™ is a technology that lets you cast your favorite entertainment from your mobile to TV. Easily control your TV with apps you already know and love from your iPhone ®, iPad ®, Android™ phone or tablet, Mac ® or Windows ® PC.Enjoy the beauty of 4K Ultra HD•120 Perfect Motion Rate for increased pixel response times •An intelligent dimming backlight for dynamic contrast •Pixel Plus UltraHD for vivid, natural, and real pictures •Stunning Brightness•Expanding the possibilities of visual perceptionComplete digital TV connectivity made simple.•HDMI 2.0 with HDCP 2.2 for 4K on all HDMI ports•Wireless LAN 802.11ac with MIMO for seamless streaming of 4K •Play HEVC, H.264, AAC, MP3, JPEG and more formats on USB •Cast your favorite entertainment from a mobile device to TV Authentic and clear sound experience.•20 Watts RMS of rich surround sound to complement 4K images •Immersive sound with clear voice designed by sonic emotion •Dolby Audio for the ultimate movie experienceHighlightsChromecast built-in™Chromecast built-in™ is a technology that lets you cast your favorite entertainment from your phone, tablet or laptop right to your TV. Easily control your TV with apps you already know and love from your iPhone ®, iPad ®, Android™ phone or tablet, Mac ® or Windows ® laptop, or ChromebookHigh Dynamic RangeHigh Dynamic Range is a technology lets you experience more detail and captivating colors for an even more engaging televisionexperience. More perceivable shades of blacks, whites and all other colors. This boils down to greater perceived brightness and contrast with darker shadows creating a breathtaking image.Bright ProBrightPro backlith boosts brighter areas of the image by up to twice as much as a regular LEDbacklight. Bright Pro enables to display exceptional brightness and contrast even in brightly lit rooms. Video scenes which feature bright light sources such as sunlight, fireworks, police lights, flashlights, etc. look more realistic and lifelike.Pixel Plus Ultra HDExperience Ultra-HD sharpness from Philips. Now you can enjoy your favorite action films and sporting events in stunning 4K Ultra HD resolution. And whether you stream online or watch a DVD, Philips' Pixel Plus Ultra-HD Engine delivers sharper images with brighter whites and blacker blacks.120 Perfect Motion Rate120 Perfect Motion Rate (PMR) creates extreme motion sharpness for clear andvibrant images in fast action movies. The new Philips PMR standard reduces response time of the HDTV to produce faster picture transitions and reduces motion artifacts.20 Watts RMS20 Watts RMS of rich surround sound to complement 4K imagesSonic Emotion PremiumImmersive sound with clear voice designed by sonic emotion. Absolute3D sound fills your surroundings with the right ambience, clarifies voice, and details the sound stage, making your experience more immersive and enjoyable.Dolby AudioDolby Audio for the ultimate movie experienceHDMI 2.0 with HDCP 2.2 for 4KHDMI 2.0 with HDCP 2.2 for 4K on all HDMI portsUSB multimedia playbackThe USB connector allows access to HEVC, H.264, AAC, MP3, JPEG and more formats files of most USB-sticks (USB memory-classdevice). Plug the USB into the slot at the side of the TV and access the multimedia content using the easy on screen content browser. You can now view and share your videos, photosand music.Issue date 2023-12-11Version: 3.0.1UPC: 6 09585 25080 2© 2023 Koninklijke Philips N.V.All Rights reserved.Specifications are subject to change without notice. Trademarks are the property of Koninklijke Philips N.V. or their respective owners.SpecificationsPicture/Display•Aspect ratio: Widescreen(16:9)•Contrast ratio (typical): 1000:1•Response time (typical): 16 ms •Diagonal screen size (inch): 55 inch •Diagonal screen size (metric): 139.7 cm •Panel resolution: 3840x2160p•Picture enhancement: Black stretch, Digital Noise Reduction, MPEG artifact reduction, Pixel Plus UltraHD, 120 PMR, Color Enhancement, Dynamic contrast enhancement, Macro Dimming •Visible screen diagonal (inch): 54.6 inch •Display screen type: LED UltraHD Display •Viewing angle: 178º (H) / 178º (V)Supported Display Resolution•Computer formats: 640 x 480, 60Hz, 720 x 480, 60Hz, 800 x 600, 60Hz, 1024 x 768, 60Hz, 1280 x 768, 60Hz, 1280 x 1024, 60Hz, 1360 x 768, 60Hz, 1440 x 900, 60 Hz, 1920 x 1080, 60Hz, 1680 x 1050, 60Hz, 1400 x 1050, 60Hz, 3840 x 2160, 60Hz, 4096 x 2160, 60Hz•Video formats: 480i, 60Hz, 480p, 60Hz, 720p, 60Hz, 1080i, 60Hz, 1080p, 24,30,60Hz, 2160p, 24, 30, 60HzSound•Equalizer: 5-bands•Output power (RMS): 2 x 10W•Sound System: Sonic Emotion Premium, Stereo, SAP, Dolby AudioLoudspeakers •Built-in speakers: 2Convenience•Child Protection: Child Lock+Parental Control •Clock: Sleep Timer•Ease of Use: Auto Volume Leveller (AVL),AutoPicture, AutoSound, Settings assistant Wizard •Remote Control: TV•Screen Format Adjustments: 4:3, Auto Format, Movie expand 14:9, Movie expand 16:9, Super Zoom, Widescreen, unscaled (1080p dot by dot), Full•Ease of Installation: Autostore•Multimedia: auto slideshow, USB media browserMultimedia Applications•Multimedia connections: USB memory class device •Playback Formats: MP3, JPEG Still pictures, MPEG1, MPEG2, H.264/MPEG-4 AVC, H.265/HEVC, AAC, AC3, MPEG4, WAVETuner/Reception/Transmission•Aerial Input: 75 ohm F-type •TV system: ATSC, NTSC •Video Playback:NTSC •Tuner bands: UHF, VHFConnectivity•Other connections: Ethernet, Headphone out, Wireless LAN(Built in)•EasyLink (HDMI-CEC): One touch play, Power status, System info (menu language), Remote control pass-through, System audio control, System standby•Audio Output - Digital: Optical (TOSLINK)•AV 1: Shared audio L/R in, CVBS/YPbPr •USB: USB•HDMI 1: Shared audio L/R in, HDMI•HDMI 2: Shared audio L/R in, HDMI (Audio Return Channel)•HDMI 3: HDMI, Shared audio L/R inPower•Mains power: 120V 50/60Hz •Power consumption: 135 W•Standby power consumption: < 0.5W•Ambient temperature: 5°C to 40°C (41°F to 104°F)Dimensions•Product weight (lb): 24.0 lb •Box height (inch): 32.0 inch •Box width (inch): 55.7 inch •Box depth (inch): 6.4 inch•Wall mount compatible: 300 x 300 mm •Set Width (inch): 48.7 inch •Set Height (inch): 28.7 inch •Set Depth (inch): 3.5 inch•Set width (with stand) (inch): 48.7 inch •Set depth (with stand) (inch): 9.0 inch •Set height (with stand) (inch): 30.1 inch •Product weight (+stand) (lb): 24.7 lb •Weight incl. Packaging (lb): 34.0 lbAccessories•Included accessories: Table top stand, Quick start guide, User Manual, Remote Control, Batteries for remote control, Screws •Power cord: 59.05 inchNetwork Services•Network Features: Chromecast built-in。
- 1、下载文档前请自行甄别文档内容的完整性,平台不提供额外的编辑、内容补充、找答案等附加服务。
- 2、"仅部分预览"的文档,不可在线预览部分如存在完整性等问题,可反馈申请退款(可完整预览的文档不适用该条件!)。
- 3、如文档侵犯您的权益,请联系客服反馈,我们会尽快为您处理(人工客服工作时间:9:00-18:30)。
开博尔q2说明书篇一:开博尔K130i使用说明书篇二:开博尔全志系列刷机教程开博尔A31S/A20机型刷机教程此教程适用机型大致如下:A31S:C3四核,Q5,Q2,K610I四核,D1,K10升级版,M7 A20 :Q7,A1,C3九代,D2,I7,K610I九代 , Q1,T2,K10准备材料如下:1.双头USB线一根或OTG线(有的机型需要)2.回形针或者牙签一个刷机步骤讲解:1.A下载好线刷工具解压 B安装线刷工具软件C得到软件2.打开线刷工具,并点击”一键刷机“3.选择好对应的固件,放上去(不要点击立即升级!!!)B线连接好机器,拿出回形针,机器断电的情况下顶住后面的小孔,并将机器USB线另一端接入电脑机箱后方的USB接口,直到提示格式化提醒才可以松开,该机器刷机可以不用接电源,USB接上电脑视为通电!!5.选择”是“进入一键刷机页面6.等待几分钟,刷机完毕,请往下看。
各位开饭请注意,A31S/A20机型的刷机方法是一模一样的,区别在于固件不一样,请一定要仔细核对好固件,不要刷错,这样很伤机器的,线刷的教程在此结束,以下是资源,请下载线刷工具:提取码 552bA31S固件:A20固件:感谢您的观看,如有更多需要请到开博尔论坛参与互动:篇三:开博尔高清播放机K009等说明书开博尔高清播放机带您进入高清世界!产品服务手册重要安全说明? 为了减少火灾、触电或产品损坏的危险,请勿让本机遭受雨淋、受潮或滴溅上液体,也不要将诸如花瓶等盛水之器物置于本机之上。
? 为了确保良好的通风条件,请勿将本机安装或置于书柜、内藏式机柜或其它密闭的空间里。
勿让窗帘或任何其它物体堵塞通风孔,以免因机器过热而造成触电或火灾危险。
? 切勿将诸如点燃的蜡烛灯明火火源置于本机之上。
? 废弃处理电池时要尽量采取不破坏环境的方式? 机器应放在交流电源输出插孔附近,电源插头应放在出现故障时能够便于拔插之处。
? 本机使用过程中,可能受到移动电话的无线电波干扰。
如果这种干扰明显的话,请将移动电话远离本机使用。
? 请阅读本说明书中说明事项及操作方法。
妥善保管本说用说明书,以备日后参考。
放置请将本机放在平坦的平面,应远离直射阳光,并避免高温、高湿和频繁的振动。
否则会造成机壳和其它内部零件的损坏,从而缩短本机的寿命。
请不要在本机上放置重物。
放置本机时,请与墙壁保持20厘米以上距离。
由于本机较重,放置本机时,请务必考虑婴幼儿或儿童的安全,以免造成人身伤害。
荷重不可在机器上放置重物或踩踏机器。
否则,会造成严重的人身伤害,也会损伤机器。
通风机壳上的槽缝和散热孔时为保证通风,避免过热,以使机器工作可靠而设计的,因而不要使其堵塞或遮挡。
不要将机器置于床、沙发、布匹或类似的物料上,以免堵塞通风孔。
不能确保通风或违反厂家规定的物件如书架、框架等,也不可作为放置本机的场所。
电源请勿使用过高的电压源,否则会造成本机过载并引起火灾。
应正确地连接交流电源线,并保证电源线没有损伤。
连接不良或电源线损坏会引起火灾和触电事故。
请不要拉扯、折弯电源线或在电源线上放置重物。
插座上的电源不可超载,延长电源线、集成式插座等也要倍加小心,因为这些都可能造成触电或引起火灾。
在拔交流电源时,应牢固地握住插头。
勿用湿手插入或拔出插头,否则可能会引起触电事故。
为了防止雷电引起的损坏或长时间不使用本机器时,应将其从电源插座上拔下。
这样可以有效的防止雷电或电网波动造成的损害。
热源本机放置场所必须远离热源,如暖气机、热调节器、加热炉以及其他发热产品(包括放大器等)。
水份及潮气使用本机时,尽量避免有水份的地方,如浴盆、脸盆、厨房洗碗池、洗衣池等;也应避免潮湿的地下室、游泳池附近以及类似场所。
结露潮气结露有损于本机,因而,请仔细阅读一下部分。
潮气结露常有发生,比如,您在热天里向玻璃中倾倒冰冻的饮料后,玻璃杯的外表面就会出现水珠。
与此类似,结露也会在本机顶盖上出现,这是本播放机中最敏感的一个部件。
在以下情况下容易产生结露:? 当您将机器骤然间从寒冷处搬移到温暖处。
? 当您在刚打开暖气的房间使用本机;或者机器的放置场所刚好是空调及冷气扫过之处。
? 在炎热的夏季,把刚在空调室内用过的机器搬到高温多湿的场所使用。
如出现结露,就不要使用本机。
如果您在此种情况下使用本机,则可能损坏内部机件。
将电源线插头插入电源插座,打开本机的电源开关,放置2到3小时。
这样,机器就会遇热并使结露蒸发。
异物及液体的侵入请勿使金属物品掉入本机内部,也不可将任何类型的液体洒入机内,否则可能部件间短路从而引起触电事故、火灾或造成机器故障。
如果不小心使液体进入本机内部,应立即拔掉电源线的插头,并于当地代理商联系。
请勿向本机上或极其内部喷洒杀虫剂,喷灌型杀虫剂中含有可燃性气体,如果进入本机内部可能会引起火灾。
清洁在清洁本机前,请拔掉交流电源线的插头。
不可使用液体洗涤剂以及喷雾清洁剂。
使用湿润的软布料即可。
对于坚固的污点,用柔软的布料浸上弱的洗涤剂液体,拧干后擦拭,再使用柔软的干布料擦干机器。
不可使用任何溶剂,比如稀释剂和汽油类溶剂,因为这类溶剂会损坏机器的表面。
如果您使用经化学浸泡处理的布料,请在擦拭机器是按照其使用说明进行。
附件不可使用未经生产厂家建议的附件,因为这样会引起危险。
辅助用具不可将本机放置在不稳定的手推车、支架、三角架、框架或桌子上,因为这样会导致机器坠落,从而使小孩或大人受伤。
机器的固定也因遵从厂家的说明,使用厂家建议使用的辅助用具。
放置在手推车上的机器在移动时要多加小心,急停、用力过猛、不平地面等都可能导致机器和手推车颠覆。
耳机在使用耳机时,将音量放在中间位置。
如果您长时间使用耳机听搞音量音乐,可能会引起听力损伤。
服务请勿试图擅自修理本机。
如果由非专业人员修理、拆卸或组装本机,可能会发生触电事故或造成本机的损坏。
如出现如下情况时或其它说明书中未记载的故障时,请拔掉交流电源线的插头,并于当地代理商或维修中心联系。
a) 发生声音/图象不正常、指示灯或本机VFD屏不亮、发出烟雾;b) 当电源线或插头破损;c) 如果机内洒入液体或有异物进入时;d) 如果机器遭雨淋或水浇之后;e) 如果按照操作说明操作机器却不能正常工作时,请只调节说明书上指定的控制按钮;因为调节说明书指定以外的控制按钮可能会损坏机器,即使训练有素的技术人员在调节机器到达正常状态时,也要花上相当的时间。
f) 如果机器从高处坠落或因其他原因而损坏时;g) 当机器的动作出现异常的现象时;这一般意味着需要修理。
当需要更换部件时,要保证维修技术人员换上厂家指定的部件或与原部件特性相同的部件。
违反规定的替换部件可能会引起火灾、触电或其他损害。
在进行完维修及修理后,一定要求技术人员进行安全检查,以确保机器处于适当的操作状态。
开博尔高清播放机使用说明书重要安全说明 ................................................ ................................................... .. (1)第一章开博尔高清播放机简介 ................................................ . (5)第二章开博尔高清播放机技术规格 ................................................ (6)2.1 硬件配置 ................................................ ................................................... . (6)2.2可支持的显示设备 ................................................ ................................................... . (6)2.3 可播放的数字媒体格式 ................................................72.4 字幕支持 ................................................ ................................................... . (7)2.5 支持多国语言 ................................................ ................................................... .. (7)2.6 支持固件升级 ................................................ ................................................... .. (7)第三章使用开博尔高清播放机时的注意事项 ................................................ .. (8)3.1机器按键 ................................................ ................................................... .. (8)3.2设定视频输出模................................................... . (8)3.3更换USB外接设备时,系统设备的更新 ................................................ .. (8)3.4海量CD ................................................ ................................................... (9)3.5建议的开机循序 ................................................ ................................................... .. (9)3.6建议的关机循序 ................................................ ................................................... .. (9)3.7网站 ................................................ ................................................... .. (10)第四章安装开博尔高清播放机内置硬盘 ................................................ .. (10)4.1 安装内置硬盘 ................................................ ................................................... (10)4.2 格式化内置硬盘 ................................................ ................................................... .. (13)4.3 向内置硬盘传送文件 ................................................ ................................................... (14)第五章开博尔高清播放机的物理连接 ................................................ (14)5.1直流电源接口(12VDC) ......................................... ................................................... .. 155.2 USB 2.0 device接口 ................................................ ................................................... .. (15)5.3 USB 2.0 host接口 ................................................ ................................................... (15)5.4 10/100M网络接口(RJ45) .......................................... . (15)5.5 A/V接口 ................................................ ................................................... (15)5.5.1 视频连接 ................................................ ................................................... (15)5.5.2 音频连接 ................................................ ................................................... (19)第六章开博尔高清播放机的VFD面板 ................................................ . (21)第七章开博尔高清播放机的遥控器 ................................................ . (23)7.1使用遥控器前的准备工作及注意事项 ................................................ (24)7.2遥控器的按键定义 ................................................ ........................................(转载自:小草范文网:开博尔q2说明书). (25)第八章开博尔高清播放机的机器按键定义 ................................................ . (28)第九章开博尔高清播放机的设定与调整 ................................................ .. (29)9.1 音频设置 ................................................................................................... .. (29)9.2 视频设置 ................................................ ................................................... .. (30)9.3 系统设置 ................................................ ................................................... .. (34)第十章开博尔高清播放机的媒体播放 ................................................ (43)10.1视频播放 ................................................ ................................................... . (43)10.2音频播放 ................................................ ................................................... . (44)。