开博尔K130i使用说明书
迈普斯 230T1SB 全高清 LCD 监视器说明书

PhilipsLCD monitor with Analog TV tuner58 cm (23") w T-line1920x1080 Full HD230T1SBFull HD TV monitor with HDMI in a stylish packageExperience brilliant multimedia performance with this stylish, glossy and stunning Full HD 1080p display with TV tuner! Combined with HDMI and AV inputs along with powerful sound the 230T1 takes entertainment to a new height!Best picture quality•Full HD LCD display, with a 1920x1080p resolution •SmartContrast 50000:1 for incredible rich black details •SmartImage: Optimized user-friendly display experience •Up to 5ms response time for clear, fast moving action Great convenience•Built-in TV tuner for viewing TV programs on your PC monitor •Remote control for TV functionsExperience true multimedia•HDMI-ready for top quality, multimedia experience•SmartSound selects a perfect mode for audio performance •Incredible Surround for enhanced audio enjoymentHighlightsFull HD LCD display 1920x1080pThe Full HD screen has the widescreenresolution of 1920 x 1080p. This is the highest resolution of HD sources for the best possible picture quality. It is fully future proof as it supports 1080p signals from all sources, including the most recent like Blu-ray and advanced HD game consoles. The signalprocessing is extensively upgraded to support this much higher signal quality and resolution. It produces brilliant flicker-free progressive scan pictures with superb brightness and colors.HDMI ReadyAn HDMI-ready device has all the required hardware to accept High-DefinitionMultimedia Interface (HDMI) input. A HDMI cable enables high-quality digital video and audio all transmitted over a single cable from a PC or any number of AV sources (including set-top boxes, DVD players, A/V receivers and video cameras).SmartContrast ratio 50000:1You want the LCD flat display with the highest contrast and most vibrant images. Philips advanced video processing combined with unique extreme dimming and backlightboosting technology results in vibrant images. SmartContrast will increase the contrast with excellent blacklevel and accurate rendition of dark shades and colors. It gives a bright, lifelike picture with high contrast and vibrant colorsIncredible SurroundIncredible Surround is an audio technology from Philips that dramatically magnifies the sound field to immerse you in the audio. Using state-of-the-art electronic phase shifting, Incredible Surround mixes sounds from left and right in such a way that it expands the virtual distance between the two speakers. This wider spread greatly enhances the stereo effect and creates a more natural sounddimension. Incredible Surround allows you to experience total surround with greater depth and width of sound, without the use of additional speakers.5ms response timeResponse time measures signal reaction speed in milliseconds. Faster response time is better as it eliminates visible image artifacts that could dampen your experience when viewing fast moving images or objects. In this case, this LCD panel gives you 5ms response time so that you can watch your LCD TV with a clear,fast moving action.Issue date 2022-04-21Version: 1.0.212 NC: 8670 000 61584EAN: 87 12581 53478 3© 2022 Koninklijke Philips N.V.All Rights reserved.Specifications are subject to change without notice. Trademarks are the property of Koninklijke Philips N.V. or their respective owners.SpecificationsPicture/Display•Aspect ratio: Widescreen, 16:9•Brightness: 300 cd/m²•SmartContrast: 50000:1•Contrast ratio (typical): 1000:1•Diagonal screen size: 23 inch / 58.42 cm •Panel resolution: 1920 x 1080•Picture enhancement: Progressive scan, TrueVision•Response time (typical): 5 ms•Screen enhancement: Anti-Reflection coated screen•Viewing angle: 170º (H) / 160º (V)Supported Display Resolution•Computer formats Resolution Refresh rate 1920 x 1080 60Hz •Video formats Resolution Refresh rate 480i 60Hz 480p 60Hz 576i 50Hz 576p 50Hz 720p 50, 60Hz 1080i 50, 60Hz 1080p 50, 60HzSound•Output power (RMS): 2 x 3W•Sound Enhancement: Incredible Surround, Smart Sound•Sound System: Mono, StereoConvenience•Ease of Installation: Automatic Tuning System (ATS), Plug & Play•Ease of Use: On Screen Display, Program List, Side Control•Remote control: 230T1 Remote control•On-Screen Display languages: English, SimplifiedChinese•Other convenience: VESA mount (100x100mm)•Screen Format Adjustments: Widescreen, Normal, Zoom 1, Zoom 2•Smart mode: Movie, Standard, Personal, Vivid, Eco •SmartSound:Music, Speech, PersonalTuner/Reception/Transmission•Aerial Input: 75 ohm coaxial (IEC75)•TV system: PAL I, PAL B/G, PAL D/K •Video Playback: NTSC, PAL •Tuner Display:PLLConnectivity•Signal Input: VGA (Analog ), HDMI, PC Audio in•Ext 1: CVBS in, Audio L/R in •Ext 2: YPbPr in, Audio L/R in •Ext 3: CVBS out, Audio L/R out•Other connections: S-Video in, CVBS in, Audio L/R in, Headphone outPower•On mode: 49W (Typ.@monitor mode)•Off mode: 0.5W•Ambient temperature: 0 °C to 40 °C •Mains power: 100-240V, 50/60HzDimensions•Product with stand (mm): 399 x 560 x 176 mm •Product without stand (mm): 364 x 560 x 65 mm •Packaging in mm (WxHxD): 477 x 653 x 160 mmWeight•Product with stand (kg): 5.53 kg •Product without stand (kg): 5.35 kg •Product with packaging (kg): 7.59 kgAccessories•Included accessories: Table top stand, Power cord, Quick start guide, User Manual, Remote Control, Batteries for remote control。
数字无线通话设备使用手册

TELIKOU®内部通话系统MDS-400/BK-2400数字无线通话设备使用手册TELIKOU®产品使用说明书随时可能修改,恕不另行通知。
目录1.概述31.1主机面板开关及接口设置 (3)●前面板 (3)●后面板 (4)1.2腰包面板开关及接口设置 (5)1.3名词解释 (5)2.MDS-400主机62.1通话操作 (6)●主机主叫 (6)●腰包主叫 (6)2.2声控功能 (6)2.3音量调节 (6)2.4接口 (7)●2-Wire内部通话接口 (7)●4-Wire内部通话接口 (7)●辅助音频输入接口 (7)●辅助音频输出接口 (7)2.5麦克风增益 (8)2.6删码与对码 (8)●删码操作 (8)●1#与2#腰包对码 (8)●3#与4#腰包对码 (8)3.BK-2400腰包93.1低电与工作指示灯 (9)●对码 (9)●低电指示 (9)3.2麦克风开关及状态指示 (9)3.3功能设置 (9)●声控功能设置 (9)●麦克风选择 (10)3.4音量调节 (10)3.5注意事项 (10)1.概述1.1主机面板开关及接口设置前面板连接座Headset耳麦端口。
Pin1、Pin2:耳机麦克风平衡输入Pin3、Pin4:耳机听筒平衡输出按键MIC耳机的麦克风开关2W/4W两线/四线内部通话端口的切换开关Aux.Audio In辅助输入端口开关on/offVOX声控使能开关CH11通道开关CH22通道开关CH33通道开关CH44通道开关用于调整辅助输入端口音频电平调整钮Aux.Audio InLevelAux Out Level用于调整辅助输出端口音频电平Intercom In用于调整内部通话输入端口音频电平LevelIntercom Out用于调整内部通话输出端口音频电平LevelMic gain用于调整耳机麦克风增益Volume用于调整耳机音量大小开关Power主机电源开关指示灯Power LED电源指示灯。
ms01k说明书

ms01k说明书
一、先用放下幕布开关在西南角音箱后面
1.开关向上,幕布向上升。
2.开关向下,幕布向下降
3.开关中平,幕布停止上升或下降
注:如果按开关幕布无反应,请检查开关控制器电源是否插好,该电源插头为白色二脚插头。
投影使用方法:
二、打开爱普生投影
遥控器放在音箱的上面,遥控器上红色的按钮为开关,按一下打开投影,稍等几秒幕布上会出现在蓝色的背影此时请不要用控制器对投影做任何操作,如再按一下开关,则提示“是否关闭”,按红色按钮确定,则关闭投影,如果误按出现“是否关闭”,不要进行任何操作,等待5秒,将自动关闭提示窗口。
注:如果按开关幕布无显示,请检查开关控制器电源是否插好,该电源插头为黑色三脚插头。
三、连接笔记本
将音箱后投影仪线与笔记本的VGA插头进行连接。
一般打开笔记本就可以在幕布上看到笔记本桌面,如果无法显示按fn+f8或crt/lcd的组合键来切换。
四、会议结束
1.按投影遥控器上红色键两下关闭投影。
2.拨下与笔记本连接的投影线,盘好放在音箱后面。
3.按下幕布控制器向上开关,收起幕布。
开博尔H1283高清播放机FTP功能使用图文教程
H1283高清播放机FTP功能使用图文教程
本帖最后由wu325dong 于2011-1-28 08:25 编辑
近期,新入手开博尔高清播放机H1283,入手前几看重它的FTP功能和全格式支持,但装上后按照说明书上所说的却发现FTP功能不知道怎么用,上开博尔论坛也查不到有这方面的说明,无耐之下只能自己折腾。
经过一段时间的研究终于知道怎么使用,特制作本图文教程,供大家参考虑。
如先前已有机油发布,让忽略本贴。
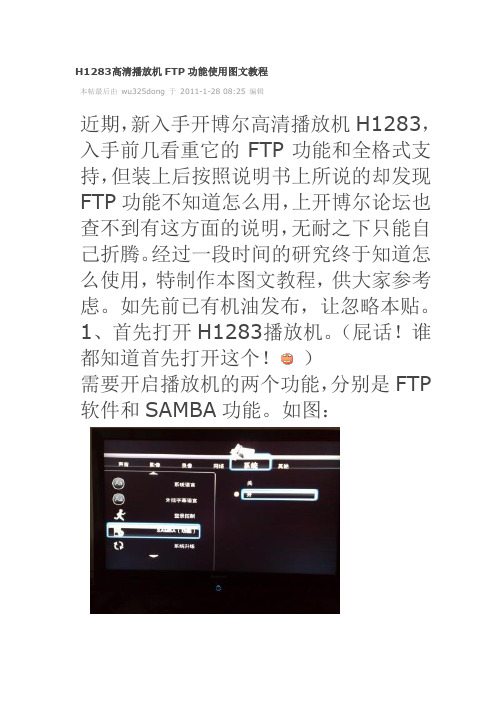
1、首先打开H1283播放机。
(屁话!谁都知道首先打开这个!)
需要开启播放机的两个功能,分别是FTP 软件和SAMBA功能。
如图:
2、开启电脑。
(#¥%¥#%废话好多!!!)安装播放机随机光盘的中的FlashFXP软件。
(什么!没这个软件!兄弟百度一下吧~)
新建站点,设置FTP的IP地址,具体查看自己的播放机,不会的请看说明书~~用户名:root 密码随意。
查好IP和用户名后先别急着点连接,要选到“高级”选项页中,把字符编码改为UTF-8,否则文件进入播放机后会变成乱码。
点击连接,如果你播放机的FTP软件已经打开,会出现下图样子。
这样子怎么看起来不像是自己机内硬盘的东东?别急,再往下看吧~
点击两次“上层目录”去到“/tmp/”目录下。
再比击进入该目录下的“usbmounts”文件夹,就可以看到播放机里的硬盘了,当然如果你机里有硬盘的话……
下图是本人进入播放机内硬盘的目录样子。
3、管理播放机里的文件,可上传进去也可删除。
Moxa AIG系列产品使用说明说明书
2Device Twin for AIG SeriesThe AIG Series integrates the Azure device-twin design, enabling the setting up of adevice twin by back-end applications using the desired properties. The device stateinformation is updated in the reported properties of the device twin and the properties are readable by back-end applications. For example, when a back-end application requests to install a new software version, AIG reports back with updates on the progress.2.1Eligible AIG SeriesAIG 300 SeriesAIG 500 Series2.2The Device Twin Reported PropertiesThe reported properties for the AIG device twin are described in the table below:No. Section Description1 applications Lists all applications{"applications": {"list": {"0": {"description": "MOXA Modbus TCP Client (Master)","desiredState": "ready","displayName": "Modbus TCP Client (Master)","hardwares": {"arraySize": 0},"health": "good","icon": "/app-icons/modbusmaster-tcp.png","id": "modbusmaster-tcp","name": "modbusmaster-tcp","state": "ready","version": "3.14.0-278"},"arraySize": 1}}}2 httpserver Displays the HTTP server settings and status.{"httpserver": {"certFileName": "default.crt","httpEnable": true,"httpPort": 80,"httpsEnable": true,"httpsPort": 8443,"keyFileName": "default.key"No. Section Description}}3 sshserver Displays SSH server status and settings{"sshserver": {"enable": true,"port": 22}}4 discovery Status of the discovery service: enable/disable{"discovery": {"enable": true}}5 serialconsole Serial console status: enable/disable{"serialconsole": {"enable": true}}6 wan Displays information on the WAN interface{"wan": {"displayName": "LAN1","dns": {"0": "10.128.8.5","arraySize": 1},"gateway": "10.144.51.254","ip": "10.144.48.128","name": "eth0","netmask": "255.255.252.0","type": "wan"}}7 route Lists routing priority of network interfaces{"route": {"priorityList": {"0": "Cellular1","1": "LAN1","arraySize": 2No. Section Description},"type": "route"}}8 dhcpservers Displays DHCP server settings and status{"dhcpservers": {"0": {"available": false,"displayName": "LAN1","domainName": "","domainNameServers": {"0": "8.8.8.8","1": "8.8.4.4","arraySize": 2},"enable": false,"endIp": "192.168.3.250","id": 1,"leaseTime": 3600,"name": "eth0","netmask": "255.255.255.0","startIp": "192.168.3.200","status": false,"type": "dhcpservers"},"arraySize": 1}}9 serials Lists the serial port configurations on the device{"serials": {"0": {"baudRate": 9600,"dataBits": 8,"device": "/dev/ttyM0","displayName": "PORT 1","flowControl": "none","id": 1,"mode": "rs232","parity": "none","stopBits": 1,"type": "serials"},"arraySize": 1}}No. Section Description10 time Displays system time zone and NTP settings{"time": {"ntp": {"enable": false,"interval": 7200,"server": ""},"timezone": "Asia/Taipei","type": "time"}}11 general Lists general device information such as CPU type, firmwareversion, and ThingsPro Edge version{"general": {"cpu": "ARMv7 Processor rev 2 (v7l)","description": "","deviceType": "gateway","firmwareVersion": "3.0","hostName": "Moxa","lastBootTime": "2019-11-13T11:42:51Z","lastRebootTime": "","memorySize": 524333056,"modelName": "UC-8112-LX","serialNumber": "TAIAB1021075","thingsproVersion": "1.1.0-348","type": "general"}}12 ethernets Lists the status and configuration of Ethernet interfaces on thedevice{"ethernets": {"0": {"broadcast": "10.144.51.255","displayName": "LAN1","dns": {"0": "10.128.8.5","arraySize": 1},"enable": true,"enableDhcp": false,"gateway": "10.144.51.254","id": 1,"ip": "10.144.48.128","mac": "00:90:e8:77:06:61",No. Section Description"name": "eth0","netmask": "255.255.252.0","status": "connected","subnet": "10.144.48.0","type": "ethernets","wan": true},"arraySize": 1}}13 gps Displays the GPS settings on the device{"gps": {"interface": "","location": {"lat": 14,"lng": 15},"mode": "manual","type": "gps"}}14 installations Displays information on the OTA upgrade progress and theresults{"installations": {"completedTask": 0,"id": 3,"isDeleted": false,"jobID": 3,"lastState": "","owner": "admin","parameter": {"download": false,"install": true,"jobID": 2},"state": "created"}}15 wifi Display the Wi-Fi settings on the device{"wifi": {"0": {"ap": {"band": "band24","broadcastSsid": true,"channel": 6,No. Section Description"region": "TW","security": {"mode": "wpa2","password": "","encryption": "aes"},"ssid": "moxa-sample-ap"},"enable": true,"id": 1,"type": "wifi","name": "wlan0","mode": "ap"},"arraySize": 1}}16 cellular Lists the cellular interface status and configuration{"cellulars": {"0": {"autoDetect": false,"available": true,"capabilities": {"sim": 1},"currentProfileId": 0,"displayName": "Cellular1","enable": false,"iccid": "","id": 1,"imei": "","imsi": "","keepalive": {"enable": false,"intervalSec": 120,"targetHost": "8.8.8.8"},"mac": "02:01:02:18:00:0b","module": "u-blox TOBY-L2 series","name": "usb0","operatorName": "","pinRetryRemain": 0,"profileTimeout": 140,"profiles": {"0": {"id": 1,"init": {"0": "sim:1",No. Section Description"arraySize": 1},"name": "SIM1","pdpContext": {"apn": "internet","auth": {"password": "","protocol": "none","username": ""},"id": 1,"static": true,"type": "ipv4"},"pinCode": "0000"},"arraySize": 1},"rat": "","status": "disconnected","type": "cellulars","wan": true},"arraySize": 1}}Note Moxa reserves the right to determine the scope of reported properties. For more information about reported properties, see Online User Manual2.3The Device Twin Desired PropertiesThe ThingsPro Edge desired properties use the following two common keys:•id: A device can have multiple interfaces of the same kind such as Ethernet. This key is used to specify the interface and start counting from 1.•arraySize: An array is encoded in an object containing sub objects and an arraySize key is used to index the sub objects. The value of arraySize should be equal to thenumber of sub objects; otherwise, the remaining sub objects will be discarded.The desired properties in ThingsPro Edge device twins are described in the table below: No. Section Description1 httpserver Used to enable/disable the HTTP(S) service and change theHTTP(S) port{"desired": {"httpserver": {"httpEnable": true,"httpPort": 80,"httpsEnable": true,"httpsPort": 8443}}}2 sshserver Used to enable/disable the SSH service and change the port{"desired": {"sshserver": {"enable": true,"port": 22}}}3 discovery Used to enable/disable device discovery service{"desired": {"discovery": {"enable": true}}}4 serialconsole Used to enable/disable the serial console port{"desired": {"serialconsole": {"enable": true}}}5 dhcpservers Used to set up the DHCP servers{"desired": {"dhcpservers": {No. Section Description"0": {"id": 1,"enable": true,"startIp": "192.168.3.100","endIp": "192.168.3.200","netmask": "255.255.255.0","domainNameServers": {"0": "8.8.8.8","arraySize": 1},"domainName": "","leaseTime": 2592000},"arraySize": 1}}}6 serials Used to set up the serial ports{"desired": {"serials": {"0": {"id": 1,"mode": "rs232","displayName": "PORT 1","baudRate": 115200,"parity": "none","dataBits": 8,"stopBits": 1,"flowControl": "software"},"arraySize": 1}}}7 time Used to set up a time zone and set up / enable / disable theNTP serverUpdating NTP Settings{"desired": {"time": {"ntp": {"enable": true,"interval": 6000,"server": ".tw"}}No. Section Description}}Updating the Time Zone{"desired": {"time": {"timezone": "Asia/Taipei"}}}8 ethernets Used to configure the Ethernet interfacesUpdating an Ethernet Interface for Dynamic IP{"desired": {"ethernets": {"0": {"id": 1,"enable": true,"enableDhcp": true,"wan": true},"arraySize": 1}}}Updating an Ethernet Interface for Static IP{"desired": {"ethernets": {"0": {"id": 1,"dns": {"0": "1.2.3.4","arraySize": 1},"enable": true,"enableDhcp": false,"gateway": "1.2.3.5","ip": "1.2.3.6","netmask": "255.255.255.0",No. Section Description"wan": true},"arraySize": 1}}}9 general Used to update the device profileUpdating the Device Host Name{"desired": {"general": {"hostName": "MyHost"}}}Updating the Device Description{"desired": {"general": {"description": "MyDevice"}}}10 gps Used to switch between the GPS modes: auto and manualUpdating the GPS lat and lng by the Manual Mode{"desired": {"gps":{"mode": "manual","location": {"lat": 11,"lng": 12}}}}Updating GPS by the Auto Mode{"desired": {"gps":{"mode": "auto","interface": "/dev/ttyUSB0"}}}No. Section Description11 wifi Used to configure the Wi-Fi AP{"desired": {"wifi": {"0": {"ap": {"band": "band24","broadcastSsid": true,"channel": 6,"region": "TW","security": {"mode": "wpa2","password": "","encryption": "aes"},"ssid": "moxa-sample-ap"},"enable": true,"id": 1,"type": "wifi","name": "wlan0","mode": "ap"},"arraySize": 1}}}12 cellulars Used to configure the cellular interfaces{"desired": {"cellulars": {"0": {"autoDetect": false,"available": true,"capabilities": {"sim": 1},"currentProfileId": 0,"displayName": "Cellular1","enable": false,"iccid": "","id": 1,"imei": "358503060483337","imsi": "","keepalive": {"enable": false,"intervalSec": 120,"targetHost": "8.8.8.8"No. Section Description},"mac": "02:01:02:18:00:0b","module": "u-blox TOBY-L2 series","name": "usb0","operatorName": "","pinRetryRemain": 0,"profileTimeout": 140,"profiles": {"0": {"id": 1,"init": {"0": "sim:1","arraySize": 1},"name": "SIM1","pdpContext": {"apn": "internet","auth": {"password": "","protocol": "none","username": ""},"id": 1,"static": true,"type": "ipv4"},"pinCode": "0000"},"arraySize": 1},"rat": "","signal": {"csq": 0,"ecio": 0,"indicator": "","level": 0,"rat": "","rscp": 0,"rsrp": 0,"rsrq": 0,"rssi": 0,"rxqual": 0},"status": "disconnected","type": "cellulars","wan": true},"arraySize": 1}No. Section Description}}Note Moxa reserves the right to determine the scope of reported properties. For more information about reported properties, see Online User ManualThe attributes and available values for serial port configuration are listed in the table below:Attributes Available Valuesmode rs232, rs422, rs4852w, rs4854wbaudRate 300, 600, 1200, 1800, 2400, 4800, 9600, 19200, 38400, 57600, 115200, 230400, 460800, 921600parity none, even, space, markdataBits 5,6,7,8stopBits 1,2,1.5flowControl none, hardware, software3Configuring the Desired Properties in Azure IoT HubOnce you create an Azure IoT Hub and add a device to the identity registry, a device twin for the device is available in the Device twin tab.To use the desired properties of the device twin, locate the key desired in the JSON fileas shown in the code below:。
智能广播U-1说明书WORD版l

智能广播U-1说明书WOR版lU盘智能音乐广播控制系统U-1系列用户手册1. 支持64MB-32GB 外插U 盘2.支持MP3、WMA3.支持六首连播及文件夹播放4.四套程序*120条定时5•可用电脑设置定时,从U盘更新&集成FM收音机(选装)7 •远距离无线遥控(选装)8•智能功放管理9.中文菜单操作系统10.定时精确到秒版权及免责声明本产品所有部分,包括硬件与软件等,其版权都归本公司所有,未经本公司许可,不得仿制、拷贝、摘抄或转译,除非得到本公司书面同意。
本书没有任何形式的担保、立场表达或其他暗示。
本书谈论到的产品名称仅做识别之用,而这些名称可能是属于其他公司的注册商标或是版权。
本公司对产品的可靠性、功能和设计方面不断改进,如本书描述与产品不符,一切以实物为准。
用户使用本公司产品必须符合本书描述的、国家及国际的操作规程及使用环境,否则:本机故障可能会对用户造成生命财产损失,即使此故障是由本公司产品设计和制造上的疏忽引起的,这些损失也与本公司及其销售商无关。
目录第四章文-------------------------- 9第五章菜单结构及操作------------------ 11一、分区控制----------------------------- 111、浏览播放----------------------------- 12[、编辑播放----------------------------- 12四、目录播放----------------------------- 13五、FM 收音机(选装)13--------------------------- 20⑤用电脑设置定时,从U盘更新第一章概述、特点、技术参数一、概述:U盘智能广播控制系统,可以定时播放U盘中MP3及WMA格式的音乐,并且自动控制功放电源和分区开关,是本公司集十余年智能校园广播研发经验,全新打造的一款海量存贮、功能齐全、使用方便、稳定可靠的智能广播控制器。
以太网通讯HMI说明
装调修比赛以太网通讯HMI操作说明系统型号:K2000MCi系统版本:K2000MCi_A01_V3.1.13a_160909HMI软件版本:HMI1.8.3网线:家用网线使用说明如下:1.设置系统参数录入方式下,设置页面,按下屏幕下方参开关对应软按键,通过按下按键把参数开关打开:P8111(本机IP)=192.168.1.101(系统出厂默认设置);P8112(子网页面)=255.255.255.0(系统出厂默认设置)P8113(默认网关IP)=192.168.1.1(系统出厂默认设置);P8114(服务器IP)=192.168.1.2(系统出厂默认设置);注:以上四个参数是系统通过网线与电脑连接的基本参数也是唯一参数,这四个参数可以修改也可以不修改,一定要灵活,如果不修改,那么意味电脑设置通讯协议参数时需要按系统提供的默认参数设置;反之,系统按照电脑设置的通讯协议参数设置参数,电脑端的参数就不需要动了。
总之,系统和电脑两个东西,互为参照,最终设置目的要保持一致。
我们一般采用不改系统参数改电脑的方式,这样比较省事。
2.关闭电脑防火墙(同时关闭其他杀毒软件)安装软件前建议将防火墙和杀毒软件关闭,否则可能出现安装时软件被隔离,安装成功后,连不上系统的问题,如果关闭防火墙,以win7系统为例说明:双击”我的电脑”打开---菜单栏找到”控制面板”打开----找到”系统和安全”打开---找到”windows防火墙”打开---对话框左侧找到”打开或关闭windows防火墙”打开---选择”关闭Windows防火墙”(家庭和公用都关闭)3.电脑侧设置本地连接的Internet 协议4右击电脑屏幕右下角无线网标志---选择打开”网络和共享中心”---找到“本地连接”打开---选择“属性”打开---选择“Internet 协议版本4(TCP/IPv4)”打开---选择“使用下面IP地址”,具体设置如下:电脑侧IP地址=P8114电脑侧子网掩码= P8112电脑侧默认网关= P8113注:这个设置是保持系统参数不变设置电脑的参数;如果反过来,电脑参数被人提前任意设置好,保持电脑不变而是修改系统参数使得两者保持一致,也希望大家会,其实很简单,就是把电脑设置的IP地址,子网掩码,默认网关设置到系统P8114、P8112、P8113,另外特别注意是参数P8111,一定要保证和P8114在一个网段(参数设置完成后一定要在程序---网络页面刷新一次,否则本机IP不会更新到网络页面导致电脑与系统连接不上),否则系统连接不上。
开博尔K760i说明
播放上一段分段电影或上一曲音乐
播放当前的影片或音乐,图片
播放下一段分段电影或下一曲音乐
影片停止播放 视频及音乐文件进行重复, 循环播放功能
2倍/4倍/8倍/16倍/32倍/速度 倒放电影 2倍/4倍/8倍/16倍/32倍/速 度播放电影
影片暂停播放
影片进行限速慢放
可查看影片播放角度
显示当前音轨信息,切换多个音 轨(针对有多个音轨文件)
10
11
内置12BIT色彩位深,可以精准的捕捉到12BIT的 图像数据,使图像的暗光部份和高光部份层次分明,图像 逼真,使用户得到最佳的扫描效果. 播放器可以内置一个硬盘,您可以在内置硬盘中长久保存文件。 注意:在抽取硬盘时,一定要在关机情况下操作。 找开右侧硬盘托架拉手,硬盘印刷字体朝上,平稳放入硬盘,关上舱门。 播放硬盘的情况下,播放器主菜单会显示HDD的符号。
密码类型 WEP 40/128位16进制 WEP 40/128位ASCII WPA-PSK(AES)密码 WPA2-PSK(AES)密码
位数 10或26位 5或13个字符 8~63个字符 8~63个字符
无线网络使用说明:
一.检查家中的宽带: 最低带宽要求:2M独享宽带,推荐中国电信,中国联 通,部分地区的中国铁通,不推荐长宽、各地方的广 电宽频及城中村共享连网方式。
蓝光光驱读取进出仓键 播放状态中,可对影片信息进行 设置调试 选时播放
播放中,可调整音效为静音模式 文件管理可以删除文件
返回到上一级目录
可对列表菜单进行上,下,左,右 选择,按ENTER(确认)进入需要 选择的项目中;
显示当前播放文件的相关信息
菜单:切换至高级控制台 标题:选择不同的章节
重复循环 音量调节键
iKAN DH7 4K支持HDMI摄像头监控器快速入门指南说明书
DH7-DKDH7 4K Support HDMI On-Camera Field Monitor Deluxe Kit********************© 2015 ikan Corporation. All rights Reserved713.272.8822What’s Included 1 x DH7 Monitor 1 x AC Adapter1 x Camera Shoe Mount 1 x Screen Cleaning Wipe 1 x Screen Protection Film1 x Sunhood1 x USB Drive1 x Standard to Mini HDMI Cable(1.5 ft)1 x Standard to Micro HDMI Cable(1.5 ft)1 x DV Battery Adapter1 x Battery1 x Charger1 x Soft Padded CaseSony “L” Series Canon “900” Series Canon “E6” Battery Panasonic “D54” Series Nikon EL15 SeriesMenu Button - Scroll WheelUsed to enter and navigate the menu.Exit / AspectUsed to exit the menu.Function ButtonsFunctions can be selected in the menu Power Button Power ON/OFF Battery Plate Release Releases Battery Plate HDMI Input Terminal3.5mm Headphone Output HDMI Output Terminal USB ConnectorUsed for Software Updates 1/4"-20 Threaded Insert DC 7-24V Power Terminal Standard DC ConnectionDV Battery Plate SlotUsed for mounting DV Battery plate1789101112234565FRONTBACKBattery Plate Installation & RemovalInstallationTo Install Battery Plate by pressing down on the battery plate, and pushing it leftRemovalTo Remove your battery plate, simply press down on the Release Button, then push the Battery Plate to the right until the plate releases.1. Press down on Release ButtonNOTE:To see further options for an active function, hold the function key for 2 seconds until option mode appears.Configuration of Setting MenusDisplays a crosshair on the center of the screen.The DH7 is equipped with Monochrome Peaking features, which highlight the desired focus area in a bright, red outline. The operator adjusts the focus control until the red indicator outlines on the desired area are razor sharp, indicating optimal focus. For best results, be sure object is properly exposed.The DSLR Scaling function will allow users to extend their DSLR camera’s HDMI Video Output any option of four; Normal 3:2, 16:9, or Full Screen. Convenience Made simple.Toggles between the Blue only, Red only, Green only, & Mono Modes. This is to help calibrate the image.The 1:1 pixel to pixel mapping allows you to emphasize on individual chosen elements in the shot. This feature is essential for ensuring you are in focus.This feature allows you to enlarge the image up to 3xThis function displays the blanking portion of the incoming signal.Activates grid on screen to assist with framing.This feature utilizes a full spectrum of assigned color indicators, ensuring flawless shot exposure. Under/Over luminance warnings enable the user to get the desired quality every time.Displays Audio Stereo Levels.The DH7 offers adjustable upper Clip Guide levels to accurately displayoverexposed images in any shooting condition. The operator simply assigns the upper IRE to their preference and any exposure over the set IRE limit will flash in a vivid purple, indicating only the over exposed area.A graphical representation of the pixels exposed in your image. The left side of the graph represents the blacks or shadows, the right side represents the highlights or bright areas and the middle section is mid-tones. How high the peaks reach represent the number of pixels in that particular tone. This tool helps you get proper exposure.Displays currently installed firmware.Used to update firmware when a USB containing update file is inserted.Function Set Up 1-8 Guides Crosshair Peaking Underscan DSLR Scaling Pixel-to-Pixel Zooming Check Field HV Delay Grids False Color Audio Wave Clip Guides Histogram 5DII Rec.Firmware Version Information Update (USB)Guides Toggle between the following: 80%, 90%, 15:9, 4:3, 1.5:1, 2:1, 2.35:1Crosshair Activates Crosshair on center of screen.Grids Activates grid on the screen to assist with framing.Video Config Brightness: 0-100 Contrast: 0-100 Chroma: 0-100 Sharpness: 0-100 Tint: 0-100Color Temp 5600K, 6500K, 9300K, Manua lBacklight Allows user to fine tune the intensity of the LCD Panel’s backlight.Aspect Allows user to change the aspect ratio of the image.System Config OSD - Language: Choose between English & Chinese for OSD.OSD - Duration: Choose how long the menu stays active without activity. OSD - Transparency: Choose from low, medium, high, or off. MENU Setup - Allows 5 users to save menu settings. System Reset - Reset Settings to factory defaults. Flip Control Flip Image and/or Menu Low Battery Alarm - Warns the user when battery is low.SpecificationsSupported Video SignalsOptional AccessoriesMA207MA211MA211-RMOUNTSBATTERY PLATESBP5-C BP5-E6BP5-P BP5-S BP5-N BP5-PG6BP5-SU7 In. Articulating Arm 11 In. Articulating Arm11 In. Articulating Arm w/ Single Rod MountCanon 900 Battery Plate Canon LP-E6+ Battery Plate Panasonic D54 Battery Sony L Series Battery Plate Nikon EN-EL15 Battery Plate Panasonic G6 Battery Plate Sony BP-U Series Battery PlateLearn MoreMore dynamic information at official website: SupportContactemail:********************CONDITIONS OF WARRANTY SERVICE• Free service for one year from the day of purchase if the problem is caused by manufacturing errors.• The components and maintenance service fee will be charged if the warranty period is expired.Free Service will not be Provided in the Following Situations:(*Even if the product is still within the warranty period.)• Damage caused by abuse or misuse, dismantling, or changes to the product not made by the company.• Damage caused by natural disaster, abnormal voltage, and environmental factors, etc.©2015 ikan Coporation. All rights reserved。
开博尔q2说明书
开博尔q2说明书篇一:开博尔K130i使用说明书篇二:开博尔全志系列刷机教程开博尔A31S/A20机型刷机教程此教程适用机型大致如下:A31S:C3四核,Q5,Q2,K610I四核,D1,K10升级版,M7 A20 :Q7,A1,C3九代,D2,I7,K610I九代 , Q1,T2,K10准备材料如下:1.双头USB线一根或OTG线(有的机型需要)2.回形针或者牙签一个刷机步骤讲解:1.A下载好线刷工具解压 B安装线刷工具软件C得到软件2.打开线刷工具,并点击”一键刷机“3.选择好对应的固件,放上去(不要点击立即升级!!!)B线连接好机器,拿出回形针,机器断电的情况下顶住后面的小孔,并将机器USB线另一端接入电脑机箱后方的USB接口,直到提示格式化提醒才可以松开,该机器刷机可以不用接电源,USB接上电脑视为通电!!5.选择”是“进入一键刷机页面6.等待几分钟,刷机完毕,请往下看。
各位开饭请注意,A31S/A20机型的刷机方法是一模一样的,区别在于固件不一样,请一定要仔细核对好固件,不要刷错,这样很伤机器的,线刷的教程在此结束,以下是资源,请下载线刷工具:提取码 552bA31S固件:A20固件:感谢您的观看,如有更多需要请到开博尔论坛参与互动:篇三:开博尔高清播放机K009等说明书开博尔高清播放机带您进入高清世界!产品服务手册重要安全说明? 为了减少火灾、触电或产品损坏的危险,请勿让本机遭受雨淋、受潮或滴溅上液体,也不要将诸如花瓶等盛水之器物置于本机之上。
? 为了确保良好的通风条件,请勿将本机安装或置于书柜、内藏式机柜或其它密闭的空间里。
勿让窗帘或任何其它物体堵塞通风孔,以免因机器过热而造成触电或火灾危险。
? 切勿将诸如点燃的蜡烛灯明火火源置于本机之上。
? 废弃处理电池时要尽量采取不破坏环境的方式? 机器应放在交流电源输出插孔附近,电源插头应放在出现故障时能够便于拔插之处。
? 本机使用过程中,可能受到移动电话的无线电波干扰。