麦景图C50前级放大器
电子管的发展历史

电子管的发展历史电子管简介:电子管,是一种最早期的电信号放大器件。
被封闭在玻璃容器(一般为玻璃管)中的阴极电子发射部分、控制栅极、加速栅极、阳极(屏极)引线被焊在管基上。
利用电场对真空中的控制栅极注入电子调制信号,并在阳极获得对信号放大或反馈振荡后的不同参数信号数据。
早期应用于电视机、收音机扩音机等电子产品中,近年来逐渐被半导体材料制作的放大器和集成电路取代,但目前在一些高保真的音响器材中,仍然使用低噪声、稳定系数高的电子管作为音频功率放大器件(香港人称使用电子管功率放大器为“胆机”)。
电子管发展历史:1883年,发明大王托马斯·爱迪生正在为寻找电灯泡最佳灯丝材料,曾做过一个小小的实验。
他在真空电灯泡内部碳丝附近安装了一小截铜丝,希望铜丝能阻止碳丝蒸发。
但是他失败了,他无意中发现,没有连接在电路里的铜丝,却因接收到碳丝发射的热电子产生了微弱的电流。
当时爱迪生正潜心研究城市电力系统,没重视这个现象。
但他为这一发现申请了专利,并命名为“爱迪生效应”。
1904年,世界上第一只电子二极管在英国物理学家弗莱明的手下诞生了,这使爱迪生效应具有了实用价值。
弗莱明也为此获得了这项发明的专利权。
1907年,美国发明家德福雷斯特(De Forest Lee),在二极管的灯丝和板极之间巧妙地加了一个栅板,从而发明了第一只真空三极管。
1947年,美国物理学家肖克利、巴丁和布拉顿三人合作发明了晶体管——一种三个支点的半导体固体元件。
1904年,世界上第一只电子管在英国物理学家弗莱明的手下诞生了。
弗莱明为此获得了这项发明的专利权。
人类第一只电子管的诞生,标志着世界从此进入了电子时代。
世界上第一台计算机用1.8万只电子管,占地170m*2,重30t,耗电150kW。
说起电子管的发明,我们首先得从“爱迪生效应”谈起。
爱迪生这位举世闻名的大发明家,在研究白炽灯的寿命时,在灯泡的碳丝附近焊上一小块金属片。
结果,他发现了一个奇怪的现象:金属片虽然没有与灯丝接触,但如果在它们之间加上电压,灯丝就会产生一股电流,趋向附近的金属片。
FUSION ENTERTAINMENT CM-AM806 四通道音频放大器说明书

MS-AM806M ARINE A MPLIFIERUser/Installation ManualContentsFeature Overview....................................Pg 3 Control Descriptions . . . . . . . . . . . . . . . . . . . . . . . . . . . . . . . . .Pg 4 Installation . . . . . . . . . . . . . . . . . . . . . . . . . . . . . . . . . . . . . . . . .Pg 6 Connections . . . . . . . . . . . . . . . . . . . . . . . . . . . . . . . . . . . . . . . .Pg 6 Inputs and Gain Setup . . . . . . . . . . . . . . . . . . . . . . . . . . . . . . . .Pg 8 Two Channel Installation ..............................Pg 8 Three Channel Installation .............................Pg 9 Four Channel Installation .............................Pg 10 Five Channel Installation..............................Pg 11 Six Channel Installation...............................Pg 11 Trouble Shooting . . . . . . . . . . . . . . . . . . . . . . . . . . . . . . . . . . . Pg 14 Specifications . . . . . . . . . . . . . . . . . . . . . . . . . . . . . . . . . . . . . . Pg 15NOTE: Not for use in 12 Volt SystemsRECORD YOUR PRODUCT DETAILS HERE: MODEL NUMBER DATE OF PURCHASE AFFIX RECEIPT HERE2010 Version 1.0Feature Overview• 2 Ohm Stable Class-D Amplifier Design• Variable LP and HP Electronic X-OVER @ 12dB/octave• 4 Gauge Power and Ground Connections• Nickel Plated Audio Input RCA Connections2-OHM STABLE STEREOProvides the option of connecting an extra pair of speakers in parallel, 2 per channel at 2-Ohms (A total of 12 speakers).MARINE GRADE CONNECTIONSNickel plated RCA connectors and stainless components improve signal flow for optimum outputCLASS-D DESIGNThe 6 x 80 Watt RMS 2-Ohm stable (per channel) design ensures clean and powerful amplification of the input signal, enough to rock the boat. CONFORMAL COATED CIRCUITRYProvides added protection from salt air and moisture to ensure maximum product life.MARINE GRADE CHASSISStainless steel end and bottom plates provide a stunning finish coupled with environmental protection.0 0 3FEATUREOVERVIEWControl Descriptions004C O N T R O L S91178106541231 Power And Status LEDs:This shows if the amplifier has been correctly powered up and if any faults are pre-sent.2 Crossover Selector:Sets the appropriate mode of operation. The 3 positions available are OFF, LP and H P .3 FREQ Control: Low Pass:Set the crossover switch 2 to LP when a subwoofer is connected. Ensure the crosso-ver frequency is set at 100Hz or below, this feature is designed to filter all mid to high frequencies that only FULL RANGE speakers should produce. NOTE: Failure to do so could result in speaker damage.005C O N T R O L SHigh Pass:Set the crossover switch 2 to HP and turn this control to 65Hz or above when using speakers smaller than 6”, this feature is designed to filter all low bass frequencies that only SUBWOOFERS should produce. NOTE: Failure to do so could result in speaker damage.4 Level:This allows level adjustment of the input signal. Use this control to correctly match the head unit to the amplifier. To set this control correctly, turn the amplifier level to MIN and the head unit to 3/4 volume, with the BASS and TREBLE on zero , then slowly turn up this amplifier level control towards the MAX end of the control. NOTE: If the sound becomes distorted, turn this control down.5 Input Selector:The MS-AM806 input section allows you to send signals to the amplifier section through the use of two, four or six differential inputs. Input connections are made via one, two or three pairs of traditional RCA-type jacks.If you wish to send six discrete channels into the amplifier, simply use all six inputs and set the “Input Mode” switch to ” Z1L+R, Z2L+R, Z3L+R” position.If you wish to feed all six channels by using only four channels of full-range input, set the “Input Mode” switch to “Z1L+R, Z2L+R” and use only the inputs to channels Z1L & Z1R, Z2L & Z2R. In this mode, channels Z3L & Z3R will operate with a sum of the Z1L & Z2R and Z2L & Z2R input signals, respectively.If you wish to feed all six channels by using only two channels of full-range input, set the “Input Mode” switch to “Z1L+R” and use only the inputs to channels Z1L & Z2R. In this mode, channels Z2L & Z2R, Z3L & Z3R will operate from the Z1L & Z2R input signals, respectively.6 RCA Input (Zone 1 & 2, Zone 3 & 4, Zone 5 & 6):Connect these RCA connectors to the LOW LEVEL output connection from the head unit.7 Ground Connection:Connect directly to suitable ground point via a 4 gauge power cable. NOTE: This is to be the first wire to connect. Damage could result if this is not done.8 Remote Connection:This input is for turning the amplifier on and off. This requires a switched positive (+12V - 24V) To power ‘ON’ the amplifier, this can be found on the rear of the head unit in the form of an electric antenna output, or a remote on output. If not available you can wire to a switched +12V - 24V supply.006I N S T A L L A T I O NInstallationMountingAppropriate mounting is very important for the prolonged life expectancy of any amplifier. Select a location that allows enough space so sufficient airflow is maintainable and a location that provides protection from moisture. Keep in mind that an amplifier should never be mounted upside down. Upside down mounting will compromise heat dissipation through the heatsink and could engage the thermal protection circuit.Excessive heat will shorten your amplifiers life. To maximise heat dissipation, be sure to leave at least 2.5” of clearance around the amplifier. If space is of the essense and the amplifier must be mounted in an enclosed or restricted area, a small 3 inch fan should be used in correspondence with a duct so the heat can flow past the Heatsink.To avoid scratching your new FUSION amplifier, pre-drill the mounting holes with either a 3mm or 9/64” diameter drill bit and use the screws supplied in the accessory kit. Be sure to investigate your mounting area thoroughly to avoid electrical wires, vacuum lines or fuel lines.Installation OptionsThe quality of installation will affect the performance and reliability of your FUSION amplifier. For maximum performance we recommend you have your new FUSIONamplifier installed by an authorised FUSION dealer. Our highly skilled dealers have vast knowledge of our products and their installation techniques are necessary to unleash the high performance capabilities of your amplifier.If you decide to connect the amplifier yourself, it is important that you read this manual carefully and throughout before starting. Once you have finished reading and you still have questions regarding installation, we recommend your FUSION dealer.ConnectionDISCONNECT THE NEGATIVE BATTERY POST CONNECTIONFUSION 24VDC amplifiers are designed to work within a 22 to 30 volt DC range. Before any wires are connected, the vessel’s electrical system should be checked for correct voltage supply with the help of a voltmeter. First, check the voltage at the battery the voltmeter should read between 24 and 28.8 Volts. If your vessel’s electrical system is9 Power +24V Connection:This must be connected to the battery positive (+) terminal via a 4 gauge power cable and with an inline fuse or circuit breaker at the battery end. NOTE: This is to be the last wire to connect up during installation as damage could result.10 Fuses:Please ensure the correct type of fuse is fitted, as specified in this manual. PLEASE NOTE: the MS-AM806 has 3x 15A fuses.11 Speaker Output:See channel installation diagrams in this manual for correct speaker connection007C O N N E C T I O Nnot up to these specification, we recommend having it checked by an auto electrician before any further installation. Once the vessel is checked, make certain the correct cable size is used.PowerFUSION amplifiers should be wired directly to the battery using the appropriate sized cable. Start at the vessels battery and run the power cable through to the amplifier. FUSION recommends the use of grommets when passing the power cable through any metal wall to avoid sharp corners or sharp body parts that may easily cut through the insulation on the cable.Avoid running the power cable over engine components. The use of an inline fuse or circuit breaker is a must, this will prevent the risk of a potential fire caused be a short in your power cable. The main power wire(s) to the amplifier(s) in the system is recom-mended to be fused within 18 inches (45 cm) of the positive battery post connection. In a multi-amplifier installation from one power cable, the fuse value at the battery should be high enough for all of the equipment being run from that power wire. Each individual amplifier is recommended to be fused within 12” (30cm) via a fused distribution block. You may now connect the cable to the battery, but remember to leave the fuse out or circuit breaker off until all other cable connections are made. If only one MS-AM806 is being run from that power wire, we recommend a 60A fuse or circuit breaker.GroundWhen grounding your FUSION amplifier, use the same gauge cable for ground as you did for the power. Secure the ground cable to the appropriate ground point, now its time to connect the power and ground cables to the amplifier. Cut both cables to length. Use a hex type screwdriver to loosen the +24V and the GND connections on the amplifier. Terminate the ground first, and then the +24V and please make sure that you terminate them into the correct terminals. Then tighten the screws down securely.Speaker LoadKeep in mind FUSION ‘AM’ series amplifiers are high power amplifiers and not high current amplifiers. In other words they require a minimum impedance of 2 ohms STEREO and 4 ohms bridged MONO to operate trouble free. Too low of an impedance could send your FUSION amplifier into protection mode and/or damage the amplifier.Remote Turn-onThis terminal uses a standard +12 to +24V remote turn-on lead, this can be provided by the source unit’s 12V remote turn-on output. The amplifier will turn on when any voltage between +12V and +24V is present at its “Remote” input and turn off when this voltage is switched off. However if a source unit does not have a dedicated remote turn-on out-put, the amplifier’s turn-on lead can be connected via a correct voltage relay from +12V to +24V that derives power from an ignition-switched circuit.Run a minimum of 18 gauge wire from the amplifier location to the source of theswitched +12V to +24V lead. Connect the source remote output to the wire. Go back to the amplifier and cut the wire to length. Loosen the screw terminal marked REM on the amplifier using a hex type screwdriver. Slip the wire into the connector and tighten the screw securely.FUSERLTwo Channel Installation008I N S T A L L A T I O NInputs & Gain SetupLow Level InputsBe extra careful with your RCA interconnects. Hiss, engine noise, and fan noise caneasily be picked up through RCA cables if run incorrectly. Avoid running your RCAs near large wire looms and electric fans if possible. Run your RCA cables away from any power cable. Be sure to check for correct balance (Red is right and Black or White is left)Level ControlOn the amplifier, is the LEVEL control, this control allows you to match the input level of the ampli-fier to the output level of your head unit. Matching the input can be accomplished in three simple steps:1. Turn the LEVEL control on the amplifier to minimum.2. Turn up the head unit and adjust to 2/3 maximum volume ensuring that the BASS and TREBLE are set to zero.3. Adjust the LEVEL control until the desired volume is achieved without audible distortion.Remember, the gain control is not a volume control. Ignoring the three steps above may leave you with damaged speakers and/or a damaged amplifier.FUSEFL FR RL RRFLFR RLRR RL Three Channel Installation009C O N N E C T I O NFour Channel InstallationFUSEFL FR RL RRFLFR RLRR RL RL 010C O N N E C T I O NFive Channel InstallationFUSERLRL 011C O N N E C T I O NSix Channel Installation012C O N N E C T I O NFUSERLLRLR013C O N N E C T I O NTrouble ShootingProblemCauseSolutionPower LED not ‘ON Fuse at battery blown ornot installed Replace with correct type and rated fuse.Improper connections Check that the ground wire, power wire and theremote wires are connected to the correct terminalStatus LED‘ON’Fuse blown Replace with correct type and rated fuse.Amplifier too hotMove the amplifier into a more ventilated areaSpeaker wires shortedCheck that there are no speaker wires shorted to any other wire and also check if any wire is shorted to ground Internal malfunctionDisconnect all wires except ground, power and remote. Then turn the amplifier ’ON’, if the protection light is still ’ON’ then return for service014T R O U B L E S H O O T I N GSpecificationsSignal to Noise >97dBInput Sensitivity 300mV - 8VLP Variable Crossover 40Hz - 400Hz @ 12dB/octave HP Variable Crossover 400Hz - 2.4KHz @ 12dB/octave InputImpedance 20kΩDampingfactor >200T.H.D 0.05%Fuse Ratings 3 x 15ADimensions(mm) 229 (W) x 405(L) x 53(H)25 Volt power output specification65 Watts RMS x 6 @ 4Ω 1% THD+N105 Watts RMS x 6 @ 2Ω 1% THD+N230 Watts RMS x 3 @ 4Ω Bridged 1% THD+N28.8 Volt power output specification80 Watts RMS x 6 @ 4Ω 1% THD+N130 Watts RMS x 6 @ 2Ω 1% THD+N275 Watts RMS x 3 @ 4Ω Bridged 1% THD+N 0 1 5SPECIFICATIONS。
矩声巨作|X-SABREPro音频解码器

矩声巨作|X-SABREPro音频解码器点击上方高保真音响杂志可订阅哦! 在我的音响组合里有几款音频解码器,有廉价老芯片的,也有现今流行的PCM1794、ES9018芯片的。
虽然并非是唯芯片论者,但我相信新技术一定会带来新感受。
去年世界最强DAC芯片ES9038PRO发布,翘首以待能有一款使用此芯片的解码器,满足我的听音追求。
春节前夕天降惊喜,一款国内生产的领先世界使用ES9038PRO芯片的解码器到手了,这款解码器陪伴我过了一个充实快乐春节。
令人叫绝的设计 开箱有喜,打开包装捧出这款解码器,真是惊喜连连。
沉甸甸的好像是个实心铝块,前面板和侧板钻石切割风格的处理,线条明快,既打破了四方四正的古板造型,看起来又不失沉稳。
显示屏中间的圆形、两边的圆弧和硬朗线条的配合显得刚柔相济,端庄典雅。
这个机壳的确是CNC数控机床用一整块铝材精工制作而成的,这使整机具有强大的机械强度,良好的防震能力,还兼具了更好的屏蔽效果。
表面采用喷砂处理,质感良好。
显示屏设计也独具匠心,中间的圆形的液晶屏提供全功能信息显示,两边9个功能键位,全部功能采用轻触操作,有很好的操作手感。
附带的全功能遥控器,全铝外壳小巧精致,采用人体工学设计,手感可人。
整体充满了一种艺术气息。
无一不备的功能原以为这就是一个使用高级芯片的常规解码器,操作起来却大出所料。
一是,X-SABRE Pro配备了功能齐全的接口,输入接口除光纤、同轴、AES/DBU、USB以外还增加了IIS接口。
有些解码器的IIS连接使用电话线接口,我总感觉电话线接口接触不太可靠。
这台解码器使用了HDMI接口连接,这种连接会接触更好更稳定,频率带宽也足够大,能更好满足现今流行的高速率的母带格式音乐数据传输。
这个高端设备上具有的接口,不经调制,能更好地降低时基抖动,更好地传输高速率数据,保证更高的音质。
二是,几乎支持所有高品质音频格式。
IIS接口支持DSD1024格式的Native DSD格式的解码,USB接口最高支持DSD512格式的ASIO原生解码,S/PDIF接口支持Pop编码的DSD64文件回放。
几款音质出色的国产胆机
近些年来,国产电子管H i-Fi放大器制造得到了飞速发展,且音效卓越。
著名的电子管放大器制造厂已有十多家,产品在国内外市场上销售旺盛,并有很高的声誉。
出色的放音效果以及相当高的声价比,赢得了众多的胆机用家的欢迎和媒体的好评。
本文就介绍几款音效奇佳的胆机。
1 MELODY SP-3、SP-6及十周年纪念版SP-31.1 MELODY SP-3MELODY是国内最有声誉、最具规模的胆机制造厂家之一。
10年前推出了型号为S P-3的合并式胆机功放,设计制造极有创意,银灰色的机身艺术性很强,声音表现极有魅力,很受胆机发烧友的青睐,媒体也给了很高的评价,称是历来最靓声的合并式胆机功放,因此也有很高的销售量。
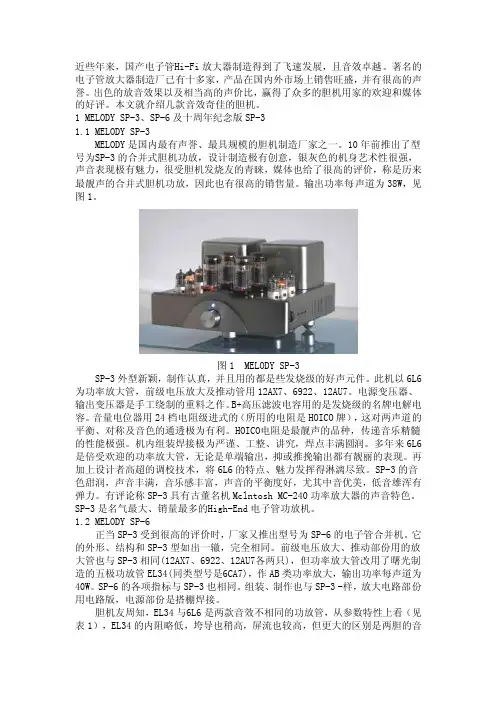
输出功率每声道为38W,见图1。
图1 MELODY SP-3SP-3外型新颖,制作认真,并且用的都是些发烧级的好声元件。
此机以6L6为功率放大管,前级电压放大及推动管用12AX7、6922、12AU7。
电源变压器、输出变压器是手工绕制的重料之作。
B+高压滤波电容用的是发烧级的名牌电解电容。
音量电位器用24档电阻级进式的(所用的电阻是HOICO牌),这对两声道的平衡、对称及音色的通透极为有利。
HOICO电阻是最靓声的品种,传递音乐精髓的性能极强。
机内组装焊接极为严谨、工整、讲究,焊点丰满圆润。
多年来6L6是倍受欢迎的功率放大管,无论是单端输出,抑或推挽输出都有靓丽的表现。
再加上设计者高超的调校技术,将6L6的特点、魅力发挥得淋漓尽致。
SP-3的音色甜润,声音丰满,音乐感丰富,声音的平衡度好,尤其中音优美,低音雄浑有弹力。
有评论称SP-3具有古董名机Mcln toshMC-240功率放大器的声音特色。
SP-3是名气最大、销量最多的H igh-End电子管功放机。
有钱也不一定能买到的经典发烧功放
有钱也不一定能买到的经典发烧功放1 麦景图 MA8000 旗舰级合并功放麦景图MA8000集合了传统的音响美学和最新的音频技术于一身,在外观上延续了麦景图招牌式的经典黑色玻璃前面板配湖蓝色功率表,精工抛光不锈钢机箱,旋钮和拉丝铝手柄;内在集合了McIntosh最新的高级音频技术,具备丰富的输入/解码功能,为用家提供极致的全能音响回放扩音。
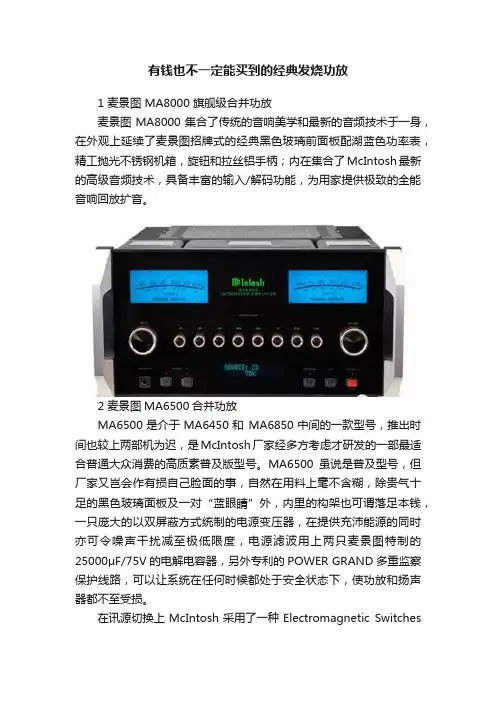
2 麦景图MA6500合并功放MA6500是介于MA6450和MA6850中间的一款型号,推出时间也较上两部机为迟,是McIntosh厂家经多方考虑才研发的一部最适合普通大众消费的高质素普及版型号。
MA6500虽说是普及型号,但厂家又岂会作有损自己脸面的事,自然在用料上毫不含糊,除贵气十足的黑色玻璃面板及一对“蓝眼睛”外,内里的构架也可谓落足本钱,一只庞大的以双屏蔽方式统制的电源变压器,在提供充沛能源的同时亦可令噪声干扰减至极低限度,电源滤波用上两只麦景图特制的25000μF/75V的电解电容器,另外专利的POWER GRAND多重监察保护线路,可以让系统在任何时候都处于安全状态下,使功放和扬声器都不至受损。
在讯源切换上McIntosh采用了一种Electromagnetic Switches技术,因为电气触点是置于充满惰性气体的玻璃管中,从而可达到无电弧的超静状态切换,并且不会氧化,永远保持最佳的接触效果。
众所周知McIntosh所有前级放大器都备有高质素的唱头放大器,这也是所有怀旧发烧友对麦景图情有独钟的原因之一,MA6500虽是合并式放大器,但厂家亦无半点轻视之意,内置有同高档前级一样的低噪音、高增益RIAA唱头放大器,适合MM动磁唱头使用,充分满足LP爱好者的需要。
3 McIntosh MC275 Gordon Gow 1989年版麦景图公司可以说是始终保持其显赫形象的少数名牌之一。
但若论最名颂千古者,则不得不数到62年面世的C22真空管前级和MC275真空管后级,这两款器材,时至今日仍是部分发烧友追求的对象,MC275每声道采用一对KT-88强方管做推挽式放大,每边输出75瓦,推力绝非泛泛之辈。
最值得珍藏的古董音响
最值得珍藏的古董音響所謂的古董音響Vintage Audio,不是看器材的外觀是不是古色古香,而是指約70 年代(含) 之前所生產,而且稱得上是經典(或至少優秀) 的產品。
在這裡,我們放寬標準,把一些80 年代的傑出器材也列入,讓你有更多機種可以參考,選擇。
...論頻寬、解析、動態,古董音響"大多" 不是現代音響的對手,但是,精準又乾淨的聲音一定令人滿意嗎?!事實證明,聽音樂,絕對不只是科學、科技上的追求而已。
古董音響因為...1. 音樂性絕佳,具有大多數現代音響所沒有的獨特感染力。
2. 零件多為真材實料,且多採手工搭棚方式製造,經久耐用。
3. 外觀具獨特風格,對喜好復古的人,有莫名的吸引力。
4. 價格較現代音響產品合理太多(部分炒作過度者除外)。
因而持續受到許多特定音響迷的喜愛。
...不過,想玩古董音響得先有"心理準備"。
撇開外觀的老舊、生鏽、傷痕... 不談,內部零件的老化,甚至毀壞,通常無可避免,勢必要翻新(摩改)。
但大規模的整修,除了得花上不少錢(可能不比買一台老機器便宜),還得擔心原有的老零件難尋,若拿現代零件取代,又可能喪失原有的韻味的尷尬局面(尤其是前級)。
不喜歡"麻煩" 的人,最好三思,要不要踏入古董音響的領域?!...另外,由於本地的氣候潮濕,就算你有幸從國外找得保存狀況良好的器材,也不免很快就鏽蝕斑斑。
建議用防鏽油,定期擦拭保養,才能讓她永保美麗。
...以下為部分最負盛名的"名器"。
但不代表這些器材一定無可挑剔,或無可匹敵。
而且選購時,尚必須考量其二手商品的事實,及零件老化、外觀磨損的狀況,仔細評估,是否值得珍藏?! 價格是否合理?!...物超所值: ★炒作過度: ★外型出眾: ★經典古董喇叭Acoustic Research : AR-3 (1959) ★/ AR-3a (1964) ★Advent : Loudspeaker (Large) (Old) (1969) ★/ Loudspeaker (Large) (New) (1978) ★Altec : A5 (1941) / A7 (1945)Apogee : Scintilla (1980) ★B&W : Matrix 801 (1979) ★/ Matrix 802 (1979) ★Dahlquist : DQ-10 (1974) ★Denon : SC-880 (1988) ★★Diatone : P-610 (1958) ★/ DS-251 (1970) ★/ DS-28B (1974) ★/DS-1000 (1983) ★★/ DS-2000 (1985) ★★/ DS-10000 (1985) ★Dynaco : A-25 (1969) ★EIectro V oice : Patrician 600 (1953) / Patrician 800 (1971)Goodmans : Maxim (1961) ★Jbl : Paragon (D44000) (1957) ★/ L101 (1965) / L100 (1971) ★/4310 (1971) ★/ 4350 (1973) / 4343 (1976) / 4344 (1982)Jensen : G610 + Imperial (1950) ★Harbeth : LS 3/5a (1975) ★★Kenwood : LS-M7 (1989) ★★Kef : LS 3/5a (1975) ★★Klh : Model 6 (1968) ★/ Model 9 (1968) ★Klipsch : Klipschorn (1946) / La Scala (1963) ★/ Belle Klipsch (1971) ★Linn : Isobarik (1976)Onkyo : Monitor 500 (1984) ★★/ D-77XG (1989) ★★Pioneer (Exclusive) : EW-302 (Model 2301) (1982) / S-101 (1987) ★★/ S-701 (1987) ★★/ S-707 (1987) ★★/ S-3000 (1987) ★Quad : ESL-57 (1957) ★/ ESL-63 (1982) ★Rogers : LS 3/5a (1975) ★★/ LS 5/8 (1976) ★/ LS 5/9 (1976) ★Snell : Type A (1978) ★Spendor : BC1 (1972) ★/ LS 3/5a (1975) ★★/ SP1 (1983) ★Spica : TC-50 (1983) ★Amesbury (1974) / Arden (1975) / Cheviot (1975) ★/ Arundel (1982)Technics : SB-10000 (1977) / SB-E100 (1978) / SB-E200 (1978) /SB-MX7 (1987) ★★Victor (Jvc) : SX-3 (1973) ★★/ SX-5 (1973) ★★/ SX-511 (1987) ★★/ SX-500 (1988) ★★/ SX-521 (1988) ★★Yamaha : NS-1000 (1978) ★/ NS-100M (1979) ★經典古董後級- 電晶體Crown : DC 300 (1967) ★Jbl : SE460 (1973) ★Mark Levinson : ML-2 (1977)Quad : 303 (1967) ★經典古董後級- 真空管Acrosound : Stereo 120 (1961) ★Altec : 350A (1959) ★Armstrong : A10 Mk2 (1957)Audiomaster : UL-II (1957) ★/ 11A (1959) ★Bbc : AM8/1 (1957 by Sound Sales) ★/ AM8/4 (1960 by Sound Sales) / AM8/6 (?)Beam Echo (Avantic) : DL7-35 (1958) ★★Conrad-Johnson : MV-75 (1983) ★Dynaco : ST-70 (1959) ★/ ST-35 (1964) ★Eico : HF-14 (1958) / HF-22 (1958) ★/ HF-30 (1958) ★/HF-35 (1958) ★/ HF-50 (1958) / HF-60 (1958)Fisher : 50A (1954) ★/ 50AZ (1955) / 55A (1955) / 80AZ (1955) /30A (1958) / SA-100 (1959) / SA-300 (1960) / SA-1000 (1962) ★/680A (1962) ★Harman Kardon : Citation II (1959) ★/ Citation V (1959) ★Heathkit : W-3M (1954) ★/ W-4M (1958) ★/ W-5M (1958) ★★Leak : TL12 (1948) ★/ TL25 (1948) / TL12.1 (1950) ★/TL25A (1953) / TL12+ (1956) ★/ TL25+ (1956) ★/ TL50+ (1957) ★/ST-20 (1958) / ST-50 (1958) / ST-60 (1961)Lowther : LL15S (1960)Luxman : MB-88 (1966) ★★/ MQ-60 (1969) ★★/ MQ-80 (1974) ★★/ MB-3045 (1976) ★★/ MQ-70 (1978) ★★/ MB-88 Ultimate (1982) ★/ MQ-50 (1983) ★/ MB-300 (1984) ★★/ MQ-360 (1985) ★Marantz : 2 (1956) ★/ 9 (1960) ★★/ 8B (1962) ★★Mcintosh : MC30 (1954) / MC60 (1954) / MC40 (1960) / MC75 (1960) ★/ MC225 (1960) / MC240 (1960) ★/ MC275 (1962) ★Michaelson & Austin : TV A-1 (1970) ★Pilot : AA-901 (1952) / SA-232 (1958) ★/ SA-260 (1958) ★/SA-264 (1961) ★Pye : PF91 (1954) / HF25 (1958) / HFS20 (Mozart) (1959)Quad : II (1954) ★Radford : STA12 (1960) / MA15 (1961) / STA15 (1962) / MA25 (1962) ★/ STA25 (1965)Radio Craftsmen : C500 (1953)Rca : MI-9377 (1954) / MI-12191 (SP-20) (1954) ★/ LMI-32216 (1957) ★★Rogers : Cadet II (1963) / Cadet III (1964)Scott : 208 (1961) ★Sound Sales : Model 12/14 (1946) / A-Z Junior (?)Stromberg-Carlson : AP-55 (1955) ★/ AP-428 (1957) ★Western Electric : 86B (1934) ★/ 91A (1936) ★/ 124 (1939) ★/131A (1940) ★/ 142A (1942) ★/ KS-16608 (?) ★經典古董前級- 電晶體Audio Research : SP-5 (1977) ★Jbl : SG520 (1973) ★Marantz : 7T (1967) ★Mark Levinson: LNP-2 (1975) ★/ LNP-2L (1977) ★Quad : 33 (1967) ★經典古董前級- 真空管P.S. 約1956 年前生產的古董前級,只有mono 輸出,所以需要兩台,請注意! Audio Research : SP-3 (1972) ★/ SP-6 (1978) ★/ SP-10 (1982) ★/SP-11 (1985) ★/ SP-9 (1987) ★Beam Echo (Avantic) : SP-21 (1959) ★Conrad Johnson : PV-2a (1981) ★/ Premier 3 (1983) ★Counterpoint : SA-11 (1984) / SA-5000 (1990)Dynaco : PAM-1 (1957)Eico : HF-65 (1956) / HF-85 (1958) / ST-84 (1960) ★Electro V oice : PRC-1 (1955)Fisher : 50-C (1953) ★/ 80-C (1956) / 400-C (1959) ★/400-CX (1961) ★/ 400-CX II (1962) ★Grommes : 211 (1956) / 207 (1957) / 209 (1960)Heathkit : WA-P2 (1954) ★★Lafayette : KT-300 (1957) ★/ KT-600 (1958) ★Leak : Varislope (1952) ★/ Varislope II (1954) ★/ Varislope Ⅲ(1956) ★/ Varislope Stereo (1962) ★/ Varislope 2 Stereo (1965) ★Luxman : CL-35 (1970) ★Marantz : 7C (1959) ★★Mcintosh : C20 (1959) ★/ C11 (1961) ★/ C22 (1962) ★★Pilot : PA-911 (1952) / PA-913 (1955) / SP-210 (1958) ★/SP-215 (1959) / SP-216 (1960)Pye : PF91A (1954) / HF25A (1958) / HFS20 (Mozart) (1959)Quad : 22 (1957) ★Radio Craftsmen : C300 (1953) / C350 (1954)Rca : MI-12150 (1953) / LMI-32215 (1957) ★Scott : 121-A (1953) / 121-C (1956) / 130 (1958) / 122 (1960) ★/LC-21 (1961)Siemens : 6SELA 2154 (1959)Sound Sales : A-Z Junior (?)經典古董綜合擴大機- 電晶體Accuphase : E-303 (1978) ★/ E-302 (1984) ★★Denon : PMA-970 (1980) ★★/ PMA-790 (1982) ★Hitachi (Lo-D) : HA-500F (1975) ★★/ HA-1100 (1975) ★★Jbl : SA600 (1966) ★Kenwood (Trio) : KA-7300 (1975) ★/ KA-9300 (1976) ★/ KA-9900 (1978) ★Kyocera : A-710 (1985) ★★Luxman : L-309 (1973) ★★/ L-100 (1975) ★★/ L-58A (1979) ★★Marantz : 1060 (1971) ★/ 1122DC (1977) ★McIntosh : MA5100 (1966) ★★ / MA6100 (1972) ★★/ MA6200 (1978) ★Nad : 3020 (1978) ★Pioneer (Exclusive) : SA-910 (1973) ★/ SA-9900 (1974) ★/ A-900 (1979) ★Sansui : AU-777 (1967) ★/ AU-9500 (1972) ★/ AU-7700 (1975) ★★/AU-9900 (1975) ★Sony : TA-1120F (1972) ★/ TA-F333ESX (1986) ★Victor : JA-S75 (1976) ★★/ A-X9 (1979) ★★/ A-X77 (1982) ★Yamaha : CA-1000 (1973) ★/ A-9 (1979) ★/ A-2000 (1983) ★經典古董綜合擴大機- 真空管Bell : 2199 (1956) / 3DT (1957) ★Dynaco : SCA-35 (1964) ★Eico : HF-81 (1959) ★/ AF-4 (1964) ★Electro V oice : A-20 (1956)Fisher : X-100 (1959) ★/ X-101 (1961) ★/ X-202 (1962) ★/KX-200 (1962) ★/ X-1000 (1962) ★Heathkit : AA-191 (1954)Luxman : SQ-38D (1964) ★/ SQ-38FD (1970) ★/ SQ-38FD II (1974) ★/L-38 (1978) ★/ LX-38U (1981) ★Mcintosh : MA230 (1963) ★Rogers : Cadet III (1964) ★Sansui : AU-111 (1965) ★★Scott : 299 (1960) ★/ 299C (1961) ★經典古董收音擴大機(Receiver)Fisher : 400 (1964) ★★/ 500-C (1964) ★★Kenwood (Trio) : KR-5600 (1977) ★/ KR-4070 (1978) ★Marantz : 2285 (1977) ★/ 2385 (1977) ★Mcintosh : MAC 1500 (1965) ★★/ MAC 1700 (1967) ★★/ MAC 1900 (1974) ★Pilot : 654 (1962) ★Pioneer (Exclusive) : C-2000 (1969) ★★/ SX-800A (1969) ★★/SX-434 (1973) ★/ SX-1250 (1976) ★/ SX-1980 (1978) ★Sansui : 500 (1964) ★★/ 500A (1964) ★★/ 1000A (1964) ★★/1000X (1967) ★★/ SAX-500 (1967) ★★/ QRX-6500 (1973) ★/9090 (1976) ★經典古董收音機(Tuner)Kenwood (Trio): KT-815 (1980) ★/ KT-917 (1980) ★/ L-01T (1979) ★/L-02T (1982) ★Marantz : 10B (1964) ★★Mcintosh : MR65 (1960) ★★/ MR67 (1963) ★★/ MR71 (1965) ★★/ MR78 (1972) ★/ MR80 (1973) ★Pioneer (Exclusive) : TX-9500 (1977) ★/ TX-9800 (1979) ★Sansui : TU-717 (1977) ★/ TU-919 (1979) ★經典古董LP 轉盤- 惰輪Dual : 1019 (1970) ★/ 1219 (1971) ★Emt : 927 (1951) ★/ 930 (1956) ★Garrard : 301 (1954) ★★/ 401 (1965) ★Lenco : L75 (1967) ★Rek-O-Kut : B-12H (1954) ★Thorens : TD 124 (1956) ★★經典古董LP 轉盤- 皮帶Acoustic Research : AR Turntable (1961) ★/ AR XA (1963) ★Ariston : RD11 (1971) ★/ RD80 (1983) ★/ RD40 (1984) ★Connoisseur : BD2/A (1977) ★Empire : 208 (1960) ★/ 598 (1965) ★Linn : Sondek LP12 (1972) ★★/ Axis (1987) ★★Luxman : PD 300 (1982) ★Micro Seiki : BL-51 (1980) ★★/ BL-71 (1980) ★★/ BL-91 (1980) ★★/ SX-777 (1981) ★/ BL-77 (1982) ★★/ RX-2000 (1982) ★Rega : Planar 3 (1977) ★Thorens : TD 150 (1966) ★/ TD 125 (1969) ★/ TD 160 (1972) ★/經典古董LP 轉盤- 直驅Denon : DP-80 (1978) ★★/ DP-60L (1980) ★★/ DP-75M (1981) ★★/DP-100M (1982) ★Emt : 938 (1982) ★★Kenwood (Trio) : KD-500 (1976) ★★/ L-07D (1979) ★/ KP-700 (1981) ★★/ KP-1100 (1985) ★★Luxman : PD 441 (1978) ★★/ PD 444 (1978) ★★Micro Seiki : DD-100 (1976) ★★Pioneer (Exclusive) : P10 (1979) ★/ PL-50 (1980) ★★/ PL-70 (1981) ★★/ P3a (1983) ★Sansui : SR-838 (1977) ★★/ SR-929 (1977) ★★Sony : PS-X9 (1977) ★/ PS-X800 (1981) ★Technics : SP-10 (1970) ★★/ SL-1200 (1972) ★/ SP-15 (1979) ★Thorens : TD 524 (1982) ★★Toshiba (Aurex) : SR-P90 (1982) ★★Victor : QL-7R (1977) ★★/ QL-A95 (1982) ★★/ QL-A70 (1983) ★★Yamaha : GT-2000 (1982) ★★/ GT-1000 (1983) ★★經典古董唱臂Audiocraft : AC-3000、AC-4000 (1980) ★/ AC-3300、AC-4400 (1984) ★★Empire : 980 (1963) ★/ 990 (1965) ★Fidelity Research : FR-64、FR-66 (1978) ★★Grace : G-707 (1979) ★Linn : Ittok LV II (1979) ★/ Basik Plus (LVX+) (1987) ★Micro Seiki : MA-505 (1980) ★/ MAX-237、MAX-282 (1980) ★★Ortofon : RMG-212、RMG-309 (1959) ★★/ RS-212、RS-309 (1959) ★Rega : RB300 (1983) ★Sme : 3009、3012 (1959)Stax : UA-7、UA-70 (1970) ★★/ UA-9、UA-90 (1979) ★經典古董唱頭從缺(選購時盡量以新品為主)經典古董CD 唱盤從缺(選購時盡量以新品為主)經典古董線材Audio Research : Litz (?) ★Cello : Strings (?) ★Kimber Kable : 4PR (1979) ★/ 4TC (1985) ★Western Electric : 各種線材(1930、40) ★...古董音響中的四大天王P.S.以下排名僅供"趣味性" 或"選購時" 之參考,主要依據目前市場上"大致的評價",但不代表其品質,或表現,無可匹敵,或無可挑剔。
仿制MATISSEReference电子管前级
仿制MATISSEReference电子管前级名牌电子管前级放大器有多款,大多数线路较复杂,仿制并不容易,而英国着名的MATISST(马蒂斯)Reference电子管前级放大器,音色很靓,但线路却非常简洁,用料很少。
原机放大部分有黑胶唱片的唱头放大电路和高电平放大电路,因为现代音源一般用CD、DVD 或SACD,所以仿制时采用高电平放大电路也称10倍放大电路(见图1)。
据资料介绍,此线路是用话筒放大线路改进的,而话筒放大线路一般是性能很高的前级放大线路,其频率范围较宽(高级话筒频率范围在40~20kHz),因此MATISST Reference电子管前级放大器的线路是简洁而性能良好的线路。
主放大电路部分是两级共阴极放大,输入级V1用高μ双三极管12AX7(μ=100),输出级V2用高频、中μ(μ=60)双三极管12AT7,此电子管屏流较大(10mA),两电子管混合使用,将其特性融合在一起,使放大器的音色独具魅力,高频纤细、晶莹绚丽、中音丰满厚润、低音强劲。
因加有大环路负反馈,能使高μ管稳定地工作,并且可以调整整机的增益。
当整机增益调到恰到好处时,音色和动态都会有超凡的表现,有醉人的听感,两放大管的阴极电阻也未设旁路电容,可作为本级电流负反馈,所以放大电路工作非常稳定。
此线路的另一特点是电子管屏极电源电压较高(410V),V1的屏极负载电阻阻值较大,这就使放大电路的失真极低,动态范围也宽泛,输出电容C2、C3取值较大,使低频响应极好。
由于12AT7的屏流较大,当输出电流较大时,音频信号通过后级功放中的级间耦合电容时损失就小,音乐的丰满度、细节等都会有好的表现,这就是输出级用高屏流放大管的裨益,由此显示了设计师的眼力和匠心,这是本机的神髓。
要想放大电路能充分发挥潜质,就必须有性能良好、功率余量较大的电源来支持。
原机电源部分采用了半导体分立元件制作整流和稳压电路,并用电路板组装较为复杂。
业余条件下制作一块电路复杂的线路板并不是易事,况且B+电压较高,走线的间隙稍小,就有短路跳火、烧坏的危险,因此本人重新设计了电源电路,采用分立元件搭棚方式组装,元件间保持足够的距离,以保证长期工作的安全。
Marshall JCM2000 Dual Super Lead 电子管音频放大器用户手册说明书
12 34 5 6 7 8 910 16HIGH GAIN INPUT (1)Used for most electric guitars. It is 6Provided for instruments that have extremely high outputs, which can result in overdriving (distorting) the High Gaininput. If both inputs are used simultaneously, the output levels are the same (both are Low Gain).PRE GAIN (3)Controls the input volume level of the amplifier.PRE-EQ PATCH JACKS (4)Provided for connecting external effects devices into the signal path. To patch an effects device, connect the send jack tothe input of the device. Connect the output of the device to the return jack. High-quality shielded cables should be used forthese connections.OPERATION NOTE:Volume pedals may be patched in at this point; pedal output should be patched into “return”, and “send” should be patched into pedal input. Instrument should connect directly to high or low gain inputs when volume pedal is connected inthis configurationLOW EQ (5)An active tone control (shelving type,boost causes greater power consumption and increases possibility of speaker damage.MIDboost (increase).SENSITIVITY (10)Controls the overall volume level of the amplifier. The final level adjustment should be made after the desired sound hasbeen achieved.EFFECTS PATCH 1 (11)Provided for connecting external effects devices into the signal path. To patch an effects device, connect the send jack tothe input of the device. Connect the output of the device to the return jack. High-quality shielded cables should be used forthese connections.EFFECTS PATCH 2 (12)Provided for connecting external effects devices into the signal path. To patch an effects device, connect the send jack tothe input of the device. Connect the output of the device to the return jack. High-quality shielded cables should be used forthese connections.REVERB (13)Reverberation is an echo effect. Rotate clockwise to increase the effect. Remote footswitch can control On/Off.PILOT LIGHT LED (14)Illuminates when AC power is being supplied to the amp.GROUND SWITCH (15)Three position rocker-type switch which, in most applications, should be operated in its center or zero position. Theremay be some situations when audible hum and/or noise will come from the loudspeaker. If this situation arises, positionthe ground switch to either positive or negative or until the noise is minimized. NOTE: Should the noise problem continue, consult your Authorized Peavey Dealer, the Peavey Factory, or a qualified service technician. THE GROUND SWITCH IS NOT FUNCTIONAL ONTone settings given are general and will vary according to type of guitar, type and gauges of strings, type of pickup and even type of pick. Personal taste, playing style, and type of music greatly contribute to desired tonality.BLOCK DIAGRAMPRE AMPPWR. AMPREVERBSESSION” 400 LTDPower120 VAC line)240 Watts RMS into 4 ohmsFrequency Response:80 Hz to 10 200 Watts RMS into 4 ohmsTotal Harmonic Distortion:Less than to 200 Watts RMS, 60 Hz to 10Humbelow rated powerPower Consumption: (domestic)600 Watts 1High EQ Mid 10Presence EQ5High dynamics reverb5Minimum levels are with pre gain220 K ohms Nominal Input Level: -22 RMS Minimum Input Level: -36pad)Impedance: High16030Patch Send: (pedal send)Load impedance: 10 K ohms or greater Nominal output: -12Patch Return: (pedal return)Impedance: High 0.25 V RMS (Switching jack providing pre EQ patch send to pre EQ patch return connection when not used)Effects 1 0.3 V RMS Maximum output:3 V RMS Effects 1 0.3 V RMS (Switching jacks providing effects patch send to effects patch return connections when not used)Preamp Out:Load impedance: 1 K ohms or greater Nominal Output: 01 V RMS (Switching jack providing preamp out to power amp in connection when not used)Balanced Line Out:Load Impedance: 600 ohms or greater Nominal Output: -10Noise 8480 Hz, active shelving Mid: passive notch Shift: 300 Hz to 128AND THE COST IS $21LINE CORD (17)(120V products only)For your safety, we have incorporated aTHIS LIMITED WARRANTY VALID ONLY WHEN PURCHASED AND REGISTERED IN THE UNITED STATES OR CANADA. ALL EXPORTED PRODUCTS ARE SUBJECT TO WARRANTY AND SERVICES TO BE SPECIFIED AND PROVIDED BY THE AUTHORIZED DISTRIBUTOR FOR EACH COUNTRY.Ces clauses de garanlie ne et au Canada. Dans pays, national etassuree parnur In den USA and Kanada gultig.Esta solamente cuando es o en Canada. Todos que extranjero, a y servicio quematerial and workmanship for a period of one (1) year from date of purchase, PROVIDED, however that this purchaser and is subject to the conditions, exclusions and limitations hereinafter set forth:PEAVEYlimited warrantyIS extended only to the original exclusions and limitations hereinafter set forth.CONDITIONS, EXCLUSIONS AND LIMITATIONS OF LIMITED WARRANTIESThese limitedretail purchase is not made from an AUTHORIZED PEAVEY DEALER: orc. The product has been damaged by accident or unreasonable use, neglect, Improper service or maintenance, or other causes not arising out of defects in material orworkmanship; ord. The serial number affixed to the product is altered, defaced or removed.In the event of a defect in material and/or workmanship covered by this limited warranty, Peavey will:a. In the case of tubes or meters, replace the defective component without charge;b. In other covered cases (i.e., cases involving patchcords, tubes or meters), repair the defect inand provided, however, that, in any case, all costs of shipping, if necessary, are paid by you, the purchaser.THE WARRANTY REGISTRATION CARD SHOULD BE ACCURATELY COMPLETED AND MAILED TO AND RECEIVED BY PEAVEY WITHIN FOURTEEN (14) DAYS FROM THE DATE OF YOUR PURCHASE.In order to obtain service under these warranties, you must:a. Bring theconnection with your purchase from him of this product.If the DEALER or SERVICE CENTER is unable to provide the necessary warranty service youShip the defective item, prepaid, to:PEAVEY ELECTRONICS CORPORATIONInternational Service CenterHighway 80 EastMERIDIAN, MS 39301including therewith a complete, detailedhave been complied with,Peavey will provide the necessaryexpressedto repair or replace the product and will return it, FREIGHT COLLECT, to you, the purchaser.Peavey’s liability to the purchaser for damages from any cause whatsoever and regardless of the form of action, including negligence, IS limited to the actual damages up to the greater of $500.00 or an amount equal to the purchasebe that in effect for the specific product when the cause of action arose. This limitation of liability will not apply to claims for personal injury or damage to real property or tangible personal property allegedly caused by Peavey’s negligence. Peavey does not assume liability for personal injury or property damage arising out of or caused by a non-Peavey alteration or attachment, nor does Peavey assume any responsibility for damage to Interconnected non-Peavey equipment that may result from the normal functioning and maintenance of the Peavey equipment.UNDER NO CIRCUMSTANCES WILL PEAVEY BE LIABLE FOR ANY LOST PROFITS, LOST SAVINGS, ANY INCIDENTAL DAMAGES OR ANY CONSEQUENTIAL DAMAGES ARISING OUT OF THE USE OR INABILITY TO USE THE PRODUCT, EVEN IF PEAVEY HAS BEEN ADVISED OF THE POSSIBILITY OF SUCH DAMAGES.THESE LIMITED WARRANTIES ARE IN LIEU OF ANY AND ALL WARRANTIES, EXPRESS OR IMPLIED, INCLUDING, BUT NOT LIMITED TO, THE IMPLIED WARRANTIES OF MERCHANTABILITY AND FITNESS FOR A PARTICULAR USE; PROVIDED, HOWEVER, THAT IF THE OTHER TERMS AND CONDITIONS NECESSARY TO THE EXISTENCE OF THE EXPRESS, LIMITED WARRANTIES, AS HEREINABOVE STATED, HAVE BEEN COMPLIED WITH, IMPLIED WARRANTIES ARE NOT DISCLAIMED DURING THE APPLICABLE ONE-YEAR OR NINETY-DAY PERIOD FROM DATE OF PURCHASE OF THIS PRODUCT.SOME STATES DO EXCLUSION OR LIMITATION OF INCIDENTALOR CONSEQUENTIAL DAMAGES, SO THE ABOVE LIMITATIONS OR EXCLUSIONS MAY NOT APPLY TO YOU. THESE LIMITED WARRANTIES GIVE YOU SPECIFIC LEGAL RIGHTS, AND YOU MAY ALSO HAVE OTHER RIGHTS WHICH MAY VARY FROM STATE TO STATE.THESE LIMITED WARRANTIES ARE THE ONLY EXPRESS WARRANTIES ON THIS PRODUCT, AND NO OTHER STATEMENT, REPRESENTATION, WARRANTY OR AGREEMENT BY ANY PERSON SHALL BE VALID OR BINDING UPON PEAVEY.In the event of any modification or disclaimer of express or implied warranties, or any limitation of remedies, contained herein conflicts with applicable law, then such modification, disclaimer or limitation, as the case may be, shall be deemed to be modified to the extent necessary to comply with such law.Your to those remedies provided herein Peavey Electronics Corporation gives this limited warranty only with respect toequipment purchased in the United States of America.INSTRUCTIONS -WARRANTY REGISTRATION CARD1. Mail the completed WARRANTY REGISTRATION CARD to:PEAVEY ELECTRONICS CORPORATIONPOST OFFICE BOX 2898MERIDIAN, MISSISSIPPI 39302-2898a. Keep the PROOF OF PURCHASE. In the event warranty service is required during the warrantyof WARRANTY REGISTRATION CARDS-Should notification become necessaryforanycondition that may requirecorrection, the REGISTRATION CARD will help ensure that you are contacted and properly notified.b.Notice of address changesinformation or correction.3. You may contact Peavey directly by telephoning (601)Meridian, MS 39301(601)483-5365 Fax 486-127801994。
全球著名放大器一览表
全球著名放大器一览表[仅供参考]北美地区:Bryston(拜事通)加拿大最具代表的晶体管放大器,产品寿命长,声音理性,力道足Sonic Frontiers 加拿大Hi-End胆机代表作,音色细致高贵,力道充沛Classe Audio(驾势)加拿大著名的晶体管放大器,音色细致,乐感丰富Sim Audio 加拿大著名Hi-End晶体管放大器,工艺先进,声音质素突出Anthem 加拿大Sonic Frontiers的平价版胆机,制作质素高,声靓价平Audio Research 美国顶级Hi-End胆机代表性品牌,以胆机为主,声音中性,味道足,速度快Mark Levinson 美国顶尖级Hi-End晶体管放大器的代表作,典范级中性音质Proceed Mark Levinson 的中价Hi-End晶体管放大器,专注于影音产品Cello Mark Levinson 创建的顶尖级高价值Hi-End晶体管放大器,质素无以伦比Krell(奇力)美国顶尖级Hi-End晶体管放大器的代表作,推力强大,乐感惊人McIntosh(麦景图)美国经典Hi-End胆/石放大器,音色高贵,收藏价值大Cary(加利)美国高级胆机生产商,近年向数码领域进军Conard Johnson(诗醉)美国经典胆机代表作,音色高贵丰润Dynaco 美国经典中价胆机代表作,音色极富乐感Pass lab(柏斯)美国重量级Hi-End晶体管放大器,声音高贵流畅Jeff Rowland(乐林)美国著名Hi-End晶体管放大器,对电源与音乐的关系十分执著Parasound 美国中低价晶体管放大器代表作,有“穷人的Krell”之称Sunfire 美国著名的中价高级胆/石放大器,力道沉厚,乐感优异Threshold 美国著名Hi-End晶体管放大器,科技应用超前VAC 美国老牌Hi-End胆机,多以分体式设计,品质如军规器材VTL 美国老牌高级胆机,品质稳定,推力大C.A.T 美国产品型号最少的高级胆机,以一部SL-1胆前级确立Hi-End级地位Canary(金丝雀)美国新兴Hi-End胆机,外观精美,声音细致高贵B.A.T 美国新兴Hi-End胆/石放大器,设计和声音贯彻“平衡”原则Hovland(浩龙)美国新兴Hi-End胆机,用料精良,外观华美Herron 美国新兴Hi-End胆/石放大器,外观俭朴,内部严谨、声音透澈开扬B&K 美国著名中价高级晶体管放大器,性价比高,《Stereophie》榜中常客Manley 美国著名Hi-End级胆机,设计精良,音质鲜明动人Aragon 美国著名的中价Hi-End晶体管放大器,近年向影音方面进军Ayre(艺雅)美国著名Hi-End晶体管放大器,用料精湛,声调自然舒畅欧洲地区:Gryphon(贵丰)丹麦重量级Hi-End晶体管放大器,声音高贵力大Primare(翩美)丹麦精品级Hi-End晶体管放大器,音色细致顺滑高贵LA.Audio 丹麦中价精品胆机、音色细致、生动有高贵感Bow(丹麦神弓)丹麦著名的高级晶体管放大器,内外制作别具特色Tact Audio 丹麦新兴Hi-End数字放大器的先驱,造工精良,声调自然舒畅Densen(丹麦王子)丹麦精品级中价Hi-End晶体管放大器,音乐圆润纯净CHORD(和弦)英国著名的监听级Hi-End晶体管放大器,造工与声音质素绝佳Matisse(马蒂斯)英国著名的Hi-End胆机,音色高贵、细致Musical Fidelity(音乐传真)英国著名高级晶体管放大器,声音柔润自然、乐感强Exposure(力宝声)英国中价力士型晶体管放大器的代言人,内涵、力道重于外表Rotel(路遥)英国著名中低价晶体管放大器,性价比高EAR 英国新兴高级胆机,据说是B&W、ATC、Thiel音箱的绝配Audio Note 英国著名的Hi-End胆机,多为小功率单端设计,为求青铜声不惜采用昂贵材料Audion 英国著名的中价高级胆机,声音乐感强烈,音色极佳Venture(威卓)由华人创建的比利时Hi-End品牌,产品以音箱为主,胆机为辅Audio Analogue(雅乐)意大利新兴中价高级晶体管放大器,声音深具文艺气息Unison Rexearch(声韵)意大利著名的Hi-End胆机,造型典雅,音质迷人SPHINX(灵狮)荷兰著名的中高价Hi-End晶体管放大器,声音清新中性NAD(乐廷)英国著名的中价晶体管放大器,高性价比Arcam(雅骏)英国剑桥地区中低价晶体管放大器代表作,音色细致,高性价比Quad(国都)英国经典高级胆机,是优美音乐的代表人LINN(莲)英国著名Hi-End多元化厂商,其晶体管放大器小巧,音色动人AMC 英国平价胆/石放大器代表作,品质稳定,乐感强Rega(君子)英国中低价晶体管放大器代表作,音色精致典雅TAG Mclaren(麦拿伦)英国新兴中高价晶体管放大器,制作精良,音调通透富有乐感Onix(欧尼士)英国价晶体管放大器,音调中性朴实Cambridge Audio(剑桥)英国剑桥平价晶体管放大器的代表作,性价比高Manley 英国新兴中低价晶体管放大器,外观别致精美,音质良好Creek(朗泉)英国老牌中低价晶体管放大器,外观朴实,音质优美Electrocompaniet(音乐之旅)挪威最具代表的Hi-End晶体管放大器,音乐优雅通透逼真亚太地区:Plinius 新西兰Hi-End晶体管放大器,用料佳,价格平实MAS 澳大利亚Hi-End晶体管放大器,产品制作用料扎实,潜质大Melody SHW(麦乐迪)华人创立的澳大利亚新兴高级胆机,音色鲜明艳丽,乐感丰富HALCRO 澳大利亚新兴巨无霸级Hi-End晶体管放大器,失真史上最低Denon(天龙)日本历史悠久的高级晶体管放大器,主攻影音产品Onkyo(安桥)日本名牌晶体管放大器,以影音放大器为主AIR-Tigtht 日本Hi-End胆机,多以单端小功率线路为主Accuphase(金嗓子)日本著名Hi-End晶体管放大器,制作严谨精美Marantz(马兰士)被日本财团控制的美国品牌中价胆/石放大器,音调柔美,富有乐感SONY(索尼)日本著名多元化视听生产商,主攻影音产品Luxman(力士)日本老牌胆/石高级放大器,声音温润丰满Audio Space 香港中高级著名胆机,造工精良,性价比高Proton(普腾)台湾名牌晶体管放大器的先驱之一,声音控制力和性价比较好Bada(八达)中国Hi-Fi级晶体管放大器的先驱之一,声音控制力和性价比较好Opera(欧博)中国Hi-Fi胆机代表作之一,外观细致,用料精良,性价比较高Spark(斯巴克)中国Hi-Fi胆机代表作之一,声音与制作质素超值Korsun(柯颂)中国晶体管放大器代表作之一,声音中性醇正Xindak(新德克)中国著名的Hi-Fi胆/石放大器,用料精良,音质与性价比较高Winner(天逸)中国著名的Hi-Fi级晶体管放大器,声调厚暖,售价实惠Sheng Ya(声雅)中国老牌Hi-Fi胆/石放大器,功力扎实,外观高档钟神/凤之声中国著名Hi-Fi晶体管放大器,用料高级,声音较佳音质和音质的评价[复制链接]何谓声音的质量所谓声音的质量,是指经传输、处理后音频信号的保真度。
FLAMMA 吉他综合效果器FX150 说明书
www.flShenzhenFlammaInnovationCo.,Ltd
目录
注意事项-----------------------------------------------------------------------------------------------------------01 性能概述-----------------------------------------------------------------------------------------------------------02 主面板说明----------------------------------------------------------------------------------------------------03-04 接口面板说明-------------------------------------------------------------------------------------- -----------05-06 应用场景连接说明------------------------------------------------------------------------------------ --------07-12 连接吉他功放后级+吉他箱体--------------------------------------------------------------------------------07 连接全频设备 - -----------------------------------------------------------------------------------------------08 全频+非全频设备混合连接 ----------------------------------------------------------------------------------09 连接吉他音箱的INPUT - -------------------------------------------------------------------------------------10 连接吉他音箱的FXLOOP------------------------------------------------------------------------------------11 四线接法 -----------------------------------------------------------------------------------------------------12 基本操作------------------------------------------------------------------------ ------------------------------13-19 开机 ----------------------------------------------------------------------------------------------------------13 主界面--------------------------------------------------------------------------------------------------------13 编辑界面-----------------------------------------------------------------------------------------------------14 选择预置音色--------------------------------------------------------------------------------------------15-17 编辑预置音色 ------------------------------------------------------------------------------------------------18 编辑效果链顺序----------------------------------------------------------------------------------------------19 预置音色保存------------------------------------------------------------------------------------------------19 调音器-------------------------------------------------------------------- -----------------------------------------20 LOOPER乐句循环功能--------------------------------------------------------------------------------------21-22