EMC_CLARiiON硬件及维护指南
(仅供参考)EMC-Unity-基本维护

Welcome to Unity Basic Maintenance.Copyright ©2016 EMC Corporation. All Rights Reserved. Published in the USA. EMC believes the information in this publication is accurate as of its publication date. The information is subject to change without notice.THE INFORMATION IN THIS PUBLICATION IS PROVIDED “AS IS.” EMC CORPORATION MAKES NO REPRESENTATIONS OR WARRANTIES OF ANY KIND WITH RESPECT TO THE INFORMATION IN THIS PUBLICATION, AND SPECIFICALLY DISCLAIMS IMPLIED WARRANTIES OF MERCHANTABILITY OR FITNESS FOR A PARTICULAR PURPOSE.Use, copying, and distribution of any EMC software described in this publication requires an applicable software license. The trademarks, logos, and service marks (collectively "Trademarks") appearing in this publication are the property of EMC Corporation and other parties. Nothing contained in this publication should be construed as granting any license or right to use any Trademark without the prior written permission of the party that owns the Trademark.EMC, EMC² AccessAnywhere Access Logix, AdvantEdge, AlphaStor, AppSync ApplicationXtender, ArchiveXtender, Atmos, Authentica, Authentic Problems, Automated Resource Manager, AutoStart, AutoSwap, AVALONidm, Avamar, Bus-Tech, Captiva, Catalog Solution, C-Clip, Celerra, Celerra Replicator, Centera, CenterStage, CentraStar, EMC CertTracker. CIO Connect, ClaimPack, ClaimsEditor, Claralert ,cLARiiON, ClientPak, CloudArray, Codebook Correlation Technology, Common Information Model, Compuset, Compute Anywhere, Configuration Intelligence, Configuresoft, Connectrix, Constellation Computing, EMC ControlCenter, CopyCross, CopyPoint, CX, DataBridge , Data Protection Suite. Data Protection Advisor, DBClassify, DD Boost, Dantz, DatabaseXtender, Data Domain, Direct Matrix Architecture, DiskXtender, DiskXtender 2000, DLS ECO, Document Sciences, Documentum, DR Anywhere, ECS, elnput, E-Lab, Elastic Cloud Storage, EmailXaminer, EmailXtender , EMC Centera, EMC ControlCenter, EMC LifeLine, EMCTV, Enginuity, EPFM. eRoom, Event Explorer, FAST, FarPoint, FirstPass, FLARE, FormWare, Geosynchrony, Global File Virtualization, Graphic Visualization, Greenplum, HighRoad, HomeBase, Illuminator , InfoArchive, InfoMover, Infoscape, Infra, Input Accel, Input Accel Express, Invista, Ionix, ISIS,Kazeon, EMC LifeLine, Mainframe Appliance for Storage, Mainframe Data Library, Max Retriever, MCx, MediaStor , Metro, MetroPoint, MirrorView, Multi-Band Deduplication,Navisphere, Netstorage, NetWorker, nLayers, EMC OnCourse, OnAlert, OpenScale, Petrocloud, PixTools, Powerlink, PowerPath, PowerSnap, ProSphere, ProtectEverywhere, ProtectPoint, EMC Proven, EMC Proven Professional, QuickScan, RAPIDPath, EMC RecoverPoint, Rainfinity, RepliCare, RepliStor, ResourcePak, Retrospect, RSA, the RSA logo, SafeLine, SAN Advisor, SAN Copy, SAN Manager, ScaleIO Smarts, EMC Snap, SnapImage, SnapSure, SnapView, SourceOne, SRDF, EMC Storage Administrator, StorageScope, SupportMate, SymmAPI, SymmEnabler, Symmetrix, Symmetrix DMX, Symmetrix VMAX, TimeFinder, TwinStrata, UltraFlex, UltraPoint, UltraScale, Unisphere, Universal Data Consistency, Vblock, Velocity, Viewlets, ViPR, Virtual Matrix, Virtual Matrix Architecture, Virtual Provisioning, Virtualize Everything, Compromise Nothing, Virtuent, VMAX, VMAXe, VNX, VNXe, Voyence, VPLEX, VSAM-Assist, VSAM I/O PLUS, VSET, VSPEX, Watch4net, WebXtender, xPression, xPresso, Xtrem, XtremCache, XtremSF, XtremSW, XtremIO, YottaYotta, Zero-Friction Enterprise Storage.This course provides the knowledge and skills necessary to perform basic maintenance on the Unity family of mid-range products. It includes topics on alerts, diagnostic information, health checks, software upgrades, and CRU and FRU replacements.This module focuses on basic alerts, diagnostics, and support functions.Basic maintenance and troubleshooting of the Unity storage system is performed using EMC Unisphere for Unity. Unisphere uses a graphical, application-oriented model with a web-familiar look and feel. The easy navigation and built-in best practices within Unisphere enables the management of advanced storage features without an in-depth understanding of these technologies. In addition, a support ecosystem provides access to learning materials and support resources that make storage management easier than ever. This results in a more efficient and productive environment.Supported browsers include Google Chrome v33 or later, Internet Explorer v10 or later,Mozilla Firefox v28 or later, and Apple Safari v6 or later.This demo will show introduce Unisphere for Unity.Shown here is the System Service Overview page. We can tell from this view that all Storage Processors are running in normal mode, and we can see the software version and serial number of the Unity system. Tasks available here include Test or Change ESRS, Refresh or Review Support Contracts, change Support Credentials, and change Contact Information. These tasks can also be completed in the settings window.Also available on this page are the Service Tasks, Technical Advisories, and Logs tabs. Let’stake a look at what is available in the Service Tasks tab.Now we have selected the Service Tasks tab. On this page there are a number of storage system tasks as well as some Storage Processor tasks. Note that you can click on the More Information link next to each task for the complete details. The link will bring you to the corresponding help page in Unisphere. Let’s take a look at the various storage system tasks first.To assist with diagnosing and resolving problems with your system, you can collect detailed information about your system and save it to a file.To proceed, highlight the Collect Service Information task and click on the Execute button.In the window that opens, you can select a collection file that already exists for download, or you can create a new one. To download an existing file, highlight it and select the download icon in the upper left hand corner. To create a new one, click on the Add icon (plus sign).It will take up to 10 minutes for the data collection to complete. Once it is complete, youcan select it and save the file a local directory or an external storage location.The Save Configuration task saves details about the current system configuration settings to a local file. The configuration details include information about the system specifications, users, installed licenses, storage resources, storage servers, and hosts. A service provider can use this file to assist with reconfiguring the storage system after a major system failure or system reinitialization. You can also use this file to keep a record of system configuration changes. The configuration settings should be saved after each major configuration change to ensure there is a current copy of the file.Note that only the details about the system configuration are saved to the file. You cannotrestore your system data from this file.The Restart Management Software task is used to resolve connection problems between the storage system and Unisphere. Note that you cannot restart the management software when both Storage Processors are in Service Mode. To proceed, highlight the Restart Management Software task and click on Execute. Restarting the management software will disconnect the current management session, but will not disrupt data access to the storage system. You will not be able to manage the storage system during this time. Wait three to five minutes while the management software restarts.You will see alerts indicating that the connection to the system is down. When themanagement software has restarted, you will see alerts indicating that the connection is up.The Reinitialize service task resets the entire system to the original, default factory settings. Before you begin, all Storage Processors must be present in the system, operating normally, and in Service Mode. Once both SPs are in the service mode, you must log into Unisphere as the service user and run the Reinitialize Service Task. Note that reinitializing will destroy all system configuration settings and stored data on the system. After reinitializing the system, you will need to copy all data to the system from an external storage system, such as a backup server. The reinitialization can take 90 to 120 minutes to complete.When system reinitialization has completed, the system reboots and is ready to be configured. Use the Connection Utility to establish an initial network connection to the system and then log in to Unisphere and run the Initial Configuration Wizard to configurethe system.The Change Service Password task allows you to change the service password. The service account is used to execute service tasks on the Unity storage system. Note that this will notaffect the users and groups in the settings menu.The system shut down or power down procedure involves shutting down the Storage Processors (SPs). When all SPs are down, all I/O services stop and hosts lose access to the system. Before performing this procedure, it is recommended that you disconnect all network shares, LUNs, and VMware datastores from each host to prevent data loss. When the system is fully powered up, you can reconnect the hosts to these storage resources.The shutdown process can take between 10 to 20 minutes to complete. During this time, the connection to the system will be lost and you will not have access to Unisphere or the online help. It is important that you print the power up instructions from the help menu to be sure you have all of the information you need to power up the system. You will need to physically remove power from the SPs and then reconnect them to power the system back up. The system has shutdown and the power can be removed from the SPs when the StatusFault LED is blinking amber and the power LED is solid Green.To connect to the system and perform advanced system maintenance, you need to enable the Secure Shell (SSH) protocol on the storage system. To enable SSH, highlight the task and click Execute. You will be prompted for the service password. This service action allows you to run service tools, such as service actions or service scripts, on the storage system. Once SSH is enabled, you or your service provider can run the tools through a service portal. When the service tools have finished running, disable the SSH protocol to ensure that the system is secure. To learn more about using service commands, refer to the UnityService Commands Technical Notes document available on .The Enter Service Mode task is a Storage Processor service task, meaning it applies to an individual SP, and not to the storage system as a whole. Entering service mode may be required to reimage an SP, reinitialize the storage system, or replace certain hardware components. An SP will also automatically enter service mode when it is unable to resolve an issue and thus requires intervention.When an SP enters service mode it stops servicing I/O to hosts and all I/O loads on the SP fail over to the peer SP, if it is healthy.Once you select the task and click Execute, you will be prompted for the service password. Wait at least 10 minutes for the SP to enter service mode and do not attempt any actions in Unisphere until it has completed.To verify that the SP is in service mode, check that the Mode field displays Service. Here, both SP Modes are reported as Normal. Note that Unisphere may not refresh automatically. If prompted, reload Unisphere. If not, refresh the browser manually. To physically confirmthe SP is in service mode, ensure the SP fault LED flashes alternating amber and blue.The Reboot an SP task can resolve minor problems with the SP, its components, or the system software on the SP. This task is also used to reboot an SP that is in service mode to return it to normal mode, provided that the SP is healthy enough to do so. Note that when an SP reboots, it stops servicing I/O to hosts. If the peer SP is healthy and in normal mode, it will service the rebooting SP’s I/O to hosts and it’s write cache will remain enabled.Once you highlight the task and click Execute, you will be prompted for the service password. After waiting a few minutes and refreshing Unisphere, confirm the SP reboot hascompleted by noting the SP Mode Field. It should display a Normal Mode.In order to monitor the SP boot process, you need to establish a Serial Over LAN (SOL) connection to the SP service port. This is accomplished using the IPMI tool. The IPMI tool can be found on by searching the Unity Support Tools section. First, install the tool to the C:\ directory of your service laptop. Next, set your local network adapter to the IP address 128.221.1.250 and then issue the command shown to connect to SP A. If you need to connect to both SP A and SPB, you can connect to the service ports via a small Ethernet switch. Open another command prompt window and issue the command again to SP B. It is the same command except that the IP address for the service port for SP B ends in 253.Please refer to the EMC IPMI Tool Technical Notes document available on for the complete details.The Reimage a Storage Processor (SP) task is used to safely fix problems with the system software that could not be resolved by rebooting the SP. Reimaging reinstalls the system's root operating system while leaving the user's data intact. The system configuration settings and stored files will not be changed.Reimaging an SP requires that it is first placed in service mode. That is why the Execute button for this task is now greyed out. Once you have the SP in service mode and execute the reimage task, wait at least 20 minutes while the system reimages the SP and do not attempt any actions in Unisphere until it has completed. After it has completed reimaging, it will boot into service mode. You can then use the reboot service task to reboot it to NormalMode.Now that we’ve looked at all of the service tasks, let’s take a look at the other two tabs in the System Service window. The Technical Advisories tab displays up-to-date, real time information and advisories specific to your system from the Knowledgebase available on the support website. Here you can select an advisory from the list and choose the link in the Knowledgebase Number column. A new Web browser displays the technical advisory article from the support website. Note that you can customize the view as well as sort, filter, andexport data.The Unity storage system monitors and reports on a variety of system events. These events are collected and written to a log shown here in the System Service Logs window. Note that you can customize the view as well as sort and filter data by date and time, user, source SP, Category and Message. You can also configure remote logging. Click on the Manage Remote Logging link to navigate directly to the Specify Remote Logging Configuration section in the System Settings menu.To configure remote logging, the remote host must be accessible from the storage system. By default, the storage system transfers log information on port 514 using the UDP protocol. For more information on setting up and running a remote syslog server, refer tothe documentation for the operating system running on the remote system.The Unisphere Support page can be reached via the navigation pane on the left. The Support page provides links to resources for learning about and getting assistance with your storage system. Options include watching how-to videos, accessing online training modules, downloading the latest product software, searching and participating in the online community, and much more.You can also access support options through the product's support website. To register your system, download licenses, or obtain updated software, you must first establish a supportaccount.The tools available for Unity Implementation are shown in the next two slides. These tools are intended for Service Enabled Partners and EMC Support Personnel.Shown here are the remaining Unity implementation tools.This module focuses on the Software and Licenses section of the Unisphere Settings menu.Navigate to the Settings menu by selecting the settings icon in the upper right corner of Unisphere. Shown here is the Software and Licenses menu. Notice that there are links to get a license online and install a license. As we can see here, in this case, the issued license does not include Data at Rest Encryption. Note that Unity storage systems are orderable as either encrypted or non-encrypted. The encryption state is set the first time a license is applied and you cannot apply another license at a later time to enable or disable encryption.A destructive reinitialization would be required to change the encryption state.Let’s take a look at the Disk Firmware menu next.Shown here is the Disk Firmware menu. Here we can view the current firmware, obtain new firmware online, and install firmware.On the Language Packs page, we can obtain and install optional language packs.Shown here are the system limits. Now let’s take a look at the Software Upgrades menu.As we can see in the Software Upgrades page the current UnityOS version and release date are displayed. Here we can download new software, start an upgrade, or perform a health check.Selecting the Perform Health Checks button will begin a Pre-Upgrade Health Check. A health check is a series of checks on the state of the storage system. Performing a system health check helps ensure that no underlying problems exist that may prevent a successful software upgrade. If there are no problems with the storage system, the health check should complete in a few minutes and should report “The storage system's health checks have successfully completed” as shown here. If any issues are reported, they must be dealtwith prior to proceeding with a software upgrade. Now let’s try the software upgrade.This demos will show the Unity software upgrade.This module focuses on CRU and FRU replacements.These demos can be viewed in the elearning course.This course covered the basic maintenance of the Unity storage system. This concludes the training.。
EMC产品体系
存储产品:三大系列低端:celerra系列对应容灾产品:Celerra Replicator中端:CLARIION价格十几万到几十万对应容灾产品:mirrorview(磁盘到磁盘的复制,可以做一对多的复制)snapview(基于快照、克隆的数据备份)Mirrorview可以做一个存储到两个备份存储的数据复制高端:symmetrix价格几十万到上百万对应容灾产品:Symmetrix SRDF(类似mirrorview,可做远程和本地的)timefinder(类似snapview)这些容灾功能都是在存储内部本身已经集成的,每个产品对应的各自的系列容灾产品mirrorview、Symmetrix SRDF是存储到存储的数据复制,要求两边的存储要是同一个系列的。
snapview、timefinder是存储到存储内部本身的数据备份备份容灾软件:networker:实现数据集中备份的软件,可以对多种不同数据库进行备份(类似我们的服务器备份)RecoverPoint、RecoverPoint/SE:也是存储到存储的数据复制,其中RecoverPoint/SE是专门针对CLARIION系列存储的这个软件做本地和异地的都可以的,可以一对一,可以一对多,可以本存储到本存储,也可以本存储到另一个存储RecoverPoint是独立的软件,可以针对布什EMC的存储设备去做数据复制Avamar:重复数据删除软件,EMC自己的Homebase:数据恢复和迁移功能的软件容灾备份硬件Data Domain :Data Domain是被EMC收购的公司具有重复数据删除功能的备份存储设备,与上面的三个系列的存储不一样,是专门用来存备份的数据的,其重复数据删除功能与avamar相似Avamar,Data Domain 功能类似,大都与networker想结合使用Data library虚拟带库设备EMC做容灾备份没有单独一个软件就能实现所有功能的,一般都是几个产品组合成一整套的解决方案,价格都是比较高的。
EMC-存储-交换机-巡检报告

3.Zone设置是否正确并有效?(查
section:Zone Checks)
4.是否有Panic和Critical error产 生?(查section:Error dump analysis) 5.所有Port的连接状态是否正常?(查
section:Port statistics)
正常异常无权限正常异常正常异常正常异常正常异常正常异常正常异常正常异常正常异常正常异常正常异常正常异常正常异常正常异常符合不符合无权限符合不符合符合不符合符合不符合符合不符合符合不符合符合不符合符合不符合符合不符合符合不符合符合不符合clariion客户名称
连接Clariion的交换机健康检查报告
客户名称: 交换机类型: 工程师姓名: 设备安装地址: 服务类别: 保修期内 交换机现配置的名称: 检查交换机相关硬件状态: 1.内存状态是否正常?(查
满意
C h
尚可
C h
不满意
C h
具体意见
客户签字
日期
客户联系人电话: Switch操作系统版本: 健康检查时间: 交换机WWN : 服务后状态: 说 完成 未完成 明
说
明
Brocade Checks)
2. 检查BB credit,R_A_TOV,RA timeout, E_D_TOV是否符合Swat要 符合 求?(没有警告,查section:Generic Brocade
Checks)
不符合
建议及修复措施:
客户签署意见及签字: 尊敬的客户您好, 本次服务已完成, 请您对我们的服务提出宝贵意见,谢谢合作!
6.Frame statistics的统计结果是否 正常?(查section:Frame statistics) 7.所有License是否正确注册?(查
EMC CX4 系列存储物理结构及安装步骤
CX4-480
• 最多 480 个驱动器 • 16 GB 缓存 • 标配 8 个光纤通道/ 4 个 iSCSI • 最多 24 个前端光纤通道 和/或 iSCSI • 闪存驱动器
CX4-960
• 最多 960 个驱动器 • 32 GB 缓存 • 标配 8 个光纤通道/ 4 个 iSCSI • 最多 32 个前端光纤通道 和/或 iSCSI • 闪存驱动器
EMC存储介绍
产品结构及实施步骤
CLARiiON CX4 系列简介
新
可扩展性 CX4-240 CX4-120
• 最多 120 个驱动器 • 6 GB 缓存 • 标配 4 个光纤通道/ 4 个 iSCSI • 最多 16 个前端光纤通道 和/或 iSCSI • 最多 240 个驱动器 • 8 GB 缓存 • 标配 4 个光纤通道/ 4 个 iSCSI • 最多 20 个前端光纤通道 和/或 iSCSI
RAID Group RAID0 RAID1 RAID5 RAID5 RAID6 RAID10 . . . . .
LUN0 LUN1 LUN2 LUN3 LUN4 . . . . . . .
Storage group
Host
LUN
主机软件安装:Agent
主机软件安装:Powerpath
存储设备信息收集:CAP
服务器信息收集:Grab
项目验收报告
对了,最后千万别忘了让客户帮我们签一下 ” 项目验收报告”!!!
谢谢!
CX4-120/240/480物理架构(前视)
CX4-120/240/480物理架构(后视)
局部放大视图
数据线连接:
电源线连接:
பைடு நூலகம்
准备工作:用CPG工具生成文档
EMC-使用手册

Version 5.3 and Service Pack Releases
Release Notes
P/N 300-008-342 Rev A05
November 2, 2009
These release notes contain information about features, system requirements, and limitations of PowerPath 5.3 for AIX. The release notes supplement other PowerPath 5.3 documentation. ◆ Revision History ....................................................................................2 ◆ Product description...............................................................................2 ◆ New features and changes ...................................................................2 ◆ Fixed problems ......................................................................................6 ◆ Environment and system requirements.............................................9 ◆ Known problems and limitations .....................................................17 ◆ Technical notes.....................................................................................22 ◆ Documentation ....................................................................................25 ◆ Software media, organization, and files...........................................27 ◆ Installation ............................................................................................28 ◆ Troubleshooting and getting help.....................................................28
EMC日常维护手册
EMC日常维护手册(v )版本说明目录目录1硬件部分Clariion CX 系列产品硬件介绍Clariion CX 系列产品的基本构成构成:由 SPS,DPE/SPE 和 DAE 三部分组成示例:CX4-960名词解释:SPS:Standby Power Supply,接 DPE 或者 SPE+DAE OS,对 Write Cache 提供后备电源保护SPE:Storage Processor Enclosure,包含两个全冗余的存储控制器DPE:Disk Processor Enclosure,SPE 和 DAE OS 在同一个 EnclosureDAE:Disk Array Enclosure,磁盘柜,包含 15 个硬盘槽位,磁盘 ID 从左至右为 0-14DAE_OS:包含控制器系统(OS)的 DAE,占用 DAE 从左至右前五块硬盘注:Clariion 系列中采用 DPE 架构的有 CX200/300/400/500,而 CX600/700,3 和 4 系列均为SPE 架构CX600 / CX700 基本部件及状态灯介绍CX600 / CX700 Storage Processor Enclosure (SPE)--前视图(1) 3 个热插拔风扇模块(图 1-1)(2) 风扇模块错误灯(黄灯亮表示有错误,在前面板上看不见,需拆下前面板才能看见)(3) SPE 电源指示灯(绿灯) SPE 错误指示灯 (黄灯)CX600 / CX700 Storage Processor Enclosure (SPE)--后视图(1) Storage Processors A (2) Storage Processors B(图 1-2)(3) 2 个热拔插电源模块 (active/active, 1+1)CX600 / CX700 Storage Processor (SP)—细节图(图 1-3)(1) 4 个前端(连主机)2Gb FC 端口(每个 Storage Processor )(2) 4 个后端(连扩展 DAE)2Gb FC 端口(每个 Storage Processor )(3) 10/100 局域网管理端口(4) SP Status LEDs--用于 SP 启动检测和检查 SP 的健康状态(5) Port80h Card--在 SP 主板上,用与开机自检,(6) SPS Monitoring Port--连接 SPS 的串口,用于 SP 与 SPS 之间的通讯和控制(7) Serial/PPP Port--获取动态 IP 地址进行维护或也可通过 HyperTerminal 软件检测 SP 的启动CX200 / 300 / 400 / 500 基本部件及状态灯介绍CX200 / 300 / 400 / 500 Disk Processor Enclosure (DPE)(四款产品均为 DPE 架构,除 SP 的前端和后端端口数量有差别外,基本一样,下图为 CX500的 DPE)(图 1-4)(1) BE0 –后端总线端口 0(HSSDC)--连接 DPE 和 DAE (2) BE1 –后端总线端口 1(HSSDC)--连接 DPE 和 DAE (3) 两个前端 2Gb 端口(FC) 每个 Storage Processor(4) Enclosure 状态灯--绿色(电源灯),黄灯(错误灯或可用于检测启动过程)(5) 10/100 以太网管理端口(6) Serial Mgmt Port (RJ-45)--获取动态 IP 地址进行维护或也可通过 HyperTerminal 软件检测 SP的启动(7) SPS Monitoring Port--连接 SPS 的串口,用于 SP 与 SPS 之间的通讯和控制CX3-10 / 3-20 / 3-40 基本部件及状态灯介绍CX3-10 / 3-20 / 3-40 Storage Processor Enclosure (SPE)--前视图(图 1-5)(A) 四个热插拔电源模块,从左至右依次为 PS_A0 A1 B0 B1 (B) 电源模块故障指示灯,故障时亮黄色(C) 系统电源指示灯:绿色,常亮系统故障指示灯:黄色,系统故障时亮CX3-10 / 3-20 / 3-40 Storage Processor Enclosure (SPE)—后视图(图 1-6)CX3-10 / 3-20 / 3-40 Storage Processor (SP)—细节图(三款产品均为 SPE 架构,除 SP 前端和后端端口数量有差别外,基本一样,下图为 CX3-40的 SP)(图 1-7)A:SPS 监控端口B:管理串口 C:电源指示灯:绿色,常亮 D:故障指示灯:黄色,故障时亮 E:服务管理网口 F:客户管理网口 G:后端扩展端口 H:前端光纤端口CX3-80 基本部件及状态灯介绍CX3-80 Storage Processor Enclosure (SPE)—前视图(图 1-8) A:电源模块,上有黄色故障指示灯,故障时亮 B:冷却风扇模块,上有黄色故障指示灯,故障时亮 C:系统故障指示灯:黄色,故障时亮 D:系统电源指示灯:绿色,常亮CX3-80 Storage Processor Enclosure (SPE)—后视图A:电源模块B:SAN Management ModuleC:I/O 模块电源模块(图 1-9)CX3-80 Storage Processor (SP)—细节图A:SP 控制器工作状态指示灯B:I/O Module(图 1-10)CX3-80 I/O Module --细节图A:后端端口工作状态 LED B:后端端口C:前端端口D:前端端口工作状态 LED(图 1-11)E:I/O 模块电源与故障指示灯,黄色灯亮表示有故障CX3-80 SAN Management Module --细节图A:电源指示灯 B:故障指示灯 C:用户管理网络端口D:服务管理网络端口,仅限于 EMC 服务人员使用E:管理串口F:SPS 监控端口(图 1-12)CX4-120 / 240 / 480 基本部件及状态灯介绍CX4-120 / 240 / 480 Storage Processor Enclosure (SPE)—前视图A0:电源模块 A1:电源模块 B0:电源模块 B1:电源模块 C:CPU 模块 A D:CPU 模块 B E:CPU 模块 A 电源和故障指示灯F:CPU 模块 B 电源和故障指示灯G:存储系统电源和故障指示灯(图 1-13)CX4-120 / 240 / 480 Storage Processor Enclosure (SPE)—后视图A:Management Module(管理模块)B:I/O Module(I/O 模块)(图 1-14)C:Power / Fault LED(电源/故障指示灯)CX4-120 / 240 / 480 Storage Processor (SP)—细节图A:Management Module(管理模块)(图 1-15)B:Back End Port on I/O Module(I/O 模块上的后端端口,连接 DAE)C:FC Front End Port on I/O Module(I/O 模块上的前端光纤端口,连接主机)D:iSCSI Front End Port on I/O Module(I/O 模块上的前端 iSCSI 端口,连接主机)CX4-120 / 240 / 480 Management Module—细节图A:Service LAN Port(服务端口,仅限于 EMC 服务使用)B:Management LAN Port(用户管理端口) C:SPS Port(SPS 监控端口) D:Communications Port(管理端口) E:NMI (系统维护用,勿触动)(图 1-16)CX4-960 基本部件及状态灯介绍CX4-960 Storage Processor Enclosure (SPE)—前视图A1:Power Supply A(电源模块 A)A2:Power Supply B(电源模块 B)B1-B4:Blowers / Fans(风扇模块)(图 1-17)C:Enclosure Fault LED(系统故障指示灯)D:Power LED(系统电源指示灯)CX4-960 Storage Processor Enclosure (SPE)—后视图A:Power Supply B(电源模块 B) B:Power Supply A(电源模块 A) C:Management Module(管理模块) D:Management Module (管理模块) E:I/O Annex(I/O 扩展模块)(图 1-18)CX4-960 Storage Processor (SP)—细节图A:Power LED(电源指示灯) B:Fault LED(故障指示灯) C:Unsafe to Remove LED D1-D4:I/O Module(I/O 模块)(图 1-19)CX4-960 Management Module—细节图A:Fault LED(故障指示灯) B:Power LED(电源指示灯) C:USBD:Management LAN Port(以太网管理端口)E:Service LAN Port(以太网服务端口,仅限于 EMC 服务人员)F:NMI ButtonG:Communications Port(服务端口)H:SPS Port(SPS 监控端口)(图 1-20)Disk Array Enclosure (DAE)基本部件及状态灯介绍Disk Array Enclosure (DAE) --前视图(图 1-21)(10) 硬盘状态灯--绿灯表示连接状态,绿灯闪烁表示磁盘活动状态,黄灯亮表示磁盘报错(11) 盘柜状态灯--绿灯表示供电正常,黄灯亮表示盘柜有错误(12) Slot0-4 ,共 5 块 DAE-OS Vault Drives (仅限于 DAE_OS),从左至右,Slot 0--Slot 4 Disk Array Enclosure (DAE) --后视图Two Link Control Card (LCC)(图 1-22)(1) LCC 状态灯--绿色表示电源,黄色表示有错误(2) Expansion 端口(HSSDC)--灯亮表示有信号(3) 光纤环路 ID 指示灯( Loop ID LED)--0,1,2,3, 表示后端连接的光纤换路(Loop)ID (4) Primary 端口(HSSDC)--灯亮表示有信号Two DAE 电源模块(5) 两个集成了风扇的电源模块(6) 风扇错误灯(黄色)(7) 电源状态灯(绿色--有电,黄色--有错)(8) 交流电源输入开关,对 DAE-OS,DPE 或 SPE 关电,应使用此开关(9) Enclosure 地址开关-如是 DAE-OS 的 Enclosure,则其必须被设置为 0Disk Array Enclosure 2P/3P (DAE 2P/3P) --后视图(图 1-23) A:电源模块,下面电源模块为 PS A,上面为 PS B B:LCC 模块,下为 LCC A,上为 LCC B C:PRI 端口,连接 SP Back End 端口或者上级 DAE EXP 端口D:EXP 端口,连接下级 DAE PRI 端口E:Enclosure ID LED F:Loop ID LED G:电源与故障指示灯Standby Power Supply (SPS) 基本部件及状态灯介绍1 KW I U SPS(1) 电源开关(2) 交流电源输入(3) SPE & 启动盘所在 DAE 的交流输出(图 1-24)(4) SPS 监测端口--连接 SP 的串口,用于 SP 与 SPS 之间的通讯和控制(5) 状态灯 (从下至上)内部监测灯—亮黄色表示 SPS 内部监测出错更换 SPS 指示灯—亮黄色表示电池寿命已到或者自检出错电池供电指示灯--当 SPS 给 SP 或 DAE OS 供电时亮黄色电源灯--当 SPS 充满电后亮常绿,当 SPS 电池被充电时闪绿色2U SPSA:交流输入B:交流输出C:电源开关(图 1-25)D:SPS 监测端口--连接 SP 的串口,用于 SP 与 SPS 之间的通讯和控制E:状态灯(从下至上)内部监测灯—亮黄色表示SPS 内部监测出错更换 SPS 指示灯—亮黄色表示电池寿命已到或者自检出错电池供电指示灯--当 SPS 给 SP 或 DAE OS 供电时亮黄色电源灯--当 SPS 充满电后亮常绿,当 SPS 电池被充电时闪绿色如何用 Navisphere 看存储的状态在 Navisphere 中,除正常状态以外,CX 磁盘阵列的四种常见状态T:一个或者多个部件处于 Transition 状态,比如 LUN 正在 Rebuilding,SPS 正在充电 F:一个或者多个部件出现故障,注意,存储刚加电,由于 SPS 充电,也会出现 F 状态 X:存储系统不可访问,比如网络连接断开等情况:当前 Navishper 版本不支持对该存储系统进行管理举例如下:Array in TransitionArray FaultedArray Inaccessible如在 Navisphere 发现有报错,检查 CX 磁盘阵列错误的简单方法1、右击存储,选择 fault,会显示具体报错信息2、展开 Physical 项,可以定位具体故障部件3、Clariion 每个部件都有独立的故障指示灯,在 Navishpere 发现错误后,可以观察存储故障部件的错误指示灯进一步确认客户发现 Clariion 出现问题,应如何报修(注:如客户已装了 dial-out 或者 Call-home, 存储会让管理工作站自动拨号并报修,若无,需客户自己发现并报修)获取 Clariion CX 系列阵列的序列号有以下五种方法:方法一:EMC 工程师在存储安装时会在存储贴上写有序列号的白色标签,标签上会注明客户EMC 报修电话、Site ID 、存储序列号等信息:方法二:如安装工程师漏贴标签,注意必须查 SPE 或 DPE 上的标签(DPE 架构的从机柜后面查看上图所示位置)(SPE 架构的从机柜正面拆下 SPE 挡板,查看上图所示位置)方法三:通过 serialization tag 查看(仅适用于 Clariion 4 系列产品)CX4-120/240/480 请查看存储 SPE 后部的黑色标签,上面有产品的 PN(型号),SN(序列号)CX4-960 和 CX4-120/240/480 差不多,也是在 SPE 后部有一个黑色标签,只是位置不同方法四:通过 Navisphere 命令查看 CX 存储的序列号:(红色字体) C:\Program Files\EMC\Navisphere CLI>navicli -h getagent Name: K10Desc:Node: A-CK0124Physical Node: K10Signature: 1912950Peer Signature: 1912955SCSI Id: 0SP Identifier: ARevision: .016Model: CX3-40c Model Type: Rackmount Prom Rev:SP Memory: 4096Serial No: CK0124Cabinet: SPE3 C:\Program Files\EMC\Navisphere CLI>方法五:通过 Navisphere 图形界面查看 CX 存储的序列号右击存储,选择 Properties,在弹出窗口 General 选项卡中的 Serial Number 一项拔打 EMC 全球响应中心 800 电话报修如用固定电话报修,请拔打 09 如用手机报修,请拔打 09 请依照语音提示进行报修注意:必须事先准备好序列号,报修时需提供存储序列号( CX 系列的序列号格式基本都是 CK2000 开头,后跟 8 位数字),同时请提供具体的故障描述,如果部件故障,最好能提供故障部件的 Part Number(PN),特别是硬盘的 PN,以便于服务人员准确准备备件EMC Clariion CX 系列开关机注意事项及详细步骤开机前注意事项:1. 磁盘阵列在加电前,为确保磁盘柜散热和工作正常,请确认所有磁盘柜的每个槽位都已经插上硬盘和挡风板2. 开机前需确保――SPE 或 DPE 至少要有一个正常工作的 SP,每个 DAE 都至少要一块正常工作的 LCC开机步骤:1. 检查所有供电线路联接是否正常,是否有松动或改动并改正2. 从机柜顶部开始,由上至下打开所有 DAE 磁盘机箱的电源。
EMC CLARiiON CX4 系列
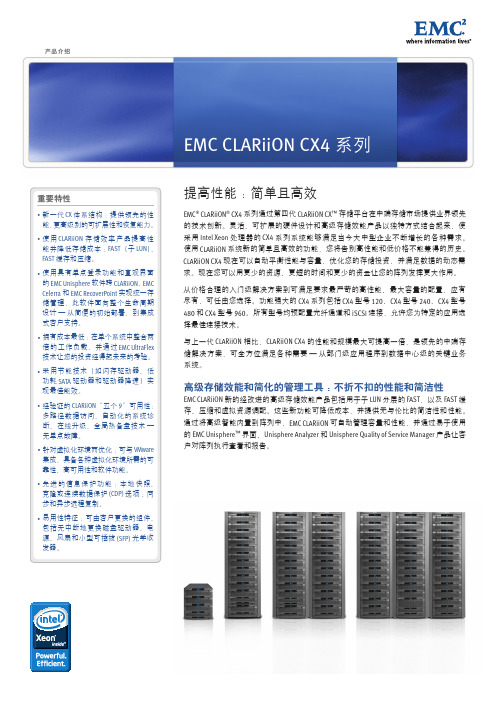
产品介绍提高性能:简单且高效EMC ® CLARiiON ® CX4 系列通过第四代 CLARiiON CX ™ 存储平台在中端存储市场提供业界领先的技术创新。
灵活、可扩展的硬件设计和高级存储效能产品以独特方式结合起来,使采用 Intel Xeon 处理器的 CX4 系列系统能够满足当今大中型企业不断增长的各种需求。
使用 CLARiiON 系统新的简单且高效的功能,您将告别高性能和低价格不能兼得的历史。
CLARiiON CX4 现在可以自动平衡性能与容量,优化您的存储投资,并满足数据的动态需求。
现在您可以用更少的资源、更短的时间和更少的资金让您的阵列发挥更大作用。
从价格合理的入门级解决方案到可满足要求最严苛的高性能、最大容量的配置,应有尽有,可任由您选择。
功能强大的 CX4 系列包括 CX4 型号 120、CX4 型号 240、CX4 型号 480 和 CX4 型号 960。
所有型号均预配置光纤通道和 iSCSI 连接,允许您为特定的应用选择最佳连接技术。
与上一代 CLARiiON 相比,CLARiiON CX4 的性能和规模最大可提高一倍,是领先的中端存储解决方案,可全方位满足各种需要 — 从部门级应用程序到数据中心级的关键业务系统。
高级存储效能和简化的管理工具:不折不扣的性能和简洁性EMC CLARiiON 新的经改进的高级存储效能产品包括用于子 LUN 分层的 FAST ,以及 FAST 缓存、压缩和虚拟资源调配。
这些新功能可降低成本,并提供无与伦比的简洁性和性能。
通过将高级智能内置到阵列中,EMC CLARiiON 可自动管理容量和性能,并通过易于使用的 EMC Unisphere ™ 界面、Unisphere Analyzer 和 Unisphere Quality of Service Manager 产品让客户对阵列执行查看和报告。
EMC CLARiiON 全自动存储分层 (FAST):提高性能和效率 — 通过动态地将“热”数据移动到高性能的驱动器和将“冷”数据移动到更经济划算的高容量驱动器,FAST 以较低的成本提供最佳性能。
EMC 操作手册

壹、EMC CX3-80主要元件介紹 (2)一、CX3-80 儲存系統由下列元件組成(高度、位置如圖1示) .. 2二、控制器(Storage Processor Enclosure, SPE) (3)三、硬碟櫃(Disk-Array Enclosure, DAE or DAE3P) (8)貳、獨立磁碟備援陣列(RAID)的定義與CLARiiON支援種類.. 17一、RAID的定義與作用 (17)二、CLARiiON 支援的RAID 種類 (17)三、RAID Group的定義與設定 (22)EMC CX3-80主要元件介紹一、CX3-80儲存系統由下列元件組成(高度、位置如圖1示)(一)控制器(SPE, Storage Processor Enclosure)1.電池*2 (SPSs, Standby Power Supplies)2.硬碟櫃,至少要有前五顆硬碟,為OS (DAE, Disk ArrayEnclosure)3.選擇性擴增的硬碟櫃,最多可有32櫃(二)此系統強調的「高可用性」特色1.備援儲存處理器(Redundant Storage Processors, SPs)2.預備電源供應(Standby Power Supplies, SPSs)3.備援電源供應(指控制器或硬碟櫃的Redundant PowerSupplies)4.備援風扇以下依序介紹各組成元件二、控制器(Storage Processor Enclosure,SPE)(一)概述由下列元件組成1.兩個儲存處理器(Storage Processor ,SP),各有一CPU模組及兩個I/O模組(圖2為單一個SP,圖3為其CPU模組及I/O模組示意)圖22.兩個管理模組,各有SPS、管理、服務連接埠(如圖4)圖43.四個風扇(blowers,圖5)4.兩個電源供應器(PSA & PSB,圖5)圖5以下針對儲存處理器& 管理模組,再做詳述。
- 1、下载文档前请自行甄别文档内容的完整性,平台不提供额外的编辑、内容补充、找答案等附加服务。
- 2、"仅部分预览"的文档,不可在线预览部分如存在完整性等问题,可反馈申请退款(可完整预览的文档不适用该条件!)。
- 3、如文档侵犯您的权益,请联系客服反馈,我们会尽快为您处理(人工客服工作时间:9:00-18:30)。
一、 CLARiiON硬件及维护指南(一) - CX3/CX4基本部件介绍 CX3/CX4基本部件介绍
CLARiiON CX系列产品的基本构成
构成:由SPS,DPE/SPE和DAE三部分组成 示例:CX4
SPS:Standby Power Supply,接DPE或者SPE+DAE OS,对Write Cache提供后备电源保护 SPE:Storage Processor Enclosure,包含两个全冗余的存储控制器 DPE:Disk Processor Enclosure,SPE和DAE OS在同一个Enclosure DAE:Disk Array Enclosure,磁盘柜,包含15个硬盘槽位,磁盘ID从左至右为0-14 DAE-OS:包含控制器系统(OS)的DAE,占用DAE从左至右前五块硬盘
注:CLARiiON系列中采用DPE架构的有CX200/300/400/500,而CX600/700,3和4系列均为SPE架构
二、 CLARiiON硬件及维护指南(二) - 状态指示灯 版本 7 以CLARiiON CX4系列为例介绍SPE、DAE和SPS的基本部件及其状态灯。
1. CX4-120 / 240 / 480 Storage Processor Enclosure (SPE)基本部件及状态灯介绍 1.1 SPE前视图
A0,A1,B0&B1:电源模块 C&D:CPU模块A和B E:CPU模块A电源和故障指示灯,黄色灯亮表示有故障 F:CPU模块B电源和故障指示灯,黄色灯亮表示有故障 G:存储系统电源和故障指示灯,黄色灯亮表示有故障
1.2 SPE后视图
A&B:管理模块和I/O模块 C:电源/故障指示灯,黄色灯亮表示有故障
1.3 SP细节图
A:管理模块 B: I/O模块上的后端端口,连接DAE C&D: I/O模块上的前端光纤端口和前端iSCSI端口,连接主机
2. CX4-960 Storage Processor Enclosure (SPE)基本部件及状态灯介绍 2.1 SPE前视图
A1&A2:电源模块A和B B1-B4:风扇模块 C:磁盘柜系统故障指示灯 D:系统电源指示灯
2.2 SPE后视图 A&B:电源模块B和A C&D:管理模块 E: I/O扩展模块
2.3 SP细节图
A:电源指示灯,绿色,常亮 B:故障指示灯,黄色,故障时亮 C:勿拔提醒指示灯 D1-D4: I/O模块
3. Disk Array Enclosure (DAE) 基本部件及状态灯介绍 3.1 DAE前视图
A: 硬盘状态灯--绿灯表示连接状态,绿灯闪烁表示磁盘活动状态,黄灯亮表示磁盘报错 B: 盘柜状态灯--绿灯表示供电正常,黄灯亮表示盘柜有报错 C: 插槽共5块DAE-OS Vault Drives (仅限于DAE_OS),从左至右,Slot 0--Slot 4
3.2 DAE 2P/3P后视图-适用于CX4-120/240/480/960 A:电源模块,下面电源模块为PS A,上面为PS B B:LCC模块,下为LCC A,上为LCC B C:PRI端口,连接SP 后端端口(Back end port)或者上级DAE的扩展端口(EXP port) D:EXP端口,连接下级DAE端口 E:磁盘柜标识(Enclosure ID)指示灯 F:环路标识(Loop ID)指示灯 G: 电源与故障指示灯
4. Standby Power Supply (SPS) 基本部件及状态灯介绍 4.1 SPS型号1 KW I U -适用于CX4-120/240/480
(1) 电源开关 (2&3) 交流电源输入和输出 (4) SPS 监测端口--连接SP的串口,用于SP与SPS之间的通讯和控制 (5) 状态灯 (从下至上) 内部监测灯—亮黄色表示SPS内部监测出错 更换SPS指示灯—亮黄色表示电池寿命已到或者自检出错 电池供电指示灯--当SPS给SP或DAE OS供电时亮黄色 电源灯--当SPS充满电后亮常绿,当SPS电池被充电时闪绿色
4.2 SPS型号2.2KW 2U-适用于CX4-960 A&B:交流输入和输出 C:电源开关 D:SPS监测端口--连接SP的串口,用于SP与SPS之间的通讯和控制 E:状态灯 (从下至上) 内部监测灯—亮黄色表示SPS内部监测出错 更换SPS指示灯—亮黄色表示电池寿命已到或者自检出错 电池供电指示灯--当SPS给SP或DAE OS供电时亮黄色 电源灯--当SPS充满电后亮常绿,当SPS电池被充电时闪绿色
三、 CLARiiON硬件及维护指南(三) - Navisphere图形管理界面
Navisphere图形管理界面适用于运行Flare版本19到29之间的CLARiiON。在有多台CLARiiON的环境中,将所有CLARiiON加入同一个存储域(Storage Domain),选择其中一台作为域的主要节点(Domain Master),即可用一个界面管理该域中所有的CLARiiON。
1. 从Navisphere登录作为Domain Master的CLARiiON,管理该存储域(Storage Domain)下所有的CLARiiON。 在Navisphere中,除了正常状态,还有以下四种常见状态: T:一个或者多个部件处于Transition状态,比如LUN正在重建Rebuilding。 F:一个或者多个部件出现故障,注:存储刚加电,由于SPS充电,也会出现F状态。 X:存储系统不可访问,比如网络连接断开等情况。 ?:当前Navishpere版本不支持对该存储系统进行管理。
2. 在主机Hosts界面查看主机和存储之间的连接、注册情况。
3. 在监控Monitors界面,配置具体监控哪些事件以及监控的方式Email、Paging或者SNMP。
4. 选择CLARiiON的序列号右击,可以配置存储、监控运行、管理属性、复制数据并且分析性能。
4.1 运行监测---错误分析报告 选择CLARiiON的序列号右击,点击Faults,查看系统错误分析报告。
4.2 运行监测---磁盘概况 选择CLARiiON的序列号右击,点击Disk Summary,查看磁盘使用情况。
5. 选择CLARiiON的SP右击,可以查看SP事件日志、重启SP、收集SP日志spcollects并且分析性能。
选择CLARiiON的SP右击,点击View Events,查看SP报出的事件日志。 四、 CLARiiON硬件及维护指南(四) - Unisphere图形管理界面
Unisphere图形管理界面适用于运行Flare版本30及更高版本的CLARiiON。在有多台CLARiiON的环境中,将所有CLARiiON加入同一个存储域(Storage Domain),选择其中一台作为域的主要节点(Domain Master),即可用一个界面管理该域中所有的CLARiiON。
1.从Unisphere登录作为Domain Master的CLARiiON,在控制板Dashboard界面可以查看该存储域(Storage Domain)中的所有设备。
2.在告警Alerts界面查看系统告警和错误,确认运行是否有异常。
3.在工具栏选择CLARiiON的序列号,即到该设备的管理界面。选择系统System,点击系统信息System Information,可以管理系统属性或者对控制器SP进行操作。
4. 选择系统System,点击硬件Hardware,可以从网页界面查看硬件构造及各部件目前的状态。
5. 选择存储Storage,可以创建RAID组或者存储池、绑定LUN、配置存储组SG。
6.选择主机Hosts,查看主机和存储之间的连接、注册情况。
7.选择复制Replicas,使用各种复制软件进行数据保护。
8.选择监控Monitoring, 查看系统错误报告和SP事件日志、分析性能、配置监控的方式Email、Paging或者SNMP。
9.选择支持Support界面,从EMC多种在线渠道获得信息和解决方案。 五、 CLARiiON硬件及维护指南(五) - NaviSecCLI常用命令
NaviSecCLI常用命令
创建一个安全文件,这样下次登录时不用再输入用户名和密码。安全文件是加密的,且与本机绑定:
naviseccli -AddUserSecurity -user xxxx -password xxxxx -scope 0
注:Secure CLI(naviseccli)在Classic CLI(navicli)的基础上提供了身份验证、CLI事件审计、SSL加密等功能。创建安全文件后就不必在每次执行naviseccli时再带上-user、-scope和-password参数。
显示系统中各组件状态:
naviseccli -h getcrus
显示哪个SP是某个LUN默认和当前的主SP:
naviseccli -h getlun -default -owner
显示指定行数的SPlog日志(如:200行):
naviseccli -h getlog -200
或将输出结果另存为本地文件:
naviseccli -h getlog -200 > getlog_spa.txt
确认SP Agent状态: