
电子温度计说明书
ED详细资料
is详细资料
数字显示干湿温度计,数字干湿温度计,电子干湿温度计,数显干湿温度计,液晶显示干湿温度计,大屏幕干温计
大屏幕电子温度计_大屏幕电子温度计批发_大屏幕电子温度计价格_HTC-1大屏幕显示温湿度计数字显示干湿温度计价格,数字干湿温度计价格,电子干湿温度计价格,数显干湿温度计价格
婴儿房温度计价格,婴儿房用数字显示温度计价格,婴儿房用数字显示温湿度计,儿童房数字温湿度计表价格婴儿房温度表,婴儿房温度计,婴儿房用数字显示温度计,婴儿房用数字显示温湿度计,儿童房数字温湿度计表产品规格:
温度测量范围:-50C〜+70C(-58T〜+158T)
温度测量精度:土1C(1.8 T)温度分辨率:0.1 C(0.2 T)温度测量范围:20%R〜99%RH
湿度测量精度:土5%RH
温度分辨率:1%
使用电池:AAA 1.5V (低功耗)
产品尺寸:100*108*20mm
产品质量:160g 基本功能:
1、温度/湿度显示
2、C/T温度切换显示
3、/最低温度记忆功能
4、12/24小时制时钟
5、整点报时功能
&每日闹钟功能&日历显示功能
具体操作方法:
1、依机背指示方向推开电池门,取出电池隔片,然后装回电池门,该机即可用。
2、按键功能:(MOD)切换时钟与闹钟显示模式/设定当前时间、闹钟、12或2 4小时制、日期(ADJ调整被设项目的数值;(MEMORY显示记忆中的/最低温湿度值/清除记忆的/最低温湿度值;(C/ oF)切换温度单位以C (摄氏度
或oF (华氏度)显示;(RESET清除所有设定/记忆值,返回初始状态。
3、在初始状态下按住(MODE1秒,当前时间的分钟数开始闪动,按(ADJ可以调节分钟数,连续按(MODE可以分别设定“时钟”、“ 12/24 ”、“月(M)”、“日(D)”
4、在当前时钟模式下,(时钟与分钟之间的两点每秒闪动一次)切换显示为闹钟模式(时钟与分钟之间的两点不闪动),此时按(ADJ可以切换“闹钟” (A larm)功能/ “整点报时”()功能的开与关,再按住(MODE 2秒,可以设定闹铃时间,同时启动“整点极时”功能,()符号出现。
5、在闹钟模式下,若无任何操作则一分钟后自动返回当前时钟,此时按一次(A DJ)切换至日历显示,3秒后自动返回当前时钟按MAX/MINS,显示温/湿度最后次清除(CLEAR以来的值。
6按(MEMORW以显示记忆的温/湿度值(MAX和最小值(MIN),按住(M EMORY
超过2秒可清除记忆的/最小值。
注意事项:
1. 初次使用或更换电池时请按一次RESET(在机背后);
2. 若该机出现任何不良,请按一次RESET
3. 电池用完后,请放回政府指定地点。
温馨提示:一些常见环境温湿度范围
居室环境:40〜70%RH
最有利的防病、治病环境:40〜55%RH
图书、文物保管环境:40〜60%RH
计算机、通讯器材保管环境:45〜60%RH
棉毛纺织品存放:40〜60%RH
奶制品存放:50〜60%RH
糖果、点心存放:50〜60%RH
蔬菜、水果存放:50〜70%RH
粮食存放:50〜70%RH
人生活在地球上,离不开恰当的温度和湿度,而往往又最容易忽视这个身边最普通对人身体健康又极为重要的问题。
(1)温度温度与人们的生活密不可分,人们无时无刻不在寻求或创造生活各个领域中的温度。
8〜15C,是储粮的温度,这一温度可以防止粮食生虫。
35〜38 C,是洗澡
水的温度,因为这一温度与体温近似。
40〜45°C,是就寝前洗脚水的温度,因为这一温度的热水能促使足部和下肢的血管扩张,使大脑得以休息,有助于进入睡眠。
70〜80C,是泡茶叶开水的温度,用这一温度开水泡出的茶,可以说是色、香、味俱全。
那么,室内的温度是多少?是18〜20C。
这一温度是我国北方春季的平均温度,所以有“温暖如春”的成语。
当室内的温度低于或高于这一室温时,人们就会感到冻手冻脚,工作效率降低,或大汗淋漓,头脑发昏。
室内环境装饰的一个主要内容,就是用一切办法创造或保持室内的温度。
(2)湿度看看我们各自的家庭,具有温度计的很多,而同时墙上挂有湿度计的则很少(其实市面上就有卖温度湿度放在一起的记录表)。
这说明家庭室内装饰中的湿度问题,似乎还没引起我们足够的认识。
其实,合适的湿度较之居室的主人来说,其重要性并不亚于温度。
空气湿度是指空气潮湿的程度,可用相对湿度表示。
相对湿度是指空气实际所含水蒸气密度和同温下饱和水蒸气密度的百分比值。
人体在室内感觉舒适的相对湿度是40〜70%相对湿度过低或过高,对人体都不适甚至有害。
相对湿度过低,还会导致木材水分散失,引起家具或木质地板变形、开裂和损坏;钢琴、提琴等对湿度要求高的乐器不能正常使用;文物、档案和图
书脆化、变形。
相对湿度过高,又易使室内家具、衣物、地毯等织物生霉、铁器生锈、电子器件短路;地毯、壁纸发生静电现象,对人体有刺激,甚至诱发火灾。
晨光电子温湿度计使用说明书
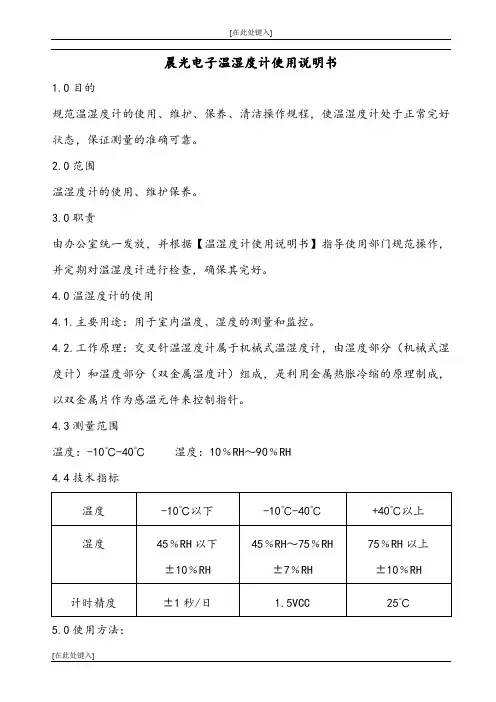
晨光电子温湿度计使用说明书1.0目的规范温湿度计的使用、维护、保养、清洁操作规程,使温湿度计处于正常完好状态,保证测量的准确可靠。
2.0范围温湿度计的使用、维护保养。
3.0职责由办公室统一发放,并根据【温湿度计使用说明书】指导使用部门规范操作,并定期对温湿度计进行检查,确保其完好。
4.0温湿度计的使用4.1.主要用途:用于室内温度、湿度的测量和监控。
4.2.工作原理:交叉针温湿度计属于机械式温湿度计,由湿度部分(机械式湿度计)和温度部分(双金属温度计)组成,是利用金属热胀冷缩的原理制成,以双金属片作为感温元件来控制指针。
4.3测量范围温度:-10℃-40℃湿度:10﹪RH~90﹪RH4.4技术指标5.0使用方法:5.1悬挂在通风的房间内墙壁上。
5.2仓库管理人员每天两小时检测一次将记录【温湿度记录表】中,如超出规定范围由仓库管理人员进行相应的改善措施。
5.2.1如仓库管理人员进行监控时低于零下10℃时关闭门窗,通知品管将库存品重新检验后方可发货。
5.2.2如仓库管理人员进行监控时高于40℃时,由安全员进行相应的降温措施,并通知品管对库存品重新检验。
5.2.3如仓库管理人员发现温湿度过高或过低时由仓库管理人员采取相应的措施。
5.3失效处理当发现温湿度计失效时,应及时停用,并向办公室报告送检测检测部门进行维修。
6.0温湿度计的维护6.1将温度计置于通风处,要远离冷、热源,避免骤热,不要被阳光照射、水淋。
6.2保持使用场所环境清洁,避免灰尘,定期用抹布擦拭温湿度计进行清理。
6.3不能直接接触蒸汽,也不要用嘴哈气,否则会使器件内结露,造成示值漂移。
6.4每年请有校验资格的部门校验一次,按规定的期限将温湿度计送专业机构进行校验。
合格后(贴合格证书)方可使用。
6.5当发现温湿度计失效后,应及时停用,并送检测部门进行维修。
海尔电子火焰模型1H2C数字温度计说明书

19ENGLISH, FRANCAIS(et Canada)•Installation •OperationEffective 9/21/04LITERATURE NUMBERMPD 31492hydro flameTMModel 1H2C Digital ThermostatFOR STANDARD FURNACES&A /C SYSTEMSSPECIFICATIONSOperating Voltage ........................9VDC to 18VDC Current Consumption at 12VDC ................100mA Operating Temp.............................-40F to +185F Room Temp. Range ........................+55F to +90F Room Temp. Display Range ..............+35F to +99F Thermostat Accuracy ................................+/- 1F Switching Capability A/C ..........................up to 24 VAC(max. 2 AMPs)THERMOSTAT INSTALLATIONThermostat is very sensitive. HANDLE WITH CARE AT ALL TIMES .Locate thermostat 48˝ to 54˝ above floor on an INTERIOR wall. Pick a dry area where air circulation is good.EXTERIOR wall location must have a 3/4˝ spacer between thermostat and exterior wall.1. Be sure all electrical power has been disconnected from the air conditioner, furnace and the power supply.2. Do not install the thermostat where there are unusual heating conditions: such as direct sunlight, heat producingappliances (television, radio, wall lamp, etc.) or a furnace or air conditioner supply register.3. ATTACHING THE WALL THERMOSTAT .Separate the thermostat body from the sub-base by gently squeezing the top and bottom,connecting wiring perrequirements. Attach thermostat sub-base to the wall at desired mounting location.THIS THERMOSTAT HAS BEEN DESIGNED TO OPERATE STANDARD AIR CONDITIONING UNITS IN CONJUNCTION WITH A RV FURNACE .Display System SwitchTemperature SetMode Set7.5 VDC ANALOG A/C SYSTEMS (DOMETIC ®)THERMOSTATWIRE FROM FURNACEWIRE FROM A /C TERMINAL# (L -R )FUNCTIONFUNCTION1-12vdc ground47.5 vdc3+12vdc5Compressor 6High Fan 7Low Fan8Furnace Control12 VDC ANALOG A/C SYSTEMS (RVP ®)THERMOSTATWIRE FROM FURNACEWIRE FROM A /C TERMINAL# (L -R )FUNCTIONFUNCTION1-12vdc ground 2not used not used 3 & 4+12vdc5Compressor 6High Fan 7Low Fan8Furnace ControlSLIDE SWITCH SCROLL ORDER OFLEFTRIGHTDISPLAYED MODESOPERATIONCOOL OFFHEAT FANFurnace Operation•HIFurnace cycles to satisfy set point.COOL OFFHEAT FANAir Conditioner Operation•AUAir conditioner automatically switches compressor and high and low speed fan when cycling to satisfy set point.•HIAir conditioner compressor and high speed fan cycle to satisfy set point.•LOAir conditioner compressor and low speed fan cycle to satisfy set point.COOL OFFHEAT FANFan Operation•HIAir conditioner fan runs at high speed to circulate air.•LOAir conditioner fan runs at low speed to circulate air.COOL OFFHEAT FANOff•OFNo operation occurs.WIRING REQUIREMENTS FOR ATWOOD THERMOSTATFURNACE12 VDC SOURCE+7.5VH I F A N6L O W F A N7C O M P R E S S O R54831FURNACE+Y GH GL BH I F A N6L O W F A N7C O M P R E S S O R512 VDC SOURCE831CONNECT4 TO 3WITH JUMPERScrew Mounting Holes*Note: Move jumper to positions 3 and 4 for RVP Unit. Discard jumper for Dometic ®.112VDC Ground 3+12VDC2NOT USEDScrew Mounting Holes4RELAY COM *5A/C COM-PRESSOR 6A/C HI FAN 7A/C LOW FAN8TH FROM FURNACE20ENGLISH, FRANCAIS(et Canada)•Installation •OperationEffective 9/21/04LITERATURE NUMBERMPD 31493hydro flameTMModel 2H2C Two Stage Furnace Digital ThermostatFOR TWO STAGE FURNACESpecificationsOperating Voltage ......................9VDC to 18VDC Power Consumption ................................100mA Operating Temperature ..................-40F to +185FRoom Temperature Range ..............+55F to +90F Room Temperature Display Range ..+35F to +99F Thermostat Accuracy ................................+/- 1FSystem Slide Switch SCROLL ORDER OF LEFTRIGHTDISPLAYED MODESOPERATIONCOOLOFFHEATFANScroll Order of Displayed ModesFurnace Operation•AUFurnace automatically switches between high and low BTU valve and high and low speed fan when cycling to satisfy set point.•HIFurnace high BTU valve and high speed furnace fan cycle to satisfy set point.•LOFurnace low BTU valve and low speed furnace fan cycle to satisfy set point.•HFFurnace fan runs at high speed to circulate air. Air conditioner fan does not run.•LFFurnace fan runs at low speed to circulate air. Air conditioner fan does not run.COOLOFFHEATFANScroll Order of Displayed ModesAir Conditioner Operation•AUAir conditioner automatically switches compressor and high and low speed fan when cycling to satisfy set point.•HIAir conditioner compressor and high speed fan operate to satisfy set point.•LOAir conditioner compressor and low speed fan operate to satisfy set point.•HFAir conditioner fan runs at high speed to circulate air. Furnace fan does not run.•LFAir conditioner fan runs at low speed to circulate air. Furnace fan does not run.COOLOFFHEATFANScroll Order of Displayed ModesFan Operation•HIAir conditioner fan and furnace fan run at high speed to circulate air.•LOAir conditioner fan and furnace fan run at low speed to circulate air.COOLOFFHEATFANScroll Order of Displayed ModesOff•OFNo operation occurs.THERMOSTAT INSTALLATIONThermostat is very sensitive. HANDLE WITH CARE AT ALL TIMES .Locate thermostat 48˝ to 54˝ above floor on an INTERIOR wall.Pick a dry area where air circulation is good. EXTERIOR wall location must have a 3/4˝ spacer between thermostat and exterior wall.1. Be sure all electrical power has been disconnected from the air conditioner, furnace and the power supply.2. Do not install the thermostat where there are unusual heating conditions: such as direct sunlight, heatproducing appliances (television, radio, wall lamp, etc.) or a furnace or air conditioner supply register.3. ATTACHING THE WALL THERMOSTAT .Separate the thermostat body from the sub-base by gently squeezing the top and bottom. Pull wires through access hole in base plate.Attach thermostat sub-base to the wall at the desired mounting location. Mount the sub-base to the wall before connecting the wires.THIS THERMOSTAT HAS BEEN DESIGNED TO OPERATE STANDARD AIR CONDITIONING UNITS IN CONJUNCTION WITH AN EXCALIBUR 2-STAGE FURNACE .*Note: Move jumper to positions 3 and 4 for RVP Unit. Discard jumper for Dometic ®.Display System SwitchTemperature SetMode Set21Anticipator setting1.0.20.48 (valve amperage)WHAT IS A THERMOSTAT?• It is an ON/OFF switch controlled by a bi-metal coilwhich opens and closes an electrical contact by sensing changes in the ambient temperature.• With its contacts close, it supplies power to the time delay relay which in turn closes a contact that sends power to the blower motor.• Normally, the thermostat contacts are closed if the blower is running.• The hydro flame thermostat is equipped with a heat anticipator which allows one to adjust the length of the heating cycles. A furnace should cycle 5-6 times an hour.a. The anticipator is set at 1.0 on all hydro flame thermostats. If you want to shorten the heating cycle, move anticipator to a lower amp setting. You should not set lower than .48 which is the amperage rating of the gas valve. Setting any lower could burn out the anticipator wire.Note: Heat anticipator adjustments are not covered underwarranty.Mechanical Thermostat -HEAT ONLYHeat/cool thermostats are being used in conjunction with air conditioners and our furnace. The warranty, installation instructions and diagnostic information is provided by the manufacturer of the thermostat. However, if you need to isolate a furnace problem or a dual thermostat problem, by-pass the furnace wires at the thermostat. If the furnace ignites and heats, you have a thermostat problem. If the furnace does not run, the problem is in the furnace, and you should consult the trouble shooting guides in the back of this manual.THERMOSTAT LOCATION• It should be on an inside wall 48˝-54˝ above the floor on an inside wall.• It should not be near areas of extreme heat or cold.• It should not be located directly across from a heat duct.• If installed on an outside wall, a 3/4˝ spacer must be used behind legs of thermostat. This will allow the thermostat to sense the air temperature and not the temperature of the wall.• A minimum of 22 gauge wire should be used to connect the thermostat to the furnace. We recommend 18 gauge stranded wire.MOUNTING HOLETEMPERATURE SETTING LEVELMOUNTING HOLEOFF LEVERANTICIPATORSETTING LEVERCAPPING SCREWSCAPPING SCREWS12BASE FACEBASE BACK22Guides are only intended for use on Atwood ®products by service technicians who have successfully completed Atwood ®training. This guide should be used in conjunction with the appropriate Instruction Manual provided with the product and any applicable Industry Standards. This is not intended to be a complete list. Please direct questions concerning service of Atwood ®products to 866-869-3118 option 5 before proceeding.CAUSE SOLUTIONBLOWE R DOE S NOT RUNTemperature selector out of place --------------------Re-set to desired position Thermostat wires broken or disconnected ----------Not covered under warranty.Heat anticipator burned out --------------------------Dead short (not covered under warranty). Repair short and then replacethermostat.Faulty relay drawing more than 1 amp. Replace relay and thermostat. Covered under warranty.No continuity through thermostat withcontacts closed and switch on.----------------------Replace thermostat.Continuity through thermostat withcontacts closed and switch on.----------------------• Check and reestablish power to thermostat• Reset tripped circuit breaker.• Correct poor ground.• Correct any loose wires.• Replace defective relay.• Replace defective motor.FURNACE DOE S NOT CYCLE PROPE RLYFurnace cycles too quickly ----------------------------Move anticipator to a higher amp setting to lengthen cycle. NOT coveredunder warranty.Thermostat located too close to a heat duct. Move thermostat or duct outlet.NOT covered under warranty.High temperature variance ----------------------------Move anticipator to a lower amp setting to shorten cycle. NOT covered underwarranty.Note: When the anticipator is set properly and the heating system has operated for a few hours, the furnace shouldcycle 5-6 time per hour.hydro flame ThermostatTROUBLE SHOOTING GUIDEEffective: 8/10/98。
Omega CL-355A 电子温度计说明书
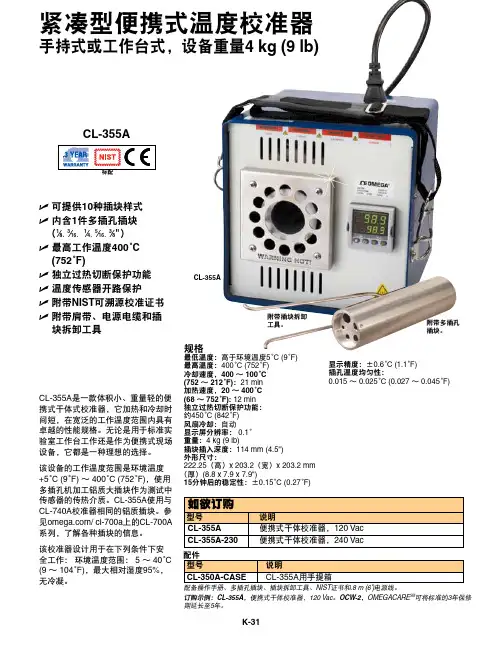
K-31U 可提供10种插块样式U 内含1件多插孔插块(1⁄8、3⁄16、 1⁄4、5⁄16、3⁄8")U 最高工作温度400°C(752°F)U 独立过热切断保护功能U 温度传感器开路保护U 附带NIST 可溯源校准证书U 附带肩带、电源电缆和插块拆卸工具CL-355A 是一款体积小、重量轻的便携式干体式校准器,它加热和冷却时间短,在宽泛的工作温度范围内具有卓越的性能规格。
无论是用于标准实验室工作台工作还是作为便携式现场设备,它都是一种理想的选择。
该设备的工作温度范围是环境温度+5°C (9°F) ~ 400°C (752°F),使用多插孔机加工铝质大插块作为测试中传感器的传热介质。
CL-355A 使用与CL-740A 校准器相同的铝质插块。
参见/ cl-700a 上的CL-700A系列,了解各种插块的信息。
该校准器设计用于在下列条件下安全工作: 环境温度范围: 5 ~ 40°C(9 ~ 104°F),最大相对湿度95%,无冷凝。
规格最低温度:高于环境温度5°C (9°F)最高温度:400°C (752°F)冷却速度,400 ~ 100°C (752 ~ 212°F):21 min 加热速度,20 ~ 400°C (68 ~ 752°F): 12 min 独立过热切断保护功能: 约450°C (842°F)风扇冷却:自动显示屏分辨率: 0.1°重量:4 kg (9 lb)插块插入深度:114 mm (4.5") 外形尺寸: 222.25(高)x 203.2(宽)x 203.2 mm (厚)(8.8 x 7.9 x 7.9")15分钟后的稳定性:±0.15°C (0.27°F )CL-355ANIST 8 m (6')订购示例:CL-355A ,便携式干体校准器,120 Vac 。
温度计说明书
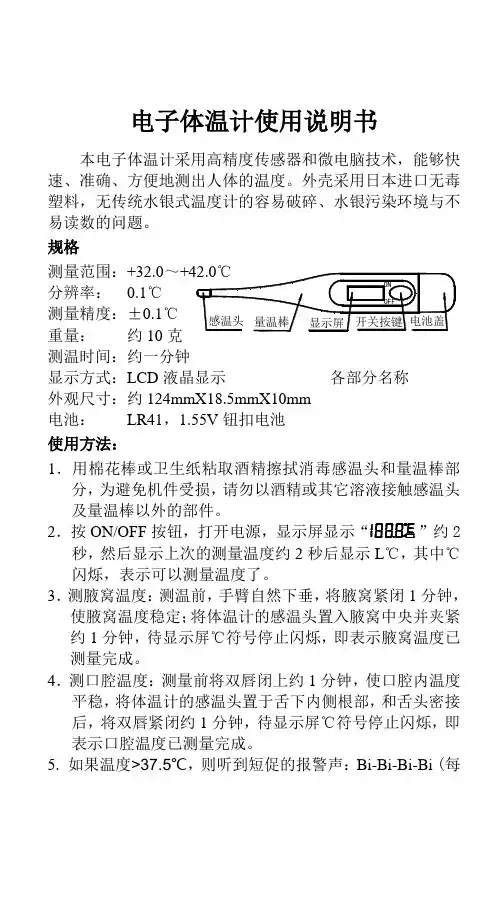
电子体温计使用说明书本电子体温计采用高精度传感器和微电脑技术,能够快速、准确、方便地测出人体的温度。
外壳采用日本进口无毒规格测量范围:分辨率: 0.1测量精度:±重量: 约显示方式:外观尺寸:约电池: 使用方法:1.用棉花棒或卫生纸粘取酒精擦拭消毒感温头和量温棒部分,为避免机件受损,请勿以酒精或其它溶液接触感温头及量温棒以外的部件。
2.按ON/OFF2秒,然后显示上次的测量温度约2闪烁,表示可以测量温度了。
3.测腋窝温度:测温前,手臂自然下垂,将腋窝紧闭1分钟,使腋窝温度稳定;将体温计的感温头置入腋窝中央并夹紧约1分钟,待显示屏℃符号停止闪烁,即表示腋窝温度已测量完成。
4.测口腔温度:测量前将双唇闭上约1分钟,使口腔内温度平稳,将体温计的感温头置于舌下内侧根部,和舌头密接后,将双唇紧闭约1分钟,待显示屏℃符号停止闪烁,即表示口腔温度已测量完成。
5. 如果温度>37.5℃,则听到短促的报警声:Bi-Bi-Bi-Bi (每0.125秒响一次),表示测量完成并警示已发烧了。
如果温度≤37.5℃,则听到较慢的声音:Bi-Bi-Bi-Bi (每0.5秒响一次),表示测量完成并且体温正常。
6. 如果测量温度小于32.0℃,则显示L℃;大于等于42.0℃,则显示H℃。
7. 按ON/OFF按钮,关闭电源,否则,体温计会在8分40秒后自动切断电源。
电池更换1力不足必须尽快更换电池,以确保测量之准确性。
2.更换电池时,把体温计的显示屏朝下,拉出电池盖,再轻轻地拉出体温计机芯约5-15mm(切勿用力过猛、拉出过多,以免损坏元器件),将旧电池取出,负极朝上装入一颗新电池,把机芯推回原位,装上电池盖即可。
注意事项:电子体温计属精密电子产品,故请注意:1.请勿从高处掉下及扭曲机体。
2.感温头至显示屏前端可以用酒精消毒,显示屏及以后部分因无防水装置,只可用干布擦拭,切不可放入水中或在热水中煮沸消毒。
3.除更换电池外请勿打开任何部件。
海尔电子迷你温度计说明书
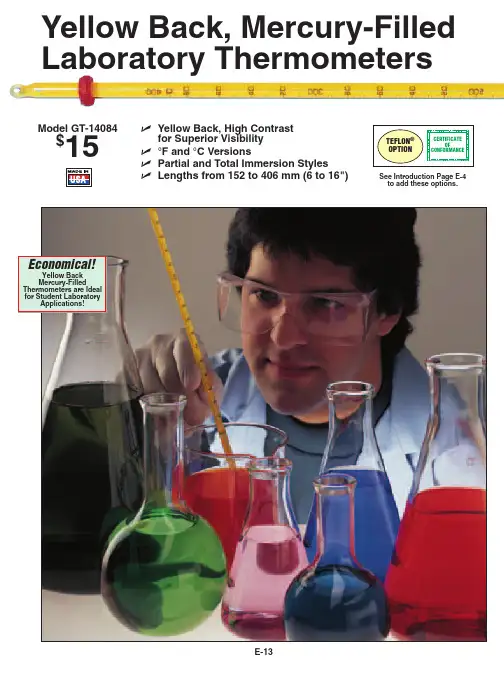
E-13ߜYellow Back, High Contrastfor Superior Visibility ߜ°F and °C VersionsߜPartial and Total Immersion Styles ߜLengths from 152 to 406 mm (6 to 16")Yellow Back, Mercury-Filled Laboratory ThermometersModel GT-14084$15See Introduction Page E-4 to add these options.Economical!Yellow Back Mercury-FilledThermometers are Ideal for Student LaboratoryApplications!CONFORMANCEEach thermometer comes in a protective plastic shipping tube with operator’s manual.Ordering Examples: GT-1344Y is a total immersion style 406 mm (16") thermometer with 0 to 950°F range and 5°divisions, $60. ASTM-CASE-1-16 is a case for a 16" thermometer, $23.50See page E-25 for thermometer cases.to add these options.®Optional GTSK-7720 Mercury ControlSpill Kit, $195. See Accessories, Page E-25Did You Know?meteorological purposes.CONFORMANCEEach thermometer comes in a protective plastic shipping tube withoperator’s manual.Ordering Examples: GT-3460is a partial immersion style 406 mm(16") thermometer with -10 to 650°C range and 2°divisions, $102.ASTM-CASE-1-16 is a case for a 16" thermometer, $23.50See page E-25 for thermometer cases.E-14CANADA www.omega.ca Laval(Quebec) 1-800-TC-OMEGA UNITED KINGDOM www. Manchester, England0800-488-488GERMANY www.omega.deDeckenpfronn, Germany************FRANCE www.omega.frGuyancourt, France088-466-342BENELUX www.omega.nl Amstelveen, NL 0800-099-33-44UNITED STATES 1-800-TC-OMEGA Stamford, CT.CZECH REPUBLIC www.omegaeng.cz Karviná, Czech Republic596-311-899TemperatureCalibrators, Connectors, General Test and MeasurementInstruments, Glass Bulb Thermometers, Handheld Instruments for Temperature Measurement, Ice Point References,Indicating Labels, Crayons, Cements and Lacquers, Infrared Temperature Measurement Instruments, Recorders Relative Humidity Measurement Instruments, RTD Probes, Elements and Assemblies, Temperature & Process Meters, Timers and Counters, Temperature and Process Controllers and Power Switching Devices, Thermistor Elements, Probes andAssemblies,Thermocouples Thermowells and Head and Well Assemblies, Transmitters, WirePressure, Strain and ForceDisplacement Transducers, Dynamic Measurement Force Sensors, Instrumentation for Pressure and Strain Measurements, Load Cells, Pressure Gauges, PressureReference Section, Pressure Switches, Pressure Transducers, Proximity Transducers, Regulators,Strain Gages, Torque Transducers, ValvespH and ConductivityConductivity Instrumentation, Dissolved OxygenInstrumentation, Environmental Instrumentation, pH Electrodes and Instruments, Water and Soil Analysis InstrumentationHeatersBand Heaters, Cartridge Heaters, Circulation Heaters, Comfort Heaters, Controllers, Meters and SwitchingDevices, Flexible Heaters, General Test and Measurement Instruments, Heater Hook-up Wire, Heating Cable Systems, Immersion Heaters, Process Air and Duct, Heaters, Radiant Heaters, Strip Heaters, Tubular HeatersFlow and LevelAir Velocity Indicators, Doppler Flowmeters, LevelMeasurement, Magnetic Flowmeters, Mass Flowmeters,Pitot Tubes, Pumps, Rotameters, Turbine and Paddle Wheel Flowmeters, Ultrasonic Flowmeters, Valves, Variable Area Flowmeters, Vortex Shedding FlowmetersData AcquisitionAuto-Dialers and Alarm Monitoring Systems, Communication Products and Converters, Data Acquisition and Analysis Software, Data LoggersPlug-in Cards, Signal Conditioners, USB, RS232, RS485 and Parallel Port Data Acquisition Systems, Wireless Transmitters and Receivers。
Omega PHB-212和PHB-213电子pH计和温度计说明书
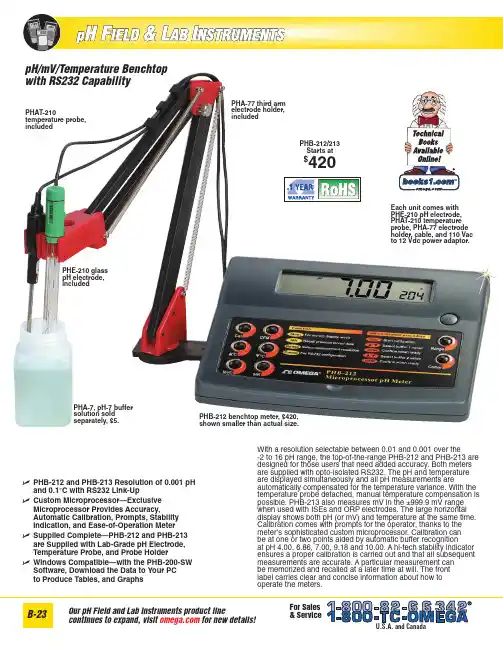
PHA-7, pH-7 buffer solution sold separately, $5.
PHB-212 benchtop meter, $420, shown smaller than actual size.
ߜ PHB-212 and PHB-213 Resolution of 0.001 pH and 0.1°C with RS232 Link-Up
Ordering Examples: PHB-212, pH/temperature C benchtop meter, PHA-4, 4.00 buffer solution, PHA-7, 7.00 buffer solution, $420 + 5 + 5 = $430.
PHB-213, pH/temperature benchtop meter, PHA-4, 4.00 buffer solution, PHA-7, 7.00 buffer solution, $450 + 5 + 5 = $460.
PHAT-210
44
Replacement temperature probe
PHE-210
86
Replacement glass pH electrode
PHE-1411
63
Double junction, plastic body, gel-filled combination pH electrode with 1 m (3.3') cable
6WDPIRUG &7
&$1$'$ ZZZRPHJDFD /DYDO 4XHEHF 7&20(*$
81,7(' .,1*'20 ZZZ RPHJDFRXN 0DQFKHVWHU (QJODQG
体温计说明书
电子体温计说明书测量精度:±0.1°c,工作温度是:0℃-55℃,工作湿度是80%r, 工作电压是1.5v,电池寿命:约3年(以1天使用10分钟计算),可更换电池,确保长期使用。
【使用方法】1,使用前,应先用酒精对体温计传感头进行消毒2,按压电源键,蜂鸣器会发出蜂鸣声,显示提示符号3,随后,显示器显示上次测量的温度,并持续2妙钟,接着显示器°c符号闪烁,表示已处于待测状态4,将体温计传感头放入测量部位。
同时°c符号闪烁,表示测量进行中。
当°c符号停止闪烁或1分钟左右后,听到“哔、哔”声鸣叫提示,表示体温测量完毕并已记忆测量结果,即可读取显示出的温度值5,测量结束后,如没有按压电源键关闭电源,则若干分钟后自动关机6,友情提醒:温度计使用时,打开电源后,先等20秒左右再测比较准。
【小常识】人体温度似身体健康状态的晴雨表,正常的体温一般在36°c~37.3°c(以口腔温度为准),37.4°c~38°c为低度发烧,38.1°c~39°c为中度发烧,39.1°c~41°c为高度发烧,大于41°c为超高度发烧;人的通常口探温度为36.8°c,腋窝探比口腔探约底0.3°c~0.5°c,肛门探比口腔探约高0.3°c~0.6°c篇二:电子智能体温计使用说明书电子智能体温计使用说明书一、概述泰福电子智能体温计采用专用芯片,液晶数字显示(lcd),高精度传感器和微电脑技术,能快速、准确、方便地测出人体的温度,具有记忆及蜂鸣器提示等功能,并通过ce认证,本产品适用于家用,医院等场所,对人体口腔、腋下体温的测量。
二、技术参数测量范围:32.0℃-44.0℃分辨率:0.1℃测量时间:口腔约1分钟,腋下约3分钟精确度:±0.1℃(36.0℃~39.0℃)±0.2(<36.0℃或>39.0℃)电源:dc1.5v(钮扣电池型号:ag3或lr41或392a)功耗:0.15mw电池使用寿命:200小时环境温度:-10℃~40℃相对湿度:80%大气压力:86kpa~106kpa显示方式:lcd液晶显示自动断电功能:测得最高体温,10分钟内自动切断电源外形规格:130mm×18mm×10mm 包装尺寸:145mm×32mm×20mm 重量:9.5g三、使用方法1.体温计使用前,用消毒棉签,棉片等蘸取医用酒精消毒感温头和量温棒部分。
nVent Raychem LC EU1551 电子加热轨迹温度计及连接配件说明书
Produits industriels de traçage électrique (IEC / ATEX)/RAYCHEM | 2©2021 nVent. Toutes les marques et tous les logos nVent sont la propriété de nVent Services GmbH ou de ses sociétés affiliées, ou sont concédés sous licence par nVent Services GmbH ou ses sociétés affiliées. Toutes les autres marques de commerce sont la propriété de leurs propriétaires respectifs. nVent se réserve le droit de modifier des spécifications sans préavis. nVent Thermal Management Brevets: https:///patents RAYCHEM-LC-EU1551-QuickReferenceSheetEMEAI-FR-2107Notre éventail complet de marques:Rubans chauffantsparallèlesBTV (85°C)BSA (85°C)(260°C)(260°C)(250°C)Température de service en continuV e r i f i e z le c a t a l o g ueRuban chauffant autorégulant pour les zones ordinaires - BSA• 65°C température de service en continu• 85°C température d'exposition intermittente maximale • Puissance de sortie nominale: 10 -23 W/mRuban chauffant autorégulant - BTV• 65°C température de service en continu• 85°C température d'exposition intermittente maximale • Classe de température: T 6•Puissance de sortie nominale (à 10°C): 9 - 16 - 25 - 29 W/mRuban chauffant autorégulant - QTVR• 110°C température de service en continu• 110°C température d'exposition intermittente maximale • Classe de température: T 4•Puissance de sortie nominale (à 10°C): 38 - 51 - 64 W/mRuban chauffant autorégulant - XTV• 121°C température de service en continu• 250°C température d'exposition intermittente maximale • Classe de température: T 3 (T 2 pour 20XTV)• Puissance de sortie nominale (à 10°C): 12 - 25 - 38 - 47 - 63 W/mRuban chauffant autorégulant - HTV• 205°C température de service en continu• 260°C température d'exposition intermittente maximale • Classe de température: T 3 (T 2 pour 20HTV)•Puissance de sortie nominale (à 10°C): 9 - 16 - 25 - 32 - 38 - 48 - 64 W/mRuban chauffant à puissance limitante - VPL• Température de service en continu: <230°C (par dessin)• Température d'exposition intermittente maximale: 260°C • Classe de température: per dessin• Puissance de sortie nominale (à 10°C): 15 - 30 - 45 - 61 W/mFranceTél 0800 906045Fax 0800 906003*****************BelgiqueTel +32.16.213.502Fax +32.16.213.604**********************SuisseTél: +41 (41) 766 30 80Fax: +41 (41) 766 30 81******************。
和森森电子有限公司 DTG 数字温度计 FH0、FH1、FH2 或 FH5 型号产品说明书
SPECIFICATIONSCompliance: 3-A, NEMA 4X, IP-66Product Contact Surface: Fitting & Probe: 316L SS Non-Product Contact Surface: Housing - 304 SS Lens - Polysulfone Process Temp. Range: 0 to 300°F (-18 to 150°C)Units: Deg F and Deg C; field selectable Resolution: 0.1°F or °C Accuracy: +/- .5°F (+/-0.3°C)Ambient Operating Limits: 40 to 140°F (4.4 to 60°C)Ambient Temp. Stability: Better than 0.1°C per 10°C ambient shift Storage Temp.: 32 to 140°F (0 to 65°C)Display: LCD: 4 digit main display, 6 digit secondary; 0.9" high contrast LCD Error Warning: LCD flashingPower: 2 AA Industrial Grade Batteries (Style 0,1,5); Customer supplied 9-30 VDC(Style 2)Battery Life: Style 0,1,5: 12 months typical Style 2: external power Vibration: 10 to 60 Hz, 2g Warranty: 2 year Display Update:3 secondsCalibration Adjustment: Via onboard switches; single point offset adjust Surface Finish:R a max = 32 micro inchesDTG Model“FH2”-Switch WiringRestore Factory SettingsThe “Restore Factory Settings” function will return the DTG to the factory shipped calibration.1.Flip Run switch to the down position.ALRM1ALRM22.Press Menu switch down and release once to go to Unit screen.ALRM1ALRM23.Press Menu switch down and release once to go to Dampening Factor screen.ALRM24.Press Menu switch down and release once to go to Decimal Position screen.ALRM1ALRM25.Press Menu switch down and release once to go to Factory Reset screen.ALRM1ALRM26.Hold Value switch up for 5 seconds to restore factory settings.ALRM1ALRM27.Flip Run switch to middle position.Change Offset ValueThe “Offset Value” function is used to apply a linear offset factor to the device. If your DTG shows a repeatable discrepancy (less than 1 degree) throughout the test range, this function may be used to remove the differential.Example: Reference reads 32.0°F and DTG reads 32.3°F Reference reads 150.0°F and DTG reads 150.3°F Reference reads 212.0°F and DTG reads 212.3°F “Offset Value” of “-0.3°F” programmed will remove discrepancyCAUTION: Be sure to use only an NIST traceable reference thermometer that is known accurate, and within it’s specified calibration period. 1.Flip Run switch to the downposition.ALRM1ALRM22.Press Menu switch up and release once to go to Offset screen.ALRM23.Use Value switch to set Offset from 0.0 to +/-5.0.ALRM1ALRM24.Flip Run switch to the middle position.Change Unit of MeasureThe DTG may be programmed to read in either Degrees F or Degrees C. When changing from one mode to another, any “User Calibration”points are converted automatically to their respective unit of measure – no additional programming is required.1.Flip Run switch to the down position.ALRM1ALRM22.Press Menu switch down and release once to go to Unit screen.ALRM1ALRM23.Use Value switch to alternate between °F and °C.ALRM1ALRM24.Flip Run switch to the middle position.Change Dampening FactorThe “Dampening Factor” is used as a means to slow down the reaction rate of the unit. Under most circumstances, this value should be set to “0.” If a process has very erratic temperature shifts, and the display fluctuates, introduction of a small dampening factor may smooth display.1.Flip Run switch to the down position.ALRM1ALRM22.Press Menu switch down and release once to go to Unit screen.ALRM1ALRM23.Press Menu switch down and release once to go to Dampening Factor screen.ALRM1ALRM24.Use Value switch to set Dampening Factor from 0.0 to 10.0.ALRM1ALRM25.Flip Run switch to middle position.Change Decimal PositionThe DTG is capable of displaying to the nearest WHOLE DEGREE, or with the addition of a decimal point, to the NEAREST TENTH degree. Modify-ing this parameter requires no additional programming changes to “User Calibration” points.1.Flip Run switch to the down position.ALRM22.Press Menu switch down and release once to go to Unit screen.ALRM1ALRM23.Press Menu switch down and release once to go to Dampening Factor screen.ALRM24.Press Menu switch down and release once to go to Decimal Position screen.ALRM1ALRM25.Use Value switch to alternate select decimal position.ALRM1ALRM26.Flip Run switch to middle position.WHOLE DEGREE display will ROUND DOWN to previous whole number. Example: Process = 181.9 °F Display = 181°FChange Alarm 2 ActionThe “Alarm Action” can be set to HI to activate alarm if Example: Alarm is set to a HI value of 76. The hysteresis value is。
电子温度计说明书
电子温度计说明书 IMB standardization office【IMB 5AB- IMBK 08- IMB 2C】详细资料详细资料数字显示干湿温度计,数字干湿温度计,电子干湿温度计,数显干湿温度计,液晶显示干湿温度计,大屏幕干温计大屏幕电子温度计_大屏幕电子温度计批发_大屏幕电子温度计价格_HTC-1大屏幕显示温湿度计数字显示干湿温度计价格,数字干湿温度计价格,电子干湿温度计价格,数显干湿温度计价格?婴儿房温度计价格,婴儿房用数字显示温度计价格,婴儿房用数字显示温湿度计,儿童房数字温湿度计表价格婴儿房温度表,婴儿房温度计,婴儿房用数字显示温度计,婴儿房用数字显示温湿度计,儿童房数字温湿度计表产品规格:温度测量范围:-50℃~+70℃(-58℉~+158℉)温度测量精度:±1℃(℉)温度分辨率:℃(℉)温度测量范围:20%RH~99%RH湿度测量精度:±5%RH温度分辨率:1%使用电池:AAA?(低功耗)产品尺寸:100*108*20mm产品质量:160g基本功能:1、温度/湿度显示2、℃/℉温度切换显示3、/最低温度记忆功能4、12/24小时制时钟5、整点报时功能6、每日闹钟功能6、日历显示功能具体操作方法:1、依机背指示方向推开电池门,取出电池隔片,然后装回电池门,该机即可用。
2、按键功能:(MODE)切换时钟与闹钟显示模式/设定当前时间、闹钟、12或24小时制、日期(ADJ)调整被设项目的数值;(MEMORY)显示记忆中的/最低温湿度值/清除记忆的/最低温湿度值;(℃/oF)切换温度单位以℃(摄氏度)或oF(华氏度)显示;(RESET)清除所有设定/记忆值,返回初始状态。
3、在初始状态下按住(MODE)1秒,当前时间的分钟数开始闪动,按(ADJ)可以调节分钟数,连续按(MODE)可以分别设定“时钟”、“12/24”、“月(M)”、“日(D)”4、在当前时钟模式下,(时钟与分钟之间的两点每秒闪动一次)切换显示为闹钟模式(时钟与分钟之间的两点不闪动),此时按(ADJ)可以切换“闹钟”(Alarm)功能/“整点报时”()功能的开与关,再按住(MODE)2秒,可以设定闹铃时间,同时启动“整点极时”功能,()符号出现。