Dell LCD QPA checklist V5
Dell QPA QSA Checklist--Review 版 QM
Dell Confidential Document No. COR.40.WWP.SQ.0003 Rev 3.0Information and InstructionsPURPOSEThis document was developed as an Audit Tool to assess a supplier's Quality Systems against Dell's Quality Systems Requirements.The Dell Quality Systems Audit (QSA) is build upon the ISO-9000 Quality Systems Standard, but with additional Dell specific requirements included.SCOPEThe Dell Quality Systems Audit is not commodity specific, therefore it may be used to assess the Quality Systems deployed by a supplier/manufacture irrespective of the commodity.AUDIT BY SELF ASSESSMENTA supplier's facility is required to complete a self assessment using this tool in advance of the Dell Audit. (One QSA is required per facility.)By doing this, a facility will be able to prepare for the audit and seek advance help and guidance from Dell SQE to be best positioned to succeed.It is expected that during the self-assessment process, that the supplier will use this opportunity to ask questions for either clarification or to better understand intent of the audit criteria. Waiting for the formal Dell audit to ask these types of questions is too late. It is also expected that based on self audit results, a supplier will inform the Dell team of their readiness for a formal Dell audit.A self assessment is completed by scoring the relevant column in each worksheet.AUDIT BY DELLDuring the audit process, the Dell SQE may wish to review every question/criterion listed on the audit document, or alternatively the SQE may choose to focus only on those questions for which the supplier awarded themselves a score of 1 by self-assessment. The path taken is left to SQE discretion.The score awarded by the SQE Auditor will be entered in the 'Score' column on each worksheet.AUDIT RESULTSThe SQE Auditor must complete ALL sections before an Audit Result can be declared.The Audit Result of each section is based on the number of questions scored as 1 versus the total number of questions of the section.Any questions that are scored as N/A are adjusted automatically in the score denominator.The overall average score does not determine the Audit Result, rather all the individual section scores will determine the Audit Result.The 'Pass' score for the Audit is 90%. If the Audit Scores for all sections of equal or greater than 90% are achieved, a 'Pass' or 'Approved' result is awarded.If an Audit Score of equal or greater than 80% but less than 90% is achieved at any section, a 'Conditionally Approved' result is awarded.If an Audit Score of less than 80% is achieved at any section, a 'Fail' or 'Not Approved' result is awarded.If a "Conditionally Approved" Result is awarded, a Corrective Action Plan is due from the supplier within TWO weeks of the date of audit completion for any sections of the QSA that are below 90%.If a "Not Approved" Result is awarded, a Corrective Action Plan is due from the supplier within TWO weeks of the date of audit completion for any sections of the QSA that are below 80%. On completion of this Corrective Action Plan, a supplier is required to generate second Corrective Action Plan to bridge to the 90% 'Approved'Status.All Corrective Action Plans must contain a timeline to 'bridge' to a 'Conditionally Approved' or 'Approved' status, depending on the initial audit result, and must propose a target date for a Dell follow-up Audit.Failure to achieve a 'Conditionally Approved' Result on a follow up Audit may impact business award decisions.A PASS RESULTOnce a supplier's facility has Passed the Audit, the Quality Systems are approved for the facility audited, not all supplier facilities.Passing the QSA does not guarantee a business award, but is the first step towards winning technical approval for a site. In addition, many commodities have a commodity specific Quality Process Audit (QPA), which also requires to be passed before technical approval may be obtained.AUDIT MECHANICS and QUESTIONSThe Audit breaks down the Quality System into individual sections, each of which is represented by an individual worksheet.Within each worksheet is contained a series of questions specifically pertaining to the section being examined.The questions were devised and developed as closed questions with every attempt to avoid ambiguity.Because of the closed nature of the questions, there can only be one of three answers to any question, i.e. Yes (1), No (0), or N/A (x).If the Criterion is fully met, a score of 1 is obtained. If the Criterion is not met, a score of 0 is obtained.A score of N/A (x) may be awarded if the SQE believes that any particular question is truly Not Applicable in the case of the supplier facility under review.In any cases the total number of N/A should be kept as minimum as possible.If there is any doubt as to the score to award for any given Criterion, a score of zero shall be awarded by default.Any Criterion that scores 1 shall be clearly demonstrated, followed, and be beyond reproach.In the event that a supplier clearly meets the intent of the audit question, but does not exactly do what the question asks, a score of 1 shall be given.TRAININGThe QSA is very technical in content with regard to Quality Systems and Engineering Techniques.An internal training session will be provided to the SQEs who use this checklist.SQEs who use this tool are considered within Dell as being sufficiently qualified to conduct this audit.AUDIT SCHEDULEThe Audit may be used as and when the need arises. However, Dell may conduct an official audit annually for key suppliers. The frequencyof the re-audit will be based on the audit result & action closure of the last audit, as well as the supplier quality performance in the past year period.Before conducting an audit, the auditor must ensure the Dell commodity management team responsible for the relationship are advised of the audit schedule.It is also intended for suppliers to conduct internal audits by self assessment every quarter so progress may be reported to Dell.ADDITIONAL QUESTIONSPlease contact Alfred Lau at alfred_lau@ for additional information.REVISION HISTORYQuality System Audit1 of 22 of 2。
DELL STSM Audit check list(中英文)1.13
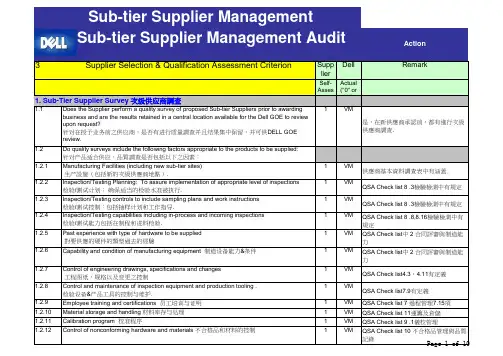
3Supplier Selection & Qualification Assessment CriterionSupp lierDellRemarkSelf-Asses s Actual ("0" or "1")1.1Does the Supplier perform a quality survey of proposed Sub-tier Suppliers prior to awarding business and are the results retained in a central location available for the Dell GOE to review upon request?针对在授予业务前之供应商,是否有进行质量調查并且结果集中保留,并可供DELL GOE review.1VM是,在新供應商承認前,都有進行次級供應商調查.1.2Do quality surveys include the following factors appropriate to the products to be supplied:针对产品适合供应,品質調查是否包括以下之因素:1.2.1Manufacturing Facilities (including new sub-tier sites) 生产設施(包括新的次級供應商地點).1VM 供應商基本資料調查表中有涵蓋.1.2.2Inspection/Testing Planning: To assure implementation of appropriate level of inspections 检验/测试计划: 确保适当的检验水准被执行.1VM QSA Check list 8 .3檢驗檢測中有規定1.2.3Inspection/Testing controls to include sampling plans and work instructions 检验/测试控制:包括抽样计划和工作指导.1VM QSA Check list 8 .3檢驗檢測中有規定1.2.4Inspection/Testing capabilities including in-process and incoming inspections 检验/测试能力包括在制程和进料检验.1VM QSA Check list 8 .8,8.16檢驗檢測中有規定1.2.5Past experience with type of hardware to be supplied 對要供應的硬件的類型過去的經驗1VM QSA Check list 中 2 合同評審與制造能力1.2.6Capability and condition of manufacturing equipment 制造设备能力&条件1VM QSA Check list 中 2 合同評審與制造能力1.2.7Control of engineering drawings, specifications and changes 工程图纸,规格以及变更之控制1VM QSA Check list4.3,4.11有定義1.2.8Control and maintenance of inspection equipment and production tooling .检验设备&产品工具的控制与维护.1VM QSA Check list7.9有定義1.2.9Employee training and certifications 员工培训与证明1VM QSA Check list 7 過程管理7.15項1.2.10Material storage and handling 材料库存与处理1VM QSA Check list 11運籌及倉儲1.2.11Calibration program 校准程序1VM QSA Check list 9 .1儀校管理1.2.12Control of nonconforming hardware and materials 不合格品和材料的控制1VMQSA Check list 10 不合格品管理與品質1. Sub-Tier Supplier Survey 次级供应商調查Action3Supplier Selection & Qualification Assessment Criterion SupplierDell RemarkSelf-Assess Actual("0" or"1")Action3Supplier Selection & Qualification Assessment Criterion SupplierDell RemarkSelf-Assess Actual("0" or"1")Action3Supplier Selection & Qualification Assessment Criterion SupplierDell RemarkSelf-Assess Actual("0" or"1")Action3Supplier Selection & Qualification Assessment Criterion SupplierDell RemarkSelf-Assess Actual("0" or"1")Action3Supplier Selection & Qualification Assessment Criterion SupplierDell RemarkSelf-Assess Actual("0" or"1")Action3Supplier Selection & Qualification Assessment Criterion SupplierDell RemarkSelf-Assess Actual("0" or"1")Action3Supplier Selection & Qualification Assessment Criterion SupplierDell RemarkSelf-Assess Actual("0" or"1")Action3Supplier Selection & Qualification Assessment Criterion SupplierDell RemarkSelf-Assess Actual("0" or"1")Action。
供应商过程审核(QPA)模板
一般 - 是否有先进先出的程序并按照程序进行? 一般 -材料储存区域标识是否与实物相符? 一般 -有无规划HF和ROHS 物料放置区? 一般 - 化学品放置是否符合安全要求? 关键 - 化学品放置有无安全资料警示? 一般 - 是否设定成品的保存期限?超过期限的成品是否申请重新进行品质确认?
一般 - 材料的进料检验通知是否符合规定要求?
1
1
Y
一般 各车间宣传栏中需是否张贴“信息安全保密资料”?
1
1
Y
一般 车间各主要出入口、厂区出入口现场是否有安排安保人员?
1
1
Y
一般 门禁区域是否有实施门禁管理
1
1
Y
一般 来访登记表是否有出入时间的完整记录?
1
1
Y
关键 - 是否对员工有定期的培训要求?培训效果是否得到评估?
8
体系运行
一般 - 是否有客户满意度调查流程,定期进行顾客满意度测定并进行分析和持续改进?
关键 无禁止员工强制劳动无限制员工自由;未使用童工。
一般 员工工作时间是否符合法规要求?是否保障员工每周休息一日?
一般 对员工无性别歧视;对员工无罚款规定;
点数 得分 Points Score
Remark
2
0 仓库无规划待检区和不合格区
1
1
1
1
1
1
1
1
1
1
2
0
1
1
1
1
2
0
1
1
1
1
1
1
评价 N Y Y Y Y
Y
N Y Y N Y Y
Y
关键
- 材料的进料检验是否有检验标准?是否订立合适的抽样程序?在程序和检验表中是否详细说明抽样计划和 允收标准(如:MIL_STD,AQL… )
Dell UltraSharp U3219Q 显示器使用指南说明书
Dell UltraSharp U3219Q顯示器使用指南機型:U3219Q規格型號:U3219Qb注意:「注意」意指重要資訊的注意事項,可幫助您更妥善使用電腦。
小心:顯示「小心」,表示未遵循指示可能導致硬體損壞或資料遺失。
警告:「警告」標誌意指可能會造成財產損害、人體傷害或導致死亡。
Copyright © 2018-2019 Dell Inc. 或其子公司。
版權所有。
Dell、EMC 及其它商標為 Dell Inc. 或其子公司的商標。
其它商標可能為個別所有者的商標。
2019 - 08Rev. A05目次關於您的顯示器 . . . . . . . . . . . . . . . . . . . . . . . . . . . . . 6包裝內容 . . . . . . . . . . . . . . . . . . . . . . . . . . . . . . . . . . . . . . . 6產品功能特色. . . . . . . . . . . . . . . . . . . . . . . . . . . . . . . . . . . . 8認識各部位與控制裝置. . . . . . . . . . . . . . . . . . . . . . . . . . . . . 9前視圖 . . . . . . . . . . . . . . . . . . . . . . . . . . . . . . . . . . . . . . . . . . . . . . . 9背視圖 . . . . . . . . . . . . . . . . . . . . . . . . . . . . . . . . . . . . . . . . . . . . . . .10側視圖 . . . . . . . . . . . . . . . . . . . . . . . . . . . . . . . . . . . . . . . . . . . . . . . 11底視圖 . . . . . . . . . . . . . . . . . . . . . . . . . . . . . . . . . . . . . . . . . . . . . . .12顯示器規格 . . . . . . . . . . . . . . . . . . . . . . . . . . . . . . . . . . . . 13解析度規格. . . . . . . . . . . . . . . . . . . . . . . . . . . . . . . . . . . . . . . . . . . .15支援視訊模式. . . . . . . . . . . . . . . . . . . . . . . . . . . . . . . . . . . . . . . . . .15預設顯示模式. . . . . . . . . . . . . . . . . . . . . . . . . . . . . . . . . . . . . . . . . .15電氣規格 . . . . . . . . . . . . . . . . . . . . . . . . . . . . . . . . . . . . . . . . . . . . .16實體特性 . . . . . . . . . . . . . . . . . . . . . . . . . . . . . . . . . . . . . . . . . . . . .16環境特性 . . . . . . . . . . . . . . . . . . . . . . . . . . . . . . . . . . . . . . . . . . . . .18電源管理模式. . . . . . . . . . . . . . . . . . . . . . . . . . . . . . . . . . . . . . . . . .19針腳定義 . . . . . . . . . . . . . . . . . . . . . . . . . . . . . . . . . . . . . . . . . . . . 20隨插即用相容性. . . . . . . . . . . . . . . . . . . . . . . . . . . . . . . . . 22通用序列匯流排 (USB) 介面 . . . . . . . . . . . . . . . . . . . . . . . 22 USB 3.0 上載連接器. . . . . . . . . . . . . . . . . . . . . . . . . . . . . . . . . . . . 23 USB 3.0 下載連接器. . . . . . . . . . . . . . . . . . . . . . . . . . . . . . . . . . . . 23 USB Type-C連接器. . . . . . . . . . . . . . . . . . . . . . . . . . . . . . . . . . . . 24 USB 連接埠 . . . . . . . . . . . . . . . . . . . . . . . . . . . . . . . . . . . . . . . . . . 24液晶顯示器品質與像素政策 . . . . . . . . . . . . . . . . . . . . . . . . 25維護指南 . . . . . . . . . . . . . . . . . . . . . . . . . . . . . . . . . . . . . . 25清潔您的顯示器 . . . . . . . . . . . . . . . . . . . . . . . . . . . . . . . . . . . . . . . 25│3設定顯示器 . . . . . . . . . . . . . . . . . . . . . . . . . . . . . . . 26安裝支架 . . . . . . . . . . . . . . . . . . . . . . . . . . . . . . . . . . . . . . 26連接您的顯示器. . . . . . . . . . . . . . . . . . . . . . . . . . . . . . . . . 29連接 DisplayPort(DisplayPort 轉 DisplayPort)連接線 . . . . . . . . 29連接 HDMI 連接線(選購). . . . . . . . . . . . . . . . . . . . . . . . . . . . . . . 30連接 USB Type-C 連接線 . . . . . . . . . . . . . . . . . . . . . . . . . . . . . . . . 31連接 USB 3.0 連接線. . . . . . . . . . . . . . . . . . . . . . . . . . . . . . . . . . . . 31整理您的連接線. . . . . . . . . . . . . . . . . . . . . . . . . . . . . . . . . 33移除顯示器支架. . . . . . . . . . . . . . . . . . . . . . . . . . . . . . . . . 33 VESA 壁掛式組件(選購). . . . . . . . . . . . . . . . . . . . . . . . . 34操作顯示器 . . . . . . . . . . . . . . . . . . . . . . . . . . . . . . . 35開啟顯示器電源. . . . . . . . . . . . . . . . . . . . . . . . . . . . . . . . . 35使用前面板控制按鈕 . . . . . . . . . . . . . . . . . . . . . . . . . . . . . 35前面板按鈕 . . . . . . . . . . . . . . . . . . . . . . . . . . . . . . . . . . . . . . . . . . . 36使用畫面顯示項目 (OSD) 功能表 . . . . . . . . . . . . . . . . . . . . 37存取功能表系統. . . . . . . . . . . . . . . . . . . . . . . . . . . . . . . . . . . . . . . . 37 OSD 警告訊息. . . . . . . . . . . . . . . . . . . . . . . . . . . . . . . . . . . . . . . . . 52設定最大解析度. . . . . . . . . . . . . . . . . . . . . . . . . . . . . . . . . 56設定 KVM 切換器. . . . . . . . . . . . . . . . . . . . . . . . . . . . . . . . 57觀看或播放 HDR 內容的要求 . . . . . . . . . . . . . . . . . . . . . . . 59使用傾斜、旋轉和垂直展開功能. . . . . . . . . . . . . . . . . . . . . 60傾斜、旋轉 . . . . . . . . . . . . . . . . . . . . . . . . . . . . . . . . . . . . . . . . . . .60垂直展開. . . . . . . . . . . . . . . . . . . . . . . . . . . . . . . . . . . . . . . . . . . . .60旋轉顯示器 . . . . . . . . . . . . . . . . . . . . . . . . . . . . . . . . . . . . 61順時針旋轉 . . . . . . . . . . . . . . . . . . . . . . . . . . . . . . . . . . . . . . . . . . . 61逆時針旋轉 . . . . . . . . . . . . . . . . . . . . . . . . . . . . . . . . . . . . . . . . . . . 62調整您系統的旋轉顯示設定 . . . . . . . . . . . . . . . . . . . . . . . . 62疑難排解 . . . . . . . . . . . . . . . . . . . . . . . . . . . . . . . . . 63自我測試 . . . . . . . . . . . . . . . . . . . . . . . . . . . . . . . . . . . . . . 634 │內建診斷工具. . . . . . . . . . . . . . . . . . . . . . . . . . . . . . . . . . . 64一律啟動 USB Type-C 充電 . . . . . . . . . . . . . . . . . . . . . . . . 65常見問題 . . . . . . . . . . . . . . . . . . . . . . . . . . . . . . . . . . . . . . 65產品特定問題. . . . . . . . . . . . . . . . . . . . . . . . . . . . . . . . . . . 68通用序列匯流排 (USB) 特定問題 . . . . . . . . . . . . . . . . . . . . 69附錄. . . . . . . . . . . . . . . . . . . . . . . . . . . . . . . . . . . . . 70 FCC 聲明(僅針對美國)與其它法規資訊 . . . . . . . . . . . . . 70 RoHS 聲明(僅針對台灣) . . . . . . . . . . . . . . . . . . . . . . . . 70與 Dell 聯絡. . . . . . . . . . . . . . . . . . . . . . . . . . . . . . . . . . . . .71│56 │ 關於您的顯示器關於您的顯示器包裝內容您的顯示器包裝中包含以下表格內的元件。
戴尔 Dell 17 19英寸 TFT-LCD 显示器说明书
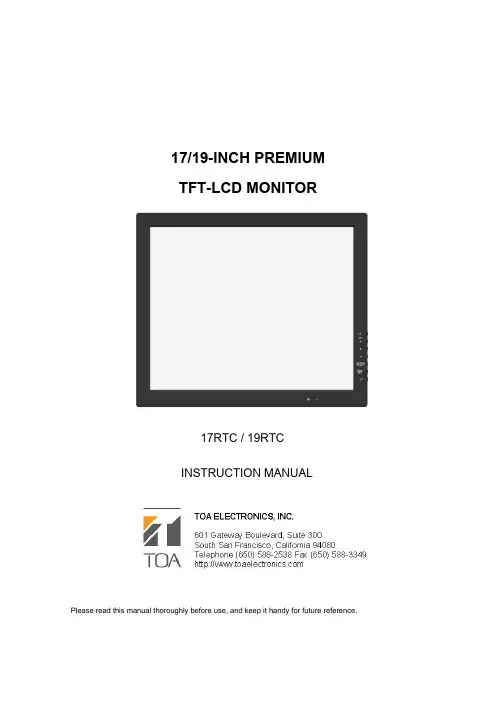
17/19-INCH PREMIUMTFT-LCD MONITORINSTRUCTION MANUAL17RTC / 19RTCINSTRUCTION MANUALPlease read this manual thoroughly before use, and keep it handy for future reference.SAFETY INSTRUCTION...............................................................................2 - 3 CAUTIONS . (4)FCC RF INTERFERENCE STATEMENT (5)CONNECTING WITH EXTERNAL EQUIPMENT (6)REMOTE FUNCTIONS (7)CONTROLS AND FUNCTIONS....................................................................8 - 26 MOUNTING GUIDE .. (27)D-SUB CONNECTOR PIN ASSIGNMENTS (28)POWER MANAGEMENT (29)SPECIFICATIONS.................................................................................. (30)TROUBLESHOOTING GUIDE. (31).1…………………………………………………………………………… INSTRUCTION MANUAL1. Read all of these instructions.2. Save these instructions for later use.3. Follow all warnings and instructions marked on the product.4. Unplug this product from the wall outlet before cleaning.Do not use liquid cleaners or aerosol cleaners. Use a damp cloth for cleaning.5. Do not use this product near water.6. Do not place this product on an unstable cart, stand or table.The product may fall, causing serious damage to the product.7. Slots and openings in the cabinet and the back are provided for ventilation: to ensure reliable operation of the product, these openings must not be blocked by placing the product on a bed, sofa, rug or other similar surface.This product should never be placed near or over a heat register.This product should not be placed in a built-in installation unless proper ventilation is provided.8. This product should be operated from the type of power source indicated on the marking label. If you are not sure of the type of power available, consult your dealer or local power company.9. This product is equipped with a 3 wire grounding type plug having a third(grounding) pin. This is a safety feature. If you are unable to insert the plug into the outlet, contact your electricianto replace your obsolete outlet. Do not defeat the purpose of the grounding-type plug.10. Do not allow anything to rest on the power cord.Do not locate this product where persons will walk on the cord.11. If an extension cord is used with this product, make sure that the total of the ampere ratings on the products plugged into the extension cord do not exceed the extension cord ampere rating. Also, make sure that the total of all products plugged into the wall outlet does not exceed 10 amperes.12. Never push objects of any kind into this product through cabinet slots as they may touch dangerous voltage points or short out parts that could result in a risk of fire or electric shock. Never spill any kind of liquid on the product.13. Do not attempt to service this product yourself, as opening or removing covers may expose you to dangerous voltage points or other risks.INSTRUCTION MANUAL (2)Refer all servicing to service personnel.14. Unplug this product from the wall outlet and refer servicing to qualified service personnel under the following conditions.A. When the power cord or plug is damaged or frayed.B. If liquid has been spilled into the product.C. If the product has been exposed to rain or water.D. If the Product does not operate normally when the operating instructions are followed. Adjust only those controls that are covered by the operating instructions since improper adjustment of other controls may result in damage and will often require extensive work by a qualified technician to restore normal operation.E. If the product has been dropped or the cabinet has been damaged.F. If the product exhibits a distinct change in performance, indicating a need for service.CAUTIONThe power supply cord is used as the main disconnect device, ensure that thesocket-outlet is located/installed near the equipment and is easily accessible.ATTENTIONLe cordon d`alimentation est utillsé comme interrupteur général. La prise decourant doit être située ou installée à proximité du matériel et être faciled`accès3 ……………………………………………………………………………… INSTRUCTION MANUAL▶ NEVER REMOVE THE BACK COVERRemoval of the back cover should be carried out only by qualified personnel.▶ DO NOT USE IN HOSTILE ENVIRONMENTSTo prevent shock or fire hazard, do not expose the unit to rain or moisture.This unit is designed to be used in the office or home. Do not subject the unit to vibrations, dust of corrosive gases.▶ KEEP IN A WELL VENTILATED PLACEVentilation holes are provided on the cabinet to prevent the temperature from rising.Do not cover the unit or place anything on the top of unit.▶ AVOID HEATAvoid placing the unit in direct sunshine or near a heating appliance.▶ TO ELIMINATE EYE FATIGUEDo not use the unit against a bright back ground and where sunlight or other light sources will shine directly on the monitor.▶ BE CAREFUL OF HEAVY OBJECTNeither the monitor itself nor any other heavy object should rest on the power cord.Damage to a power cord can cause fire or electrical shock.INSTRUCTION MANUAL (4)NOTEThis equipment has been tested and found to comply with the limits for a Class B digital device, pursuant to Part 15 of the FCC Rules. These limits are designed to provide reasonable protection against harmful interference in a residential installation.This equipment generates, uses and can radiate radio frequency energy and, if not installed and used in accordance with the instructions, may cause harmful interference to radio communications. However, there is no guarantee that interference will not occur in a particular installation.If this equipment does cause harmful interference to radio or television reception which can be determined by turning the equipment off and on, the user is encouraged to try to correct the interference by one or more of the following measures.- Reorient or relocate the receiving antenna.- Increase the separation between the equipment and receiver.- Connect the equipment into an outlet on a circuit different from that to which the receiver is connected.- Consult the dealer or an experienced radio, TV technician for help.- Only shielded interface cable should be used.Finally, any changes or modifications to the equipment by the user not expressly approved by the grantee or manufacturer could void the users authority to operate such equipment.▶ DOC COMPLIANCE NOTICEThis digital apparatus does not exceed the Class B limits for radio noise emissions from digital apparatus set out in the radio interference regulation of Canadian Department of communications.5 ……………………………………………………………………………… INSTRUCTION MANUALA. BOTTOM PANEL CONTROL1. DC 12V IN2. COMPONENT Y,Pb,Pr & SOUND L,R IN3. AUDIO OUT4. PC STEREO IN5. D-SUB IN6. DVI IN7. HDMI IN (OPTION)B. SIDE PANEL CONTROL1. VIDEO 1(AV1) IN2. VIDEO 1(AV1) OUT3. VIDEO 2(AV2) IN4. VIDEO 2(AV2) OUT5. S-VIDEO (Y/C) IN6. S-VIDEO (Y/C) OUT7. AV1, S-VIDEO AUDIO IN8. AV1, S-VIDEO AUDIO OUT9. AV2 AUDIO IN10. AV2 AUDIO OUT 11. DC12V ADAPTORINSTRUCTION MANUAL (6)123 4 5 67 12345678 91011C. REMOTE CONTROLLER1. POWER()Turns the power ON or OFF. There will be a fewseconds delay before the display appears.2. SOURCESelect pc or video( AV1 / AV2 / S-Video / PC ) sources.9. AUTOAuto geometry adjustment in PC Source.10. MUTEMute the sound.11. MENUActivates and exits the On Screen Display.12. EXITExit the On Screen Display.13. VOL()Increases or decreases the level of audio volume.14. UP/DOWNMove to OSD menu.15. ENTERAccepts your selection or displays the current mode.16. INFOInput mode information Display.17. STILLPause the picture.12. PIP (Picture In Picture)Activates PIP mode.15. P.INPUTSelect PC or video source.16. P.POSMove the position of sub picture for PIP mode.16. P.SIZEChange the size of sub and main picture for PIP mode.14. SWAPAlternates between main and sub picture.11. ARC (Aspect Ratio Control)Select screen ratio.3. APC (Auto Picture Control)Select picture mode.4. ACC (Auto Color Control)Select Colour mode.6. S.SETSelect Sound mode main input or sub input6. PCSelect PC mode(PC,DVI)5. AVSelect AV mode.(AV1,AV2,S-VIDEO)7. COMPSelect COMPONENT mode. 7…………………………………………………………………………… INSTRUCTION MANUALD. FRONT KEY CONTROL1. POWER ON/OFF()Turns the power ON or OFF. There will be a few seconds delay before the display appears.2. MENU / EXITActivates and exits the On Screen Display.3. SOURCE/SELECTSelect PC or video source. Select On Screen Display menu4 / 5. ▼ / ▲This button allows user to enter the sub-menu of the activated function6 / 7. VOL ◀▶Adjust the volume / Adjust menu settings.8. IR SensorRemote controller sensor.9. POWER LEDThe power LED(next to the power switch) lights with green when the power is turned ON. The power is turned off by pressing the power switch again and the power LED goes Red.INSTRUCTION MANUAL (8)1892 3 4 5 6 7OSD MENU DESCRIPTIONA: CUSTOM MENU (Only Video mode)Press the MENU button and then up(▲) / down(▼) button to select the Custom menu.Press the up(▲) / down(▼) button to select Custom sub menu.Press the left(◀) /right(▶) button to adjust picture setting.Press the MENU button to save.Brightness: Increase or decrease the intensity of the image.Contrast: Increase or decrease the intensity (lightness or dimness) of the image. Color: Increase or decrease the colour of the picture.Tint: Increase or decrease the tint of the picture.Sharpness: Increase or decrease the sharpness of the picture. 9…………………………………………………………………………… INSTRUCTION MANUALA: CUSTOM MENU (Only PC mode)Press the MENU button and then up(▲) / down(▼) button to select the Custom menu.Press the up(▲) / down(▼) button to select Custom sub menu.Press (◀) /right(▶) button to adjust picture setting.Press the MENU button to save.INSTRUCTION MANUAL (10)B. Picture / Sound Menu(Only Video mode)Press the MENU button and then up(▲) / down(▼) button to select the Picture / Sound.Press the right(▶) or ENTER button.1. Picture ModePress the up(▲) / down(▼) button to select the Picture Mode.Press the right(▶) or ENTER button and then press up(▲) / down(▼) button to select the desire Picture Mode.Press the MENU button to save. 11…………………………………………………………………………… INSTRUCTION MANUAL2. Color TonePress the up(▲) / down(▼) button to select the Color Tone.Press the (▶) or ENTER button and then up(▲)/down(▼) button to select the desired color tone. Press the MENU button to save.INSTRUCTION MANUAL (12)3. MutePress the up(▲) / down(▼) button to select the Mute.Press the (▶) or ENTER button and then up(▲)/down(▼) button to select the desired Mute. Press the MENU button to save.13…………………………………………………………………………… INSTRUCTION MANUAL4. VolumePress the up(▲) / down(▼) button to select the Volume.Press (◀) /right(▶) button to adjust Volume.Press the MENU button to save.5. SizePress the up(▲) / down(▼) button to select the Size.INSTRUCTION MANUAL (14)Press the (▶) or ENTER button and then up(▲)/down(▼) button to select the desired Size. Press the MENU button to save.6. PC (Only PC mode)Press the up(▲) / down(▼) button to select the PCPress the ▶or ENTER button 15…………………………………………………………………………… INSTRUCTION MANUALPress the up(▲) / down(▼) button to select PC sub menuPress the right(▶) or ENTER button and then left (◀) /right(▶) button to adjust PC setting. Press the MENU button to save.Auto Adjust: Auto geometry adjustmentPhase:Adjust the number of horizontal picture elements.H. position:Move image horizontally on screen right or left.V. position:Move image vertically on screen up or down.Frequency:Adjust the vertical noise of screen image.C. PIP MENUPress the MENU button and then up(▲) / down(▼) button to select the PIP menu.Press the right(▶) or ENTER button.INSTRUCTION MANUAL (16)1. PIPPress the up(▲) / down(▼) button to select the PIP.Press the right(▶) or ENTER button and then press up(▲) / down(▼) button to select the On or Off.Press the MENU button to save.2. Input SourcePress the up(▲) / down(▼) button to select the Input Source. 17…………………………………………………………………………… INSTRUCTION MANUALPress the right(▶) or ENTER button and then press up(▲) / down(▼) button to select the desire Input Source.Press the MENU button to save.3. SizePress the up(▲) / down(▼) button to select the Size.INSTRUCTION MANUAL (18)Press the right(▶) or ENTER button and then press up(▲) / down(▼) button to select the desire Size.Press the MENU button to save.4. PositionPress the up(▲) / down(▼) button to select the Position. 19…………………………………………………………………………… INSTRUCTION MANUALPress the right(▶) or ENTER button and then press up(▲) / down(▼) button to select the desire Position.Press the MENU button to save.5. SwapPress the up(▲) / down(▼) button to select the Swap.Press the right(▶) or ENTER buttonINSTRUCTION MANUAL (20)5. Sound SelectPress the up(▲) / down(▼) button to select the Sound Select.Press the right(▶) or ENTER button and then press up(▲) / down(▼) button to select the desire Sound Select.Press the MENU button to save. 21…………………………………………………………………………… INSTRUCTION MANUALD. SETUP MENUPress the MENU button and then up(▲) / down(▼) button to select the Setup menu. Press the right(▶) or ENTER button.1.ResetPress ENTER button to select the resetReset: Select to reset all setting to the factory default values.INSTRUCTION MANUAL (22)2. LanguagePress the up(▲) / down(▼) button to select the Language menu.Press the right(▶) or ENTER button.Press the up(▲) / down(▼) button to select language.Press the MENU button to save. 23…………………………………………………………………………… INSTRUCTION MANUAL3. OSD TonePress the up(▲) / down(▼) button to select the OSD tone menu.Press the right(▶) or ENTER buttonPress the up(▲) / down(▼) button to select the desire OSD Tone.Press the MENU button to save.INSTRUCTION MANUAL (24)4. Blue ScreenPress the up(▲) / down(▼) button to select the blue screen.Press the right(▶) or ENTER button.Press the up(▲) / down(▼) button to select on or off.Press the MENU button to save. 25…………………………………………………………………………… INSTRUCTION MANUAL5. Key LockPress the up(▲) / down(▼) button to select the key lock menu.Press the right(▶) or ENTER buttonPress the up(▲) / down(▼) button to select on or offPress the MENU button to save.INSTRUCTION MANUAL (26)Wall mount installation:1) Remove the monitor stand bracket assembled with the monitor.2) Us e the VESA standard mount ing design and the 100mm hole pattern on the back panelto install the LCD monitor to the (Optional) mounting bracket sold separately.(Screws provided with the mounting bracket.)27…………………………………………………………………………… INSTRUCTION MANUAL▶ PIN ASSIGNMENTS▶ ACCESSORY1. POWER CORD2. USER’S MANUAL3. PC cable4. Adaptor5. Remote Control6. Batteries7. Wall mount (Option)8. Rack mount (Option)INSTRUCTION MANUAL (28)This monitor features a power management system to “power down” upon receipt of the VESA DPMS(The display power management signaling) from a VESA DPMS video card. The VESA DPMS-compliant video card performs this signaling system through not sending horizontal, vertical, or sync signal.This monitor enters an appropriate mode through identifying each of the three modes of the signaling system.POWER CONSUMPTIONMODE POWER CONSUMPTIONON <50WSTANDBY <11WSUSPEND <11WACTIV OFF < 8.5WLED INDICATORThe power management feature of the monitor is comprised of four stages: On(Green), Standby, Suspend, Active off(Red on/off 1 sec) and Unsupported mode(Green).MODE LED COLOR MONITOR OPERATIONON GREEN NormalOperationSTANDBYSUSPEND ACTIV OFF RED ON/OFF1 SECScreen blanks after preset idle timeAnd some electronic circuits or allCircuitry in the monitor shut down.UNSUPPORTESMODE GREENNormal operation but the on screenDisplay will show error massagePOWER OFF RED NotOperation 29…………………………………………………………………………… INSTRUCTION MANUAL17“ 19“17˝ Diagonal AM-TFT(Active-Matrix) 19˝ Diagonal AM-TFT(Active-Matrix)Pixel pitch(mm) : 0.264(H) 0.264(V)Pixel pitch(mm) : 0.294(H) 0.294(V)BRIGHTNESS: 300cd/㎡(Typical) BRIGHTNESS:300cd/㎡(Typical) CONTRAST RATIO: 1000:1(Typical) CONTRAST RATIO: 1000:1(Typical)VIEWING ANGLE: 160°/160°(H/V) VIEWINGANGLE:160°/160°(H/V) LCD- TypeRESPONSE TIME: 5msec(Typical) RESPONSE TIME: 5msec(Typical) RESOLUTION(H x V)1280X1024 @60Hz 1280X1024 @60HzFREQUENCY HORIZONTAL: 31- 64KHzVERTICAL: 56-75HzHORIZONTAL: 31- 64KHzVERTICAL: 56-75HzVIDEO(2ch input 1.0Vp-p,75Ω terminated, loop-through out)VIDEO(2ch input 1.0Vp-p,75Ω terminated, loop-through out) S-VIDEO(1ch input (Y/C) ,loop-through out)S-VIDEO(1ch input (Y/C) ,loop-through out)COMPONENT(Y,Pb,Pr, Sound L/R) COMPONENT(Y,Pb,Pr, Sound L/R) DVI I/D(Digital Video Interface DVI I/D(Digital Video InterfacePC RGB PC RGBAV(composite) Sound in AV(composite) Sound inINPUT SIGNALPC Stereo Sound PC Stereo SoundACTIVE DISPLAYAREA (W x H)337.9 mm x 270.3 mm 376.32mm X 301mmPACKINGDIMENSIONS(W x H x D)477mm X 543mm X 205mm 477mm X 543mm X 205mmNet Weight : TBD Net Weight : TBD WEIGHTGross Weight : TBD Gross Weight : TBD ELECTRICALRATINGS DC 12V/ 4.12A DC 12V/ 4.12A▶▶NOTE :Technical specifications are subject to change without notice.INSTRUCTION MANUAL (30)“Going to Sleep”message on screenWEEE SymbolsCorrect Disposal of This Product(Waste Electrical &ElectronicEquipment)(Applicable in the European Union and otherEuropean countries with separate collection systems)This marking shown on the product or its literature,indicatesthat it should not be disposed withother household wastes at the end of its working life.Toprevent possible harm to theenvironment or human health from uncontrolled wastedisposal,please separate this from othertypes of wastes and recycle it responsibly to promote thesustainable reuse of material resources.Household users should contact either the retailer wherethey purchased this product,or theirlocal government office,for details of where and how theycan take this item for environmentallysafe recycling.Business users should contact their supplier and check theterms and conditions of the purchasecontract.This product should not be mixed with othercommercial wastes for disposal.31…………………………………………………………………………… INSTRUCTION MANUAL。
新供应商QSA QPA审核checklist及审核报告
b.核心技术人员的成就(如工作经历、技术成就等);
技术研发能力及产品发展规划
a.主要的研发技术能力行业水平对比(如在行业的排名等)
b.核心技术是否自主完成?例如结构件的模具、NCVM、按键组装夹具
4.2
等; c.公司的技术产品规划何技术创新(如是否为行业主流趋势或引领行业趋
势);
d.获得或正在申请的专利情况(关注数量和是否为核心专利,是否对行
2.4.1
检验标准 a.检验标准是否适用?是否每种产品都有标准?是否确定抽样计划?AQL 是否根据客户要求确定?是否确定检验转移规则?是否明确关键测试参 数及使用工具? b.检验项目是否涵盖客户要求(包括环保要求)?例行可靠性检验是否 有?是否自己完成?或者需要外发完成? c.样板管理:是否有标准样板?是否进行版本管理?
c.是否有满意度调查记录?抱怨处理记录?
6 组织结构
组织结构配置
6.1 a.质量部门是否独立? b.质量部门权限如何?
组织结构 质量、设计人员配置比率
6.2 a.主要质量、设计人员的构成(如数量比例、学历、工作经验等); b.核心技术人员的成就(如工作经历、技术成就等);
7
变更管理
变更管理流程(完善性、适宜性、有效性)
7.1
a.是否有5M1E变更管理流程?怎样定义变更? b.通过什么方式进行变更传递(含内部及客户)?是否受控状态?
变更管理
c.变更后产品是否重新签样认可?是否需要客户认可? 记录
a.是否有变更记录?相关联的资料能否很快找到?
7.2 b.各工序是否第一时间获得变更信息?怎样获得?怎样执行变更后信
息?
c.出货时是否在产品及包装上明确标识变更信息?
于失准前的测试产品是否重新测试?
DELL服务器LCD信息代码
DELL服务器LCD信息代码DELL服务器LCD信息代码的意思:E1114Temp Ambient系统周围环境温度超出允许范围。
E1116Temp Memory内存已超过允许温度,系统已将其禁用以防止损坏组件。
E1210CMOS Batt缺少 CMOS 电池,或电压超出允许范围。
E1211ROMB BattRAID 电池丢失、损坏或因温度问题而无法再充电。
E12nnXX PwrGd指定的稳压器出现故障。
E1229CPU # VCORE处理器 # VCORE 稳压器出现故障。
E122B0.9V Over Voltage0.9 V 稳压器电压已超过电压允许范围E122CCPU Power Fault启动处理器稳压器之后,检测到稳压器故障E1310RPM Fan ##指定的冷却风扇的 RPM 超出允许的运行范围。
E1410CPU # IERR指定的微处理器正在报告系统错误。
E1414CPU # Thermtrip指定的微处理器超出了允许的温度范围并已停止运行。
E1418CPU # Presence指定的处理器丢失或损坏,系统的配置不受支持。
E141CCPU Mismatch处理器的配置不受 Dell 支持。
E141FCPU Protocol系统 BIOS 已报告处理器协议错误。
E1420CPU Bus PERR系统 BIOS 已报告处理器总线奇偶校验错误。
E1421CPU Init系统 BIOS 已报告处理器初始化错误。
E1422CPU Machine Chk系统 BIOS 已报告机器检查错误。
E1618PS # Predictive电源设备电压超出允许范围;指定的电源设备安装错误或出现故障。
E161CPS # Input Lost指定的电源设备的电源不可用,或超出了允许范围。
E1620PS # Input Range指定的电源设备的电源不可用,或超出了允许范围。
E1710I/O Channel Chk系统 BIOS 已报告 I/O 通道检查错误。
DELL QPA(中英文对照)
Audit Criterion
Are Dell Returns logged into the RMA tracking system by serial number upon receipt? 對於DELL的退貨品數據,是通過在其上的序號進入到追蹤系統中查到嗎? Are all failure details supplied by Dell entered into the tracking system for each board serial number? (e.g. RTV & DSP details.) DELL提供的所有失敗的詳細信息,輸入到追蹤系統,並且每一片板的序號與之相對應。 Does the tracking system have the proven capability to segregate factory returns from field returns using forced routing? 追蹤系統能否證明可以分開廠退貨嗎? Does the tracking system have the proven capability to capture a specific serial number that has been flagged by Dell Engineering ? 追蹤系統證明可以獲得被DELL的工程師做過標記的特別的序號嗎? Does the tracking system have the proven capability to record Warranty & ECO status on Dell Returns? 追蹤系統證明能記錄DELL退貨品時保證書及ECQ之狀況。 Does the tracking system have the proven capability to report both the manufacturing history & previous RMA history by serial number? 追蹤系統證明維修報告中每一個編號的生產歷史和第一次RMA歷史記錄 Does the tracking system have the proven capability to identify the receipt of 2nd or 3rd time Dell Returns? 追蹤系統能證明識別收到的板子是DELL的第二次或第三次的退貨? Does the tracking system include a flag to identify when Dell Returns should be scrapped? (Dell Requirement is to scrap upon 3rd time return) 追蹤系統包括一個標示,能夠識別DELL退貨是報廢品(DELL要求在第三次退貨以上為報廢)。 Does the tracking system have the proven capability to monitor the turn around time by board serial number and to conduct full WIP age analysis? 追蹤系統可以證明能夠監控全程的板子的序列號和對制程的返回周期的分析。 Can it be demonstrated that there are no boards in the RMA loop for longer than 30 days? 追蹤系統能夠證明沒能板子在RMA停留超過了30天。 Does the tracking system have the proven capability to capture repair and defect information for every board serial number? 對於每一片板子的序列號,追蹤系統可以證明能夠獲得維修及不良信息 Does the tracking system have the proven capability to capture and highlight the components replaced as a result of rework? 追蹤系統可以證明能夠抓到和顯示重工過后,被替換的零件。 Does the tracking system have the proven capability to allow traceability between the reworked board and the reworker who completed the rework? 追蹤系統可能證明能夠追溯重工板和重工人 Does the tracking system have the proven capability to generate a Failure Analysis Report for boards in and completed the RMA process? 追蹤系統可以證明(在完成RMA過程之后)能夠產生不良分析報告 Is a Forced Board Routing system and WIP Tacking system fully deployed to monitor and control RMA Process Flows? Force Board Routing系統和工作制程Tacking系統完全去監控RMA流程嗎 Does the system verify the 'last' step processed and compare it to the expected 'last' step? (True Forced Routing) 系統有證明最后一步制程和將它分所期望的最后一步過程做比較嗎? Does the forced routing system have the proven capability to automatically re-route NFF boards for additional special processing? Forced Routing 系統可以證明能夠對另外特定的過程,自動重新安排NDF板子的行程嗎? Has it been demonstrated that RMA pass/fail data is logged real-time to the forced routing system by serial number and is available? 系統能證明RMA通過或失敗的日期是時實通過板子的序號標識,在Forced Routing系統上的嗎? Does the system ensure that only boards that have passed through all stages of the RMA Process will be returned to Dell? 系統能證明通過了RMA的全過程之后才出貨給DELL嗎?
Dell Checklist
只对物料描述及标定值进行确 认,没有AOI设备进行检查 目前没有设备进行公差检查,我 们会根据BOM/wi中详细的物料描 述与实物进行核对,经过QA对所 有元器件进行确认
《首件检验报告》
2.9
电阻电容测量值公差
2.10 Is a first-article log signed to verify acceptance before start up? 确认首件是否有可接受标签?
2.2
2.3
Are the component loading verification aids hard linked to the placement program so that loading is verified against program data? 元件装载确认设施同放置程序连接了? Can traceability of component lot codes be demonstrated for critical devices?
元件放置
Status DOC NO Title Rewark
Audit Criterion 稽核规范
Yes
Loading list
1.2
Yes
E3SP203 E3SP204 E3SP212
《CM82高速贴片机操作指导书》 《CM92多功能贴片机操作指导书》 《CM202,301及MTF操作指导书》
Yes
No
鉴定装置能跟踪元件批次号吗?
2.4 Is component loading/changes verified and cross checked by an individual other than the set-up operator at product changeover? 当转变机种时,确认元件放置/变更的核查是由一个独立的人而不是由设 立的作业员? Is a component loading/changes verification log signed by the set-up operator and countersigned by the cross checker before start up?
新供应商QSA QPA审核checklist及审核报告
8 人员(流动、培训、技术管理及能力)
上岗资格及培训、定期核查
a.是否进行岗前培训及考核(包括技术人员、检验人员、作业人员)?
b.是否有资格评定记录? 是否定期考核、实行末位淘汰?是否对培训记
8.1
录进行维护和更新? c.对员工上岗资格的评定程序与内容是否有效和足够?员工上岗资格如何
2.1.4 供应商规模在同行业中如何?
2.1.5
新供应商审核 a.是否有审核细则? b.是否有审核报告及记录? c.结果管理:是否经过审批?是否对不合格再审或改善跟进?
2.1.6
样板管理 a.是否有样板管理流程(含签样规则)? b.样板卡内容是否能识别不同状态? c.是否有样板发放/回收管理?
2.1.7 对供应商是否有变更管理要求与记录?
稽核员: 综合评述:
时间:2018/8/3
序号
稽查项目
无关
1 体系文件审核(ISO9001、QC080000) (Quality)
高层管理者的质量理念及意识如,公司内质量方面的最高管理人员在公 1.1.1 司管理层的地位及其被赋予的职责和权限是否充分和足够?高层管理者
是否参加重要质量会议,参与公司管理评审等
于失准前的测试产品是否重新测试?
测试设备
是否满足客户/产品需求
3.3
a.是否满足客户要求? b.是否满足产品的要求?
c.若客户有特殊要求,是否能按客户要求配置测试设备?
测试设备
MSA 3.4 a.是否实施MSA ?
B.何时做MSA?不合格时会如何处理及改善?
4 技术能力
技术研发人员结构:
4.1 a.主要技术研发人员的构成(数量比例、学历、工作经验等);
2.4.1
- 1、下载文档前请自行甄别文档内容的完整性,平台不提供额外的编辑、内容补充、找答案等附加服务。
- 2、"仅部分预览"的文档,不可在线预览部分如存在完整性等问题,可反馈申请退款(可完整预览的文档不适用该条件!)。
- 3、如文档侵犯您的权益,请联系客服反馈,我们会尽快为您处理(人工客服工作时间:9:00-18:30)。
1. QSA/QPA approval guideline
Even though the overall score is higher than 90%, if any of individual section scored lower than 80%, then the supplier will not be given “approval”.
Supplier scored lower than 90%:
It's not allowed to issue new score after follow up audit. Audit score can be changed only with a new QSA/QPA
Minimum period for Re-Audit
As long as audit CA 100% were completed or GCQM/GSQM feel comfortable, then re-audit can be implemented regardless of period.
Here is a guideline, 3~6 months period is recommended.
Supplier in AVL
Regarding the new supplier or the new factory of existing supplier, mass product can be started after passing the audit.
As regard of the existing factory for existing product once it fail the audit, it requires corrective action within one month. If the factory fails again on the new audit,
Dell SEQ team informs GCT, it's a high potential risk to continuous MP at the existing manufacturing site.
2. Results of Dell SEQ Quality Systems Audit
Dell SEQ will perform a Quality Systems Audit at a minimum of once every other year or at the discretion of the Dell GSQM.
Full latest audit report(s) will be placed with corrective action status in the identified QMP appendix.
3. Results of Dell SEQ Quality Process Audit
Dell SEQ or JQE (if delegated) will perform a Quality Process Audit at a minimum of once every year or at the discretion of the Dell GSQM.
Instruction Page 2。