TWLC使用手册
ENDURA TWC12M Twelve Unit Rapid Charger 使用说明书
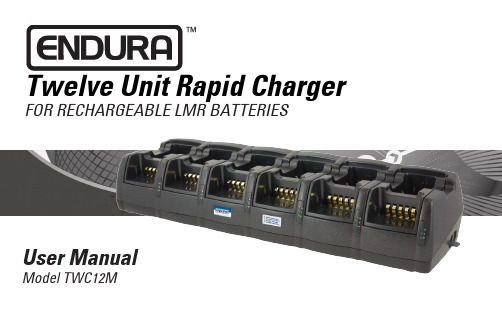
FOR RECHARGEABLE LMR BATTERIESModel TWC12MTopic PageIntroduction 1Important 2Caution 2-3Features4-5Replacing A Charging Pod 6Charging A Battery 7 – 8Battery Fault Conditions 9Warranty And Service 10Specifications11Table of ContentsENDURA™ TWC12MIntroductionThank you for purchasing an ENDURA™ TWC12M, Twelve Unit Rapid Charger. This high quality product is designed for charging two-way radio batteries whether on or off a radio. Using six replaceable pods, the TWC12M can charge twelve batteries at the same time and the batteries may be the same or different chemistries. Separate LEDs confirm the charge status of each battery.The six replaceable pods may be mixed. For example, six different pods could be installed allowing two batteries for each of six different radio brands to be charged.With the appropriate charging pod installed, TWC12M can charge these battery chem-istries: lithium ion (Li-Ion), lithium polymer (LiPo), nickel-metal hydride (NiMH), or nickel cadmium (NiCd). For a complete list of charging pods available for this charger, contact your Power Products dealer or call customer service at 800-529-1618.Important1. Read all Caution statements below and this User Manual before attempting to chargea battery.2. Always charge new batteries completely before initial use. Recycle batteries whenthey can no longer be used. Do not discard unwanted batteries in the trash or inciner-ate. Batteries exposed to fire or excessive heat may explode.3. For best battery performance, charge NiCd and NiMH batteries when they are fullydischarged.Caution1. Never charge alkaline or dry cell batteries with this charger. Do not charge Li-Ion,LiPo, NiMH, or NiCd batteries unless they are designed with overcharge protec-tion.2. Use charger in areas protected from the weather. Do not expose the charger to rain,any liquids, or excessive moisture.3. Do not attempt to charge a battery without first installing the appropriate chargingpod. Use only charging pods designed for the ENDURA TWC12M charger. Disconnect charger from power supply before installing, adjusting, or removing the charging pod.4. Make sure contacts in charging pod and battery are clean. Do not allow wire or metalobjects to touch contacts in charging pod or any internal part of the charger.5. Do not remove the charger’s housing or make any modification to the charger.6. Use only the power supply provided with the ENDURA TWC12M charger. If a replace-ment power supply is required, order part number TWC12M-PS. Use of other power supplies may damage the charger or batteries you may be attempting to charge.Caution (continued)The exclamation point within the triangle is a warning sign alerting you of important instructions accompanying the product.CAUTION: TO REDUCE THE RISK OF ELECTRIC SHOCK, DO NOT REMOVE COVER. NO USER SERVICEABLE PARTS ARE INSIDE. REFER ANY SERVICING TO QUALIFIED SER-VICE PERSONNEL.The lightning flash and arrowhead within the triangle is a warning sign alerting you of ‘dangerous voltage’ inside the product.ENDURA TWC12M Features1. DC power connection (see next page).2. Charge status LEDs – for front and rear positions.3.Quick reference information for charge status 4. TWC12M – rapid charger base.5. Power on/off switch (left side of unit).6.Removable charging pod for two batteries (shown for first position only).Note: DC power connection (7) is a custom design that securely holds the DC plug (8).(continued)9. TWC12M-PS - power supply for TWC12M (UL listed).10. TWC6M-PC - power cord to connect TWC12M-PSwith AC wall outlet.Replacing A Charging PodThe charging pod is made from quality materials and designed to provide years of service when properly used. In most cases, the charging pod will only be replaced when you want to use the charger with a different battery. Each pod charges two batteries for a specific radio; the two batteries may have different capacities or chemistries.Follow these steps to change the charging pod:1. Obtain a charging pod made specifically for the TWC12M. Confirm that the charging pod iscompatible with the battery you want to charge.2. Unplug the power supply from the TWC12M.3. The charging pod is secured to the base with a single screw. Turn the locking screw on the bot-tom of the rear charging pod counter-clockwise until it no longer holds the pod. Lift the charging pod from the charging base.4. Insert the replacement charging pod into the charging base and secure with the locking screw.Do not over tighten the screw.5. Inspect the charging contacts to ensure they are clean and unobstructed.6. Connect the power supply to the TWC12M. You are now ready to charge a battery compatiblewith the charging pod.Charging A Battery (continued)4. When a battery is placed in the charging pod and while charging, the charge statusLED (F or R) will illuminate RED with no flashing. If the charge status LED is red and flashes, a fault has been detected. The flash pattern represents a specific fault condi-tion. See section Fault Conditions for details.5. When the battery is charged to 80% of capacity, the charge status LED will change toGREEN and begin to flash. It is recommended that the battery be charged to at least 80% capacity before use.6. The charge status LED will illuminate GREEN with no flashing when the battery is fullycharged.7. After removing a fully charged battery, the charge status LED will illuminate ORANGEfor a few seconds. Allow the charge status LED to go off before placing another bat-tery in the charging pod.8. The TWC12M is designed to operate at room temperatures between 15°C and 30°C(59° F – 86° F). Do not charge batteries at temperatures below 0°C (32° F) or above 45°C (113° F).Fault ConditionsWhen the F or R charge status LED flashes RED, a fault condition exists. There are three different flash patterns, each indicating a specific type of fault. The flash patterns and fault conditions are as follows:Flash Pattern Fault TypeFlashes 1 Time Indicates charging complete, but battery is under charged.Battery voltage is below minimum level required. This warning isprovided after the rapid charging stage is complete.Flashes 2 Times Indicates battery contact is “open” and current is not passingthrough the (+) and (-) contacts on the battery. This warning isprovided after the initial diagnostic stage is complete. Checkcharging pod to confirm compatibility with battery.Flashes 3 Times Indicates over-current condition caused by battery short circuit.Have the battery checked by a qualified technician. Do notattempt charging the battery if a short circuit exists.Warranty And Service During WarrantyThe ENDURA TWC12M is made from high quality materials and designed to provide years of reliable service. The following warranty applies:Power Products Unlimited, Inc. (PPU) warrants this product to be free from defects in workmanship and materials for one-year from date of purchase by the end user. This warranty applies to the original purchaser and is void if the product has been altered, misused, damaged, neglected, or if repair is required because of normal wear and tear. This is the only warranty made by PPU. In no event will PPU, its affiliates, subsidiaries, related entities, or their respective directors, officers, or employees, be liable for any damages beyond repair or replacement as described above, including without limitation, indirect, incidental, or consequential damages.For service under warranty, return the product along with dated proof of purchase to the retailer where purchased or to Power Products. If returning directly to Power Products, follow these in-structions:1. Send item to Power Products – Warranty Service Department, 2170 Brandon Trail, Alpharetta, GA 30004. Foryour protection, we recommend you obtain proof of delivery for your shipment.2. Include with your product, dated proof of purchase, your name, email address, daytime telephone number,and return address (street address only; return shipments cannot be made to a P.O. Box).3. All items sent become the property of Power Products and will not be returned.ENDURA TWC12M SpecificationsDimensions (W x L x H)509 x 148 x 94 mm / 20.0 x 5.8 x 3.7 inches Weight (Charger Only) 1.63 kg / 3.6 lbsWeight (Power Supply)0.86 kg / 1.9 lbsCompatible Chemistries Li-Ion / LiPo / NiMH / NiCd Recommended Operating Temperature15º C – 30º C / 59º F – 86º FStorage Temperature0º C – 65º C / 32º F - 149º FPower Supply Input (TWC12M-PS)100V – 240V AC / 50 Hz – 60 Hz / 2.2A (max) Charger Input12-24V DC / 12.5ACharge Rate800 mA (10.6V – 13.5V)Product Approval FCC, CE, UL (power supply)Specifications subject to change without notice.This device complies with Part 15 of the FCC Rules. Operation is subject to the following conditions: (1) this device may not cause harmful interference, and (2) this device must accept any interference received, including interference that may cause undesired operation.ENDURA™ TWC12M Accessories2170 Brandon Trail • Alpharetta, GA 30004TMPart Number DescriptionTWC12M-MB Bracket for mounting on a wall or horizontal surface.TWC12M-PS Power supply (included with TWC12M).TWC6M-PC Power cord for TWC12M-PS (included with TWC12M).。
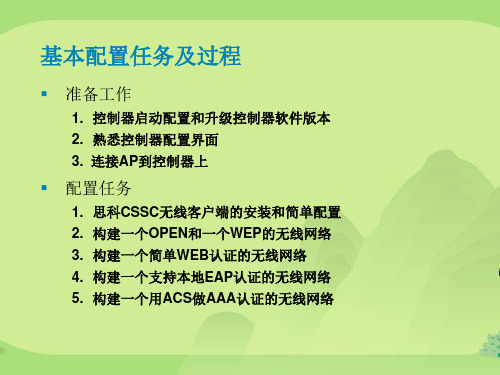
Cisco无线控制器配置基础
WLC的组成及接口(续)
▪ 动态接口:根据需要,为通过CAPWAP 隧道扩展到LAP 的VLAN自动创建 的接口,动态 接口有时也被称为用户接口,动态接口使用的IP 地址属于无 线客户端VLAN 的子网。
▪ Configure a RADIUS Server now? [YES][no]: no ▪ Warning! The default WLAN security policy requires a RADIUS server. ▪ Please see documentation for more details.
$3,743.00 $7,493.00 $13,493.00 $19,493.00
5500系列无线控制器
▪ 1 RU 高度
8口千兆上联
▪ 支持 12, 25, 50, 100, 250, 500 AP; ▪ 支持多达7000个客户端; ▪ 经过优化的802.11n性能;
▪ 智能射频控制平面,可以自行配置、修 复和优化。
$220,490.00 $136,490.00
$83,990.00 $47,240.00 $33,590.00 $23,090.00
准备工作
▪ 网线和Console线。 ▪ 如果是5508,需要GLC光纤模块和光纤或者GLC-T模块 ▪ 确认控制器版本是否需要升级 (用命令show sysinfo查看系统版本) ▪ 相应数量的瘦AP
▪ 高效漫游功能可提升应用性能; ▪ 2 热插拔电源模块插槽
AIR-CT5508-500-K9 AIR-CT5508-250-K9 AIR-CT5508-100-K9 AIR-CT5508-50-K9 AIR-CT5508-25-K9 AIR-CT5508-12-K9
校园无线局域网管理系统WLC的设计和实现
第 8卷第 3期
湖 南 工 业 职 业 技 术 学 院 学 报
V k8 o N0 3 .
20 年6 08 o B
J U N LO I N O R A Fl A I
曼 !
望
பைடு நூலகம்
J r 0 8 uL2 0
校园无线局域 网管理 系统 WL C的设 计和实现
a d U e.t g t e t h n a e n f c mp s wi l s N n trn h i a in h s b c me c mp s w r ls AN n i o tn a t0 n S o e h rwi t e ma g me to a u r e s LA mo i i g t e st to a o a u e e s L h e o u e i a mp r t p r £ a Ca u rl s AN n g me ts se h s b c me a c mp s wi l s AN y tm p r tn n a n ip n a e p r h o l t n o h mp swiee s L ma a e n y t m a e o a u r e s L e s se o a ig i n id s s bl a t o t e c mp e i t e e e f o f man a c s o n e ie c n i u t n,mo i rn ,t g t e t h n e n s r i o mai n W i d a c s i c n l g d s f r o i c e sp i td vc o fg r i a o n ti g o e h rw h t e ma a me to u e r t . o i g f f n o t a v e n t h oo y a ot e t h n e n wa c n i u u l p r d h a p s, r l s o a . a n t r n a e n o t r a i l o f u a in o h q i me t t u l o t lt e o t o sy u g a e t e c n m u *e e s lc l8 ̄ ewo k ma g me ts f i f 1 e wa e h s a s mp e c n g r t t e e u p n o f ly c n r h i o f o c i ia e t r s C p sw r l s AN n g me ts f a e h e n c ni uo sy i r v d l c lfa u e 、 a u e e s L n m i ma a e n ot r a b e o t w s n u l mp e . o
卡萨帝冰箱 BCD-470WLCFD8FG3U1说明书

冰箱使用说明书型号BCD-470WLCFD8FG3U1• 本说明书为通用手册• 本公司保留说明书解释权• 产品外观请以实物为准• 阅后请与发票一并妥善保存• 如遇产品技术或软件升级,恕不另行通知• 本产品只适合在中国大陆销售和使用1. 产品介绍1 1.1. 产品部件1 1.1.1. 部件介绍1 1.1.2. 装箱单1 1.2. 技术规格1 1.2.1. 技术数据11.2.2. 产品尺寸及安装要求22. 使用说明3 2.1. 安全注意事项3 2.1.1. 符号含义3 2.1.2. 电气3 2.1.3. 使用3 2.1.4. 维护3 2.2. 冰箱安装3 2.2.1. 安装步骤3 2.2.2. 首次使用步骤4 2.3. 冰箱操作4 2.3.1. 显示屏4 2.3.2. 通电/断电4 2.3.3. 特色功能4 2.3.4. 温度调节5 2.3.5. 互联功能5 2.4. 食品贮存注意事项6 2.4.1. 贮存建议区间6 2.4.2. 冷藏室的使用6 2.4.3. 冷冻室的使用6 2.4.4. 节能7 2.5. 清洁保养7 2.5.1. 冰箱清洁7 2.5.2. 部件清洁72.5.3. 搬运/停用73. 售后服务9 3.1. 疑难解答9 3.1.1. 结露9 3.1.1.1. 冰箱外部的水珠?9 3.1.1.2. 冰箱内部的水珠?9 3.1.1.3. 抽屉前盖凝霜?9 3.1.2. 制冷93.1.2.1. 冰箱不工作9 3.1.2.2. 冰箱的制冷效果差?9 3.1.2.3. 冰箱的冷藏室、抽屉的食品冻住了?10 3.1.2.4. 冰箱压缩机的工作时间?10 3.1.3. 发热10 3.1.3.1. 冰箱外壳的温度?10 3.1.4. 异声10 3.1.4.1. 冰箱启动时发出较大的声音?10 3.1.4.2. 工作的声音经常提高10 3.1.4.3. 冰箱在开停机时发出“嗒嗒”声?10 3.1.4.4. 冰箱有水流声和水煮沸声10 3.1.4.5. 冰箱在工作时发出“啪啪”声?11 3.1.4.6. 冰箱在工作时有轻微吹风声?11 3.1.4.7. 冰箱在工作时有“咝咝”声或“嗤嗤”声?11 3.1.4.8. 冰箱在工作时噪音大?11 3.1.5. 异味11 3.1.5.1. 冰箱内有异味11 3.1.6. 其他11 3.1.6.1. 开关门力大?11 3.2. 环保清单11 3.3. 保修说明111. 产品介绍1.1. 产品部件1.1.1. 部件介绍编号部件名称是/否可拆卸①搁物架是②保湿盒盖板是③保湿盒是④变温中隔板否⑤珍品盒是⑥冷冻上托盘是⑦冷冻下托盘是⑧上瓶座是⑨保湿盒搁物架是⑩下瓶座是变温抽屉是冷冻上抽屉是冷冻下抽屉是1.1.2. 装箱单名称型号/数量型号BCD-470WLCFD8FG3U1附件袋总成1普通搁物架2果菜搁物架1保湿盒盖板1保湿盒1变温中隔板1珍品盒1婴爱空间抽屉1上瓶座4下瓶座2上冷冻托盘1上冷冻抽屉1下冷冻托盘1下冷冻抽屉1本产品因不断研究改进,保留冰箱各部件的变更权利,恕不另行通知,敬请谅解。
tx—nljc使用说眀书
tx—nljc使用说眀书
(最新版)
目录
1.TX-Nljc 的使用说明书概述
2.TX-Nljc 的主要功能和特点
3.TX-Nljc 的基本使用方法
4.TX-Nljc 的进阶使用方法
5.TX-Nljc 的维护和保养方法
6.TX-Nljc 的安全注意事项
正文
一、TX-Nljc 的使用说明书概述
欢迎使用 TX-Nljc,这是一款功能强大,易于使用的设备。
本说明书将详细解释如何使用和维护 TX-Nljc,以确保您能够充分利用其功能和特性。
二、TX-Nljc 的主要功能和特点
TX-Nljc 主要功能包括:数据输入、数据处理、数据输出。
其特点包括:操作简便、处理速度快、结果准确等。
三、TX-Nljc 的基本使用方法
1.开机:按下设备上的电源按钮,打开设备。
2.数据输入:将需要处理的数据输入到设备中。
3.数据处理:设备将自动处理输入的数据,并生成结果。
4.数据输出:将处理后的结果从设备中取出。
四、TX-Nljc 的进阶使用方法
1.设置参数:根据需要,可以调整设备的一些参数,如处理速度、结果精度等。
2.定制功能:可以根据具体需求,定制设备的特定功能。
五、TX-Nljc 的维护和保养方法
1.定期清洁:使用软布擦拭设备表面,防止灰尘和污垢积累。
2.避免撞击:使用和存放设备时,避免撞击,防止设备受损。
六、TX-Nljc 的安全注意事项
1.使用时,请确保设备接地,以防止电击。
2.避免在潮湿环境中使用设备,以防止短路。
3.使用和存放设备时,请确保设备远离火源。
复旦微电子 FM62429双通道数字音量控制芯片 说明书
产品说明书
FM62429 双通道数字音量控制芯片
版本 2.1
4
参数说明
极限额定参数
符号 VCC PD Topr Tstg 参数说明 电源电压 最大功耗 工作温度 储藏温度 数值 6.0 625 - 20 ~ + 75 - 55 ~ + 125 单位 V mW ℃ ℃
电特性参数
(测试条件:VCC = 5V,Ta = +25℃,除非另有说明) 符号 ICC ATTMAX ATTERR VIM VOM VNO1 VNO2 THD CS 参数说明 静态电流 最大衰减 衰减误差 最大输入电压 最大输出电压 输出噪声电压 总谐波失真 通道隔离度 ATT= - ∞ ATT=0 THD=1%,ATT= -6dB THD=1% ATT=0,Rg=0,JIS-A ATT= - ∞,Rg=0,JIS-A f=1kHz,VO=0.5Vrms,ATT=0 f=1kHz,JIS-A 测试条件 技术指标 最小值 -2.0 1.5 0.8 典型值 6 -90 0 1.7 1.3 4 5 0.01 -80 最大值 12 -80 2.0 10 10 0.05 -70 单位 mA dB dB Vrms Vrms μVrms μVrms % dB
产品说明书
FM62429 双通道数字音量控制芯片
版本 2.1
10
产品说明书
FM62429 双通道数字音量控制芯片
版本 2.1
5
数字单元交流特性
符号 tcr tWHC tWLC tr tf tSD tHD 参数说明 时钟周期 高电平的脉冲宽度 低电平的脉冲宽度 上升沿时间 下降沿时间 数据建立时间 数据保持时间 测试条件 技术指标 最小值 典型值 最大值 4 1.6 1.6 0.8 0.8 0.4 0.4 单位 μs μs μs μs μs μs μs
ET62429
ET62429 串行数据控制的双声道电子音量调节电路概述ET62429是由两路串行数据控制的双声道电子音量调节电路。
功能特点z内建参考电路z串行数据控制音量0~-83dB,-无穷大(两声道可独立控制)z低噪音及低失真度VNO=5µV,(ATT=-无穷大,JIS-A)THD=0.01%,(V0 = 0.5V,DIN-AUDIO)z DIP或SOP封装管脚排列图管脚说明管脚号管脚名称功能描述1 VIN11声道输入端。
2 VOUT11声道输出端。
3 GND接地端。
4 DATA输入数据控制端。
随时钟信号同步输入数据。
5 CLOCK时钟输入端。
6 VCC电源端。
加2个退耦电容。
7 VOUT22声道输出端。
8 VIN22声道输入端。
应用范围汽车音响、功放。
ET62429功能框图功能说明数据与时钟关系数据输入格式D0 D1 D2 D3 D4 D5 D6 D7 D8 D9 D10 0/1 0/1 音量 1 1 D0中0/1定义0:1声道1:2声道D1中0/1定义0:在某时双声道1:在某时单声道音量代码:极限参数名称 符号最小值典型值最大值单位工作电压 V CC — 6 — V 功耗 P d 440 — 625 mW工作环境温度 Topr -20 — +75 ℃ 存贮温度Tstg -55—+125 ℃电参数(Ta =25℃,V CC = 5V)名称 符号 最小值 典型值 最大值 单位 测试条件工作电流 I CC — 8 16 mA最大衰减 ATT-无穷大-90 -80dBATT =-无穷大 衰减误差 EA TT -2.02.0 dBATT =0 最大输入电压 VIM 1.5 1.7 — V THD =1%, ATT =-6dB 最大输出电压 V OM 0.8 1.3 — V THD =1% V NO1 — 4 10 V ATT =0, Rg =0, JIS-A 输出噪音电压V NO2 —510 VATT =-无穷大 ,Rg=0, JIS-A谐波失真 THD — 0.01 0.05 %f=1kHz, VO=0.5Vrms,ATT=0 声道分离度CS— -80 -70 dB f =1kHz, JIS-ADC 参数名称 符号最小值典型值最大值单位测试条件 低电平输入电压 V IL 0 — 0.2V CC V 高电平输入电压 V IH 0.8V CC — V CC mW数据,时钟端低电平输入电流 I IL -10 — 10 µA VI =0高电平输入电流 I IH — — 10 µAVI =5V 数据,时钟端AC 参数名称 符号最小值典型值最大值单位时钟周期 tcr 4 — — µs 时钟脉宽(高电平) t WHC 1.6 — — µs 时钟脉宽(低电平) t WLC 1.6 — — µs 时钟上升时间 tr — — 0.4 µs 时钟下降时间 t f — — 0.4 µs 时钟建立时间 t SD 0.8 — — µs时钟保持时间 t HD 0.8—— µs时钟和数据时序t rCLOCKDATA75%25%t crt f t WLCt WHCt SD t HD参考应用线路图地址:在使用本产品之前应仔细阅读本说明书,雅高科技(无锡)有限公司江苏省无锡市新区长江路21号信息产业园A 棟207室电话: 0510 521 4772 1390 6191767 广州业务:135****8018传真: 0510 505 6077 E-mail:*************注意:本资料中的信息如有变化,恕不另行通知。
WTW手持多参数计Multi 350i说明书
TCLPWLC维修手册精讲PPT学习教案
第17页/共41页
PWL37电源板(IC2-L6563)引脚介绍
电源进入保护状态后,AC重置后电源才能重新工作。
第4页/共41页
PWL37电源板过流保护设置
Output Voltage
输出电压
24V
12V
5V
Over Current 过流
8-10A
8-10A
2-3.5A
Comment 备注
24V and 12V shutdown 5V normal
24V and 12V shutdown 5V normal
第16页/共41页
PWL37电源板(IC2-L6563)引脚介绍
引脚 1 2 3 4
5
名称 INV COMP MULT CS
VFF
引脚功能
倒置的输入误差放大器(阀值2.5V)。该脚通过取样电阻分压得到PFC输出电 压的反馈信号,该脚内部设置一电流源,通过取样电流的变化实现对PFC输出 电压的补偿。
PWL37电源板原理框图
AC IN EMC 滤波电路
桥式整流 电路
PFC 控制电路
IC2 L6563
14
16V
PWM控制 电路
T1 隔离 变压器
输出整流 滤波电路
12V 24V
IC3
4
L6599
12
12V
稳压 电路
1
T2
4
卡萨帝冰箱 BCD-633WLCFDA4A5U1说明书
冰箱使用说明书型号BCD-633WLCFDA4A5U1• 本说明书为通用手册• 本公司保留说明书解释权• 产品外观请以实物为准• 阅后请与发票一并妥善保存• 如遇产品技术或软件升级,恕不另行通知• 本产品只适合在中国大陆销售和使用1. 产品介绍1 1.1. 产品部件1 1.1.1. 部件介绍1 1.1.2. 装箱单2 1.2. 技术规格2 1.2.1. 技术数据21.2.2. 产品尺寸及安装要求32. 使用说明9 2.1. 安全注意事项9 2.1.1. 符号含义9 2.1.2. 电气9 2.1.3. 使用9 2.1.4. 维护9 2.2. 冰箱安装10 2.2.1. 安装步骤10 2.2.2. 首次使用步骤10 2.3. 冰箱操作11 2.3.1. 显示板11 2.3.2. 通电/断电12 2.3.3. 特色功能12 2.3.4. 温度调节14 2.3.5. 互联功能15 2.4. 食品贮存注意事项15 2.4.1. 贮存建议区间15 2.4.2. 冷藏室的使用16 2.4.3. 冷冻室的使用17 2.4.4. 节能使用的注意事项17 2.5. 清洁保养18 2.5.1. 冰箱清洁18 2.5.2. 部件清洁182.5.3. 搬运/停用183. 售后服务21 3.1. 疑难解答21 3.1.1. 结露21 3.1.1.1. 冰箱外部的水珠?21 3.1.1.2. 冰箱内部的水珠?21 3.1.2. 制冷21 3.1.2.1. 冰箱不工作213.1.2.2. 冰箱的制冷效果差?21 3.1.2.3. 冰箱的冷藏室、抽屉的食品冻住了?21 3.1.2.4. 冰箱压缩机的工作时间?22 3.1.3. 发热22 3.1.3.1. 冰箱外壳的温度?22 3.1.4. 异声22 3.1.4.1. 冰箱启动时发出较大的声音?22 3.1.4.2. 工作的声音经常提高22 3.1.4.3. 冰箱在开停机时发出“嗒嗒”声?22 3.1.4.4. 冰箱有水流声和水煮沸声22 3.1.4.5. 冰箱在工作时发出“啪啪”声?22 3.1.4.6. 冰箱在工作时有轻微吹风声?23 3.1.4.7. 冰箱在工作时有“咝咝”声或“嗤嗤”声?23 3.1.4.8. 冰箱在工作时噪音大?23 3.1.4.9. 冰箱有突突的声音?23 3.1.4.10. 冰箱有运转声和冰块下落声?23 3.1.5. 异味23 3.1.5.1. 冰箱内有异味23 3.2. 有害物质23 3.3. 保修说明241. 产品介绍1.1. 产品部件1.1.1. 部件介绍可拆卸部件部件名称部件名称瓶座*4MSA抽屉防翻瓶座*2MSA抽屉托盘悬臂搁物架*2冷冻上抽屉密封盖1.1.2. 装箱单本产品因不断研究改进,保留冰箱各部件的变更权利,恕不另行通知,敬请谅解。
- 1、下载文档前请自行甄别文档内容的完整性,平台不提供额外的编辑、内容补充、找答案等附加服务。
- 2、"仅部分预览"的文档,不可在线预览部分如存在完整性等问题,可反馈申请退款(可完整预览的文档不适用该条件!)。
- 3、如文档侵犯您的权益,请联系客服反馈,我们会尽快为您处理(人工客服工作时间:9:00-18:30)。
矿产资源开发利用方案编写内容要求及审查大纲
矿产资源开发利用方案编写内容要求及《矿产资源开发利用方案》审查大纲一、概述
㈠矿区位置、隶属关系和企业性质。
如为改扩建矿山, 应说明矿山现状、
特点及存在的主要问题。
㈡编制依据
(1简述项目前期工作进展情况及与有关方面对项目的意向性协议情况。
(2 列出开发利用方案编制所依据的主要基础性资料的名称。
如经储量管理部门认定的矿区地质勘探报告、选矿试验报告、加工利用试验报告、工程地质初评资料、矿区水文资料和供水资料等。
对改、扩建矿山应有生产实际资料, 如矿山总平面现状图、矿床开拓系统图、采场现状图和主要采选设备清单等。
二、矿产品需求现状和预测
㈠该矿产在国内需求情况和市场供应情况
1、矿产品现状及加工利用趋向。
2、国内近、远期的需求量及主要销向预测。
㈡产品价格分析
1、国内矿产品价格现状。
2、矿产品价格稳定性及变化趋势。
三、矿产资源概况
㈠矿区总体概况
1、矿区总体规划情况。
2、矿区矿产资源概况。
3、该设计与矿区总体开发的关系。
㈡该设计项目的资源概况
1、矿床地质及构造特征。
2、矿床开采技术条件及水文地质条件。