TP-link-LT-W710N-无线路由说明书
TP-LINK WR720 WR710M迷你无线路由器 台式机和无线设备共享网络的设置指南

TL-WR720N /WR710N 迷你无线路由器设置指南-Router模式(无线路由模式)以PPPoE为例(一般需要输入宽带账户和密码的连网方式,例如电信ADSL)也就是如果你想一台设备是有线上网,其他都用无线上网要选的模式啦!一。
连线ADSL MODEM宽带口----无线路由器W AN口无线路由LAN口----需有线上网的电脑的宽带接入口二。
设置模式把路由器的模式开关切换到ROUTER必须使用有无线网卡的设备笔记本搜索该无线信号连接,右键,状态,属性,双击TCP/IPV4出属性,使用下面的ip地址,把ip地址设为192.168.1.100 ,确定打开IE浏览输入地址192.168.1.253进入路由器管理界面输入帐号和密码均为admin点击设置向导以下是官网提供的方法/pages/article-detail.asp?result=school&d=270 一TL-WR720N的设置步骤1:在浏览器中输入“192.168.1.253”,输入登陆帐号及密码均为admin,打开TL-WR720N的管理界面,自动弹出“设置向导”(也可以点击管理界面菜单“设置向导”),如下图所示。
步骤2:点击“下一步”开始设置,弹出无线工作模式设置页面,如下图所示。
步骤3::根据前端宽带线路来决定选择上网的方式,若不清楚可选择推荐项。
此例以PPPOE为例。
步骤4:输入宽带“上网账号”及“上网口令”,击“下一步”,如下图所示。
上图所示页面中,可以设置TL-WR720N的SSID(即无线网络名称TP-LINK_531984)。
为防止非法用户蹭网,建议设置无线安全,推荐选择“WPA-PSK/WPA2-PSK”并设置PSK密码(本例为11222234)。
步骤6:点击“下一步”,提示设备需要重新启动,如下图所示。
点击“重启”,路由器自动重新启动,设置完成。
再到无线连接TCP/IPV4属性里把IP的获取方式改为自动获取重新搜索信号,输入密码,链接网络。
无线路由器产品说明书

无线路由器产品说明书一、产品概述无线路由器是一种网络设备,用于将互联网信号通过无线方式传输给多个终端设备。
它充当了一个中转站,将来自网络服务提供商的宽带信号转化为无线信号,使用户可以在家中或办公室内的各个角落连接到互联网。
本产品说明书将详细介绍我们的无线路由器产品,包括功能特点、技术规格、使用方法等。
二、功能特点1. 高速稳定的无线连接我们的无线路由器采用最新的无线技术,支持高速的无线连接。
无论是下载大文件、在线观看高清视频还是进行网络游戏,都能提供稳定的无线连接,让用户享受流畅的网络体验。
2. 多设备连接无线路由器支持多个设备同时连接,无论是智能手机、平板电脑、笔记本电脑还是智能家居设备,都可以通过无线方式连接到路由器,实现互联网共享。
3. 安全保护为了保障用户的网络安全,我们的无线路由器提供了多种安全保护机制。
支持WPA/WPA2加密、防火墙、访问控制等功能,有效防止未经授权的设备接入网络,保护用户的隐私和数据安全。
4. 灵活的网络管理用户可以通过简单的设置界面管理无线路由器,包括网络名称、密码、设备连接管理等。
同时,路由器还支持远程管理功能,用户可以通过手机或电脑远程管理路由器,随时随地掌握网络状态。
三、技术规格1. 无线标准:IEEE 802.11ac/n/g/b2. 传输速率:最高可达1200Mbps3. 无线频率:2.4GHz和5GHz双频段4. 无线覆盖范围:室内最大覆盖范围约为100平方米5. 网络接口:1个WAN口、3个LAN口6. 安全加密:支持WPA/WPA2-PSK加密7. 电源:输入AC 100-240V,输出DC 12V/1A四、使用方法1. 连接设备将无线路由器的电源适配器插入电源插座,并将其它一端插入路由器的电源接口。
接着,将宽带网络提供商提供的网络线缆插入路由器的WAN口,将电脑或其他设备通过网线连接到路由器的LAN口。
2. 设置无线网络打开电脑或移动设备的无线网络设置,搜索并连接到路由器的无线网络。
TP-Link 无线 4G LTE 路由器快速安装指南说明书
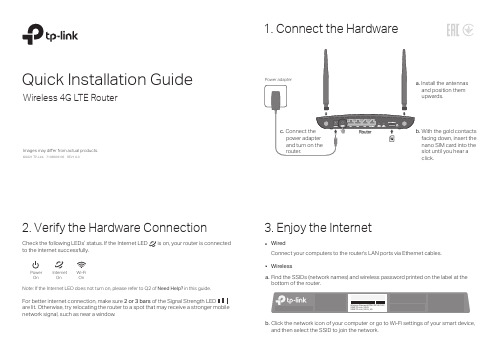
Quick Installation GuideWireless 4G LTE Router1. Connect the HardwareImages may differ from actual products.©2021 TP-Link 7106509105 REV1.0.0Check the following LEDs’ status. If the Internet LED is on, your router is connected to the internet successfully.3. Enjoy the Internet2. Verify the Hardware ConnectionNote: If the Internet LED does not turn on, please refer to Q2 of Need Help? in this guide.Power OnOnInternet OnWi-Fi For better internet connection, make sure 2 or 3 bars are lit. Otherwise, try relocating the router to a spot that may receive a stronger mobile network signal, such as near a window.WirelessWiredConnect your computers to the router's LAN ports via Ethernet cables.Find the SSIDs (network names) and wireless password printed on the label at the bottom of the router.a.Click the network icon of your computer or go to Wi-Fi settings of your smart device, and then select the SSID to join the network.b.With the gold contacts facing down, insert the nano SIM card into the slot until you hear a click.Install the antennas and position them upwards.Customize the 4G LTE RouterConfigure the router via Tether AppNote: The router can also be used (or configured) in Wireless Router Mode for DSL/Cable connections. For more advanced configurations, please refer to the user guide on TP-Link official website at .Note: If the login page does not appear, please refer to Q1 of Need Help? in this guide.2. Launch a web browser and type in or http://192.168.1.1. Create a new password for future logins.3. Follow the step-by-step instructions of the Quick Setup to complete the initial configuration.1. Make sure your computer is connected to the router (wired or wireless).to retrieve or reset your wireless password.The TP-Link T ether app provides a simple, intuitive way to access and manage your router.View information about clients connected to your routerBlock unwelcome users from connecting to your networkSet up Parental Controls with access timeChange the basic wireless network settingsNote: If you don’t have an account, create one first.1. Download the TP-Link T ether app.2. Open the T ether app and log in with your TP-Link ID.3. Tap the button in the T ether app and select Router > 3G/4G Router . Follow the steps to complete the setup and connect to the internet.orHow to begin?• Do not use any other chargers than those recommended.• Do not use the device where wireless devices are not allowed.• Adapter shall be installed near the equipment and shall be。
TP-LINK 无线路由说明书

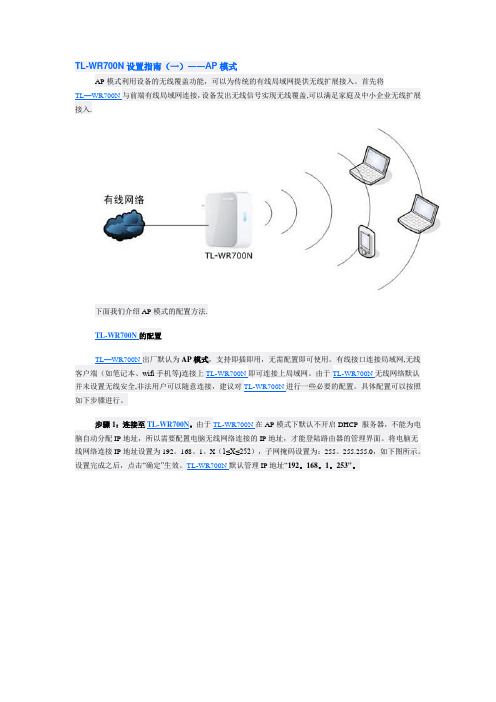
TL-WR700N设置指南(一)――AP模式AP模式利用设备的无线覆盖功能,可以为传统的有线局域网提供无线扩展接入。
首先将TL-WR700N与前端有线局域网连接,设备发出无线信号实现无线覆盖,可以满足家庭及中小企业无线扩展接入。
下面我们介绍AP模式的配置方法。
TL-WR700N的配置TL-WR700N出厂默认为AP模式,支持即插即用,无需配置即可使用。
有线接口连接局域网,无线客户端(如笔记本、wifi手机等)连接上TL-WR700N即可连接上局域网。
由于TL-WR700N无线网络默认并未设置无线安全,非法用户可以随意连接,建议对TL-WR700N进行一些必要的配置。
具体配置可以按照如下步骤进行。
步骤1:连接至TL-WR700N。
由于TL-WR700N在AP模式下默认不开启DHCP 服务器,不能为电脑自动分配IP地址,所以需要配置电脑无线网络连接的IP地址,才能登陆路由器的管理界面。
将电脑无线网络连接IP地址设置为(1≤X≤252),子网掩码设置为:,如下图所示。
设置完成之后,点击“确定”生效。
TL-WR700N默认管理IP地址“”。
注意:电脑IP地址配置方法可以参考如下链接:&d=72TL-WR700N默认SSID是TP-LINK_PocketAP_419F2E(“419F2E”是TL-WR700N无线MAC地址后六位),且并未设置无线安全。
电脑可以通过有线或无线方式连接到TL-WR700N(以Win7系统无线连接到TL-WR700N为例),扫描环境中的无线网络,选中TL-WR700N的无线SSID,并点击“连接”,连接上之后,如下图所示。
步骤2:在浏览器中输入“”,输入登陆用户名及密码均为admin,打开TL-WR700N的管理界面,自动弹出“设置向导”(也可以点击管理界面菜单“设置向导”),如下图所示。
步骤3:点击“下一步”开始设置,弹出工作模式设置页面,如下图所示。
步骤4:选择“AP”,点击“下一步”,弹出无线设置页面,如下图所示。
TP-LINK 无线路由说明书【精选文档】
TL-WR700N设置指南(一)――AP模式AP模式利用设备的无线覆盖功能,可以为传统的有线局域网提供无线扩展接入。
首先将TL—WR700N与前端有线局域网连接,设备发出无线信号实现无线覆盖,可以满足家庭及中小企业无线扩展接入.下面我们介绍AP模式的配置方法.TL-WR700N的配置TL—WR700N出厂默认为AP模式,支持即插即用,无需配置即可使用。
有线接口连接局域网,无线客户端(如笔记本、wifi手机等)连接上TL-WR700N即可连接上局域网。
由于TL-WR700N无线网络默认并未设置无线安全,非法用户可以随意连接,建议对TL-WR700N进行一些必要的配置。
具体配置可以按照如下步骤进行。
步骤1:连接至TL-WR700N。
由于TL-WR700N在AP模式下默认不开启DHCP 服务器,不能为电脑自动分配IP地址,所以需要配置电脑无线网络连接的IP地址,才能登陆路由器的管理界面。
将电脑无线网络连接IP地址设置为192。
168。
1。
X(1≤X≤252),子网掩码设置为:255。
255.255.0,如下图所示。
设置完成之后,点击“确定”生效。
TL-WR700N默认管理IP地址“192。
168。
1。
253"。
注意:电脑IP地址配置方法可以参考如下链接:http://www.tp—link。
com。
cn/pages/article—detail。
asp?result=school&d=72TL—WR700N默认SSID是TP-LINK_PocketAP_419F2E(“419F2E"是TL-WR700N无线MAC地址后六位),且并未设置无线安全。
电脑可以通过有线或无线方式连接到TL-WR700N(以Win7系统无线连接到TL-WR700N为例),扫描环境中的无线网络,选中TL-WR700N的无线SSID,并点击“连接”,连接上之后,如下图所示。
步骤2:在浏览器中输入“192.168。
TPLINK WR710N代理服务器方式如何设置无线密码

TPLINK WR710N代理服务器方式如何设置无线密码背景:我的电脑原先使用代理服务器上网。
现在新入了一个TP link WR710。
连好路由后,默认可以进入局域网,可以上公共网站。
但是美中不足的是是无线无密码。
我想增加密码,于是根据官网的设置指南,无法操作下去。
原因是根本无法链接192.168.1.253。
经过若干尝试,发现问题出在代理服务器上。
现共享解决方案如下:1.进入ie的internet选项2.取消代理服务器,如下图3.双击无线图标,点击属性,进入internet协议(TCP/IP)4.取消自动获取IP,改为使用下面的IP,如下图。
如果提示IP冲突,可改为1.1505.然后进入IE,就可以进入192.168.1.253了。
后续改密码设置参考以下官网说明。
注意,此说明针对AP模式。
步骤2:在浏览器中输入“192.168.1.253”,输入登陆用户名及密码均为admin,打开TL-WR700N 的管理界面,自动弹出“设置向导”(也可以点击管理界面菜单“设置向导”),如下图所示。
步骤3:点击“下一步”开始设置,弹出工作模式设置页面,如下图所示。
步骤4:选择“AP”,点击“下一步”,弹出无线设置页面,如下图所示。
上图所示页面中,可以设置TL-WR700N的SSID(即无线网络名称)。
为防止非法用户蹭网,建议设置无线安全,推荐选择“WPA-PSK/WPA2-PSK”并设置PSK密码(本例为abcdefgh)。
步骤5:点击“下一步”,提示设备需要重新启动,如下图所示。
点击“重启”,路由器自动重新启动,设置完成。
步骤6:重启完成,此时TL-WR700N的无线网络已经设置了无线安全,电脑的无线网络连接会自动断开,需要重新连接TL-WR700N的无线网络(本例中SSID为TP-LINK_PocketAP_419F2E),连接过程中需要输入TL-WR700N的无线PSK密码(本例为abcdefgh),连接上之后,如下图所示。
TP-Link 无线范围扩展器用户手册说明书
Range ExtenderConnect your devices to the extender wirelessly or via an Ethernet cable, Launch the T ether app and log in with yourTP-Link ID. If you don’t have an account, create one first.Scan for T etherorSetup with videosScan the QR code, or visi thttps:///support/setup-video/#ra nge-extenders and search for the setup video of your model.* Images may differ from your actual product.TP-Link OneMesh router and extenders work together to form one unified Wi-Fi network. Walk through your home and stay connected with the fastest possibleOneMesh TM with Seamless RoamingSeamless RoamingDevices automatically switch between your router and extenders as you move through yourhome for the fastest possible speeds.Unified Wi-Fi NetworkRouter and extenders share the same wireless settings, including network name, password,access control settings and more.Easy Setup and ManagementSet up a OneMesh network with a push of WPS buttons. Manage all network devices on theT ether app or at your router’s web management page.T o check full list of TP-Link OneMesh devices, scan the QR code,or visit https:///onemesh/compatibility.Method 2: Via a Web Browser1. Connect your computer or smartphone to the extender’s network. If you areusing a computer, unplug the Ethernet cable if any.2. Launch a web browser, enter in the addressbar, and log in.3. View or change extender settings as needed.Method 1: Via the T ether App1. Connect your smartphone to the extender‘s or router’s network.2. Launch the T ether app, select your extender, and log in.3. View or change extender settings as needed.Access Extender SettingsAfter setup, you can access extender settings via any of the methods below.Y ou can reselect host network, change extended network settings and more.Note: If your extender and router use the same network name, Method 1 is recommended.• Do not attempt to disassemble, repair, or modify the device. If you need service, please contact us.AXE5400 Tri-Band Wi-Fi 6E Range Extender Model: RE815XE。
TP-LINK TL-WR702N 150Mbps无线N迷你路由器使用说明书
TL-WR702N150Mbps Wireless N Nano RouterRev: 2.0.0COPYRIGHT & TRADEMARKSSpecifications are subject to change without notice. is a registered trademark of TP-LINK TECHNOLOGIES CO., LTD. Other brands and product names are trademarks or registered trademarks of their respective holders.No part of the specifications may be reproduced in any form or by any means or used to make any derivative such as translation, transformation, or adaptation without permission from TP-LINK TECHNOLOGIES CO., LTD. Copyright © 2015 TP-LINK TECHNOLOGIES CO., LTD. All rights reserved.FCC STATEMENTThis equipment has been tested and found to comply with the limits for a Class B digital device, pursuant to part 15 of the FCC Rules. These limits are designed to provide reasonable protection against harmful interference in a residential installation. This equipment generates, uses and can radiate radio frequency energy and, if not installed and used in accordance with the instructions, may cause harmful interference to radio communications. However, there is no guarantee that interference will not occur in a particular installation. If this equipment does cause harmful interference to radio or television reception, which can be determined by turning the equipment off and on, the user is encouraged to try to correct the interference by one or more of the following measures:•Reorient or relocate the receiving antenna.•Increase the separation between the equipment and receiver.•Connect the equipment into an outlet on a circuit different from that to which the receiver is connected.•Consult the dealer or an experienced radio/ TV technician for help.This device complies with part 15 of the FCC Rules. Operation is subject to the following two conditions:1) This device may not cause harmful interference.2) This device must accept any interference received, including interference that may causeundesired operation.Any changes or modifications not expressly approved by the party responsible for compliance could void the user’s authority to operate the equipment.Note: The manufacturer is not responsible for any radio or TVinterference caused by unauthorized modifications to this equipment. Such modifications could void the user’s authority to operate the equipment.FCC RF Radiation Exposure StatementThis equipment complies with FCC RF radiation exposure limits set forth for an uncontrolled environment. This device and its antenna must not be co-located or operating in conjunction with any other antenna or transmitter.“To comply with FCC RF exposure compliance requirements, this grant is applicable to only Mobile Configurations. The antennas used for this transmitter must be installed to provide a separation distance of at least 20 cm from all persons and must not be co-located or operating in conjunction with any other antenna or transmitter.”CE Mark WarningThis is a class B product. In a domestic environment, this product may cause radio interference, in which case the user may be required to take adequate measures.Canadian Compliance StatementThis device complies with Industry Canada license-exempt RSS standard(s). Operation is subject to the following two conditions:(1) This device may not cause interference, and(2)This device must accept any interference, including interference that may cause undesired operation of the device.Cet appareil est conforme aux norms CNR exemptes de licence d’Industrie Canada. Le fonctionnement est soumis aux deux conditions suivantes:(1) cet appareil ne doit pas provoquer d’interférences et(2) cet appareil doit accepter toute interférence, y compris celles susceptibles de provoquer un fonctionnement non souhaité de l’appareil.Industry Canada Statement:Complies with the Canadian ICES-003 Class B specifications.Cet appareil numérique de la classe B est conforme à la norme NMB-003 du Canada.This device complies with RSS 210 of Industry Canada. This Class B device meets all the requirements of the Canadian interference-causing equipment regulations.Cet appareil numérique de la Classe B respecte toutes les exigences du Règlement sur le matériel brouilleur du Canada.Korea Warning Statements:당해무선설비는운용중전파혼신가능성이있음.NCC Notice:注意!依據低功率電波輻射性電機管理辦法第十二條經型式認證合格之低功率射頻電機,非經許可,公司、商號或使用者均不得擅自變更頻率、加大功率或變更原設計之特性或功能。
TP-Link Wi-Fi扩展器说明书
orScan for T etherLaunch the T ether app and log in with your TP-Link ID. If you don’t have an account, create one first.Method 2: Via a Web Browser1. Connect your computer or smartphone to the extender’s network . If you are using a computer, unplug the Ethernet cable if any.2. Launch a web browser, enter in the address bar, and log in.3. View or change extender settings as needed.Method 1: Via the T ether App1. Connect your smartphone to the extender‘s or router’s network.2. Launch the T ether app, select your extender, and log in.3. View or change extender settings as needed.Access Extender SettingsAfter setup, you can access extender settings via any of the methods below. Y ou can reselect host network, change extended network settings and more.Note: If your extender and router use the same network name, Method 1 is recommended.LED ExplanationTP-Link OneMesh router and extenders work together to form one unified Wi-Fi network. Walk through your home and stay connected with the fastest possible speeds thanks to OneMesh’s seamless coverage.OneMesh TM with Seamless RoamingSeamless RoamingDevices automatically switch between your router and extenders as you move through your home for the fastest possible speeds.Unified Wi-Fi Network Router and extenders share the same wireless settings, including network name, password, access control settings and more.Easy Setup and ManagementSet up a OneMesh network with a push of WPS buttons. Manage all network devices on the T ether app or at your router’s web management page.T o check full list of TP-Link OneMesh devices, scan the QR code, or visit https:///One-Mesh/compatibility .。
无线路由器安装及使用指导手册
由器(WAN口)上,然后把电脑也连接到路由器上(LAN口),如下图:注意事项插上电之后,路由器正常工作后系统指示灯(SYS灯或者是小齿轮图标)是闪烁的。
线路连好后,路由器的WAN口和有线连接电脑的LAN口对应的指示灯都会常亮或闪烁,如果相应端口的指示灯不亮或电脑的网卡图标显示红色的叉,则表明线路连接有问题,尝试检查下网线连接或换根网线试试注意事项Windows 2000/XP系统:双击电脑桌面右下角的本地连接"小电脑"图标(若电脑右下角没有网卡图标,进入方法为"开始--控制面板--网络连接--双击本地连接"),然后按照下图进行配置即可。
Windows 7/Vista系统:点击桌面右下角的网络连接图标,依次点击"打开网络和共享中心--更改适配器设置/管理网络连接--右击本地连接--属性"(或者点击"开始按钮--控制面板--网络和Internet--网络和共享中心--更改适配器设置/管理网络连接--右击本地连接--属性"),然后按照下图配置即可。
经过上面的配置后,您的电脑就会自动向路由器"索要"IP地址,路由器也会在接收到请求后分配参数给电脑,成功后点击电脑右下角的小电脑图标,在本地连接状态的"支持"选项卡里可以看到电脑获取的参数,如下图(以XP系统为例):步骤三:设置路由器上网①打开网页浏览器,在地址栏输入http://192.168.1.1打开路由器的管理界面,在弹出的登录框中输入路由器的管理帐号(用户名:admin 密码:admin);如果无法打开路由器的管理界面,请检查输入的IP地址是否正确以及是否把"."输成了中文格式的句号。
②选择"设置向导",点击"下一步";的描述选择您的上网方式);PPPOE:拨号上网,单机(以前没使用路由器的时候)使用Windows系统自带的宽带连接来拨号,运营商给了一个用户名和密码。