Genesys全中文操作手册
Genesys Framework 6.5安装手册
Genesys Framework 6.5安装手册安装Genesys Framework 6.5之前,最好先将机器加入到域里面,然后安装数据库。
可以选择安装不同类型的数据库,SQL Server或Oracle之类的,看情况和需要而定,这里,我们先安装SQL Server数据库,在Windows 2000 Server下面。
安装好数据库之后,我们就可以开始正式安装Genesys Framework了。
第一步,安装DBServer,在Genesys 6.5 New\ Management_Framework_6.5.004.00_ ENU\ services_layer下,由于用的是Windows 2000的操作系统,所以,在这里选windows,然后找到Setup.exe文件,双击执行安装。
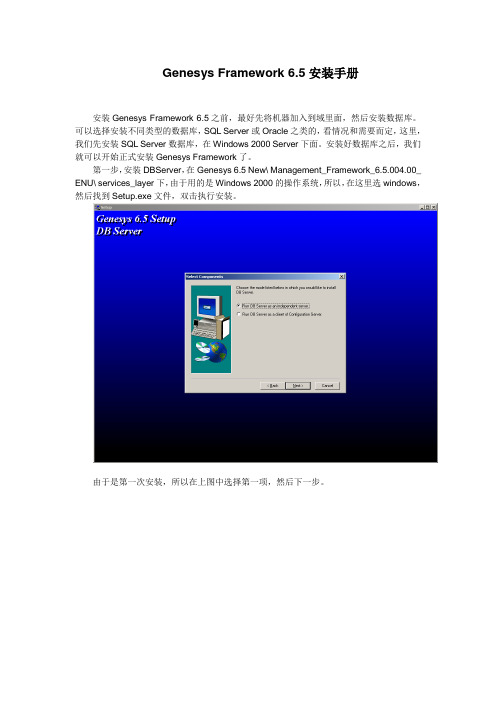
由于是第一次安装,所以在上图中选择第一项,然后下一步。
下一步。
在这里,我们选择是。
这里是安装程序自动配置的,继续点击下一步。
选择数据库类型,我们用的是SQL Server,所以在这里选dbclient_mssql,下一步。
这是选择安装目录,可以新建一个,用来和以后的DB Server区分,所以这里输入cfg_DBServer,然后点击OK,下一步,并将它设为服务,选择手动启动,下一步,直到此安装程序完成。
第二步,安装Configserver,在Genesys 6.5 New\ Management_Framework_6.5.004.00_ ENU\ configuration_layer\ configserver\single下,下面,选择windows,开始安装。
这个比较简单,安装目录使用默认的,同时也将它设为服务,选择手动启动,下一步,直到完成。
然后到C:\GCTI\ConfigurationServer里面,将其下的confserv.sample改名为confserv.cfg然后双击这个文件,进到里面去修改一些配置。
通赢生物GenNext NGS文库制备试剂盒使用手册说明书

JAPAN CHINA TOYOBO CO., LTD. TOYOBO (SHANGHAI) BIOTECH, CO., LTD. Tel (+81)-6-6348-3888 Tel (+86)-21-58794900 www.toyobo.co.jp/e/bio1F1753KGenNext TM NGS Library Prep KitLPK-101 24 reactions LPK-101T 8 reactions LPK-101L 96 reactionsStore at -20°CContents[1] Introduction [2] Components[3] Protocol1. End repair and A-tailing2. Adapter ligation3. Cleanup (after adapter ligation)4. Library amplification5. Cleanup (after library amplification)6. Size selection (optional) [4] Library QC [5] Application data [6] Troubleshooting [7] Related productsC AUTIONAll reagents in this kit are intended for research purposes. Do not use for diagnostic or clinical purposes. Please observe general laboratory safety precautions while using this kit.- illumina ® and MiSeq ® are registered trademarks of illumina, Inc.- Agencourt ® and AMPure ® are registered trademarks of Beckman Coulter, Inc.JAPAN CHINATOYOBO CO., LTD. TOYOBO (SHANGHAI) BIOTECH, CO., LTD.Tel (+81)-6-6348-3888 Tel (+86)-21-58794900 www.toyobo.co.jp/e/bio********************1[ 1 ] Introduction DescriptionGenNext™ NGS Library Prep Kit comprises the enzymes and buffers for preparinglibraries for illumina® sequencing from fragmented double-stranded DNA and PCRproducts.With this system, it is possible to conveniently and quickly convert a broad range (1ng -1μg) of input amounts of DNA into libraries for illumina® sequencing. Terminal repairand 3' end adenylation of the fragmented DNA can be conducted in the end repair andA-tailing step. Platform-specific adapters are then ligated to both ends of the DNAfragments.If required, a high-fidelity amplification step can be performed using the reagentsincluded in the GenNext™ NGS Library Prep Kit. Library Amplification Master Mixuses a highly-accurate PCR enzyme developed using genetically-modified KOD DNApolymerase. This minimizes the influence of GC bias on amplification and can amplifyvarious regions evenly.Process Workflow* Adapters and beads required for cleanup after adapter ligation and library amplification are notincluded.Features-Simple and quick operation flowThe steps from terminal repair and 3' end adenylation to adapter ligation can beconducted in the same container.Terminal repair and adenylation at the 3' end can beperformed in 15 minutes. Adapter ligation can be done in 15 minutes.Libraryamplification can be performed in cycles of 10 seconds’ annealing and 15 seconds’extension.-A wide range of input amountGenNext™ NGS Library Prep Kit is compatible with various inputs from 1 ng to 1 μg.JAPAN CHINATOYOBO CO., LTD. TOYOBO (SHANGHAI) BIOTECH, CO., LTD.Tel (+81)-6-6348-3888 Tel (+86)-21-58794900 www.toyobo.co.jp/e/bio********************2[ 2 ] Components -Low bias library amplificationLibrary Amplification Master Mix uses a highly-accurate PCR enzyme developed using genetically-modified KOD DNA polymerase. It minimizes the influence on GC-bias-induced amplification, and it is possible to amplify various regions evenly.The kits include the following reagents, which can be used for 24 (LPK-101), 8 (LPK-101T) and 96 (LPK-101L) reactions. All reagents should be stored at -20°C.GenNext TM NGS Library Prep Kit (Code No. LPK-101, LPK-101T, LPK-101L)LPK-101 LPK-101T LPK-101L End repair and A-tailing buffer*240 µL 80 µL 960 µLEnd repair and A-tailing enzyme*60 µL 20 µL 240 µLLigation solution 1,200 μL 400 µL 1,600 μL × 3 Library amplification master mix 690 µL 230 µL 1,380 μL × 2 Library amplification primer mix 138 µL 46 µL 552 µL* Do not store the mixed solution.End repair and A-tailing bufferEnd repair and A-tailing Buffer is optimized to convert fragmented DNA to repaired DNA having 5´-phosphorylated, 3´-dA-tailed ends. End repair and A-tailing buffer should be used with end repair and A-tailing enzyme.End repair and A-tailing enzymeEnd repair and A-tailing enzyme is optimized to convert fragmented DNA to repaired DNA having 5´-phosphorylated, 3´-dA-tailed ends. End repair and A-tailing enzyme should be used with end repair and A-tailing buffer. Please pipette slowly as this is viscous.Ligation solutionThis solution contains DNA Ligase and optimized reaction buffer. Please pipette slowly as this is viscous.Library amplification master mixThis is a 2×concentrated master mix containing genetically-modified KOD DNA polymerase, dNTPs (dATP, dGTP, dCTP, dTTP) and Mg2+.V arious regions of the genome can be amplified homogeneously even if these regions contain GC bias. The resulting amplicons are suitable for next-generation sequencing analyses.Library amplification primer mixThe primer mix (10×) is optimized to amplify illumina® libraries flanked by the P5 andP7 flow cell sequences.JAPAN CHINATOYOBO CO., LTD. TOYOBO (SHANGHAI) BIOTECH, CO., LTD.Tel (+81)-6-6348-3888 Tel (+86)-21-58794900 www.toyobo.co.jp/e/bio********************3[ 3 ] Protocol Required materials not included・Thermocycler・Fragmentation equipment or reagentGenNext™ NGS Library Prep Kit is compatible with mechanical and enzymatic fragmentation methods.・Adapters for illumina®GenNext™ NGS Library Prep Kit is compatible with adapters in which both the cluster generation sequences and sequencing are added during the ligation step, such as those routinely used in TruSeq (illumina®) and other similar library preparation workflows.・SPRI (Solid Phase Reversible Immobilization) paramagnetic beadAgencourt®AMPure®XP Beads (Beckman Coulter, cat. no. A63880, A63881) are recommended for use with the GenNext™ NGS Library Prep Kit.・10 mM Tris-HCl, pH 8.0 - 8.5Dilution of adapter stock in water and elution of DNA in water is not recommended.・Magnetic rack/stand for magnetic bead separation・80% ethanol (freshly prepared)1.End repair and A-tailing(1)Prepare the reaction mix in a tube or PCR plate as follows:Component Reaction volume(60 µL)Fragmented dsDNA 50 µLEnd repair and A-tailing buffer* 8 µLEnd repair and A-tailing enzyme mix* 2 µL* Premixes are stable for at least 24 hours at 4°C. Use the mixed solution within 24 hours.(2)V ortex gently or mix well by pipetting. Spin down briefly and proceed immediatelyto the next step.(3)Incubate the mixture as follows:30°C, 10 minutes65°C, 5 minutes4°C, hold(4)Proceed immediately with adapter ligation as described in the next protocol.JAPAN CHINATOYOBO CO., LTD. TOYOBO (SHANGHAI) BIOTECH, CO., LTD.Tel (+81)-6-6348-3888 Tel (+86)-21-58794900 www.toyobo.co.jp/e/bio********************42.Adapter Ligation(1)Dilute adapter stocks in 10 mM Tris-HCl, pH 8.0 - 8.5, as follows:FragmentedDNA per 50 µL End repair and A-tailing reaction Adapter stock concentrationAdapter :insertmolar ratio1 µg15 µM10:1500 ng15 µM20:1250 ng15 µM40:1100 ng15 µM100:150 ng15 µM200:125 ng7.5 µM200:110 ng 3 µM200:15 ng 1.5 µM200:12.5 ng750 nM200:11 ng300 nM200:1(2)In the same plate/tubes in which end repair and A-tailing was performed, prepare thereaction mix as follows:Component Reaction volume (110 µL)End repair and A-tailing reaction product 60 µLAdapter stock 5 µLLigation solution 45 µL(3)Mix well and centrifuge briefly.(4)Incubate the mixture as follows:20°C, 15 minutes4°C, hold(5)Immediately proceed to the next process (cleanup).3.Cleanup (after adapter ligation)(1)Perform a 0.8× SPRI-bead-based cleanup as follows:Component V olume (198 µL)Adapter ligation reaction product 110 µLAgencourt® AMPure® XP* 88 µL* Ensure that beads are fully resuspended.(2)Mix well by vortexing and/or pipetting up and down multiple times.JAPAN CHINATOYOBO CO., LTD. TOYOBO (SHANGHAI) BIOTECH, CO., LTD.Tel (+81)-6-6348-3888 Tel (+86)-21-58794900 www.toyobo.co.jp/e/bio********************5(3)Incubate the plate/tubes at room temperature for 5 - 15 minutes.(4)Place the plate/tubes on a magnetic stand to capture the beads. Incubate until thesolution is clear.(5)Carefully remove and discard the supernatant.(6)A dd 200 μl 80% ethanol in the plate/tubes on the magnetic stand.(7)Incubate the plate/tubes on the magnetic stand at room temperature for 30 seconds.(8)Carefully remove and discard the ethanol.(9)A dd 200 μl 80% ethanol in the plate/tubes on the magnetic stand.(10)Incubate the plate/tubes on the magnetic stand at room temperature for 30 seconds.(11)Carefully remove and discard as much ethanol as possible. Be careful not to disturbthe beads.(12)Air dry the beads at room temperature for 3 - 5 minutes while the plate/tubes are onthe magnetic stand with lids open.NotesOverdrying the beads may reduce the yield.(13)Remove the plate/tubes from the magnetic stand.(14)Resuspend the b eads in 25 μL elution buffer (10 mM Tris-HCl, pH 8.0 - 8.5) andincubate the plate/tubes at room temperature for 2 minutes. If proceeding with size selection (optional: see [3] 6), resuspend the beads in 55 μL elution buffer.(15)Place the plate/tubes the magnetic stand to capture the beads. Incubate until thesolution is clear.(16)Transfer the supernatant to a new plate/tubes.Purified libraries can be stored at–20°C.4.Library Amplification(1)Prepare a reaction mix as follows:Component Reaction volume (50 μL)Library amplification master nix (2×) 25 μLLibrary amplification primer mix (10×) 5 μLAdapter-ligated library 20 μLJAPAN CHINA TOYOBO CO., LTD. TOYOBO (SHANGHAI) BIOTECH, CO., LTD. Tel (+81)-6-6348-3888 Tel (+86)-21-58794900 www.toyobo.co.jp/e/bio ********************6(2) Mix well and centrifuge briefly.(3) Amplify using the following cycling conditions:(amplified libraries can be stored at –20°C.) StepTemp Duration Cycles Initial denaturation 94°C 2 minutes 1 Denaturation 98°C 10 seconds Minimum number required for optimal amplification (see below)Annealing 60°C 10 seconds Extension 68°C 15 secondsHOLD4°C-1Recommended cycle numbers* The optimal number of amplification cycles may be 1 - 3 cycles higher or lower, depending on the sample type and size distribution of the input DNA.5. Cleanup (after library amplification) (1) Perform a 1× SPRI-bead-based cleanup as follows:ComponentV olume (100 μL)Library amplification reaction product 50 μL Agencourt ® AMPure ® XP*50 μL* Ensure that beads are fully resuspended.(2) Mix well by vortexing and/or pipetting up and down multiple times. (3) Incubate the plate/tubes at room temperature for 5 - 15 minutes.(4) Place the plate/tubes on a magnetic stand to capture the beads. Incubate until thesolution is clear.(5) Carefully remove and discard the supernatant.Input DNA (into end repair and A-tailing reaction) Cycles* 1 μg 0 500 ng 0 250 ng 0 100 ng 0-2 50 ng 3-5 25 ng 5-6 10 ng 7-9 5 ng 9-11 2.5 ng 11-13 1 ng 13-15JAPAN CHINATOYOBO CO., LTD. TOYOBO (SHANGHAI) BIOTECH, CO., LTD.Tel (+81)-6-6348-3888 Tel (+86)-21-58794900 www.toyobo.co.jp/e/bio********************7(6)A dd 200 μl 80% ethanol in the plate/tubes on the magnetic stand.(7)Incubate the plate/tubes on the magnetic stand at room temperature for 30seconds.(8)Carefully remove and discard the ethanol.(9)A dd 200 μl 80% ethanol in the plate/tubes on the magnetic stand.(10)Incubate the plate/tubes on the magnetic stand at room temperature for 30 seconds.(11)Carefully remove and discard as much ethanol as possible. Be careful not to disturbthe beads.(12)Air dry the beads at room temperature for 3 - 5 minutes.NotesOverdrying the beads may reduce the yield.(13)Remove the plate/tubes from the magnetic stand.(14)Resuspend the beads in an appropriate volume of elution buffer (10 mM Tris-HCl,pH 8.0 - 8.5). Incubate the plate/tubes at room temperature for 2 minutes. If proceeding with size selection (optional: see [3] 6), resuspend the beads in 55 μL elution buffer.(15)Place the plate/tubes on a magnetic stand. Incubate until the solution is clear.(16)Transfer the supernatant to a new plate/tubes. Purified, amplified libraries can bestored at –20°C. Proceed with size selection, library quality control or sequencing, as appropriate.6.Size selection(optional)If required, size selection may be performed at several points in the process workflow, for example, prior to end repair and A-tailing, after the post ligation cleanup or after library amplification. Size selection results in a narrower library size distribution, but at the cost of a much amount of library. Below is an example of selecting a library of 250 - 450 bp.(1)Add 0.6× SPRI beads to the library as follows:Component V olume (80 μL)Library 50 μLAgencourt® AMPure® XP* 30 μL* Ensure that beads are fully resuspended.JAPAN CHINATOYOBO CO., LTD. TOYOBO (SHANGHAI) BIOTECH, CO., LTD.Tel (+81)-6-6348-3888 Tel (+86)-21-58794900 www.toyobo.co.jp/e/bio********************8(2)Mix well by vortexing and/or pipetting up and down multiple times.(3)Incubate the plate/tubes at room temperature for 5 - 15 minutes.(4)Place the plate/tubes on a magnetic stand. Incubate until the solution is clear.(5)Transfer 75 μl the supernatant to a new plate/tubes.(6)Add 0.13× SPRI beads to the supernatant as follows:Component V olume (85 μL)Library (supernatant) 75 μLAgencourt® AMPure® XP* 10 μL* Ensure that beads are fully resuspended.(7)Mix well by vortexing and/or pipetting up and down multiple times.(8)Incubate the plate/tubes at room temperature for 5 - 15 minutes.(9)Place the plate/tubes on a magnetic stand. Incubate until the solution is clear.(10)Carefully remove and discard the supernatant.(11)A dd 200 μL 80% ethanol in the plate/tubes on the magnetic stand.(12)Incubate the plate/tubes on the magnetic stand at room temperature for 30 seconds.(13)Carefully remove and discard the ethanol.(14)A dd 200 μL 80% ethanol in the plate/tubes on the magnetic stand.(15)Carefully remove and discard as much ethanol as possible. Be careful not to disturbthe beads.(16)Air dry the beads at room temperature for 3 - 5 minutes.NotesOverdrying the beads may reduce the yield.(17)Remove the plate/tubes from the magnetic stand.(18)Add the required amount (e.g., 20 μL) of 10 mM Tris-HCl (pH 8.0 - 8.5) to theplate/tubes and incubate these at room temperature for 2 minutes.(19)Place the plate/tubes on a magnetic stand. Incubate until the solution is clear.(20)Transfer the supernatant to a new plate/tubes. Purified libraries can be stored at–20°C.JAPAN CHINATOYOBO CO., LTD. TOYOBO (SHANGHAI) BIOTECH, CO., LTD.Tel (+81)-6-6348-3888 Tel (+86)-21-58794900 www.toyobo.co.jp/e/bio********************9[ 4 ] Library QC Library quantificationLibrary quantification can be performed using GenNext™ NGS Library QuantificationKit (Code No. NLQ-101) or equivalent. The kit allows the specific and accuratequantification of libraries bearing P5 and P7 adapters and can be applied to flow cellamplification.Library quality controlAssess the quality of the library using a capillary electrophoresis device such as AgilentBioAnalyzer or equivalent.JAPAN CHINA TOYOBO CO., LTD. TOYOBO (SHANGHAI) BIOTECH, CO., LTD. Tel (+81)-6-6348-3888 Tel (+86)-21-58794900 www.toyobo.co.jp/e/bio ********************10[ 5 ] Application data1. Example of library quantification and quality controlLibraries were prepared from fragmented human genomic DNA, E. coli genomic DNA, or 100 bp DNA ladder with the GenNext TM NGS library prep kit or another company’s Kit (Company A).Libraries were amplified using 0-11 cycles of PCR and the size distribution checked using a MultiNA (Shimadzu Corporation). Library quantifications were performed using a GenNext™ NGS library quantification kit (code NLQ-101).There was no difference in the distribution of libraries between the GenNext™ NGS library prep kit and the other company’s kit (Company A). For most illumina ® sequencing platforms, 2 - 4 nM for each library is the preferred starting concentration for denaturation and dilution guidelines. These data illustrate that the GenNext™ NGS library prep kit achieved sufficient adapter-ligated library yields, even with low input amounts of DNA.Adapters of approximately 60 bp are ligated to both ends of the insert DNA fragments, so the total size of DNA fragments will increase by approximately 120 bp.JAPAN CHINATOYOBO CO., LTD. TOYOBO (SHANGHAI) BIOTECH, CO., LTD.Tel (+81)-6-6348-3888 Tel (+86)-21-58794900 www.toyobo.co.jp/e/bio********************112.Example of next generation sequencing resultsLibraries were prepared from 1μg or 1ng of E. coli genomic DNA with the GenNext TM NGS library prep kit or another company’s library construction kit (Company A). Libraries prepared from 1ng DNA were amplified using 12 PCR cycles. Sequencing was performed on an illumina® MiSeq® and data analyzed using CLC Genomics Workbench (QIAGEN / CLC bio). Sequencing reads were down-sampled to 1 million per library prior to analysis.These data illustrate that GenNext TM NGS library prep kit enables high quality sequence data.JAPAN CHINA TOYOBO CO., LTD. TOYOBO (SHANGHAI) BIOTECH, CO., LTD. Tel (+81)-6-6348-3888 Tel (+86)-21-58794900 www.toyobo.co.jp/e/bio ********************12[ 6 ] Troubleshooting[ 7 ] Related productsProduct namePackage Code No. NGS Library quantification for illumina ®’s instrumentGenNext™ NGS library quantification kit 500 reactionsNLQ-101Symptom CauseSolutionPresence of adapter dimersLow-quality adapter- Avoid excessive freezing and thawing of adapter stock solutions.- Dilute and store adapters in 10 mM Tris-HCl (pH 8.0 - 8.5).Non-optimal adapter concentration- The optimal concentration of adapter should bedetermined by preliminary tests: try the recommended adapter concentration (see [3] 2).- If the yield of the library is sufficient, repeat thepurification process or perform size selection (see [3] 6). Low yieldIncorrect ratio of added magnetic beads reagent and library solution - Ratio of SPRI magnetic bead reagent and library solution used for purification greatly influences size distribution and yield. Please check whether the liquid volume proportion is accurate.Overdrying the magnetic beads- Overdrying the magnetic beads may reduce the yield. Air dry the beads at room temperature within 5 minutes.。
Spectronic GENESYS 产品说明书
Analyze • Detect • Measure • Control ™Versatile UV-Vis for multiple laboratory applicationsSpectronic ™GENESYS ™spectrophotometers from Thermo Electron Corporation are ideal for busy laboratories that need fast, accurate quantitative measurements. Whether your application is research, QC, biotechnology or water, Spectronic GENESYS systems offer the versatility, ease-of-use and high-quality performance to meet your laboratory needs.When high sample throughput and reliability are critical, count on Spectronic GENESYS. This system will prove to be an indispensable tool for increasing productivity in your lab. With minimal training and set up,you are ready to go. Pre-programmed tests allow you to quickly get the answers you need – and results you can trust. Even with first-time users, you are ensured that your test is being run correctly. In addition, the ability to print out your results with instrument parameters allows you to comply with regulatory requirements.Get the System You Need, for Today and TomorrowSpectronic GENESYS spectrophotometers will run tests that cover a wide range of applications. The system is available in two models to suit your laboratory requirements.The Spectronic GENESYS 5 is the ideal system to handle your daily analyses such as concentration, rate measurements, and survey scans. For advanced capabilities and higher performance, choose Spectronic GENESYS 2. This system offers greater scanning features and the ability to perform more complex data manipulations, which is useful for applications such as advanced kinetics studies and quanti fication of your scans. Both systems include an automatic 8-position sample holder as standard. Or you can expand the sample handling of your Spectronic GENESYS with an accessory, and you have a cost-effective solution to fit your application and your budget.Get the Whole PictureSpectronic GENESYS instruments have a backlit, LCD screen which displays test parameters, easy-to-read instrument status icons, and test results in tabular or graphical format. The screen gives details that analog and one-line digital displays cannot provide.The color display of the Spectronic GENESYS 2further enhances data presentation.5Flexible, removable cell holder saves timeAdvanced Kinetics:Kinetics data showing Standard Curve: Second-order standard curve Derivative Scans:Holmium oxide absorbanceSoftDrink SoftCardles can be transferred from directly to a variety of printersor plotters, converted to ASCIIformat, or transferred analysis or long term archiving.Powerful Data Acquisition sensitivity, and arithmetic functions usingconstants or other spectra.Simple Kinetics:Lactate dehydrogenase deter-3-Point Net Absorbance:Background-corrected Performance Validation:Noise test at 0 APeristaltic Pump and One-Position Thermo-electricUSA:5225 Verona Road Madison, WI 53711-4495Tel: +1 800 201 8132, +1 608 276 6100Fax: +1 608 273 5046Email:***********************©2003 Thermo Electron Corporation. All rights reserved worldwide. We make no warranties, expressed or implied, in this productsummary, and information is subject to change without notice. All product and company names are property of their respective owners.P/N 169-731500 5/03BR_S0392UK:8 Mercers Row Cambridge, CB5 8HY, UK Tel: +44 (0)1223 345410Fax: +44 (0)1223 345411Email:*************************Switzerland:En Vallaire Ouest C case postale, CH-1024, Ecublens Tel: +41 (0)21 694 71 11Fax: +41 (0)21 694 71 12Email:*************************/spectronic Spectral Slitwidth 5 nm2 nmOptical System Split-beam, dual detectors Split-beam, dual detectors Wavelength Range 200 to 1100 nm 200 to 1100 nm Accuracy ±1 nm±1 nmPrecision ±0.5 nm (ASTM method #E275-83)±0.5 nm (ASTM method #E275-83)Display Graphic, backlit monochrome LCD screen Graphic, backlit color LCD screen Display Range – 0.3 to 4.0 A– 0.3 to 4.0 APhotometric Readout Absorbance and % Transmittance Absorbance and % Transmittance Range – 0.1 to 3.0 A; 0 to 125 %T – 0.1 to 3.0 A; 0 to 125 %T Accuracy*±0.003 A from 0 to 0.3 A±0.003 A from 0 to 0.3 A±1% of reading from 0.3 to 2 A ±1% of reading from 0.3 to 2 A ±2% of reading from 2A to 3 A ±2% of reading from 2 A to 3 A Noise ±0.001 A at 220 and 340 nm at 0 A ±0.001 A at 220 nm at 0 A, ±0.0015 A at 340 nm at 0 A Drift±0.002 A/hour at 340 nm ±0.002 A/hour at 340 nm Stray Radiant Energy**0.05%T at 220 nm and 340 nm 0.05%T at 220 nm and 340 nm Scan Speeds300 nm/min (1 pt/1 nm), or SLOW: up to 200 nm/min (1 pt/0.3 nm)900 nm/min (1 pt/3 nm)MEDIUM: up to 600 nm/min (1 pt/1 nm)FAST: up to 1800 nm/min (1 pt/3 nm)TURBO: up to 2400 nm/min (1 pt/6 nm) Slew Speed27,000 nm/min27,000 nm/min(across full wavelength range)(across full wavelength range)Standard Instrument CapabilitiesAbsorbance, % Transmittance, and Absorbance, % Transmittance, and Concentration (with factor or standard), Concentration, File Manager, Program File Manager, Program Manager, outputManager, output to internal printer, Epson to internal printer, Epson or HP Laserjet printer, or HP Laserjet printer, HPGL plotters, or HPGL plotters, or computer in ASCII or Lotus computer in ASCII or Lotus format.format. Application programs include: Advanced Scanning program includes:Standard curve, absorbance ratio,Data Acquisition: baseline collection, area-under-a-curve, 3-point net, simple kinetics, scanning at slow, medium, fast, andsurvey scan.turbo speeds, real-time derivative scanning, repeat scanning. Color Display of up to 8 scans, tabular display of data.Data Processing: Peak & valley labeling, log A, A to %T, derivative, 3-point net, area-under-a-curve, add/subtract constants/scans, spectrum smoothing.Standard Cell Holder 8-position, instrument controlled 8-position, instrument controlled Standard Interfaces RS-232C and Centronics ports RS-232C and Centronics ports Power Requirements 115 V, 50/60 Hz; 230 V, 50/60 Hz 115 V, 50/60 Hz; 230 V, 50/60 Hz Dimensions 47.9 cm (18.9") (w) x 55.5 cm (22.3") (d)47.9 cm (18.9") (w) x 55.5 cm (22.3") (d)x 21.0 cm (8.3") (h)x 21.0 cm (8.3") (h)Weight12.3 kg (27 lbs)12.3 kg (27 lbs)* Measured using NIST 930D filters** 220 nm, 340 nm, and 400 nm measurements with Spectronic Standards (#333150); 220 nm measurement with deuterium lamp; 340 nm and 400 nm measurements with tungsten-halogen lamp。
Genelec 1034B操作手册说明书

Genelec 1034BControl Room Monitoring SystemOperating Manualsingle system. A pair is shipped in a single box, containing two cabinets, two amplifier units, two mains connecting cables, two LED connecting cables, two loudspeaker connecting cables and one Allen key. (See Fig 1)Before installing the system, check all items for damage and omissions. If there are any damaged products, contact directly the distributor and insurance agent. If there are any missing compo-nents, contact your local dealer or GENELEC.2.2 AMPLIFIER POSITIONINGThe Genelec 1034B amplifier electronics are encased in two standard 19" 7U rack cases. The unit should be well ventilated to prevent excessive overheating, there must be a supply of air to the front and rear of the amplifier unit. If the system overheats it will stop operating until a safe temperature is reached.Make sure that the amplifier is positioned so that the speaker connecting cables will reach. Longer cable lengths can be or-dered from GENELEC upon special re-quest. A space 100 mm (4") deep should1. DESCRIPTIONThe GENELEC 1034B monitor is designed for neutral sound reproduction at high SPLs in large control rooms. The system comprises of a 160 litre cabinet and a 19"7U rack mount amplifier unit.The speaker cabinet contains two 305mm (12") bass drivers, a 130mm (5")midrange, and a 25mm (1") treble driver.The midrange and treble drivers are mounted in a Genelec Directivity Control Waveguide (DCW) which can be rotated through ±90° for either horizontal or verti-cal mounting. The cabinet low frequency -3dB point is at 32 Hz and the bass re-sponse extends down to 27 Hz. The high frequency response extends up to 22kHz (-3dB).Each amplifier unit contains a 3 channel active crossover, driver overload protec-tion circuits, and 4 separate power ampli-fiers producing 2 x 400W, 350W and 120W of short term power in the bass,midrange, and treble channels respec-tively. The crossover filter incorporates tone controls to enable the user to accu-rately match the speaker to the local acoustic environment.2.3 LOUDSPEAKER POSITIONINGThe 1034B control room monitor is de-signed to be flush mounted in either the vertical or horizontal configuration. The DCW should be rotated so that the treble and midrange drivers align vertically. This ensures that optimum stereo symmetry is obtained.IMPORTANT-The DCW plate is heavy,care must therefore be taken when re-moving and replacing the DCW. To rotate the DCW plate, proceed as follows:•Place the speaker in its intended lis-tening orientation.•Unscrew the eight M5 fixing screws on the edges of the plate using the 4mm Allen key provided with the system.•Carefully pull the plate a small distance away from the cabinet.•Rotate the DCW so that the midrange and treble drivers are aligned vertically (treble driver on top) and remount the DCW plate reversing the procedure above.Fig 1. The 1034B system.Fig 2.2 Vertical configuration.2.4 FLUSH MOUNTING OF THE SPEAKERAlthough the 1034B may be used suc-cessfully as a free standing speaker, flush mounting is strongly recommended for acoustical reasons. Flush mounting im-proves the bass response and efficiency and also enhances the midrange tran-sient and frequency response.The speaker has its acoustical axis mid-way between the midrange and treble drivers. This axis should be used as the listening and measuring axis of the sys-tem. (See Fig 2.1 and Fig 2.2)The listening position should be between 2 ... 3.5m (6½ ... 11½') from the speakers. The speaker should be aimed so that theNote the following:• A space 50…100 mm (2..4") wide canbe left around the speaker.•Cover the space around the speakerwith a facing panel, this should be fixed tothe wall. Leave a gap of about 5..10 mm(¼..½") between the speaker and thepanel. Fill this gap with a soft rubbergasket to allow for possible cabinet move-ment.•Ensure that the speaker cables canreach the rear of the speakers.•If a light (e.g. wooden) wall is used, thespeaker cabinet should be mounted onvibration isolators, with a resonant fre-quency of around 2…8Hz, to preventvibrations from being transmitted to thewall and impairing the low frequencyperformance. The space around thecabinet should be filled with absorbentmineral wool or foam plastic. The wallsmust be well braced.•For a solid wall (e.g. concrete), thespeaker may be directly mounted to thewall without vibration isolators. The spacearound the cabinet should be filled withmineral wool or sand bags.Discontinuities in the speaker mountingwall will cause diffraction, which leads toinferior frequency response and stereoimagery, so:•Ensure that the cabinet is flush with thesurface of the wall.•If a decorative cloth frame is used tocover the wall, make sure that the edgesadjacent to the speaker are less than 20mm (3/4") deep. The cloth must be verythin Tricot or acoustically transparentmaterial, otherwise the high frequencyresponse of the system will be adverselyaffected. GENELEC approved clothgrilles are available.2.5 RECESS FOR LOUDSPEAKERCONNECTORSThe speaker connector cable extends100 mm (4") from the rear panel of theloudspeaker. Therefore, a space at least100 mm (4") deep must exist to allow forthe cable behind the loudspeaker. Thedimensions of the recess should be atleast 100x140x75 mm (4"x51/2"x3"), asshown in Fig. 6. Note that the connectorsare positioned off-centre. Therefore, if theloudspeaker is rotated for a left and rightchannel, the recess will be at differentheights on the left and right side. Thisoccurs when the speakers are mounted inthe horizontal configuration.vertical acoustical axis of the two speak-ers meet midway between the standingand seated listening position (1.4m - 4'7"from the floor). This allows the correctfrequency response to be received by astanding or seated person. The speakersshould not be mounted too high as thisincreases the required vertical tilt of thespeaker and reduces the optimum listen-ing area.The ceiling, side walls and especially therear wall should be acoustically absor-bent at low frequencies. The speakermounting wall should be acoustically hardand therefore reflective. The speakermounting wall should be angled so thatthe speakers are correctly aimed. Greatcare should be taken over how thespeaker is mounted into the wall.Fig 3. Speaker mounting.Side view (top), Plan view (bottom).Fig 4. Speaker mounting details.Fig 5. Eliminating discontinuities.Fig 6. Recess for loudspeaker connec-tors. (Front view)2.6 CONNECTING CABLEThe two connecting cables have different types of connectors at each end, a loud-speaker connector and an LED connec-tor. The loudspeaker connector is larger than the LED connector, therefore the connectors cannot be inserted into the wrong socket. Insert the connectors into the appropriate sockets found on the rear panel of the amplifier unit and the rear of the loudspeaker.To insert the connectors proceed as follows:•Insert the connectors into the sockets and turn the connectors clockwise. The connectors lock automatically.•The electrical connections are only made when the connectors are fully in-serted.To remove the connectors proceed as follows:•Pull the release lever on the connector and turn the connector counterclockwise simultaneously. The connector can now be removed from the socket.for suggested starting positions of the tone controls in four different room types.The table shows that the midrange and treble controls should be left in their free field positions, since these frequencies are controlled by the speaker more than the room. Acoustical measurements, and precise listening tests should be com-pleted by qualified personnel, to deter-mine the optimum tuning of the speaker to the room.3.3 FREQUENCY RESPONSE MEA-SUREMENT IN THE CONTROL ROOMThe overall sound balance experienced at the listening position can, to a certain extent, be measured with steady state signals (e.g. pink noise, warble sine etc.)and a corresponding frequency analyser.However, the results obtained are very sensitive to the measuring methods and the equipment used.Recommended Measuring Equipment.Microphone•Always use a laboratory grade mea-surement microphone.•B&K 4134 (or similar) for far field, 4133or 4165 (or similar) for near field below 8kHz.•B&K 4004 and 4007 (or similar) up to 8kHz.Do not use a microphone having a polar pattern other than omnidirectional, or one not having an accurately known fre-quency response.3. ACOUSTICAL SETUP3.1 INPUT SENSITIVITY ADJUSTMENTThe input sensitivity of the 1034B can be adjusted to match the output signal level of the driving source . This is done by turning the 'Input sensitivity' trimmer,which is accessed through the front panel of the amplifier unit. However, an accu-rate left/right balance is obtained when the trimmer is set to the fully clockwise 'cal' position. Leaving the input sensitivity trimmer in the 'cal' position is therefore recommended.To obtain the maximum sound pressure level of 123 dB SPL, with the input sensi-tivity set to -6 dBu, a signal level of +20dBu is required.3.2 ADJUSTMENT OF THE TONE CON-TROLSThe frequency response of the system should be adjusted to match the listening room's acoustic environment. This adjust-ment is made using the tone controls,'BASS TILT', 'BASS ROLL-OFF', 'BASS LEVEL', 'MIDRANGE LEVEL', and'TREBLE LEVEL'. These controls are ac-cessed through the amplifier unit's front panel. The default setting of these con-trols is in the 'off' position, which yields a flat frequency response when the speaker is operated in an anechoic environment.Note that only one switch in each control group should be in the 'on' position.The room normally boosts the low fre-quencies compared with free field condi-tions. To get a flat room response, adjust-ments to the bass tone control switches are usually required. See table 1 belowTable 1. Suggested starting positions for tone controls.Fig 8. Speaker/LED connector Fig 7. Amplifier unit connectors.•Reflections from nearby boundaries (Floor, ceiling, walls) interfering with direct sound.Incorrect vertical speaker alignment can cause interference dips at the upper crossover frequency (around 3.2kHz).Hence care should be taken aiming the speaker correctly towards the listening position. (See Fig 3.)4. OVERLOAD INDICATORSEach speaker is provided with two LED's marked 'CLIP PROTECT (FAULT)' and 'READY'. The green 'READY' LED indi-cates that the amplifier system power is switched on, and that the speaker is ready for use. The red 'CLIP PROTECT (FAULT)' LED indicates that the amplifier system is overloaded or that the driver protection circuit is activated. If the red LED lights, reduce the signal level so that the LED stops blinking. If this LED stays lit constantly, then the amplifier thermal protection circuitry has activated. Let the amplifier cool down, and ensure that the amplifier is adequately ventilated.5. MAINTENANCEThere are no user serviceable parts within the amplifier unit. Any maintenance of the unit should only be undertaken by quali-fied service personnel.Ensure that only fuses of the appropriate voltage and current ratings are used if a fuse has to be replaced.REMEMBER to disconnect the power supply by removal of the mains cable before changing a fuse.Clean the amplifier unit's air filter every six months, or more frequently in dusty envi-ronments. The air filter is located behind the grille, found to the left of the frontpanel. The air filter can be cleaned with a vacuum cleaner without removing the grille.6. SAFETY CONSIDERATIONSAlthough the 1034B has been designed in accordance with international safety stan-dards, to ensure safe operation and to maintain the instrument under safe oper-Signal SourceUse a signal source which is suitable for the type of analyser being used. Do not use a noise generator which is integrated into a mixing console, since these signal generators tend to have a very coarse spectrum content and are not intended to be used for measurement purposes.AnalyserAny professional quality real time analyser or tracking plotter can be used. (1/3 or 1/1octave analysis is usually sufficient for frequency response balancing)3.4 NEAR FIELD MEASUREMENT.This measurement gives an indication of the direct sound radiation of the loud-speaker below 1kHz.•Set the microphone 1m away from the loudspeaker on the acoustic axis. (See Fig 2.1 and 2.2)•Measure the frequency response of the speaker, and adjust the tone controls to achieve a flat frequency response below 1kHz.Make sure that any sound reflecting ob-jects such as chairs etc. are removed from the close proximity of the loud-speaker.3.5 LISTENING POSITION MEASURE-MENT.Once the near field frequency response measurement has been made, the fre-quency response at the listening position can be determined by the same means.When comparing the results, the following items should be noted.High frequency roll-offThis is due to the following physical fac-tors:•Increasing room and air absorption with higher frequencies.•Increasing loudspeaker and micro-phone directivity with increasing fre-quency.Low frequency irregularities.These are caused by•Insufficient standing wave absorption in the control room.ating conditions, the following warnings and cautions should be observed.Servicing and adjustment should only be performed by qualified service personnel.Opening the amplifier's front panel isstrictly prohibited except by such persons who are aware of the hazards involved.It is forbidden to use this product with an unearthed mains cable, which may lead to personal injury.Warning!This equipment is capable of delivering sound pressure levels in excess of 85dB,which may cause permanent hearing damage.7. GUARANTEEThis product is guaranteed for a period of ONE year against faults in materials or workmanship. Refer to supplier for full sales and guarantee terms.Genelec Oy, Olvitie 5FIN - 74100 IISALMI, FINLAND Phone:+358 17 813311Telefax:+358 17 812267E-mail:*******************Web:Genelec Document DR34001COPYRIGHT GENELEC OY 1998All data subject to change without prior noticeLower cut-off frequency,-3 dB:< 32 Hz Upper cut-off frequency,-3 dB:> 20 kHzFree field frequency response of system:33 Hz - 20 kHz (± 2.5 dB)Maximum short term sine wave acoustic output on axis in half space, averaged from 100 Hz to 3kHz:@ 1m > 123 dB SPL Maximum long term RMS acoustic output in same conditions with IEC-weighted noise (limited by driver unit protection circuit):@ 1m > 118 dB SPL Maximum peak acoustic output per pair @ 2m from the engineer with music material:> 125 dB Self generated noise level in free field @ 2m on axis:< 15 dB(A)Harmonic distortion at 100 dB SPL @ 1m on axis:Freq: 50...200 Hz <1%200...10k Hz <0.5%Drivers:Bass 2 x 305 mm (12") cone Mid 1 x 130 mm (5") cone Treble 1 x 25 mm (1") metal dome Weight:Speaker 73 Kg (161 lb)Amplifier30 Kg(66 lb)Speaker dimensions (Horizontal mounting):Height 700 mm (279/16")Width 890 mm (35")Depth 383 mm (15")*Amplifier dimensions:Height 310 mm (123/16")Width 483 mm (19")Depth250 mm(913/16")**Note that the cable connectors requireadditional 100 mm (4") of space behind both the amplifier and the speaker cabinetInput connector: XLR femalepin 1gnd pin 2+pin 3-Input impedance:10 kOhm balanced Input level for 100 dB SPL output @ 1m:variable from +6 to -6 dBu Input level for maximum short term output of 126dB SPL @ 1m:variable from +32 to +20 dBu Subsonic filter below 27 Hz :18 dB/octave Ultrasonic filter above 22 kHz:12 dB/octave Crossover frequencies:Bass/Mid 400 Hz Mid/Treble3.2 kHzCrossover acoustical slopes:>24 dB/octaveLevel control operating range in 1 dB steps:Bass from 0 to -6 dB & MUTE Mid from 0 to -6 dB & MUTE Treble from 0 to -6 dB & MUTE Bass roll-off control in 2 dB steps:from 0 to -8 dB @ 29 Hz Bass tilt control operating range in 2 dB steps:from 0 to -8 dB @ 50 Hz The 'CAL' position is with all tone controls set to 'off' and input sensitivity control to maximum and corresponds to a maximally flat free field response.Fig 9. The above curves illustrates the effect of the 'bass tilt','bass roll-off' and 'bass',' mid' and 'treble' level controls on the free field response, measured at 2 m.Fig 10. The upper curve group shows the horizontal directivity characteristics of the 1034B in its horizontal configuration mea-sured at 2m. The lower curve is a 1/6 octave power response measurement, derived from 144 directivity measurements.SYSTEM SPECIFICATIONSAMPLIFIER SECTIONCROSSOVER SECTIONBass amplifier output power with an 8 Ohm load:Short term 2 x 400 W Mid amplifier output power with a 8 Οhm load:Short term 350 W Treble amplifier output power with an 8 Ohmload:Short term 120 W Long term output power is limited by driver unit protection circuitry.Slew rate:80 V/µsAmplifier system distortion at nominal output:THD <0.05%SMPTE-IM <0.05%CCIF-IM <0.05%DIM 100<0.05%Signal to Noise ratio, referred to full output:Bass >100 dB Mid >100 dB Treble >100 dB Mains voltage: 100/200 or 115/230V Voltage operating range at230V setting:207 - 244 V (-10/+6 %)115V setting:104 - 122 V (-10/+6 %)Power consumption:Idle 70 W Full output 1000W。
Elecsys2010 操作说明

ELECSYS 2010操作说明1. 打开分析仪1.1简介在测试样品前,必须检查样本盘是否存在,是否打开打印机开关和分析仪开关,是否在软件上记录了你的操作号。
1.2检查样本盘打开操纵台前的门,检查样本盘是否在样本盘槽内。
1.3打开打印机如果打印机未开启,打开位于打印机前右侧的开关。
当打印机打开时,绿灯亮。
同时检查打印纸是否足够。
注意:打印机型号可根据国家而不同1.4打开分析仪分析仪的开关通过位于操纵台前的开关来控制。
按开关的右端使之处于ON的位置,小绿灯亮表明系统已打开。
打开分析仪后,打开PROCELL和CLEANCELL瓶盖。
1.5登录开机短时间后,触摸式屏幕显示的是分析仪关闭时的最后一次软件记忆内容。
根据下列程序操作进入操作者ID号码:1.按STATUS进入STATUS屏幕,如下所示。
不管系统是否被使用,OPERATOR ID总在屏幕上的相同位置。
2.按OPERATOR ID,输入你的号码(1-99)。
3.按ENTER。
2.登录检查2.1简介每天测试样品前要进行登录检查。
2.2目测检查×探针是否良好,是否有粘附物。
×管道是否变形和弯曲。
×吸样针是否有气泡,如有,需冲洗。
×吸样管和孵育器表面保持干净,吸样管和孵育器上液体的溢出可能引起顶端或孵育系统阻塞,所以会引起机械臂的警报。
2.3登录屏幕按INBENTORY显示登录屏幕。
2.4PROCELL和CLEANCELL的检查:根据需要更换PROCELL和CLEANCELL。
如果SET1和SET2大于30%,屏幕键显绿色。
如果SET1和SET2大于0%而小于30%,屏幕键显黄色。
如果SET1和SET2等于0%,屏幕键显红色。
注意:SET2(右侧)首先被用完。
如要替换SET2,将左侧试剂瓶(SET1)移至右侧(SET2),然后装上新的试剂瓶于左侧(SET1)2.5装满蒸馏水:当容器空了,键显红色。
2.6清除废物筒:当废物筒满了,键显红色。
Genesys全中文操作手册

Genesys全中文操作手册×××客服中心系统March 22, 20101 前言 ..................................................................... ........................... 5 2 系统运行...................................................................... ..................... 6 2.1 系统启动方式 ..................................................................... ..... 6 2.2 启动顺序 ..................................................................... ............ 6 2.3 系统工具部分 ..................................................................... ..... 6 3 Genesys系统描述 ..................................................................... ...... 7 3.1 Genesys系统服务器组成 ....................................................... 7 3.2 Genesys 数据库访问内容 . (7)3.3 Genesys应用说明及Port配置 ............................................... 8 4 Genesys License管理 ....................................................................8 4.1 License更新 ............................................................................ 9 4.2 License运行情况检查 ............................................................. 9 5 资源管理(CME) ................................................................ ......... 10 5.1 登录CME .................................................................... ......... 10 5.2 新建DN ..................................................................... ........... 10 5.3 删除DN ..................................................................... ........... 11 5.4 新增分机 ..................................................................... .......... 12 5.5 新增路由点 ..................................................................... ...... 13 5.6 新增队列 ..................................................................... .......... 14 5.7 新增话务员登录账号 ............................................................. 15 5.8 删除话务员登录账号 ............................................................. 16 5.9 新增位置 ..................................................................... .......... 17 5.10 删除位置 ............................................................................. 18 5.11 新增位置组 ..................................................................... ..... 18 5.12 新增人员 ..................................................................... ........ 20 5.13 删除人员 ..................................................................... ........ 22 5.14 新增话务员组 ......................................................................23 5.15 删除话务员组 ......................................................................242 北京白矾科技有限公司.6 系统运维管理(SCI)................................................................. ... 24 6.1 登录SCI .................................................................... ........... 24 6.2 应用程序管理 ..................................................................... ... 25 6.3 观察应用程序的信息 ............................................................. 25 6.4 启动单个应用程序 (26)6.5 停止单个应用程序 (26)6.6 管理日志 ..................................................................... .......... 27 6.7 主机管理 ..................................................................... .......... 29 6.8 观察主机的信息 ....................................................................297 实时资源监控(CCP) ................................................................ .. 30 7.1 登录CCP .................................................................... .......... 30 7.2 新建实时监控视图 (30)7.3 保存实时监控视图 (32)7.4 打开已保存的实时监控视图.................................................. 33 7.5 使用实时资源状态监视 (33)7.6 使用整体试图 ..................................................................... ... 35 7.7 使用试图模板设计 (38)8 历史报表管理—设计(CCA—DMA) ........................................... 42 8.1 登录DMA .................................................................... ......... 42 8.2 新增过滤器 ..................................................................... ...... 43 8.3 新增时间区间 ..................................................................... ... 45 8.4 新增时间设定 ..................................................................... ... 46 8.5 格式模板管理 ..................................................................... ... 48 8.6 新增格式模板 ..................................................................... ... 49 8.7 修改数据项目 ..................................................................... ... 54 8.8 删除格式模板 ..................................................................... ... 57 8.9 新增报表格式 ..................................................................... ... 58 8.10 删除报表格式 ......................................................................61 8.11 激活报表格式 ......................................................................623 北京白矾科技有限公司.8.12 关闭报表格式 ......................................................................63 8.13 浏览数据 ..................................................................... ........ 64 9 历史报表管理(CCA—ETLAssistant) ........................................ 65 9.1 登录ETL Assistant ...............................................................65 9.2 浏览数据 ..................................................................... .......... 67 10 路由策略设计器(IRD) .................................................................68 10.1 登录IRD .................................................................... ......... 68 10.2 新建路由策略 ......................................................................68 10.3 修改已有路由策略 (69)10.4 加载路由策略 ......................................................................69 10.5 查看路由运行情况 (70)4 北京白矾科技有限公司.CTI(Computer Telephony Interface)服务器是一台与排队机CTI链路相连的设备,它使用户能够通过计算机来操作全部的电话功能,实现呼叫中心系统的计算机化管理。
gl850g中文资料_数据手册_参数

万联芯城-电子元器件采购网,提供一站式配套, 解决物料烦恼,万联芯城销售IC电子元器件,芯片,电阻,电容, 二极管,三极管等多种类别,现货型号能够满足各种物料需求,只 需提交BOM物料清单,我们将为您报出一个满意的价格,订单最 快可当天发出,为客户节省采购时间,提高生产效率, 点击进入万联芯城。
Hale Waihona Puke GL850G是Genesys Logic的高级版本Hub解决方案,完全符合通用串行总线规范修订2.0。GL850G嵌入一个8位RISC处理器来操作控制/ 状态寄存器并响应来自USB主机的请求。GL850G固件控制其通用I/O (GPIO)访问外部EEPROM,然后响应主机在外部EEPROM中配 置的自定义PID和VID。在没有外部EEROM的情况下,对主机响应内部掩码ROM中的默认设置。为客户设计的GL850Gis具有很大的 灵活性。更复杂的设置,如PID、VID和下游端口的数量设置很容易通过编程外部EEPROM来实现(参见第5章)。GL850G的每个下游 端口都支持双色(绿色/琥珀色)状态led,指示正常/异常状态。GL850G还支持单独模式和组模式(4个端口作为一个组),用于电源管 理。GL850G是一个完整的功能解决方案,支持个人/团体电源管理模式和双色(绿色/琥珀色)状态led。详情请参阅本章末尾的表格。 为了完全满足成本/性能需求,GL850G是一个单TT hub解决方案。Genesys Logic还为多个TT集线器提供GL852解决方案,以针对那些 对全/低速设备(如对接口站、嵌入式系统等)要求更高性能的系统。详细GL850G信息请参考GL852datasheet。*TT (transaction translator) 是USB 2.0 hub中的主要流量控制引擎,用于处理上游端口和下游端口之间不平衡的流量速度。GL850G上游端口支持高速(HS)和全速 (FS)流量;下游端口支持高速(HS)、低速(LS)流量;字节数据有效负载)−1.1向后兼容USB规范修订•芯片上的8位微处理器−−USB RISClike架构优化指令集−性能:6 MIPS @ 12 mhz−64字节的RAM和2 k掩模ROM−支持定制的PID, VID通过读取外部eepm−支持下游端口配置 通过读取外部eepm•单一事务翻译(STT)−单一TT同样的TT控制逻辑所有下游港口设备。这是TT最有效的解决方案。多个TT为每个下 游端口提供单独的TT控制逻辑。这是USB 2.0 hub更好的性能选择。详情请参阅GL852数据表。 集成USB 2.0收发器 每个下游端口 支持双色状态指示灯,提供自动和手动模式兼容USB规范修订2.0•内置上游1.5 k引体向上和下游15 k下拉•GL850G为USB信号嵌入系列 电阻器•支持个人和帮派的电源管理模式和过流检测fordownstream港口•符合总线电源要求••GL850G支持复合设备自动切换供电和buspowered模式(不可拆卸的下游端口)的I / O管脚排列•配置固定的设备支持•锁相环嵌入与外部12 MHz水晶•嵌入5 v至3.3 v调节器•低功 耗•改善输出驱动转换速率控制减少EMI•内部ESD复苏的掉电检测•全功能48-pin LQFP包•应用程序:−独立的USB集线器−PC主板USB集 线器,对接的笔记本−−液晶显示器中心任何复合设备支持USB集线器功能
Genesys Framework 入门指南

Framework 6.5入门指南© Genesys Telecommunications Laboratories, Inc.此文所包含的信息为专利信息并保密,未经Genesys Telecommunications, Laboratories事先书面许可,不得泄漏或复制。
Copyright © 2000–2002 Genesys Telecommunications Laboratories, Inc. All rights reserved.65fr_gs_04-2002_v2.01关于 GenesysGenesys Telecommunications Laboratories, Inc.是巴黎Alcatel全权拥有的、独立的分支机构,在计算机集成(CTI)领域中处于领先地位,现在已经成为企业, 服务供应商, 及电子商务从业者独立架构接触中心解决方案的供应商的领导者。
它可以集成各种媒体类型的交易,包括网络和传统的语音媒体, Genesys软件帮助商务人员提供相容的客户交互经验。
各种产品在Genesys技术支持网站或文档库CD上都有在线浏览的文档,并可以向Genesys索取。
要了解详细内容,请与销售代表联系。
备注虽然此文档耗费了大量的工作,以确保其中信息在发布时完整而正确,Genesys Telecommunications Laboratories, Inc.,却不能保证对任何现有错误负责。
此文档的改变或修正可能会在今后的版本中给出。
您对系统安全的责任您对自己的系统的安全负责。
您的责任是对产品进行管理,以防止未经授权就使用产品。
系统管理员应阅读随产品送达的所有文档,全面理解现有特性,减少应未经许可使用Genesys 产品引起的责任风险。
商标Genesys 和Genesys 图标是Genesys Telecommunications Laboratories, Inc.的注册商标 UNIX是X/Open Company, Ltd.的注册商标。
- 1、下载文档前请自行甄别文档内容的完整性,平台不提供额外的编辑、内容补充、找答案等附加服务。
- 2、"仅部分预览"的文档,不可在线预览部分如存在完整性等问题,可反馈申请退款(可完整预览的文档不适用该条件!)。
- 3、如文档侵犯您的权益,请联系客服反馈,我们会尽快为您处理(人工客服工作时间:9:00-18:30)。
Genesys全中文操作手册×××客服中心系统March 22, 20101 前言 ..................................................................... ........................... 5 2 系统运行...................................................................... ..................... 6 2.1 系统启动方式 ..................................................................... ..... 6 2.2 启动顺序 ..................................................................... ............ 6 2.3 系统工具部分 ..................................................................... ..... 6 3 Genesys系统描述 ..................................................................... ...... 7 3.1 Genesys系统服务器组成 ....................................................... 7 3.2 Genesys 数据库访问内容 . (7)3.3 Genesys应用说明及Port配置 ............................................... 8 4 Genesys License管理 ....................................................................8 4.1 License更新 ............................................................................ 9 4.2 License运行情况检查 ............................................................. 9 5 资源管理(CME) ................................................................ ......... 10 5.1 登录CME .................................................................... ......... 10 5.2 新建DN ..................................................................... ........... 10 5.3 删除DN ..................................................................... ........... 11 5.4 新增分机 ..................................................................... .......... 12 5.5 新增路由点 ..................................................................... ...... 13 5.6 新增队列 ..................................................................... .......... 14 5.7 新增话务员登录账号 ............................................................. 15 5.8 删除话务员登录账号 ............................................................. 16 5.9 新增位置 ..................................................................... .......... 17 5.10 删除位置 ............................................................................. 18 5.11 新增位置组 ..................................................................... ..... 18 5.12 新增人员 ..................................................................... ........ 20 5.13 删除人员 ..................................................................... ........ 22 5.14 新增话务员组 ......................................................................23 5.15 删除话务员组 ......................................................................242 北京白矾科技有限公司.6 系统运维管理(SCI)................................................................. ... 24 6.1 登录SCI .................................................................... ........... 24 6.2 应用程序管理 ..................................................................... ... 25 6.3 观察应用程序的信息 ............................................................. 25 6.4 启动单个应用程序 (26)6.5 停止单个应用程序 (26)6.6 管理日志 ..................................................................... .......... 27 6.7 主机管理 ..................................................................... .......... 29 6.8 观察主机的信息 ....................................................................297 实时资源监控(CCP) ................................................................ .. 30 7.1 登录CCP .................................................................... .......... 30 7.2 新建实时监控视图 (30)7.3 保存实时监控视图 (32)7.4 打开已保存的实时监控视图.................................................. 33 7.5 使用实时资源状态监视 (33)7.6 使用整体试图 ..................................................................... ... 35 7.7 使用试图模板设计 (38)8 历史报表管理—设计(CCA—DMA) ........................................... 42 8.1 登录DMA .................................................................... ......... 42 8.2 新增过滤器 ..................................................................... ...... 43 8.3 新增时间区间 ..................................................................... ... 45 8.4 新增时间设定 ..................................................................... ... 46 8.5 格式模板管理 ..................................................................... ... 48 8.6 新增格式模板 ..................................................................... ... 49 8.7 修改数据项目 ..................................................................... ... 54 8.8 删除格式模板 ..................................................................... ... 57 8.9 新增报表格式 ..................................................................... ... 58 8.10 删除报表格式 ......................................................................61 8.11 激活报表格式 ......................................................................623 北京白矾科技有限公司.8.12 关闭报表格式 ......................................................................63 8.13 浏览数据 ..................................................................... ........ 64 9 历史报表管理(CCA—ETLAssistant) ........................................ 65 9.1 登录ETL Assistant ...............................................................65 9.2 浏览数据 ..................................................................... .......... 67 10 路由策略设计器(IRD) .................................................................68 10.1 登录IRD .................................................................... ......... 68 10.2 新建路由策略 ......................................................................68 10.3 修改已有路由策略 (69)10.4 加载路由策略 ......................................................................69 10.5 查看路由运行情况 (70)4 北京白矾科技有限公司.CTI(Computer Telephony Interface)服务器是一台与排队机CTI链路相连的设备,它使用户能够通过计算机来操作全部的电话功能,实现呼叫中心系统的计算机化管理。