索澳导航一体机。背面说明。
Samwon NOVAESERIES I 用户手册说明书

用户手册SD560(数码指示器)作为数码指示器,支援了传送输出与警报输出,也具备了通过外部接点输入可Reset、显示PV功能的产品。
CopyrightCopyrightⓒ 2016 Samwon technology Co., Ltd 这部操作说明书受版权保护。
没有㈱Samwon technology的事前书面同意,不允许把使用说明书的一部分或者全部内容复制,公众送信,发布,翻译或者换成机器可读的形态。
关于安全的标志■表示“小心轻放”或者“注意事项”。
若违反此事项、会导致死亡或重伤及机器的严重损伤。
(1) 产品 : 为了保人或机器、在必熟知的情之下。
(2) 产使用明 : 心因等用有生命和身危,了防止生此事故,而述注意事。
■表示“接地端子”。
安装产品及操作时必须与地面接地。
■表示“补充说明”。
记述补充说明的内容。
☞■表示“参照事项”。
述要参照的内容和参照页数。
■本使用说明书告知最终使用者随身携带、并保管在随时可以看到的地方。
■本产品要先熟知使用说明书之后才可使用。
■本使用说明书仔细说明了产品的详细功能,因而不能保证使用说明书以外的事项。
■本使用说明书的内容在没有事先通报和预告之下,可任意变更。
■本使用说明书的内容没有实现通报或者预告之下不能任意变更。
■若本使用说明书在内容上有不足点、笔误、露点等情况时,请与购买处(代理店)或本公司销售部取得联系。
有关本产品的安全及改造(变更)的注意事项■了本产品及连接本产品使用的系统的保护及安全、请熟知本使用说明书的有关安全的注意(指示) 事项后、使用本产品。
■不按照本使用说明书的指示使用或处理的情况及不注意而发生的所有损失,本公司概不负责。
■为了本产品及连接本产品使用的系统的保护及安全、另行保护或者设置安全回路时、一定要在本产品的外部设置。
■严禁在本产品的内部进行改造(变更)或者追加。
■不要任意分解、修理改造。
会成为触电、火灾及误启动的原因。
■交换本产品的零件及消耗品时、请务必联系本公司销售部。
Pioneer 双面式 DVD 导航系统说明书

SPECIFICATIONSModel No. PNV9674GeneralfeaturesTFT screen 800*480pixelSD 64GWorking power12 VMax Output 4*80WWorking Temperature -20°C~70°C / -4°F~158°FSize 96.5*170.5*144mmWeight 1.92kg / 4.23lbsCompatible MediaPicture JPG/JPEG/BMP/GIF/PNGDisc CD/CD-R/CD-RW/DVD/DVD-R/DVD+R/ DVD-RW/DVD+RW Audio file MP3/AAC/WAVVideo file .AVIMPEG/AC-3 MPEG-4 OMPEG/AAC AVC XMP4MPEG/AAC MPEG-4 Visual OAAC AVC XMPGMPEG/AC-3 MPEG-1/2 OAAC AVC XRMCooker RealVideo1 XCooker RealVideo3 O RMVB Cooker RealVideo3 O Fixed front panel 6.2 inch TFT screenFM/AM RadioDVD fully compatible withDVD/VCD/CD/MP3/MPEG4/JPEGBuilt-in GPSFront USB & SD reader supportBuilt-in BluetoothAUX InputAV InputAV outputRear view cameraFront, Rear and Subwoofer Pre-Amp Output 4*80W AMP power output maximum Steering wheel controlNOTE: O-YES X-NOSAFTY NOTICE Please read and understand the following safety information before operating this unit.The device is suitable for 12V power supply (requires grounding). Do not connect it to 24V power supply in trucks or buses, or else it will Please use genuine discs, instead of incompatible and poor discs,Without the guide of qualified personnel, do not replace the fuse,Please follow the traffic laws and regulations and do not watchTo ensure safety and operate the device normally, please askqualified personnel to install the device. do not disassemble or repair the device without authorization, to avoid damage and accidents. Please contact local car audio distributor for details.Do not put the device in moist environment or water, to avoid electric shock, damage and fire due to short circuit.The mechanical drive part of the monitor uses automatic precision transmission component. Do not pull, push or rotate the device by Do not insert the audio plug of the vehicle into the master unitWhen install the unit, prevent metal objects falling into the masterSafety StatementFor the safety of you and others, do not watch programs or operate the device when you are driving. It is prohibited by the laws and The backing monitor function should be used as auxiliary means.we are not responsible for any accidents occurred during backing.ACCESSORIESBelow are the photos with the accessories included in the box.Remote Control Mounting HardwareTrim Ring/Touch Pen HarnessMounting Brackets ScrewCM5*6mm 8pcsScrewPA5*18mm 1pcSpring Washer1pc Rear Chassis Support Bolt M5x23mm 1pc Rubber Support Boot 1pcGPS AntennaRCA I/O HarnessREMOTE CONTROL OPERATIONPress to turn on or turn offthe unit.2.EQ mode Press to set EQ mode.3.EJECT Key Press to eject the Disc inthe unit. And press again toload the Disc if you do nottake out it.Press to show CLK ,and press again back the last source.No working when video is playing.5.MODE key Press to change mode of the unit.5697810111312141519161718REMOTE CONTROL OPERATION6.MENU keyPress Menu to return to the home menu.7.Audio KEYPress to change switch language in DVD mode,and switch left、right or stereo in VCD mode.8.SUBTITLE Changing Key Switch the subtitle during playing if the Disc have multiple subtitle.9.Direction and OK keyIf there is a Disc with root list menu,press direction key to move up/down/left/right, and press OK to confirm.10.MUTE keyPress to mute the unit and press again to restore the volume.11.REPEAT keyUnder DISC/Music/Video mode, press to set the repeat mode.12.Play/PausePress to switch play pause.13.ROOT keyDVD playing mode, press to go into root list menu; VCD playing mode, press to turn on/off PBC function.14.TITLE keyUnder DVD playing mode, press to enter into title list menu.15.Under Disc/music/video mode, press to choose previous/next song.Under music list menu, press to choose PRE/NEXT music. Under RADIO mode, press to search frequencyforward/backward.16.VOLUME UP/DOWN key Press to adjust volume up and volume down.17.Receiving calls/call out;hang up.18.STOP/C/BANDIn disc playing mode, press to STOP, press “ok” to start;In radio mode press to change band betweenFM1/FM2/FM3/AM1/AM2; Press to enter RADIO mode, except DVD mode.Delete wrong number when in phone mode.19.Number keyEnter phone number in phone mode.UNIT INSTALLATIONBracketBracketScrew1.Put the 2 brackets to the left and right side of the unit;e screws to fix the brackets to the unit.WIRES CONNECTION DESCRIPTIONThe Description of the Input/Output InterfaceDescription of the Wiring Diagram for Socket AAPANEL INTRODUCTION1.Eject key When there is a Disc in the unit, press EJECT to remove the Disc. And press again to load the Disc if you do not take out it.2.MODE key Press to select system mode (RADIO/DISC/PHONE/VIDEOS/MUSIC/ PICTURES/AUX IN/AV INPUT/CAMERA/NAVI)3.NAVI key Press to enter into GPS function, or back media from GPS.4.TURN ON/OFF & VOLUNE UP/DOWN Long touch to turn ON/OFF the unit. Short touch to activate the MUTE function and silence the audio output. Touch again to restore sound. Rotate to adjust the output volume UP or DOWN.5.BAND key For radio band conversion between FM1/FM2/FM3/AM1/AM26.Open to see GPS card slot, AUX IN jack, SD slot, USB port and reset key.123456MAIN MENU OPERATION INSTRUCTION 1.Shows the present time of the unit.2.Shows the present date and week .3.Press to go into main menu 2.4.NAVI: Navigation Interface5.Disc Interface6.Radio Interface7.Phone setup Interface8.BT Music Interface 9.Music Interface 61459102378MAIN MENU 1MAIN MENU OPERATION INSTRUCTION 111213141512.AUX Interface 13.AV no signal Interface14.Camera Interface 15.Settings Interface10.Video Interface 11.Picture InterfaceMAIN MENU 2There are five menu in setup: GENERAL SETUP—Menu 1ACCESS SETUP INTERFACEjklOTHER SETUP -Menu 51.Reverse trigger: Turn on if you have a rear view camera.Turn off if you havn’t.2.Touch to enter swc menu.3.Touch to enter calibrate menu.4.Load factory setting.5.Touch to see the saftware version of the unit.SWC-STEERING WHEEL CONTROL SETTING Picture 1Picture 2Touch SWC enter SWC setting menu :Press”OK”to start SWC learning.Start learning:Set the POWER button as an example.1.Press POWER button in the unit(Picture 1) ,then you will see reminder like picture 2, Press OK.2.Press POWER key in your steering wheel. Then you can see the reminder in the unit like Picture .Setting successfully. Will show like Picture3.3.Click OK, and finished learning.4.Repeat 1-3 to learning other keys.SWC-STEERING WHEEL CONTROL SETTINGRADIO OPERATION Picture 3SWC1: Select different SWC resistanceto meet different cars. If you cannot finishall key pairing,you can press to selectSWC2 SWC3,until all keys can learn.NOTE: Click SWC1 you will lost all KEYlearning before.1.Show the present mode. Touch to go back home.2.Click to choose the frequency.3.Short press to seek backward. Long press to enter manual mode and backward in step.4.Short press to seek forward. Long press to enter manual mode and forward in step.5.Preset stations area, long press to save current station.6.Band changing:Click to change band betweenFM1/FM2/FM3/AM1/AM2.7.Search the stations, play the searched one for 5S and go on to search next one and repeat this.8.Change betwech AS and PS.9.LO/DX: Touch to select Local or Distant broadcasting stations.10.Stereo on/off:Click to turn on/off stereo when receiving a stereo signal. 11.EQ: Press to set the audio effect.RADIO OPERATIONRADIO OPERATION 12.RBDS: Touch to enter RBDS setup menu. you can choose the program type you like to listen: news, sports ,inform, etc.a.TA(Traffic Announcement)ON: When the taffic station is turned on, the radio will automatically search for traffic stations. After a staton is searched, screen displays “TP” Only when traffic information is broadcasted can it be received, after traffic information is completed, the radio will automatically switch to the previous mode.OFF: Repress [TA] button to close TA function. In other modes, traffic announcement will automatically switch to radio mode, after the traffic announcement is completed, it will automatically switch to the previous mode.b.AF(Auto Frequency)Touch the button to turn the AF function on/off. AF function is turned on, When the received station signals become weak, the radio will automatically fine-tune to other frequencies. When receiving an emergency announcing, the screen will display warning message.c.CT (Clock Time)To provide current time correction information, the RBDS station can automatically correct the system clock of the receiver when the clock RBDS is opened.d.PTY(Programming Type)Touch the button the screen displays program types, users can search station according to program type.DISC PLAYBACK-VIDEO1.Icon gray mean no disc loaded,orange mean disc loaded.2.Function Area: show the process and time of the present video. This bar will disappear in a while, and click this area to show this function bar again. Touch the bar to set the playing time.3.Click to show the information of present video.4.Function bar same as audio playing menu.Press the function key and you will see the following to choose chapter:Click the relevant key tochoose the chapter NOTE: When properly installed, a video cannot be displayed unless the parking brake is applied. If the parking brake wire is not installed correctly, the following message will appear.DISC PLAYBACK-AUDIO1.Total time of the playing song.2.ID3 information of the music playing such as singer’s name, music style, music name etc. if available.3.Present playing one/total music numbers.4.Random play.5.Loop playback.(ALL/SINGLE loop play).6.PREV: Press to choose previous music.7.PLAY/PAUSE: Touch to begin playing. And press the icon again to pause playing.8.NEXT ONE: Press to choose next music.9.Click to see the music play list menu. And user’s can choose which one to play here.10.Press to going into EQ setting interface:Press MUSIC in the main menu, it refers to the music file from SD and USB.BLUETOOTH OPERATIONClick phone icon and will enter into Bluetooth function interface:MUSIC PLAYING MENU BLUETOOTH OPERATION MENU1.Bluetooth setting menu:a.ON/OFF: Turn on and turn off of Bluetooth when not using.Turn on:show gray BT . and the icon turn blue when paired phone.b.Anser automatically: Can turn on or turn off the function of listen to calls automatically.c.Connect automatically: Can connect the devices automatically which have already been connected before .d.Default Bluetooth name for this unit: Planet Audio PNV9674e.PIN code: Default password”0000” , and can be change by yourselfclick”0000”BLUETOOTH OPERATION2.Function area:a.Click and see the dialing keypad, users can dial no. and make phone calls.b.Click to see the Bluetooth phonebook menu.c.Click to see the Bluetooth call history.d.Bluetooth pairing interface as following:e.Bluetooth setting menu.1.Shows the number you press in,and press to delete wrong number.2.Key area.3.Touch to call out.BLUETOOTH DIALINGBLUETOOTH OPERATION1.Press to hang up the phone call.2.Touch to talk through Bluetooth.3.Touch to talk through cellphone.4.Touch to mute mic5.Touch to get keypad.6.Show contact name.BLUETOOTH PHONE BOOKBLUETOOTH CALL456BLUETOOTH OPERATION1.Touch to enter name and search the wanted phone number.2.Click to sync phonebook.3.Contact list.BLUETOOTH PHONE CALL HISTORY1.Touch to show the dialed phone number.2.Touch to show the received phone number.3.Touch to show missed calls.PHOTOSBLUETOOTH MUSIC-A2DP1.Show playing song name and ID32.Previous song3.Play/pause.4.Next sony5.Enter EQ setting menu.45PICTURE8.Press to tailor the picture as you want. Touch and drag the corner to decide the picture and press ,you can set the picture as thebackground of the unit. And this background will remain the same till you reset it.1.Press to turn to the previous picture.2.Press to turn to the next picture.3.PLAY/PAUSE: touch to begin play. Press again the icon to pause.During picture playing mode, one picture will be played for 5s automatically and goes to the next if you do not press it.4.Zoom in the present picture.5.Zoom out the present picture.6.Turn left 90 degrees.7.Turn right 90 degrees.9.Press to see the picture list:a.Touch to change between picture mode and picture list mode.b.Scan the picture file of your SD or USB.PHOTOSCAMERA/AUX/AV MENUCAMERA: Rear view function,the rear view video signal can display automatically when you reversing the car,and back to the last sources after reversing the car.AUX IN:External audio input functionConnect the audio device to the unit by the 3.5mm jack in front of the panel and touch AUX INPUT icon.AV INPUT:External video and audio input functionConnect the video and audio device to the unit by the RCA jacks and touch AV INPUT icon.TROUBLESHOOTINGTable 1: Error message n o i t c A e v i t c e r r o C e s u a Cd e y a l p s i d a i d e M Loading Disc is being readc s ide h t n a e l Cy t r i d s i c s i D c s i D d a B /c s i D o N y a w t h g i r n i c s i D t r e s n I n w o d e d i s p u s i c s i D Unknown Disc Unsupported Disc type Check the disc andchange oneIllegal mechanismoperation Error Press EJECT for 5s to reset loading mechanismTable 2:General problemsn o i t c A e v i t c e r r o C e s u a C m e l b o r P Unit will not power onInstall new fuse with rightratingt h g i r h t i w e s u f w e n l l a t s n I n w o l b e s u f y r e t t a b r a C Radio fuse blown ratingn o t t u b T E S E R e h t s s e r Pn o i t a r e p o l a g e l l I Screen touch is insensitive Place of touch screenis offsetGo to setup menu and set the calibration No audio output Improper audio output connection e m u l o v e h t p u n r u T0 E M U L O V Improper MUTEconnectionCheck wiring and TEL MUTE connection s r e k a e p s e g n a h Cd e g a m a d r e k a e p S Volume set too lowHeavily biased volumebalance Check and adjust the channel balance to the center position Check wiring and correct Low audio output Increase the volumePoor sound quality or distortionNo GPS image Speaker power ratingnot compatible with unit Connect proper speakersChange to GPS systemt s a r t n o c r e k a e p sk c e hCd e t r o h ss i r e k a e p SImage has not beenchanged to GPS systemTable 3: TFT monitorsn o i t c Ae v i t c e r r oCe s u aCme l b o r PIncorrect connection No imageto parking wire Check wiring and correctd e g a g n et o ns i e k a r bg n i k r aP Stop vehicle in safe placeand set parking brake ONFlashing image or interference appears on screen DVD is not compatible withcurrent TV system settingsChange setup toaccommodate DiscCheck wiring and correct Improper video signal connectionsImproper image, improper height/width ratio display Improper aspect ratio setupUse correct aspectratio settingTable 4: Tunern o i t c Ae v i t c e r r oCe s u aCme l b o r PWeak station searching Auto antenna is not fullyextendedConnect the autoantenna properlyt a v i t c as i n o i t c n u f LACOL edTROUBLESHOOTINGTurn LOCAL function OFFTROUBLESHOOTING Table 5: Disc。
潮车品牌电动汽车导航系统说明书

Screen:All selections and instructions are displayed on the screen. Enter information into the system either by voice or by using the interface dial.Note:Shifting into Reverse (R)activates the rearview camera;the image is displayed on the screen.AUDIO button:Displays the audio screen.MAP/GUIDE button:Displays the map.When en route,switches the display between the map and guidance screens.MENU button:Displays the “Enter a destination by”screen.When en route,displays the route options on the MENU screen.SETUP button:Displays the Setup screen to change and update information in the system.INFO button:Displays the screen for selecting Messages, Traffic Incidents, Weather Information*, Trip Computer, Cellular Phonebook, Calendar, Calculator,and Roadside Assistance.More options are available by moving theInterface Dial to the right; Voice Command Help, Map Legend, and Key to Zagat Ratings.Interface Dial/ENTER button:Moves left,right,up,and e to move the highlighting around the display,to scroll through lists,or to look around a displayed map.Push in to enter the selection into the system.CANCEL button:Cancels the current screen and returns to the previous screen.CLOCK:Controlled by the navigation system and canautomatically compensate for daylight savings time and time zone changes.Navigation SystemSee the navigation system manual for more information .Map Screen LegendAcura Dealer School Restaurant ATM Parking LotPost OfficeHonda Dealer Hospital Grocery Store Gas Station Hotel/Lodging Parking Garage Freeway Exit Informationshow current location.)Landmark IconNOTE:If you move the Interface Dial over an area (map features shown above),the name is displayed on the screen.NOTE:See Map Legend on the Information screen for further explanation.GPS Signal StrengthMissing: Poor/No Reception to view.)zoom in or out by rotating the Interface Dial knob .): Park : Hospital : Shopping Mall : Golf Course: Water Area : Cemetery : University : Indian Reservation: Airport/Stadium/BusinessCommonly Used Voice Commandsfollowing page for an example of this process.Voice RecognitionQuick Start GuideEntering a Destination Using Voice ControlNote:Press and release the Navi Talk button, wait for a beep, and say your command.1.Say "display menu." The displaychanges to the Enter Destination by screen.2.Say "address."3.Say “city” (or “change state” ifnecessary).8.Say the street address numberas a continuous series. Forexample, for the addressnumber 15200, say "one, five,two, zero, zero, done."5.A list of city names appears. Saythe number listed next to the desired city.6.Say the street name. Do not saythe direction (north, south, east, or west) or type (street, avenue, etc).7.Say the number listed next to thename of the desired street.4.Say the name of the city or say"select current city."9.The system displays the“Calculate route to” screen. Say "OK" to display a map of the route. The plotted route appears in blue.Tip: While en route, you can cancel or change your current destination or select other options by saying "display menu."Using the Voice Control SystemThe voice control system allows for convenient, hands-free operation of navigation and selected audio and climate control system functions. For a complete list of voice commands, see the Navigation System Manual or presssystem mutes). Press and release the Navi TALK button,then wait for a beep .Give a voice command in a clear, natural speaking voice (without pause) within 3 seconds. Otherwise, the system will prompt you to repeat your command.Tip:A multiple beep sound indicates a function is unavailable, or is already set.•BACK button:Returns the display to the previous screen. It is enabled for navigation commands only, but can cancel an audio or climate command up to one second after the command confirmation.General Voice Control GuidelinesThe voice control microphone is located in the ceiling console. To optimize voice recognition and hear the voice feedback, we recommend:say "Repeat voice."•Ensure that the navi volume and "Voice feedback" in the Setup menu are set to ON. The feedbackprovides confirmation of your command and provides the best way to say the command.Voice RecognitionQuick Start Guide。
NAV Slim 可携式汽车导航系统 说明书

NAV Slim可攜式汽車導航系統使用手冊版本版本::1.0版2008年九月註冊資訊HOLUX 和GPSmile 是HOLUX Technology, Inc.的商標。
所有其他商標屬於各註冊公司。
註若修改本手冊的內容,恕不另行通知。
本產品的適當操作溫度範圍在0℃到40℃之間。
在溫度超過45℃的環境中操作或充電可能導致系統無法作用。
但這是正常現象。
請勿在極端溫度的環境中操作本產品。
安全注意事項•請使用本產品包裝內隨附的電源轉換器,如果使用其他電源轉換器可能造成故障並產生危險。
•本機僅能搭配隨附的電池使用。
•關於電源轉換器:1. 不可在潮溼環境中使用電源轉換器。
手腳潮濕時,請勿碰觸電源轉換器。
2. 請確定在通風良好的區域使用電源轉換器。
不可讓紙張或其他物品覆蓋電源轉換器,這樣會影響它的冷卻。
電源轉換器在袋子內時,請勿使用它。
3. 不可嘗試維修本裝置。
如果本裝置損壞或在潮溼環境中,請立刻更換本裝置。
4. 本公司不建議從電腦上充電,因為電腦的電壓不足以供應本裝置所需的電壓。
電池第一次使用, 請充飽6小時以上, 以確保電池電量充足。
•關於電池1. 僅限使用原廠許可的充電器。
2. 本產品有內建的鋰電池。
要避免起火或皮膚燙傷,請勿拆解、刺穿、撞擊或將電池暴露在火源下。
如果丟入火源中,電池可能破裂、爆炸或釋放危險化學物質。
•重要指示1. 註:換用錯誤的電池可能產生爆炸。
請依照指示廢棄電池。
更換電池時,僅限使用原廠許可的電池。
2. 回收或廢棄電池時,必須依照法規。
3. 隨附的電池僅供本裝置使用。
保固聲明•本保固適用於Holux Technology Inc.製造和銷售的GPSmile62零件與服務。
涵蓋的區域範圍是台灣,保固日期是購買日期開始後的一年內(從銷售收據上的日期開始算起)。
在正常的使用下,HoluxTechnology提供免費的維修服務。
維修後,換下的零件屬於Holux Technology Inc.的財產。
SOKKIA GPS设备使用手册说明书

UNIVERSIDAD NACIONAL AUTÓNOMA DEMÉXICOFACULTAD DE INGENIERÍADIVISIÓN DE INGENIERÍAS CIVIL Y GEOMÁTICAManual para el uso del navegador GPS S O KKIAElaborado por: M. en I. Adolfo Reyes PizanoProfesor de CarreraIngeniería GeomáticaFacultad de IngenieríaUNAMINTRODUCCIÓNEste manual se elaboró con el propósito de mostrar a los usuarios interesados el manejo básico del GPS S O KKIA.El sistema de posicionamiento global, por sus siglas en ingles GPS es un sistema de radio navegación de Estados Unidos, está basado en el espacio y proporciona servicios fiables de posicionamiento, navegación y cronometría gratuita e ininterrumpidamente a usuarios en todo el mundo.A todo lo que cuente con un receptor de GPS, el sistema le proporcionara su localización y la hora exacta en cualquier condición atmosférica, ya sea de día o de noche, en cualquier parte del mundo.El GPS se compone de tres elementos básicos:Satélites en órbita alrededor de la Tierra.Estaciones terrestres de seguimiento y control.Receptores de GPS, propiedad de los usuarios.Desde e l e s p a c i o, l o s s a tél i t e s d e G P S t r a n s m i t e n s eña l e s q u e r e c i b e n e identifican los receptores, a su vez ellos proporcionan por separado sus coordenadas tridimensionales de latitud, longitud y altitud, así como la hora local precisa.Hoy en día los receptores portátiles de GPS están al alcance de todos en el mercado, con dichos receptores el usuario puede determinar con exactitud su ubicación.MANUAL DE USUARIOPrincipios de funcionamiento:La toma de datos con el receptor GPS adecuado puede proporcionar a los usuarios posicionamientos precisos y homogéneos, requerimientos ambos para cualquier proyecto topográfico. Esta sección ofrece una visión general de los Sistemas de Navegación Global por Satélite (GNSS) existentes y propuestos, así como de las funciones de manera que se puedan aplicar los principios básicos de trabajo (Abreco, 2016).1. Panel de control.El panel de control del receptor GRX1 es la interfaz del instrumento con el usuario a través del cual se visualiza y muestra la situación del receptor en un momento dado.Encendido: para encender el receptor se debe pulsar el botóndurante más de 3 segundos y se debe soltar, el indicador de bateríamuestra el avance del proceso de arranque. A los 20 segundos elindicador de la batería se apagará durante un momento y se oirá elmensaje de receptor listo indicando que el sistema ya está operando.Apagado: para apagar el receptor se debe pulsar el botón hasta oírel mensaje de apagado, se encenderán los tres diodos superioresdel indicador de batería.Parámetros de fábrica: (más de 10 segundos y menos de 20) con elreceptor encendido se debe pulsar el botón hasta oír el mensaje de“Parámetros de fábrica”. Se encenderán los tres diodos superioresdel indicador de batería, satélites rastreados y capacidad de memoria,se debe soltar para reiniciar el receptor con sus valores de fábrica.2. Antena y tarjetas SD/SDHC y SIM.Antes de iniciar el trabajo que se desea realizar, se debe colocar la antena.Los puertos para las tarjetas de SD/SDHC y SIM se encuentran dentro del compartimiento de la batería.3. Preparación antes de la toma de datos.Antes de empezar a tomar datos con el receptor, se debe instalar el siguiente programa:Instalar el programa de configuración del receptor.Instalar una tarjeta SD/SDHC y SIM.Configurara el módulo de Bluetooth.4. Arranque del receptor.La estación base deberá arrancarse, comenzar a tomar datos y empezar a emitir correcciones antes de arrancar el receptor móvil.Montaje del receptor base:Colocar el tripié sobre un punto de control conocido.Sujetar la base nivelante a la cabeza del tripié, colocar un adaptadory apretar los tornillos. Es necesario hacer la nivelación del tripiéantes de colocar los demás accesorios.Colocar el receptor sobre el alzacuello de 10 cm.Colocar la antena en el receptor.5. Medición de la altura de la antena.Se debe medir la altura de la antena con respecto al punto sobre el que está colocada la base, es muy importante para cualquier trabajo topográfico.Existen dos métodos para medir la altura de la antena:Vertical: se mide desde el punto estación hasta la marca dereferencia que tiene la antena en su parte inferior, en la base de larosca de anclaje. Para la medida vertical, el desfase simplemente seañade a la distancia vertical medida para dar una altura vertical“real”.Inclinada: medida desde el punto estación hasta la pestaña situadaen el perímetro del disco de la antena, encima de la tapa delcompartimiento de la batería. Para la medida inclinada, se debecalcular primero la distancia vertical conociendo el radio de la antenay luego añadir el desfase.Una vez que está instalado el receptor y que se han seguido los pasos anteriores, se procede a seguir los siguientes pasos en la controladora.Controladora.6. Encender la controladora.Como primer paso se debe encender la controladora, presionando el botón verde que se encuentra en el lado inferior derecho.7. Configuración.Una vez encendida la controladora de da clic en el ícono de Start y posteriormente en el ícono de SSF.Clic enStart8. Iniciar un trabajo.Se debe iniciar un nuevo trabajo, dando clic en “Nuevo” y aparecerá una segunda pantalla donde se deben llenar los campos que se indican, posteriormente se da clic en “Más”, como se muestra a continuación.9. Configuración del trabajo.Una vez que se dio clic en el botón de “Más” aparecerá la pantalla de “Estilo Observación” donde se va a elegir el trabajo que se va a realizar, para este caso se selecciona “My RTK” para un trabajo en tiempo real, posteriormente se da clic en los puntos suspensivos “…”.Una vez que se presione el botón de los puntos suspensivos aparecerá la pantalla de “Configuraciones”, se debe presionar el botón “Editar” para verificar la configuración.Una vez presionado el botón de “Editar” aparecerá la pantalla de “Configurar Observación”, posteriormente se da clic en el botón de “Más”.*Es importante que la tarjeta SD esté colocada para que el trabajo funcione.10. Configuración para la base.Una vez hecho lo anterior, aparecerá la pantalla de configuración para la base.Receiver Model → Modelo del receptor.Máscara Elev → Mascarilla de elevación.Formato RTK → Formato de transmisiónde la corrección, existen diferentes formatoslos más usados son CMR+ y RTCM V3.0.Antena → Modelo de la antena.Alt Ant → Altura de la antena.Aparecerá la pantalla de configuración del pos proceso en la base:Nom.Arch. →En Def Usuario, permitiráponer nombre al archivo donde sealmacenarán los datos.Grabar en → Se define donde sealmacenarán los datos del pos proceso.Intervalo → Se define el intervalo degrabación.Se da clic en “Más” hasta que aparezca la pantalla de configuración para el móvil.Ventana “Recep. Móvil”Receiver Model → Modelo del receptor.Mascara Elev → Mascarilla de elevación.Formato RTK → Formato de transmisiónde la corrección.Presionar el botón de “Mas”.Pantalla de configuración del pos proceso en el móvil.Aparecerá la pantalla de configuración para el radio.Aparecerá la pantalla de tiempos de inicialización.Se especifica el tiempo mínimo de inicialización del equipo cuando se trabaja en pos proceso.*Cuando se trabaja con un equipo de doble frecuencia con más de 6 satélites el tiempo de inicialización debe ser de 10 minutos.A continuación, aparecerá la pantalla de parámetros de levantamiento.Se especifica el tipo de solución con el que se va a trabajar, dependiendo del trabajo que se desea realizar. También se puede especificar el número de lecturas que se desea que el equipo tome, en la parte superior de la pantalla se puede determinar el intervalo de tiempo al que se necesite.Presionar más hasta que aparezca la pantalla de parámetros avanzados, donde se puede determinar el tipo de constelación con la que se necesita trabajar.Posteriormente aparecerá la pantalla donde puede indicar si se desea que se desplieguen las coordenadas después de haber sido medidas, la altura del bastón cada que tome un dato y si se desea escuchar un sonido cuando se almacena el mismo.Esto hará que se regrese a lapantalla de estilo deobservación. Una vez ahípresionar “Más”.Una vez hecho lo anterior, aparecerá la pantalla de sistema de coordenadas, aquí e puede definir la proyección, el Datúm y el geoide.Se presiona el botón de puntos suspensivos de la operación que se desea modificar.Una vez que se han llenado todos los campos, se da clic en “OK”Aparecerá la pantalla para definir las unidades de medición.En esta pantalla sólo se puede definir las unidades de distancia y las unidades de ángulo, si en la pestaña de “Ángulo” se visualiza “DMS”, quiere decir que el ángulo se medirá en grados, minutos y segundos. Posteriormente aparecerá una segunda pantalla donde se define el tipo de coordenadas con las que se va a trabajar, el origen del azimut, etc.Una vez realizados los pasos anteriores se da clic en el botón de “Fin”. Aparecerá la siguiente pantalla principal del programa, para que el equipo trabaje se debe activar la opción de Bluetooht, esto se hace seleccionando el ícono de modo y dentro de ese activar la opción de Bluetooht.El programa buscará los equipos que se encuentren encendidos y los identificara con el número de serie, se debe seleccionar la base para conectarse con ésta.Para arrancar la base se debe seleccionar el ícono de “Setup” mostrado anteriormente, posteriormente se da clic en “Iniciar Base”.Es necesario poner nombre al punto. También es necesario colocar las coordenadas de la base, en caso de no saberlas se debe dar clic en el botón “Auto”, cuando aparezcan las coordenadas en los campos se debe dar clic en “Parar” y posteriormente en “Iniciar Base”, una vez que se inició la base aparecerá la pantalla para ponerle nombre al archivo que se va a grabar en la tarjeta SD, se debe poner nombre al archivo y dar clic en “OK”.Posteriormente aparecerá la siguiente ventana:Se da clic en el botón “Cerrar” y automáticamente se regresará a la pantallaprincipal.Una vez concluidos los pasos anteriores, se procede a ejecutar el trabajo deseado.Fuentes electrónicas consultadas:https:///spanish.phphttps:///proyectos/soporte/TOPCON-SOKKIA/GPS/GRX1/Gu%C3%ADa%20R%C3%A1pida%20SSF.pdf.mx/manuales_topografia/gps/Sokkia_GRX1_esp.pdf。
悦动车载dvd导航多图使用说明
车载DVD导航一体机,是一种集DVD 导航蓝牙收音倒车后视等功能为一体的电子产品,根据分辨率的不同,可分为模拟屏和数字高清屏2种,480X272(234)的机器是模拟屏,800X480的机器是数字高清屏。
地图厂家根据市场上的机器种类,也会出品适合各种不同分辨率机器用的地图,高清的导航机器使用的地图是800X480分辨率的,模拟屏导航机器用的地图是480X272或480X234分辨率的地图,科骏达和卡士达2009年下半年出来的机器基本上都是800X480分辨率的机器,如K6072G CA3672G等。
导航机器在出厂时厂家会设置机器的GPS端口和卡名,卡名是机器系统设置的导航卡插口名称,不是我们用的SD卡名称,如果在机器使用多图系统或善领电子狗等文件,里面的配置文件和导航路径设置的卡名必须和机器的卡名对应,使用的地图的端口也必须和机器的GPS端口一致。
科骏达和卡士达的卡名和端口根据本人的经验,基本上分为2种,一种是storage card卡名,端口是COM1,9600。
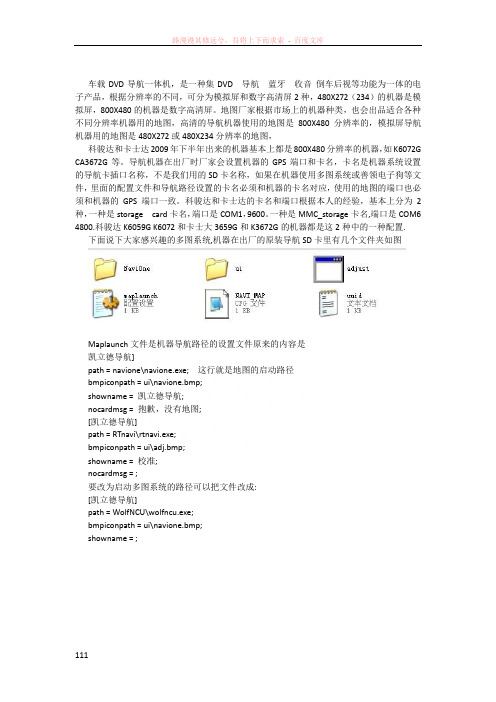
一种是MMC_storage卡名,端口是COM6 4800.科骏达K6059G K6072和卡士大3659G和K3672G的机器都是这2种中的一种配置.下面说下大家感兴趣的多图系统,机器在出厂的原装导航SD卡里有几个文件夹如图Maplaunch文件是机器导航路径的设置文件原来的内容是凯立德导航]path = navione\navione.exe; 这行就是地图的启动路径bmpiconpath = ui\navione.bmp;showname = 凯立德导航;nocardmsg = 抱歉,没有地图;[凯立德导航]path = RTnavi\rtnavi.exe;bmpiconpath = ui\adj.bmp;showname = 校准;nocardmsg = ;要改为启动多图系统的路径可以把文件改成:[凯立德导航]path = WolfNCU\wolfncu.exe;bmpiconpath = ui\navione.bmp;showname = ;加了多图系统后目录如图adjust.exe这个文件可以不要,这是触摸校准程序.wolfncu是多图系统的文件夹.要加入其他地图可以在卡里建新的文件夹即可.wolfncu多图系统的文件目录如图下面说一下WolfNCU下的基本文件夹:1、Clock文件夹:这里面有几个应用图片和一个default配置文件,default配置文件,第一部分配置可以更改时钟显示部分的图片和字体颜色;(下面是对应说明);第二部分是夏令时间,无需更改;第三部分是纪念日的文字、日期和图片的配置,其中:[Anniversary]Default=XXXXX… 关系到在图中间显示的默认内容,也可参考日月的ShowPost.asp?ThreadID=4249 四楼说明。
导航仪说明书
导航仪说明书尊敬的用户:感谢您选择我们的导航仪产品。
为了您更好地使用我们的产品,我们准备了以下说明书,帮助您了解和操作导航仪。
一、产品简介导航仪是一款便携式电子设备,内置全球定位系统(GPS)技术和地图数据,可用于车辆导航、旅行指引等功能。
本产品具有以下特点:1. 显示屏幕:配备高清液晶显示屏,分辨率为XXX,可清晰显示地图和相关信息。
2. GPS定位:通过卫星接收定位信号,准确显示车辆位置和导航路径。
3. 多重功能:除了导航功能外,还具备语音提醒、实时交通信息、周边搜索等功能。
二、使用方法1. 开机与关闭在适当的环境下,按下电源按钮开启导航仪。
关机时,长按电源按钮,跟随屏幕上的指示操作即可。
2. 菜单导航通过触摸屏幕上的主菜单图标,进入各个功能模块。
菜单栏包括地图、搜索、设置等选项。
轻触图标即可进入相应页面。
3. 导航在地图页面,您可以输入目的地地址或选择特定兴趣点。
导航仪将根据您的选项规划最佳路径,并提供语音导航指引。
4. 周边搜索导航仪支持周边搜索功能,您可以搜索附近的餐馆、加油站、酒店等兴趣点,并获取详细信息和导航路线。
三、注意事项1. 使用时,确保导航仪安装在车辆稳定的位置,并避免遮挡。
2. 导航仪内置电池,请在初次使用前充电,以保证足够的电量。
3. 为了安全驾驶,请在驾驶过程中集中精力观察路况,遵守交通规则。
4. 更新地图数据:地图数据可能会随时间变化而更新,在使用过程中,可通过官方网站下载最新地图数据。
5. 防止损坏:请避免将导航仪摔落、撞击或暴露在高温、潮湿环境中,以免造成功能异常。
四、常见问题解答以下是一些用户常见的问题及解答,供您参考:1. 问:为什么我的导航仪无法定位?答:请确保您的导航仪在空旷的室外,接收卫星信号。
同时,确认GPS功能已打开。
2. 问:如何更新地图数据?答:您可以登录我们的官方网站,在"支持"或"下载"页面下载最新地图数据,并按照说明进行更新。
Nucleus 视讯家庭终端导航指南说明书
Honey,I’m Home!Nucleus at a GlanceInstant Video & Audio CallingConnect with all your loved ones with ease, so home is justa tap away.Connect to MobileConnect your smartphone so you can easily check in on-the-go.Connect to AlexaActivate Alexa, Amazon’s voice activated virtual assistant.Privacy & SecurityThe Privacy Camera Shutter, Do Not Disturb, and Privacy settingsgive you full control of your device.MicrophoneSpeakersCameraCamera Privacy ShutterTouchscreenLED Light, SensorsOn / Off (hold),Sleep Display (tap)Your Nucleus DeviceWhat’s In The BoxNucleus DeviceWall Mounting BracketDC Power AdapterPower CordDesktop StandAdhesive Cord Clips Wood Screws & Anchors Level Cable Fasteners Product SpecificationsScreen Size 8” Diagonal IPS ScreenScreen Resolution 1280 x 800Wi-Fi 802.11 b/g/n, 2.4 Ghz onlyEthernet YesBluetooth Low Energy Yes (Reserved for future features)Power * Please visit /POE for more information DC Adapter (Included) or Power over Ethernet (POE)*Battery No Physical Camera Shutter Yes Sensors T emperature, Humidity Speakers Stereo Speakers Additional Ports Micro USB (for diagnostic use only) Ethernet (RJ45)Wide Angle Camera 5MP, 120-degree wide-angleLet’s Get Y ou Set Up!Setup OverviewMount It On Your WallPower Me Up Connect Me To The InternetSet It On Your DeskWe recommend you mount your Nucleus to your wall in areas likethe kitchen, living room, or kids’ room.Use the included DC PowerAdapter to power your device.You can connect your device through Wi-Fi oruse an Ethernet cableYour Nucleus can also be placed on any flat and stable surface usingthe desk mount.Alternatively if you have Power Over Ethernet, that can be used to power and to connect your device to the Internet.To learn more about Power Over Ethernet (POE), visit /POESlide the wall mount bracket*This side up6. Attach Your Nucleus 5. Power On Your Device7. Attach Cord Clips1. Power Your Device2. Attach Desk StandLED Light GuideNucleus LED LightMaintenance & SupportMaintenanceCustomer SupportWarrantyClean the screen with a soft cloth; be careful not to wipe it with anything abrasive.Experiencing Problems?*************************************’ll be happy to solve your issues.This device is not waterproof. Please keep your Nucleus device away from rain, sinks, or other wet locations.For additional product information and helpful tips, visit: /supportNucleus comes with a limited one-year warranty. For more information, visit:/warrantyDon’t expose the Nucleus device to extreme heat. Do not place in direct sunlight. Do not attempt to dry your Nucleus with an external heat source such as a microwave or hair dryer.Don’t expose the Nucleus device to extreme cold. For example, don’t leave it in the trunk of your car in sub-zero temperatures.If your device gets wet, unplug all cables and wait for the device to completely dry beforepowering it on.。
UB系列车型 Android 导航使用说明书
CatalogNavigation (1)Main Menu / How to use NavigationMusic Player (3)Music Player interface / Interface IntroductionHD Video Player (5)Video Player interface / Interface IntroductionPIP Settings (Picture in Picture)Bluetooth telephone and Music (7)Bluetooth connection / Bluetooth MusicBluetooth SettingsPhone-link (09)IOS Phone connectionAndroid Phone Connection DVR (11)USB DVR connection Method/AV DVR Connection MethodRear-view camera (13)Reversing camera connection/Reversing camera settings Information about Steering Wheel Control (14)How to control by I-DRIVE/Steering Wheel Buttons Settings (15)Audio/System/More Settings/System InfoSystem Upgrade (18)Firmware Upgrade / MCU Upgrade / Configuration Upgrade Specification and Accessories (19)Specification / Accessories1.Main MenuFirst PageSecond Page2. How to use NavigationEnter the first page.Click icon “Navigation”,access into Navigation function.Navigation1.Music Player Interface2.Interface Introduction3.Support Audio FormatAPE/FLAC/WMA/AAC/OGG/RA/WAV/MP3/MP2Music Player1.Support Video FormatH.263/H.264/MPEG1/MPEG2/MPEG4/RMVB/AVI/WMV/3GP/MP4/MOV /MPG/VOB/MKV/FLV/TS/TP/DAT etc..2.Video player Interface3.Operation Menu4.PIP settings (Picture in Picture)5.Full Screen PlayHD Video PlayerPlay/PauseUSBSelect this icon for achieving the PIP function .Touch an arbitrary point within this area for achieving playing in full screen.1.ConnectionTurn on the Phone Bluetooth and search for Bluetooth devices;Default Device name:GocAndroidPassword:00002.Dial3.Missed/Received callNote: Only can check the call log that called after connecting Bluetooth..4.Bluetooth music(*Phone should with Music Player and turn it on)5.Bluetooth SettingsYou can revise the name and password by your own.Bluetooth Telephone and Music1.IntroductionIt can map the phone screen to the device screen and display it. Supppot IOS 7.0 version or above and Android 5.5 verison or above2.Connection and NotesClick”IPHONE WIFI” or “Android WIFI”,Follow the instructionsin the screen.It will display the pictures,videos, and Navigation to device screen.*Note:1)Android version: Must connect by USB cable for the first time. 2)Android version: Must connect Bluetooth first3) If sharing the HOTSPOT from mobile phone, it would quick connect well.4)Android system: Two-way control ; IOS verisom: one way control by phone.5)Android version: Must use data cable not only for chargingPhonelink*Must install DVR device before using this function..1.Connecting method of USB2.0 DVRConnect USB DVR with USB connector, install APK of DVR.1) Connect USB Cable with android device.2) Connect USB DVR with USB connector,2.Connecting method of AV DVRAV DVR: Connect the RAC connector with Device,1) Connect AV Cable with android device.;2)Connect AV DVR with AV connector3.Setttings for AV DVRIn Factory Settings - DVR - CVBS DVR (√)After installing, click the DVR icon then it can show the current picture.*Tips:1) If you want use DVR Icon in Main menu, please order from us.2) If you installed the DVR from other suppliers, Please install the certainAP and use DVR in APPs.3) what DVR you use,it determines the sharpness of images.DVRIf you need check the reversing info, Car should be with camera.Support Original camera/Aftermarket camera/and 360 Camera1.Connecting2. Reversion camera OptionsAfter connecting well the camera, choose the correct options insettings.3.Reversion displayYou can settings the Brightness/contrast and the path line/Radar Only can show the display of Radar if the original car with Radar.Steering Wheel ControlIt can control some function in Android systemReversing cameraVideo InputPower360 Detection InputSettingsDisplayRadarNaviAnswer /Hang up Previous/Next Track Mode Volume+/-1. Settings2.Navi SettingsYou can choose one navigation as default navi.3. LanguageOnly support simplified Chinese/Traditional Chinese /English4.TimePlease set it according te the preference of the customers5.AudioPlease set it according te the preference of the customers. The volume of Bluetooth and navigation can be set here.SettingsPrevious/Next Sub menuPreview6.System1) Rear view mirror cameraThe camera ,right and left is the opposite 2)Video while driving ban*For your safety, watching Video is forbidden when driving. 3) Rear view camera typeChoose the correct one according the one you use. 4) BrightnessPlease keep the Default brightness. If set it too bright,the screen will be heat.7.System infoSystem info is the version of the Device.8.More settingsIt is Android original settings.Please set it according te the preference of the customers*Note: Please do not revise the settings if you were not a professional.Update of our deviceOur device will Update irregularly;For APK update,if connected to Internet,it will remind you to update. For System update-MCU, please contact technicians. Do not update it by yourselves before getting any permission from technicians.Settings1.Feature1) HardwareCUP: A9 1.2G Quad coreRAM: 1G(or higher)ROM:16G(or higher) Display :24:9Resolution:1280*480 RGBTouch screen: G+G capacitive touch screen2)SoftwareAndroid 4.4.4 or higher version 3)SpecificationWoring Voltage :DC 10.8-16V Working Temperature:-20---+60℃ Android Boot time:<40 secondsGPS positioning :<30seconds(Outdoors ) GPS Precise positioning: 5 Meters Reversing response time:<1 second2.AccessoriesFeature and AccessoriesPower Harness X1USB cable X1GPS Antenna X1AV DVR Cable X11:Wrong Display or showing not correctly.Reason:wrong resolutionSolution: Select the correct Cantype in FACTORY SETTINGSSteps: Factory Settings - Cantype.2.Bo display/No sound.Reason: Did not remove the optic fiber from Original power harness and plug it into our power harness.Solution :remove the optic fiber from Original power harness and plug it into our power harness.3. Not allowing to installing APKReason:The option “Do not install third party software” is on.Solution: In Factory Settings, do not choose this option,then it is ok.FAQSImportant statements:Android devices are with faster upgrading, Product you buy might not completely the same as the this user manuals. If any difference,please refer to the actual products.If any questions,pleae feel free to contact us.。
FV-CUE2专用倒车盒 安卓一体机安装使用说明书
产品型号: CAM‐CUE2【倒车盒】FAN‐CUE2【安卓一体机】这个解码器/安卓一体机能够给CUE2的GM 系列车型【界面和主机分别如左图和上方图表示】,添加倒车/导航/360图像。
适合车型【CUE2的产品】:兼容凯迪拉克及进口凯迪拉克18-19款凯迪拉克CT6、ATS、XT4 以及18-19款GMC SIERRA、GMC TERRAIN、雪佛兰Blazer 等车型。
本接口盒可以向以上车型提供倒车影像轨迹、3D-360度环视、夜视仪、DVR 功能 、实时路况、智能双向手机互联 、高清导航等 。
保留原车所有功能,所有插头都是对接,安装简单可靠。
● 插头采用专用接头,在主机后方进行对插转接,产品稳定,画质清晰;切换的过程稳定而且快速,没有延时和屏幕抖动。
● 连接360的时候,自动产生倒车信号,轨迹线信号,用户不需要单独接倒车灯线; ● 内置的安卓导航一体机能够提供实时路况,主动规避拥堵路线。
利用原车的触摸屏进行操作。
● 触摸原车屏幕左上角进行通道切换,不同视频通道之间切换平滑稳定。
FV-CUE2专用倒车盒/安卓一体机安装使用说明书_V20181114CUE2CUE2CUE2的特点是显示后都采用这样的插座。
显示对于采用CUE‐1的GM 车型:【2013~2018,凯迪拉克,雪佛兰,别克等】采用如下解码器对应:1. 京乐驰的FV_GM_CUE2016可以进行图像接入, 无论是10寸【比如CT6,分辨率1280x720】,7寸还是8寸 【XTS ,分辨率800x480】。
FAN_GM_CUE2016,FV_GM_CUE2016的产品外观如下,视频LVDS 在主机后转接。
电源线在主机后转接。
它们安装到中期改款的CUE‐1,需要更换2根线【LVDS 和电源】:2.对于采用4.3寸CUE1的车型,京乐驰的FV‐Cadillac2013可以进行图像接入, 它也支持所有的7寸屏【800x480】,不同点是:1)FV‐Cadillac2013支持所有4.3寸凯迪拉克,雪佛兰,别克显示屏,但是不支持10寸【1280x720分辨率】的CT6. FV_GM_CUE2016支持所有的7寸和8寸显示屏以及高清的10寸屏,但是不支持4.3寸屏。
- 1、下载文档前请自行甄别文档内容的完整性,平台不提供额外的编辑、内容补充、找答案等附加服务。
- 2、"仅部分预览"的文档,不可在线预览部分如存在完整性等问题,可反馈申请退款(可完整预览的文档不适用该条件!)。
- 3、如文档侵犯您的权益,请联系客服反馈,我们会尽快为您处理(人工客服工作时间:9:00-18:30)。
索澳导航一体机。
背面说明。
导航一体机的背面说明书:
第一,把导航仪的背夹卡在导航仪的背面。
第二,把吸盘支架卡进导航背夹的接口处,卡号之后即可把吸盘吸在车上的挡风玻璃的位置,车主可以根据自己的感观吸在挡风玻璃处的一个最佳位置。
这款有分单导航和导航三合一的,单导航的安装方式和上面一样的,那么导航三合一就是搭配了一个行车安全提示器(电子狗),安装方式和前面一样的,吸盘支架上有个可以卡电子狗的,安上去即可。
第三,开机之后如何使用地图呢?首先开机之后进去了机器的主界面,然后您会看到机器的左上角的第一个图标,像一辆小汽车的图标即导航图标,点击进去进去地图初始界面;然后点击一下导航A即可进去正版道道通地图。
第四,很过顾客朋友们很困惑,如何设置地图的目的地和出发地呢?接下来咱们就以机器自带的正版道道通地图为例,如何设置机器的出发地和目的地。
步骤如下:
1.点击导航A进去道道通地图;
2.点击左边的向上的箭头号,然后点击功能;
3.点击路线规划;
4.您的出发地是默认显示出来的只要您的机器连接卫星成功了,就会默认想显示出来的,您的出发地在界面的第一个位置,无需设置出发地了;
5.设置目的地点击界面最下方一个目的地:
6.点击加号设置目的地,输入地名,输入之后点击搜素,然后在信息点中点击您要去的具体位置,然后点击右下角的选点,然后点击开始导航,即可实现出发地和目的地路线,非常简便哦!。