锅炉炉膛火焰电视监视系统用户手册
炉子点火及火焰监测系统作业指导书
炉子点火及火焰监测系统作业指导书一、编制目的:为了提高自控仪表维护人员的技术水平,在生产维护中能及时处理仪表故障,特编制此指导书。
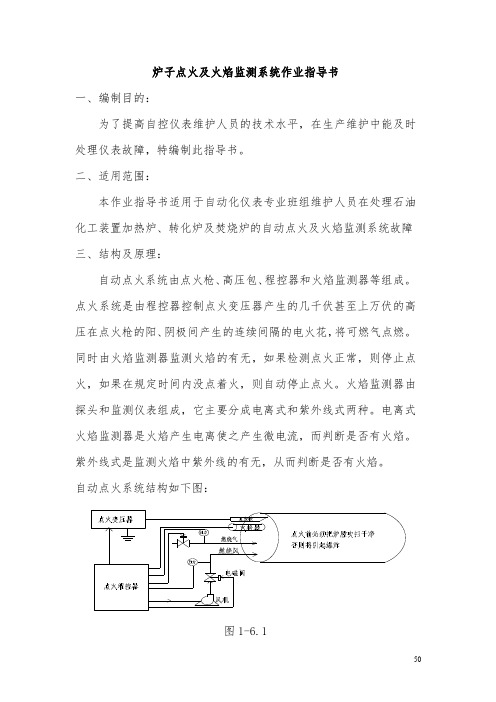
二、适用范围:本作业指导书适用于自动化仪表专业班组维护人员在处理石油化工装置加热炉、转化炉及焚烧炉的自动点火及火焰监测系统故障三、结构及原理:自动点火系统由点火枪、高压包、程控器和火焰监测器等组成。
点火系统是由程控器控制点火变压器产生的几千伏甚至上万伏的高压在点火枪的阳、阴极间产生的连续间隔的电火花,将可燃气点燃。
同时由火焰监测器监测火焰的有无,如果检测点火正常,则停止点火,如果在规定时间内没点着火,则自动停止点火。
火焰监测器由探头和监测仪表组成,它主要分成电离式和紫外线式两种。
电离式火焰监测器是火焰产生电离使之产生微电流,而判断是否有火焰。
紫外线式是监测火焰中紫外线的有无,从而判断是否有火焰。
自动点火系统结构如下图:图1-6.1四、危害分析及安全措施:由于点火枪在点火时有高电压产生,因此在检查点火枪和点火变压器时要注意防止电击,带电时不能直接接触,避免高压电击伤人。
一般情况下应关闭电源检查。
由于炉堂中有可燃气,有的炉子还有有毒有害气体,点火前炉膛必须按程序进行吹扫,确认吹扫干净后才具备点火条件吹扫完成后才能点火,绝对禁止未吹扫,先进燃烧气再点火,这样炉子有发生爆炸的可能。
同时在检查炉膛里面点火枪和火焰监测器等控制元件时应该先关闭燃气控制阀门和介质入口阀门,并且检查时应配戴防护眼镜和防护面罩。
在检查程控器线路时,由于线路一般都带220VAC高压电,为了防止电击,必须使用绝缘工具和仪器,并且要防止短路。
由于炉膛内部温度高,检查火焰监测器时不能随便关闭其冷却风,防止损坏火焰监测器。
五、点火系统常见故障及排除方法1、自动点火系统不点火故障分析步骤:程控器点火控制程序是否正常,如不正常检查软件及硬件,逐一排除,更改或更换。
达不到点火条件,程控器不能启动,必须满足点火条件2、点火时有火花点不着火:点火枪位置是否插对,如不对调整到合适位置,确保点电火花能量点火枪阳极是否洁净,如有污垢,清理干净检查燃烧气电磁阀是否打开。
富尔顿锅炉FBD型用户手册

热水锅炉
1. 主供水阀(选配) 2. 回水阀(选配) 3. 安全阀 4. 放气阀 5. 排污阀 6. 温度/压力表集成 7. 低水位保护 8. 温度保护和控制 9. 极限温度联锁 富尔顿公司可根据用户的需要为您配备其它选配件。
安全阀由厂方预装在锅炉顶部并预先设置,无权威部门及富尔顿公司的许可不得进 行调整。
a) 在安全阀上标明了开启压力,未经权威部门的许可不得进行调整。 b) 安全阀的作用是防止锅炉内的压力超过其设计压力。 c) 任何与锅炉相连接的系统,如不能承受锅炉的压力,必须用一个独立的安全阀
对其进行保护,该安全阀的设定开启压力应能被系统所承受。 d) 建议妥善安装泄压管,其尺寸必须大于等于安全阀出口,泄压管必须有足够强
简
介
本手册介绍了如何正确地操作和维护您的富尔顿锅炉,要保证负责锅炉运作 的操作人员人手一册,并按本手册的要求对锅炉进行维护。
本手册不应被当成是锅炉运行的标准,它也不应替代现行的任何标准。
正确的使用及维护锅炉是操作人员的职责,操作人员不应以操作手册代替思 考和对故障原因的判断。该手册不应成为操作人员操作不当推卸责任的理由。
安装整装锅炉时,应详细阅读本手册中的有关章节以确保正确的安装。锅炉 的安装及使用应符合所有当地有关法规的规定。
为了确保用户得到高质量的产品,装箱前进行了下列测试:
a. 材料检测
f. 运行试验
b. 生产过程检测
g. 最后检测
c. 焊接检测
h. 装箱检测
d. 水压试验(劳动局驻厂监检)
ABB火焰检测装置用户手册

命令菜单 主菜单
MFD1.0 B1G2# 1
Name: B1G2 Channel: 1 Flicker Channel: 2 Pulse OK C Channel : 1.1 Set 1 Channel : 1.1 Set 2 Channel : 1.1 Set 3 Channel : 1.1 Set 4 Channel : 1 Scan Flame ID Node: 1 Baud Rate: 4800 Network Access: Enabled Analog Outputs: 4-20mA
1
BG=10
Fs=
1
PA=10
Fs=
1
DW=1
Fs= sec Fs= sec Fs=
1
UP=1
* Channel : 1
Scan Flame
2
*2 1
LF=200Hz
*2 1
HF=300Hz
Fs=
*1 Channel : 1
Set up
Channel : 1 Ch1=PA2+PA1 Channel : 1 Ch1=PA2&PA1[Set?]
PDF created with FinePrint pdfFactory trial version
参数组设置
每个通道的三个参数组,可通过外部自 由电压接点或逻辑输出 24Vdc 进行选择
火焰继电器动作时间 火焰信号输出
可设置 1-5 秒 每个通道一个,0-10V 或 4-20mA 无 电隔离
远方通讯 自检时间周期 环境温度
一个 RS485 接口通讯规约 MODBUS 2 分钟 工作:0-60℃ 贮存:-25-85℃
相对湿度
≤75%,常年不凝结 ≤95%,每年 30 天不凝结。
SU-2000用户手册(3月20日)

SU-2000火焰检测器用户手册目录1 介绍 (1)1.1 产品开箱确认 (1)1.2 声明 (1)2 描述 (2)3 主要部件 (3)3.1 挠性光纤组件 (6)3.2 观测管组件 (6)3.3 安装管组件 (7)3.4 冷却风软管 (7)3.5 手动球阀 (7)3.6 火检探头 (7)3.7 电缆组件 (8)3.8 电源组件 (8)3.9 联网软件 (8)4 安装 (9)4.1 观测管组件的安装 (9)4.2 挠性光纤组件的安装 (10)4.2.1 外导管组件的安装 (10)4.2.2 内导管组件的安装 (11)4.3 安装管组件的安装 (11)4.4 冷却风软管的安装 (11)4.5 火检探头的安装 (11)4.6 电源组件的安装 (11)4.7 电缆组件就地接线盒的安装 (11)4.8 电气连接 (12)5 调试 (13)5.1 冷态调试 (13)5.2 热态调试 (14)5.2.1 热态调试-油火检调试 (14)5.2.2 热态调试-煤火检调试 (15)6 操作 (17)6.1 自动选择鉴别频率 (17)6.2 手动选择鉴别频率 (18)7 常见问题处理 (19)8 维护 (21)8.1 光纤 (21)8.2 内导管组件 (22)8.3 外导管组件 (22)8.4 观测管组件 (22)8.5 冷却风软管 (22)8.6 火检探头 (23)8.7 电缆组件 (23)9 仓储 (24)10 产品返修 (25)11 备件采购 (25)12 表单模板 (26)12.1 RMA维修联络单模板 (26)12.2 备件询价单模板 (27)其他附图∙挠性光纤组件∙观测管组件∙电源分配回路图∙火检系统接线原理图∙电源柜外形尺寸示意图∙就地接线盒及接线示意图∙火检系统联网图1 介绍SU-2000火焰检测器作为锅炉安全检测设备,被广泛运用于电站、石化、冶金等行业的单燃烧器或多燃烧器锅炉中,在锅炉启动、运行的各个阶段,对燃烧器火焰进行准确检测,能够有效地预防燃料送入炉膛而未被点燃时可能导致炉膛爆炸的潜在危险,为锅炉安全稳定运行提供保护。
锅炉控制系统操作手册

本手册为有一定电气和计算机知识的工程师、操作人员、维护人员及电气人员编写。
如何使用本手册
您需要通读本手册,然后通过目录查找相应信息。
第一章
锅炉控制系统,主要由监控主机、系统控制器、节能控制系统、数据采集系统、通讯系统以及其它低压保护和控制电器元件构成。
锅炉控制系统采用了先进的工业自动化、测控、变频和通讯网络技术,对系统进行全自动寻优控制,有效的降低能耗,减轻劳动强度,提高经济效益和延长设备的使用寿命。设备的各项报警和保护功能齐全,安全系数大大提高。对供暖设备信息进行采集、显示、并进行处理后作为实现自动化控制的依据,其中控制设备为一拖一控制方式即一台变频器拖动一台循环水泵另一台为工频备用(一用一备),其中供暖管道温度传感器对供暖管道温度进行数据采集和对系统设备集中控制,更直观的显示现场系统在运行中的各种工况数据,提高了系统的可靠性。
参数设置功能:
本系统参数设定包含蓄热罐温度设定,频率设定、压力设定等。
安全防护功能:
系统为了保证整个系统的安全,在没有获得授权的情况下,非值班运行人员,不得进行任何的操作和参数设定。只有登录的用户才可以进行相应的操常运行中,为了便于运行人员对设备及运行的参数管理,当设备出现故障或运行的数据与设定的参数不符时,系统报警,提醒运行人员。
警告
如果不采取适当的预防措施,将导致死亡或严重的人身伤害的可能,以及发生设备事故等。
小心
如果不采取适当的预防措施,将有可能导致人身伤害或不希望的结果、状态以及财产损失。
危险
绝对不能对设备进行改造,否则可能导致设备事故及不可预料的结果。
合格人员
合格人员是指被授权按照安全规范和标准,对线路、设备及系统进行调试、接地和维护的人员。只有合格人员才允许操作和维护该设备。
布朗·欧斯 天然气烈焰锅炉用户手册说明书
Gas hob[en]Instruction manual22 Control knobs3 Auxiliary burner (up to 1kW)5 Rapid burner (up to 3kW)6Triple-flame wok burner (up to 4 kW)Safety precautions (2)Your new appliance...................................................................4Accessories .........................................................................................4Gas burners................................................................................4Switching on manually.......................................................................4Switching on automatically................................................................4Safety system......................................................................................4Switching off a burner........................................................................5Power levels.........................................................................................5Warnings...............................................................................................5Cooking guidelines.............................................................................5Cooking pans.............................................................................5Suitable pans.......................................................................................5Precautions for use. (5)Cleaning and maintenance........................................................6Cleaning...............................................................................................6Maintenance........................................................................................6Trouble shooting.........................................................................6Technical Assistance Service ...................................................7Warranty conditions............................................................................7Used appliances and packaging...............................................7Environmentally-friendly disposal.....................................................7Additional information on products, accessories, replacement parts and services can be found at and in the online shopRead these instructions carefully. You will only be able to use your appliance safely and effectively when you have read them. These operating and installation instructions should be retained, and passed onto the buyer if the appliance is sold.The manufacturer is exempt from all responsibility if the requirements of this manual are not complied with.The images shown in these instructions are for guidance only.Do not remove the appliance from its protective packaging until it is installed in the unit. Do not switch on the appliance if it is damaged in any way. Contact our Technical Assistance Service.This appliance is class 3 type, according to the EN 30-1-1 regulation for gas appliances: built-in appliance.Before installing your new hob, ensure that it is being installed according to the assembly instructions.This appliance cannot be installed on yachts or in caravans.This appliance must only be used in well ventilated places.This appliance is not intended for operation with an external clock timer or a remote control.All operations relating to installation, connection, regulation and conversion to other gas types must be performed by an authorised technician, respecting allapplicable regulations, standards and the specifications of the local gas and electricity suppliers. Special attention shall be paid to ventilation regulations.This appliance leaves the factory set to the gas type that is indicated on the specifications plate. If this needs to be changed, please consult the assembly instructions. It is recommended you contact the Technical Assistance Service to change to another gas type.This appliance has been designed for home use only, not for commercial or professional use. This appliance is only intended for cooking purposes, not as a heating system. The warranty will only be valid if the appliance is used for the purpose for which it was designed.Never leave the appliance unattended during operation.Do not use lids or protective barriers for children which are not recommended by the hob manufacturer. They may cause accidents such as those due to the overheating, ignition or detachment of fragments of materials.This appliance may be used by children8years old and older and by persons with reduced physical, sensory or mental capacity or a lack of experience or knowledge if they are supervised or they have been instructed about the safe use of the appliance and have understood the associated dangers.Never let children play with the appliance. Cleaning and user maintenance must not be carried out by unsupervised children. Risk of deflagration!Accumulation of unburned gas in an enclosed area carries a risk of deflagration. Do not subject the appliance to draughts. These might blow out the burners. Carefully read the instructions and warnings on the operation of gas burners.Risk of poisoning!The kitchen will become hot and humid and combustion products produced when this gas appliance is used. Make sure the kitchen is well ventilated, particularly when the hob is in operation: either keep the natural ventilation apertures open, or install a ventilation system (extractor hood). Intense prolonged use of the appliance may require additional or more effective ventilation: open a window or increase the power of the ventilation system.Risk of burns!The hotplates and their immediate vicinity get very hot. Never touch the hot surfaces. Keep children under 8 years old well away from this appliance.Risk of fire!■The hotplates get very hot. Do not rest inflammable objects on the hob. Do not store objects on the hob.■Do not store or use corrosive chemicals, products which produce fumes, inflammable materials or non-food products below or near this domestic appliance.■Fat or oil which is overheated can catch fire easily. Never leave fat or oil to heat up unattended. If oil or fats do catch fire, never use water to put the fire out. Put the fire out by covering the pan with a lid and switch off the hotplate.Risk of injuries!■Sudden changes in temperature may cause breakage of the glass. While using your hob, prevent any draughts and do not spill any cold liquids on it.■Pans which are damaged, are not the right size, hang over the edge of the hob or are not positioned correctly can cause serious injuries. Follow the advice and warnings provided relating to the cooking pans.■In the event of a malfunction, turn off the appliance’s gas and electricity supply. For repairs, call our Technical Assistance Service.■Do not tamper with the appliance's interior. If necessary, call our Technical Assistance Service.■If one of the control knobs will not turn, do not force it. Call the Technical Assistance Service immediately so that they can repair or replace them.Risk of electric shock!■Do not clean the appliance using steam cleaners.■Cracks or breaks in the glass may carry an electrocution risk. Disconnect the fuse from the fuse box. Notify the Technical Assistance Service.34Page 2 shows an overall view of your new appliance as well as the burner power.AccessoriesDepending on the model, the hob may include the following accessories. These can also be acquired from the Technical Assistance Service.The manufacturer accepts no liability if these accessories arenot used or are used incorrectly.There are indications to show which burner each control knob operates.It is essential to ensure that all the burner parts and pan supports are correctly installed for the appliance to work correctly. Do not swap the burner caps around.Switching on manually1.Press the chosen burner control knob and turn itanticlockwise to the required setting.e any type of lighter or flame (cigarette lighter, matches,etc.) and bring it close to the burner.Switching on automaticallyIf your hob can be switched on automatically (ignition sparkers):1.Press the chosen burner control knob and turn itanticlockwise to the maximum power setting.While the control knob is still pressed down, sparks are produced on all burners. The flame ignites.2.Release the control knob.3.Turn the control knob to the required setting.If it does not come on, turn the control knob to the off setting and repeat the steps above. This time, press and hold the control knob for longer (up to 10 seconds).: Risk of deflagration!If after 15 seconds the flame does not ignite, switch off the burner and open a nearby window or door. Wait at least one minute before trying to switch the burner back on.Safety systemDepending on the model, your hob may have a safety system (thermocouple) that prevents the flow of gas if the burners accidentally switch off.To ensure that this device is active:1.Switch on the burner as usual.2.Without releasing the control knob, press and hold it downfirmly for 4 seconds after lighting the flame.Additional wok pan support Only for use on wok burners with pans with a round base.The additional wok pan sup-port should be used to pro-long the appliance's usefullife.5Switching off a burnerTurn the corresponding control knob clockwise to the 0 setting.Power levelsThe progressive control knobs can be used to control the power needed, from minimum to maximum power.WarningsIt is normal to hear a soft whistling noise while the burner is operating.When first used, it is normal for the burner to give off odours. This does not pose any risk and does not indicate a malfunction. They will disappear in time.An orange-coloured flame is normal. This is caused by the presence of dust in the atmosphere, spilt liquids, etc.If the burner flames are accidentally blown out, switch off the burner operating control knob and do not try to relight it for at least 1 minute.A few seconds after the burner is switched off, a sound (thud) will be produced. This is not a fault - this means that the safety device is no longer operating.Keep the burner as clean as possible. If the ignition sparkers are dirty they will not light properly. Clean them periodically using a small non-wire brush. Bear in mind that the ignition sparkers must not suffer any serious impacts.Cooking guidelinesSuitable pansPrecautions for useThe following advice is intended to help you save energy and prevent pan damage:Setting ÛControl knob offHigh flame —Maximum capacity or aperture and elec-tricity onLow flame˜Minimum capacity or apertureBurner Very high - HighMediumLowWok burnerBoiling, steam-ing, griddling,toasting, paellas, Asian food (wok).Reheating and keeping things hot: cooked and pre-cooked dishes Rapid burner Escalopes,steaks, ome-lettes, frying Rice, white sauce, ragout Steaming: fish, vegeta-blesSemi-rapid burnerSteamed pota-toes, fresh vege-tables, vegetable stews, pasta Reheating, keeping things hot and making tasty casse-rolesAuxiliary burnerCooking: casse-roles, rice pud-ding, caramelDefrostingand slowcooking: veg-etables, fruit and frozen productsMelting: but-ter, choco-late, jelly Burner Minimum pan diameter Maximum pan diameter Wok burner 22cm 30cm Rapid burner 22cm 26cm Semi-rapid burner 14cm 20cm Auxiliary burner12cm16cmUse pans which are the right size for each burner.Do not use small pans on large burners. The flame must not touch the sides of the pan.Do not use damaged pans, which do not sit evenly on the hob. Pans may tip over.Only use pans with a thick, flat base.Do not cook without using a lid and make sure the lid is properly fitted. This wastesenergy.Always centre the pan over the burner, not to one side. Otherwise it could tip over.Do not place large pans on the burners near the control knobs. These may bedamaged by the very high temperatures.Place the pans on the pan supports, never directly on the burner.Make sure that the pansupports and burner caps are correctly positioned before using the appliance.Pans should be placed on the hob carefully.Do not strike the hob and do not place excessive weight on it.Never use two burners or heat sources to heat one single pan.Do not use grill pans,earthenware casserole dishes, etc. for a long period of timeon maximum power.6CleaningOnce the appliance is cool, use a sponge to clean it with soap and water.After each use, clean the surface of the respective burner parts once they have cooled down. If any residue is left (baked-on food, drops of grease etc.), however little, it will become stuck to the surface and more difficult to remove later. The holes and grooves must be clean for the flame to ignite properly. The movement of some pans may leave metal residue on the pan supports.Clean the burners and pan supports using soapy water and scrub with a non-wire brush.If the pan supports are fitted with rubber rests, ensure thatthese are also cleaned. The rests may come loose and the pan support may scratch the hob.Always dry the burners and pan supports completely. Water droplets or damp patches on the hob at the start of cooking may damage the enamel.After cleaning and drying the burners, make sure the burner caps are correctly positioned on the diffuser.Caution!■Do not use steam cleaners. This could damage the hob.■Never use abrasive products, steel scourers, sharpimplements, knives, etc. to remove bits of hardened food from the hob.■Do not use knives, scrapers or similar implements to clean the point where the glass meets the burner trims, the metal frames or the glass/aluminium panels, if fitted.MaintenanceAlways clean off any liquid as soon as it is spilt. This willprevent food remains from sticking to the hob surface and you will save yourself any unnecessary effort.Never slide pans across the glass surface, as you may scratch it. In addition, try not to drop heavy or sharp objects on the glass. Never strike any part of the hob.Grains of sand that may come from cleaning fruits and vegetables will scratch the glass surface.Melted sugar, or foods which contain a lot of sugar which may have spilt, should be cleaned off the hotplate immediately,using the glass scraper.Sometimes certain faults detected can be easily resolved. Before calling the Technical Assistance Service, bear in mind the following advice:FaultPossible causeSolutionThe general electrical sys-tem is malfunctioning.Defective fuse.Check the fuse in the main fuse box and change it if it is damaged.The automatic safety switch or circuit breaker has tripped.Check the main control panel to see if the auto-matic safety switch or circuit breaker has tripped.The automatic switching on function does not work.There may be food or cleaning products stuckbetween the ignition sparkers and the burners.The space between the ignition sparker and the burner must be clean.The burners are wet.Dry the burner caps carefully.The burner caps are not correctly positioned.Check that the burner caps are correctly posi-tioned.The appliance is not earthed, is poorly connected or the earthing is faulty.Contact the installation technician.The burner flame is not uni-form.The burner components are not correctly posi-tioned.Correctly place the parts on the appropriateburner.The grooves on the burner are dirty.Clean the grooves on the burner.The gas flow is not normal or there is no gas.The gas supply is blocked by gas taps.Open all gas taps.If the gas is supplied from a gas cylinder, check that it is not empty.Change the gas cylinder.The kitchen smells of gas. A gas tap has been left on.Turn off the taps.Incorrect coupling of gas cylinder.Check that the coupling is sound.Possible gas leak.Shut off the gas supply, ventilate the premises and immediately notify an authorised installation techni-cian to check and certify the installation. Do not use the appliance until ensuring that there is no gas leak in the installation or appliance itself.The burner immediatelyswitches off after releasing the control knob.The control knob was not held down for long enough.Once the burner is on, hold the control knob down a few seconds longer.The grooves on the burner are dirty.Clean the grooves on the burner.7When contacting our Technical Assistance Service, please provide the product number (E-Nr.) and production number (FD) of the appliance. This information is given on thespecifications plate located on the lower section of the hob and on the label in the user manual.Warranty conditionsIn the unlikely event that the appliance is damaged or does not meet your expectations in terms of quality, please inform us assoon as possible. For the warranty to be valid, the appliance must not have been tampered with, or used inappropriately.The applicable warranty conditions are those set out by the company's representative office in the country of purchase. Detailed information is available from retail outlets. Proof of purchase must be presented to obtain the benefits of the warranty.We reserve the right to introduce changes.If the ) symbol is shown on the specifications plate, bear in mind the following instructions:Environmentally-friendly disposalDispose of packaging in an environmentally-friendly manner.The packaging of your appliance has been manufactured using only the materials which are strictly necessary to guarantee efficient protection during transport. These materials are 100% recyclable, thus reducing the environmental impact. You can also contribute to caring for the environment by following the advice below:■Dispose of the packaging in the appropriate recycling bin.■Before you get rid of an old appliance, make sure you disable it. Contact your local authority to find out the address of your nearest recycling centre to dispose of your appliance.■Do not pour used oil down the sink. Collect it in a sealed container and take it to an appropriate collection point or, failing that, place it in the rubbish bin (it will end up in a controlled dump; this is probably not the best option, but it will avoid contaminating ground water)This appliance is labelled in accordance with European Directive 2012/19/EU concerning used electrical and electronic appliances (waste electrical and electronic equipment - WEEE). The guideline determines the framework for the return and recycling of used appliances as applicable throughout the EU.A*9000904470*9000904470Robert Bosch Hausgeräte GmbH Carl-Wery-Straße 3481739 München Germany。
炉膛火焰监视彩色工业电视系统

炉膛火焰监视彩色工业电视系统技术指标及功能一、YXTV-L型高温炉膛火焰监视彩色工业电视系统1、系统概述为了确保电厂锅炉的安全生产,公司在吸收国内外同类产品先进技术的同时,结合我国锅炉运行实际情况研制成功YXTV-L型高温炉膛火焰监视彩色工业电视系统。
该系统是监视锅炉运行的一种重要设备。
其摄像探头可直接伸到炉膛内,真实反映其内部火焰的燃烧情况,操作人员可在控制室外内通过彩色监视器观察到锅炉内点火、灭火及正常燃烧等现象,能及时发现各种危险状况,从而制止事故的发生,这对于提高生产效率,改善工作条件,将起到重要作用。
(1)系统主要组成部分①具有保护功能的摄像探头②摄像机控制器③电气控制柜④气源控制柜⑤传动装置⑥彩色监视器⑦视频电缆、控制电缆、金属软管等备注:摄像探头由光学镜头、CCD彩色摄像机和不锈钢风冷组成。
(2)系统特点①光学镜头设计为视场角90°、仰角20°、带远控光圈的特种高温镜头,另外还配有各种滤色片,以适应不同的光谱范围。
见下表:②在彩色监视器上逼真地显示与真实场景一致的色彩。
③该系统采取了风冷却、镜风与吹扫风吹扫及特种金属防腐等保护措施,从而满足在高温、强腐蚀等恶劣条件下长期工作的需要。
④针对电厂保护条件、气的波动性,该系统采用压力、传感技术、使系统具备自我保护的功能,并设计了由微型电机拖动的传动装置。
2、系统主要配置(1)CCD彩色摄像机①功能CCD(电荷耦合器件)彩色摄像机把入射到图像传感器上的图像光学信号分成若干个像点,以串行方式,按时间序列逐一输出每个像点信号,即视频信号,经过放大电路放大后,由视频电缆送至图像控制器,再由图像控制器视频线送至监视器显示图像。
(也可由视频电缆送至彩色监视器显示。
)摄像机温度由涡流制冷器控制,温度保持在20℃左右。
②技术指标行频:15625Hz场频:50Hz视频输出:1.0VP-P 75ΩCCD尺寸:6.4mm×4.8mm有效象素数:752(H)×582(V)分辨率:500TVL(水平)信噪比:≥50dB工作电源:AC24V/50Hz或 DC12V工作温度:-10℃~+60℃净重:0.40kg③CCD彩色摄像机工艺及工作过程●工艺CCD彩色摄像机图像机图像传感器是在硅片上采用氧化、扩散、离子注入、光刻等集成电路工艺而制成的半导体集成光电器件,其基本结构是由金属或低阻多晶硅膜、二氧化硅和硅组成的MOS电容,同时经高温固化处理。
STV4700型高炉炉顶红外成像系统使用说明书范文

STV4700型高炉炉顶红外成像系统使用说明书范文目录一、高炉炉顶红外成像工业电视系统的特点二、高炉炉顶红外成像工业电视系统气水原理三、高温探头的结构特点介绍四、高炉炉顶红外工业电视系统的使用及维护规程五、红外成像工业电视系统的电气控制六、高炉监控系统伪彩软件的安装使用七、数字硬盘录象机的数据的备份八、高炉红外成像工业电视备件清单九、高炉炉顶红外成像工业电视系统的附图十、高炉红外成像工业电视在线维护规程及红外探头内套维护说明一、高炉炉顶红外成像工业电视系统的特点STV4700型高炉炉顶红外成像工业电视系统是一种安装在高炉上的特种监控设备,它直接安装在高炉炉顶上,通过预留孔对炉内生产情况进行实时连续监测,在控制室的监视器上就可以对炉内摆动溜槽的运动情况;料面的分布情况;内部炉料的坐料、塌料等情况进行实时观察,这对高炉炉况的控制、节约能源、提高铁水质量具有指导意义。
另外,我公司自主开发的高炉成像配套软件能以彩色RGB图象清楚地反映高炉炉况,并且能对炉内的温度分布进行实时跟踪,同时能自动存储图象和温度曲线。
本系统具有图象清晰、性能稳定、自动吹扫镜头、自动保护镜头、维护简便的特点,当系统的冷却水、氮气、电源供应发生异常或摄像探头内的温度超过45℃时,系统会自动报警,同时闸阀关闭实现镜头的自动保护。
该系统具有如下特点:1.宽视场范围:110°2.成熟的保护结构:探头采用针孔、水冷气封式结构,可在炉内温度1800℃、环境温度200℃下正常工作;3.最低照度:0.0001Lu某;感应红外波长:780nm-1100nm;4.超低温成像:在炉顶温度110℃,炉气较正常时,保证图像质量,但低于正常温度时可通过伪彩温控软件观看料面图像。
如采用炉内特种照明系统,可提供有效距离5米,发射角100度可照明光源,经现场试验,极大的提高成像效果。
5.清晰度:480TVL;6.独特的镜头刮扫组件:在镜头表面被粉尘遮挡或结垢时,操作人员可在监控室对炉内的探头前端进行气动刮扫,同时系统可设置定时自动清扫,实现免维护操作。
- 1、下载文档前请自行甄别文档内容的完整性,平台不提供额外的编辑、内容补充、找答案等附加服务。
- 2、"仅部分预览"的文档,不可在线预览部分如存在完整性等问题,可反馈申请退款(可完整预览的文档不适用该条件!)。
- 3、如文档侵犯您的权益,请联系客服反馈,我们会尽快为您处理(人工客服工作时间:9:00-18:30)。
锅炉炉膛火焰电视监视系统 用户手册
型 号:DZHJ-B 工 号:118182 项目编号:A016Y 版 本 号:B
编制: 校对: 审核: 批准:
东 方 电 气 深圳东方锅炉控制有限公司
2012年03月 服务热线:(86)- 800 830 6264 目 录 第一篇 技术说明 ........................................................................................................................... 3 前言 ................................................................................................................................................. 3
系统概述 ......................................................................................................................................... 3
性能特点 ......................................................................................................................................... 3
技术参数 ......................................................................................................................................... 4
系统功能 ......................................................................................................................................... 4
系统构成 ......................................................................................................................................... 4
系统设备配置(一头一尾) ......................................................................................................... 6
系统设备 ......................................................................................................................................... 6
安全和注意事项 ........................................................................................................................... 11
第二篇 安装调试 ......................................................................................................................... 11 设备安装 ....................................................................................................................................... 11
设备调试 ....................................................................................................................................... 13
第三篇 操作使用 ......................................................................................................................... 15 控制室的操作、显示 ................................................................................................................... 15
现场的操作、显示 ....................................................................................................................... 15
第四篇 系统维护 ......................................................................................................................... 16 日常维护 ....................................................................................................................................... 16
常见故障及分析 ........................................................................................................................... 16
附件 第一篇 技术说明 前言 “DZHJ型锅炉炉膛火焰电视监视系统”是深圳东方锅炉控制有限公司在吸取国内外先进技术的基础上,自行开发研制出的一种内窥式锅炉炉膛火焰电视监视系统。该系统将摄像镜管部件部分地插入锅炉炉膛,从炉壁上部总体监视炉膛内燃烧状态,其视场内可看到整个炉膛的火焰情况。运行人员在集控室通过彩色电视监视器能观察到炉膛火焰的真实图像。在锅炉点火、低负荷运行或发生危害锅炉正常运行的故障时,该系统有助于防止锅炉炉膛灭火放炮,是锅炉安全、经济、可靠运行不可缺少的设备。适用于电站各类型锅炉:四角喷燃、对冲、W火焰及流化床锅炉。
系统概述 DZHJ气冷内窥式高温工业电视系统采用微气量保护方式,通过电动执行器将摄像镜管伸入到高温炉膛内获取炉内图像,并将图像信号传输至监视器的特种工业电视系统。系统采用结构化设计,安装维修便捷,环境适应性强,抗干扰能力强,耐高温耐腐蚀,视场角大,图像清晰,用气量少,使用寿命长。
性能特点 采用专门研制的特种耐高温针孔镜头,视场角大(90º),分辨率高(32线对/mm),镜片采用耐高温材料制造,最前端为蓝宝石镜片,极大提高了镜头的耐高温性能、抗污染能力和使用寿命; 摄像镜管无需水冷却,也不需微型制冷器,只要少量压缩空气或氮气吹扫镜头。高温镜头具备自清洁功能,克服了传统水冷却摄像镜管易堵塞、腐蚀、漏水及管路复杂、易损坏、使用寿命短等缺点。同时,由于无需铺设冷却水管道,安装维护简单、工程费用少; 摄像镜管防护罩采用特种耐高温耐腐蚀材料及特殊的结构设计,有效保护高温光学镜头及摄像机,摄像镜管结构设计合理简单,维护方便,使用寿命长。采用重力式自锁炉门,结构简单动作可靠,不会因炉门受热变形产生机械故障,在冷却保护夹套退出炉膛后能自动关闭窥视孔以密闭炉膛; 图像采集单元采用先进的低照度、高动态范围、高清晰度彩色CCD摄像机,配合我公司开发的可以遥控调节光圈的高温镜头,保证清晰观察炉膛内部图像; 电动执行器采用永磁低速同步电机驱动及先进的链条式传动,动作灵活自如, 可电动/手动两用,克服了传统的丝杠螺母结构容易变形卡死的情况,整个系统结构简单、紧凑、精致,重量轻; 现场及控制室均可以对摄像镜管进退及镜头光圈大小进行控制。当压缩空气压力低于设定值或摄像镜管内部温度高于设定值时,摄像镜管能够自动退出炉膛,观察孔自动关闭并送出报警信号。
技术参数 摄像镜管最高工作温度: 2000℃ 摄像镜管工作行程: 600mm 镜头视场角: 90° 综合分辨率: ≥400TVL 图像制式: PAL 25帧/秒 视频输出: 1.0Vp-p/75Ω BNC端子 信 噪 比: 46dB(AGC功能关闭) 环境温度: -10℃~+55℃ 相对湿度: ≤95% (25℃) 电源功耗: AC220V(±10%)/50Hz <400W
系统功能 实时显示锅炉炉膛点火、燃烧及其他状态彩色/黑白清晰图像; 摄像镜管采用压缩空气冷却防护; 摄像镜管采用电动进、退控制; 在集控室内或锅炉现场均可对系统进行操作,控制摄像镜管进、退,调整光圈大、小; 为保护探头安全,设计双重传感监测保护,当冷却用压缩空气压力低于设定值或高温光学镜头温度超过设定值时,摄像镜管均能自动退出高温工作区; 提供DCS系统控制接口。
系统构成
DZHJ气冷内窥式高温工业电视系统主要由前端设备、信号传输电缆、控制显示三部分构成。前端设备包括:高温摄像镜管总成(特种耐高温光学镜头、高分辨率CCD摄像机、特种耐高温耐腐蚀保护套)、炉门、电动执行器、系统控制柜等;信号传输电缆包括:视频电缆、控制电缆;控制及显示包括:远操器、画面切换器、监视器。