SmartImage For Codeigniter
IMAGE函数

IMAGE函数
IMAGE函数可以生成条形码(BarCode)和二维码(QRcode)
如果想要批量生成条形码或二维码,就可以使用IMAGE函数。
IMAGE函数有4个参数
1. 链接
2. 模式,可选参数
3. 高度,可选参数
4. 宽度,可选参数
制作条形码或者二维码时,网站
barcodeapi
制作条形码
网站名加上”.org/"和"api/auto/"。
再置于双引号内,使用”&“符号与单元格连接
就能依据单元格内容生成条形码或者二维码。
当单元格内容是一系列数字时,生成条形码;若单元格内容是链接时,生成二维码。
可选参数的模式选择”4“时,就能手动调整条形码或二维码的高度或者宽度。
其它条形码格式
支持以下格式条形码:
1. CODEBAR:早期条形码设计
2. Code128:包含更大字符集的条形码设计
3. Code39:只包含大写字母和数字的基础条形码设计
4. EAN 13:全球通用的商品识别码
5. EAN 8:从EAN 13分类,应用于小包裹
除以上五种外还有UPC A、UPC E等其它格式条形码。
将网址最后的”auto“,修改为对应格式即可。
比如将auto替换成code39,就能只包含大写字母和数字的二维码。
制作二维码
二维码支持两种格式:
1. Aztec
2. QR Code
把auto替换成aztc和qrcode,即可生成二维码。
CI(CodeIgniter)框架配置

CI(CodeIgniter)框架配置MVC的组成部分:模型 (Model)代表你的数据结构。
通常来说,你的模型类将包含取出、插⼊、更新你的数据库资料这些功能。
视图 (View)是展⽰给⽤户的信息。
⼀个视图通常是⼀个⽹页。
控制器 (Controller)是模型、视图以及其他任何处理 HTTP 请求所必须的资源之间的中介,并⽣成⽹页。
举例⽐如⼀批统计数据你可以分别⽤柱状图、饼图来表⽰。
C存在的⽬的则是确保M和V的同步,⼀旦M改变,V应该同步更新。
每个控制器都是⼀个类Class, 在每个 Class ⾥⾯的 function 都是⼀个页⾯, 嗯, 这个概念很重要!⼊⼝⽅法:⼊⼝——>控制器——>⽅法——>参数localhost/index.php/welcome/index控制器:1、到底什么是控制器简⽽⾔之,⼀个控制器就是⼀个类⽂件⽤户通过URL访问的就是某个控制器类中的具体成员⽅法并由这个⽅法中的代码去做某些操作2、如何创建控制器a.创建⽂件夹\application\controllersb.类名必须以⼤写字母开头c.继承核⼼的控制器类CI_Controller3、创建⽅法a.就是创建⼀个成员⽅法function()b.默认访问的是index⽅法4、URL如何传递参数给⽅法⽅法段后的按次序传⼊⽅法中的形式参数配置CI:1.在CI官⽹下载最新版的CI框架,⽬前最新版的是2.13版本2.解压之后,有三个⽂件夹:application 开发要⽤到的配置⽂件,Model,VIew,Control 的等⽂件……system CI框架源码user_guide ⽤户⼿册index.php CI的接⼝⽂件3.根⽬录建⽴⼀个⽂件夹ci,把 application ,system和index.php复制到 ci下,这个⽂件夹,⾃⼰可以随便写4.然后访问: localhost/ci 实际访问路径——> localhost/ci/index.php/welcome/index这样就可以⽤了,具体使⽤说明如下:1.上边讲到它访问的⼊⼝⽅法⼊⼝——>控制器——>⽅法——>参数2.主要就是application下的controllers⽂件夹下的welcome.php⽂件访问了views下的welcome_message.php⽂件3.它是怎么访问的呢?在config⽂件夹下有个路由⽂件routes.php配置了路由路径⽂件welcome因此可以看到Welcome to Codelgniter!4.在models ⾥建⽴业务逻辑⽂件,在views⾥建⽴视图⽂件复制代码代码如下:/*注意的是,类名(⾸字母⼤写,也是⽂件名)不能与⽅法名相同,否则会报错,像这样的Index,下边有⼀个index ⽅法,就会出错*/class Index extends CI_Controller{function index(){}}。
smarty3.0中文手册文档
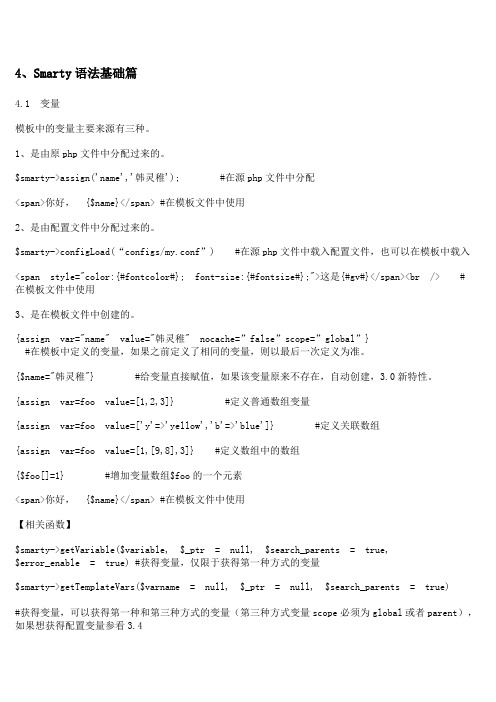
4、Smarty语法基础篇4.1 变量模板中的变量主要来源有三种。
1、是由原php文件中分配过来的。
$smarty->assign('name','韩灵稚'); #在源php文件中分配<span>你好, {$name}</span> #在模板文件中使用2、是由配置文件中分配过来的。
$smarty->configLoad(“configs/my.conf”) #在源php文件中载入配置文件,也可以在模板中载入<span style="color:{#fontcolor#}; font-size:{#fontsize#};">这是{#gv#}</span><br /> #在模板文件中使用3、是在模板文件中创建的。
{assign var="name" value="韩灵稚" nocache=”false”scope=”global”}#在模板中定义的变量,如果之前定义了相同的变量,则以最后一次定义为准。
{$name="韩灵稚"} #给变量直接赋值,如果该变量原来不存在,自动创建,3.0新特性。
{assign var=foo value=[1,2,3]} #定义普通数组变量{assign var=foo value=['y'=>'yellow','b'=>'blue']} #定义关联数组{assign var=foo value=[1,[9,8],3]} #定义数组中的数组{$foo[]=1} #增加变量数组$foo的一个元素<span>你好, {$name}</span> #在模板文件中使用【相关函数】$smarty->getVariable($variable, $_ptr = null, $search_parents = true,$error_enable = true) #获得变量,仅限于获得第一种方式的变量$smarty->getTemplateVars($varname = null, $_ptr = null, $search_parents = true)#获得变量,可以获得第一种和第三种方式的变量(第三种方式变量scope必须为global或者parent),如果想获得配置变量参看3.44.2 Smarty保留变量Smarty系统中保留了一些内置变量,可以快速访问相应的变量。
Source_Insight设置
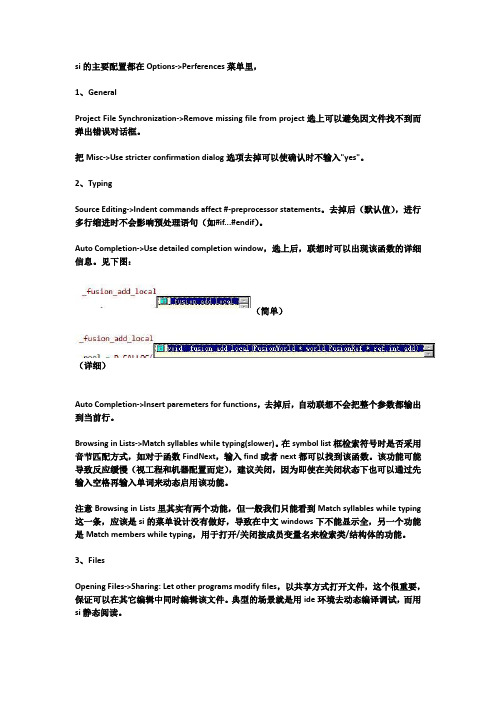
si的主要配置都在Options->Perferences菜单里,1、GeneralProject File Synchronization->Remove missing file from project选上可以避免因文件找不到而弹出错误对话框。
把Misc->Use stricter confirmation dialog选项去掉可以使确认时不输入"yes"。
2、TypingSource Editing->Indent commands affect #-preprocessor statements。
去掉后(默认值),进行多行缩进时不会影响预处理语句(如#if...#endif)。
Auto Completion->Use detailed completion window,选上后,联想时可以出现该函数的详细信息。
见下图:(简单)(详细)Auto Completion->Insert paremeters for functions,去掉后,自动联想不会把整个参数都输出到当前行。
Browsing in Lists->Match syllables while typing(slower)。
在symbol list框检索符号时是否采用音节匹配方式,如对于函数FindNext,输入find或者next都可以找到该函数。
该功能可能导致反应缓慢(视工程和机器配置而定),建议关闭,因为即使在关闭状态下也可以通过先输入空格再输入单词来动态启用该功能。
注意Browsing in Lists里其实有两个功能,但一般我们只能看到Match syllables while typing 这一条,应该是si的菜单设计没有做好,导致在中文windows下不能显示全,另一个功能是Match members while typing,用于打开/关闭按成员变量名来检索类/结构体的功能。
ci框架中文手册——常规主题
RewriteCond %{REQUEST_FILENAME} !-d
//
(
)
RewriteCond $1 !^(index\.php|images|robots\.txt) RewriteRule ^(.*)$ /index.php/$1 [L]
css js
:
RewriteRule ^(.*)$ index.php/$1 [L]
URI
URI URI
/index.php/products/shoes/sandals/123
URI 3 4
sandals
123
<?php class Products extends CI_Controller {
public function shoes($sandals, $id) {
echo $sandals; echo $id; } } ?>
<?php class Products extends CI_Controller {
public function shoes($sandals='Test', $id=1) {
echo $sandals; echo $id; } }
parent::__construct(); }
public function index() {
echo 'Hello World '; }
public function comments()
{
echo '
';
}
}
?>
comments
/index.php/blog/comments/
1/49 2015/4/1
Apache2.4+PHP5.4+CodeIgniter安装步骤
Apache 2.4.23 + PHP 5.4.45 + CodeIgniter安装步骤1 Apache安装1.1 下载:访问/download/VC10/下载WINDOWS XP可以使用的最新版本。
1.2 解压:C:\Apache2.4。
1.3 配置:打开C:\Apache24\conf\httpd.conf找到ServerName修改为ServerName localhost:8080,找到Listen修改为Listen 8080,找到ServerRoot修改网站基地址,找到DocumentRoot修改网页目录,找到Directory修改虚拟目录,找到DirectoryIndex添加默认显示页面名称。
1.4 运行环境:安装Visual C++ Runtime(x86)运行环境。
1.5 启动:进行DOC窗口,CD C:\Apache24\bin,httpd.exe为窗口启动,httpd.exe -k install 为安装服务。
然后访问http://localhost:8080即可显示It works!2 PHP安装2.1 下载:访问/download/下载WINDOWS XP可以使用的最新版本。
2.2 解压:C:\PHP2.3 环境变量:右击我的电脑,点击属性,点击高级--环境变量,点击系统变量--Path,添加;C:\PHP;C:\PHP\ext;C:\Apache24\bin(可以不添加)。
2.4 配置:修改C:\PHP\php.ini-production修改为C:\PHP\php.ini。
找到修改extension_dir修改为“ext”或“.\ext”或“C:\PHP\ext”。
2.5 功能扩展:找到extension选择需要的模块并去掉前面的分号即可开启。
3 Apache与PHP关联3.1 打开C:\Apache2.4\conf\httpd.conf找到LoadModule,在最后添加LoadModule php5_module "C:/php/php5apache2_4.dll"。
基于CodeIgniter的Blog系统的设计与实现
D vlp nMeh d 等 多 种 方 法 。 ee met to ) o
典 型 的敏 捷 过 程 总 图如 图 1所 示 :
代周
螽 资
产 品 发布 、 里 程牌
一/ — 7
图 1 典 型 敏 捷 开 发 过 程
图 2 M VC 模 式
1 2 Bo . lg系 统 结 构
因其具有 的这些 优点 , 其在 We 使 b应用 开发 中得 到 了大
量 的运用 。
C dln e 核 心 框 架 是 为 这 个 程 序 特 别 编 写 的 , o eg i r t 而
其 他很多类库 、 助 函数 和 子系统 则来 自于 Rc El 辅 i ls和 k i
摘 要 : 简单介绍 了敏捷 开发和 MV C架构 , 细讲 解 了 C dIntr 详 o eg i 安装 与配置 , e 以及 基 于 C dIntr o eg i 开发 设计的 e
Bo lg系统 , 核 心 功 能 做 了进 一 步 的 实现 , 对 并展 示 了运 行 效 果 。
关键词 : 敏捷开发 ; c; o eg i r博客 ; MV c dInt ; e 插件 中图 分 类 号 : 3 1 5 TP 1 . 2 文献标识码 : A 文章 编 号 :6 2 7 0 ( 0 1 0 — 1 30 1 7 — 8 0 2 1 ) 70 0 —2
视 图是 用 户 看 到 并 与 之 交 互 的 界 面 。在 视 图 中 其 实 没有 真 正 的 处 理 发 生 , 管 这 些 数 据 是 联 机存 储 的 还 是 一 不 个 雇 员 列 表 , 为 视 图来 讲 , 只 是 作 为 一 种 输 出数 据 并 作 它 允许 用 户 操 纵 的 方 式 。 MVC优 点 在 于 能 为 应 用 程 序 处 理 不 同的 视 图 。
【CI3.1】CI框架简单使用方法
【CI3.1】CI框架简单使⽤⽅法CI框架简单使⽤⽅法1、回忆MVC1.1、M:模型,提供数据,保存数据1.2、V:视图,只负责显⽰,表单form1.3、C:控制器,协调模型和视图1.4、action:动作,是控制器中的⽅法,⽤于被浏览器请求2、CI中的MVCCI简介:CodeIgniter是⼀个轻量级但功能强⼤的php框架,基于MVC的设计模式。
提供了⼀套丰富的类库2.1、访问的url使⽤的pathinfo2.2、格式:⼊⼝⽂件/控制器/动作(默认pathinfo格式)2.3、application⽬录:Controllers控制器Models模型Views视图2.4、默认的控制器是welcome2.5、默认的动作是index2.6、⽂件名全部⼩写3、控制器(controller):3.1、不需要加后缀,直接是类名.php3.2、⽂件名全部⼩写,例如 user.php(⼤写的⽂件名浏览器不⽀持)3.3、所有的控制器,直接或间接继承⾃CI_Controller类,类名⾸字母⼤写3.4、⽅法名不区分⼤⼩写动作要求:1.必须以public开头2.不能以下划线(_)开头注意!⽅法名与类名相同,会被php当做构造⽅法(__construct)4、视图(view)4.1、在控制器中加载视图:$this->load->view(“user_add”);//不加扩展名4.2、在控制器中加载视图:$this->load->view(“user/add”);//不加扩展名注意:可以多次调⽤$this->load->view(视图);4.3、视图中,直接使⽤原⽣php代码4.4、在控制器中分配变量:$this->load->vars(“视图中变量名”,php中变量名);例如:$str=“abcdefg”;$this->load->vars(“str”,$str);视图中使⽤:<?php echo $str;?>4.5、在控制器中分配多个变量:例如:$str=“abcd”;$list = array(“id”=>”1”,”name”=>”zhangsan”,”pwd”=>”1234”);$data[“str”]=$str;$data[“list”]=$list;$this->load->vars($data);4.6、CI框架会⾃⼰解决php中的短标签<?=…?>4.7、推荐使⽤:<?phpforeach($listas$key=>$val):?>…<?php endforeach;?>5、超级对象:当前控制器对象,提供了很多属性5.1、$this->load属性5.1.1、装载器类的实例system/core/Loader.php5.1.2、CI_Loader提供的⽅法:$this->load->view()装载视图$this->load->vars()分配变量到视图$this->load->database()装载数据库操作对象$this->load->model()装载模型对象$this->load->helper()帮助对象$this->load->view(“视图名”,$变量名)装载视图时分配变量5.2、$this->uri属性5.2.1、装载器类的实例system/core/URI.php5.2.2、CI_URI提供的⽅法:$this->uri->Segment(n)⽤于获取URL中的第n个参数控制器代表1,动作代表2,值1代表3,值2代表为4…⽤法1:⼊⼝⽂件/控制器/动作/值1/值2echo $this->uri->segment(3);//输出值1⽤法2:index.php/控制器/动作/6//可以直接获取;参数⼀定要对应正确publicfunction($id=0){echo $id;//输出6}5.3、$this->input属性5.3.1、装载器类的实例system/core/Input.php5.3.2、CI_Input提供的⽅法:$this->input->post(‘username’);//$_POST[“username”];$this->input->server(“DOCUMENT_ROOT”);//$_SERVER[“DOCUMENT_ROOT”] $this->input->server(“REMOTE_ADDR”);//客户端IP$this->input->server(“SERVER_ADDR”);//服务器端IP注意:在视图中,可以直接⽤$this来访问超级对象中的属性6、访问数据库6.1、修改配置⽂件:application/config/database.php6.2、装载数据库操作类:$this->load->database();加载成功后,会放⼊超级对象的属性中,默认属性名是db$this->db6.3、$query=$this->db->query($sql);//返回值是对象(array_fetch_object)$sql = $this->db->last_query($sql);//显⽰最后⼀条执⾏的sql语句6.3.1、$query=$this->db->escape();//此函数会确定数据类型,对字符串类型数据转义6.4、$list=$query->result();//返回数组,数组中是⼀个⼀个的对象6.5、$list=$query->result_array();//返回⼆维数组,⾥⾯是关联数组6.6、$row=$query->row();//返回第⼀条数据,直接是⼀个对象6.7、$row=$query->row_array();//返回第⼀条数据,是⼀个数组6.8、$count=$query->num_rows();//返回结果集的⾏数6.9、$field=$query->num_fields();//返回请求的字段数6.10、$count=$query->affected_rows();//返回受影响的⾏数6.11、$id=$query->insert_id();//返回⾃增ID7、数据库中的配置7.1、⾃动加载db:在application/config/autoload.php中配置:$autoload[“libraries”]=array(“database”);这样就不需要 $this->load->database();7.2、参数绑定$name = $this->input->post(“name”);$pwd = $this->input->post(“pwd”);//使⽤问号绑定参数$data[0]=$name;$data[1]=$pwd;//⽤⼆维数组传递值$sql =“insertintoci_user(name,pwd)values (?,?)”;//多个问号,需要传⼀个索引数组$bool = $this->db->query($sql,$data);//返回值是boolean7.3、表前缀配置在application/config/database.php中配置:$db[‘default’][‘dbprefix’]=‘ci_’;$db[‘default’][‘swap_pre’]=‘ci_’;配置为⼀样,代码中,直接编写表前缀后⾯的名就⾏了,如果以后项⽬表前缀发⽣变化,只需要修改$db[‘default’][‘dbprefix’]=‘new_’,代码中ci_会⾃动替换为new_8、数据库操作(AR模型)8.1、配置application/cinfig/database.php中$active_record = TRUE;8.2、在配置⽂件中,配置表前缀后,会⾃动添加8.3、查找(get):$res = $this->db->get(‘表名’);//返回结果集对象$list = $res->result();//返回数组,数组中是⼀个⼀个的对象$list = $res->result_array();//返回⼆维数组,⾥⾯是关联数组8.4、插⼊(insert)://数据使⽤关联数组$data[“数据库字段名”]=值;//$this->input->post(“name”);$data[“数据库字段名”]=值;$res = $this->db->insert(“数据表名”,$data);//返回结果boolean;8.5、修改(update)://数据使⽤关联数组$data[“数据库字段名”]=值;//$this->input->post(“name”);$data[“数据库字段名”]=值;$where = array(“id”=>”4”);$res = $this->db->update(“数据表名”,$data,$where);//返回结果boolean;8.6、删除(delete):$where = array(“id”=>”4”);$res = $this->db->dalete(“数据表名”,$where);//返回结果boolean;9.1、$res=$this->db->select("id,name")//查找的字段->from("user")//数据表名->where("id>",3)//条件id与>之间必须要有空格->order_by("iddesc")//排序->limit(3,1)//分页;表⽰跳过1条,取3条,与tp相反->get();//获取数据$list = $res->result_array();9.2、where()条件条件符:“>”、“>=”、“<”、“<=”、“=”、“!=“;不指定条件付默认是”=“1、只有单个条件时:9.2.1、$res=$this->db->where(“字段”,”值”)->get();例如:$res= $this->db->where(“name”,”admin”)->get();//⾃动会加上“=”9.2.2、$res=$this->db->where(“字段=”,”值”)->get();例如:$res= $this->db->where(“name=”,”admin”)->get();//必须要有空格2、有多个条件时:⽤array()9.2.3、$res=$this->db->where(array(“字段”=>”值”,“字段”=>”值”))->get();例如:$res= $this->db->where(array(“name”=>”admin”,“id>3”=>”2”))->get();9.2.4、复杂的查询语句使⽤$this->db->query($sql,$data);//使⽤问号绑定参数9.3、join连接查询9.3.1、默认为左查询(leftjoin … on)$this->db->select(“字段”)->from(“数据表名”)->join('连接表','连接条件')->get(); //默认为左查询(leftjoin … on)例如:$this->db->select(“*”)->from(“user”)->join('category',user.id= category.id)//默认为左查询(leftjoin )->get();9.3.2、通过join()第三个可选参数选择连接,可选参数包括:left、 right、outer、 inner、left outer、right outer 例如:$this->db->select(“*”)->from(“user”)->join(“category”, “user.id = category.id”,”left”)//通过第三个参数指定->get();10.1、扩展控制器1、在application/core新建⼀个⾃⼰的控制器(MY_Controller),新建的控制器继承CI_Controller类,可以从⾃⼰创建的控制器中进⾏扩展。
MP_Cache:用户指南
MP_Cache: User GuideMP_Cache: 用户指南译:蕃茄网络- AvinMP_Cache was written as a more flexible caching solution than those offered by CodeIgniter. As such it offers you a way to cache anything from a single variable, to a SQL query or the fully generated page. MP_Cache saves these entries serialized to files and has functions to retrieve and delete these.MP_Cache 类是为CodeIgniter提供更多灵活性的缓存解决方案。
你能使用它来缓存从数据库查询获得的单一数据变量或者缓存整个页面。
MP_Cache 把序列化后的数据保存进文件,同时提供函数方法去回收重建和删除该缓存文件。
Additionally you can set expiration time and dependencies to force a main cache to refresh itself after one of its subcaches has been refreshed or deleted.同时,你能够设置缓存过期时间和为某个主缓存与多个其它缓存建立依赖(关联缓存),使得主缓存的更新和删除,都依赖于子缓存。
(也即是,当子缓存过期更新或者被删除时,主缓存会自动同步更新或者被删除)Installing MP_CacheDownload the file here and unzip it to your application/libraries directory.下载此文件并解压到你项目的application/libraries目录Create a directory for you cache, for example application/mp_cache建立一个缓存目录,例如在:application/mp_cacheAdd a value 'mp_cache_dir' to an autoloaded config file, for instance application/config/config.php and set it to the mp_cache directory relative to your index.php file.For example: $config['mp_cache_dir'] = APPPATH.'mp_cache/';在项目的:application/config/config.php里增加一个变量值'mp_cache_dir'进自动加载配置文件。
ci框架中文手册——常规主题
index.php
index.php images robots.txt HTTP
URL
config/config.php URL
CodeIgniter
URL
/index.php/products/view/shoes
.html
/index.php/products/view/shoes.html
l
l Hello World
l
l URI
l l l l l l l
HTTP
URI:
/index.php/blog/
CodeIgniter URI
: Hello World
blog.php
URI blog.php
3/49 URL
file:///C:/Users/Administrator/AppData/Local/Temp/~hh2D1B.htm
CodeIgniter URL
CodeIgniter
URL
CodeIgniter
/news/article/my_article
URL
URI
--
URL
/class/function/ID
1.
2.
3.
ID
file:///C:/Users/Administrator/AppData/Local/Temp/~hh2D1B.htm
l CodeIgniter V 1.2
l CodeIgniter V 1.1
l CodeIgniter V 1.0
Git
Git is a distributed version control system.
Public Git access is available at GitHub. Please note that while every effort is made to keep this code base functional, we cannot guarantee the functionality of code taken from the tip.
- 1、下载文档前请自行甄别文档内容的完整性,平台不提供额外的编辑、内容补充、找答案等附加服务。
- 2、"仅部分预览"的文档,不可在线预览部分如存在完整性等问题,可反馈申请退款(可完整预览的文档不适用该条件!)。
- 3、如文档侵犯您的权益,请联系客服反馈,我们会尽快为您处理(人工客服工作时间:9:00-18:30)。
1.在index.php添加一个ROOTPATH常量 define("ROOTPATH", str_replace("\\", "/", (realpath(dirname(__FILE__))).'/')) ;
注意:以下常量可以定义在index.php中,否则容易重复定义 define('MEMORY_TO_ALLOCATE', '100M'); define('DEFAULT_QUALITY', 90); define('DOCUMENT_ROOT', ROOTPATH); define('CURRENT_DIR', DOCUMENT_ROOT); define('CACHE_DIR_NAME', '/images/imagecache/'); define('CACHE_DIR', CURRENT_DIR . CACHE_DIR_NAME);
2.library/Custom_image.php // Smart Image Resizer 1.4.1
// Parameters need to be passed in through the URL's query string: // image absolute path of local image starting with "/" (e.g. /images/toast.jpg)
// width maximum width of final image in pixels (e.g. 700) // height maximum height of final image in pixels (e.g. 700) // color (optional) background hex color for filling transparent PNGs (e.g. 900 or 16a942)
// cropratio (optional) ratio of width to height to crop final image (e.g. 1:1 or 3:2)
// nocache (optional) does not read image from the cache // quality (optional, 0-100, default: 90) quality of output image
///////////////////// // EXAMPLES /////////////////////
// Resizing a JPEG: // src="/image.php/image-name.jpg?width=100&height=100&image=/path/to/image.jpg" alt="Don't forget your alt text" />
// Resizing and cropping a JPEG into a square: // src="/image.php/image-name.jpg?width=100&height=100&cropratio=1:1&image=/path/to/image.jpg" alt="Don't forget your alt text" />
// Matting a PNG with #990000: // src="/image.php/image-name.png?color=900&image=/path/to/image.png" alt="Don't forget your alt text" />
///////////////////// // CODE STARTS HERE /////////////////////
class Custom_image{ function create($get_image='',$get_width='',$get_height='',$get_cropratio='',$get_color='',$get_quality='',$get_nocache=''){
$CI =& get_instance(); $base_url = $CI->config->slash_item('base_url');
$base_url = preg_replace('/\/$/', '', $base_url); //去除最后的 '/'原因是,CI里设置路径都加入了'/'
if ($get_image == '') { header('HTTP/1.1 400 Bad Request'); return 'Error: no image was specified'; exit(); }
define('MEMORY_TO_ALLOCATE', '100M'); define('DEFAULT_QUALITY', 90); define('DOCUMENT_ROOT', ROOTPATH); define('CURRENT_DIR', DOCUMENT_ROOT); //define('CURRENT_DIR', dirname(__FILE__)); define('CACHE_DIR_NAME', '/images/imagecache/'); define('CACHE_DIR', CURRENT_DIR . CACHE_DIR_NAME);
// Images must be local files, so for convenience we strip the domain if it's there
$image = preg_replace('/^(s?f|ht)tps?:\/\/[^\/]+/i', '', (string) $get_image);
// For security, directories cannot contain ':', images cannot contain '..' or '<', and
// images must start with '/'
if ($image{0} != '/' || strpos(dirname($image), ':') || preg_match('/(\.\.|<|>)/', $image))
{ header('HTTP/1.1 400 Bad Request'); return 'Error: malformed image path. Image paths must begin with \'/\'';
exit(); }
// If the image doesn't exist, or we haven't been told what it is, there's nothing
// that we can do if (!$image) { header('HTTP/1.1 400 Bad Request'); return 'Error: no image was specified'; exit(); } // Strip the possible trailing slash off the document root $docRoot = preg_replace('/\/$/', '', DOCUMENT_ROOT);
if (!file_exists($docRoot . $image)) { header('HTTP/1.1 400 Bad Request'); //header('HTTP/1.1 404 Not Found'); return 'Error: image does not exist: ' . $docRoot . $image; exit(); }
// Get the size and MIME type of the requested image $size = GetImageSize($docRoot . $image); $mime = $size['mime'];
// Make sure that the requested file is actually an image if (substr($mime, 0, 6) != 'image/') { header('HTTP/1.1 400 Bad Request'); return 'Error: requested file is not an accepted type: ' . $docRoot . $image;
exit(); } $width = $size[0]; $height = $size[1];
$maxWidth = ($get_width !== '') ? (int) $get_width : 0; $maxHeight = ($get_height !== '') ? (int) $get_height : 0;
if ($get_color !== '') $color = preg_replace('/[^0-9a-fA-F]/', '', (string) $get_color);
else $color = FALSE;
// If either a max width or max height are not specified, we default to something
// large so the unspecified dimension isn't a constraint on our resized image.
// If neither are specified but the color is, we aren't going to be resizing at
// all, just coloring. if (!$maxWidth && $maxHeight) { $maxWidth = 99999999999999; }