戴尔 Precision 5510 笔记本电脑
dell latitude 5340 5440 5540 中文用户手册说明书
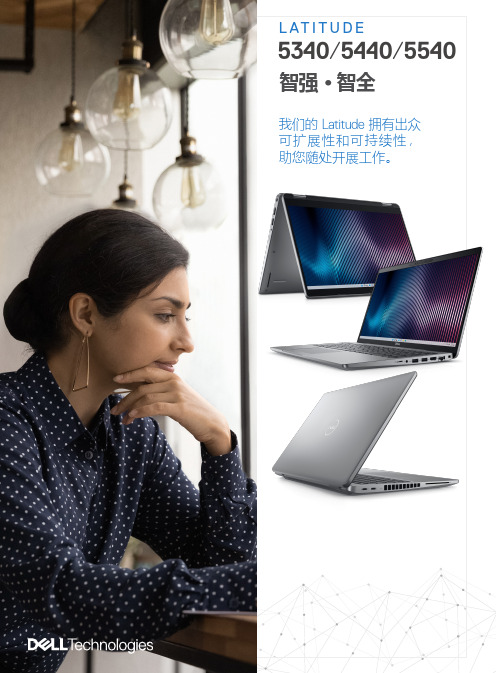
并且能够灵活地远程工作。
使用 100% 回收和可再生包装18, 包括更加环保的多件包装。
Intelligent Privac y 功能: 提醒您注意 旁观者,保护屏幕上显示的您不看屏幕时,系统会感知到,并调暗屏幕以保护隐私和节省电增强的音频效果改善音频质量,优化协作体验。
触控板升级,改善了触感以提高生产力。
ExpressConnect 智能双网连接支持同时利用 2 个或更多网络连接,该同时多网络连接技术可加快数据和视频下载速度。
主流商用笔记本的大部分安全选项14 配备的选项包括接触式/非接触式智能卡、TPM 、Control Vault 3、指纹读取器、 楔形钥匙锁插槽、摄像头隐私挡板、Windows Hello/红外摄像头和 Intelligent Privacy 。
更多可扩展性能选项 全新英 13 代 U 和 系列处理器。
提供各种内存 LPDDR5 (13”)、可,以及独立。
ExpressSign-in 智慧感知登录功能可在您靠近时唤醒您的系统,并在您离开时将其锁定。
适合每一类用户的显示屏入门级屏幕和摄像头升级为全高清,并且可选选项。
13电池续航时间的面板,能够尽可能提高生产力,还可以让您体验Glass 屏幕。
卓越的多功能性13” 可作为笔记本电脑或二合一笔记本。
出色的运行时间,并可以利用ExpressCharge 快速充电更快完成充电提供多种电池选项,电池容量最高 54 瓦时,以及下一代可延长电池续航时间的面板。
Intelligent Audio 智能音频,采用神经降噪功能借助基于 AI 的背景噪声消除功能,自信地开展协作。
拥有出众可持续性的 Latitude 系列Latitude 5000 中使用的可回收塑料和可再生 塑料增加了 64%(按重量)14,生物基/ PCR 含量扩展到 B/C/D 护盖、扬声器外壳、掌托和内框架。
所有尺寸全部支持 Wi-Fi 6E 17 和 5G 网络。
在桌面办公或出差时保持联网。
2017年新出的戴尔笔记本买什么好
2017年新出的戴尔笔记本买什么好笔记本的新旧会影响性能!想购买一台2017年新出的戴尔笔记本买什么好呢?有什么好的推荐呢?下面是店铺收集整理的2017年新出的戴尔笔记本买什么好,希望对大家有帮助~~2017年新出的戴尔笔记本推荐一戴尔 Latitude E6500(R801125)处理器Intel Core2 Duo(Penryn) P8600(2.4G) 主板芯片组Intel GM45 ICH9M 内存容量1024MB硬盘容量160GB 屏幕尺寸15.4英寸显示芯片集显独显,NVIDIA Quadro NVS 160M 集Intel GMA X4500显卡重量约2.3Kg价钱107992017年新出的戴尔笔记本推荐二戴尔(Dell) INS15RR-3316B 15英寸笔记本电脑(i3-3110M 2G 500G D刻 HD7670M 1G独显 linux)灰-3299元戴尔(Dell) INS15RR-3316L 15英寸笔记本电脑(i3-3110M 2G 500G D刻 HD7670M 1G独显 linux)蓝-3299元戴尔(DELL) Ins14RR-3316B 14英寸笔记本电脑(i3-3110M 2G 500G D刻 GT630M 1G 独显Linux 蓝牙)灰-3299元戴尔(Dell) INS15RR-3316R 15英寸笔记本电脑 (双核 i3-3110M 2G 500G D刻 HD7670M 1G独显 linux)红-3299元戴尔(DELL) Ins14RR-3316L 14英寸笔记本电脑(i3-3110M 2G 500G D刻 GT630M 1G独显 Linux 蓝牙)蓝-3299元戴尔(DELL) Ins14RR-3316R 14英寸笔记本电脑(i3-3110M 2G 500G D刻 GT630M 1G独显 Linux 蓝牙)红-3299元些目前京东标价参考实体店低降3000参考些配置加2G内存直接升级4G戴尔(DELL)Ins14VR-1316B 14英寸笔记本电脑(i3-3110M 2G 500G D刻 GT620M 1G独显蓝牙)黑色 -2999元2017年新出的戴尔笔记本推荐三戴尔 Ins14TR-6526S,14英寸屏幕,i5-3230M双核四线程,4G 内存,500G硬盘,GT640M/2G普通独显,Linux系统,黑色外观,3999元左右。
DELL笔记本命名规则

DELL笔记本命名规则戴尔笔记本整体命名规则——————⼤图————长久置顶和惠普⼀样,戴尔笔记本也可清晰地分成家⽤和商⽤两个部分,各⾃⼜拥有3~4个系列产品,它们的名称分别是(定位从低到⾼排列):家⽤:Inspiron 灵越,Studio 思跃,Adamo 雅慕,Alienware外星⼈商⽤:Vostro 成就(⼩企业),Latitude (中企业),Precision(⼤企业)从戴尔笔记本的具体型号中,我们往往只能看出它的尺⼨,却很难读出更多信息。
⽐如“Inspiron 14(I1464D-138)”,除了看出它是14英⼨机型以外,顶多再了解到它的具体型号为1464,就到此为⽌了。
⾄于处理器、显卡等⽅⾯的配置信息,⼏乎是⽆法从型号中看出来的。
其它家⽤本的命名⽅式也是类似规律,⽐如Studio 15、Alienware M17X 等等,⽽Adamo系列皆为13英⼨,因此就直接⽤括号⾥的代码来区分机型了,⽽这组代码也是很难掌握其规律的。
戴尔Adamo XPS超轻薄笔记本(点击放⼤)在商⽤本⽅⾯也有类似情况,⽐如“Vostro 3400(T520401CN)”,第⼀位数字代表第⼏代产品,⽐如“3”系皆为最新的酷睿i5/i3系列机型,“1”系则皆为上⼀代英特尔平台。
第⼆位数字在3系列中可表明屏幕尺⼨,⽐如3400是14英⼨机型,⽽在1系列中则毫⽆意义,⽐如Vostro 1088。
在Latitude系列中,之前的⽼款型号命名⽅式是这样的,以Latitude E6400为例,第⼀位字母通常都是字母E;第⼆位数字代表处理器性能,数字越⼤性能越好;第三位数字代表屏幕尺⼨;最后两位通常都是数字0,没有什么意义。
戴尔Latitude Z系列商⽤笔记本不过从戴尔官⽹的新款Latitude来看,部分机型的命名规则也像家⽤本那样简化了,⽐如Latitude 13。
此外值得⼀提的是,戴尔新推出的Latitude Z系列很炫,它堪称⽬前全球最轻薄的16英⼨商⽤笔记本,⽽且融⼊了许多超前的功能。
DELL Latitude商用笔记本系列产品

尝新体验活动
戴尔商业用户 直销销售团队
戴尔全球商用合作伙伴 事业部(GCC) 销售
优惠价bundle回 馈 返利 ……
4
DELL Confidential
APJ Enterprise Solutions
Global Marketing
Latitude E-Family 核心价值
长效电池提供持久生产力,并可通过 ExpressCharge™在1小时内达到80%充电量。 以及有3年长效电池的选项, 通过MIL-STD-810G 测试的笔记本 电脑,能够应对极端温度、 振动、灰尘环境及高海拔地 区等严峻挑战。
Dell Latitude™ E 系列笔记本电脑的设计历史
各代 Latitude 设计均坚持从客户反馈获取灵感
便利性
单个维修盖板
符合人体工程学的商 务级设计
ISO 键盘、触摸板、指点 杆、照明、手势
时尚造型
简洁、醒目的品牌设 计,超薄的内部显示 屏边框
可扩展的风格
一致的外形
接口布置
考虑周密、精心设计的布 局
From ultra-mobile to fully rugged, 10 - 12 小时电池使用时 高达 the Latitude E-family laptops offer go-anywhere productivity, confident security and efficient manageability - in a durable design that’s 更优秀移动宽带连接的高性能天线, 可确保进行全球高效沟通 间 built to last.
MIL-STD 810G 戴尔内部测试概述
1) 2) 可储存/运输/使用/空运的最高海拔
戴尔笔记本报价参考
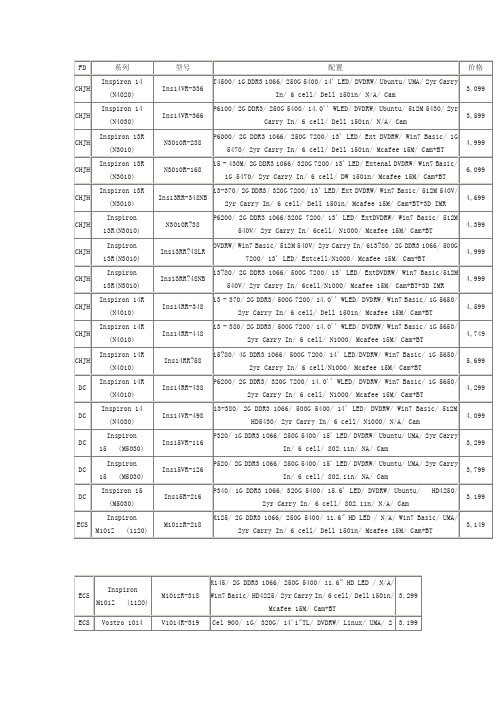
HLH
Inspiron M501R (M5010)
4,699
CHJH
Inspiron 13R(N3010)
N3010R?38
P6200/ 2G DDR3 1066/320G 7200/ 13' LED/ ExtDVDRW/ Win7 Basic/ 512M 540V/ 2yr Carry In/ 6cell/ N1000/ Mcafee 15M/ Cam+BT
P360/ 2G DDR3/ 320G 5400/ 14.0'' WLED/ DVDRW/ Win7 basic/ 512M 5430/ 2yr Carry In/ 6 cell/ N1000/ N/A/ Cam
3,399
HLH
Inspiron 14 (M4010)
Ins14R-386
P840/ 2G DDR3/ 320G 5400/ 14.0'' WLED/ DVDRW/ Ubuntu/ 512M 5430/ 2yr Carry In/ 6 cell/ Dell 1501n/ N/A/ Cam
FD
系列
型号
配置
价格
CHJH
Inspiron 14 (N4020)
Ins14VR-336
T4500/ 1G DDR3 1066/ 250G 5400/ 14& In/ 6 cell/ Dell 1501n/ N/A/ Cam
3,099
4,749
CHJH
Inspiron 14R (N4010)
Ins14RR?58
i5?80/ 4G DDR3 1066/ 500G 7200/ 14' LED/DVDRW/ Win7 Basic/ 1G 5650/ 2yr Carry In/ 6 cell/N1000/ Mcafee 15M/ Cam+BT
2022新出的戴尔笔记本电脑戴尔笔记本电脑新款
2022新出的戴尔笔记本电脑戴尔笔记本电脑新款戴尔于2022台北国际电脑展推出了新一代Inpiron灵越二合一系列产品,全新推出的Inpiron灵越二合一系列产品包括高端的7000系列、主流的5000系列及入门的3000系列,新款产品搭载不同级别的处理器和可选配置功能,让重视网络互联的学生、家庭及其他用户能够学习与实现更多。
全新的Inpiron灵越7000二合一系列笔记本将于今年6月1日起在中国上市,共有13、15两种选择,用户也可通过戴尔官网购买,5999元人民币起。
而Inpiron灵越5000二合一系列产品将于今年6月1日在中国上市,共有13和15寸两种选择,消费者也可通过戴尔官网购买,3999元人民币起。
此外,Inpiron灵越113000二合一产品将于今年6月1日在中国上市,消费者也可通过戴尔官网购买,起始价人民币2999元。
而Inpiron灵越5000系列将于今年下半年在全球发售,共有15、17寸两种选择。
Inpiron灵越7000二合一产品具有卓越的铝合金设计和高效的性能,共有13和15寸两种选择,搭载第六代英特尔酷处理器使日常工作能快速完成,全方位360度旋转设计使用户可以根据环境需求在四种模式间任意切换,包括打字的笔记本模式、演示文稿的帐蓬模式、影视观赏的站立模式和浏览社交媒体的平板模式。
此外,Inpiron灵越7000系列产品拥有高端配置包括配置全高清分辨率宽视角屏幕、在昏暗环境方便打字的背光键盘、以及支持WindowHello生物识别技术的红外摄像头,用户只需露一下脸便可实现快速登录。
高精度触摸面板提供更精确的定位指向和手势识别,同时内置Wave音频增强软件Ma某某AudioProaudio可提升用户的多媒体体验,全新802.11ac无线标准传输为网页浏览、影音串流和视频聊天提供增强的带宽和速度。
在配件上全新Inpiron灵越7000二合一产品可选戴尔USBTypeC适配器,能外接HDMI与VGA显示器,以太网络连接与USB3.0接口可支持外部固态硬盘、打印机、扫描仪。
戴尔 Precision 3551 设置和规格指南说明书
戴尔 Precision 3551设置和规格指南注意、小心和警告:“注意”表示帮助您更好地使用该产品的重要信息。
:“小心”表示可能会损坏硬件或导致数据丢失,并告诉您如何避免此类问题。
:“警告”表示可能会导致财产损失、人身伤害甚至死亡。
© 2020 Dell Inc. 或其子公司。
保留所有权利。
Dell、EMC 和其他商标是 Dell Inc. 或其附属机构的商标。
其他商标可能是其各自所有者的商标。
Rev. A001 设置 Precision 3551 (5)2 创建适用于 Windows 的 USB 恢复驱动器 (7)3 机箱概览 (8)显示屏视图 (8)底视图 (9)左视图 (9)右视图 (10)掌托视图 (11)4 技术规格 (12)系统规格 (12)处理器 (12)芯片组 (12)操作系统 (12)内存 (13)系统板连接器 (13)存储 (13)介质卡读取器 (14)音频 (14)显卡 (14)摄像头 (14)通信 (15)移动宽带 (15)电源适配器 (16)电池 (16)尺寸和重量 (18)端口和接口 (18)触摸板 (19)显示屏 (19)键盘 (20)指纹读取器(在电源按钮上) (20)指纹读取器 (21)传感器和控制规格 (21)安全性 (21)安全选项 - 接触式智能卡读取器 (21)安全选项 - 非接触式智能卡读取器 (22)安全软件 (23)计算机环境 (23)支持政策 (24)5 键盘快捷方式 (25)目录36 软件 (27)下载 Windows 驱动程序 (27)7 系统设置程序 (28)引导菜单 (28)导航键 (28)引导顺序 (29)系统设置选项 (29)一般选项 (29)系统信息 (30)视频 (31)安全性 (32)Secure Boot(安全引导) (33)英特尔软件防护扩展 (33)Performance(性能) (34)Power management(电源管理) (34)POST Behavior(POST 行为) (35)Manageability(可管理性) (36)Virtualization support(虚拟化支持) (36)无线 (36)维护屏幕 (36)System logs(系统日志) (37)在 Windows 中更新 BIOS (37)在已启用 BitLocker 的系统上更新 BIOS (38)使用 USB 闪存盘更新您的系统 BIOS (38)系统密码和设置密码 (38)分配系统设置密码 (39)删除或更改现有的系统设置密码 (39)8 获取帮助 (40)联系戴尔 (40)4目录设置 Precision 3551: 根据您所订购的配置,本文档中的图像可能与您的计算机有所差异。
戴尔笔记本电脑快速参考指南说明书
Dell Precision™ M90MobileWorkstation Quick Reference GuideModel PP05XAw w w.d e l l.c o m|s u p p o r t.d e l l.c o mNotes, Notices, and CautionsNOTE: A NOTE indicates important information that helps you make better use of your computer.NOTICE: A NOTICE indicates either potential damage to hardware or loss of data and tells you how to avoid theproblem.CAUTION: A CAUTION indicates a potential for property damage, personal injury, or death.Abbreviations and AcronymsFor a complete list of abbreviations and acronyms, see Glossary in your User’s Guide.If you purchased a Dell™ n Series computer, any references in this document to Microsoft® Windows®operating systems are not applicable.____________________Information in this document is subject to change without notice.© 2006Dell Inc.All rights reserved.Reproduction in any manner whatsoever without the written permission of Dell Inc.is strictly forbidden.Trademarks used in this text: Dell, the DELL logo, Dell Precision, and ExpressCharge are trademarks of Dell Inc.; Intel is a registered trademark of Intel Corporation; Microsoft and Windows are registered trademarks of Microsoft Corporation; Bluetooth is a trademark owned by Bluetooth SIG, Inc. and is used by Dell Inc. under license.Other trademarks and trade names may be used in this document to refer to either the entities claiming the marks and names or their products. Dell Inc. disclaims any proprietary interest in trademarks and trade names other than its own.Model PP05XAFebruary 2006P/N PD063Rev. A00ContentsFinding Information (5)Setting Up Your Computer (8)About Your Computer (9)Front View (9)Left Side View (10)Right Side View (10)Back View (11)Bottom View (12)Using a Battery (13)Battery Performance (13)Checking the Battery Charge (14)Charging the Battery (16)Replacing the Battery (16)Storing a Battery (17)Troubleshooting (17)Lockups and Software Problems (17)Dell Diagnostics (19)Index (23)Contents34ContentsFinding InformationNOTE: Some features or media may be optional and may not ship with your computer. Some features or media may not be available in certain countries.NOTE: Additional information may ship with your computer.What Are You Looking For?Find It Here•A diagnostic program for my computer •Drivers for my computer•My computer documentation•My device documentation •Notebook System Software (NSS)Drivers and Utilities CD (also known as ResourceCD) NOTE: The Drivers and Utilities CD may be optional and may not ship with your computer.Documentation anddrivers are alreadyinstalled on yourcomputer. Y ou can use theCD to reinstall drivers orto run the Dell Diagnostics(See "Dell Diagnostics" onpage19).Readme files may beincluded on your CD toprovide last-minute updates about technical changes to your computer or advanced technical-reference material for technicians or experienced users.NOTE: Drivers and documentation updates can be found at .•Warranty information•Terms and Conditions (U.S. only)•Safety instructions•Regulatory information•Ergonomics information•End User License AgreementDell™ Product Information Guide•How to remove and replace parts •Specifications•How to configure system settings •How to troubleshoot and solve problems Dell Precision™ User’s GuideMicrosoft Windows XP Help and Support Center1Click Start→Help and Support→Dell User and System Guides→System Guides.2Click theUser’s Guidefor your computer.Quick Reference Guide5•Service Tag and Express Service Code •Microsoft Windows License Label Service Tag and Microsoft® Windows® LicenseThese labels are located on your computer.•Use the Service Tag to identify your computer when you use or contact technical support.•Enter the Express ServiceCode to direct your callwhen contacting technicalsupport.•Solutions — Troubleshooting hints and tips, articles from technicians, and online courses, frequently asked questions•Community — Online discussion with other Dell customers•Upgrades — Upgrade information for components, such as memory, the hard drive, and the operating system •Customer Care — Contact information, service call and order status, warranty, and repair information •Service and support — Service call status and support history, service contract, online discussions with technical support•Reference — Computer documentation, details on my computer configuration, product specifications, and white papers•Downloads — Certified drivers, patches, and software updates•Notebook System Software (NSS)— If you reinstall the operating system for your computer, you should also reinstall the NSS utility. NSS provides critical updates for your operating system and support for Dell™3.5-inch USB floppy drives, Intel® processors, optical drives, and USB devices. NSS is necessary for correct operation of your Dell computer. The software automatically detects your computer and operating system and installs the updates appropriate for your configuration.Dell Support Website — NOTE: Select your region to view the appropriate support site.To download Notebook System Software:1Go to , select your region or business segment, and enter your Service Tag.2Select Drivers & Downloads and click Go.3Click your operating system and search for the keyword Notebook System Software.NOTE: The user interface may vary depending on your selections.What Are You Looking For?Find It Here6Quick Reference Guide•Software upgrades and troubleshooting hints — Frequently asked questions, hot topics, and general health of your computing environment Dell Support UtilityThe Dell Support Utility is an automated upgrade and notification system installed on your computer. This support provides real-time health scans of your computing environment, software updates, and relevant self-support information. Access the Dell Support Utility from the icon in the taskbar. For more information, see "Dell SupportUtility" in your User’s Guide.•How to use Windows XP•How to work with programs and files •How to personalize my desktop Windows Help and Support Center1Click the Start button and click Help and Support.2T ype a word or phrase that describes your problem and click the arrow icon.3Click the topic that describes your problem.4Follow the instructions on the screen.•How to reinstall my operating system Operating System CDNOTE: The Operating System CD may be optional and maynot ship with your computer.The operating system is already installed on your computer.To reinstall your operating system, use the OperatingSystem CD. See "Reinstalling Windows XP" in your User’sGuide.After you reinstall youroperating system, use theDrivers and Utilities CD(ResourceCD) to reinstalldrivers for the devices thatcame with your computer.Y our operating systemproduct key label is locatedon your computer.NOTE: The color of your CD varies based on the operatingsystem you ordered.What Are You Looking For?Find It HereQuick Reference Guide78Quick Reference GuideSetting Up Your ComputerCAUTION: Before you begin any of the procedures in this section, follow the safety instructions in theProduct Information Guide .1Unpack the accessories box.2Set aside the contents of the accessories box, which you will need to complete the setup of your computer.The accessories box also contains user documentation and any software or additional hardware (such as PC Cards, drives, or batteries) that you have ordered.3Connect the AC adapter to the AC adapter connector on the computer and to the electrical outlet.4Open the computer display and press the power button to turn on the computer (see "Front View" on page 9).NOTE: It is recommended that you turn on and shut down your computer at least once before you install any cards or connect the computer to a docking device or other external device, such as a printer.Quick Reference Guide 9About Your ComputerFront View1display latches (2)6touch pad11keyboard 2display latch release 7media control buttons 12media button 3display 8speakers (2)13keyboard and wireless status lights4power button 9touch pad buttons 5device status lights10touch-pad scroll zone2113694813571121010Quick Reference GuideLeft Side ViewRight Side View1security cable slot 3USB connectors (2)5optical-drive-tray eject button2air vent4optical drive1smart card slot 4IEEE 1394 connector 7air vent2hard drive 55-in-1 media memory card reader3ExpressCard slot6audio connectors (2)123452345671Back View1air vent 5USB connectors (2)9AC adapter connector 2S-video TV-out connector 6USB connectors (2)10air vent3network (RJ-45) connector 7Digital-Video Interface(DVI) connector4modem (RJ-11) connector 8video (VGA) connector 12345678910Bottom View1subwoofer 5cover for optional internalcard with Bluetooth ®wireless technology9docking-device connector 2battery charge/health gauge 6hard drive10memory module cover 3battery-bay latch release 7air vent11air vent 4battery 8Mini-Card/modem cover12optical-drive security screw123456789111210Using a BatteryBattery PerformanceNOTE: For information about the Dell warranty for your computer, see the Product Information Guide or separate paper warranty document that shipped with your computer.For optimal computer performance and to help preserve BIOS settings, operate your Dell™ portable computer with the battery installed at all times. One battery is supplied as standard equipment in the battery bay.NOTE: Because the battery may not be fully charged, use the AC adapter to connect your new computer to an electrical outlet the first time you use the computer. For best results, operate the computer with the AC adapter until the battery is fully charged. To view battery charge status, click Start→ Control Panel→ Power Options, and click Power Meter tab.NOTE: Battery operating time (the time the battery can operate the computer) decreases over time. Depending on how often the battery is used and the conditions under which it is used, you may need to purchase a new battery during the life of your computer.Battery operating time varies depending on operating conditions. Operating time is significantly reduced when you perform operations including, but not limited to, the following:•Using optical drives.•Using wireless communications devices, ExpressCards, or USB devices.•Using high-brightness display settings, 3D screen savers, or other power-intensive programs such as complex 3D graphics applications.•Running the computer in maximum performance mode. See "Configuring Power Management Settings" on in your User’s Guide for information about accessing Windows Power Options Properties or Dell QuickSet, which you can use to configure power management settings.NOTE: It is recommended that you connect your computer to an electrical outlet when writing to a CD or DVD.Y ou can check the battery charge before you insert the battery into the computer. Y ou can also set power management options to alert you when the battery charge is low. For more information, see "Checking the Battery Charge" on page14.CAUTION: Using an incompatible battery may increase the risk of fire or explosion. Replace the battery only with a compatible battery purchased from Dell. The battery is designed to work with your Dell computer. Do not use a battery from other computers with your computer.CAUTION: Do not dispose of batteries with household waste. When your battery no longer holds a charge, call your local waste disposal or environmental agency for advice on disposing of a lithium-ion battery. See "Battery Disposal" in the Product Information Guide.CAUTION: Misuse of the battery may increase the risk of fire or chemical burn. Do not puncture, incinerate, disassemble, or expose the battery to temperatures above 65°C (149°F). Keep the battery away from children.Handle damaged or leaking batteries with extreme care. Damaged batteries may leak and cause personal injury or equipment damage.Checking the Battery ChargeThe Dell QuickSet Battery Meter, the Microsoft Windows Power Meter window and icon, the battery charge gauge and health gauge, and the low-battery warning provide information on the battery charge.NOTE: Dell QuickSet may not be available on your computer.Dell™ QuickSet Battery MeterIf Dell QuickSet is installed, press <Fn><F3> to display the QuickSet Battery Meter. The Battery Meter displays status, battery health, charge level, and charge completion time for the battery in your computer. For more information about QuickSet, right-click the icon in the taskbar, and click Help.Microsoft® Windows® Power MeterThe Windows Power Meter indicates the remaining battery charge. To check the Power Meter, double-click the icon on the taskbar.If the computer is connected to an electrical outlet, a icon appears.Charge GaugeBy pressing (or pressing and holding) the status button on the charge gauge on the battery, you can check:•Battery charge (check by pressing and releasing the status button)•Battery health (check by pressing and holding the status button)The battery operating time is largely determined by the number of times it is charged. After hundreds of charge and discharge cycles, batteries lose some charge capacity—or battery health. That is, a battery can show a status of "charged" but maintain a reduced charge capacity (health).Check the Battery ChargeTo check the battery charge, press the status button on the battery charge gauge to illuminate the charge-level lights. Each light represents approximately 20 percent of the total battery charge. For example, if the battery has 80 percent of its charge remaining, four of the lights are on. If no lights appear, the battery has no charge.Check the Battery HealthNOTE: You can check battery health either by using the charge gauge on the battery as described below, or by using the Battery Meter in Dell QuickSet. For information about QuickSet, right-click the icon in the taskbar, and click Help.To check the battery health using the charge gauge, press and hold the status button on the battery charge gauge for at least 3seconds. If no lights appear, the battery is in good condition, and more than 80percent of its original charge capacity remains. Each light represents incremental degradation. If five lights appear, less than 60percent of the charge capacity remains, and you should consider replacing the battery. See "Specifications" in your User’s Guide for more information about the battery operating time.Low-Battery WarningNOTICE: To avoid losing or corrupting data, save your work immediately after a low-battery warning.Then connect the computer to an electrical outlet. If the battery runs completely out of power, hibernate mode begins automatically.A pop-up window warns you when the battery charge is approximately 90 percent depleted. The computer enters hibernate mode when the battery charge is at a critically low level.Y ou can change the settings for the battery alarms in QuickSet or the Power Options Properties window. See "Configuring Power Management Settings" in your User’s Guide for information about accessing QuickSet or the Power Options Properties window.Conserving Battery PowerPerform the following actions to conserve battery power:•Connect the computer to an electrical outlet when possible because battery life is largely determined by the number of times the battery is used and recharged.•Place the computer in standby mode or hibernate mode when you leave the computer unattended for long periods of time. See "Power Management Modes" in your User’s Guide for more information about standby and hibernate modes.•Use the Power Management Wizard to select options to optimize your computer’s power usage. These options can also be set to change when you press the power button, close the display, or press<Fn><Esc>. See "Configuring Power Management Settings" in your User’s Guide for moreinformation on using the Power Management Wizard.NOTE: See "Configuring Power Management Settings" in your User’s Guide.Charging the BatteryNOTE: With Dell™ ExpressCharge™, when the computer is turned off, the AC adapter charges a completely discharged battery to 80 percent in about 1 hour and to 100 percent in approximately 2 hours. Charge time is longer with the computer turned on. You can leave the battery in the computer for as long as you like. The battery’s internal circuitry prevents the battery from overcharging.When you connect the computer to an electrical outlet or install a battery while the computer is connected to an electrical outlet, the computer checks the battery charge and temperature. If necessary, the AC adapter then charges the battery and maintains the battery charge.If the battery is hot from being used in your computer or being in a hot environment, the battery may not charge when you connect the computer to an electrical outlet.The battery is too hot to start charging if the light flashes alternately orange and green. Disconnect the computer from the electrical outlet and allow the computer and the battery to cool to room temperature. Then connect the computer to an electrical outlet to continue charging the battery.For more information about resolving problems with a battery, see "Power Problems" in your User’s Guide. Replacing the BatteryCAUTION: Before performing these procedures, turn off the computer, disconnect the AC adapter from the electrical outlet and the computer, disconnect the modem from the wall connector and computer, and remove any other external cables from the computer.NOTICE: You must remove all external cables from the computer to avoid possible connector damage.CAUTION: Using an incompatible battery may increase the risk of fire or explosion. Replace the battery only with a compatible battery purchased from Dell. The battery is designed to work with your Dell™ computer. Do not use a battery from other computers with your computer.To remove the battery:1If the computer is connected to a docking device (docked), undock it. See the documentation that came with your docking device for instructions.2Ensure that the computer is turned off.3Slide and hold the battery-bay latch release on the bottom of the computer, and then lift the battery from the bay.To replace the battery, follow the removal procedure in reverse order.Storing a BatteryRemove the battery when you store your computer for an extended period of time. A battery discharges during prolonged storage. After a long storage period, recharge the battery fully before you use it. See "Charging the Battery" on page 16.TroubleshootingLockups and Software Problems CAUTION: Before you begin any of the procedures in this section, follow the safety instructions in theProduct Information Guide .The computer does not start upE N S U R E T H A T T H E AC A D A P T E R I SF I R M L Y C O N N E C T E D T O T H E C O M P U T E R A N D T O T H E E L E C T R I C A L O U T L E T The computer stops respondingNOTICE: You might lose data if you are unable to perform an operating system shutdown.T U R N T H E C O M P U T E R O F F —If you are unable to get a response by pressing a key on your keyboard or moving your mouse, press and hold the power button for at least 8 to 10 seconds until the computer turns off. Then restart your computer.1battery-bay latch release 2battery12A program stops responding or crashes repeatedlyNOTE: Software usually includes installation instructions in its documentation or on a floppy disk or CD.E N D T H E P R O G R A M—1Press <Ctrl><Shift><Esc> simultaneously.2Click Task Manager.3Click the program that is no longer responding.4Click End Task.C H E C K T H E S O F T W A R ED O C U ME N T A T I O N—If necessary, uninstall and then reinstall the program.A program is designed for an earlier Microsoft® Windows® operating systemR U N T H E P R O G R A M C O M P A T I B I L I T Y W I Z A R D—The Program Compatibility Wizard configures a program so it runs in an environment similar to non-Windows XP operating system environments.1Click the Start button, point to All Programs→Accessories, and then click Program Compatibility Wizard.2In the welcome screen, click Next.3Follow the instructions on the screen.A solid blue screen appearsT U R N T H E C O M P U T E R O F F—If you are unable to get a response by pressing a key on your keyboard or moving your mouse, press and hold the power button for at least 8 to 10 seconds until the computer turns off. Then restart your computer.Other software problemsC H E C K T H E S O F T W A R ED O C U ME N T A T I O N O R C O N T A C T T H E S OF T W A R E M A N U F A C T U R E R F O R T R O U B L E S H O O T I NG I N F O R M A T I O N—•Ensure that the program is compatible with the operating system installed on your computer.•Ensure that your computer meets the minimum hardware requirements needed to run the software.See the software documentation for information.•Ensure that the program is installed and configured properly.•Verify that the device drivers do not conflict with the program.•If necessary, uninstall and then reinstall the program.B AC K U P Y O U R F I L E S I M M ED I A TE L YU S E A V I R U S-S C A N N I N G P R O G R A M T O C H E C K T H E H A R D D R I V E, F L O P P Y D I S K S, O R CD SS A V E A N D C L O S E A N Y O P E N F I L E S O R P R O G R A M S A N D S H U T D O W N Y O U R C O M P U T E R T H R O U G H T H E Start M E N U S C A N T H E C O M P U T E R F O R S P Y W A R E—If you are experiencing slow computer performance, you frequently receive pop-up advertisements, or you are having problems connecting to the Internet, your computer might be infected with spyware. Use an anti-virus program that includes anti-spyware protection (your program may require an upgrade) to scan the computer and remove spyware. For more information, go to and search for the keyword spyware.R U N T H E D E L L D I A G N O S T I C S—See "Dell Diagnostics" on page19. If all tests run successfully, the error condition is related to a software problem.Dell DiagnosticsCAUTION: Before you begin any of the procedures in this section, follow the safety instructions in the Product Information Guide.When to Use the Dell DiagnosticsIf you experience a problem with your computer, perform the checks in "Lockups and Software Problems" on page17 and run the Dell Diagnostics before you contact Dell for technical assistance.It is recommended that you print these procedures before you begin.NOTICE: The Dell Diagnostics works only on Dell computers.NOTE: The Drivers and Utilities CD is optional and may not ship with your computer.Enter system setup, review your computer’s configuration information, and ensure that the device you want to test displays in system setup and is active.Start the Dell Diagnostics from either your hard drive or from the Drivers and Utilities CD (also known as the ResourceCD).Starting the Dell Diagnostics From Your Hard Drive1T urn on (or restart) your computer.a When the DELL™ logo appears, press <F12> immediately. Select Diagnostics from the bootmenu and press <Enter>.NOTE: If you wait too long and the operating system logo appears, continue to wait until you see theMicrosoft® Windows® desktop. Then shut down your computer and try again.b Press and hold the <Fn> key while powering the system on.NOTE: If you see a message stating that no diagnostics utility partition has been found, run the DellDiagnostics from the Drivers and Utilities CD.2See "Contacting Dell" in your User’s Guide.Starting the Dell Diagnostics From the Drivers and Utilities CD1Insert the Drivers and Utilities CD.2Shut down and restart the computer.When the DELL logo appears, press <F12> immediately.If you wait too long and the Windows logo appears, continue to wait until you see the Windows desktop. Then shut down your computer and try again.NOTE: The next steps change the boot sequence for one time only. On the next start-up, the computer bootsaccording to the devices specified in the system setup program.3When the boot device list appears, highlight CD/DVD/CD-RW Drive and press <Enter>.4Select the Boot from CD-ROM option from the menu that appears and press <Enter>.5T ype 1 to start the ResourceCD menu and press <Enter> to proceed.6Select Run the 32 Bit Dell Diagnostics from the numbered list. If multiple versions are listed, select the version appropriate for your computer.7When the Dell Diagnostics Main Menu appears, select the test you want to run.Dell Diagnostics Main Menu1After the Dell Diagnostics loads and the Main Menu screen appears, click the button for the option you want.2If a problem is encountered during a test, a message appears with an error code and a description of the problem. Write down the error code and problem description and follow the instructions on the screen.If you cannot resolve the error condition, contact Dell. See "Contacting Dell" in your User’s Guide .NOTE: The Service Tag for your computer is located at the top of each test screen. If you contact Dell,technical support will ask for your Service Tag.OptionFunction Express Test Performs a quick test of devices. This test typically takes 10 to20minutes and requires no interaction on your part. Run Express Testfirst to increase the possibility of tracing the problem quickly.Extended Test Performs a thorough check of devices. This test typically takes 1 hour ormore and requires you to answer questions periodically.Custom Test Tests a specific device. Y ou can customize the tests you want to run.Symptom T reeLists the most common symptoms encountered and allows you to selecta test based on the symptom of the problem you are having.Quick Reference Guide 213If you run a test from the Custom Test or Symptom Tree option, click the applicable tab described in the following table for more information.4When the tests are completed, if you are running the Dell Diagnostics from the Drivers and Utilities CD , remove the CD.5Close the test screen to return to the Main Menu screen. To exit the Dell Diagnostics and restart the computer, close the Main Menu screen.Tab FunctionResults Displays the results of the test and any error conditions encountered.Errors Displays error conditions encountered, error codes, and the problem description.Help Describes the test and may indicate requirements for running the test.ConfigurationDisplays your hardware configuration for the selected device.The Dell Diagnostics obtains configuration information for all devices from the system setup program, memory, and various internal tests, and it displays the information in the device list in the left pane of the screen. The device list may not display the names of all thecomponents installed on your computer or all devices attached to your computer.ParametersAllows you to customize the test by changing the test settings.。
2016年戴尔笔记本系列推荐
2016年戴尔笔记本系列推荐有朋友问我2016年戴尔笔记本哪个系列的好呢?该买什么好!下面由店铺给你做出详细的2016年戴尔笔记本系列推荐介绍!希望对你有帮助!2016年戴尔笔记本系列推荐一:戴尔Vostro 成就 3450(V3450D-568) 5499元屏幕尺寸:14英寸 1366x768CPU型号:Intel 酷睿i5 2450M CPU主频:2.5GHz 内存容量:4GB DDR3 1333MHz硬盘容量:500GB 5400转,SATA显卡芯片:AMD Radeon HD 6630M 操作系统:Windows 7 Home Basic 64bit(64...摄像头:集成摄像头光驱类型:DVD刻录机支持DVD SuperMulti...无线网卡:支持802.11b/g/n无线协议笔记本重量:2.28Kg蓝牙:支持,蓝牙3.0模块2016年戴尔笔记本系列推荐二:戴尔Inspiron 灵越 15R(Ins15RD-768)戴尔Inspiron 灵越 15R(Ins15RD-879)戴尔Inspiron 灵越 14R(Ins14RD-758AL)戴尔Inspiron 灵越 14R(Ins14RD-888AL)2016年戴尔笔记本系列推荐三:推荐你高端显卡的型号大型3D游戏、设计都没问题14寸屏幕的有Acer 4745G(482G50Mnks) 4850元I5处理器 2G 500G 14寸神舟精盾K470-i5D1 4999元I5处理器 2G 500G 14寸15寸屏幕的有Acer 5742G(482G50Mncc) 4800元I5处理器 2G 500G 15.6寸神舟精盾 K580-i3 D3 4699元I3处理器 2G 500G 15.6寸超高端GDDR5显卡。
戴尔笔记本电脑快速入门指南.pdf_1700824087.0653446说明书
1Connect the power adapter and press the power buttonSluit de netadapter aan en druk op de aan-uitknop.Podłącz zasilacz i naciśnij przycisk zasilaniaPriključite napajalnik in pritisnite gumb za vklop/izklop.2Finish Windows 7 setupVoltooi de installatie van Windows 7 | Skonfiguruj system Windows 7Dokončajte namestitev sistema Windows 7Set a password for WindowsStel een wachtwoord voor Windows in Ustaw hasło do systemu Windows Nastavite geslo za sistem WindowsConnect to your networkMaak verbinding met uw netwerkPodłącz komputer do sieci Povežite se z omrežjemwireless network access when prompted.als u verbinding maakt met een beveiligd draadloos netwerk, voer dan het wachtwoord in voor toegang tot het draadloze netwerk wanneer u hierom wordt gevraagd.Jeśli nawiązujesz połączenie z zabezpieczoną siecią bezprzewodową, wprowadź hasłodostępu do sieci po wyświetleniu monitu.Če se povezujete v zaščiteno brezžično omrežje, ob pozivu vnesite geslo za dostop do brezžičnega omrežja.Protect your computer Beveilig de computerChroń komputer przed wirusami Zaščitite računalnikProduct support and manuals Productsupport en handleidingenPomoc techniczna dotycząca produktu i instrukcje obsługi Podpora in navodila za izdelek/support/support/manuals /support/windowsContact DellContact opnemen met Dell | Skontaktuj się z firmą Dell Stik s podjetjem Dell/contactdellRegulatory and safetyRegelgeving en veiligheidsvoorschriften | Zgodność z normami i bezpieczeństwo | Zakonsko predpisane in varnostne informacije/regulatory_complianceRegulatory modelModel van regelgeving | Formalne oznaczenie modelu Zakonsko predpisan modelP56FRegulatory typeType regelgeving | Formalne oznaczenie typu Zakonsko predpisan tipP56F001Computer modelComputermodel | Model komputera Model računalnikaDell Precision 5520© 2017 Dell Inc. or its subsidiaries.© 2017 Canonical Ltd.© 2017 Microsoft Corporation.2017-03FeaturesKenmerken | Funkcje | Funkcije1. Aan-/uitknop2. Sleuf voor Kensington-beveiliging3. Knop voor status van batterij4. Batterijstatuslampjes5. USB 3.0-poort met PowerShare6. Geheugenkaartlezer7. Toetsenblok8. Headsetpoort9. Thunderbolt ™ 3-poort 10. HDMI-poort11. USB 3.0-poort met PowerShare 12. Voedingskabelconnector 13. Statuslampje voor camera 14. Camera 15. Luidspreker16. Microfoon17. Statuslampje voeding 18. Microfoon 19. Luidspreker 20. Servicetaglabel1. Przycisk zasilania2. Zabezpieczenie firmy Kensington3. Przycisk stanu akumulatora4. Lampki stanu akumulatora5. Port USB 3.0 z funkcją PowerShare6. Czytnik kart pamięci7. Tabliczka dotykowa8. Gniazdo słuchawek9. Port Thunderbolt ™ 310. Złącze HDMI11. Port USB 3.0 z funkcją PowerShare 12. Złącze zasilania 13. Lampka stanu kamery 14. Kamera 15. Głośnik16. Mikrofon17. Lampka stanu zasilania 18. Mikrofon 19. Głośnik20. Etykieta ze znacznikiem serwisowym1. Gumb za vklop/izklop2. Reža za ključavnico Kensington3. Gumb za stanje baterije4. Lučke stanja baterije5. Vrata USB 3.0 s funkcijo PowerShare6. Bralnik pomnilniških kartic7. Sledilna ploščica8. Vrata za slušalke9. Vrata Thunderbolt ™ 310. Vrata HDMI11. Vrata USB 3.0 s funkcijo PowerShare 12. Priključek za napajanje 13. Lučka stanja kamere 14. Kamera 15. Zvočnik16. Mikrofon17. Lučka stanja napajanja 18. Mikrofon 19. Zvočnik 20. Servisna oznaka1. Power button2. Kensington security slot3. Battery status button4. Battery status lights5. USB 3.0 port with PowerShare6. Memory card reader7. Touchpad8. Headset port9. Thunderbolt ™ 3 port 10. HDMI port11. USB 3.0 port with PowerShare 12. Power connector 13. Camera status light 14. Camera 15. Speaker16. Microphone 17. Power status light 18. Microphone 19. Speaker 20. Service tag label。
- 1、下载文档前请自行甄别文档内容的完整性,平台不提供额外的编辑、内容补充、找答案等附加服务。
- 2、"仅部分预览"的文档,不可在线预览部分如存在完整性等问题,可反馈申请退款(可完整预览的文档不适用该条件!)。
- 3、如文档侵犯您的权益,请联系客服反馈,我们会尽快为您处理(人工客服工作时间:9:00-18:30)。
BIWIN SSD (固态硬盘) 256 GB 共 204 次 O0818A SATA III 600 MB/秒 S.M.A.R.T, APM, 48-bit LBA, 日立 HGST HTS541010A7E630 1 TB 2.5 寸 5400 转/分
NCQ
32 MB 共 235 次,累计 767 小时 SE0OA4C0 SATA III 600.00 MB/秒 1061.00 Mb/秒 S.M.A.R.T, APM, 48-bit LBA, 13.00 毫秒 1.00 毫秒 25.00 毫秒 5.50 毫秒 70.00 x 100.00 x 7.00 毫米 95 克
电脑型号 操作系统 处理器 主板 内存 主硬盘 显卡 显示器 声卡 网卡 处理器 速度 处理器数量 核心代号 生产工艺 插槽/插座 一级数据缓存 一级代码缓存 二级缓存 三级缓存 特征
主板型号 芯片组 序列号 主板版本 BIOS BIOS的大小 板载设备
DIMM A 制造日期 型号 序列号
产品 容量 硬盘已使用 固件 接口 数据传输率 特征 产品 容量 形状特征 转速
NCQ 2
英特尔 HD Graphics 530 192 MB 戴尔 Intel Video BIOS 20.19.15.4331 11-20-2015 Nvidia Quadro M1000M 2 GB Version 82.7.82.0.23 10.18.13.5894 11-9-2015
夏普 夏普 2015 15.7 宽屏 1920 1920
PS/2pliant 鼠标 戴尔 触摸板 Integrated Webcam
戴尔 0N8J4R 英特尔 PCI standard host CPU bridge /8T82D72/CN129635BT0008/ A00 戴尔 Inc. 01.00.05 / 制造日期: 2015年10月14日 16384 KB "Intel HD Graphics" / 视频设备 (启用)
镁光 DDR4 2133MHz 8GB 2015 年 08月 2C 16ATF1G64HZ-2G1A2 107075C0
SHP1453 年 10月 英寸 (35 厘米 x 19 厘米) 16 : 9 x 1080 32 位真彩色 x 1080
三星 DELL M7R965A - 50153 10.42% 55997 mWh 50160 mWh 50153Samsung SDIDELL M7R965A
英特尔 Dual Band Wireless-AC 8260 瑞昱 @ 英特尔 High Definition Audio 控制器
产品 电池损耗 出厂设计容量 完全充电容量 ID
无线网卡 声卡 键盘
键盘 鼠标 鼠标 摄像头
戴尔 Precision 5510 笔记本电脑 Windows 7 专业版 64位 SP1 ( DirectX 11 ) 英特尔 Core i7-6820HQ @ 2.70GHz 四核 戴尔 0N8J4R ( 英特尔 PCI standard host CPU bridge ) 8 GB ( 镁光 DDR4 2133MHz ) BIWIN SSD ( 256 GB / 固态硬盘 ) 英特尔 HD Graphics 530 ( 192 MB / 戴尔 ) 夏普 SHP1453 ( 15.7 英寸 ) 瑞昱 @ 英特尔 High Definition Audio 控制器 英特尔 Dual Band Wireless-AC 8260 英特尔 Core i7-6820HQ @ 2.70GHz 四核 2.71 GHz (100 MHz x 27.0) 核心数: 4 / 线程数: 8 Skylake 14 纳米 U3E1 4 x 32 KB, 8-Way, 64 byte lines 4 x 32 KB, 8-Way, 64 byte lines 4 x 256 KB, 4-Way, 64 byte lines 8 MB, 16-Way, 64 byte lines MMX, SSE, SSE2, SSE3, SSSE3, SSE4.1, SSE4.2, HTT, EM64T, EIST, Turbo Boost
缓存 硬盘已使用 固件 接口 数据传输率 内部数据传输率 特征 磁头数 平均寻道时间 道间寻道时间 全程寻道时间 延迟时间 外形尺寸 重量
主显卡 显存 制造商 BIOS版本 驱动版本 驱动日期 显卡 显存 BIOS版本 驱动版本 驱动日期
产品 厂商 固件日期 屏幕尺寸 显示比例 分辨率 最大分辨率