Roland罗兰GW-8说明书 中文
Roland VS-1680 880数字工作站补充说明书

®Supplemental NotesApril 24, 1998 © 1998 Roland Corporation U.S. Synchronizing the VS-1680 and VS-880 Page 1 of 3 The 24-Track Virtual Studio - Synchronizing the VS-1680 and VS-880Have you ever wondered what it would be like to have a 24-track digital studio with 320 recordable tracks,12-tracks of simultaneous recording, six digital stereo multi-effects processors, and 40 channels of automated digital mixing? Adding a VS-1680 to your existing VS-880 studio will give you all that and more. The purpose of this document is to show you, step-by-step, just how easy it is. We will start by showing you the procedure for synchronizing a VS-1680 with a VS-880 using MIDI Time Code. Then, we will show how to synchronize thetwo units using MIDI Machine Control and Digital Clock.I. Syncing the VS-1680 with the VS-880 using MTCBoth the VS-1680 and the VS-880 have the ability to generate and slave to MIDI Time Code (MTC). Inaddition, they have the ability to varispeed their sample rate to account for fluctuations in the source signal.This provides a sync that is frame accurate and allows you to do things such as lock to video and locate on the fly. In the following example, we will synchronize the VS-880 as a slave device to the VS-1680 using MIDITime Code.SetupSyncing recording devices usually requires using expensive time code generators and converters, a multitude of assorted cables, and many aspirin to relieve the headaches associated with configuring this type of setup. The only items needed to synchronize the VS-1680 and VS-880, are a MIDI cable and a pair of audio cables. Use thef ollowing procedure to setup a VS-1680 and VS-880 to operate in sync with the VS-1680 as the master device: 1) Connect the MIDI OUT jack of the VS-1680 to the MIDI IN jack of the VS-880.2) Connect the left MASTER OUT jack of the VS-880 to INPUT 3 on the VS-1680.3) Connect the right MASTER OUT jack of the VS-880 to INPUT 4 on the VS-1680.VS-1680 Settings1) Hold SHIFT and press F5 [SYSTEM].2) Press F4 [MIDI].3) Use the CURSOR buttons to highlight “Device ID” and use the TIME / VALUE dial to select “17.”4) Use the CURSOR buttons to highlight “MIDI Thru” and use the TIME / VALUE dial to select “Out.” 5) Use the CURSOR buttons to highlight “SysEx Tx” and use the TIME / VALUE dial to select “On.”6) Use the CURSOR buttons to highlight “MMC” and use the TIME / VALUE dial to select “MASTER.”7) Use the CURSOR buttons to highlight “Control Type” and use the TIME / VALUE dial to select “Off.”8) Press F6 [EXIT] to return to the System menu.9) Press F6 [SYNC].10) U se the CURSOR buttons to highlight “Sync Source” and use the TIME / VALUE dial to select “INT”(if necessary).11) U se the CURSOR buttons to highlight “Sync Gen.” and use the TIME / VALUE dial to select “MTC.”12) U se the CURSOR buttons to highlight “Sync MTC Type” and use the TIME / VALUE dial to select “30”(if necessary).13) P ress PLAY/DISPLAY to return to the main Play screen.VS-880Master Out L Input 3 Master Out R Input 4 MIDI OUT MIDI IN VS-1680V S-1680 Settings (continued) Now that we have made the necessary settings for synchronization, it is necessary to route the Master outputs of the VS-880 to the Master output of the VS-1680 so that we have a single output that contains the audio from oth units. Use the following procedure: b 1) Press ST IN (under SELECT/Ch Edit) so that it is lit.2) Use the CURSOR buttons to highlight “Select” and use the TIME / VALUE dial to select “Input 3/4.”3) Set the MASTER fader on the VS-880 to “0” (about two-thirds of the way up) and the INPUT 3 and 4knobs on the VS-1680 to the 12 o’clock position (straight up).4) Press the CURSOR DOWN button and use the TIME / VALUE dial to adjust the level of the VS-880 as desired.5 ) Press the CURSOR DOWN button and use the TIME / VALUE dial to set the Stereo In pan to “0” (if necessary). VS-880 Settings1) Press SYSTEM until “SYS MIDI PRM?” is displayed and press YES / ENTER.2) Press the PARAMETER RIGHT button until “SYS EX RX” is displayed and use the TIME / VALUE dial to select “ON.”3) Press the PARAMETER RIGHT button until “MMC =“ is displayed and use the TIME / VALUE dial to select “SLAVE.”4) Press the PARAMETER RIGHT button until “OUT/THRU =“ is displayed and use the TIME / VALUE dial toselect “OUT.”5) Press SYSTEM until “SYS SYNC/TEMPO” is displayed and press YES / ENTER.6) Use the TIME / VALUE dial to select “EXT.”7) Press the PARAMETER RIGHT button so that “MTC TYPE” is displayed and use the TIME / VALUE dial toselect “30.”8) Press PLAY [DISPLAY] to return to the main screen. When you press PLAY on the VS-1680, both units will start playing. The VS-1680’s mix output will nowcontain audio from both units.II. Syncing the VS-1680 with the VS-880 using MMC and Digital ClockIn addition to MIDI Time Code, the VS-1680 and VS-880 can be synchronized by using MIDI Machine Control and Digital Clock. MIDI Machine Control messages are used to control the transport functions while Digital Clock messages are used to provide a timing reference. This allows us to transfer the audio from the slave unit to the master without leaving the digital domain. In the following example, we will synchronize the VS-880 as a lave device to the VS-1680 using MIDI Machine Control and Digital Clock. s SetupUse the following procedure to setup a VS-1680 and VS-880 to operate in sync with the VS-1680 as the aster device: m 1) Connect the MIDI OUT jack of the VS-1680 to the MIDI IN jack of the VS-880.2) Connect DIGITAL OUT jack of the VS-880 to the DIGITAL IN 1 jack on the VS-1680.NOTE: Make sure that both the VS-1680 and VS-880 are powered on and that the current song’ssampling rate (48kHz, 44.1kHz, or 32kHz) is the same on both units. If you are unsure what the currentsong’s sampling rate is set to, press PLAY/DISPLAY on the VS-880 to access the Play screen (ifnecessary). Then, hold SHIFT and press SONG. The sampling rate will be displayed under “SYNC MODE.” On theVS-1680, hold SHIFT and press DISPLAY until the song name appears. The sample rate will be displayed below to song name next to “Rate.” The sampling rate is linked to the song. If the sampling rates do notmatch, you will need to create a new song on either the VS-1680 or the VS-880 with a sampling rate that matches the other unit.VS-880DIGITAL IN 1 DIGITAL OUT MIDI OUT MIDI IN VS-1680VS-1680 Settings1) Hold SHIFT and press F5 [SYSTEM].2) Press F1 [SYSPRM].3) Use the CURSOR buttons to highlight the Master Clock icon and use the TIME / VALUE dial to select“DIGIN1.” “Digital In Lock” will be displayed.4) Press F6 [EXIT] to return to the System Menu screen.5) Press F4 [MIDI].6) Use the CURSOR buttons to highlight the MIDI Thru icon and use the TIME / VALUE dial to select “Out”necessary).(if7) Use the CURSOR buttons to highlight the SysEx Tx icon and use the TIME / VALUE dial to select “On.”8) Use the CURSOR buttons to highlight the MMC icon and use the TIME / VALUE dial to select “MASTER.”9) Use the CURSOR buttons to highlight the Control Type icon and use the TIME / VALUE dial to select “Off”(if necessary).10) P ress PLAY [DISPLAY] to return to the main screen.Now that we have made the necessary settings for synchronization, it is necessary to route the Master outputs of the VS-880 to the Master output of the VS-1680 so that we have a single output that contains the audio from both units. Use the following procedure:1) Press ST IN (under SELECT/Ch Edit) so that it is lit.2) Use the CURSOR buttons to highlight “Select” and use the TIME / VALUE dial to select “Digital.”3) Set the VS-880’s MASTER fader to “0” (about two-thirds of the way up).4) Press the CURSOR DOWN button and use the TIME / VALUE dial to adjust the level of the VS-880 asdesired.5) Press the CURSOR DOWN button and use the TIME / VALUE dial to set the Stereo In pan to “0”necessary).(ifVS-880 Settings1) Press SYSTEM until “SYS MIDI PRM” is displayed and press YES / ENTER.2) Press the PARAMETER RIGHT button until “SYS EX RX” is displayed and use the TIME / VALUE dial toselect “ON.”3) Press the PARAMETER RIGHT button until “MMC=“ is displayed and use the TIME / VALUE dial to“SLAVE.”select4) Press SYSTEM until “SYS SYNC/TEMPO” is displayed and press YES / ENTER.5) Use the TIME / VALUE dial to select “Syn:Source = INT” (if necessary).6) Press PLAY [DISPLAY] to return to the main screen. Press PLAY on the VS-1680 to begin playback. When you press PLAY on the VS-1680, both units will start playing. The VS-1680’s mix output will now contain audio from both units.As you can see, the combination of a VS-1680 and a VS-880 offers powerful features that rival most professional studios. We hope that this document has provided you with a better understanding of the procedures required to synchronize the VS-1680 with the VS-880. Both units provide many synchronization options. For more information, please consult your VS-1680 and/or VS-880 Owner’s Manual(s).。
CUBE Street_ 立体声音箱说明书

* 当您将设备翻转并进行操作的时候,请用一 叠报纸或杂志垫在设备的四个角上或两端, 以防止正面板上的按键和控制器受损。您也 可以试着确定摆放的位置以免按键和控制 器受损。
中文说明书
感谢并恭喜您选购 Roland CUBE STREET 电池供电立体声音箱。
使用本设备之前,请仔细阅读有关章节: z 安全使用本设备(第 2-第 3 页) z 重要注意事项(第 4 页)
为了能够让您全面掌握这一新设备的各种功能,请完整阅读本使用说明书。 请将说明书妥善保管并放置于随手可取之处以便查阅。
上海乐兰电子有限公司
5
面板描述
控制面板
MIC/LINE CHANNEL
1. INPUT 接口 连接话筒或线路输入乐器(原声吉他或键盘)。
2. SELECT 切换 按下按键切换适合于您连接设备(话筒/线路) 的输入电平。当您连接原声吉他或键盘,请选 择 Line。
3. VOLUME 旋钮 调节通道的音量。
主要特点:
z 轻巧的立体声音箱 这是一台内置有 2 台最新研发的 6.5 英寸高性能扬声器的小型立体声音箱,它的输出功能为 5W(2.5W + 2.5W)
z 由电池或 AC 供电的双单元操作功能 双单元操作功能可以胜任您随时随地的需求。 仅仅 6 节 AA 电池,CUBE STREET 可以工作 15 个小时。(电池寿命将取决于使用环境。)
y 请使用随机提供的交流电源适配器。 保证线路电压与交流电源上标明的 输入电压相符。其他交流电源使用 的电极或电压可能不同,使用不当 将导致设备损坏、发生故障或电击。
Roland VG-88 Guitar System TurboStart TBS117 用户手册说

Guitar SystemIt’s a Fact…The Roland VG-88 Guitar System is the next generation of Roland’s V-Guitar technology, featuring a new realistic nylon-string guitar, new brass sounds and new polyphonic effects along with cutting-edge GT-Series effects. Other features include:•260 patches (160 preset + 100 user)•Electric, acoustic and nylon-string guitar models •Polyphonic intelligent pitch shifter instantly recreates 12-string, open tunings, bass guitar,and more•Direct 1/4” guitar input provides access to COSM™ amp models and effects using normalelectric guitar pickups•Built-in expression pedal for realtime parameter control•Natural tube amp models and overdriven soundsSetting the GK-2A PickupTo ensure the best possible tracking and sound quality, you must adjust the VG-88 pickup driver settings. Use the following procedure:1.Press F6, and then press F1.2.Turn the VALUE dial to select one of the fivememory settings, A-E.3.Cursor down and turn the VALUE dial to selectthe type of divided pickup that’s installed on your guitar.4.Cursor down and turn the VALUE dial to specifythe direction in which the pickup is attached onyour guitar.5.Cursor down and turn the VALUE dial to specifythe scale length of your guitar. (This is the length from the guitar’s bridge to its nut.)6.Press PAGE (!) and use a tape measure orruler to measure each string from the center ofthe divided pickup to the bridge.7.Press F1 and turn the VALUE dial to specify inmillimeters the length of the first string. Do thesame with Strings 2 - 6.8.Press PAGE (!) and turn the VALUE dial toadjust sensitivity. The level should not reachmaximum.9.Cursor down to continue adjusting the sensitivityof the remaining strings. Press EXIT when you’re finished.Note: Please refer to Page 18 of the VG-88 Owners Manua l for more detailed setup instructions.Selecting PatchesUse the following procedure to select patches using the footswitches:1.Press the BANK (") and (#) footswitches toselect patch banks.e Footswitches 1 – 4 to select patches.Try out these patches:•Preset 26—2 AcGt12st•Preset 26—3 Texs St•Preset 27—2 Nylon•Preset 28—4 Organ•Preset 29—4 Horn Gt•Preset 30—2 Body openESelecting PickupsThe S1 and S2 switches on the GK-2A can select different pickups. Use the following procedure to change from the bridge position to the neck position: 1.Select Preset 27—1 Smoke ST. (Use theprocedure described above).2.Press S1. Each time S1 is pressed, a differentpickup position is selected.Selecting Amplifier ModelsYou can send your guitar through various amplifier models, with each one having its own distinct tonal characteristics. Use the following procedure to switch between the different amplifier models:1.Select Preset 27—1 Smoke ST.2.Press AMP.3.Cursor down and turn the VALUE dial to selectthe different amplifier models.4.Press EXIT when you’re finished.Selecting Speaker ModelsChoosing speaker models is another way of creating tonal variations. Use the following procedure to select different speaker models:1.Select Preset 26—1 V-GUITAR.2.Press AMP.3.Press PAGE (!) three times, and thenCURSOR (!) once.4.Turn the VALUE dial to select the differentspeaker models.5.Press EXIT when you’re finished.Guitar SystemChanging TuningsThe VG-88 allows you to use different tunings without actually physically retuning your guitar. Use the following procedure to change your tunings:1.Select Preset 56—3 AcPIEZO.2.Press GUITAR.3.Cursor down and turn the VALUE dial to chooseOPEN TUNE.4.Press CURSOR (!) twice.5.Press F5.6.Turn the VALUE dial to select alternate tunings.7.Press EXIT twice when you’re finished.ChainThe VG-88 allows you to decide where in the signal chain you want to place your COSM guitar, amps and internal multi-effects. Use the following procedure to edit the chain:1.Press NAME/CHAIN.2.Press F5.3.Press CURSOR (#).4.Cursor left or right to choose the GK pickup,COSM amp or effect whose position you want to change. (Regular pickups on your guitar cannotbe moved in the chain.)5.Turn the VALUE dial to move the chosen deviceto another location.6.Press EXIT twice when you’re finished.EZ EditEZ edit allows you to change several parameters for each patch without having to navigate through their menus. Use the following procedure:1.Select the desired patch.2.Press EZ EDIT.e the CURSOR ($) or (!) buttons to select aparameter, and turn the VALUE dial to changethe currently selected parameter’s value. Assigning the EXPRESSION and CTL PedalsThe EXPRESSION and CTL pedals can control to a multitude of parameters. Use the following procedure to select the parameter you’d like to control using one of the pedals:1.Press PEDAL/ASSIGN.2.Press F5 [CTL].3.Turn the VALUE dial to select TUNER.4.Cursor down to set TUNER’s minimum andmaximum values. Set the minimum to Off andmaximum to On since TUNER is a simple on/offswitch. With parameters that provide a complete range of values—such as the master level—setyour minimum to the lowest value you want touse and maximum to the highest. You’ll alsowant to use the EXPRESSION pedal to be ableto sweep through all of the parameter’s values.5.Press EXIT twice when you’re finished.。
罗兰AE-10电吹管中文说明书
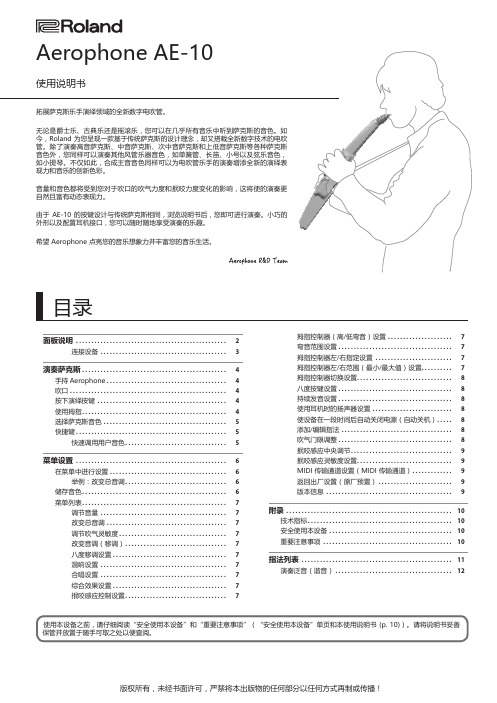
当您不演奏时,请使用随设备附属的吹口护盖保护吹口。
当您开启设备电源,吹口的灵敏度将进行自动调节。
鉴于此,请勿在开启设备电源时抿咬或挤压吹口。
演奏按键用于电吹管的演奏。
演奏按键与传统萨克斯的按键位置相同 (p.& 详细信息请参阅说明书尾页的“指法列表”。
八度按键切换八度音域。
请使用左手拇指进行操作。
八度按键可指定 +1 / ±2 / ±3 个八度 (p. [POWER] 开关用于开启/关闭设备电源。
设备电源将在您未播放音乐或未操作按键或控制器的一段时间后自动关闭(自动关机功能)。
如果您不想设备自动关机,请关闭自动关机功能 (p. [TONE](音色选择)按键用于进入音色选择界面。
该按键可以与演奏按键结合使用快速调用用户音色。
& “快速调用用户音色” (p.+2+1-1-2您无需像传统萨克斯一样维护 AE-10。
如果吹口由于长时间的吹奏而积累污垢,请将其取下并用清水冲洗。
然后,请使用柔软的干布将吹口擦干。
当您取下或安装吹口时,请小心不要弯折当您安装吹口时,请小心操作可移除部件并避免夹到手指。
您同样可以在安装和取如果吹口由于陈旧而需要更换时,请另行感应杆如右图所示,请完全插入吹口直到凹凸部分对如果吹口未完全插入,您无法通过改变抿咬簧片的力度从而提升或降低音调(应用颤AB C E D 11电吹管专卖店- 淘宝搜索:佛斯特电声乐器行 https://dzcn.taobao.com电吹管专卖店- 淘宝搜索:佛斯特电声乐器行 https://dzcn.taobao.com电吹管专卖店- 淘宝搜索:佛斯特电声乐器行 https://dzcn.taobao.com中可选的各种演奏声音称为“音色”。
U:001–。
当您开启设备电源,设备将选择最近一次所选的音色。
通过市售的 USB 2.0 连接线连接该端口和Aerophone 的电升高音调滑音咆哮音电吹管专卖店- 淘宝搜索:佛斯特电声乐器行 https://dzcn.taobao.com电吹管专卖店- 淘宝搜索:佛斯特电声乐器行 https://dzcn.taobao.com请使用唇齿轻轻抿咬吹口并以演奏传统萨克斯相同的方式进行吹吹气的力度不仅影响音量,而且影响音色本身。
罗兰三剑客说明书

Edirol Orchestral一般乐器面版If the selected sound is a stereo sound, this will be checked to indicate "STEREO"( ). You can click this indication to remove the check mark ( ), making the sound play in mono. This will设定将被忽略)VELO SW SENS(Velocity Switch Sens) 力度感应增加此值则即便轻奏的音符会被增高音调,你可藉由最大化或最小化此值,来让大力度或小力度的音被听见。
ENVELOPE[ATTACK] (Attack Time) 调整包络线的起始时间,高-->时间长-->和缓,低-->时间短-->剧烈[DECAY] (Decay Time)调整衰减的速度,高-->衰减时间长-->和缓,低-->衰减时间短-->剧烈[RELEASE] (Release Time) 调整释放时间,高-->释放时间长,低-->释放时间短VELOCITY SENS[ATTACK] 调整力度如何影响Attack Time,增加此值,强的力度将强化Attrck,减少此值,强的力度将柔化Attrck。
[DYNAMICS] Determines the extent to which changes in velocity (playing dynamics) will affect the volume or tone. As the value is decreased, changes in velocity will have less effect on the volume or tone. When the value of this parameter is increased, changes in velocity will produce greater effect on the volume or tone.Character调整声音的清晰或混浊度Filter[CUT OFF] (Brightness) 亮度~ 调整声音的亮度[RESONANCE] 共鸣(Timbre/Harmonic Intensity) 调整声音的个性,调低-->有气质,调高-->凸出个性Vibrato颤音[RATE] (Vibrato Rate) 颤音频率[DEPTH] (Vibrato Depth)颤音深度[DELAY] (Vibrato Delay)颤音长度RAND MOD (Random Modulation)随机数模式[RATE ]调整随机数比率[DEPTH] 调整随机数程度PORTAMENTO 滑音[ON/OFF]滑音功能开关[TIME]滑音转换时间调整PAN KEYFOLLOWUse this parameter when you want each note's keyboard position to affect its stereo location. Higher settings cause a greater shifting of the Tone's original pan position as you move further away from Middle C (C4), where the original stereo TVA Pan value remains in effect. Positive (+) settings cause notes above Middle C to be panned rightward. Negative (-) settings cause them to be panned leftward.MOD DEPTH (Modulation Depth)Adjusts the depth of modulation that will occur when modulation messages are received. These parameters have no effect on sounds that support Advanced Vibrato via modulation.这鉴盘指的是建议的声音演出范围,以正常黑白色指出乐器的正常演出范围,其它范围以灰色标示,红点指出的是每个音符的落点,让你检查你的音符是否落在建议范围内,你也可点击键盘听听相对应的音高。
TD-4中文说明书

上海乐兰电子有限公司3• 当发生以下情况时,请立即关闭电•请将本设备和AC 适配器放置在不影 源,将插头拔掉,并与“信息”页响其良好通风的场所或方向。
列表中的当地Roland 服务中心或Roland 授权经销商联系: •将AC 适配器的插头插入或拔开插座• AC 适配器、电源线或是插头破损 时,请手拿设备电源线的插头部分。
• 发生冒烟或发出异味• 异物或液体掉入或渗入设备 •每隔一段时间,您必须将AC适配器• 设备直接遭雨淋(或打湿) 的电源插头拔掉,并用干布擦拭和清• 设备操作不正常或是表现有明显 除累积于插头的灰尘。
当长期不使用的变化本设备时,也请将电源插头拔离插座。
在电源插头与电源插座之间沉积的灰• 请注意家中的孩童。
成人应监督孩尘可能会使绝缘不良而导致火灾。
童行为,直到他有能力遵循必要的安全指示操作本设备。
•避免电源线与各种导线互相缠绕。
此外,也请让孩童远离电源线与导线。
• 避免强烈的碰撞。
(请勿摔落!) •请勿踩踏在设备上,也不要将重物放置在设备上。
• 请勿将过多的电器与本产品共用一个插座。
在使用延长线时,请特别 •手部潮湿时,请勿拿取本设备的电源 注意您连接在延长线上的所有设备,线或将AC 适配器的插头插入或拔离 其总功率绝对不可超过延长线所能插座。
承受的功率。
电流的超载会导致导线发热并溶解包覆电线的绝缘物质。
•移动本设备之前,请拔下AC 适配器 连接线和所有与设备连接的外置设备• 在国外使用本设备之前,请与“信连接线。
息”页列表中的当地Roland 服务中心或Roland 授权经销商联系。
•清洁本设备之前,请关闭电源并从插座上拔下AC 适配器连接线。
•若怀疑您的地区可能发生雷击时,请将电源插头拔掉。
•请把螺丝放置于孩童触及不到的安全之处,以防孩童误吞食。
重要注意事项电力供应•请勿将本设备与其他由逆变器控制的设备(如冰箱、洗衣机、微波炉或空调)或带有电机的电器设备共用一个电源输出口。
Roland MC-808 新一代 Groovebox 说明书
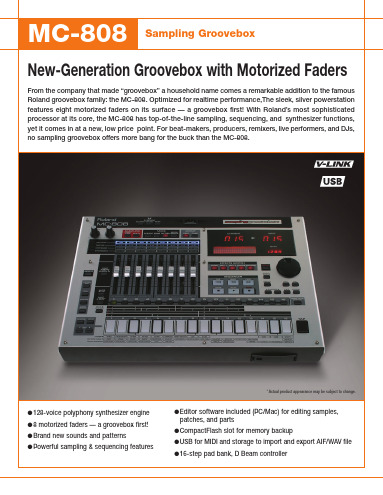
New-Generation Groovebox with Motorized Faders
From the company that made “groovebox” a household name comes a remarkable addition to the famous Roland groovebox family: the MC-808. Optimized for realtime performance,The sleek, silver powerstation features eight motorized faders on its surface — a groovebox first! With Roland’s most sophisticated processor at its core, the MC-808 has top-of-the-line sampling, sequencing, and synthesizer functions, yet it comes in at a new, low price point. For beat-makers, producers, remixers, live performers, and DJs, no sampling groovebox offers more bang for the buck than the MC-808.
------------------------------------------------------------------------------------------------------------------------------------
- 1、下载文档前请自行甄别文档内容的完整性,平台不提供额外的编辑、内容补充、找答案等附加服务。
- 2、"仅部分预览"的文档,不可在线预览部分如存在完整性等问题,可反馈申请退款(可完整预览的文档不适用该条件!)。
- 3、如文档侵犯您的权益,请联系客服反馈,我们会尽快为您处理(人工客服工作时间:9:00-18:30)。
Roland罗兰GW-8说明书中文
简介
Roland罗兰GW-8是一款功能齐全的合成器,为音乐爱好者提供了广泛的音色和功能。
本说明书将帮助用户了解GW-8的各种功能和操作方法,并指导用户如何充分利用GW-8的优势来创造出各种音乐作品。
目录
1.开箱和设置
2.控制面板功能
3.音色设置
4.乐曲演奏模式
5.音效处理
6.MIDI和合成器设置
7.高级功能
8.故障排除
9.技术规格
10.常见问题解答
1. 开箱和设置
在打开GW-8之前,请确保包装完好无损,并仔细查看产
品表面是否有任何损坏。
当您确保产品完好后,按照以下步骤设置GW-8:
•将GW-8放置在平稳的表面上。
•连接电源适配器,并将适配器插入GW-8的电源插
座。
•按下电源开关,GW-8将进入待机模式。
•调整音量控制旋钮以确保适当的音量。
2. 控制面板功能
GW-8的控制面板提供了一系列功能,用于调整音色、音量、节奏等。
下面是控制面板的主要功能:
•LCD显示屏:显示当前选择的音色、设置和操作状态。
•功能按钮:用于选择不同的功能区域,如音色、效果和设置。
•可编程按钮:用于存储和调用特定的设置、音色或效果。
•音量控制旋钮:控制输出音量。
•节奏控制旋钮:控制节奏的速度。
•转置按键:用于将音高上升或降低半音。
3. 音色设置
GW-8提供了多种音色,包括钢琴、吉他、合成器和打击乐器等。
用户可以通过以下步骤设置音色:
1.按下功能按钮,选择音色功能区域。
2.按下音色按钮,进入音色菜单。
3.通过转动控制旋钮或按下相应的数字按键,在音色
列表中选择所需的音色。
4.按下确认按钮以保存所选音色。
4. 乐曲演奏模式
GW-8具有多种乐曲演奏模式,如单音、重音和和弦等。
以下是进入乐曲演奏模式的步骤:
1.按下功能按钮,选择乐曲演奏模式功能区域。
2.按下乐曲演奏模式按钮,进入乐曲演奏模式菜单。
3.根据需要选择单音、重音或和弦模式。
4.按下确认按钮以保存所选模式。
5. 音效处理
GW-8提供了多种音效处理功能,如合唱、延迟和回声等。
以下是使用音效处理功能的步骤:
1.按下功能按钮,选择音效处理功能区域。
2.按下音效处理按钮,进入音效处理菜单。
3.通过转动控制旋钮或按下相应的数字按键,在音效
列表中选择所需的音效。
4.调整音效参数,如混响时间、延迟时间等。
5.按下确认按钮以保存所选音效。
6. MIDI和合成器设置
GW-8支持MIDI连接和合成器设置。
以下是设置MIDI和
合成器的步骤:
1.连接MIDI设备,如计算机或其他合成器。
2.按下功能按钮,选择MIDI功能区域。
3.根据需要设置MIDI通道、传输方式和合成器参数。
4.按下确认按钮以保存设置。
7. 高级功能
GW-8还提供了一些高级功能,如录音、循环播放和编辑等。
这些功能可以帮助用户更好地创作音乐作品。
请参阅GW-8的高级功能部分以了解更多相关信息。
8. 故障排除
如果您在使用GW-8时遇到任何问题,请参阅故障排除部分。
这里提供了一些常见问题和解决方法,以帮助您解决问题。
9. 技术规格
GW-8的技术规格包括产品尺寸、重量、电源要求等。
请查阅技术规格部分以获取详细信息。
10. 常见问题解答
在常见问题解答部分,我们列出了一些用户经常提出的问
题和答案。
如果您有其他问题,请随时联系我们的客服团队。
以上是对Roland罗兰GW-8说明书中文的简要介绍。
如需详细了解各功能和操作方法,请参阅完整的说明书。