EASE 高级应用之声场设计
教室声场计算机模拟分析

教室声场计算机模拟分析摘要本文利用EASE软件,建立某大学1#教学楼的101教室的声场模型,通过分析混响时间等声学指标,结果表明教室在满场情况下其混响时间有一定程度的减小,各个参量均与听音者在教室内的位置有关。
对各个频率的混响时间进行分析发现了阶梯教室室内的主要音质缺陷,为以后阶梯教室的音质改造和试验研究奠定了基础。
关键词EASE软件;混响时间;阶梯教室;音质评价1 概述准确预测房间的声学参数一直以来都是声学设计者的目的,声学模拟软件可以预测厅堂声学特性,评估和调整声学设计方案,因此,计算机声学辅助设计已成为当前声学领域的一种趋势[1]。
在教室声学方面,由于EASE软件在电声和建声相结合方面的优势,它被较多的应用于教室声学的计算模拟。
EASE是为声学工程师设计的计算机模拟软件,自从90年代被德国ADA声学设计公司开发以来,已经在许多国家被注册使用。
其主要功能为:扩声(特别是扬声器布置的方案设计)和建声的计算机辅助设计[1-2]。
2 多媒体阶梯教室的模拟2.1 1#101多媒体阶梯教室的基本情况本文以某大学1#教学楼的101阶梯教室为研究对象介绍EASE声学软件在教室声环境研究中的应用[2]。
101阶梯教室位于1#教学楼的东南角,其南面距体育场大概有10m的距离。
该教室平面形式为递增的长方形,其前部宽为12m,后部宽为12.8m,长为15.8m,教室前部净高为4.3m,后随台阶逐渐减小,有七个台阶,每个台阶高为0.12m,教室后部高为3.46m。
地面面积约为195.9m2,其中有126个座位,所占面积约为66.2m2,容积约为777.1m3。
2.2 教室的声场模型的建立首先我们对101教室进行了现场实测,得到建模所需的数据,然后针对教室声场的音质特点,进行实例建模得到三维立体模型。
如下图所示:其中绿色为听众区,红色座椅为试听位置,蓝色为扬声器,粉色为窗户,淡紫色为座席区,黑色为门,亮灰色为讲台和黑板。
计算机声学设计软件_EASE_隋星

和实际厅堂中测量得到的脉冲图在同一窗口中的比
较, 蓝色的脉冲是实际测量得到的, 红色的脉冲是在
EASE 中通过运算得到的模拟脉冲。 由于比较是在同
一窗口中显示,所以有很强的直观性。 EASE 软件是目
前世界上最好的声学设计软件之一, 要得到其具有参
考价值的模拟结果,需要将声场的几何数据、吸声参量
等准确输入,同时还要对 EASE 进行正确使用。
研究, 只需几百条声线以及低反射次数的设定 (一般 3~5 次),就可快速进行对声线反射方式的研究。 声探 测功能是 EASE JR 所不具备的,声探测功能是研究对 于 1 个 特 定 目 标 的 声 线 撞 击 (Impact),声 线 撞 击 与 声 线跟踪的区别在于声线撞击是研究撞击特定目标的声 线, 这个特定目标确切说是指在听声者周围直径 1 m 的球。 如要查看声线跟踪, 则需生成声线跟踪文件 (Trace File);如需进行声探测,则需生成声线撞击文件 (Impact File)。 生成声线撞击文件需要更大量的声线以 及更高次的声反射,以形成声撞击,超过 95%的声撞击 发生率是好的。 如果说声线跟踪对于声线反射方式的 研究还显粗糙, 那么对于研究经过多次反射和能量损 失最后到达设定听声点的声线特性, 则需要更具体细 致的研究并且可用来进行试听(Auralization)。 那么怎 样采用声线跟踪和声探测解决实际工程中什么问题 呢? 下举 1 例:给声源设定 200 万条声线,每条声线设 定 20 次反射, 形成声撞击率为 98%的声反射序列图 (如图 7 所示), 当发现在声反射序列图中有异乎寻常 的脉冲突出时,说明声场中有回声存在,然后在观察项 目视窗(View Project Window)中(如图 8 所示),查看该 脉冲的声反射路线以找到产生回声的地方, 以便进行 适当的吸声补救。
EASE资料

工程方案设计为了达到并超过相关国家标准的技术指标,我们借助先进的计算机声场模拟软件EASE 4.1根据厅堂的实际尺寸对音响系统的扩声效果进行了模拟计算。
EASE4.1声场模拟软件是由德国SDA声学设计公司研制开发的,已经得到广泛推广和应用。
EASE声学模拟软件可调用(借助)AUTOCAD建立三维空间模型,进行设计、编辑和方案修改;利用其内置的可听化模拟软件模块,使用模拟计算的脉冲响应与音乐信号,通过外耳传输函数,使设计师能够听到实际的音响效果,以便修改。
根据多功能厅的实际使用功能需要,结合我们在多功能厅音响系统方面的丰富升级经验以及参考了EASE4.1声场模拟软件的计算结果。
我们选用了美国C-MARK音箱作为主要设备。
EASE图多功能厅三维效果图这是一个与实体相符的模型具有实际的参考意义多功能厅平面图多功能厅侧面图多功能厅剖面图多功能厅声线覆盖图此图显示了音箱的能量指向的主要覆盖面积多功能厅三维声线覆盖图此图从三维显示了音箱的能量指向的主要覆盖面积多功能厅声学效果图此图可让你感觉一个实体的厅堂及音箱摆放位置多功能厅室声学内视效果图此图从内部让你感觉一个实体的厅堂及音箱摆放位置多功能厅在500Hz时声压图此图可让你直观的知道声压级是否达到指标,在这里厅堂的大部分面积声压级达到102dB完全达到国家一级标准.多功能厅在1000Hz时声压图此图可让你直观的知道声压级是否达到指标,在这里厅堂的大部分面积声压级达到99dB完全达到国家一级标准.多功能厅在2000Hz时声压图此图可让你直观的知道声压级是否达到指标,在这里厅堂的大部分面积声压级达到96dB完全达到国家一级标准.多功能厅在4000Hz时声压图此图可让你直观的知道声压级是否达到指标,在这里厅堂的大部分面积声压级达到95dB完全达到国家一级标准.经过计算机对各项指标的测算,结果都表明应用美国C-MARK音箱能达到国家标准,这样对声音的高品质有了客观科学的保障。
AR蹦床EASE分析结果
声学模拟软件—EASE声学分析报告计算机模拟是现代扩声系统设计的重要手段,为了保证该房间的扩声效果,需要对声学设计方案进行全面地计算机声场模拟分析,验证声场设计是否达到预期指标。
我们采用目前国际通用的电声系统模拟软件EASE4.3,其主要功能是对封闭大型空间或者敞开空间以及半闭空间的各种声学行为加以模拟,它能够较准确地模拟出加入扬声器后各项声学特性指标。
该系统已经广泛应用于体育场馆,剧场剧院、演播室等扩声系统设计中。
它通过针对厅堂的建筑设计,建立与施工图纸精确度相同的三维立体模型,在软件中输入各种扬声器参数,确定扬声器的安装位置,通过计算机运算,十分准确的仿真出扩声声场分布和声学参数,预测声场效果。
通过模拟分析,验证和优化设计方案,达到最终的设计目标。
EASE软件可以准确地预测声场分布、直达声声场分布、快速语言传递指数STIPA,辅音损失度%ALcons等。
厅堂扩声系统由扩声设备和声场组成。
不同功能的厅堂扩声系统,国家设计规范都有相应的声学特性指标要求,要满足这些设计要求,传统的做法是采用经典的声学公式(建筑声学、电声学)对厅堂进行计算。
进行这样的计算工作量大,而且准确度小。
采用声学模拟设计软件,用计算机辅助设计的方法完成这一工作,能够达到事半功倍的效果,厅堂扩声系统应达到与其功能相当的厅堂扩声系统的声学特性指标。
在进行工程的深化设计时,需提供图文并茂的厅堂扩声系统工程专业设计方案。
除了电声系统设备组成设计外,还包括用声学模拟软件进行设计,提供厅堂建筑模型图、混响时间与频率关系曲线图、辅音清晰度损失率分布曲线图、快速语言传递指数分布曲线图、听音面7个频率下的声压级分布图等。
以便预计本工程达到相应声学指标的情况,对工程调试进行指导。
自20世纪70年代以来国际上一些著名的公司相继开发声学(建声、电声)模拟计算机辅助设计软件。
这些软件在不同的时期适应不同品牌扬声器数据库。
随着计算机硬件和操作系统的逐渐升级,其软件计算方法也在不断完善,建模方法和计算结果的显示也在不断地完善。
EASE设计流程
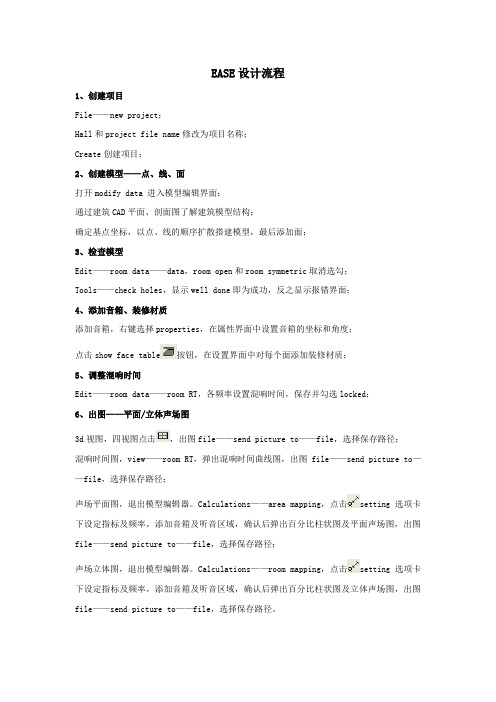
EASE设计流程1、创建项目File——new project;Hall和project file name修改为项目名称;Create创建项目;2、创建模型——点、线、面打开modify data 进入模型编辑界面;通过建筑CAD平面、剖面图了解建筑模型结构;确定基点坐标,以点、线的顺序扩散搭建模型,最后添加面;3、检查模型Edit——room data——data,room open和room symmetric取消选勾;Tools——check holes,显示well done即为成功,反之显示报错界面;4、添加音箱、装修材质添加音箱,右键选择properties,在属性界面中设置音箱的坐标和角度;点击show face table按钮,在设置界面中对每个面添加装修材质;5、调整混响时间Edit——room data——room RT,各频率设置混响时间,保存并勾选locked;6、出图——平面/立体声场图3d视图,四视图点击,出图file——send picture to——file,选择保存路径;混响时间图,view——room RT,弹出混响时间曲线图,出图file——send picture to——file,选择保存路径;声场平面图,退出模型编辑器。
Calculations——area mapping,点击setting选项卡下设定指标及频率,添加音箱及听音区域,确认后弹出百分比柱状图及平面声场图,出图file——send picture to——file,选择保存路径;声场立体图,退出模型编辑器。
Calculations——room mapping,点击setting选项卡下设定指标及频率,添加音箱及听音区域,确认后弹出百分比柱状图及立体声场图,出图file——send picture to——file,选择保存路径。
EASE专业建筑声学设计软件说明书Part0

1EASE Software © Copyright ADA (Acoustic Design Ahnert), GermanyTutorialRH 545 4/16/04 Version 4.1.0.6Thanks are due to the following individuals whoprepared this manual.Carl DorwaldtofRenkus-Heinz, Inc.Foothill Ranch, CaliforniaUSAWith the able assistance ofDr. Wolfgang AhnertStefan FeistelDr. Waldemar RichertFrank SiegmannKaren IrmscherEmad El-SaghirBruce OlsonofADA (Acoustic Design Ahnert)Berlin, Germany2Licensing AgreementThe software and/or databases described in this document are furnished under a license agreement or nondisclosure agreement. No part of this document and/or database may be reproduced or transmit-ted in any form or by any means, electronic or mechanical, including photocopying, recording, or information storage and retrieval systems, for any purpose other than the purchaser’s personal use, without the written permission of Renkus-Heinz, Inc. (hereinafter referred to as Renkus-Heinz.) Limited WarrantyRenkus-Heinz and ADA have made every effort to ensure the accuracy of this manual and make no warranties with respect to this documentation and disclaim any implied warranties of merchantabil-ity or fitness for a particular purpose. Information in this document is subject to change without notice. Renkus-Heinz and ADA make no warranties that such files and features as mentioned in this documentation exist on the distribution disks or as part of the materials distributed.The Loudspeaker DatabaseThe loudspeaker database supplied with your copy of EASE contains data from numerous loud-speaker manufacturers in addition to data from Renkus-Heinz. Renkus-Heinz and ADA have given all loudspeaker manufacturers equal opportunity and instructions for supplying loudspeaker data. If you require loudspeaker data not currently supplied with EASE, or if you have problems with the supplied data, please contact that manufacturer directly. As a matter of policy, Renkus-Heinz and ADA include data as supplied by the loudspeaker manufacturers and assume no responsibility for its accuracy.TrademarksEASE, EASE JR, EARS, AURA and ADA are registered trademarks of Acoustic Design Ahnert.Windows 98, 2000, XP & NT, DOS and DirectX are registered trademarks of Microsoft.AutoCAD is a registered trademark of Autodesk.LAKE Convolution is a registered trademark of Lake Technology Limited.CADP is a registered trademark of JBL Professional.VMAx Virtual Home Theater is a registered trademark of Harman International.CopyrightsRenkus-Heinz Inc. 2004. All rights reserved. Printed in the United States of AmericaADA (Acoustic Design Ahnert) Berlin, Germany34Processor RAMDisk Space Req. (for program)Disk Space Req.(for Databases)Graphics Screen Resolution Video Driver Sound CardEASE EASE JR300 MHz 128 MB 70 MB 500 MB 256 Colors 800 x 600Open GL**compatible 16-Bit StereoEARS EARS RT EASE EASE JR EARS EARS RT MINIMUMRECOMMENDED300 MHz 12870 MB 500 MB 256 Colors 800 x 600Open GL**compatible 16-Bit Stereo***Maximum Available Maximum Available 70 MB 500 MB True Colors (24-Bit)1024 x 768Open GL**compatible 16-Bit Stereo.Maximum Available Maximum Available 70 MB 500 MBTrue Colors (24-Bit)1024 x 768Open GL**compatible 16-Bit Stereo***OPERATING SYSTENSEASE 4.1, EARS 4.1, EARS RT 4.1 and AURA are designed to run on Windows 98, Windows 2000, Win-dows NT* and Windows XP. Windows 95 is not supported and Windows ME (Millennium Edition) is not recommended.EASE 4.1, EARS 4.1, EARS RT 4.1 and AURA will also run on Mac’s using Virtual PC software.* NT 4.0 must have Service Pack 4, version 4 installedNOTES** To use EASE & EASE JR, the OpenGL driver provided by the 3D graphics card must have the following characteristics:1. Full support of Open GL: Version 1.1 or later.2. An OpenGL Installable Client Driver (ICD): The 3D graphics card must provide a full ICD in its OpenGL driver software. The “miniGL” drivers provided by some 3D graphics cards are not adequate for EASE &EASE JR.*** DirectX7 or higher must be installed to use the Lake Convolution software. A full duplex sound card is needed to fully utilize EASE RT.Equipment RequirementsAURA 300 MHz Maximum Available 70 MB 500 MB 256 Colors 800 x 600Open GL**compatible 16-Bit StereoAURA Maximum Available Maximum Available 70 MB 500 MBTrue Colors (24-Bit)1024 X 768Open GL**compatible 16-Bit StereoProgram SupportIf you have a question about EASE / EASE JR / EARS / AURA or run into a problem and cannot find the answer in this manual or on our website, call our Technical Support staff. Before you call, please:Review the subject in this manual.Have your User ID number handy and know what version number you are using. You will find the User ID number on the rear of your EASE & EASE Guard CD jewel cases. The version number can be found in the About screen under the Help pull down menu.Have a clear description of the problem and the wording of any error messages.Call from a telephone located near your computer and have your computer running, so you can refer to the screen during the call.EASE / EARS/ AURA TECHNICAL SUPPORTPhone: 949 588 9997Monday through Friday between 8:00 AM and 5:00 PM Pacific Time.Ask for:Carl Dorwaldt (Extension 108)Jim Mobley (Extension 104)Jonas Domkus (Extension 135)E-mailCarl@Jim@Jonas@IR InfraRed Technical SupportIf you have a problem relating to the IR InfraRed Simulation Module,call Bruce Olson:Phone: 763-493-5835Monday through Friday between 8:30 AM and 5:00 PM Central TimeE-mail: bcolson@5TABLE OF CONTENTSGENERAL INFORMATIONLicensing & Trademark Information3Equipment Requirements4Program Support5Table of Contents6Installation Instructions11Registration Instructions13Online Licensing15Offline Licensing16Importing/Exporting License Keys17Termination Keys18 Protect License19Program Updates19Loudspeaker Database Updates19Recovering Lost License Keys19 PART 1. OVERVIEWGeneral Information22Program Structure23Brief Recap of Key Commands24Starting EASE26Option Settings29 Opening a Project31Project Data Files32 Project Options34Viewing a Project35Using The Walker39Calculation Setup Menus40Calculations Menu44Edit Project Menu Tool Bars46Vision52 PART 2. CONSTRUCTING A MODELNaming a Project57Loading Loudspeakers and Wall Materials61Printing Wall Material DataBase62Room Modeling Techniques63Room Entry666Edit Project Options68Entering V ertices71Entering Faces74Making Steps77Adding Seating Areas (Coat Feature)81Closing a Room83Reverb Times83Adding Audience Areas84Adding Listener Seats85Adding Loudspeakers86Setting Loudspeakers Power Levels87 Aiming Loudspeakers90Distance Calculations97Adding Edges98Adding Windows98Using Extrude99 Adding / Changing Face Colors100Using Vision103Making Global Material Changes109Finding And Fixing Holes110Finding Unknown Dimensions114 PART 3. ALTERNATE ROOM INPUT METHODSCreate Shape Examples120Creating Curved Surfaces124Using Extrude126Creating Rooms with Curved Ceilings and Walls128Cutting Faces into Two Faces (Using Fixed Cut)135Adding Interior Shapes137Using Extrude Faces139 Using Mirror Insertion140Using Sequence126Using Insert Audience Area147145 Adding Listener Seat Grids148Adding Loudspeaker Grids (distributed Loudspeaker Systems)149Adding Steps / Bleachers151Using Prototype Rooms154Prototype Room Models157Using Objects1687PART 4. CLUSTER BUILDINGUsing Main Speaker Base178Using Edit Project187Using Cluster Objects189Creating CASE Drawings190Creating New Loudspeaker Files193PART 5. USING OPTIMIZE RTOptimize RT196 PART 6. ROOM INVESTIGATIONSArea Mapping202Moving Audience Areas203 Setup Options / Direct Sound203Display Resolution208All Mapping210View Calculations Window210Displays Types:Direct SPL214ALcons / Articulation Loss215RASTI216C Measurements217Pressure Levels219Sum / Total SPL219D/R Ratio219Critical Distance220Arrival Time220Lspk Overlap221ITD Gap223Aiming222Local Decay Time224 Standard Mapping With Reflections226Room Mapping227Auralize Direct Sound228Local Ray Tracing230 PART 7. Import/Export Module - - DXF Import and ExportIntroduction234Import EASE 2.1234Export EASE 3.0 Project235Import CADP2235Import ASC112368Import ASCII (EASE 2.1)234Export ASCII234DXF File Transfer235Exporting DXF Files from EASE235Importing EASE DXF Files into AutoCAD236Importing AutoCAD DXF Files into EASE239Helpful Hints for non-AutoCAD users244 PART 8. VISIONIntroduction248Creating a New Light Source (Light Source Editor)248Creating a New Texture (Texture Editor)252Assigning Textures to the Model256Using EASE Vision258 PART 9. ADVANCED ACOUSTICAL INVESTIGATIONSRay Tracing264View Trace File269Movies274 Ray Tracing Impacts275View Impact File280Probe280Display Types281Schroeder RT287 Mirror Image Impacts292Split Impact File293Update Impact File293 PART 10. AURALIZATIONAuralization296Step 1. Creating the Reflectogram297Step 2. Adding a Tail to the Reflectogram299Using Add Random Tail299Using Predicted Impacts301 Step 3. Combining the Reflectogram with theCharacteristics of Hearing304Step 4. The Final Convolution3069EARS Options310EARS RT Real Time Auralization315 PART 11. AURAConstructing an Aura Room Model320AURA Introduction323AURA Mapping326Echograms332EDT (Early Decay Time)333T Measures334Definition335Articulation Loss (ALcons)336Speech Transmission Index (STI)337C Measures337Center Time338LF & LFC Measures339Sound Strength340Echo Speech340Echo Music341 Echograms341Echo Speech341Echo Music341 Histograms342Particle Loss Method344AURA Response347AURA Improvements353Scattering Wizard353PART 12. IR INFRAREDIR Infrared358Inserting Emitters359Calculations361Creating New IR Devices366Radiators367Modulators370PART 13. INDEX37310INSTALLATION INSTRUCTIONSImportant: Before you attempt to install EASE 4.1 on your computer, make sure you have read the equipment requirements on page 4 of this manual and have sufficient memory and hard disk space.The program and data bases will occupy almost 600 MB of hard disk space ( or more if you are not running a FAT32 system). Windows also likes to have open hard disk space at least equal to the amount of RAM for use as virtual memory. Thus, if you have 128 MB of RAM you need at least 728 MB of hard disk space just to load and operate the program.This assumes your machine is set up for FAT32 operation. If it isn't, your hard disk space requirements almost double! FAT32 (for NT systems NTFS) is an enhancement of the File Allocation Table (FAT and FAT16) file system format. It stores data much more efficiently and speeds up operation.You can check your machine's setup by selecting the hard drive (s) with your right mouse button and then selecting Properties from the Option menu. If your machine is set up for FAT32 operation, the Properties' window will show FAT32 as the File System. If you are running FAT16, either FAT or FAT16 will be listed as the File System. If you are not running FAT32, you most likely will be able to upgrade to FAT32. This change should be made on the drive (s) you intend to use for EASE 4.0 and/ or the data files. Select Program/Accessories/System Tools/Drive Converter (FAT32) and them follow the prompts.Note 1: If you have EASE 3.0 installed on your machine, you do not need to uninstall it before installing EASE 4.1. The two programs are compatible and can run side by side on the same machine. You will be asked by the 4.1 install program if you want to uninstall EASE 3.0, but you do not have to.Note 2: If you have EASE 4.0 installed on your machine, you do not need to uninstall 4.0 before installing 4.1. The 4.1 Install routine will automatically ask if you want to uninstall the previous version. Answer Yes to both uninstall prompts. You will also be asked about removing a number of “Shared Files.”’ We recommend answering Yes to All. Note that installing the newer version will not affect either your License Key or your project files.The Uninstall routine will not remove the EASE 4.0 Data folder. However, the Install routine will overwrite old data with new data during the installation. To save the old data files intact, rename them before beginning the installation. For example, change the existing EASE40Data folder name to EASE40DataOld.Note 3: If you are running Windows 2000, make sure you have local system Administrative Access Permissions to the EASE 4.0 Install folder, Windows System folder and System Registry before beginning the installation.EASE 4.1 requires that users be assigned either Power User or Administrative Permissions when Windows 2000 is used. Failure to assign these Permissions causes EASE 4.0 to perform incorrectly. Refer to your Windows 2000 Help system for information about assigning Administrative Permissions.Note 4: If you are using a Virus protection program, you should disable it before beginning the installation.Important: A complete EASE 4.1 installation is a 3-step procedure. First, you install the EASE program (from the EASE 4.1 Program CD), then you install EASE Guard (from the EASE Guard License Control CD) and then you obtain a License Key which unlocks the program.To install EASE 4.1:1.Insert the EASE 4.1 CD-ROM into your CD drive. The Install program should open automatically.If it doesn’t, proceed to steps 2 and 3.2.From the Start menu select Settings, then Control Panel and Add/Remove Programs.3.Click on Install and follow the prompts.Note: If for some reason Windows can not locate the EASE setup program, click on the Browse button to manually locate the Setup program on the EASE 4.1 CD. Double-click on the Setup.exe file to launch the Setup program.4.During the installation routine, you will be given 3 installation options:Complete will install the Program and the Speaker, Material and Example Databases plusadditional (Textures, Lights and Infrared devices) databases. You will be given theopportunity to select the location for the Program and the Databases. Note that the Program and the Databases may be stored on different drives. We recommend installing both on your C drive.You will also be given the chance to select the Material databases you want to install andwhich manufacturer's Loudspeaker Files will be installed.Program Only will install just the program; no databasesData Only will install only the Databases you select.The installation program will install the EASE Program and Databases and place an EASE shortcut icon on your desktop.NOTE: You will not be able to use the program, except in the Demo mode, until you have also installed the EASE Guard License Control program and obtained a License Key.Your EASE License allows you to install and run the program simultaneously on up to 5 machines. Use of the program is controlled by License Keys issued by ADA, with each EASE License entitling you to 5 License Keys.If you want to use the program on more than 5 machines, you must purchase additional Licenses. Each additional License allows you to use the program on 5 additional machines.License Keys are managed and controlled by the EASE Guard License Control program.Key elements of the EASE Guard program are the:USER ID NumberThe USER ID number is the identification number assigned to your company at the time you purchased the License. It includes details on any previous EASE licenses you owned and identifies what version of EASE you purchased; for example EASE or EASE JR. You cannot obtain a License Key without it. You will find your USER ID Number on the rear of the EASE and EASE Guard CD jewel cases.Reference FileThe Reference File (sometimes called Reference Key) is a file (an .erf, Ease Reference File) generated by the EASE Guard program and placed in the EaseLicenseFiles folder on your computer. It identifies your computer and its operating system in the EASE Guard License Control program and will be linked to your License Key. This file is different for each computer and, if you use the program on more than one computer, each will have its own unique Reference File.Note that any change in your computer’s operating system will be detected by EASE Guard, the link between your computer and the License Key will be broken and the program will revert to the Demo mode. You will have lost your License Key and will not be able to run EASE until you have obtained a replacement License Key from ADA.License FileThe License File (sometimes called License Key) is a file (an .elf Ease License File) generated by ADA. It is linked to your USER ID Number and to your computer’s Reference File and unlocks the specific EASE version you purchased.REGISTRATION INSTRUCTIONS1. Insert the EASE Guard CD-ROM into your CD drive. The Install program should openautomatically If it doesn’t, proceed to steps 2 and 3.2.From the Start menu select Settings, then Control Panel and Add/Remove Programs.3.Click on Install and follow the prompts.Note: If for some reason Windows can not locate the EASE Guard setup program, click on the browse button to manually locate the Setup program on the EASE Guard CD.Double-click on the Setup.exe file to launch the Setup program.4. As soon as the EASE Guard installation is completed, start EASE by double clicking on the EASE Icon.5.Then double click on the Register Icon in the EASE 4.0 desktop window or open theHelp pull down menu and select Register.6.This will open the EASE Registration prompt shown below.7.An affirmative answer will close EASE, launch the EASE Guard program and open thescreen shown below.EASE 4.1 offers 2 ways for you to obtain a License Key, Online and by File.The Online method is by far the fastest and the easiest, if you have access to the Web from your computer. It is the method recommended for everyone who has direct Web access from theircomputer. The File method is for those who do not have access to the Web from their computer. ONLINE LICENSING1.If you have automatic direct access to the Web, make sure that Online Licencing is selected andthen click on Download License.This will connect you to the EASE License website on the ADA FTP server, send your computer’s reference information to the website and, if everything checks out, generate your License Key and download and install it on your computer. The entire operation is automatic and takes only a few seconds. It’s that simple.Note that the Licence Status fields will now show the Version you have installed (for example, EASE or EASE JR), your company’s name and the number of Licences (License Keys) available on your computer. It will read 1, since you downloaded only 1 License Key.Note 1: If you do not have automatic access to the Web and must “log on” to gain access, be sure to “log on” to the Web before starting the Online Licensing procedure.Note 2: If you receive an Error message at this point and are unable to download a License Key, it’s probably because your “Firewall” is blocking it. Try turning off the Firewall or use your network browser to connect to a website and then try again. If you still are unable to download a License Key, use the Offline Licensing method to obtain a key.2.If at this point you press the Info button, it will show that you still have four Licenses available todownload. Do not download them unless you have a specific need for them. They are safer stored on the ADA FTP server than they would be stored on your computer.Downloading and storing additional License Keys on your computer is not recommended.Spare Keys are far safer stored on the ADA FTP server.3.If you have a second computer with Web access, you can download a License Key to it byfollowing the same procedure you used with the first computer.Other users within your company can, of course, obtain License Keys for their computers byfollowing the same procedure.4.If you have a second computer that doesn’t have access to the Web, you can download a secondLicense File (Key) onto your computer and then Export it to the computer that doesn’t have Web access. Exporting License Keys will be covered later in this section.Note 1: The Export procedure should be used only for computers that do not have Web access.The automated download procedure eliminates any human errors and is far more fool proof. It is recommended for any computer with Web access.OFFLINE LICENSING ( LICENSING BY FILE)1.If you do not have access to the Web, you will need to create a Reference File and send it to ADAby e-mail or regular mail. ADA will then generate the License File and return it to you in the same fashion.2.For Offline Licensing, click on the Licencing By File button. This will open the screen shownbelow.3.Click on Create Reference File to open a Save File window. Use the Save In window to select thestorage location for the Reference File; for example, Desktop or My Documents.4.Copy the Reference File onto a floppy and then either mail it to ADA or use a computer with e-mail capabilities to e-mail it to ADA.ADA Acoustic Design AhnertArkonastrasse 45-49D-13189 Berlin, GermanyFax: + 49 30 4670 9220E-mail: licence@ada-acousticdesign.de5. ADA will then return a License File to you.6.When you receive your Licence File, copy it onto your computer. Then open EASE and return tothe Licencing By File window.7.Select Install Licence, Browse to the Licence File and click on Open to install the License Key. Exporting License Keys (OffLine Licensing)The Import/Export folder in the Licencing By File window allows you to import or export License Keys from one computer to another computer.1. The first step in exporting a License Key to another computer, to your laptop for example, is to load EASE and EASE Guard onto that computer (EASE refers to it as the Target computer). Then open EASE on the Target computer and go to Register/Licenceing By File and Import/Export. Next, click on Create Reference File and follow the prompts to save it to a logical location, such as a floppy disk. Then, move it to your computer.2 The second step is to open EASE on your computer, the one having a valid license (EASE refers to it as the Source computer), and open the Import/Export section of the Licenceing By File window. 3. Next, select Export Licence. This will open an Open File Window. Browse to the Reference File you just moved to this computer, select it and then click on the Open button. This will generate a Licence Key export file and open a Save File window. Enter a logical location for the file and then click on Save.4. The fourth and final step is to move this file to the Target computer and then Import it into EASE. Select Import Licence from the Import/Export folder under the Register/Licensing By File window. This will open the Open File window, browse to the License Key file, select it and then clickon Open. This will install the License Key and you’ll be up and running.TERMINATING LICENSE KEYS (Offline Licensing)The proper procedure to follow if you decide to upgrade your old computer or replace it a new one is to officially Terminate your computer’s License Key. This protects you from losing your License Key in the transition. Remember, any change in your computer’s operating system will be detected by EASE Guard and the link between your computer and the License Key will be broken.To Terminate your computer’s License Key, select the Terminate folder under the Register/Licens-ing By File window. Then press the Terminate Licence button. This will open a Save File window.Enter a logical location for the file and then click on Save. A Send E-mail Now prompt will appear. If you have direct access to the Web, clicking on Yes will send the Termination file to ADA. If you don’t have direct access, Save the file and then either mail it to ADA or use a computer that has E-mail capabilities to E-Mail it to ADA.Note: Online users do not need to “Terminate” their License Keys. Instead, they can simply Upload them to the ADA website and then Download them again after they have made the computer changes.The Remove License button is used only to correct licensing problems resulting from software or hardware errors. Don’t use it unless you are having problems and ADA tells you to use it.Don’t use it without their knowledge and consent, as it will remove all licensing information from your computer and complicate the task of recovering the lost License Key. PROTECT LICENCEFor those who want to maintain tight control over their EASE License Keys, EASE 4.1 includes a Protect Licence feature. It is accessible under the Help pull down menu. Protect Licence, when activated, removes the EASE Guard program from that computer making it impossible for the user to access the EASE website to download additional License Keys.PROGRAM UPDATESThe latest EASE 4.1 program updates are also stored on the ADA FTP server and can be easily downloaded by any Licensed user having direct access to the Web. Open the Help pull down menu and select EASE Update. This will automatically connect you to the ADA FTP server and, if you are not running the latest version, automatically update your program to the latest version. SPEAKER DATABASE UPDATESLoudspeaker database updates are also stored on the EASE website and can be easily downloaded by any Licensed user having access to the web. Open the Help pull down menu and select Speaker Base Update. This will automatically connect you to the EASE Website and allow you to download any new loudspeaker Databases you want.RECOVERING LOST LICENSE KEYSAt some point in time, through no fault of your own, you may lose a License Key. Your hard drive will crash and burn and you will lose everything on it, or someone unfamiliar with EASE will decide it’s time to reformat your computer without your knowledge, or some other unforeseen event will occur.When you lose a License Key, it is imperative that you immediately get in touch with ADA at “licence@ada-acousticdesign.de” and let them know what happened. They are the only one who can issue a replacement for the lost License Key.To assist you in this process, EASE includes a License Information collection tool. It gathers all of your computer’s Licensing Files and compresses them into a single Zip file that you can either send to ADA for archive purposes or store on a floppy in a safe spot.We strongly recommend that you create this archive file as soon as you have obtained your License Key and update it whenever you make any alterations to your computer.To create this archive, go to the Help pull down menu and select Create Status Report. This will open the screen shown below.As you can see, it gives you the opportunity to just save the file on your hard drive or to also send it to ADA. The choice is yours. No matter which you choose, we suggest that you immediately use Windows to copy this file onto a Floppy and then store the Floppy in a safe place.Then, if you should ever lose your License Key, it is an easy matter to attach it to an E-mail to ADA. Your E-Mail should explain what happened and request a replacement License Key. The Ease40Info file will give them all the information they need.The correct E-mail address for ADA is licence@ada-acousticdesign.de.ADA will get back to you as quickly as possible.。
EASE简介及安装
EASE效果展示
EASE常用功能
EASE的出图方式(以直达声为例) a: b:
EASE常用功能
一、计算和显示厅堂里直达声和混响总声压级的分布曲线(Total SPL )
EASE常用功能
二、计算和显示厅堂听音区不同频率下的声场声压级分布曲线(Direct SPL)
EASE常用功能
三、C7(直达声和混响声的声能比)
EASE在建筑声学中的重要性
1. EASE作为建筑电声计算机辅助设计软件,能使声学研究者、建筑师、音 响工程师、建筑装修设计师预计建筑的声学、扩声系统包括扬声器布置方 案。通过EASE模拟设计可以直观地看到设计项目的厅堂扩声系统预期的 声学特性效果图,了解厅堂建筑内所采用的吸声材料、扬声器型号、摆放 位置、角度以及扬声器的相关数据,对实际的建设项目具有良好的指导作 用。 2. EASE可以提供厅堂建筑模型、直达声分布曲线图、混响时间与频率的关 系曲线、ALC和STI等等。通过改变听音面的吸声材料等模拟手段来改变 声场环境对声音的影响,从而达到近似理想的实际设计效果。 3. 在舞台方面,音箱位置的摆放及选型,会得到怎样的音质效果都可以通过 EASE模拟出效果。
音频部:段文青 2016.06.17
EASE常用功能
七、频响曲线
EASE的安装指南
一、进入目录1“ CD_EASE4.3.8安装光盘”,运行“setup”,安装 EASE.4.3.8 二、进入目录2“破解” 1、将文件 “UserInfo.euf”复制到EASE软件安装目录,如 “C:\Program Files\EASE 4.3\Easepath” ; 2、运行 "RegEase",例如“用户状态”显示“登录用户:hahan /用户ID:(null) / 注册句柄:89406”,则表明破解成功;若显示“EASE4.1/4.2 没有注册,因 此没有用户状态”,则点击“注册”按钮进行破解; 3、运行EASE软件,若主菜单包含6个下拉菜单,则表明破解成功。
ease功能
ease软件 4.0版的特点和应用[摘要] 本文简述了声学模拟软件ease的发展历史,基本结构,功能,使用方法及可靠性。
特别介绍了ease4.0版相对于ease3.0版的改进,及ease由扩声系统设计软件向声学设计软件方向发展的趋势,最后给出该软件在工程上的一个应用实例。
[关键词] 声学设计模拟软件 ease[abstract][key words]1 引言ease是the enhanced acoustic simulator for engineers的缩写,意为增强的工程师声学模拟软件。
作为优秀的商品化扩声建声设计软件,ease使建筑师,音响工程师,声学顾问和建筑商可以预计建筑的声学特性和扩声系统(特别是扬声器布置方案设计)特性。
ease最早是在1990年,ada(ahnert声学设计公司)在montreux举行的88届aes大会上介绍的。
99年,该公司发布了esae3.0版。
此后不久,jbl公司便决定停止开发他们自己的声学设计软件cadp2而转向使用ease。
99年年末,ada公司开始致力于ease4.0的开发,并于2002年八月正式发布ease4.0及相关的使用手册和指南,这是ease目前的最新版。
本文主要介绍ease软件的基本结构,特点和使用,特别是ease4.0的相对于3.0版所作的改进。
2 ease4.0简介2.1 ease4.0结构简介ease4.0可以在window98, window2000, window nt和window xp的环境运行,不支持window95,也不推荐windowsme。
软件混合使用了声线跟踪法和声像法,结合了前者模拟速度快而后者精度高的特点。
由于ease4.0在出售时封装的不同,在主程序之外,会包括不同的计算模块,这些计算模块是ada向别的公司或大学购买的。
完整的计算模块包括aura, 房间声学分析软件(基于caesar算法); ears 4.0 双耳试听模块4.0版,包含vmax ?transaural stereo imaging software; ears rt 4.0双耳试听模块4.0版,包括lake?convolution and vmax ?transaural stereo imaging software 。
EASE软件适用性及正确使用的探讨
EASE软件适用性及正确使用的探讨作者:高玉龙来源:《演艺科技》2016年第07期【摘要】探讨EASE.C&件的适用范围,以及使用中涉及适用房间的大小、吸声材料数据库和扬声器数据库等诸多方面需要注意的问题,为厅堂扩声系统工程总体布局产生思路,以指导工程实施。
【关键词】EASE软件;声学设计;适用性;房间大小;声场环境;声学参数;模拟文章编号:10.3969/j.issn.1674-8239.2016.07.0061 EAsE软件的适用性讨论1.1适用房间大小EASE软件适用于声学意义上的大房间,即处于临界频率以上。
1.2适用声场环境EASE软件中包括标准运算模块、计人反射的标准运算模块和AURA运算模块。
(1)标准运算模块适用于均匀的扩散声场所谓均匀的扩散声场就是,当封闭空间内被激发起足够多的简正方式时,由于不同方式有各自特定的传播方向,因而使达到空间内某点的声波包括各种可能的入射方向。
在这种情况下,除在临界距离内的自由声场区和距离界面1/4波长范围内的固定干涉区之外,空间内各点的声能密度相等;从各个方向到达某点的声强相等;到达某点的各声线之间的相位是无规则的。
具备这样特性的声场称为均匀扩散声场。
在以自然声为主的音乐厅中为了充分利用有限的声能,不采用强吸声材料,适量增加反射和声扩散,使声场满足均匀扩散声场的要求。
在一般厅堂建筑中,获得均匀的扩散声场是十分困难的。
因此,标准运算模块由于严格的适用声环境条件的限制,在采用扩声系统的厅堂建筑中进行声学参量模拟数据仅仅是粗线条的估算值。
其结果很难和实际测量数据一致起来。
(2)计入反射的标准运算模块适用于均匀的扩散声场由于计入反射的标准运算模块是在前者的基础上改进而来,适用于均匀的扩散声场的前提条件没有发生变化。
因此,较前者的性能提升也是有限的,并没有质的改变。
(3)AURA运算模块适用于非均匀的扩散声场所谓非均匀扩散声场是指在采用扩声系统的厅堂中,由于声源扬声器的强指向性,房间部分界面材料需要作强吸声处理。
计算机声学设计软件_EASE
计算机声学设计软件_EASE文章编号,1002-8684,2009,09-0046-03* 软件应用??计算机声学设计软件—— EASE隋星声学设计与咨询有限公司中国香港中国,EASE ,, , ,自年第次大会初次被介绍给专业 ,RASTI,。
1990 88 AES电声及音响界以来软件已经发展成为当今最,EASE被声学工程师广泛应知名的专业声学设计软件之一,用于声学设计中软件的发展历程经过了。
, EASE 1994年版的年版的DOS EASE2.1,1999 WINDOW EASE3.0 并入了试听模块年并入了室 ,EARS,,2002 EASE4.0 内声学分析模块和用于设计会议厅的红外辐,AURA,射模块年升级为版,,, IR INFRARED2007 EASE4.2本其使建模更简便计算结果更准确运算速度更, , ,快同时德国公司即将正式推出此 ,,AFMG EASE4.3,版本使建模功能更强大并且进一步完善了程 , EASE 序操作。
将真实准确的建声数据和信息输入到软件 EASE 中通过计算机进行相关声学参量运算从而对实际工 ,,程安装进行预判断和分析是软件的价值所在,EASE 。
对于混响时间的基础设计应用版 ,, EASE EASE JR的计算是以爱林赛宾公式为基,,,,,, RTEyring/Sabine础图是在中生成的混响曲线但 ,1 EASE JR 。
EASEJR空间构造复杂声场的运算是不足对吸声系数差异大、够的当声场中各反射面的吸声系数比较均匀时如。
,图所示用进行声学参量的运算是可以2 ,, EASE JR但声场的各反射面吸声系数差异很大的如图所。
, 3 示时用进行运算就会得到不准确的结果,,。
EASE JR除了需要考虑吸声系数的均匀性外还要考虑声场的,空间几何结构如图所示当声场的空间几何结构出,, 4现内角大于的情况其产生的大量声散射180?, ,Scat-也会导致声参量运算结果的不准确tering,EASE JR 。
- 1、下载文档前请自行甄别文档内容的完整性,平台不提供额外的编辑、内容补充、找答案等附加服务。
- 2、"仅部分预览"的文档,不可在线预览部分如存在完整性等问题,可反馈申请退款(可完整预览的文档不适用该条件!)。
- 3、如文档侵犯您的权益,请联系客服反馈,我们会尽快为您处理(人工客服工作时间:9:00-18:30)。
EASE 高级运用之声场设计 声场设计的主要内容 声场设计是电声设计的核心。当我们绘制好模型之后,确立好了厅堂基本的吸声材料之后,就可以进行声场的设计工作了。通常情况下,声场设计主要的工作内容就是根据各种厅堂的结构类型来进行音箱的选型和分布形式的设计,后期还要根据声场的不同情况对建声环境和装饰材料做最终调整。
声场设计的原则 当我们拿到工程图纸的时候,在脑海中首先就可以大概确立扬声器系统的扩声形式。目前常用的扩声分布形式有:集中式、分散式、集中加分散式。当然,无论采用哪中分布形式,始终都要围绕以下几点来指导具体的设计: 1、 根据不同类型的厅堂来定义合理的混响时间; 所谓定义合理的混响时间,是必须靠更改模型相关面的吸声材料来实现的。在实际工程的运作中,往往很多建筑材料并不是设计人员所能决定的,但是,我们可以在其他面上选择相应的材料来弥补现有的吸声材料所造成的不足。同时,在方案的设计说明中,我们要提出当前甲方使用此材料的不足,我们可以根据EASE模拟的结果给出合理的建议。 2、 确定适当的声压级; 根据厅堂的面积、容积以及结构的不同,来选择相应不同类型的扬声器系统。不同性质的厅堂,根据级别的高低,声压级也不尽相同。具体内容请参照国家相关相关规定中的不同厅堂的声压级标准。这里,我们设计时主要考虑的是功率的大小以及灵敏度的高低。 3、 保证声压均匀的覆盖整个听众区; 这跟扬声器的辐射特性、扬声器系统采用的分布方式以及房间是否存在声场缺陷有直接关系。另外,各扬声器的功率大小的分配也直接影响声压级分布是否均匀。 4、 尽量减少声压的重叠与干涉; 这和扬声器的分布排列形式、指向角度、扬声器覆盖角度大小是密不可分的。特别是当多组音箱同时出现在同一声场时,此问题尤为严重。 5、 达到较高的传声增益; 在声场中,扩声系统无论能达到多么高的声压级,当有话筒或声学乐器存在时,总是不能完全发挥。因此,传声增益始终是一个不容忽视的问题。特别是当会议系统中有多只话筒出现时,更应该从建声以及电声角度综合加以分析,避免啸叫的发生。 6、 保证较高的语言清晰度; 只要解决好了直达声和混响声的比例问题,则清晰度往往就会有较为可观的值。 7、 避免常见的声缺陷; 这是建声的基础工作,一旦发生诸如驻波、声聚焦、回声、梳妆滤波等现象,我们首先尽量从厅堂的结构上下手。如果土建不能动,那么我们可以从外观装修上下工夫,比如增加屏风、障板、吸声球、扩散体等等,破坏声缺陷的产生,提高扩声质量。 8、 考虑甲方提出的特殊要求; 有时甲方会提出一些意想不到的特殊要求,比如:音箱不能吊装,某个地方有空调口,音箱只能隐藏,或者遇到某些墙面已经装修完毕不能破坏等等。这些都需要在你的方案中及时作出调整,并与装饰部门协做完成。 下面,我将通过常用的案例,用EASE3.0来分析何种情况下该采用何种分布形式,同时又是如何围绕以上8条原则来展开设计的。
集中式扩声 如下图1,这是一个体育馆。
由于此体育馆的观众席位较多,而且上下看台跨度较大,如果音箱用分散式来覆盖观众席,虽然可以达到要求,但是安装施工的工程量非常大的。而且信号远距离传输的损耗也是不容忽视的。而且这一问题目前在业界已经变得越来越突出了,特别是模拟音频的传输损耗。再加之如果用分散式分布,体育馆顶层的构架的安装方式可能会影响观众的视线,更严重的是在最下面一排观众席上的观众会感觉声音从头顶上传下来的,显然,声像定位不一致,这是
不可取的。如图2,这是不太合理的设计。除非万般无奈,一般我们不建议这样吊挂。基于这样众多因素的考虑,当体育馆在建设时,一般都会考虑到这些,当然考虑的还会有体育馆的灯光照明和大屏幕的投影显示等问题,因此采用集中分布方式就成了最常用的方式。集中式安装的好处是,系统安装调试和管理方便、传输损耗小、声像定位一致、覆盖均匀度较好。让我们具体结合这个实例,来看看如何设计音箱的摆放才能满足标准规定的要求。 特别说明:为了大家能更方便的亲自动手学习本文章中的案例,我已经把这些案例放到中国音响设计网上了,地址是www.xycad.com, 没有这些案例的朋友,请到此网站下载,然后跟着我一步步来操作,这样将更有利于大家的学习。 当采用集中扩声方式而且投射距离又比较远时,我们一般均采用远程音箱来覆盖。因为远程音箱的辐射角度都很小,这样能量集中,所以辐射的更远,而且辐射角度小同样可以减少相互的声干涉问题。同时音箱的承受功率和灵敏度都要很高,否则由于远距离辐射的衰减,当声音到达观众区域是将会变的很弱,则声压级不达标。现在我们打开此案例,启动EASE的Edit Project Date程序。我们的设计思路是在中间吊挂两组远程音箱,分别指向四周看台的上下两个区域的观众层。这里远程音箱选用了Peavey的6只QF2212A,用于东西方向远程投射,Meyer Sound的4只CQ-1来覆盖南北方向的观众区域。分布方式如图3。
选中图中扬声器S1然后按F4(或者选择Properties)打开其属性,定义它的三维坐标数值是(0.5,-6,16)m,水平指向角度是35度,垂直指向角度是4度。这里需要注意的是,平常的扬声器的垂直指向均的负值,即是指向下方的,这里却指向了上方。这是由于扬声器的位置比较靠下,而观众席位却相对很高,所以扬声器的辐射方向必须朝上。但是我们应该更小心的处理和设计扬声器的高度和它向上的指向角度,因为处理不好很容易造成后面的观众被前面的观众所阻挡,这是绝对不允许的。也就是说扬声器的吊挂高度相对与上层观众席不能太低。那会不会越高越好呢?当然也不是,因为扬声器一旦太高,声音会被顶层的天花所阻挡。如何知晓?依据是什么?凭经验还是感觉?虽然大家都知道此音箱的水平和垂直角度,但那是理论值,怎样在模型中直观的显示出来,在设计时实时供我们参考呢?回答是可以的。EASE3.0为我们提供了一个非常有用的显示工具:按F9选择How to Draw选项卡,在右下
角有个Aiming选项,如图4。这里显示的就是以扬声器中心指向轴向四周衰减不同分贝值后的覆射角度。图中分别列出了-3dB\-6dB\-9dB的情况,也可以对不同频率段进行选择,以供设计时参考。这里我们选择-3dB,然后确定。如你所见,你会看到次扬声器在-3dB的衰减下的覆盖情况。如果没有看到显示情况,请把扬声器属性页中的Show dB Cov.Cone选中。经过我们的位置和指向角度的调整,现在可以清晰的看到扬声器的主要辐射区域已经覆盖在想要的观众席上了。你可以任意旋转模型进行多方位的三维观察。这其实就是我们在进行声场不均匀度的设计时的设计依据。大家也可以看看-6dB的覆盖情况,很显然-6dB的覆盖范围会变的更大。现在来看其他的9只音箱的设置。他们的属性分别如下表: 扬声器序号 X轴坐标 Y轴坐标 Z轴坐标 hor水平指向 ver垂直指向 S2 0 -6 16 0 4 S3 -0.5 -6 16 -35 4 S4 -0.5 6 16 215 4 S5 0 6 16 180 4 S6 0.5 6 16 145 4 S7 -6 -0.25 16 -65 6 S8 -6 0.25 16 -115 6 S9 6 0.25 16 115 6 S10 6 -0.25 16 65 6 按照以上表格里的数据定义好音箱的参数之后,再把每个音箱的功率开到最大,方法是在每个扬声器的属性页里点击All To Max。所有数据调整好之后,下面可以来看看模拟的效果如何了。完整的模型是包含每个面的吸音材料和大厅的听音模拟面的,为了简化教学,这个模型的吸音材料和听音面已经被设置好了。模拟之前一定要查看一下模型是否封闭。封闭之后,接着再按F5看看数据能否通过检测,如果通过检测则按一下F6保存数据,则EASE会把此改变加载到别的子程序中去。现在,把此模型编辑程序最小化,在EASE主程序中打开Calcuations\Standdard Mapping程序。 这是EASE的标准模拟程序。这里可以模拟不同频率段下的等声压级线(可以理解为扬声器的覆盖范围)初始到达时间、声压级、声场不均匀度、直达声场、C参数(直混比)、L参数(不同时间段内的声压级),以辅音清晰度和语言清晰度的模拟。记住,模拟之前必须先打开所有的扬声器:点击工具栏中的小喇叭图标,选中所有的扬声器,点击确定。然后选择Mapping\Total SPL来看看声压级的分布情况(点击快捷菜单中的图标也可以)。经过几
秒钟的运算,得出了他的声压分布图,如图5。如果你的模拟效果不同,请注意选择模拟频率段是2000Hz。从图中可以看出:图形中上下两片红色和桃红色的声压级的分布是相当均匀的,不均匀度在1dB左右,而左右就相差很大了,几乎超过了5dB。你可以试着再看看其他的频率段的均匀度分布情况,基本上这两片区域在中频段和中高频段都不同程度的高于其他区域。这就说明我们需要调整扬声器的输入功率或者是声压级的大小。方法是在属性中让他们的声压级统一下降4dB,全部改成127dB,点击All To One,再点确定。4只音箱调整好之后,我们再进行模拟,结果如图6。
很显然,这次的均匀度就好了许多了,总体不均匀度没有超过3dB。 这里需要说明一点,本文旨在教大家如何去设计声场,让声场满足国标要求,从实际模拟的情况来看,虽然均匀度达到了要求,但最大声压级是不够的。怎么办呢?其实细心的朋友会从扬声器的覆盖图中发现,远程的音箱并没有完全覆盖整个上层观众区域。而是间隔的在覆盖,这其实是造成声压级不够的一个很大原因。解决办法就是增加远程音箱。从模拟图中可以清晰的看到,目前的声压级是97db左右,为了能达到100dB以上,必须每一边再增加3只QF2212音箱。而左右4只CQ-1在不减少输入功率的情况下正好满足要求,所以不必增加。还有一个需要说明的问题就是,我们目前主要讲解的是上层观众席的覆盖方案。而最靠竞技场一圈的观众席和中间的竞技场地并没有配置音箱,那么一旦配上音箱之后室内声压级是绝对没有任何问题的。不妨作一个试验:在其中一边添加3只QF2212A,另一边不加,