hb860mb v1.0驱动器说明书
星辰伺服驱动说明书
NAS 系列交流伺服系统使用说明书特别提示在您第一次接通本伺服系统电源以前,为确保系统能安全、正常、高效地为您工作,请仔细阅读手册中有关使用方面的重要信息。
感谢使用星辰伺服的交流伺服系统!为使本机一直维持良好的运行状态,请将本手册随整机附送给最终用户。
虽然在您的选型过程中,可能已经对本产品有所了解并与本公司的技术人员进行了某些沟通,但为充分发挥本机最佳功能,仍请在使用前,仔细阅读本使用说明书,必要时可与星辰伺服的有关人员联系以获得必要的帮助。
本说明书中,对不同级别的提示、警示、警告采用如下提示符:★一般性的提示警示,如果不按照执行,可能带来设备的损坏警告,如果不按照执行可能带来设备严重损坏、火灾或人身伤害星辰伺服分支机构及技术服务机构:桂林星辰电力电子有限公司市场服务部地址:桂林高新技术产业开发区星辰大厦邮编:541004电话:************,5810692 传真:************ Email:******************上海星之辰电气传动技术有限公司伺服部地址:上海市科技创业中心(徐汇区钦州路100号)2#601-605 邮编:200235电话:************(8线), 64829055 传真:************深圳市星辰激光技术有限公司伺服部地址:深圳市高新区北区清华信息港研发楼A栋3楼邮编:518057电话:*************(15线),26030572 传真:*************目录1.安全注意事项1.1.安装注意事项1.2.运转操作注意事项1.3.保养检查注意事项1.4.关于废弃1.5.其它2.产品的确认和注意事项2.1.产品的确认2.2.伺服电机型号说明2.3.伺服驱动器型号说明2.4.使用前的注意事项3.NAS系列交流伺服系统性能参数3.1.NAS系列伺服系统标准规格配套表3.2.驱动器标准规格及功能表3.2.1.驱动器标准规格及一般功能3.2.2.驱动器使用环境条件及一般技术状态3.2.3.驱动器控制功能及运动性能表3.2.4.伺服电机特性3.2.4.1.N系列电机3.2.4.2.SY系列电机3.2.5.有关工作制的说明4.安装4.1.安装场所和保养4.2.驱动器外形尺寸4.3.驱动器安装4.4.驱动器前级盒的拆卸和安装4.5.伺服电机外形尺寸4.6.伺服电机安装4.7.制动电阻安装5.端口说明及外围电路设计5.1.接线注意事项5.2.外围接线图及端口说明5.2.1.控制接口(44芯排插头)全部功能连接图5.2.2.控制接口(44芯排插头)接口功能表5.2.3.状态通报口的使用5.2.4.模拟量接口的使用5.2.5.转矩环控制运行5.2.6.速度环控制运行5.2.7.带速度限制的位置环控制运行5.2.8.带转矩限制的位置环控制运行5.2.9.带转矩限制的速度环控制运行5.2.10.带转矩偏置的速度环控制运行5.2.11.位置环脉冲给定接口的使用5.2.12.反馈接口(15芯排插头)的连接5.2.13.反馈接口(15芯排插头)端口功能表5.2.14. RS485接口(9芯排插头)的连接5.2.15. RS485接口(9芯排插头)端口功能表5.2.16.动力接口6.操作面板6.1.面板显示说明6.1.1.监视状态下驱动器面板显示状态表6.1.2.运行状态下驱动器面板显示状态表6.2.面板操作说明及编辑状态下面板显示6.2.1.几种典型的操作6.2.2.编辑状态下的显示7.运转7.1.运转前的检查7.2.首次上电和试运转7.3.运转7.3.1.功能、参数设定总表7.3.2.位置闭环运行7.3.3.速度闭环运行7.3.4.转矩环运行8.RS485串行通讯功能8.1.概述8.2.通过RS485串行通讯进行伺服驱动器的运转8.2.1.状态查询8.2.2.修改参数8.2.3.实时控制8.3.TB485-V10通讯协议8.3.1.串口通讯数据格式8.3.2.工作方式说明8.3.2.1.问答方式8.3.2.2.速传方式8.3.3.通讯故障约定及校验说明8.3.3.1.问答方式8.3.3.2.速传方式9.保护功能9.1.设定方法(功能代码显示模式)9.2.功能代码一览表9.3.功能说明10.故障确认11.保养和检查11.1.保养和检查时的注意事项11.2.检查项目11.3.兆欧表测试11.4.零部件的更换安全注意事项1.安全注意事项1.1.安装注意事项★ 安装环境:使用温度伺服电机 -20℃~+40℃伺服驱动器 -10℃~+40℃保存温度-25℃~+65℃环境湿热伺服电机 95%,30℃,不结露伺服驱动器 90%,30℃,不结露标准高度海拔2000m以下(2000m以上,每上升1000m降容20%)★ 请将电机和驱动器安装于通风良好的场所。
YKE2608MH脉冲式步进驱动器使用手册说明书

YKE2608MH脉冲式步进驱动器使用手册版本:V1.0深圳研控自动化科技股份有限公司目录目录 (2)版本修订历史 (3)前言 (4)第1章概述 (5)1.1 产品介绍 (5)1.2 特性 (5)1.3 应用领域 (5)1.4 产品命名规则 (6)第2章性能指标 (7)2.1 电气特性 (7)2.2 使用环境 (7)第3章安装 (8)3.1 安装尺寸 (8)3.2 安装方法 (8)第4章驱动器端口与接线 (9)4.1 接线示意图 (9)4.2 端口定义 (10)4.2.1 状态指示灯 (10)4.2.2 控制信号输入端口 (10)4.2.3电源输入和电机端口 (10)4.2.4拨码开关 (11)4.3 输入/输出端口操作 (11)4.4 信号输入时序图 (12)第5章驱动器运行参数设定 (13)5.1驱动器电流设置 (13)5.2驱动器细分设置 (13)5.3锁机电流设定 (14)5.4 MF电机释放信号 (14)5.5 脉冲模式选择 (14)第6章适配电机 (15)6.1 电机尺寸 (15)6.2 技术参数 (16)6.3电机接线图 (16)第7章驱动器状态指示灯 (17)第8章一般故障排除方法 (18)第9章保修及售后服务 (19)9.1保修 (19)9.2售后服务 (19)YKE2608MH使用手册V1.0 版本修订历史版本修订历史YKE2608MH使用手册V1.0 前言前言感谢您使用本公司步进驱动器。
在使用本产品前,请务必仔细阅读本手册,了解必要的安全信息、注意事项以及操作方法等。
错误的操作可能引发极其严重的后果。
声明本产品的设计和制造不具备保护人身安全免受机械系统威胁的能力,请用户在机械系统设计和制造过程中考虑安全防护措施,防止因不当的操作或产品异常造成事故。
由于产品的改进,手册内容可能变更,恕不另行通知。
用户对产品的任何改装我公司将不承担任何责任。
阅读时,请注意手册中的以下标示:第1章概述1.1 产品介绍YKE2608MH是基于全新一代数字控制技术的高性能步进驱动器,该驱动器控制模式为自发脉冲速度控制,4个拨码可选16段转速,也可通过上位机在速度范围内设置任意转速;三路光电隔离数字输入,驱动器支持电机参数辨识自适应以及相位记忆功能;在内部采用类似伺服的控制原理,独特的电路设计,优越的软件算法处理可以使电机低速运行平稳,精确的电流控制技术大大减小了电机发热,在用户期望低发热、低噪声、高平稳性、高精度的设备中应用效果特佳。
thorx6专用M860驱动器说明书

冷却方式自然冷却(恶劣情况下需要外加辅助散热) 使用环境 场合尽量避免粉尘、油雾及腐蚀性气体 温度-5℃~+40℃ 湿度<80%RH ,无凝露,无结霜 震动5.9m/s 2Max 贮存环境温度 -40℃~+55℃ 湿度<93%RH ,无凝露,无结霜 外形尺寸116×60×37mm 重量 0.21 Kg 【提示注意】由于储运环境温度的剧烈变化,容易产生凝露或结霜,此时应把驱动器放置12小时以上, 待驱动器温度与环境温度一致后方可通电运行。
电源电压步进驱动器内部的开关电源设计保证了可以适应较宽的电压范围,用户可根据各自的情况在10V 到40VDC 之间选择。
一般来说较高的额定电源电压有利于提高电机的高速力矩,但却会加大驱动器的损耗和温升。
输出电流选择步进驱动器最大输出电流值为3A/相(峰值),通过驱动器面板上六位拨码开关的第5、6、7三位可组合出八种状态,对应八种输出电流,从0.9A 到3A (详见电流选择表)以配合不同的电机使用。
说明:面板丝印上的白色方块对应开关的实际位置。
细分选择步进驱动器可提供整步、改善半步、4细分、8细分、16细分、32细分、64细分和128细分八种运行模式,利用驱动器面板上六位拨码开关的第1、2、3三位可组合出不同的状态(详见细分模式选择表)。
说明:面板丝印上的白色方块对应开关的实际位置1 2 31 2 3 1 2 3 1 2 3 ON ON ON 128细分 ON OFF ON 32细分ON ON OFF 8细分 ON OFF OFF 半步 OFF ON ON 64细分 OFF OFF ON16细分 OFF ON OFF 4细分 OFF OFF OFF 整步自动半电流 若上位控制机在半秒钟内没有发出步进脉冲信号,驱动器将自动进入节电的半电流运行模式,电机绕组的相电流将减为设定值的一半,在此状态下电机和驱动器的功耗得以降低,但电机的输出力矩也相应下降。
HP 笔记本电脑 驱动器 说明书

驱动器用户指南© Copyright 2009 Hewlett-Packard Development Company, L.P.Microsoft、Windows 和 Windows Vista 是Microsoft Corporation 在美国的注册商标。
本文档中包含的信息如有更改,恕不另行通知。
随 HP 产品和服务附带的明确有限保修声明中阐明了此类产品和服务的全部保修服务。
本文档中的任何内容均不应理解为构成任何额外保证。
HP 对本文档中出现的技术错误、编辑错误或遗漏之处不承担责任。
第 1 版:2009 年 3 月文档部件号:515639-AA1产品通告本用户指南介绍大多数机型常用的功能。
您的笔记本计算机上可能未提供某些功能。
目录1 取放驱动器2 使用光驱识别安装的光驱 (3)使用光盘 (4)选择正确的光盘(CD、DVD 和 BD) (5)CD-R 光盘 (5)CD-RW 光盘 (5)DVD±R 光盘 (5)DVD±RW 光盘 (5)LightScribe DVD+R 光盘 (5)蓝光光盘 (BD) (5)播放 CD、DVD 或 BD (7)配置自动播放 (8)更改 DVD 的国家/地区设置 (9)遵守版权警告 (10)复制 CD、DVD 或 BD (11)创建或“刻录”CD 或 DVD (12)取出 CD、DVD 或 BD (13)3 使用外接驱动器4 提高硬盘驱动器性能使用磁盘碎片整理程序 (15)使用磁盘清理程序 (15)5 更换硬盘驱动器托架中的硬盘驱动器6 故障排除光盘托盘打不开,无法取出 CD、DVD 或 BD (20)笔记本计算机检测不到光驱 (21)光盘无法播放 (22)光盘无法自动播放 (23)iii光盘刻录过程无法启动,或者在完成之前停止 (24)在 Windows Media Player 中播放的 DVD 没有声音或不显示图像 (25)必须重新安装设备驱动程序 (26)获取 Microsoft 设备驱动程序 (26)获取 HP 设备驱动程序 (26)索引 (28)iv1取放驱动器驱动器是容易损坏的计算机组件,取放时应格外小心。
MantelMount MM860安装说明书

Do not use this product in any way, or for any purpose, that is not specifically described in these instructions. MantelMount is not responsible for damage or injury caused by incorrect installation or improper use.incorrect installation or improper use.!CAUTION:Do not operate MantelMount when anyone is near or behind the mount. MantelMount is very strong and can result in crushing injuries.that is able to hold five times the combined weight of all equipment. If you are unsure about your structure, a contractor must evaluate your installation.U.S. Pat. No. 8,864,092Other Patents PendingPAGE 2MantelMount MM860Required Tools7/32”10-14mm4-5mmBefore you begin, please verify that all components are included and undamaged. If any parts are missing or damaged, contact MantelMount. Never proceed with missing or damaged parts!Lay out all components and make sure you identify that each one has a match in the diagram. Some of the parts included will not be used during installation. Do not proceed if you do not understand and identify all of the components.{02} x4M5x30{01} x4M5x12{10} x8M5-M6{11} x8M8{12} x12Spacer{18} x10M6x12{19} x4M6x40{03} x4M5x40{05} x4M6x30{04} x4M6x16{06} x4M6x40{08} x4M8x25{07} x4M8x15{09} x4M8x45{13} x6{16} x8Locknut M6{17} x4Locknut M8{20} x8M8x16{62} x4M8x12, Silverx1Black Parts for MountSilver Screws for back of TVMantelMount is designed for use only with decorative fireplaces that are not the primary heat source for a house. Temperature at the front edge of mantle should never exceed 110° F .ACMantle must not extend from mounting surface more than 19 inches (22 inches for non-recessedinstallations). MantelMount can not extend past a mantel larger than 19 inches. Larger mantels will also reduce the amount of side-to-side swivel.110°F MAX.MantelMount MM860PAGE 310 - 12 inches 12 - 14 inches 14 - 17 inches Less than 10 inches Add 5 inches Add 6 inches Add 8 inches Add 11 inches 17 - 19 inchesAdd 14 inchesPAGE 4{27} {27}TV{30} distance you end up with when you attach everything to the.. However , the Brace Extenders {28}- The Brace Extenders above the bottom of the TV . Use the .- The Brace Extenders are installed below the TV with enough room to install the Sound Bar onto Horizontal Brace {29}. Or use Sound Bar Wings {59}.8 - 14 INCHES(Less if a Sound Bar is used){28}Bottom of MantelMount MM860PAGE 5PAGE 6 MantelMount MM860For STEP 12.bar) can be installed above the mantel.example, then these heights are only minimum DEPTH OF MANTELDISTANCE From STEP 8:Can be programmed with the SET buttonMantelMount MM860 PAGE 9PAGE 10 MantelMount MM860:does not require within 2 seconds press the “M1” button. The Memory One position should be set.d. Repeat for Memory Two position using the M2 button.Cover to assist with cable routing:This cover can be used to hide cables that are routed through the Housing.Access Cover {32} requires removing two screws {18}.MantelMount MM860 PAGE 13• Home network will automatically assign an IP Address to MM860 via DHCPMM860 can be manually assigned a Static IP Address for home automation systems (STEP 26)• PC or laptop can manually upload the latest Firmware to the MM860 if needed • MM860 is configured with a PC or home automation system over the network• The MM860 Utility and latest firmware must be loaded onto the PC or Laptop before InstallationMantelMount MM860 is connected to a home network (LAN)Determine how the MantelMount MM860 will be used:MantelMount MM860 is PAGE 14MantelMount MM860• PC (or laptop) is temporarily connected directly to the MM860 Control Module via Ethernet cablePC must be set to the correct IP Address 192.168.150. 2 (see “Connecting with Ethernet” page 15:)• PC or laptop can manually upload the latest Firmware to the MM860 if needed• MM860 is configured in a web browser on a computer connected directly to the Control Module • The MM860 Utility and latest firmware must be loaded onto the PC or Laptop before InstallationNOTE: The MM860 Wifi communication is much slower than Ethernet. If WiFi is used to operate the mount, an Ethernet connection from the computer to the Control Module is still recommended for setup and also for updating the Firmware, (if needed).When Connecting to a Network:• MM860 will be connected to a laptop via Ethernet for set-up, then WiFi for operation • MM860 will be connected to a Network via Ethernet for set-up and also for operation • MM860 will be connected to a Network via WiFi for set-up and also for operationDetermine how the MantelMount MM860 will be connected:MantelMount MM860 PAGE 15E1Before connecting the Ethernet cable to the Control Module, you must set your PC to the correct IP address 192.168.150.2 as follows:E3E2Connect the Ethernet cable to the MM860 Control Module first, and then power up the Module.Proceed to the MM860 Utility Software section (page 18) to configure the MM860.• If Ethernet is used only to set up the MM860, connect the Ethernet cable directly from the laptop to the Ethernet port in the MM860 Control Module• If Ethernet is used for all operations, connect the Ethernet cable directly from the MM860 Control Module to the Network• If Ethernet is used only to configure the MM860, use the Utility software for configuration and then return to the section “Connecting with WiFi” (page 16) to proceed with WiFi. The Ethernet cable must be disconnected from the MM860 Control Module before using WiFi.• If Ethernet is used for all operations, do not use the “Connecting with WiFi” section.MantelMount MM860also has an IRDA port for 5-volt IR receivers(receiver not included)Verify that the label on yourControl Module is MM860 v2 (Version 2):Older versions do not support WiFi.W1To begin using wifi, you must first connect to the MantelMount MM860 WiFi network that isbroadcast by the Module in order to enter your specific network information. After you have entered your network information, the MM860 Module will shut down its own network and automatically connect to your network over WiFi . You can then access MM860 within the Network.• The MM860 can only connect to a 2.4 GHz WiFi Network• If using an extender or mesh network, for the best performance the MM860 and computer should be connected to the same node• Before connecting, verify that the location of the MM860 has a good WiFi Signal• DO NOT select “Connect Automatically”• Connect your computer to the MantelMount Network • Wait 30 seconds for the connection to finishW2Power On the MM860 Control Module:In the set-up computer , locate the “MantelMount XXXXXX” in the list of available WiFi networks: (XXXXXX is a code specific to the MM860 unit).W3• On the Control Module, press and hold the “Program” button • Use a pointy object to press the “Reset” button for one second • Keep holding the “Program” button until the Red Light comes on • Release the button and wait one minute for the system to reset • The Green Light will come on when the MM860 is readyIf the “MantelMount XXXXXX” WiFi is not broadcasting, or for other problems with connecting, the MM860 Control Module should be Reset to Factory Default settings as follows:NOTE: This will RESET all saved memory and soft stop positions, remote pairing, network information.W4PAGE 16 MantelMount MM860• Once connected, the MM860 will only be able to communicate over this selected network • Browser will redirect to Success or Fail Page within 30 seconds• If Fail, a Fail message will show up for a few seconds then redirect automatically to step W5• If Success, a Success message will display the IP address that is assigned to the MM860• MM860 will connect to the network selected in step W6• Connect your Computer , via WiFi or Ethernet, to the same network as MM860 selected in Step W6• The MM860 Utility software is now ready to use W5In a web browser (Chrome preferred), enter and go to the IP address: 192.168.4.1. The following screen should appear:W6Click on the SSID box to show and select your desired Network for the MM860:Enter the Network Password and click Submit.W7Copy this IP address for future reference. In the example below the IP address is 92.168.254.15W8The MM860 will now stop broadcasting its own MantelMount_XXXXXX network and your computer will be disconnected from MM860.W9• Some SSID might not follow proper naming conventions. When entering the SSID Network name, DELETE ANY INSTANCES of the following characters:Spacescommas?"$[\]+Also, DELETE the following ONLY IF they are the FIRST character: !#;MantelMount MM860PAGE 17MantelMount MM860 Utility Software Package (3 Modules): This utility must be loaded onto a PC or laptop in order to configure the MantelMount MM860 The MM860 Utility and MM860 Firmware are available for download at - (Dealer)Module 2: MM860 Configuration(Device Page)Module 2:(Network Page)Select Ethernet or WiFi based on how the MM860 is connected to the Network.Opens the Configuration Module 2Opens the Toolbox Module 3After a Scan, this will display only MantelMount products. Select the correct MM860 here.:MantelMount MM860 PAGE 19PAGE 20 MantelMount MM860MantelMount MM860 PAGE 21PAGE 22MantelMount MM86029181665181819591816162726504820201139424111205320283218251731204547544945542044432011434420115517572134333736353866561624516123222062401120424618116463603068676924702271MantelMount MM860PAGE 23I T E M N O .P A R T N U M B E R D E S C R I P T I O N Q T Y .3536373839404142434544464748495051525354555658576059211704P i v o t S h a f t211684211512C l i pA c t u a t o r210601210731S w i v e l S w i v e l B r a c k e t210331A x l e 211194210372B u s h i n gA x l e 21092W a s h e r M 8 x 3 x 242112142B u s h i n g 210352A x l e A n c h o r , A c t u a t o r211654210631B o t t o m P i v o t21054T o p P i v o t210811L o w e r A r m , W e l d e d210181U p p e r A r m , W e l d e d4212281P o w e r C a b l e , N E M A , U .S .21163S e t S c r e w M 5 x 15221185R o u n d S c r e w M 8 x 5021121211W a r n i n g S t i c k e r221147W a s h e r M 10121200R e m o t e C o n t r o l15023S t u d B r a c k e t215010S o u n d b a r W i n g221240G a s S p r i n g61121074S w i v e l A d j u s t m e n t P l a t e62421182R o u n d S c r e w , S i l v e r , M 8 x 12121237U p p e r B r a c k e t221225S p a c e r121177S o c k e t C a p S c r e w M 10 x 25221171A n c h o r A l i g n m e n t P i n121076L o w e r A d j u s t m e n t B l o c k121149N u t M 10221179S o c k e t C a p S c r e w M 8 x 30121048S l i d i n g A n c h o r P i v o t221223M o u n t i n g R o d6364656667696870717273121190C a r d b o a r d T e m p l a t e 735 x 335m m1M M 860MI n s t r u c t i o n M a n u a l210412C o n n e c t o r B r a c eI T E M N O .P A R T N U M B E R D E S C R I P T I O N Q T Y .12345678910111213141516171819202122232425303132333426272829121894121904121914121931219444M 5 x 12M 5 x 30M 5 x 40M 6 x 16M 6 x 30121974121984412199121954M 8 x 15M 8 x 25M 8 x 45M 6 x 4012166814126261212212141376W a s h e r M 6W a s h e r M 8 x 2S p a c e r1411012162126R o u n d S c r e w M 6 x 121218312121876L a g B o l t M 8 x 6041217628C a b l e T i e A n c h o r4L o c k n u t M 821050T V F r a m e , W e l d e d14038V e r t i c a l B r a c e1C a b l e T i e62121862N u t M 8140562B r a c e E x t e n d e r140601T V H o r i z o n t a l B r a c e210392H o r i z o n t a l B r a c e211406W a l l C o v e r211884R o u n d S c r e w M 5 x 40212301C o m m a n d M o d u l e122551821088R o u n d S c r e w M 6 x 4012178S o c k e t C a p S c r e w M 8 x 2521178R o u n d S c r e w M 6 x 15L o c k n u t M 6210151R e c e s s F r a m e , W e l d e d21160A c c e s s C o v e r121191L o c k n u t M 54R o u n d S c r e w M 8 x 16PAGE 24 U.S. Pat. No. 8,864,092 21Nov2022 MantleMount MM860Customer Service: (800)Full Manufacturer Warranty:MantelMount will replace or repair any product or part that proves defective due to improper workmanshipor material during the warranty period. Visit for details.© 2022 MANEHU PRODUCT ALLIANCE, LLC. For more information on MantelMount patented technology visit:/pages/patents。
驱动器说明书
F
数字位显示值为反馈信号
0~100之间数值
反馈信号值,其显示值为百分数,例如反馈信号为0~10V,当反馈信号为1V时,此时 的显示值为1/10*100=10
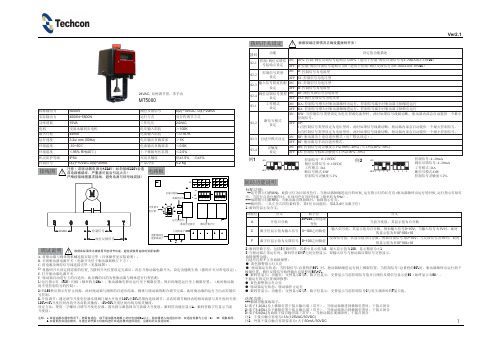
2)数码管数字位,包括3位数码管,其最小显示值为0,最大显示值为100,显示精度为±1 3)当驱动器正常运行时,数码管在C和F之间交替显示,即输入信号与驱动器反馈信号交替显示。 故障报警功能: 自适应过程不正常故障报警: ● 黄色报警指示灯点亮 ● 驱动器运行状态:当控制信号>总量程的50% 时,驱动器轴缩进运行到上极限位置,当控制信号<总量程的50%时,驱动器轴伸出运行到下 极限位置,阀位反馈信号始终输出总量程的50%+1%。 ● 数码管显示:功能位:交替显示C与F,数字位显示:交替显示当前控制信号值并且阀位反馈信号显示值50(始终显示为50)。 不能运行指定位置故障报警: ● 黄色报警指示灯点亮 ● 驱动器运行状态:驱动器停止运行 ● 数码管显示:功能位:交替显示C与F,数字位显示:交替显示当前控制信号C与发生故障时的F显示值。
拨码开关设定 ! 根据现场应用情况正确设置拨码开关!
Ver2.1
24VAC, 比例调节型,带手动
MT5000
标称输出力
5000N
阀位反馈信号
0(2)~10VDC, 0(4)~20mA
实际输出力
4500N~5500N
运行方式
直行程调节方式
功率消耗
15VA
工作电压24VAC源自电机交流永磁同步电机
电压输入阻抗
选配功能:
---辅助功能接线端子:
1)端子1,2(UL)为上极限位置干接点输出端(常开),当驱动器缩进到极限位置时,干接点闭合
2)端子3,4(DL)为下极限位置干接点输出端(常开),当驱动器伸出到极限位置时,干接点闭合
860DSP_中文说明书_200809版双面

860 DSP & 860 DSPi 中文使用说明书广州市领驭电子科技有限公司编译200809版860 DSP 使用注意事项1. 使用反向功能(SSR & RSVP ),下行输入电平不得大于+20dBmV (即+80dBuV ),工作范围是-20dBmV~~+20dBmV ;2. 正向测试功能的输入电平不得大于+50dBmV (即+110dBuV ),工作范围是-40dBmV~~+50dBmV ; 3. 测试端口不能带电工作。
目录概述功能应用Mode—电平模式外界面说明 LevelMode—数字信号分析测量电池及充电 QAM电源管理 BERMode—长效误码率测量界面及操作键Spectrum Mode – 频谱分析界面说明Tilt Mode – 斜率测量页面的切换CM STAT Mode – CM登录其他按键的作用 PingMode—Ping功能Mode—V oIP功能图标功能表 V oIPFN功能菜单介绍THRU PUT Mode-- THRU PUT功能仪器设定Auto Test Mode—自动测试模式Mode—自动测试结果ResultsTest系统设定 AutoMode—频道频谱模式Global -- 全局参数设定 ScanMode—全频道扫描模式Measure — 测量设定 SweepMode—双向网络调整及故障排除SSR Mode—双向网络调试、故障排除设定 SSRMode—CM安装验证功能RSVP Mode—CM安装测试设定 RSVPRET Link—反向连接搜索设定 Source—模拟信号发生器Level Mode—电平模式设定QAM Source Mode—数字信号发生器EVS—QAM信道频谱Scan Mode—频道频谱模式设定 QAMMode—电源哼声干扰测量CSO/CTB—设定 HUMFWD Sweep—全频道扫描设定 C/NMode—载噪比测量Mode—调制深度测量Digital—数字信号设定 MODULATIONCOM/NET—通信/网络设定FM DEV Mode—伴音或调频广播测量Browser—浏览器设定 CSO/CTB测量CM/CPE—Cable Modem相关设定V oIP—设定Learn Channel Plan —学习频道配置表Edit Channel Plan —编辑频道配置表Create New Location File—创建测试点文件860DSP & 860DSPi 外界面说明前面板1.橡胶护套2.显示屏幕3.手柄4.黄色功能按键5.数字按键6.箭头(方向)按键7.扬声器8.红色操作按键9.电源开关顶部板10.预留扩展端口11.正向射频信号端口12.反向/双向测试端口(含读取9581SST下行数据)右侧面板13.充电接口14.PC电缆连接串行接口15.电池B接口(未有功能,保留未来使用)17.以太网接口(选项)电池充电860 DSP & 860DSPi 的充电860 DSP & 860DSPi 使用的是7.2V 2700mAH Ni-MH 电池,通常电池的连续工作时间是4小时(不使用选项功能情况下),860DSPi使用的时间稍微短些,电池每次用完后充电的时间需要4小时,尽量在用完电池的电量后再做充电,以保证电池的工作寿命。
阿克隆8600系列电动阀门驱动器安装说明书

any point on apparatus. Failure to do so will result in damage to the controller.
A
If the electric actuator is being installed on an existing Style 8820-8835, or 7820-7835, 8920-8930 valve, begin the
NOTE: The Akron Electric Valve Actuator may only be operated with the Akron Electric Valve Controller. Other controls will damage the unit.
CAUTION: Always disconnect all wiring and cables from the valve controller before electric arc welding at
Prior to installing the electric actuator, the existing handle, stop plate, bonnet, ball
trunnion, wave spring, trunnion bearing, and bearing brake must be removed.
B
installation with Section I instructions. If the electric actuatoris being installed on an existing Style 7840 or 8940 valve, begin the installation with Section II instructions. If the electric actuator
- 1、下载文档前请自行甄别文档内容的完整性,平台不提供额外的编辑、内容补充、找答案等附加服务。
- 2、"仅部分预览"的文档,不可在线预览部分如存在完整性等问题,可反馈申请退款(可完整预览的文档不适用该条件!)。
- 3、如文档侵犯您的权益,请联系客服反馈,我们会尽快为您处理(人工客服工作时间:9:00-18:30)。
hb860mb v1.0驱动器说明书
新一代混合伺服是一款具有创新特点的产品,采用最新专用电机控制DSP 芯片和应用矢量型闭环控制技术,从而彻底克服开环步进电机丢步的问题,同时也能明显提示电机的高速性能,从而提升机器的加工速度和精度。
此外,在电机连续过载时,驱动器会输出报警信号,具有与交流伺服系统同样的可靠性,适配60/86全系列混合步进伺服电机。
供电电压采用24-80VAC或24-110VDC的安全电源,达到安全标准。
带6位数码管显示及5位调试按键,可设置参数和监视电机运行状态。
特点:
1:低发热/高效率(静止时,电流几乎为零,无发热)
2:平滑精确(基于反馈编码器的空间矢量电流控制算法和矢量平滑滤波技术,对困扰传统步进电机的低频共振有很好的抵制作用)
3:高速响应(先进的伺服控制技术提供了大力矩输出,使得系统具有极高动态响应,步进伺服速度可到600-2000RPM)
4:适用行业:点胶机/木工机/焊接机/螺丝机/拉链机/绕线机/贴片机/包装机/雕刻机/激光机/LED/电子设备。