2010 S2 CVEN 2101 - Wk 9-2 (2 slides)
CVE-2010-3333漏洞分析
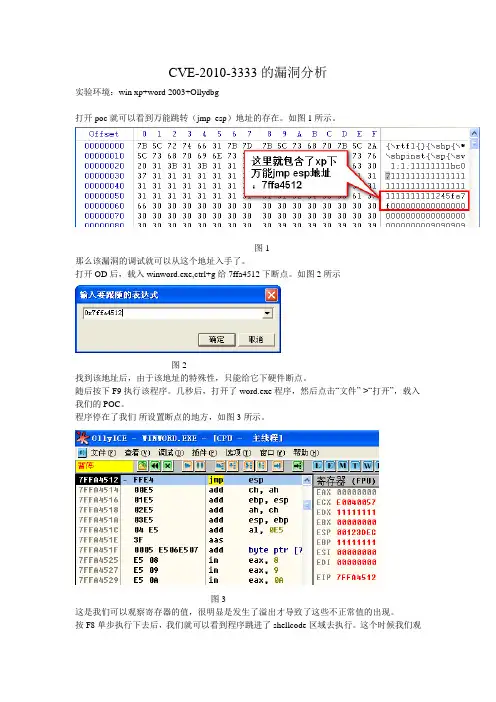
CVE-2010-3333的漏洞分析实验环境:win xp+word 2003+Ollydbg打开poc就可以看到万能跳转(jmp esp)地址的存在。
如图1所示。
图1那么该漏洞的调试就可以从这个地址入手了。
打开OD后,载入winword.exe,ctrl+g给7ffa4512下断点。
如图2所示图2找到该地址后,由于该地址的特殊性,只能给它下硬件断点。
随后按下F9执行该程序。
几秒后,打开了word.exe程序,然后点击“文件”->“打开”,载入我们的POC。
程序停在了我们所设置断点的地方,如图3所示。
图3这是我们可以观察寄存器的值,很明显是发生了溢出才导致了这些不正常值的出现。
按F8单步执行下去后,我们就可以看到程序跳进了shellcode区域去执行。
这个时候我们观察栈区的数据,或许可以发现程序的调用。
图4从图4中可以看出,在跳转到jmp esp地址之前,word程序调用了mso模块中的地址为:30f4ccb1的函数,难道就是该函数发生了问题??我们在此地址下下断点,来看看!如图5图5找到该地址,然后下断点。
然后重新载入该程序。
图6果断程序妥妥的停在了我们刚设置断点的地址,如图6。
这个时候,我们继续观察战中的变化,看shellcode是否已经被copy到栈区。
图7从图7中可以看到,shellcode已经被拷贝到了栈区,那么也就是说明溢出的过程和这个函数无关。
我们只能继续往上寻找,查找在调用这个函数之前是哪个函数出了问题。
这个时候我们发现,在它上面有个函数调用,难道是这个函数的问题?图8为了验证图8中的问题,我们对该函数调用的任意一行指令下断点。
看那时候栈区的情况,如图9。
图9然后重新载入程序。
图10同样,在此时,栈区数据又已经被shellcode所覆盖.如图10。
没办法,我们只能继续往上走。
我将断点设置在此处,如图11。
图11重新载入程序后运行。
然后我们发现发现这个时候shellcode并未覆盖该栈区。
2102文档
21021. General descriptionThe SSL2102 is a Switched Mode Power Supply (SMPS) controller IC that operates in combination with a phase cut dimmer directly from rectified mains. It is designed to driveLED devices. The device includes a high-voltage power switch and a circuit to allow direct start-up from the rectified mains voltage. Furthermore the device includes high-voltage circuitry to supply the phase cut dimmer.For dimmer applications, integrated dedicated circuitry optimizes the dimming curve.SSL2102是一个开关电源(电子)控制电路,设有结合阶段切直接从纠正调电源。
它是用来驱动LED器件。
该装备包括一个高压电源开关和一个电路回路,来实现整流电源电压的直接启动。
此外,本装置还包括高压电路,能够逐步调节亮度。
对于调光器的应用,有综合和专用的电路来完善调变曲线。
2. Features⏹ Easy migration to existing lighting control infrastructure, TRIAC and transistor dimmers⏹ Supports majority of available dimming solutions⏹ Valley switching efficiency is optimized by dedicated built-in circuitry⏹ Built-in demagnetization detection⏹ The IC has Over Temperature Protection (OTP) built-in⏹ Short-Winding Protection (SWP) and Over Current Protection (OCP)⏹ The IC has internal V CC generation that allows start-up from rectified mains voltage⏹ Natural dimming curve by logarithmic correction⏹ Limited external components required due to high integration level⏹ Thermal enhanced SO20 wide body package.易迁移到现有的照明控制基础设施,TRIAC和晶体管调光器支持大部分的可用调光措施有专用内置电路对Valley转换效率进行了优化内置的退磁检测集成电路有内置过温度保护(网)绕组短路保护及电流过载流保护(OCP)。
SSL2101
最初,IC从经过整流的市电电压上自行供电。一旦管脚VCC上的电压超过VCC(启动) 电平,IC马上开始切换,来自市电电压的供电停止,变压器的辅助绕组能够马上接管 供电,以实现高效率工作。或者,IC也能通过连接到高压的泄放电阻器来供电。不过, 需要注意IC的最大VCC电压额定值。 如果由于某些原因使得辅助电源不够用,那么高压电源也能给IC供电。一旦管脚VCC 上的电压下降到低于VCC(UVLO)电平,且内部提供的电流足够,IC会马上停止切换并 重新开始从经过整流的市电电压上供电。
-0.4 -0.4
-0.4 -0.4 -20 -10
-2 -2 0 0
+40
V
+3
V
+3
V
+5V+5来自V+5V
+600 V
+600 V +600 V
+5
mA
+5
mA
+2
A
+2
A
40
mA
25
mA
总的功率损耗 贮存温度 环境温度 结点温度 静电放电电压
Tamb=70 C
人体模型;[1] 管脚16,1,2 所有其它管脚
8.2 振荡器
IC内部振荡器为开关转换器逻辑提供计时。
振荡器的频率由管脚RC和管脚RC2上的外部电阻器和电容器设定。外部电容器被快 速充电到VRC(最大)电平;然后,从新的初级励磁开始,它放电到VRC(最小)电平。 因为放电是指数关系,所以在低占空比时,占空比对调节电压的相对敏感度几乎等于 高占空比时的敏感度。与具有线性锯齿振荡器的PWM系统相比,这在占空比范围内 导致了比较恒定的增益。在低占空比下的稳定操作容易实现。当V亮度高时,可以使用 公式1来估计转换器的频率:
8.9 过温保护
ReOS V10.3版本介绍
功能变化 功能描述
动态端口(LAN、WAN口互换) 会话收集(NAT会话日志、HTTP及MAIL日志、网页日 志)
备注
仅510与520支持 仅网安系列支持,与安 装有艾泰自主研发的 Xport HiPER Manager软 件的SYSLOG服务器合用
行为管理(增加5款股票软件管理、1款IM软件管理、 所有型号 6款P2P软件管理、2款游戏软件管理、2个游戏网站。) QQ白名单配置数量与该型号产品允许IP/MAC绑定的最 所有支持QQ白名单的型 大数量一致 号 增加DNS服务器地址 增加支持PPPoE计费功能的型号 所有型号 商睿系列支持PPPoEServer功能的型号
行为管理-皮皮影视
禁止频道的搜索
资讯窗口还可以弹出, 点击窗口的播放链接, 还能看视频
行为管理-风行影视
禁止资源的搜索,对已有的资源无法禁止
行为管理-电驴
只能禁止官网资源的搜索
对已有的资源下载无法禁止
QQ白名单
在 上网管理 -> QQ白名单页面,调整各个产品型号允许配置的QQ白名单数。 QQ白名单允许配置的数量为该型号产品允许IP/MAC绑定的最大数量。 以网安UTT3640为例: IP/MAC绑定的最大数量是350个,QQ白名单允许配置的数量也是350个。
升级说明
VSTART V10.3、2008 V10.3 时: HiPER 4210G、HiPER 4240G、HiPER 4521、HiPER 4840必须先升级到 ReOS V10.3过渡版本,UTT 3640必须先升级到2008pV2版本,然后在该 版本的基础上升级到ReOS V10.3的正式版本。(从ReOS V10.3版本可以直 接降回到之前版本,建议降级之前先保存配置。) 2008pV2、2009、V10、V10.1、V10.2 V10.3 时: 可以直接升级
“极光”扫描操作系统漏洞
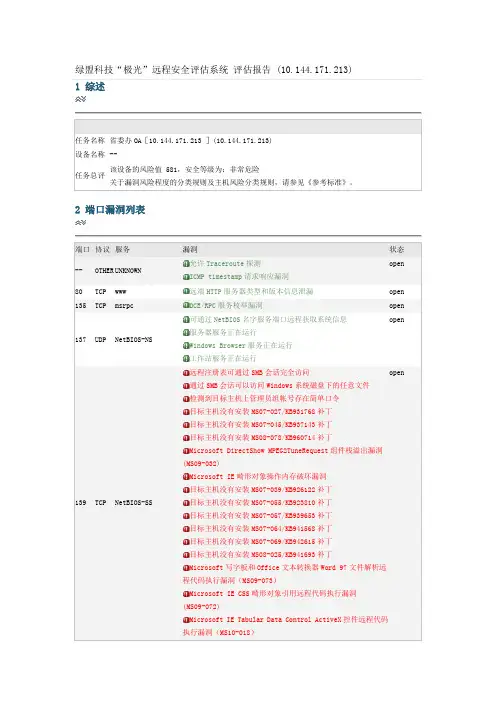
绿盟科技“极光”远程安全评估系统评估报告 (10.144.171.213) 1 综述2 端口漏洞列表允许ICMP timestamp远端HTTP服务器类型和版本信息泄漏DCE/RPC可通过NetBIOS名字服务端口远程获取系统信息远程注册表可通过通过检测到目标主机上管理员组帐号存在简单口令目标主机没有安装目标主机没有安装目标主机没有安装Microsoft DirectShow MPEG2TuneRequestMicrosoft IE目标主机没有安装目标主机没有安装目标主机没有安装目标主机没有安装目标主机没有安装目标主机没有安装MicrosoftMicrosoft IE CSSMicrosoft IE Tabular Data Control ActiveXMicrosoft IEMicrosoft IEMicrosoft IE onreadystatechangeMicrosoft IEMicrosoft IEOutlook ExpressWindowsMicrosoftMicrosoft IEMicrosoft Windows SChannel Microsoft WindowsMicrosoft IE CSSMicrosoft Windows目标主机没有安装目标主机没有安装目标主机没有安装目标主机没有安装Microsoft Windows WINS Server Microsoft Windows Print Spooler目标主机没有安装目标主机没有安装目标主机没有安装目标主机没有安装目标主机没有安装Microsoft Windows EOTMicrosoft WindowsMicrosoft Windows #GP猜测出远程可登录的存在可写共享目录目标主机没有安装目标主机没有安装目标主机没有安装目标主机没有安装目标主机没有安装目标主机没有安装目标主机没有安装目标主机尚未安装目标主机没有安装目标主机没有安装目标主机没有安装Microsoft Windows win32k.sysMicrosoft Windows win32k.sys Microsoft Windows win32k.sys Microsoft Windows xxxCreateWindowEx()MicrosoftMicrosoft IEMicrosoft Windows Win32k.sys Microsoft Windows OTFMicrosoftMicrosoft Windows DHTMLWindowsMicrosoft Windows SearchMicrosoft目标主机没有安装目标主机没有安装目标主机没有安装利用可通过空会话访问远程主机利用主机主机利用利用远程注册表可通过利用利用利用利用利用利用利用存在口令永不过期的帐号存在从未成功登录过的本地帐号存在被禁用的帐号利用利用目标主机没有安装目标主机没有安装目标主机没有安装目标主机没有安装目标主机没有安装目标主机没有安装目标主机没有安装目标主机没有安装目标主机没有安装目标主机没有安装目标主机没有安装目标主机没有安装目标主机没有安装目标主机没有安装目标主机没有安装Microsoft IEMicrosoft IE Anchor可以获取远端Windows非本地登录的用户能够共享访问非本地登录的用户能够共享访问软盘未设置策略设置了用户信任证书缓存策略Windows主机未启用策略目标主机存在Conficker蠕虫漏洞【精确扫描】Microsoft Windows远程桌面协议中间人攻击漏洞检测到远端绿盟科技“极光”远程安全评估系统评估报告(10.144.171.217)1 综述允许ICMP timestamp远端HTTP服务器类型和版本信息泄漏DCE/RPC服务器服务正在运行通过远程注册表可通过检测到目标主机上管理员组帐号存在简单口令Microsoft DirectShow MPEG2TuneRequest目标主机没有安装目标主机没有安装Microsoft IEMicrosoft IE CSSMicrosoft IEMicrosoft IEMicrosoftMicrosoft IEMicrosoft IEMicrosoft IE onreadystatechange目标主机没有安装Outlook Express目标主机没有安装目标主机没有安装目标主机没有安装WindowsMicrosoft Windows SChannelMicrosoft WindowsMicrosoft WindowsMicrosoft目标主机没有安装目标主机没有安装Microsoft IE CSSMicrosoft IE Tabular Data Control ActiveXMicrosoft IE目标主机没有安装目标主机没有安装目标主机没有安装Microsoft Windows WINS ServerMicrosoft Windows Print Spooler目标主机没有安装目标主机没有安装目标主机没有安装目标主机没有安装Microsoft Windows EOTMicrosoft WindowsMicrosoft Windows #GP目标主机没有安装Microsoft IE目标主机没有安装目标主机没有安装目标主机没有安装目标主机没有安装目标主机没有安装目标主机尚未安装目标主机没有安装Microsoft Windows win32k.sys Microsoft Windows win32k.sys Microsoft Windows win32k.sys Microsoft Windows xxxCreateWindowEx()MicrosoftMicrosoft Windows Win32k.sys Microsoft Windows OTF目标主机没有安装目标主机没有安装目标主机没有安装目标主机没有安装存在可写共享目录猜测出远程可登录的Microsoft Windows DHTMLMicrosoftMicrosoft Windows SearchWindowsMicrosoft IE AnchorMicrosoft IEMicrosoft目标主机没有安装目标主机没有安装目标主机没有安装目标主机没有安装目标主机没有安装目标主机没有安装目标主机没有安装目标主机没有安装目标主机没有安装目标主机没有安装目标主机没有安装目标主机没有安装目标主机没有安装目标主机没有安装目标主机没有安装目标主机没有安装目标主机没有安装目标主机没有安装利用存在从未成功登录过的本地帐号存在口令永不过期的帐号存在被禁用的帐号利用利用主机远程注册表可通过利用利用利用利用利用利用利用利用利用主机利用可通过空会话访问远程主机可以获取远端Windows未设置策略设置了用户信任证书缓存策略非本地登录的用户能够共享访问软盘主机未启用策略非本地登录的用户能够共享访问Windows目标主机存在Conficker蠕虫漏洞【精确扫描】检测到目标主机上运行着Windows终端服务ApacheApache Tomcat WAR远端检测到远端绿盟科技“极光”远程安全评估系统评估报告(10.144.171.216)1 综述2端口漏洞列表允许ICMP timestamp远端HTTP服务器类型和版本信息泄漏DCE/RPC服务器服务正在运行检测到目标主机上管理员组帐号存在简单口令远程注册表可通过通过Microsoft DirectShow MPEG2TuneRequest目标主机没有安装目标主机没有安装目标主机没有安装Microsoft IEMicrosoft IE CSSMicrosoft IEMicrosoftMicrosoft IEMicrosoft IEMicrosoft IE onreadystatechangeMicrosoft IE目标主机没有安装Outlook Express目标主机没有安装目标主机没有安装目标主机没有安装WindowsMicrosoft Windows SChannelMicrosoft WindowsMicrosoft WindowsMicrosoft目标主机没有安装目标主机没有安装Microsoft IE CSSMicrosoft IE Tabular Data Control ActiveXMicrosoft IE目标主机没有安装目标主机没有安装目标主机没有安装Microsoft Windows WINS ServerMicrosoft Windows Print Spooler目标主机没有安装目标主机没有安装目标主机没有安装目标主机没有安装目标主机没有安装目标主机没有安装Microsoft Windows EOTMicrosoft WindowsMicrosoft Windows #GPMicrosoft IE目标主机没有安装目标主机没有安装目标主机没有安装目标主机没有安装目标主机没有安装目标主机尚未安装目标主机没有安装Microsoft Windows win32k.sysMicrosoft Windows win32k.sysMicrosoft Windows win32k.sysMicrosoft Windows xxxCreateWindowEx()MicrosoftMicrosoft Windows Win32k.sys Microsoft Windows OTF目标主机没有安装目标主机没有安装目标主机没有安装目标主机没有安装猜测出远程可登录的存在可写共享目录Microsoft Windows DHTML MicrosoftMicrosoft Windows Search WindowsMicrosoft IEMicrosoft IE Anchor利用Microsoft目标主机没有安装目标主机没有安装目标主机没有安装目标主机没有安装目标主机没有安装目标主机没有安装目标主机没有安装目标主机没有安装目标主机没有安装目标主机没有安装目标主机没有安装目标主机没有安装目标主机没有安装目标主机没有安装目标主机没有安装目标主机没有安装目标主机没有安装目标主机没有安装利用主机利用利用利用利用可通过空会话访问远程主机利用存在从未成功登录过的本地帐号存在口令永不过期的帐号存在被禁用的帐号利用利用主机远程注册表可通过利用利用利用利用Windows非本地登录的用户能够共享访问主机未启用策略非本地登录的用户能够共享访问软盘可以获取远端Windows未设置策略设置了用户信任证书缓存策略远程主机的LDAP服务允许匿名查询目标主机存在利用利用利用Microsoft WindowsWindows检测到目标主机上运行着检测到远端NetBackup正在运行中绿盟科技“极光”远程安全评估系统评估报告(10.144.171.240)1 综述2 端口漏洞列表允许ICMP timestamp远端HTTP服务器类型和版本信息泄漏DCE/RPC可通过NetBIOS名字服务端口远程获取系统信息可通过空会话访问远程主机利用利用可以获取远端利用SMB会话可以获取RDR所管理的传输层协议信息远端远程Microsoft Windows远程桌面协议中间人攻击漏洞检测到远端NetBackup正在运行中绿盟科技“极光”远程安全评估系统评估报告(10.144.171.233)1 综述2 端口漏洞列表ICMP timestamp允许微软DCOM接口缓冲区溢出漏洞(MS03-026/MS03-039)服务器服务正在运行可通过工作站服务正在运行Windows Browser检测到目标主机上管理员组帐号存在简单口令目标主机没有安装MS04-011/KB835732补丁目标主机没有安装MS05-053/KB896424补丁多个图形处理安目标主机没有安装MS08-032/KB950760补丁WindowsMicrosoft Windows Server利用利用利用Oracle数据库PITRIG_DROPMETADATA过程远程溢出漏洞检测到目标主机上运行着Microsoft WindowsWindows绿盟科技“极光”远程安全评估系统评估报告(10.144.171.239)1 综述2 端口漏洞列表允许ICMP timestampDCE/RPC服务器服务正在运行可通过空会话访问远程主机利用利用可以获取远端利用SMB会话可以获取RDR所管理的传输层协议信息Microsoft SQL Server 2000Microsoft SQL ServerMS SQL Server远端HTTP服务器类型和版本信息泄漏Microsoft WindowsWindows检测到目标主机上运行着检测到远端绿盟科技“极光”远程安全评估系统评估报告(10.144.171.247)1 综述2 端口漏洞列表允许ICMP timestamp远端DCE/RPC服务器服务正在运行检测到目标主机上管理员组帐号存在简单口令远程注册表可通过通过Microsoft IE目标主机没有安装目标主机没有安装目标主机没有安装Microsoft DirectShow MPEG2TuneRequestMicrosoft IE CStyleSheetMicrosoft IEMicrosoft IE CSSMicrosoft IEMicrosoft IE onreadystatechangeMicrosoft IEMicrosoft IEMicrosoft IEMicrosoft IE CSSMicrosoft IE Tabular Data Control ActiveX目标主机没有安装目标主机没有安装MicrosoftMicrosoft WindowsMicrosoft WindowsWindowsMicrosoft Windows SChannelOutlook Express目标主机没有安装目标主机没有安装目标主机没有安装目标主机没有安装目标主机没有安装Microsoft Windows Print SpoolerMicrosoft Windows WINS Server目标主机没有安装目标主机没有安装目标主机没有安装Microsoft WindowsMicrosoft Windows #GPMicrosoft Windows EOT目标主机没有安装目标主机没有安装目标主机没有安装Microsoft IE目标主机没有安装目标主机没有安装目标主机没有安装目标主机没有安装Microsoft Windows OTFMicrosoft Windows Win32k.sysMicrosoftMicrosoft Windows xxxCreateWindowEx() Microsoft Windows win32k.sys Microsoft Windows win32k.sys Microsoft Windows win32k.sys目标主机尚未安装目标主机没有安装目标主机没有安装目标主机没有安装目标主机没有安装目标主机没有安装存在可写共享目录猜测出远程可登录的Microsoft Windows Workstation Microsoft Windows DHTMLMicrosoft Windows SearchWindowsMicrosoft IE Anchor Microsoft IE目标主机没有安装目标主机没有安装目标主机没有安装目标主机没有安装目标主机没有安装目标主机没有安装目标主机没有安装目标主机没有安装目标主机没有安装目标主机没有安装目标主机没有安装目标主机没有安装目标主机没有安装目标主机没有安装目标主机没有安装目标主机没有安装目标主机没有安装目标主机没有安装Microsoft利用利用主机利用利用利用利用利用利用利用利用远程注册表可通过存在从未成功登录过的本地帐号存在口令永不过期的帐号存在被禁用的帐号利用利用主机利用可通过空会话访问远程主机Windows非本地登录的用户能够共享访问主机未启用策略未设置策略设置了用户信任证书缓存策略非本地登录的用户能够共享访问软盘Windows可以获取远端IMAP服务信息可被获取目标主机存在利用利用利用检测到目标主机上运行着Windows终端服务。
VigorACS 2 Quick Start Guide
V i g o r A C S2U n i f i e d M a n a g e m e n t S y s t e mManual Version: 1.0Software Version: V2.3.1Date: August 17, 2018Table of Contents1. Platform for Windows 7 or 10 (5)1.1 Installation for Java (5)1.2 Installation for MariaDB (9)1.3 Installation for VigorACS 2 (14)1.4 StartMySQL/MariaDB Databse (23)1.5 Start VigorACS (23)2. Platform for Linux (25)2.1 Installation for MariaDB, Java and VigorACS (25)2.2 Start MySQL/MariaDB Databse (31)2.3 Start VigorACS (31)2.4 Edit VigorACS IP (31)3. Registering VigorACS 2 (32)3.1 Registration for VigorACS via Windows Platform (32)4. Configuration on CPE Device (37)4.1 Set ACS URL on CPE (37)4.2 Invoke Remote Management for CPE (39)4.3 Enable WAN Connection on CPE (40)5. Troubleshooting (42)1.P l a t f o r m f o r W i n d o w s7o r10Please follow the procedure listed below to install VigorACS 2 completely. The installation for different platforms might be different.T o start up the VigorACS, the normal procedure is listed as follows:(I)Installation for Java(II)Installation for MariaDB(III)Installation for VigorACS 2(IV)Start MySQL/MariaDB Database.(V)Edit VigorACS IP.(VI)Start VigorACS.Info VigorACS 2 can be operated only by a host with 64-bit operation system.1.1I n s t a l l a t i o n f o r J a v a1.Install Java by clicking “java-1.8.0-openjdk-1.8.1.151-1.b12…” to execute the installation.2.The first page will be shown as follows. Click Next to get into next page.3.Then, check “I accept the terms…” and click the Next button.4.In this page, optional features will be listed for you to specify the destination folder forJAVA driver installation. Choose the one you need and click Next.5.In the following page, just click Install.6.Wait for a while to install the required features.7.When the following page appears, the installation is completed. Click Finish to exit theinstalling program.1.2I n s t a l l a t i o n f o r M a r i a D B1.Install MariaDB by clicking “mariadb-10.2.10-winx64” (based on your PC condition) it toexecute the installation.2.When the welcome screen appears, please click Next for next step.3.On this dialog box, check the box of “I accept the terms….” and click Next.4.Select the way for the features to be installed. Then click Next.5.If you want to configure password for MariaDB server, please check Modify password… andtype the password. It depends on your request. Otherwise, simply click Next.6.Modify the default instance properties if required. Then click Next.7.On this dialog box, click Next.8.On this dialog box, click Install.9.The installation program starts to install required files for MariaDB to your computer. Waitfor several seconds.10.After finishing the configuration, please click Finish to exit the wizard.1.3I n s t a l l a t i o n f o r V i g o r A C S2It is time to install VigorACS main program. Follow the steps below.1.Click Setup to run VigorACS 2 setup wizard.2.When the following dialog appears, choose Local Database / Remote Database and clickNext.3.Select the directory that MariaDB being installed (done in 1.2) and click Next4.In this dialog box, choose Rebuild Database (for rebuilding the VigorACS database) orUpgrade Database (for upgrading the database). For the first time using, please choose Rebuild Database. Then click Next.5.Click Next. If you have configured MySQL/MariaDB previously and specified password for it,you have to type the password in this page and then click Next.6.Set the maximum memory and minimum memory. Click Next.7.Setup ACS HTTP and HTTPS port, we'll suggest using others port instead of default 80 and443 port to prevent conflict.Info The port number defined here will be used for opening VigorACS later.8.Determine the home path and click Next. The default directory used by this program isC:\Users. You can modify it if you want and please make sure the length of directory is not over 100 characters, otherwise you might encounter problem of VigorACS in installation.9.Determine the destination folder and click Next. The default directory used by thisprogram is C:\Program Files\VigorACS. You can modify it if you want and please make sure the length of directory is not over 100 characters, otherwise you might encounter problem of VigorACS in installation.10.Determine the start menu folder and click Next. The default directory used by thisprogram is VigorACS. You can modify it if you want and please make sure the length of directory is not over 100 characters, otherwise you might encounter problem of VigorACS in installation.11.In this dialog, check the box of “Create a desktop shortcut” for your necessity. Click Next.12.Now, the program is ready to install necessary features and files to your computer. Pleaseclick Install to start.13.Please wait for a while to complete the installation.14.While installing, the following screen will appear to show that MariaDB has been activated.Please wait for next dialog appearing.15.Now the program has completed the installation of VigorACS 2. Click Finish to exit it.1.4S t a r t M y S Q L/M a r i a D B D a t a b s eAfter installing VigorACS, install program will register MySQL/MariaDB to Windows Service.MySQL /MariaDB will startup automatically after installing VigorACS or rebooting system.Normally, you don't need to worry about this step on Windows. But if you find any problems on VigorACS, you should check mysql/mariadb first. Please go to Windows Service check theMySQL/MariaDB Service starts or not.1.5S t a r t V i g o r A C S1.Login VigorACS. Use a web browser and type “localhost:portnumber”. Note that the portnumber must be the one defined for HTTP and HTTPS port while installing VigorACS. Forexample, if HTTPS is defined as 8011, then the URL will be “localhost:8011”.2.The login page of VigorACS will be shown as the following. Please type “root” as user nameand “admin123” as password and type the authentication code. Then click Login.3.For the first time to access into the web user interface, a warning message appears first.Please click the Change password button to change the default password for networksecurity. If not, click Cancel to access into the web user interface of VigorACS and changethe password later.4.After clicking Login, main screen of VigorACS 2 will be shown as below.2.P l a t f o r m f o r L i n u xT o start up the VigorACS under Linux, please execute"/usr/local/vigoracs/VigorACS/bin/vigoracs.sh" instruction. A list of menu items will be shown as follows.1.Start mysql/mariadb2.Shutdown mysql/mariadb3.Start VigorACS4.Shutdown VigorACS5.Edit bind IP of VigorACS Server (please key in IP or server name)6.Set the Max. and Min. memory value of running java (it will be valid after restartingVigorACS)7.View the Max. and Min. memory value of running java8.exit2.1I n s t a l l a t i o n f o r M a r i a D B,J a v a a n d V i g o r A C SFollow the steps listed below to install VigorACS under Linux:1.Login Linux with root or the root privilege.2.Download the ACS installation tar.bz2 package and extract it via below command:#bzip2 -cd VigorACS_Unix_Like_xxxxxx_xxxxx.tar.bz2 | tar xvf -or#tar -jxv -f VigorACS_Unix_Like_xxxxxx_xxxxx.tar.bz23.Decompress the setup packagesbzip2 -cd VigorACS_Unix_Like_xxxxxx_xxxxx.tar.bz2 |tar xvf –4.Change the permissions mode of install.sh and uninstall.sh.chmod 755 install.shchmod 755 uninstall.sh5.Execute ./install.sh installation file.Please make sure you have /usr/bin/sh first. If you don't have /usr/bin/sh, please enter the command:#ln -s /bin/sh /usr/bin/sh6.The system will ask to create vigoracs, enter “y” to proceed.7.Next, the system will ask you to install xfonts-base and fontconfig, just enter “y” toproceed.8.Next, please select the item number which you want to execute. Note that VigorACSsupports Linux OS. The program will detect the system you have in your computer.(1) Install mysql/mariadb(2) Change root password and security configuration of mysql/mariadb(3) Install or Upgrade java(4) Install VigorACS(5) Upgrade VigorACS(6) Redirect the database path of VigorACS to remote host (7) Exitinput select num:InfoIf your computer has installed MariaDB and java previously, ignore theinstallation of them. Otherwise, install all the required items (MariaDB, Java and VigorACS) for your system. Item number 5 is used to upgrade VigorACS, so it is not necessary for you to execute for the first time of installation.9. Input 1 to install MariaDB first. Notice that it will setup blank as default password. You canchange the password by using the following command.#/usr/local/mysql/bin/mysqladmin--defaults-file=/usr/local/mysql/f -u root password 'newpassword'InfoThe password configured by the command above will be effective onlywhen there is no password set for database root before.Follow the instructions on the screen to finish the MariaDB installation.ter, input 2 to change root password and security configuration of mysql/mariadb.Info The password set in this step is used for VigorACS 2 to login database.11.Input 3 to install Java.Follow the instructions on the screen to finish the Java installation.12.Input 4 to install VigorACS. It is suggested to use ACS customized MariaDB database. Whenasked to enter MariaDB password, press “Enter” if you haven’t changed the password via the command. Then, confirm that TR-069 database has been installed successfully.Wait and follow the instructions on the screen to finish the installation.13. Now, input 6 to redirect the database path of VigorACS to remote host. For remotedatabase, please execute such step on remote host.14. Input 7 to finish and exit the installation.Info 1 Step 13 is required for establishing remote database only . You can ignore it while building local database.Info 2T o prevent port conflicts, we'll suggest that using other ports for HTTP and HTTPS instead of default 80 and 443.2.2S t a r t M y S Q L/M a r i a D B D a t a b s eAfter installing VigorACS, mysql/mariadb daemon has started. You can to see it using "ps-ef|grep mysql" instruction. Use the menu item 1 / 2 to start / shutdown mysql/mariadb.2.3S t a r t V i g o r A C SAfter installing VigorACS, access “/usr/local/vigoracs/VigorACS/bin”, execute “./vigoracs.sh”.Select item 3 to start VigorACS.If you ever reboot the machine after installing VigorACS, just select item 1 to startmysql/mariadb first. Then, select item 3 to start VigorACS.2.4E d i t V i g o r A C S I PWhen starting the VigorACS at first time on Linux, startup program will ask you input Server IP or input Enter key by using the IP address of the host. Once you input the IP address, VigorACS will keep it on startway.txt. Next time, if you want to change it, you can select item 5 to editstartway.txt using vi editor.3. R e g i s t e r i n g V i g o r A C S 2For the first time to activate VigorACS 2, the system will ask you to register VigorACS 2 onto DrayT ek MyVigor server . Refer to the following sections to register VigorACS 2 on differentplatforms.Info 1 While installing VigorACS, install program will register MySQL/MariaDB toWindows Service. MySQL/MariaDB will startup automatically after installingVigorACS or rebooting system. Normally , you don't need to worry about this step on Windows. But if you find any problems on VigorACS, you should checkmysql/mariadb first. Please go to Windows Service check the MySQL/MariaDB Service starts or not.Info 2After installing VigorACS, the software will startup automatically . Normally ,you don't need to worry about this step on Windows. But, if you find any problem on VigorACS, you could shut down VigorACS and start VigorACS again. 3.1 R e g i s t r a t i o n f o r V i g o r A C S v i a W i n d o w s P l a t f o r mBelow shows the steps to register VigorACS 2:1. Login VigorACS. Use a web browser and type “localhost:portnumber”. Note that the portnumber must be the one defined for HTTP and HTTPS port while installing VigorACS. For example, if HTTPS is defined as 8011, then the URL will be “localhost:8011”.2. The login page of VigorACS will be shown as the following. Please type “root” as user nameand “admin123” as password and type the authentication code. Then click Login.Info“root” and “admin123” are default settings.3. A License Error dialog appears as follows. Simply click Active.4. A login page for MyVigor web site will be popped up automatically . Type your account (username) and password in this page. Then, click Login.InfoIf you do not have any account, simply click Create an account now to create a new one for using the service provided by MyVigor web site.5.MyVigor will verify and authenticate if the user account you typed is allowed to access intothe web site. If yes, the following screen will appear.6.Type a nickname for VigorACS and click Add.7.After clicking Add, you can see the following screen. Click OK.8.You will get a device information page as shown below. If you are the new user of VigorACS,you can get a free charge of 30-day service of VigorACS. Simply click the Trial button.9.From the following screen, check the box of “I have read and accept the above….” andclick Next.10.In the page below, click Register.11.When the VigorACS License Information page appears, the service is ready for you to use.Click Login to ACS to use VigorACS service.12.The login page will appear as follows. Type the default settings of User Name (root) andPassword (admin123) and type the authentication code. Then, click Login.13.Now, the main screen of VigorACS will be shown as follows.4.C o n f i g u r a t i o n o n C P E D e v i c e4.1S e t A C S U R L o n C P ET o manage CPEs through VigorACS, you have to set ACS URL on CPE first and set username and password for VigorACS.1.Connect one CPE (e.g., Vigor2862 series).2.Open a web browser (for example, IE, Mozilla Firefox or Netscape) on your computer andtype http://192.168.1.1.3.Please type username and password on the window. If you don’t know the correctusername and password, please consult your dealer to get them. In this section, we takethe figures displayed on Windows as examples.4.Go to System Maintenance -> TR-069.•Please set URL as the following and type username and password for ACS server,for the connected CPE with authentication:http://{IP address of VigorACS}:80/ACSServer/services/ACSServlet•Please set URL as the following, for the connected CPE without authentication: http://{IP address of VigorACS}:80/ACSServer/services/UnAuthACSServlet•Please set URL as the following, for the connected CPE with authentication and the data transmission between CPE and VigorACS 2 with encryption (SSL).https://{IP address of VigorACS}:443/ACSServer/services/ACSServlet•Please set URL as the following, for the connected CPE without authentication but the data transmission between CPE and VigorACS 2 with encryption (SSL)https://{IP address of VigorACS}:443/ACSServer/services/UnAuthACSServlet5.Fill Username and Password for VigorACS 2 Server for authentication. Please enter as thefollowing:Username: acsPassword: password6.For the username and password of CPE client, it is not necessary for you to type them.7.Click Enable for Periodic Inform Settings.4.2I n v o k e R e m o t e M a n a g e m e n t f o r C P EYou have to make sure that the CPE device you want to connect supports VigorACS 2 features.Please consult your dealer if you have no idea in it.1.Suppose WAN IP of CPE device has been setup successfully. And you can access into Internetwithout difficulty.2.Login the device (e.g., Vigor2862) by web.3.Go to System Maintenance>>Management.4.Check Allow management from the Internet to set management access control.4.3E n a b l e W A N C o n n e c t i o n o n C P EYou have to make sure the CPE device you want to connect has been configured properly and can access into Internet.1.Login the device (e.g., Vigor2862) by web.2.Open WAN>>Internet Access.3.Choose Static or Dynamic IP as Access Mode and click Details Page for WAN2.4.The following web page appears. Click Enable and Specify an IP address. Enter correctWAN IP address, subnet mask and gateway IP address for your CPE. Then click OK.VigorACS 2 Quick Start Guide41InfoReboot the CPE device and re-log into VigorACS 2. CPE which has registered to VigorACS 2 will be captured and displayed on the home page of VigorACS 2.VigorACS 2 Quick Start Guide42 5. T r o u b l e s h o o t i n gWhen you try to invoke VigorACS 2 and get the following error message, please locate the file of “server .log ” from C:/Program Files/VigorACS/server/default/log and send the file to yourdealer for further assistance.For Linux system, please locate the file of “server .log ” from/usr/local/vigoracs/VigorACS/server/default/log/ and send the file to your dealer for further assistance.。
Ruckus Wireless R710 Access Point Quick Setup Guid
Before deploying Ruckus Wireless products, please check for the latest software and the release documentation. • User Guides and Release Notes are available at
Step 1: Collecting Setup Requirements, Hardware, and Tools
• A computer running Windows 7 (procedures for common operating systems are similar).
• One Cat 5e (or better) Ethernet cable. • A Ruckus Wireless 902-0169-xx00 AC power adapter (sold
included stainless steel clamps, and hand tools to tighten the clamps. Continue with Step 2: Connecting Your Computer to the AP.
Step 2: Connecting Your Computer to the AP
secure mounting bracket kit, then you need an electric drill with 4.75mm (3/16”) drill bits. • If you are mounting the AP on a pipe or pole using the secure mounting bracket kit, then you will also need a 38.1mm to 63.5mm (1.5" to 2.5") pipe or pole, two
cve-2002-20001修复方法
cve-2002-20001修复方法CVE-2002-2001漏洞是一种由Microsoft Internet Information Services(IIS)vyst提供的Web服务器的缺陷造成的安全漏洞。
这种漏洞允许未经授权的用户访问具有特权的Windows资源,甚至在GET,HEAD,POST和利用IIS执行任意脚本中某些操作上实现远程代码执行(RCE)。
CVE-2002-2001漏洞的修复方法主要集中于正确配置IIS服务器以限制客户端对操作系统资源的访问。
有以下几种修正措施可以用来修复CVE-2002-2001漏洞:1、禁用或删除Visual Studio用于发布IIS应用程序的功能,这将禁止客户端操作系统中的服务器端脚本(SSC)的执行。
2、查找IIS服务器中的netid,确认其用于分配访问控制列表(ACL)的ISAPI过滤器。
3、使用访问控制列表(ACL)来更新ISAPI过滤器,以限制可以访问服务器资源的用户,并防止未经授权的访问。
4、更新IIS中的SSL加密配置,确保服务器上的数据传输安全编码,以防止被恶意用户拦截。
5、启用IIS的安全模式,以确保Web应用程序中的脚本代码不可以被执行。
6、禁用操作系统的可写权限,以防止恶意用户上传WEB应用程序。
7、使用限制访问控制列表(ACL)来限制操作系统文件夹的访问权限,以防止恶意用户篡改任意文件以及执行任意脚本。
8、更新操作系统和IIS中的安全补丁,确保操作系统程序不存在任何漏洞,以免被恶意用户利用。
以上就是关于CVE-2002-2001漏洞修复方法的介绍,以正确配置IIS服务器及正确使用访问控制列表(ACL)尤其重要,这样可以有效地防止未经授权的访问和执行任意脚本的漏洞,从而保证服务器的安全可靠。
Mellanox ConnectX-2 Dual Port 10 GbE Adapter for I
Mellanox ConnectX-2 Dual Port 10 GbE Adapter for IBM System xProduct Guide (withdrawn product)The Mellanox ConnectX-2 Dual Port 10 GbE Adapter for IBM System x delivers high-bandwidth and industry leading low latency 10 GbE connectivity. With industry-leading performance, power-efficiency, integration and feature set, ConnectX-2 EN with RDMAoE (RDMA over Ethernet) adapters provide an optimized, low-latency solution for high-transaction databases, financial services, cloud computing, and virtualized server and storage data center environments. The ConnectX-2 Dual-Port 10 GbE Adapter improves network performance by increasing available bandwidth to the CPU and providing enhanced performance especially in virtualized server environments.The adapter is shown in Figure 1.Figure 1. Mellanox ConnectX-2 Dual Port 10 GbE Adapter for IBM System xDid you know?Click here to check for updatesDid you know?The Mellanox ConnectX-2 Dual Port 10GbE Adapter for IBM System x is a a high-performance, dual-port network adapter for 10Gb/s Ethernet (10GbE) networks with performance requirements for low latency. It provides an ideal solution for all servers needing high- performance, low-latency data transfer in LAN connectivity for mission-critical applications. This network adapter provides support for 10GbE networking with optical or copper connectivity.Part number informationThe part number to order this card is shown in Table 1.Table 1. Ordering part number and feature codeDescription Part number Feature code Mellanox ConnectX-2 Dual Port 10 GbE Adapter for IBM System x81Y9990A1M4The adapter has two empty SFP+ cages that support either SFP+ SR transceivers or twin-ax direct-attached copper (DAC) cables as listed in Table 2.Table 2. Supported transceivers and direct-attach copper (DAC) cablesDescription Part number Feature code Optical TransceiversQLogic 10Gb SFP+ SR Optical Transceiver49Y42180064Brocade 10Gb SFP+ SR Optical Transceiver49Y42160069IBM SFP+ SR Transceiver46C34475053Active Direct-attach copper (DAC) cables1m IBM Active DAC SFP+ Cable95Y0323A25A3m IBM Active DAC SFP+ Cable95Y0326A25B5m IBM Active DAC SFP+ Cable95Y0329A25CPassive Direct-attach copper (DAC) cables0.5m IBM Passive DAC SFP+ Cable00D6288A3RG1m IBM Passive DAC SFP+ Cable90Y9427A1PH3m IBM Passive DAC SFP+ Cable90Y9430A1PJ5m IBM Passive DAC SFP+ Cable90Y9433A1PK7m IBM Passive DAC SFP+ Cable00D6151A3RH Features and benefitsSupported serversThe adapter is supported in the IBM System x servers listed in Table 3.Table 3. Supported System x servers (Part 1)Mellanox ConnectX-2 Dual Port 10 GbE AdapterN N N N N N N N Y N N N Y N NTable 3. Supported System x servers (Part 2)Mellanox ConnectX-2 Dual Port 10 GbE AdapterY Y Y N N N Y N Y N Y N N Y YSupported operating systemsTrademarksLenovo and the Lenovo logo are trademarks or registered trademarks of Lenovo in the United States, other countries, or both. A current list of Lenovo trademarks is available on the Web athttps:///us/en/legal/copytrade/.The following terms are trademarks of Lenovo in the United States, other countries, or both:Lenovo®Intelligent ClusterServerProven®System x®The following terms are trademarks of other companies:Linux® is the trademark of Linus Torvalds in the U.S. and other countries.Microsoft®, Windows Server®, and Windows® are trademarks of Microsoft Corporation in the United States, other countries, or both.Other company, product, or service names may be trademarks or service marks of others.Mellanox ConnectX-2 Dual Port 10 GbE Adapter for IBM System x (withdrawn product)11。
KDS USB FW Update User Manual
111-38-URM-011KDS USB FW UpdateUser ManualKDS USB FW Update 111-38-URM-011Table of Contents1. Introduction (3)2. Process under Microsoft Windows (4)3. Process under Mac OS (5)KDS USB FW Update 111-38-URM-0111. IntroductionThe Epson Kitchen Display System (henceforth KDS) is preferably updated using the KDS Utility. However, an alternate update method using a USB flash drive can be employed as fallback if required, and is typically faster than with the KDS Utility, albeit at the cost of losing any configuration from the KDs device. This document describes the typical process to set up a USB flash drive for the firmware update.The same firmware update process is used for printers and controllers (henceforth called display box). Once set up, the USB flash drive can be used to sequentially update multiple devices.IMPORTANT NOTES:i. Before you proceed, note that updating the KDS using this method erases allconfiguration from the target device(s). The KDS Utility may be used to re-configure the system.ii. There are certain flash drives that may not work with this method and would fail the update process verification step in the procedures. Some models tested include:a. Kingston DataTraveler 8GB/16GBb. Transcend JetFlash V70 16GBc. Axiom Stealth 2 USBFD2 2GBd. SanDisk Cruzer Dial USB 16GBe. Misc. brands like AData, Samsung, Verbatim, Sony etc. USB 2.0 flash drivesKDS USB FW Update 111-38-URM-0112. Process under Microsoft WindowsThe following process has been verified under Microsoft Windows 7 and Windows 10. Most failures with the method can be attributed to user permissions (inability to modify USB flash drive) incompatible or corrupted USB flash drives.Here are the basic instructions for flashing the printer/display box FW:1. Get a USB flash drive of 1GB or more with no contents you care about, as everything on it will beerased.2. Plug the USB flash drive into a Windows PC.3. Run dd_win.exe (provided in the firmware update package)o Click on “File select…” and browse to the file “usb_boot_image_v26.ubi”o Click on “Drive select…” and specify the drive letter of the USB sticko Hit 'Run' and wait until completed.4. ***IMPORTANT*** Safely eject the USB flash drive from Windows, then unplug it, wait a fewseconds, then plug it back in again.5. Unzip the “KDS Image.zip” file onto the USB flash drive. The final layout of the USB stick should be:\|- autooperation|- uImage|- BOOT.BIN|- images\|-- control.tar.gz|-- hibdrv|-- hibernation|-- hibernationinfo|-- rootfs|-- uImage|-- writable-region6. Eject the USB stick from the PC again.7. Label the USB stick with ‘KDS Image’ to indicate what image is on it in case it is requ ired for otherdisplay boxes/printers or in future.Follow these instructions for each printer/display box that needs to be updated:1. With the printer/display box turned off, plug the USB flash drive into the Interface card at the back.2. Use a pen or paper clip to press the button on the BACK of the printer/display box, and keep itpressed while turning the board on. Keep holding the button down for three or four seconds until the LED near the button goes out.3. The LED light will then show orange for about 45 seconds, and then green for about 5 seconds, thenflash orange for about 60 seconds. Once the FW update is complete, the LED will flash green.4. Turn off the printer.5. Remove the USB flash drive from the back.6. Turn the printer/display box back on and wait for it to boot up; the LED on the back turns solid green.The KDS splash screen will show the new FW version on the attached monitor.7. The system should be ready to go.KDS USB FW Update 111-38-URM-0113. Process under Mac OSThe following process has been verified under Mac OS 10 and 11. Most failures with the method can be attributed to user permissions (inability to modify USB flash drive) incompatible or corrupted USB flash drives.Here are the basic instructions for flashing the printer/display box FW:1. Save the firmware update package (which includes the file usb_boot_image_v26.ubi) in the Desktopor Downloads folder.2. Get a USB flash drive of 1GB or more with no contents you care about, as everything on it will beerased. Do NOT plug it in yet.3. On the Mac, open a new terminal (iTerm).4. Type the command “diskutil list”to get the current list of devices.5. Now plug the USB flash drive into the Mac.6. Type the command “diskutil list”again and note the additional device, which is the USB flashdrive (e.g. /dev/disk2).7. Type the command “diskutil unmountDisk /dev/diskX”, where X is the number from Step 5.8. Type the following command:sudo dd if=$(find ~ -name usb_boot_image_v26.ubi | head -n 1) of=/dev/diskX bs=1m(again, substitute the X in the command with the number you learned from Step 5.)Please note:i. The command above will ask for the user (or administrator) password once; this is normal.ii. The command, when run for the first time, will trigger several pop-up dialogs requesting access to some folders. See Figure 3.1.iii. The command will output several lines with the text “Operation not permitted” when trying to search certain inaccessible folders; this is normal.Figure 3.1: Mac OS pop-ups requesting user permission to access some folders.(c ontinued…)KDS USB FW Update 111-38-URM-0119. ***IMPORTANT*** Safely eject the USB stick from the Mac, then unplug it, wait a fewseconds, then plug it back in again.10. Unzip the KDS Image.zip file into USB stick. This means the final layout for the USB stick should be:\|- autooperation|- uImage|- BOOT.BIN|- images\|-- control.tar.gz|-- hibdrv|-- hibernation|-- hibernationinfo|-- rootfs|-- uImage|-- writable-region11. Eject the USB stick from the Mac again.12. Label the USB stick with ‘KDS Image’ to indicate what image is on it in case it is required for otherdisplay boxes/printers or in future.Follow these instructions for each printer/display box that needs to be updated:1. With the printer/display box turned off, plug the USB flash drive into the Interface card at the back.2. Use a pen or paper clip to press the button on the BACK of the printer/display box, and keep itpressed while turning the board on. Keep holding the button down for three or four seconds until the LED near the button goes out.3. The LED light will then show orange for about 45 seconds, and then green for about 5 seconds, thenflash orange for about 60 seconds. Once the FW update is complete, the LED will flash green.4. Turn off the printer.5. Remove the USB flash drive from the back.6. Turn the printer/display box back on and wait for it to boot up; the LED on the back turns solid green.The KDS splash screen will show the new FW version on the attached monitor.7. The system should be ready to go.KDS USB FW Update 111-38-URM-011This page intentionally left blank.KDS USB FW Update 111-38-URM-011。
- 1、下载文档前请自行甄别文档内容的完整性,平台不提供额外的编辑、内容补充、找答案等附加服务。
- 2、"仅部分预览"的文档,不可在线预览部分如存在完整性等问题,可反馈申请退款(可完整预览的文档不适用该条件!)。
- 3、如文档侵犯您的权益,请联系客服反馈,我们会尽快为您处理(人工客服工作时间:9:00-18:30)。
[CVEN 2101] Engineering Construction
Introduction to Concrete (Con’t)
•Be of proper workability so as to enable proper consolidation, prevent segregation, completely fill the forms, and provide achievement of a proper finish
•Slump-test
–Most widely used
–Measures the amount of slump from its original height
–/watch?v=higx_ktnKLI&feature=related
Introduction to Concrete (Con’t)•Concrete operation
–Batching the materials
–Mixing
–Transporting
–Placing
–Consolidating
–Finishing
Fi i hi
concrete is batched in a central batch plant and transported to the
p p job site in trucks
•/watch?v=0Aqq3a0GTjY&feature=related •Mixer output production rate
–Mixer size is measured by volume
–Mixer output is measured by m3/hr Æmixer size / mixer cycle time
–Mixer cycle time: loading time, mixing time, and discharging time
Transit mixed Central mixed
8[CVEN 2101] Engineering Construction
Mixing Concrete (Con’t)•Freefall mixers
–Mix concrete by lifting the ingredients with the aid of fixed blades inside a rotating
drum and then dropping the material
S i bl f h iff –Suitable for concretes that are not too stiff (about 5-6 cm of min. slump)
•Power mixers
–Blend concrete by rapid rotary motion of paddles moving in centric or eccentric
courses inside the mixing drum
–Require a shorter mixing time to obtain
R i h t i i ti t bt i
homogeneous, high-quality concrete,
resulting in greater output
•/watch?v=q49_3 ePR5kw
9[CVEN 2101] Engineering Construction
[CVEN 2101] Engineering Construction
–Remotely located projects
–Large scale projects
–Project located in busy, heavily trafficked urban areas •Smaller-scale self-contained concrete plant
–Operates similarly to a full-size permanent central plant
–Can be moved between sites either on trucks or in a trailer-mounted configuration
–Highly automated and can be operated by one worker
12[CVEN 2101] Engineering Construction
[CVEN 2101] Engineering Construction
–Complementary means on projects utilizing cranes or pumps
C l t j t tili i
–Additional expenses of building ramps, runways, and similar setups should be taken into account
–Recommended for distances less than 60m
–Motor-propelled buggies (power buggies) can traverse up to 300m 14[CVEN 2101] Engineering Construction
[CVEN 2101] Engineering Construction
–Proper belt size and speed should be considered
–Particular attention must be given to points where the concrete leaves one conveyor and either continues on another conveyor
or is discharged, as segregation can occur at these points
–Optimum concrete slump for conveyed concrete is 6.5 –7.5 cm 16[CVEN 2101] Engineering Construction
/hr (up to the 58th floor);
•Consolidation
–To remove these entrapped air voids and to ensure complete filling of the forms
–Normally achieved through the use of mechanical vibrators
19[CVEN 2101] Engineering Construction
•
Any work done to a concrete surface
after it has been consolidated will
weaken the surface strength
•Surface strength is very important on a
floor slab, sidewalk, or pavement
•Only the absolute minimum finishing
necessary to impart the desired texture
should be permitted
20[CVEN 2101] Engineering Construction
[CVEN 2101] Engineering Construction
Finishing Concrete (Con’t)•Troweling
–To create a smoother surface after floating with a steel trowel
–Motor-propelled (power trowels)are used Motor propelled (power trowels)
to smooth and finish large concrete surfaces
such as floor slabs and the upper face of
horizontally concreted precast element –Improves the density of the upper concrete layer and seals plastic cracks that
developed in the face of the concrete –Floating is aimed at removing protruding aggregate grains, leveling off swells, filling。
