switch2配置信息
华为二层交换机基本配置命令有哪些

华为二层交换机基本配置命令有哪些华为二层交换机基本配置命令1、进入特权模式switch>(用户模式)进入特权模式enableswitch>enable按回车键Enterswitch#(特权模式)2、进入全局配置模式进入全局配置模式configureterminalswitch#configureterminal按回车键EnterSwitch(config)#(全局配置模式)3、交换机命名交换机命名hostnameCY3C_HTLZYQ_P6ZHSA(以CY3C_HTLZYQ_P6ZHSA为例)Switch(config)#hostnameCY3C_HTLZYQ_P6ZHSA按回车键Enter CY3C_HTLZYQ_P6ZHSA(config)#4、创建Vlan创建VlanCY3C_HTLZYQ_P6ZHSA(config)#Vlan+n(n代表Vlan编号正常范围2—1000)按回车键EnterCY3C_HTLZYQ_P6ZHSA(config-vlan)#name+名字(给Vlan创建个名字)5、创建管理Vlan和管理IP地址创建管理Vlan和管理IP地址CY3C_HTLZYQ_P6ZHSA(config)#Vlan+nCY3C_HTLZYQ_P6ZHSA(config-vlan)#name+名字(根据自己想要的结果命名)按exit退出CY3C_HTLZYQ_P6ZHSA(config)#interfaceVlan+n(n代表Vlan编号正常范围2—1000)按回车键EnterCY3C_HTLZYQ_P6ZHSA(config-if)#ipaddress+管理ip地址+子网掩码按回车键EnterCY3C_HTLZYQ_P6ZHSA(config-if)#noshutdown(开启Vlan)6、设定此交换端口为trunk口设定此交换端口为trunk口CY3C_HTLZYQ_P6ZHSA(config)#interface+端口(比如F0/1)按回车键EnterCY3C_HTLZYQ_P6ZHSA(config-if)#switchportmodetrunk(设定此交换端口为trunk即中继端口)按回车键EnterCY3C_HTLZYQ_P6ZHSA(config-if)#noshutdown7、把端口划分到Vlan内把端口划分到Vlan内CY3C_HTLZYQ_P6ZHSA(config)#interface+端口【(比如F0/5)(把单个端口划分到Vlan内)】CY3C_HTLZYQ_P6ZHSA(config-if)#switchportmodeaccess(设定f0/1端口的接入类型为接入端口即accessports.)CY3C_HTLZYQ_P6ZHSA(config-if)#switchportaccessvlan+n((把此端口即接入端口划分到vlann中,n为vlan号)按回车键EnterCY3C_HTLZYQ_P6ZHSA(config-if-range)#noshutdown或者CY3C_HTLZYQ_P6ZHSA(config)#interfacerange+端口【(比如FO/5-10)把多个端口同时划分到一个Vlan内】CY3C_HTLZYQ_P6ZHSA(config-if-range)#switchportmodeaccessCY3C_HTLZYQ_P6ZHSA(config-if-range)#switchportaccessVlan+n(n代表Vlan编号正常范围2—1000)按回车键EnterCY3C_HTLZYQ_P6ZHSA(config-if-range)#noshutdown8、配置交换机远程密码配置交换机远程密码CY3C_HTLZYQ_P6ZHSA(config)#linevty05CY3C_HTLZYQ_P6ZHSA(config-line)#passwordcisco(配置用户密码:cisco)CY3C_HTLZYQ_P6ZHSA(config-line)#loginCY3C_HTLZYQ_P6ZHSA#write(进行配置保存,避免交换机断电后配置消失)9、一些查看交换机的简单命令一些查看交换机的简单命令(1):showrun查看交换机配置信息(2):showVlan查看Vlan详细信息(3):showipinterfacebrief查看接口信息(4):showcdpnerghbors显示直连的相邻cisco设备及其详细信息(5):showcdpneighborsdetail显示ip地址和IOS版本和类型,并且包括showcdpneighbor命令的所有信息。
实验二 网络设备的基本配置

ip address IP地址 子网 配置指定接口IP地址 掩码
no shutdown 激活指定的接口
模式
#
# # #
命令 show running-config copy running-config tftp copy tftp running-config
功能
查看运行配置文件
保存运行配置文件到 TFTP服务器
回答问题
1、记录你所使用交换机的品牌、型号、接口数量和接口 类型。
2、如果不对交换机做配置,连接在其上的计算机之间能 否通信?
3、想要进行远程登录配置,前提条件是什么?
附录1:网络命令行工具
1、ipconfig:查看本机IP地址、子网掩码等信息。 2、ipconfig/all:查看详细信息。 3、ping IP地址:测试网络连通性。 4、telnet IP地址:远程登录交换机等设备。
#
从TFTP服务器回传配置 文件 ping IP地址 测试连通性 show mac-address-table 查看交换机的MAC地址 address 表
1号实验台(1号机柜)
PC1
Switch
第一组 console
RCMS
PC2 http://192.168.1.3:8080 PC3 Switch
3、实验过程中要尽量减少对接头的插拔,保护设 备接口。
4、请不要使用U盘等移动存储设备。
Switch
第一组 console
RCMS
PC2 http://192.168.1.6:8080 PC3 Switch
控制台 192.168.1.*/24
PC1
控制台
192.168.1.*/24
第二组
Cisco配置命令大全

Cisco配置命令大全1. switch配置命令(1)模式转换命令用户模式----特权模式,使用命令"enable"特权模式----全局配置模式,使用命令"configt"全局配置模式----接口模式,使用命令"interface+接口类型+接口号"全局配置模式----线控模式,使用命令"line+接口类型+接口号"注:用户模式:查看初始化的信息.特权模式:查看所有信息、调试、保存配置信息全局模式:配置所有信息、针对整个路由器或交换机的所有接口接口模式:针对某一个接口的配置线控模式:对路由器进行控制的接口配置(2)配置命令show running config 显示所有的配置show versin 显示版本号和寄存器值shut down 关闭接口no shutdown 打开接口ip add +ip地址配置IP地址secondary+IP地址为接口配置第二个IP地址show interface+接口类型+接口号查看接口管理性show controllers interface 查看接口是否有DCE电缆show history 查看历史记录show terminal 查看终端记录大小hostname+主机名配置路由器或交换机的标识config memory 修改保存在NVRAM中的启动配置exec timeout 0 0 设置控制台会话超时为0service password-encryptin 手工加密所有密码enable password +密码配置明文密码ena sec +密码配置密文密码line vty 0 4/15 进入telnet接口password +密码配置telnet密码line aux 0 进入AUX接口password +密码配置密码line con 0 进入CON接口password +密码配置密码bandwidth+数字配置带宽no ip address 删除已配置的IP地址show startup config 查看NVRAM中的配置信息copy run-config atartup config 保存信息到NVRAMwrite 保存信息到NVRAMerase startup-config 清除NVRAM中的配置信息show ip interface brief 查看接口的谪要信息banner motd # +信息 + # 配置路由器或交换机的描素信息description+信息配置接口听描素信息vlan database 进入VLAN数据库模式vlan +vlan号+ 名称创建VLANswitchport access vlan +vlan号为VLAN为配接口interface vlan +vlan号进入VLAN接口模式ip add +ip地址为VLAN配置管理IP地址vtp+service/tracsparent/client 配置SW的VTP工作模式vtp +domain+域名配置SW的VTP域名vtp +password +密码配置SW的密码switchport mode trunk 启用中继no vlan +vlan号删除VLANshow spamming-tree vlan +vlan号查看VLA怕生成树议2. 路由器配置命令ip route+非直连网段+子网掩码+下一跳地址配置静态/默认路由show ip route 查看路由表show protocols 显示出所有的被动路由协议和接口上哪些协议被设置show ip protocols 显示了被配置在路由器上的路由选择协议,同时给出了在路由选择协议中使用的定时器等信息router rip 激活RIP协议network +直连网段发布直连网段interface lookback 0 激活逻辑接口passive-interface +接口类型+接口号配置接口为被动模式debug ip +协议动态查看路由更新信息undebug all 关闭所有DEBUG信息router eigrp +as号激活EIGRP路由协议network +网段+子网掩码发布直连网段show ip eigrp neighbors 查看邻居表show ip eigrp topology 查看拓扑表show ip eigrp traffic 查看发送包数量router ospf +process-ID 激活OSPF协议network+直连网段+area+区域号发布直连网段show ip ospf 显示OSPF的进程号和ROUTER-IDencapsulation+封装格式更改封装格式no ip admain-lookup 关闭路由器的域名查找ip routing 在三层交换机上启用路由功能show user 查看SW的在线用户clear line +线路号清除线路3. 三层交换机配置命令配置一组二层端口configure terminal 进入配置状态nterface range {port-range} 进入组配置状态配置三层端口configureterminal 进入配置状态interface {{fastethernet | gigabitethernet} interface-id} | {vlan vlan-id} |{port-channel port-channel-number} 进入端口配置状态no switchport 把物理端口变成三层口ip address ip_address subnet_mask 配置IP地址和掩码no shutdown 激活端口例:Switch(config)# interface gigabitethernet0/2Switch(config-if)# no switchportSwitch(config-if)# ip address 192.20.135.21 255.255.255.0Switch(config-if)# no shutdown配置VLANconfigure terminal 进入配置状态vlan vlan-id 输入一个VLAN号, 然后进入vlan配态,可以输入一个新的VLAN号或旧的来进行修改。
网络管理员试题2和3带答案
试题一(15)阅读以下说明,回答问题1至问题3,将解答填入答题纸对应的解答栏内。
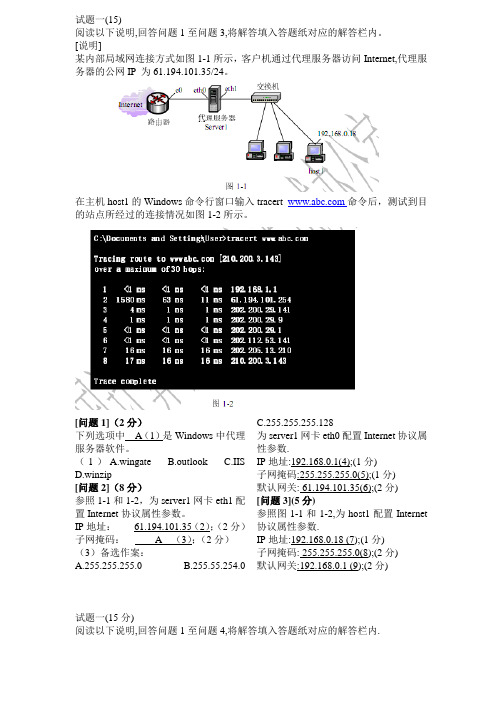
[说明]某内部局域网连接方式如图1-1所示,客户机通过代理服务器访问Internet,代理服务器的公网IP 为61.194.101.35/24。
在主机host1的Windows命令行窗口输入tracert 命令后,测试到目的站点所经过的连接情况如图1-2所示。
[问题1](2分)下列选项中A(1)是Windows中代理服务器软件。
(1)A.wingate B.outlook C.IIS D.winzip[问题2](8分)参照1-1和1-2,为server1网卡eth1配置Internet协议属性参数。
IP地址:61.194.101.35(2);(2分)子网掩码: A (3);(2分)(3)备选作案:A.255.255.255.0B.255.55.254.0C.255.255.255.128为server1网卡eth0配置Internet协议属性参数.IP地址:192.168.0.1(4);(1分)子网掩码:255.255.255.0(5);(1分)默认网关: 61.194.101.35(6);(2分)[问题3](5分)参照图1-1和1-2,为host1配置Internet 协议属性参数.IP地址:192.168.0.18 (7);(1分)子网掩码: 255.255.255.0(8);(2分)默认网关:192.168.0.1 (9);(2分)试题一(15分)阅读以下说明,回答问题1至问题4,将解答填入答题纸对应的解答栏内.[说明]某办公室一台主机host1接入Internet,其TCP/IP协议属性如图1-1所示.在没有增加公网IP地址的情况下,增加几台主机共享连接接入Internet,拓扑结构如图1-2所示,host1 eth0网卡的Internet协议属性如图1-3所示.[问题1](3分)为了保证其他主机能接入Internet,如图1-4所示的host1 eth1 网卡”Internet连接共享”应如何选择?解:勾选”允许其他网络用户通过此计算机的Internet连接来连接”后,左键单击”确定”即可.[问题2](4分)请为图1-2中eth1网卡配置Internet协议属性参数.IP地址: 61.168.112.198(1);子网掩码: 255.255.255.0(2);默认网关: 61.168.112.254(3);首选DNS服务器: 210.113.112.31(4). [问题3](6分) 请为图1-2中host2配置Internet协议属性参数.IP地址: 192.168.0.2_——192.168.0.254(5);(范围)(2分)子网掩码:255.255.255.0 (6);(1分)默认网关: 192.168.0.1(7);(1分)首选DNS服务器:210.113.112.31 (8).(2分)[问题4](2分)若host2的IP地址设为192.168.0.188,其发送到Internet上的IP数据包的源IP地址为61.168.112.198(9).试题二(15分)某局域网的IP地址为202.117.12.0/24,网络结构如图2-1所示.采用DHCP服务器自动分配IP地址,其中DHCPServer2的地址池为202.117.12.3——202.117.12.128.图2-2和图2-3分别是DHCPServer中DHCPServer1中DHCP服务器安装时分配IP地址的范围窗口和添加排除窗口.图2-4是DHCPServer1中DHCP服务器安装时路由器(默认网关)窗口.[问题1](4分)PC1首次启动时,会向网络发出一个 A (1)数据包来表达IP租用请示,PC1通常采用C (2)提供的IP地址.(1)A.Dhcpdiscover B.Dhcpoffer C.Dhcprequest D.Dhcpdeclinf(2)A.DHCPServer1 B.DHCPServer2 C.响应包最先到达的DHCP服务器[问题2](3分)参照DHCPServer2的地址池分配方式,在图2-2中为DHCPServer1配置属性参数. 起始IP地址:202.117.12.130 (3);结束IP地址:202.117.12.254 (4);如果”长度”属性参数设置为24,则系统会自动设置的子网掩码为255.255.255.0(5). [问题3](2分)图2-3中的”起始IP地址”中填入202.117.12.198(6).[问题4](2分)图2-4中的IP地址参数应设置为:202.117.12.1 (7).[问题5](4分)PC1可能通过运行D (8)命令手工释放IP地址,运行 D (9)命令重新申请IP地址.(8)A.ipconfig /giveup B.ipconfig /release C.ipconfig /recall D.ipconfig /renew(9)A.ipconfig /giveup B.ipconfig /release C.ipconfig /recall D.ipconfig /renew试题一(15分)阅读以下说明,回答问题1至问题4,将解答填入答题纸对应的解答栏内。
2 交换机基本配置

实训2 交换机基本配置一、实训目的1.掌握交换机的基础配置命令2.熟悉交换机端口配置3.能进行交换机端口安全配置二、实验逻辑图图2-1 实训逻辑图三、实验内容及步骤1.交换机基础配置(1)配置交换机主机名Switch# configure terminalSwitch(config)# hostname XXX注:在工程中名称一般命名为交换机所处建筑物位置和型号这样的名字。
(2)为log和debug设置时间戳Switch(config)# service timestamps debug uptimeSwitch(config)# service timestamps log uptime(3)禁止DNS查询Switch(config)# no ip domain-lookup(4)设置虚拟终端线路vty及telnet登录参数Switch(config-line)# line vty 0 4Switch(config-line)#password XXXSwitch(config-line)# loginSwitch(config-line)# end2.配置交换机端口速率及双工模式Switch(config)# int f0/1Switch(config-if)# speed 100Switch(config-if)# duplex full //设置F0/1口为全双工接口Switch(config-if)# exitSwitch(config)# int range f0/2 -5Switch(config-if)# speed 10Switch(config-if)# duplex half //设置F0/1口为半双工接口Switch(config-if)# exitSwitch(config)# int range f0/6 , f0/9Switch(config-if)# speed 100Switch(config-if)# duplex auto //设置F0/1口为自适应接口Switch(config-if)# endSwitch# show running-confit3.交换机端口安全配置Switch(config)# int f0/10Switch(config-if)# switchport mode access //设置接口为access模式Switch(config-if)# switchport port-security //开启端口安全Switch(config-if)# switchport port-security mac-address MAC地址//绑定MAC地址Switch(config-if)# endSwitch# show running-config4.保存所做的配置到启动配置文件Switch# copy running-config startup-configSwitch# show startup-config四、实训调测及结果1.进入交换机后,查看其当前配置Switch>enableSwitch# show running-config显示结果为:2.进行实训中的配置步骤后查看交换机当前运行配置Switch# show running-config显示结果为:(与前面显示不同处设置为蓝色)Building configuration...Current configuration : 1204 bytes!version 12.1no service timestamps log datetime msecno service timestamps debug datetime msecno service password-encryption!hostname hngy!enable secret 5 $1$mERr$AqLQG3PAfePeBA Vl5rJeQ1!no ip domain-lookupspanning-tree mode pvst !interface FastEthernet0/1 duplex fullspeed 100!interface FastEthernet0/2 duplex halfspeed 10!interface FastEthernet0/3 duplex halfspeed 10!interface FastEthernet0/4 duplex halfspeed 10!interface FastEthernet0/5 duplex halfspeed 10!interface FastEthernet0/6 speed 100!interface FastEthernet0/7 !interface FastEthernet0/8 !interface FastEthernet0/9 speed 100!interface FastEthernet0/10 !interface FastEthernet0/11 !interface FastEthernet0/12 !interface FastEthernet0/13interface FastEthernet0/14!interface FastEthernet0/15!interface FastEthernet0/16!interface FastEthernet0/17!interface FastEthernet0/18!interface FastEthernet0/19!interface FastEthernet0/20!interface FastEthernet0/21!interface FastEthernet0/22!interface FastEthernet0/23!interface FastEthernet0/24!interface Vlan1ip address 192.168.1.1 255.255.255.0 !!line con 0!line vty 0 4password hngyloginline vty 5 15login!!end3.查看启动配置文件Switch# show startup-configstartup-config is not present4.保存所做的配置到启动配置文件Switch# copy running-config startup-configSwitch# show startup-config与你前面的配置哪一步相同?第二步5.配置交换机端口速率及双工模式Switch# show running-confit将显示结果中f0/1、f0/2、f0/3、f0/4、f0/5、f0/6、f0/9端口的显示行复制:!interface FastEthernet0/1duplex fullspeed 100!interface FastEthernet0/2duplex halfspeed 10!interface FastEthernet0/3duplex halfspeed 10!interface FastEthernet0/4duplex halfspeed 10!interface FastEthernet0/5duplex halfspeed 10interface FastEthernet0/6speed 100!interface FastEthernet0/7!interface FastEthernet0/8!interface FastEthernet0/9speed 1006.交换机端口安全配置Switch(config)# int f0/10Switch(config-if)# switchport mode accessSwitch(config-if)# switchport port-securitySwitch(config-if)# switchport port-security mac-address MAC地址Switch(config-if)# endSwitch# show running-config将显示结果中f0/10端口的显示行复制:interface FastEthernet0/1duplex fullspeed 100!interface FastEthernet0/2duplex halfspeed 10!interface FastEthernet0/3duplex halfspeed 10!duplex halfspeed 10!interface FastEthernet0/5duplex halfspeed 10!interface FastEthernet0/6speed 100!interface FastEthernet0/7!interface FastEthernet0/8!interface FastEthernet0/9speed 100!interface FastEthernet0/10switchport mode accessswitchport port-security五、实训思考作为一个网络管理员,常常是将交换机的基础配置先写在一个文本文件中(.txt文件),配置时再将该文件中的内容粘贴到交换机中去,运行后再将运行配置拷贝到启动配置文件。
Vlan的配置方法
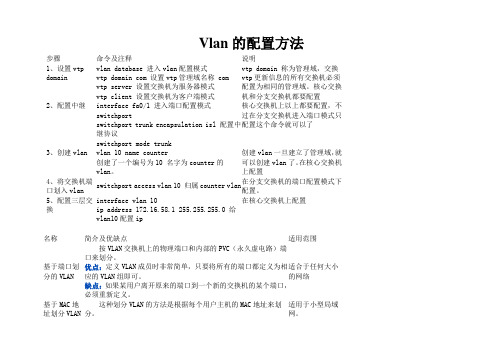
Vlan的配置方法步骤命令及注释说明1、设置vtp domain vlan database 进入vlan配置模式vtp domain com 设置vtp管理域名称 comvtp server 设置交换机为服务器模式vtp client 设置交换机为客户端模式vtp domain 称为管理域,交换vtp更新信息的所有交换机必须配置为相同的管理域。
核心交换机和分支交换机都要配置2、配置中继interface fa0/1 进入端口配置模式switchportswitchport trunk encapsulation isl 配置中继协议switchport mode trunk 核心交换机上以上都要配置,不过在分支交换机进入端口模式只配置这个命令就可以了3、创建vlan vlan 10 name counter创建了一个编号为10 名字为counter的vlan。
创建vlan一旦建立了管理域,就可以创建vlan了。
在核心交换机上配置4、将交换机端口划入vlan switchport access vlan 10 归属counter vlan在分支交换机的端口配置模式下配置。
5、配置三层交换interface vlan 10ip address 172.16.58.1 255.255.255.0 给vlan10配置ip在核心交换机上配置常见的VLAN配置类型名称简介及优缺点适用范围基于端口划分的VLAN按VLAN交换机上的物理端口和内部的PVC(永久虚电路)端口来划分。
优点:定义VLAN成员时非常简单,只要将所有的端口都定义为相应的VLAN组即可。
缺点:如果某用户离开原来的端口到一个新的交换机的某个端口,必须重新定义。
适合于任何大小的网络基于MAC地址划分VLAN 这种划分VLAN的方法是根据每个用户主机的MAC地址来划分。
适用于小型局域网。
优点:当用户物理位置从一个交换机换到其他的交换机时,VLAN 不用重新配置。
2 网络设备的配置

switch(config)#hostname xx
switch(config)#banner motd & switch(config-if)#speed 100 switch(config-if)#no shutdown
全局配置模式
全局配置模式 端口模式 日提示信息,&为终止符 配置端口速率为100Mbps 开启端口,使端口转发数据
2.远程配置方式
本地配置需要使用专门的Console端口进行,远程配置 则可通过交换机的普通端口进行。如果是堆叠型的, 也可以把几台交换机堆在一起进行配置,这时它们实 际上是一个整体,一般只有一台交换机具有网管能力。 同时,远程配置方式中不再需要超级终端软件,而是 以Telnet程序或Web浏览器方式实现与被管理交换机的 通信。 因为本地配置方式中已为交换机配置好了IP地址,所 以可以通过IP地址与交换机进行通信。
全局配置模式 显示当前模式下的所有可执行 命令
端口模式 端口模式 端口模式 特权模式 配置端口的IP地址 配置端口的时钟频率 配置端口的带宽速率 查看端口的IP协议相关属性
从一个模式退回到上一级模式时,使用退出命令exit。 直接退到特权模式的命令为end。
部分交换机的基本配置命令
基本配置命令 switch>? switch#show running-config switch#show version switch#show mac-address-table switch#show interface fa0/3 配置模式 用户模式 特权模式 特权模式 特权模式 特权模式 说明 显示当前模式下所有的可执行命令 查看交换机当前生效的配置信息 查看交换机版本信息 查看交换机当前的MAC地址表信 息 查看端口配置信息
华为交换机动态链路聚合命令
华为交换机动态链路聚合命令华为交换机动态链路聚合命令一、动态链路聚合简介动态链路聚合(Dynamic Link Aggregation,DLA)是一种将多个物理链路绑定成一个逻辑链路的技术。
通过将多个物理链路绑定成一个逻辑链路,可以提高网络带宽、提高网络可靠性和实现负载均衡等功能。
在华为交换机中,动态链路聚合可以通过LACP协议实现。
LACP协议是一种标准化的协议,可以实现交换机之间的动态链路聚合。
二、配置动态链路聚合命令1. 创建Link Aggregation Group(LAG)在华为交换机中创建Link Aggregation Group需要使用以下命令:[Switch] interface gigabitethernet 0/0/1[Switch-GigabitEthernet0/0/1] port link-aggregation group 1[Switch-GigabitEthernet0/0/1] quit其中,gigabitethernet 0/0/1表示需要绑定的物理接口,group 1表示创建的LAG编号。
2. 配置LAG属性创建好LAG后,还需要对LAG进行属性配置。
以下是常用的LAG属性配置命令:[Switch] interface Eth-Trunk 1[Switch-Eth-Trunk1] mode lacp-static[Switch-Eth-Trunk1] lacp priority 32768[Switch-Eth-Trunk1] quit其中,mode lacp-static表示LAG使用静态LACP模式,lacp priority 32768表示LAG的优先级为32768。
3. 配置物理接口将物理接口绑定到LAG上需要使用以下命令:[Switch] interface gigabitethernet 0/0/2[Switch-GigabitEthernet0/0/2] quit4. 查看LAG状态查看创建好的LAG状态需要使用以下命令:[Switch] display link-aggregation summary其中,可以查看到LAG的编号、状态、绑定的物理接口等信息。
- 1、下载文档前请自行甄别文档内容的完整性,平台不提供额外的编辑、内容补充、找答案等附加服务。
- 2、"仅部分预览"的文档,不可在线预览部分如存在完整性等问题,可反馈申请退款(可完整预览的文档不适用该条件!)。
- 3、如文档侵犯您的权益,请联系客服反馈,我们会尽快为您处理(人工客服工作时间:9:00-18:30)。
running-config:Switch#SH RUBuilding configuration...Current configuration : 1234 bytes!version 12.2no service timestamps log datetime msec no service timestamps debug datetime msec no service password-encryption!hostname Switch!enable password 123!!spanning-tree mode pvstspanning-tree vlan 30 priority 4096!interface FastEthernet0/1switchport mode trunk!interface FastEthernet0/2!interface FastEthernet0/3!interface FastEthernet0/4!interface FastEthernet0/5!interface FastEthernet0/6!interface FastEthernet0/7!interface FastEthernet0/8!interface FastEthernet0/9!interface FastEthernet0/10!interface FastEthernet0/11!interface FastEthernet0/12!interface FastEthernet0/13!interface FastEthernet0/14!interface FastEthernet0/15!interface FastEthernet0/16!interface FastEthernet0/17!interface FastEthernet0/18!interface FastEthernet0/19!interface FastEthernet0/20!interface FastEthernet0/21!interface FastEthernet0/22!interface FastEthernet0/23 switchport mode trunk!interface FastEthernet0/24 switchport mode trunk!interface GigabitEthernet1/1!interface GigabitEthernet1/2!interface Vlan1ip address 17.11.6.83 255.255.255.240 !ip default-gateway 17.11.6.94!!line con 0!line vty 0 4password 456loginline vty 5 15password 456login !! endSwitch#sh vtp staVTP Version : 2Configuration Revision : 4Maximum VLANs supported locally : 255Number of existing VLANs : 9VTP Operating Mode : ClientVTP Domain Name : ciscoVTP Pruning Mode : DisabledVTP V2 Mode : DisabledVTP Traps Generation : DisabledMD5 digest : 0xD7 0x17 0xDB 0x06 0xE5 0x50 0xCA 0x19 Configuration last modified by 0.0.0.0 at 3-1-93 00:00:30Switch#sh spaVLAN0001Spanning tree enabled protocol ieeeRoot ID Priority 4097Address 0090.2177.112ACost 19Port 24(FastEthernet0/24)Hello Time 2 sec Max Age 20 sec Forward Delay 15 secBridge ID Priority 32769 (priority 32768 sys-id-ext 1)Address 00D0.FF81.D8A0Hello Time 2 sec Max Age 20 sec Forward Delay 15 secAging Time 20Interface Role Sts Cost Prio.Nbr Type---------------- ---- --- --------- -------- --------------------------------Fa0/1 Desg FWD 19 128.1 P2pFa0/23 Desg FWD 19 128.23 P2pFa0/24 Root FWD 19 128.24 P2pVLAN0010Spanning tree enabled protocol ieeeRoot ID Priority 4106Address 0090.2177.112ACost 19Port 24(FastEthernet0/24)Hello Time 2 sec Max Age 20 sec Forward Delay 15 secBridge ID Priority 32778 (priority 32768 sys-id-ext 10)Address 00D0.FF81.D8A0Hello Time 2 sec Max Age 20 sec Forward Delay 15 secAging Time 20Interface Role Sts Cost Prio.Nbr Type---------------- ---- --- --------- -------- --------------------------------Fa0/1 Desg FWD 19 128.1 P2pFa0/23 Desg FWD 19 128.23 P2pFa0/24 Root FWD 19 128.24 P2pVLAN0020Spanning tree enabled protocol ieeeRoot ID Priority 4116Address 0090.2177.112ACost 19Port 24(FastEthernet0/24)Hello Time 2 sec Max Age 20 sec Forward Delay 15 secBridge ID Priority 32788 (priority 32768 sys-id-ext 20)Address 00D0.FF81.D8A0Hello Time 2 sec Max Age 20 sec Forward Delay 15 secAging Time 20Interface Role Sts Cost Prio.Nbr Type---------------- ---- --- --------- -------- --------------------------------Fa0/1 Desg FWD 19 128.1 P2pFa0/23 Desg FWD 19 128.23 P2pFa0/24 Root FWD 19 128.24 P2pVLAN0030Spanning tree enabled protocol ieeeRoot ID Priority 4126Address 00D0.FF81.D8A0This bridge is the rootHello Time 2 sec Max Age 20 sec Forward Delay 15 secBridge ID Priority 4126 (priority 4096 sys-id-ext 30)Address 00D0.FF81.D8A0Hello Time 2 sec Max Age 20 sec Forward Delay 15 secAging Time 20Interface Role Sts Cost Prio.Nbr Type---------------- ---- --- --------- -------- --------------------------------Fa0/1 Desg FWD 19 128.1 P2pFa0/23 Desg FWD 19 128.23 P2pFa0/24 Desg FWD 19 128.24 P2pVLAN0040Spanning tree enabled protocol ieeeRoot ID Priority 4136Address 00E0.B062.1925Cost 19Port 23(FastEthernet0/23)Hello Time 2 sec Max Age 20 sec Forward Delay 15 secBridge ID Priority 32808 (priority 32768 sys-id-ext 40)Address 00D0.FF81.D8A0Hello Time 2 sec Max Age 20 sec Forward Delay 15 secAging Time 20Interface Role Sts Cost Prio.Nbr Type---------------- ---- --- --------- -------- --------------------------------Fa0/1 Desg FWD 19 128.1 P2pFa0/23 Root FWD 19 128.23 P2pFa0/24 Altn BLK 19 128.24 P2p。