西铁城光动能手表说明书_英文
西铁城citizen光波表使用说明
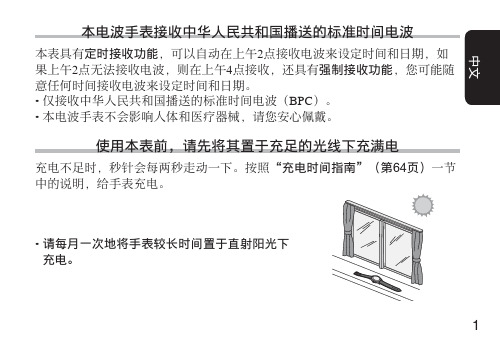
充电不足时,秒针会每两秒走动一下。按照“充电时间指南”(第64页)一节 中的说明,给手表充电。
• 请每月一次地将手表较长时间置于直射阳光下 充电。
1
部件名称(1:有计算尺表圈的机型)
功能针 (星期、记时器分钟, 记时器1/20秒)
RX:接收就绪
(B)钮
NO:接收状态 时针
充电须知........................................................................................ 66 充电电池处理方法 ......................................................................... 67 更换充电电池................................................................................. 67 15.疑难排解........................................................................................ 68 <电波接收功能> ............................................................................. 68 <光动能(Eco-Drive)> ................................................................. 69 16.注意事项........................................................................................ 70 17.规格 ............................................................................................... 76
西铁城citizen光波表使用说明
充电不足时,秒针会每两秒走动一下。按照“充电时间指南”(第64页)一节 中的说明,给手表充电。
• 请每月一次地将手表较长时间置于直射阳光下 充电。
1
部件名称(1:有计算尺表圈的机型)
功能针 (星期、记时器分钟, 记时器1/20秒)
RX:接收就绪
(B)钮
NO:接收状态 时针
A. 设定时间.................................................................................. 36 B. 设定日期.................................................................................. 38 10.检查和校正基准位置...................................................................... 42 A. 检查基准位置 .......................................................................... 42 B. 校正基准位置........................................................................... 44 使用计算尺表圈................................................................................... 47
9
每个模式的操作 5. 切换模式........................................................................................ 26 6. 使用记时器 .................................................................................... 28 7. 设定当地时间/日光节约时间 ......................................................... 30 8. 使用闹铃........................................................................................ 34 9. 手动设定时间和日期...................................................................... 36
西铁城说明书

要遵守的事项分为如下几个类型并用如下标记指示(下表列出其中两个图• 标)。
简体中文下面对必须始终遵守的安全防范事项加以说明,以免发生佩戴者或他人伤害以及财产损坏事故。
安全防范:请务必遵守对因忽视所提醒事项而导致的伤害或损失的程度,进行了分类并使用下列标• 记加以指示。
简体中文故障检修秒针每两秒走动一下。
第6页14页目录故障检修 ..................................................................1部件识别.....................................................................2手表充电.....................................................................4设定时间.....................................................................8设定日期.....................................................................10使用计时器 ...............................................................12注意事项.....................................................................16规格 (26)简体中文简体中文着装掩盖手表时,可能会限制光线充分照射表面,从而导致充电不足。
请避免在高温条件(约60°C 以上)下对手表进行充电。
本表使用内置充电电池来储存电能。
使表盘接受直射阳光或荧光灯等光源的照射,对手表进行充电。
为保证最佳性能,请务必执行下列操作。
CITIZEN手表使用说明书

关于充电本款手表内部装有可以储蓄电能的充电电池。
利用直射日光和荧光灯等照在手表文字表盘上的光进行充电。
如何舒适地使用本手表为了足够舒适地使用本手表,请按照如下内容进行操作。
·每个月一次长时间让直射日光照射5~6个小时,进行充电。
·将手表摘下之后,放在太阳光可以照射到的窗边等明亮的地方。
·想要把表放在没有日光照射的地方长期保管时,请在保管前给手表充满电。
此外,手表如隐藏在衣服等不能获得日光照射地方时,请注意此时手表不能得到充分的充电。
在高温情况下(约60℃以上)请不要为手表充电。
Page49如果充电不足(充电警告功能)如果发生充电不足的情况,“充电警告功能”就会开始工作,秒针每2秒就会晃动(2秒运针)。
这时请让光照在表盘的文字板上进行充电。
·短暂充电之后,秒针就会变得每1秒晃动了。
·2秒运针情况持续6天以上,手表就会因充电不足而停止运转。
注意发生2秒运针情况的时候,虽然可以表示时间,但是不能正常运行各种设定、确认、计时器(秒表)和闹钟的操作了。
另外,闹钟的响铃也不能发出响声了。
Page50各种环境下的大致充电时间机模式时)Page51节能省电功能放在箱子等暗处保管手表时,如果7天以上持续不让手表的表盘文字板接受光的照射的情况下,分针和秒针自动停止,抑制内设电池的消耗。
此时,表针虽然停止工作,但是手表还在继续工作。
·手表转动轴的位置置于1或2位置时,节能省电功能无法工作。
如何解除节能省电功能表盘文字板接受到光的照射开始充电时,节能省电功能即可解除,手表表示为时间和日历。
遇到疑难情况时全部重新设置(恢复出厂值)在手表工作不稳定等情况下,可以对所有设定进行重设。
电量不足时,请您事先进行充电。
1.将手表的转动轴置于1位置计时器(秒表)的表针,显示为夏令时设定。
2.旋转表轴,将城市设定为“UTC”(世界协定时间)·如图所示城市名表示在中央位置。
西铁城光动能0870款说明书_ebook

FEATURESThis watch is a multi-hands analog solar watch with alarm and chronograph functions, and a solar power function as its base which provides the powersource for the watch’s hands movement and alarm sound by converting solar energy into electrical power with the solar cell fitted on its face.Please refer to the diagram on the left when reading this instruction manual.ⅥFUNCTIONS OF SOLAR POWERED WATCH These functions are only found in the solar power watch. If the watch becomes insufficiently charged, a warning comes into operation and the display changes, as below.Insufficient Charge Warning FunctionIf the watch is put in the undercharged state during any display mode, it switches to the time display when in the other display modes, then the second hand moves to the ᮡCHARGE position, indicating the shortage of electricity. (Electric power shortage warning display) Even then, the time (hour, minute and24-hour hands) runs accurately.* The alarm does not ring even if it is set.* If the chronograph is being used, measurement stops and it is reset.* The push button does not function.Refer to, “ⅥIn These Cases”. Stop Warning FunctionIf the watch is left intact in the undercharged state, about 5 days later the second hand will move to the ᮡSTOP position, indicating that the watch hasstopped due to electric power shortage. (Stop warning display) The other hands (hour, minute and 24-hands) also stop.* In this condition, all functions stop.Refer to, “ⅥIn These Cases”. Time Setting Warning FunctionWhen the watch is recharged by exposing it to light after once stopped, the second hand moves to the ᮡSET position, indicating that the watch does not keep correct time. (Time setting warning display)* The hour, minute and 24-hour hands run at the incorrect time.Refer to, “ⅥIn These Cases”. Overcharge Prevention FunctionYou can recharge without worry.When the secondary battery is fully recharged, the overcharging prevention function works so that the secondary battery is not overcharged.Ⅵ NOTES ON USEPlease take care to charge your watch during use. Please note that if you wear long sleeves, the watch can easily become insufficiently charged because it is hidden and not exposed to light.• When you take off the watch, try to place it in as bright a place as possible, and it will always continue to run properly.CAUTIONNever use another battery apart from the secondary battery (Titanium Lithium Ion Battery) used in this watch.The watch structure is so designed that a different kind of battery other than that specified cannot be used to operate it. However, in case a different battery such as a silver battery is used by some chance, there is a danger that it will be overcharged to burst, causing damage to the watch and even the human body.When you replace the secondary battery, be sure to use a designated secondary battery.NOTES ON CHARGING• The watch will be damaged during recharging if it gets too hot (over about 60ЊC/140ЊF). Avoid recharging at high temperatures.(eg) Charging the watch near a light source that easily becomes hot, such as an incandescentlamp or a halogen lamp.Charging in a place that easily becomes hotsuch as a dashboard.• Note that full charging is difficult in a place irradiated by only weak light.• When you charge the watch by an incandescent lamp, take a distance about 50cm (20in.) from the light source to prevent extremely high temperature.Ⅵ NAMES OF PARTSPlease see the watch illustration at the beginning.➇: If the second hand moves to ᮡCHARGE position, this shows that the Insufficient ChargeWarning function is operating.➈: If the second hand moves to ᮡSTOP position, this shows that the Stop Warning Function isoperating.➉: If the second hand moves to ᮡSET position, this shows that the Time Setting Warning function is operating.Ⅵ TIME REQUIRED FOR CHARGINGTime required for recharge may vary according to the design (colour of the dial, etc.) and operating environment. The following table will serve you as a rough reference. *The recharging time is the time when the watch is continuously exposed to radiation.Full recharging time...The time from when watch (Empty to full)stopped to when it is fullyrecharged stopped.One day usage..........The recharging time requiredfor the watch to run for oneday.ⅥCHANGING THE MODESOther than the time display, this watch has alarm and chronograph main display functions.ⅥSETTING THE TIMECheck that the mode hand is indicating <TME> and the watch is in time mode.1. Pull the button ࠗM out, so that the second hand stops at the “0” position. When the watch is adjusted by button operation,the time setting is completed by electromagnetic correction.1.Time setting synchronizes the minute hand ➝hour hand ➝24-hour hand. When adjusting the hour hand, check the 24-hour hand position (am/pm).2.Set the time by pressing the button ࠗB or button ࠗC .Each time button ࠗB is pressed…The watch advances 1 minute in a clockwise direction.Each time button ࠗC is pressed…The watch turns back 1 minute in a counterclockwise direction.Depress button ࠗB or button ࠗC continuously, the hands move rapidly. turn the hands in the direction that is closest to the set time.3.After setting the time, push the button ࠗM to the normal position and the watch will start at the correct time.ⅥSETTING THE CALENDARPress button M to switch to calendar mode <CAL>.1. Pull button ࠗM out.2. Press button ࠗA to correct the month number.Correction can be made by advancing by one month each time button ࠗA is pressed.The month number can be read directly from the normal hour positions.2.(Example: 3:00 ➝March, 1:00 ➝January)Correction can be made rapidly by holding button ࠗA down.3. Press button ࠗB to correct the date.Correction can be made by advancing one day each time button ࠗB is pressed. The dateadvances one day when the function hand makes four turns. Correction can be made rapidly by holding button ࠗB down.4. Push button ࠗM in to the normal position.*Since the date and function hand are synchronized with each other, the function hand will turn at when correcting the date.*Date correction at the end of each month is not required. However, since February is set at 28days, date correction must be performed only for February in leap years.Leap Year Adjustment 1.Press button ࠗM to change the mode to <CAL>.2.Pull out the button M by one click.3.Press button ࠗC for more than two seconds to set/cancel the leap year.•The leap year is set if button ࠗC is continuously pressed when March 1 is displayed.•The leap year is cancelled if button ࠗC is continuously pressed when February 29 is displayed.4.Push button ࠗM back into normal position.*Once the leap year is set, February 29 is displayed once in every four years.Displays present time in hours, minutes, seconds and 24-hours.Use the 24-hour hand to confirm am/pm.Displays current date by second hand (month)and date. Since the date and function hand are syncronized with each other, the function hand will turn at when correcting the date.Display alarm set time.The alarm setting is in 1 minute. Confirm of am/pm with the 24-hour hand. If the alarm is ON, it will ring at the set time for 15 seconds once every day.Measures up to amaximum 60 minutes in 1/20 seconds, and displays split times. A confirmation rings when you start/stop or measure a split time.Each press of the M button changes Time <TME>➝Calendar <CAL> ➝Chronograph <CHR>.Confirm the change with the mode hand.After that it returns to the time <TME> display.ⅥUSING THE ALARMThe alarm sounds once a dayfor 15 seconds at the alarmtime set.Pressing any buttons ࠗA,ࠗB orࠗC stops the alarm ringing.Setting the AlarmAlarm setting is on a 24-hour system in 1 minute.The hands are moved thus: minute hand ➝hourhand➝24-hour hand.1.Press button ࠗM to set the mode hand to <ALM>and switch to the alarm mode.2.Pull button ࠗM out, to the alarm set time adjustingstate.3.Press button ࠗB orࠗC to set the minute, hour and24-hour hands to the desired time.•Each time button ࠗB is pressed…The watchadvances 1 minute in a clockwise direction.•Each time button ࠗC is pressed…The watch turnsback 1 minute in a counterclockwise direction.*Depress button ࠗB or button ࠗC continuously, thehands move rapidly.Switching the Alarm ON and OFFEach time button ࠗA is pressed in the alarm mode,the alarm switches ON and OFF.Alarm Sound MonitorOn the alarm mode (button ࠗM in normal position),pressing button ࠗA will sound the alarm for 5seconds.NOTE•There may be some variation in the volume ofthe alarm sound, depending on how much thesecond battery is charged.•The alarm sound volume gets rather lower in thedisplays other than the time display (calendar,alarm, chronograph, “0” position confirmation,and each display’s adjustment state).Once the alarm time has been set, use the watchnormally in time display mode.ⅥUSING THE CHRONOGRAPHChronograph measurement is taken in 1/20 (0.05)seconds and can continue for 60 minutes max. Over60 minutes, the watch enters the chronograph resetstate.Reading the Chronograph Hands•Function hand ➝Chrono minutes or Chrono 1/20seconds.* The function hand moves every one minute.Pressing button ࠗB while in chrono stop or splitdisplay, switches the function hand to showchrono 1/20 seconds.•Second hand ➝Chrono second hand.Chronograph MeasurementChronograph standard oraccumulated elapsed timemeasurement1. Press button ࠗM to set themode hand to <CHR> andget the chronograph display.At this time, the secondhand and the functionhand will return to the “0”position.*The hour, minute and 24-hour hands show thepresent time.2.Each time button ࠗA is pressed, it repeatedlystarts or stops the chronograph, along with aconfirmation sound.How to read each chronograph hand if themeasured time when the chronograph is stopped isover 1 minute.➀Read the number of minutes with the functionhand➁Read the number of seconds with the secondhand.➂While pressing button ࠗB continuously, the functionhand switches to 1/20 (0.05) second handmeasurement, so read the value at that time.When button ࠗB is released, the function handresumes showing chronograph minutes.3.While the chronograph is stopped state, pressingbuttonࠗC resets the function hand and thesecond hand to the 0 position.Chronograph Split MeasurementPressing button ࠗC during chronographmeasurement causes the chronograph split time toappear on display with a beep for confirmation.Press button ࠗC again, the next chronograph splittime is displayed, along with a confirmation sound.The split time display is automatically cancelledafter about 10 seconds, and the chronographreturns to the measurement state.During either chronograph split time display ormeasurement, pressing button ࠗA causes thechronograph stop to appear on display.In the chronograph stop state, pressing button ࠗCcauses the chronograph reset.* During split timemeasurement or whilesplit time display, eachtime you press button ࠗCthe next split time isdisplayed.ⅥIN THESE CASESWhen shown the Insufficient Charge WarningDisplayIf the watch is put in the underchargedstate during any display mode, itswitches to the time display when inother display modes, then the secondhand moves to the ᮡCHARGEposition, indicating insufficientlycharged.In such a case, expose the watch to sufficient lightfor the warning state to be cancelled. (The secondhand returns to 1 second movement)It takes about 30 minutes to complete charging;from starting to expose the watch to light until thiswarning state is cancelled. The charging time variesdepending on the light (light source) that radiatesover the watch.When Shown the Stop Warning DisplayIf the watch is left intact in theundercharged state, about 5 dayslater the second hand will move totheᮡSTOP position, indicating thatthe watch has stopped due toinsufficient recharge.* All functions are stopped in this state.In such a case, expose the watch to sufficient lightfor the warning state to be cancelled.After carrying out sufficient charging, it is necessaryto reset the alarm time.When Shown the Time Setting Warning DisplayIf you expose a watch which hasstopped once to light and recharge it,the second hand will move to the ᮡSET position to let you know that thetime is incorrect.In such a case, readjust the hour,minute and 24-hour hands to keepthe correct time.Without adjusting the time hands after the watch isfully recharged, you cannot use such functions asalarm, chronograph, etc. properly.* Be careful because if the watch is not sufficientlycharged during the Time Setting Warning Displaystate, and if light is blocked from it, the secondhand will change to the ᮡSTOP position and thewatch will stop running.ⅥCHECKING AND ADJUSTING EACH HAND’S“0” POSITIONThe watch’s display may go wrong due to the effectof static electricity, strong shock, etc.In such a case, check and adjust the “0” postion ofeach of the following hands.“0” Position Checking1.Press button ࠗM to set themode hand at <CHR> positionfor chronograph function.2.Pull out button ࠗM by one clickand check to see if each hour,minute, second, 24-hour andfunction hands quickly movesto “0” position (12 o’clock position) while datehand quickly moves to “1” position.If any hand returns wrong out of the correctposition “0” or “1”, the watch needs [“0” positionadjustment].“0” Position Adjustment1.For adjusting the second handto “0” postion:•Press button ࠗA.2.For adjusting hour, minute and24-hour hands to “0” position:•Press button ࠗC.3.For adjusting date and functionhand to position “1” and “0” respectively:•Press button ࠗB.•“0” position for function hand is equivalent to12 o’clock position just after the date has beenset at “1” position.•With four turns of a function hand, date indicationis adjusted by a day.•If button ࠗA,ࠗC orࠗB is continuously pressed, thehand corresponding to the button moves quickly.4.When “0” position adjustment is complete, pushbuttonࠗM into the original position.*Make sure to reset time, calendar, alarm timecorrectly following “0” position adjustment.2.Avoid temperature extremesAvoid leaving your watch in extremely warm or cold locations for long periods of time.• This may cause your watch to gain or lose time and affect its other function.• The watch restores its original accuracy if it is placed in normal temperature.3.Avoid strong shockThis watch will withstand the bumps and jars normally incurred while playing and during sports activities.Avoid dropping your watch on the ground or subjecting the watch to severe shock which may cause malfunction or damage.4.Avoid strong magnetic fieldsKeep your watch out of the immediate vicinity of strong magnets. Generally, your watch is not affected by magnetic fields from such household appliances as television sets and stereo equipment.7.Keep your watch cleanIt may become difficult to pull out the crown due to dirt and dust getting caught between the crown and the watch case when the watch is worn for long periods of time. To help prevent this from happening, turn the crown freely back and forth occasionally while it is in the normal set position.Wipe off any water and moisture that adheres to the case, glass and band with a soft, clean cloth. Any dirt left on the case or band may cause skin rash.A watchband will easily become soiled with dust and perspiration because it is in direct contact with the skin. Even a stainless or gold-plated band may begin to corrode if it has not been cleaned for a long period of time.Mesh bands, because the meshes are very fine, will lose their particular “flexibility” if they are left soiled for a long time.Metal watch bands should be washed periodically to keep them looking beautiful at all times.Metal watchbands are usually washed with a brushⅥSPECIFICATIONS1.Type......................Multi-Hand Analog SolarPower Watch2.Caliber No.............0870/08753.Time Accuracy.......±20sec per month (temp.5°C/41°F to +35°C/95°F)4.Operational temperaturerange.....................-10°C ~ +60°C/14°F ~ 140°F 5.Display Functions:Time..............Hour, minute, second and24 hour handsCalendar.........Month, dateAlarm..............Hour, minute and 24-hourhands, alarm ON/OFFChronograph..Minute, second and 1/20(0.05) second hands6.Additional functions:Alarm..............Daily alarm (sounds for about15 seconds)Alarm monitor (Sounds forabout 5 seconds)Chronograph..Measurement is taken in 1/20seconds and for 60 minutesmax. (A beep for start/stop/splitconfirmation will sound whenthe associated button ispressed.)Insufficient Charge Warning FunctionStop Warning FunctionTime Setting Warning FunctionOvercharge Prevention Function7.Secondary BatteryUsed......................Titanium lithium ionsecondary batteryWater ResistanceThe water-resistant quality of our timepieces is offered in varying degrees depending on the model. This ranges from non-water resistant models to those suitable for SCUBA diving. Water resistance of our timepieces is measured in BAR or Barometric Pressure. Each BAR of pressure is equal to 14.5 pounds per square inch of pressure.Water resistance is measured when the watch is at a static, or motionless state. As the watch is moved in water, such as from the motion of swimming, pressure is added from velocity. While you may be swimming ina pool at surface level, the watch may be experiencing forces equal to that of 100 feet of water pressure(3 BAR). Diving into a pool can cause forces on the watch to exceed those pressures. As such, youshould always allow a margin of safety when exposing your watch to moisture. Never "push the limit" ofthe degree of water resistance of your timepiece.A primary factor to keep in mind about water resistance is that periodic maintenance is needed tomaintain original factory specifications for water resistance. When a watch is new, it meetsspecifications for water resistance as indicated on the case back. However, as the watch ages, the gaskets that seal the watch become dry and brittle, diminishing its water resistant quality. Exposure to environments such as chlorinated pools, salt water or soaps from showering can accelerate drying of the gaskets. We recommend that the gaskets be changed at least every 18 to 24 months to maintain the water resistant quality of your timepiece. If the watch is frequently exposed to chlorinated pools, soaps salt water, etc., we recommend that the gaskets be changed on a yearly basis.From time to time, you may notice condensation that appears then goes away after a short period of time. This is a normal occurrence and happens primarily from sudden temperature changes. When there are sudden temperature changes such as entering a cool building from the hot out of doors, or jumping into pool on a hot day the watch may fog. Conversely, if you go to the cold outdoors from a warm building, fogging may occur. As long as the fogging clears in a short period of time, there is no need for concern.Be sure the crown is completely pushed in prior to any contact with moisture. If your model is equipped with a screw down crown, be sure it is properly seated against the case. Do not operate the crown or any push button when the watch is wet as this may allow the entrance of moisture. . If at anytime, you notice moisture in your timepiece that does not clear in a short period of time, you should send your timepiece as soon as possible to the nearest Authorized Service Center for inspection.You can determine the level of water resistance of our watches from the markings on your case-back. Additionally, models that are water resistant to 100 or 200 meters have an indication on the dial as well. The case-backs and dials are normally marked as follows:The case back has no indication of water resistanceThis indicates the watch is a non water-resistant model and is not designed for contact with moisture at all. Caution should be exercised to avoid any contact with moisture, such as when washing your hands or from a rainstorm.“Water Resist”This watch is designed to withstand water from accidental splashing, such as from washing your hands or rain. Any submersion into water may result in the entrance of moisture.“Water Resist 10BAR” or “W.R. 10BAR”, Dial marked “WR100”This watch is designed to withstand water pressure up to 333 feet. This includes water exposure from accidental splashing and rain, but also from showering, swimming in a pool and snorkeling. Be sure to rinse the watch with fresh water after exposure to a chlorinated pool, salt water, soaps, etc. After rinsing with fresh water, be sure to dry the exterior with a soft cloth.“Water Resist 20BAR” or “W.R. 20BAR”, Dial marked “WR200”This watch is designed to withstand water pressure up to 666 feet. This includes all exposure to water up to and including recreational SCUBA diving. Be sure to rinse the watch with fresh water after exposure to a chlorinated pool, salt water, soaps, etc. After rinsing with fresh water, be sure to dry the exterior with a soft cloth.Special Note about Jacuzzis and Hot TubsThe various components used in the manufacture and assembly of your watch expand at various rates. This results in a loss of the sealing capabilities of gaskets, which may allow moisture to enter. In addition, heat from these sources can cause deformation of certain materials leading to mechanical failures. For these reasons, you should remove your watch before entering a hot tub or Jacuzzi.。
E870西铁城万年历光动能手表简易调时间说明
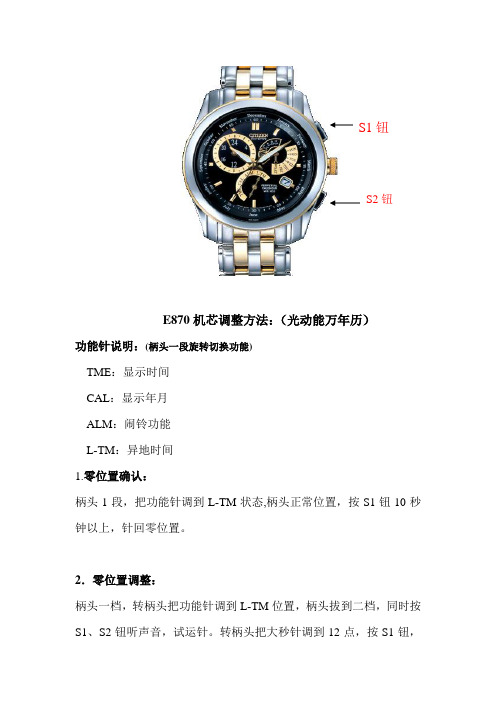
S1钮S2钮E870机芯调整方法:(光动能万年历)功能针说明:(柄头一段旋转切换功能)TME:显示时间CAL:显示年月ALM:闹铃功能L-TM:异地时间1.零位置确认:柄头1段,把功能针调到L-TM状态,柄头正常位置,按S1钮10秒钟以上,针回零位置。
2.零位置调整:柄头一档,转柄头把功能针调到L-TM位置,柄头拔到二档,同时按S1、S2钮听声音,试运针。
转柄头把大秒针调到12点,按S1钮,时分针摆动,转柄头把时分针调到12点,24小时针调到24正中间。
按S1钮,机能针动,转柄头把机能针调到日历1号第二圈的SUN上。
(正、反转都可以),柄头调回正常位置,大秒针一秒运针。
3.对时间调整:柄头一档,转柄头把功能针调到TME位置,柄头拔到二档,对到正常时间。
(注意上、下午,上午时间正转、下午时间反转)4.年月日调整:柄头一档,转柄头把功能针调到CAL位置,柄头拔到二档,机能针停在L.Y(润年)位置上,转柄头调到当年。
按S1钮,大秒针停在1点(1月)位置上,转柄头调到当月。
按S1钮,机能针停在SUN上,转柄头调到当前日期(正、反调都可以)。
按S1钮,机能针动一下,转柄头调到当前星期。
5.闹铃检查:柄头一档,转柄头把功能针调到ALM位置,时、分、秒针自动转到12点机能针停在OFF上,柄头推回正常位置,按S2钮,确认声音。
柄头二档,机能针停在ON位置,按S2钮,OFF与ON的转换。
6.时差调整:柄头一档,把功能针调到L-TM位置,时间会自动追赶到现在时间,柄头二段,轻轻旋转柄头正转快一小时,反转逆一小时。
西铁城光动能电波手表说明书
修理除了表带之外,本表的所有修理均应由西铁城进行以维持本表质量。
因为本表的修理、检查和调节需要特殊技术和设备。
手表需要修理或其他服务时,请与西铁城维修服务中心联系。
1本电波手表接收中华人民共和国播送的标准时间电波●仅接收中华人民共和国播送的标准时间电波(BPC)。
●本电波手表不会影响人体和医疗器械。
使用本表前,请先将其置于充足的光线下充满电充电不足时,秒针会每两秒走动一下。
按照“充电时间通用参考”(第44页)一节中的说明,给手表充电。
时间。
345本表不影响人体或医疗器械,可以无此顾虑地使用(手表不发射电波)。
◎本表是光动能(Eco-Drive)电波手表,具有将光能转换为电能来驱动手表的光电发电功能。
本表也具有节能功能,当表盘不受光线照射时减少手表的电能消耗。
◎本表具有「表针校正功能」,如果强烈撞击或磁力等外界因素导致手表不准确,可自动校正时间。
◎本表具有时差校正功能,便于在海外使用。
当前往不同时区的地区或国家时,该功能便于将手表设置为当地时间。
《螺丝锁定表把的操作步骤》《持续转动表针》快速持续转动表把(两下或多下)当表把在第一段或第二段时,请快速持续向右或向左转动表把(两下或多下)以持续转动表针(时针、分针或秒针)和日历(星期、日期)。
向右或向左转动表把一次(一下)以停止表针转动。
※转动表把时,指尖能感觉到轻微的卡嗒一声。
特征操作表把• •表把弹出一些至正常位置。
67【插图1∶以秒针短臂显示接收结果等的机型】【插图2∶以秒针长臂显示接收结果等的机型】*您所购买之手表与本手册中的插图可能会有所不同。
■部件名称■●本手册提供的操作说明基于以秒针短臂显示接收结果等的机型。
如果手表为以秒针长臂显示接收结果等的机型,使用本手册时请参考插图2。
接收程度/接收结果M、L)8■使用手表前请检查下列事项■【以秒针短臂显示接收结果等的机型】【以秒针长臂显示接收结果等的机型】M∶L∶/中低1011间和日期。
《接收步骤》●从手腕上取下手表,将其置于如窗子附近的易于接收电波信号的稳定平面上,并将9点位置(接收电波信号的天线)对准电波发讯基地台方向。
CITIZEN W770光动能手表 说明手册
• 该手表是光动能手表。
请将表盘接受光照且充满电后使用。
• W770 说明手册• 若要查看操作短片,请单击 PDF 上的图标。
组件识别指针和按钮1. 拉出柄头到位置 1。
秒针指向 30 秒位置并停止。
2. 旋转柄头以更改模式。
• 转动柄头以使模式指针稳固地指向期望模式的标记。
3. 推入柄头到位置 0 完成步骤。
手表根据所选模式更改显示。
• 可能需要稍等片刻手表才能完成显示更改。
1. 更改模式至 [TME] 或 [L-TM] 并推入柄头到位置 0。
2. 反复按下并释放右下方按钮 A ,直至功能指针指示剩余电量级别。
显示您可以在以下网站查看有关兼容的智能手机(运行 Android OS 5.1/iOS 9.3 或更高版本温馨提示,本商品适用于iPhone 5以上的机型。
)和专门应用程序的信息: /support/• 本款手表在一定程度上可通过专门应用程序操作,并且其部分功能仅可通过此应用程序使用。
注意在飞机等限制使用电子设备的场所,应终止与智能手机的连接,并将手表模式更改为 [CHR]。
时间信息接收本款手表可以从智能手机接收时间信息,并自动调整时间和日历(自动接收时间信息)。
每天第一次取消节能状态时(手表 [TME] 模式下 3:00 AM 之后),执行时间信息的自动接收。
• 即使手表与可连接的智能手机断开,也会临时与此手机保持连接状态并获取时间信息。
自动接收时间信息功能在以下情况下不可用:• 手表模式不是 [TME] 或 [L-TM] 时。
• 专门应用程序的[时间同步]设置未启用时。
手表上的通知显示• 仅当手表模式为 [TME] 或 [L-TM] 且柄头处于 0 位置时,才会显示秒针的通知显示。
手表收到上述以外状态的通知时,将推迟显示通知,直到状态更改为上述任意状态。
• 如果手表在显示一个通知时又收到一个新通知,将取消旧通知并显示新通知。
通知声音和振动可使用应用程序上的 [Notification] 设置为秒针的指示激活通知声音和振动。
西铁城 CITIZEN 牌手表 说明书
B510操作指南产品特点感谢您购买西铁城CITIZEN牌手表!本产品是一只模拟指针式手表。
具备指示时、分、秒、24小时、日历和秒表等各种实用的功能。
本手表具备了由光动能发电和机械动能发电两种动力系统。
在表盘下面有一个太阳能电池可将光能转换成电能;在机芯内部有一套动力发电系统,手表在运动时可将动能转化成电能,在有光照的环境下和佩带运动时均能够对手表的中的充电电池进行充电。
本手表的充电电池中不含诸如汞等有害的重金属,是一个环保清洁的能源电池。
电量一旦充满,即使不再充电,手表也可运行五个月左右。
所以,本表电池可以反复使用,不需象其他石英手表那样定期更换,并减少丢弃的旧电池对环境的污染。
本手表具有防止过度充电的功能,可以保护电池及电路不会因长期充电而引起损坏。
产品特点各部位名称①时针②分针③秒针④24小时针⑤秒表秒针⑥秒表分针产品特点※在通常使用时,注意必须将柄头按回原位。
即使在不使用手表时,亦请将手表放置在有光照的环境中。
调整时间(1)等秒针到达0秒时,将柄头拉出到调整时间的位置上。
(2)转动柄头调整时间,注意区分24小时针上午及下午的时间,否则会发生中午跳日期的现象。
(在调整时间时,指针与日历相互连动。
因此,24小时针经过午夜12时,日历会改变)(3)根据电话或电台等标准时间报时信号,将柄头按回原位。
调整日期(1)将柄头拉出到调整日期的位置上。
(2)转动柄头,将日期调整到今天的位置上。
(3)推回柄头,日期调整完毕。
(4)注意当24小时针在夜间21~1点之间不可调整日期,否则容易发生第二天日期变动不准确的现象。
(5)每当遇到小月和2月末,须将日期调整到下个月的1日。
秒表的使用方法本秒表可以按0.2秒(1/5秒)的精度运行59分59秒。
(1)按一下A钮,秒表启动,大秒针会开始转动。
(2)按一下A钮,秒表暂时停止,按再下A钮,秒表恢复运行。
(3)按一下B钮,秒表回到0位。
秒表的秒针和分针复位方法当秒表的指针遇到意外因素不能回复到0位置时,请用下列方法给予调整:(1)将柄头拉到拨针位置。
西铁城三眼光动能手表调试指南(使用说明书).
1. 产品特长2. 使用前须知3. 表盘及按钮说明4. 光动能手表特有的功能•充电不足警告功能•快速启动功能•本表因电量不足而停止运作时•过度充电防止功能5. 充电时间的参考6. 使用注意事项•务必请经常为本表充电7. 充电电池的更换8. 时间及日期的设定•设定时间•设定日期9. 秒表的使用10. 秒表秒针的0位调整11. 注意事项12. 规格目录199200201202207208210211214216218224本表是一个使用光动能运作的手表。
在手表玻璃下装有一个光动能电池,可将光能转变为电能。
本表设有多个实用功能,包括24小时时间显示及能以1秒为单位进行60分钟计时的秒表功能。
................................................................................................................................................................................................................................................................................................................................................................................................................................................................................................................................................................................................................................................................................................................................................................................................................................................................................................................................................................................................................................................................................................................................................................................................1. 产品特长1981992002013. 表盘及按钮说明本表是一个使用光动能运作的手表。
- 1、下载文档前请自行甄别文档内容的完整性,平台不提供额外的编辑、内容补充、找答案等附加服务。
- 2、"仅部分预览"的文档,不可在线预览部分如存在完整性等问题,可反馈申请退款(可完整预览的文档不适用该条件!)。
- 3、如文档侵犯您的权益,请联系客服反馈,我们会尽快为您处理(人工客服工作时间:9:00-18:30)。
Thank you for your purchase of this Citizen watch.Before using the watch, read this instruction manual carefully to ensure correct use.After reading, be sure to store this manual in a safe place should it be needed for future reference.✳ The case has different features depending on the model.Details of the case features are not contained in this manual, see“ h ttp://www.citizenwatch.jp/support/default.htm ”.Safety precautionsThis manual may contain certain safety advisories. Y our watch should be used in accordance with these advisories at all times to ensure optimal enjoyment of your watch and to prevent injury to yourself, other persons and/or damage to property.■ Safety advisories are categorized and depicted in this manual as follows:Before using the watchThe followings must be done before using the watch:Checking the power reserve Page 8Checking the time signal reception Page 9Setting the city Page 103Before using the watch (3)Component identification (6)Checking the power reserve (8)Checking the time signal reception (9)Setting the city ........................10Notes on the time signal reception (14)On-demand reception—manual signal reception activation (22)During the Daylight Saving Time season (24)Recharging your watch (30)Adjusting the time/calender manually (34)Table of contents4Checking and correcting the current reference (0) position (38)Troub leshooting (42)Solar-powered watch handling precautions (48)Water resistance ......................52Precautions andusage limitations (55)Maintenance (60)Information (61)Specifications (62)58the button.The second hand indicates “OK” or “NO” at the end of this procedure to show the reception result of the time signal.9Setting the cityPull the crown out to position .The second hand moves to indicate the currently11 to 13.Pull the crown out to position .The second hand rotates to indicate the current24 to 29.Push the crown in to position .The watch resumes normal operation. (The current1112For details of each signal station, see pages 16 to 19.13Notes on the time signal reception Receiving the time signal14• The time signal reception function cannot be deactivated.• Even when this watch receives a time signal successfully, the accuracy of the displayed time will be dependent on the reception environment and internal processing.• If the watch is not able to receive the signal, it will operate normally within an accuracy range of ±15 seconds per month.When receiving the time signalRemove the watch and place it on a stable surfacewhere it can receive the signal better, such as nextto a window.• The reception antenna is located at the 9:00position of the watch. Place the watch with the9:00 position facing toward the station.• Do not move the watch during time signalreception.• The watch will not receive a time signal whenin a low charge state as indicated by the secondhand moving in two second increments (the insufficient charge warning). Charge the watch before reception.15Note on the time signalThis watch receives the time signal from the five signal stations located in four regions and automatically adjusts the time and date. The receivable signal stations are listed asreceivable area roughly.16Approximate receivable areaThe distance of receivable range is only used as an approximate value. It is often affected by the receiving environment and weather.• The value of the distance is a radius of the value from the signal station.JJY (Japan): Approx. 2000 km Kyushu stationJJY (Japan):Approx. 1500 kmFukushima station Continued on the next page1718WWVB (USA):Approx. 3000 km Fort Collins stationThe distance of receivable range is only used as an approximate value. It is often affected by the receiving environment and weather.• The value of the distance is a radius of the value from the signal station.DCF77 (Germany): Approx. 1500 km Mainflingen station BPC (China): Approx. 1500 km Shangqiu stationThe distance of receivable range is only used as an approximate value. It is often affected by the receiving environment and weather.•The value of the distance is a radius of the value from the signal station.19Poor reception areasIt may be difficult to receive the time signal properly under certain environmental conditions or in areas susceptible to radio noise.Inside vehicles•Near electrical equipment or office •Near high-tension electrical •lines, railway overhead wires or communication facilitiesInside reinforced concrete •mountains, or underground Near mobile phones that are in•use20When signal reception is poorHigh-tension electrical lines or others structures near your house may block the path to the signal location. This may cause a poor environment for receiving the time signal.With reference to pages 17 to 19, search for a better place for reception.Then, attempt to receive the time signal following the procedure on pages 22 and 23.2122On-demand reception—manual signal reception activationY ou can adjust the watch by receiving the time signal anytime when the time and date are not correct or the receptionresult is “NO.”• The watch will not start to receive if the second hand ismoving once every two seconds (this is the insufficientcharge warning). Fully charge the watch beforeattempting on-demand reception.• Not all areas can receive a signal. Be sure you are not insuch an area and confirm the city is selected for yourtime zone. See pages 10 to 13.1.2.To cancel the receptionPress and hold the lower right button A for two or more seconds.Cancel the reception and the current time will be indicated.23During the Daylight Saving Time seasonBefore proceeding, please know the movement type in your watch. Please refer to page 1 for this determination.Some areas observe Daylight Saving Time.• Daylight Saving Time rules will vary depending on the country or region within a country.Movement caliber H144When the watch receives a time signal, the Daylight Saving Time setting is automatically updated. The time signal update overrides any manual settings that may have been made. If you live in an area that does not observe Daylight Saving Time, you may need to use alternate city for correcting the time. See pages 10 to 13. Movement caliber H145When the watch receives a time signal, the Daylight Saving Time setting is automatically updated, provided the user has not manually turned OFF overridden the Daylight Saving Time setting.If you live in an area that does not receive a time signal, you will need to update the Daylight Saving Time setting manually. See page 26.24251.2.To manually change the Daylight Saving Time setting1.Pull the crown out to position . Array2.• For details of the selection of cities, see pages 11 to 13.3.Pull the crown out to position .• Rotate the crown clockwise to activate DaylightSaving Time (turn on).or• Rotate the crown counterclockwise to deactivateDaylight Saving Time (turn off).4.Push the crown in to position .Special note about movement caliber H145When manually changing the Daylight Saving Time from OFF to ON to OFF,this engages the manual override built into movement caliber H145. This manual override precludes Daylight Saving Time from being automatically adjusted during the time signal update. If this function is not desired, the only way to cancel themanual override is to do the reset and 0-Positioning outlined on page 46.26<Cities sharing the Daylight Saving Time setting>The Daylight Saving Time / standard time is shared and automatically updated amongWhen changing to a city other than outlined in the chart above:Movement caliber H144Time signal overrides any manual setting of the Daylight Saving Time.Movement caliber H145Daylight Saving Time is set in accordance with the last-received time signal. However, when manual override has been activated, the time signal will not update the time zone with the manual Daylight Saving Time override.• For how to check the movement number, see page 1.27If you live in an area that does not observe Daylight Saving Time<Movement caliber H144>Anytime a time signal is received, any manual Daylight Saving Time is overridden and set in accordance with the time in the time signal. If you live in an area that does not observe Daylight Saving Time, it will be necessary for you to utilize an alternate time zone to have the correct time shown (see pages 10 to 13).e.g.Select the city with +1 hour time difference.CautionY ou must change the city setting to the correct time zone city after the Daylight Saving Time season has finished.28If you live in an area that does not observe Daylight Saving Time (continued)<Movement caliber H145>Movement caliber H145 will “remember” a manual Daylight Saving Time setting. As such, if you manually turn the Daylight Saving Time to “OFF” for a particular time zone, it stay “off” and not be affected by any time signal update. It is important to note however that with the change of each Daylight Saving Time, you will need to manually turn the setting ON or OFF as outlined on page 26.The only way to cancel any manual override setting is to do the reset and 0-positioning procedure as outlined on page 46.29Recharging your watchThis watch has a rechargeable cell which is charged by exposing the dial to light such as direct sunlight or fluorescent lamps.For optimal performance:• Expose the watch with the dial facing towards direct outdoors sunlight (not through a window) for five to six hours at least once a month.• After taking off the watch, put it in a position where the dial is exposed to bright light, such as by a window.• Before storing the watch in a dark place for an extended period of time, be sure to charge it fully.When the watch is regularly covered with long sleeves, it may not be charged sufficiently. Try to keep the watch exposed to light sufficient for charging.Do not charge the watch at a high temperature (about 60˚C/140˚F or higher).30When the watch reaches a low charge state—insufficient charge warning functionCharging time by environmentBelow are the approximate times needed for charging when exposing the watch dial towith the power save feature engaged (based on a full charge).After the second hand starts moving once every two seconds, it will last for approximately three days.32Power save featureWhen the watch is not exposed to light for more than seven days such as when you store it in the dark, the minute hand and second hand automatically stop to save power. (The time signal reception is not possible with the power save feature engaged.) However the watch still keeps the time.• When the crown position is or , the power save feature will not activate.•To cancel the power save featureWhen the watch is exposed to light sufficient for charging, the power save feature is automatically disengaged and normal time indication will resume.After the power save feature is disengaged, you should receive the time signal manually. See pages 22 and 23.33Adjusting the time/calendar manually1.Pull the crown out to position .2.Press and release the lower right button A.The second hand moves to the 0 second position.3.Rotate the crown to adjust the minute.• The second hand rotates around once and the minutehand moves one minute.• When it passed “0:00:00,” date advances once.Be aware of the AM/PM status when you adjust thetime.4.Press and release the lower right button A.The hour hand moves slightly.5.Rotate the crown to adjust the hour.• When it passed “0:00:00,” date advances once.Be aware of the AM/PM status when you adjust thetime.346.Press and release the lower right button A.The date indicator moves slightly.7.Rotate the crown to adjust the date.8.Press and release the lower right button A.The second hand indicates the current setting of the month and year.9.Rotate the crown to set the current month and leap year.• See pages 36 and 37 for how to read the year and month.10. A few minutes may have elapsed during setting of the calendar.Press and release the lower right button. Rotate the crown clockwise to set the current minute.11. Push the crown in to position .The current time is indicated.When adjusting minute/hour/date, you can move hands or date indicatorcontinuously by spinning the crown quickly a few times. To stop them, rotate thecrown in either direction.35Continued on the next pageMonth and year indicationsThe position of the second hand shows the month.year. 3637The figure showsAugust in the 2nd year since the recent leap year (e.g. 2010).The figure shows April in the 3rd year since the recent leap year (e.g. 2011).Quick reference chart for number of years passed since leap yearChecking and correcting the current reference (0) position If the time or date is not shown correctly even after proper reception of the time signal, check whether the reference (0) position is correct or not.1.Pull the crown out to position .2.Press the upper right button B for five or moreseconds, then release it.All hands and the date indicator move to indicate thecurrent reference (0) position.• No operations are available while the hands and dateindicator are moving.Continued on the next page393.Pull the crown out to position .4.Press and release the lower right button A.The hour hand moves slightly.5.Rotate the crown to adjust the hour hand to the“0:00:00” position.• If you spin the crown quickly a few times, the handwill move continuously. To stop it, rotate the crown ineither direction.6.Press and release the lower right button A.The minute hand and second hand move slightly.407.Rotate the crown to adjust the minute hand and second hand to the“0:00:00” position.• If you spin the crown quickly a few times, the hands will move continuously. To stop them, rotate the crown in either direction.8.Press and release the lower right button A.The date indicator moves slightly.9.Rotate the crown to adjust the date to the “1” position.• If you spin the crown quickly a few times, the date indicator will movecontinuously. To stop it, rotate the crown in either direction.10. Push the crown in to position .indicated.41Solar-powered watch handling precautions<Always be Sure to Expose Your Watch to Light Regularly>• Y our watch enjoys regular exposure to light. Wearing in situations that prevent light exposure such as long shirt or coat sleeves will prevent your watch from receiving light sufficient for charging. In these instances, supplemental charging may be needed.• When you take your watch off, try and place it in a bright location. This will ensure your watch receives light for charging and will continue to operate properly. Storing your watch in dark places for extended periods of time may cause the stored energy to become depleted and your watch to stop.48CAUTIONmalfunction.Examples:halogen lamp.the dashboard of a vehicle.49<Replacement of Rechargeable Cell>• Y our watch features a cell that does not need regular replacement.However, after an extended period of time, power consumption may increase due to deterioration of lubrication in the movement. This may result in shorter than expected run time. Be sure to have your watch regularly inspected by an Authorized Service Center.Note: Regular maintenance is not covered under the terms of the warranty.WARNING Handling of Rechargeable Cell• The rechargeable cell should never be removed from the watch.If for any reason it becomes necessary to remove the rechargeable cell from the watch, keep out of the reach of children to prevent accidental swallowing.If the rechargeable cell is accidentally swallowed, consult a doctor immediately.• Do not dispose of the rechargeable cell with ordinary garbage. Please follow the instructions of your municipality regarding collection of batteries to prevent the risk of fire or environmental contamination.50。