高清摄像笔使用中英文说明书ppt
高拍仪CH200中性英文版使用说明书
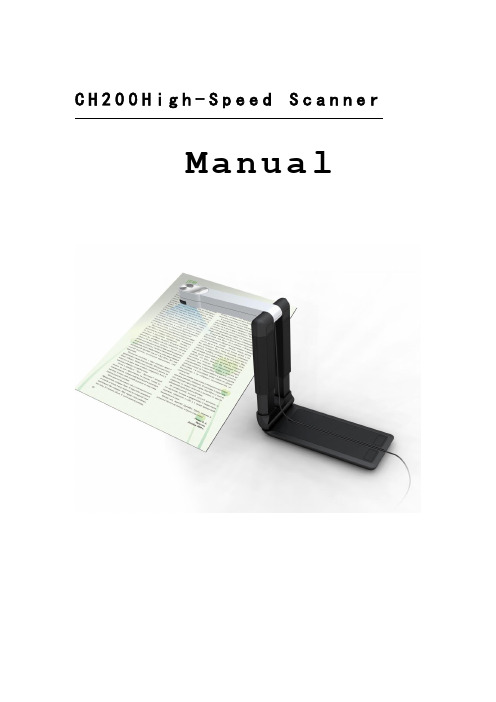
C H200H i g h-S p e e d S c a n n e rManualCONTENTSService information (2)Chapter I Introduction (3)1.1 Package contents (3)1.2 Appearance (3)1.3 Recommended configuration (3)1.4 Product functions, parameters and application (4)1.4.1 Functions (4)1.4.2 Parameters (5)1.4.3 Applications (5)Chapter II Installation (6)2.1 Structural drawing (6)2.2 Software CD (6)2.3 Driver Installation (7)2.4 Software Installation (13)Chapter III Software Interface Instruction (17)3.1 Application (17)3.2 Menu (18)3.2.1 File (18)3.2.2 Edit (20)3.2.3 View (21)3.2.4 Snapshot (22)3.2.5 Image (23)3.2.6 Effect (25)3.2.7 Tool (27)3.2.8 Help (28)3.3 Tool Information (28)Service informationNetwork servicesYou can get technique support and related information though our company website and telephone.After-sales insurance notes1、All the after-sales policy complies with the stipulation of "three packages".2、Maintenance service is non-freight, charge retails and overhauling programs by nextyear.3、When the products are sent to repaired, total package is demanded to ensure the qualityof maintenance.4、Non-warranty scope●The damage is made by irresistible disease such as natural disease.●Personal factors.●Improper use.●Problems and error made by other software of installation and design.●Computer virus.●One that tear original warranty serial number card or non-serial number card willcancel his rights of maintenance and not provide maintenance.5、If the adverse products are generated by factors of non-warranty scope, we'll chargeunder the standard required by company, which has nothing to do with warranty years.6、The warranty scope is only for the product itself without joint maintenance responsibilityfor supplies.7、During repairing, our company is not responsible for the interests of purchaser andpotential damage in foreseeing circumstances.Suggestion for useThe effect is better under the environment of adequate lighting.Chapter I Introduction1.1 Package contents(1)High-Speed Scanner(2)High-Speed Scanner Special manuscript desk(3)CD-ROM(including driver programs, operation instructions and application procedure)(4)Cable for USB 2.0(5)Instruction for user(6)YardstickIf above package accessories are incomplete, please contact with your dealer or company to ensure your interests.1.2 AppearanceFold Open1.3 Recommended configuration(1)Hardware:Pentium 4 or the level of CPU or higher, 512MB or higher memory, CD-ROM.(2)USB 2.0 connector.(3)Operation system: Windows 2003、Windows XP、Windows 7.1.4 Product functions, parameters and applicationHigh-Speed scanner is portable document photography facility. Whatever, such as paper files, color picture or three-dimensional objects, it can scan and store easily. It adopts special folding design, the appearance is simple, noble, generous and stable. When scanning, documents and objects will not touch with it, so that cardboard phenomenon found in traditional scanner is avoided, the high-definition display and storage of video files will meet the demand for document management. With it, you can get access to valuable video data at your own will. It provides more functions and has wider application than usual traditional scanner.1.4.1 Functions(1)D uplicatorIt can get quickly access to paper files, video files,etc,and can print at real time through black and white or colored duplicator, provide files video photocopy simultaneously .It's free to set the size and angle of rotation ,which can also copy books.(2)P hysical objects projectorDocuments photography is a vertical scanning design ,which can take place under lens, capture graphics at real time, and project to screen directly if harmony with software.(3)p hysical objects scannerScanning induct components with mechanical design, it’s convenient to scan objects, which can preserve data. At the same time, it can scan continuously, and time and space will be free.(4)V ideoBesides providing the function of scanning papers files and objects, it provide video at random, operate simply and time of video is free.(5)S canning and preserving for A4 filesDocuments photography adopt interface in USB2.0,transmission speed comes to 480Mbps,2 million pixels HD lens, provide high quality of scanning ,maximum size comes to A4,and provide cropping in dealing with pictures ,this way could save space of documents reserving.(6)E-mailThe video files scanned and reserved by documents photography are able to be sent anywhere.(7)I mage processingIt attaches powerful image processing software arbitrarily. which can add words to video files ,cut pictures, tilt correction ,rotate pictures at arbitrary angle, filtering can eliminate the stain and impurity, etc. It is able to make OCR identification to words and form, which can transform picture file into edited text file.1.4.2 Parameters1.4.3 Applications(1)As portable photography, it proceeds daftly digital scanning of paper file or other objects everywhere.(2)As camera, it proceeds video scanning.(3)Realize photocopying by combining computer and printer.(4)object scan function concert with projector to show videoChapter II Installation2.1 Structural drawing2.2 Software CDPut High-speed scanner software CD into the drive, it will read automatically, pop-up installation window with six buttons: Driver, Software, Fax, Infor, Scan, Exit, with Chinese and English language choices.2.3 Driver InstallationChoose “Driver”button to install driver for High-Speed Scanner, please confirm that High-Speed Scanner is connected with the computer before installing.Choose “next”:If appear with the follow form, please insert High-Speed Scanner to USB interface, and then choose “Yes”.If appear with the follow form, please choose “continue anyway”.If appear with the follow form, please choose “continue anyway”.Choose “finish” to finish installation. After installation, please remove the facility before pull in it again.Windows XP driver updateAfter driver installation, the follow hardware update form will pop up automatically.Choose “Install from a list or specific location (Advanced)”, choose “next”.Choose “Don’t search, I will choose the driver to install”, choose “next”.Choose “CH200” and “next”.If appear with the follow form, please choose “continue anyway”.The drive is update automatically.Choose “finish” to finish update driver.2.4 Software InstallationPress “Software” button to install software.Choose “next”.Input user information or with the default information, choose “next”.Choose install path or with the default path, choose “next”.Choose “next”.Prepare to install, “next” to continue.It is installing, please wait…Choose “finish” to finish installation.Chapter III Software Interface Instruction3.1 Application(1)Open application form,double-click the shortcut “CH200” on desktop, or click "Start-All programs- CH200- CH200 ".(2)Display the interface of software.This software interface are mainly divided into: the title bar, the menu , toolbar, image list view, video preview view, photo editing view, text views, the status bar, popup menu and view splitter.MenuAll the functions of the software can be found in the menuToolbarIt is the shortcut of the menu , user can enhance operational efficiency through using the icons displayed on the toolbar.Information clewClew the real-time operation and relative information.Image list viewDisplay all the pictures of the current Settings folder and user can open, or delete the pictures displayed in the image list view. The number of list can be operated by user.Video preview viewsPreview the video capture from the business scanner.Display the actual effect after editing the picture.Popup menuDisplayed partial menus witch can be used currentlyView splitterIt can adjust the size of the view.3.2 Menu3.2.1 FileFile menu usually use for existing file operations, including: new, open, save, save as, Send Email, print setup, print preview, printing (1:1), print and exit these functions.NewNew a blank document, in it image can be pasted and operated.OpenOpen the picture file existing in computer; it can precede several of format picture files which support this system, while others can not make it.SaveSave the image displayed on image view after editing, the filename, file formats, and the file path are same as the original ones.Save asSave the image displayed on image view after editing, the filename, file formats, and the file path can be modified.Send EmailOpen the web site which user use to send an E-mail. Remember to write the web site in the setting dialog.Print SetupChoose the printer that has been installed in the computer, it should be set up before printing or printing preview.Print previewLook over the image before printing. Different printers with different preview results, it has to print setup before preview. And the picture got from scanning needing to rotate 90 before preview and print.Print (1:1)Check the Print (1:1) menu item, and then print the image, the size that printed on the paper will be same as the object. This menu has up, mid and down three choices according to three scan heights. So to get the right print result, you must choose right menu and the print picture must be got with our facility.PrintPrint the image displayed on image view by the printer on the computer.ExitExit when user finishes using the software.3.2.2 EditIt includes Undo, Redo, Cut, Copy, Paste, Eraser, Text, Font, Cut Out, Delete, etc.UndoBack to the last step of edit operation.RedoGo to the next step of edit operation.CutRemove selected part of the picture.Copy a part or the whole picture.PastePaste the clipboard data.EraserRemove picture information with width 1, 5, 10 or 50.TextAdd text in the picture. At the location wanting text, press left-button to get one edit-box to input text. Press left-button out of the edit-box to finish this operation.FontSet text font for adding text to the picture.Cut OutRemove unselected part of the picture.DeleteDelete the opened picture.3.2.3 ViewIt includes Full Screen, Actual Size, Frame Size, Move, Dynamic or Static, Rearrangement, etc.Full ScreenOnly show Video preview views without menu, toolbar, status bar, information clew and image list view.Actual SizeShow the video and picture with their actual size.Frame SizeShow the video and picture with frame size and at the same time the proportion of image height and width is changeless.Move the image if user want to see the different part of the image.Dynamic or StaticShow the image view and hide the video view, or show the video view and hide the image view.RearrangementRestitute window to default state.3.2.4 SnapshotIt includes Snapshot Setting, Snapshot, Time Snapshot, Stop Snapshot, Digital Zoom, Video Capture, Stop Capture, etc.Snapshot SettingIt provides settings of picture size, picture state, picture format, picture naming, auto threshold, auto ground color removal, auto add snapshot time, auto gray scale, time internal of time snapshot, JPG quality, and save path, etc. And also auto threshold and auto ground color removal can be previewed. Choose this menu item, you will get the follow dialog.SnapshotScan an image for the video preview.Time SnapshotScan automatically according to the interval.Stop SnapshotStop the scan which make by the "Start Scan".Digital ZoomWith this, the video can be zoomed in, it has six steps.Video CaptureStart recording the video.Stop CaptureStop recording the video.3.2.5 ImageIt includes Rotate left 90, Rotate Right 90, Rotate, Larger, Smaller, Resample, Rect Select, Free Select, Reverse Select and Correction.Rotate Left 90Rotate the image for counter-clockwise with 90 degrees.Rotate Right 90Rotate the image for in clockwise with 90 degrees.RotateRotate the image for in clockwise or counter-clockwise with any degree.LargerDisplay the image with a smaller scale.SmallerDisplay the image with a bigger scale.ResampleChange the actual size of the image. Click the menu item, the resample dialog will be shown.User can choose to change the image size factor or change directly the image height or width, and choose different interpolation approach.Rect SelectSelect one rectangle area in the image.Free SelectSelect one un-regular area in the image.Reverse selectReverse select the unselected area by rect select or free select.GammaThough the gamma values may differ for input and output devices to accommodate the difference between scene lighting and lighting of the viewing environment.ColorizeAdds color to a grayscale image converted to RGB, or adds color to an RGB image-for example, to make it look like a duotone image by reducing its color values to one hue.3.2.6 EffectIt includes some operation to picture.NegativeImage displays dark areas as light and light areas as dark.EmbossMake increasing pattern on the surface of image.EdgeReserve the edge of the image.ThresholdThe Threshold effect converts grayscale or color images to high-contrast, black-and-white images. Specify a certain level as a threshold; all pixels lighter than the threshold convert to white and all pixels darker convert to black.Gray scaleMake the image into colors which mix the black and white, like the colors of ash.Ground Color RemovalRemove the ground color.Noise RemovalRemove the noise of image.Remove Red EyeRemove the red eye of the people in the image after select the eye.DilateTo make the edges in the image become bigger than before.ErodeTo make the edges in the image become smaller than before.BlurMake the image less clear in different part.SharpenEnhanced image edge effect, so it will has more obvious edges.SoftenTo make the whole image more gentle.LightenIncrease the value of a pixel in the image.DarkenReduce the value of a pixel in the image.More ContrastIncrease the contrast of the image.Less ContrastReduce the contrast of the image.More SaturationIncrease the saturation of the image.Less SaturationReduce the saturation of the image.3.2.7 ToolIt includes video format, video attribute, audio format, make PDF, make signature, insert signature and optical character recognition, etc.Video FormatTo choose the color space compress format,output image size and frame frequency.Video AttributeSet video light, contrast, saturation, etc.Audio FormatSet parameters of microphone.Make PDFConvert pictures to PDF document.Make SignatureMake signature picture and encode it.Insert SignatureDecode signature file and insert it to the right location.OCROptical Character Recognition, recognize the text in the image. Note: you must install OCR software to use the function.3.2.8 HelpAbout CH200Show information about this software.Troubleshootingopen the help file about troubleshooting,tips and othersUser ManualShow the user manual document.3.3 Tool Information1->Open 2->Save 3->Cut4->Copy 5->Paste 6->Undo7->Redo 8->Picture Size 9->Actual Size10->Actual Size 11->Frame Size 12->Full screen13->Rotate 14->Rotate Left 90 15->Rotate Right 90 16->Ground Color Removal 17->Gray Scale 18->Threshold19->Lighten 20->Darken 21->More Contrast 22->Less Contrast 23->OCR 24->Restoring default 25->Make PDF 26-> Insert Signature 27->Video Capture 28->Snapshot 29->Time Snapshot 30->Stop Capture31->Dynamic or Static 32->Rect Select 33->Free Select34->Cut Out 35->Text 36->Larger37->Smaller 38->Move 39->Eraser40->pen。
PENTAXME中文说明
2011-01-22 13:03:45 来自: kukunya(Not Nice)近日觅得ME彩版说明书,遂通览,获益良多,择要翻译并注,作备忘及参考。
主楼用作目录及勘误,按章节在跟帖中翻译,欢迎讨论!1、术语解释2、规格说明3、更换镜头4、更换电池5、基本操作6、装片与过片7、底片速度设定8、快门锁9、100X档与B档10、卸片11、自拍器12、闪光同步13、红外摄影14、多重曝光15、使用螺口太苦马镜头16、极限温度与温差抗力17、其他== 补充==上弦提示窗:规格说明部分提到的“上弦指示”是过片扳手旁的一个圆形小窗,快门上弦后呈红色,释放后为黑色;== 勘误==. 2011-01-22 13:39:24 kukunya (Not Nice) Pentax ME 术语解释(部分):3、自拍拨杆:机身前面,镜头卡口左侧(正视);7、快门表盘:机身上面,快门旁,刻有L、AUTO、100X及B四档标识;8、热靴:机顶最上方,单点式;9、曝光补偿表盘:机身上面,倒片转盘外围,刻有1/4x - 4x五档标识;13、凸起式校准点:手动镜头上凸起的“白点”,亦有的镜头为黄色或绿色等;19、X同步接口:镜头卡口右侧面(正视);21、过片/倒片指示:机身后面,过片扳手下方“小窗”,内红黑相间;22、导针通道:机身底面,手柄通信接口(下述)旁的圆形凹孔;23、手柄通信接口:机身底面,黑色条形,上有三个圆形金属触点;30、倒片钮:机身底面,凹槽内黑色按钮;31、输片接口:倒片钮旁边圆形接口,上有金属盖;33、承片轴:机内右侧(后视),上有多根白色细轴;> 删除. 2011-01-22 14:40:55 kukunya (Not Nice) Pentax ME 规格说明(部分):类型:35mm全幅SLR相机,光圈优先自动曝光,电子焦平面快门,全开光圈中央重点式TTL测光;镜头卡口:宾得K卡口;标准镜头:SMC 50/1.2,SMC-M 50/1.4,SMC-M 50/1.7,SMC-M 40/2.8;快门:精工(Seiko)MFC 纵走式金属焦平面,电子自动控制8 - 1/1000秒;手动控制机械1/100秒;B门;具有快门锁定和上弦指示("Cocked" indicator);闪光同步:X同步接口,热/冷靴接口,闪光同步1/100秒;自拍器:4 - 12秒延时快门;取景器:镀银五棱镜取景器,裂像及微棱对焦屏,92%视野率,0.97x放大率(50mm镜头,无穷远),目镜屈光度-0.5,取景器内LED红点快门速度指示和过/欠曝警告,目镜框可安装M型镜片校正转换器、M型放大器和M型直角取景器;过片及倒片:单次扳动过片,过片行程135°,预备角30°,快速倒片手柄;自动手柄:ME机身可安装使用1.5张/秒的自动连拍手柄,连续或单张曝光;测光表:全开光圈中央重点TTL测光,GPD测光元件快速响应,LED曝光读数,卷片手柄及快门按钮兼做测光快关;测光范围EV1 - EV19(ASA100,f/1.4),胶片ISO设定范围12 - 1600;电池:两节1.5V银芯电池(G13),测光LED指示电池电量;后背:可换ME日期后背;> 删除. 2011-01-22 14:49:45 kukunya (Not Nice) Pentax ME 更换镜头:1、镜头红点对准机身卡口红点,按下并顺时针旋至“滴答”一声为锁定;2、暗处难以看见红点时,将镜身凸起式校准点对齐机身卡口释放按键,按下并顺时针旋至“滴答”一声为锁定;注意:1、在没有前后盖时若需放置镜头,务必将镜头前组向下放置,切勿(NEVER)后组向下放置;2、室外更换镜头时,若机身内装有底片,注意避免阳光直射;> 删除. 2011-01-22 15:04:42 kukunya (Not Nice) Pentax ME 更换电池:1、安装电池用硬币旋开底面电池仓盖,放入两节电池,正极向下,旋紧电池仓盖;LR44碱性纽扣电池亦可;2、检查电池:正常情况下,一组新电池可使用一年或支撑快门动作约10000次;半按快门若取景器内一个LED指示灯亮起则电池为激活状态,若LED指示灯闪烁则电力不足,应尽快更换,若无LED指示灯亮起,则电池已不可使用;请随身携带备用电池;> 删除. 2011-01-22 15:15:00 kukunya (Not Nice) Pentax ME 基本操作(从略,重点翻译测光部分):基本步骤1 - 7:上卷- 曝光补偿置为0 - 设定对应底片速度- 设定镜头光圈- 快门表盘置为AUTO - 过片- 对焦8、测光:将过片扳手稍外拉至预备角(约30°,将开启一个电池开关),轻按快门释放钮(即半按,将开启另一个电池开关),开启测光系统,取景器内某个LED指示灯将会亮起,指示自动选择的曝光快门速度;若预设的光圈值会导致过曝或欠曝,“OVER”或“UNDER”旁的LED指示灯将亮起以示警告;9、完全按下快门释放钮,电子快门将按照LED指示的速度释放,完成曝光;> 删除. 2011-01-22 15:45:29 kukunya (Not Nice) Pentax ME 装片与过片:1、向上拉动倒片旋钮即可打开后盖;2、胶卷置入片仓,按下倒片旋钮,拉出片头并插入承片轴上任意两根白色细轴之间;3、交替扳动过片扳手和释放快门按钮,直至胶片上下边缘小孔均准确套上齿轮,合上后盖;4、扳动过片扳手并确认倒片旋钮随之逆时针转动,则装片正确,底片随过片而从片盒内移动至承片轴上;如果装片正确,过片/倒片指示窗口会“闪动”;按动快门,过片至计数器指示为“1”,即可开始拍摄;注意:1、上述步骤3、4应在快门表盘置为100X情况下操作,以避免不必要的电力浪费(同时可以避免慢速快门带来的等待时间,译注);2、拍摄前切记将快门表盘置回AUTO档;> 删除. 2011-01-22 16:05:10 kukunya (Not Nice) Pentax ME 底片速度设定:轻提曝光补偿表盘边缘,并旋转至底片对应的ASA指示值即可;表盘上可用的ASA依次为:1600,#1250,#1000,800,#640,#500,400,#320,#250,200,#160,#125,100,#80,64,#50,#40,32,#25,20,#16,12;其中加#的为表盘上仅以圆点标出而未注明具体数值的档位;> 删除. 2011-01-22 16:20:07 kukunya (Not Nice) Pentax ME 快门锁:为避免上弦后的快门被误操作,可按下快门表盘旋钮上的白色按钮,并旋转至“L”档,即可锁住快门;当希望转回至AUTO档时,无需按下白色按钮,直接旋转即可,当转至AUTO 档后,白色按钮会自动弹起并锁定旋钮;注意:当未取下镜头盖或在极暗的环境下时,按下处于AUTO档的快门,反光镜可能会锁定,进行超长时间的曝光;此时若需修正,请将快门表盘旋钮旋至100X档即可迅速关闭快门;下次拍摄前请确认快门表盘旋钮置回了AUTO档;> 删除. 2011-01-22 16:32:33 kukunya (Not Nice) Pentax ME 100X档与B档1、100X档为1/100秒机械快门,快门将维持工作在1/100秒速度,可以在没有电源的情况下配合光圈完成正确曝光;2、100X档同时用于配合电子闪光灯使用,后述;3、B档(Bulb)用于长于8秒的曝光控制,使用时先安装快门线至快门释放按钮,档快门线上的活塞按下期间,快门将持续开启;对于长达几分钟至几小时的曝光,请使用带有锁定装置的快门线;> 删除. 2011-01-22 16:41:57 kukunya (Not Nice) Pentax ME 卸片当一卷底片拍完最后一张后,过片扳手将会无法扳动(此时切勿用力扳动!),则需要更换底片;翻出倒片手柄,按下底面倒片钮,顺时针转动扳手从而将底片卷回片盒;若倒片顺利,过片/倒片指示窗口将会“闪动”,当倒片手柄上的紧张感突然减弱,说明片头已从承片轴上脱离,打开后盖,取出片盒;注意:1、卸片操作时尽量避免光线直射;2、片头脱落后即无需再旋动倒片扳手,以免片头缩入片盒造成不便——译注;> 删除. 2011-01-22 16:48:00 kukunya (Not Nice) Pentax ME 自拍器:自拍器延时范围为4 - 12秒,取决于自拍钮被拨动的程度;要使用自拍,将自拍钮逆时针拨动至静止状态,轻轻回拨自拍钮即可开始计时;> 删除. 2011-01-22 17:00:12 kukunya (Not Nice) Pentax ME 闪光同步:ME具有一个X同步接口和一个位于热/冷靴插槽内的独立X触点;热/冷靴触点在未插入闪光灯至热/冷靴时将不会接通,这是由靴内插槽下方的一个微型开关控制的,可以有效避免使用X同步接口时此处造成触电的危险;如果您使用的闪光灯有靴型插口,请将其插入机顶热/冷靴使用,如果您的闪光灯不适用于靴型插槽,请将其引线插至机身上的X同步接口;当使用电子闪光点时,务必将快门表盘旋钮旋至100X档,这是可供闪光灯使用的最高快门速度;> 删除. 2011-01-22 17:06:48 kukunya (Not Nice) Pentax ME 红外摄影:当希望拍摄红外照片时,请使用镜头景深表中橙色线标出的红外对焦标记,步骤如下:1、正常对焦至拍摄对象清晰;2、从对焦环上读出拍摄对象至相机的距离;3、调整对焦环,将红外对焦标记对准对焦环上刚才读到的距离;例如当对焦于无穷远处时,即将对焦环上无穷远位置对准红外对焦标记即可;注意:1、使用黑白红外底片时需要作上述对焦修正,使用彩色红外底片则不需要;2、红外对焦标记即镜头景深表上除中线外的橙色细线,亦有用红点或“R”标识的——译注,感谢smallandred、方方和quitsky同学提供帮助;> 删除. 2011-01-22 17:18:35 kukunya (Not Nice) Pentax ME 多重曝光:当试图多重曝光时,步骤如下:1、使用正常的曝光操作进行第一次曝光;2、旋转倒片手柄,将片盒内的底片旋紧,并保持倒片手柄位置(keep hold of the rewind knob);3、按下倒片钮并过片,这将在不过片的情况下为快门上弦;4、最后,释放快门完成第二次曝光;注意:1、完成多重曝光之后,请空拍一张,防止底片上影像重叠;2、由于计数器在每次快门上弦均会计数,两重曝光的一次拍摄将会在计数器上反映为两张;> 删除. 2011-01-22 17:47:00 kukunya (Not Nice) Pentax ME 使用螺口太苦马镜头:通过K型转接环,传统的螺口Takumar镜头(包括Super-Takumar和SMC Takumar)可以很容易地使用在您的ME机身上,然而,使用转接时会有以下问题:1、由于耦合系统的差异,自动光圈将无法工作;2、全开光圈测光的镜头将工作在收缩光圈测光状态;具体转接部分从略;--PS:验证码居然是mount,天意啊~~~> 删除. 2011-01-22 18:04:36 kukunya (Not Nice) Pentax ME 极限温度与温差抗力:您的ME相机将在摄氏50°至零下20°范围内正常工作,然而低温下被污染的润滑油可能会影响其对低温的耐受力,因此为确保相机在低温下正常工作,需要彻底检查并更换润滑油;突然的温度变化可能会导致相机内部受潮,并可能造成生锈,对相机机械结构造成极大伤害;如果从温暖环境突然进入低温环境,可能导致冷凝而造成更大伤害;因此应当尽量避免突然的温度变化,我们建议在温差超过10摄氏度的环境间应采取分步适应的方法,并保持30分钟以上适应时间,如果难以实现,将相机装入保护袋或相机包中可以减小温度突变带来的伤害;另外,低温将会影响电池的性能,所以应尽量避免低温使用,或尝试仅在拍摄前即时安装电池;温度极低时,应使用新电池;> 删除. 2011-01-22 18:19:33 kukunya (Not Nice) Pentax ME 其他以上是我的选择翻译,没有翻译的部分包括:1、曝光补偿的使用场合及方法;2、不同场合建议的光圈设定值(类似阳光十六法);3、裂像微棱对焦屏的使用方法;4、保持相机稳定的拍摄姿势;5、景深表的使用;6、全开光圈测光镜头与收缩光圈测光镜头;7、日常相机保养;8、免责条款;9、ME腰带夹:这个是ME的配件,可以装上机身,然后别在腰带上,亮骚利器,见过淘宝有人卖,比相机还贵,>_<10、以上翻译中另有说明从略的部分;以上如有需要,可以跟帖说明,我补充翻译;另外由于包含一些基于个人经验的注释,限于水平有限,如有错误或疑问之处欢迎讨论,我将在主楼设置勘误;。
_高清摄像笔使用说明书_内置存储_2010102701
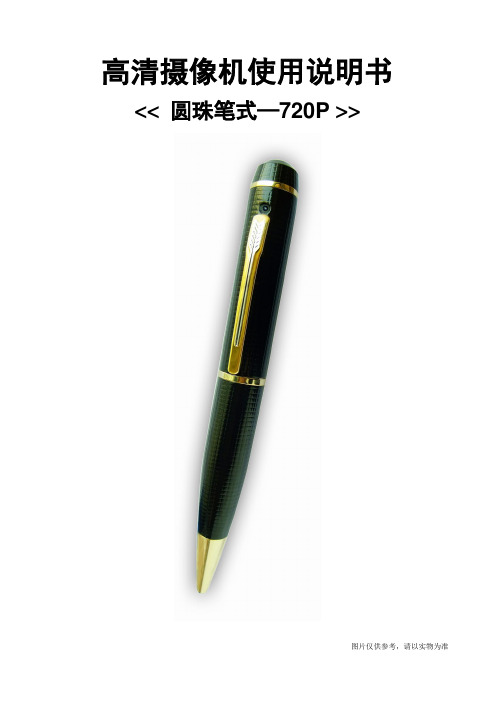
高清摄像机使用说明书<< 圆珠笔式—720P >>图片仅供参考,请以实物为准一、 产品简介感谢您选购本产品,作为一款数码摄录一体机,它有多种实用的功能,时尚精致的外观,稳定卓越的品质,广泛多样的用途,将给您带去全新难忘的使用体验,是您身边不可缺少的实用工具。
本机有的功能为:高清摄像、高清拍照、优质录音、电脑摄像头、可移动磁盘。
本产品具有的特点为:多功能、多用途、外观时尚酷炫、摄录效果卓越、小巧便携、易于使用、稳定可靠、响应快速等。
本产品适用于:记者采访、精彩抓拍、突发事件记录、生活片段记录、娱乐休闲记录、体育运动记录、教学辅助记录、家庭安防监控、执法刑侦取证、旅行人文风景记录、户外探险记录、辅助记忆,等等。
二、 结构概述编号名称 描述 1操作键 它是一个多功能按键,在不同模式以及状态下具有不同功能,包括:开机、关机、开始摄像、停止摄像、拍照、开始录音、停止录音。
2摄像头 用于拾取图像信号。
3麦克风 用于拾取音频信号。
4状态指示灯孔 内置红绿蓝三色指示灯,3种颜色的灯通过不同的组合方式指示产品的不同工作状态。
5模式开关 通过拨动模式开关,改变设备当前工作模式 6 Standard 4 Pin USB 接口 连接数据线、电源线的接口。
三、 操作说明1. 开关机:1.1 开机A. 长按操作键(部件1)2秒钟,再松开按键。
图片仅供参考,请以实物为准B. 产品电源被打开,绿灯亮起,进入产品的初始化状态。
C. 初始化完成,绿灯熄灭。
D. 开机后,设备进入默认的摄像功能待机状态,红灯亮起。
E. 完成开机。
注意:本产品的开机类似于电脑的启动,有一个启动过程,在此期间,请勿进行任何操作,直到开机动作完成。
开机初始化的时间长短,视存储容量大小而异。
1.2 关机A. 长按操作键(部件1)2秒钟,再松开按键。
B. 状态指示灯全部熄灭,完成关机。
注意:如果您的产品正在工作中,关机时,产品会自动为您保存正在录制的文件。
T1高清1080摄像笔操作说明书
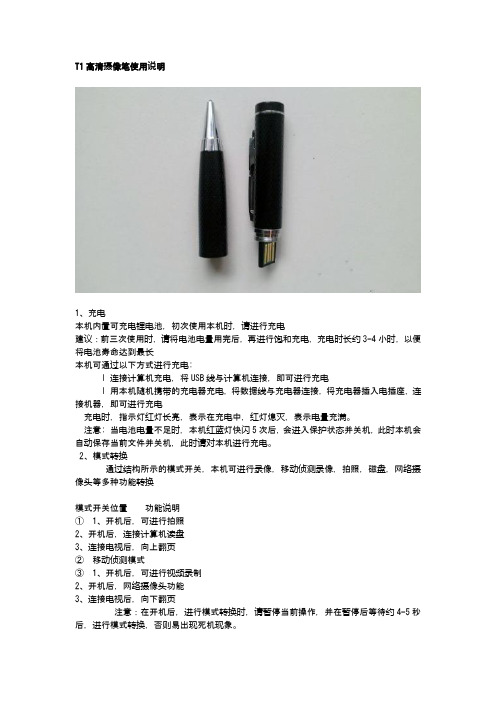
T1高清摄像笔使用说明1、充电本机内置可充电锂电池,初次使用本机时,请进行充电建议:前三次使用时,请将电池电量用完后,再进行饱和充电,充电时长约3-4小时,以便将电池寿命达到最长本机可通过以下方式进行充电:l 连接计算机充电,将USB线与计算机连接,即可进行充电l 用本机随机携带的充电器充电,将数据线与充电器连接,将充电器插入电插座,连接机器,即可进行充电充电时,指示灯红灯长亮,表示在充电中,红灯熄灭,表示电量充满。
注意: 当电池电量不足时, 本机红蓝灯快闪5次后,会进入保护状态并关机,此时本机会自动保存当前文件并关机,此时请对本机进行充电。
2、模式转换通过结构所示的模式开关,本机可进行录像,移动侦测录像,拍照,磁盘,网络摄像头等多种功能转换模式开关位置功能说明①1、开机后,可进行拍照2、开机后,连接计算机读盘3、连接电视后,向上翻页②移动侦测模式③1、开机后,可进行视频录制2、开机后,网络摄像头功能3、连接电视后,向下翻页注意:在开机后,进行模式转换时,请暂停当前操作,并在暂停后等待约4-5秒后,进行模式转换,否则易出现死机现象。
3、开机/关机l 开机:当机器处于关闭状态时,长按开机键,此时指示灯亮起,表示本机已完成开机。
l 关机:保存当前文档后,长按关机键,此时指示灯完全灭掉,表示本机已完成关机。
4、录制影像将模式开关拨至结构说明所示③的位置,本机开机后,此时黄灯长亮,点按顶部按键,此时黄灯闪烁,进入录像状态,再次点按顶部按键,暂停录像,本机保存当前文档,此时黄灯恢复长亮,并处于待机状态。
注意:为确保文件不会丢失,每5分钟自动保存一个视频文件本机属于高端方案,高清技术,为确保视频效果及使用顺畅,请使用CLASS 6 以上原装正版存储卡,否则易出现死机,不放不流畅等现象。
5、移动侦测将模式开关拨至结构说明所示②的位置,本机开机后,此时蓝灯长亮,当侦测到移动物体时,自动启动录像,此时蓝灯闪烁;当侦测不到移动物体10秒后,自动停止录像并保存文件,处于待机状态。
720P超高清录像笔使用说明
720P超高清攝錄隐形筆使用說明書一、產品簡介感謝您選擇本產品,本產品是全球首款真正具備高清攝錄、外置存儲功能的數碼筆,支持大容量Micro TF卡;它有多種實用的功能,時尚精緻的外觀,穩定卓越的品質,廣泛多樣的用途,將給您帶去全新難忘的使用體驗,是您身邊不可缺少的實用工具。
本機主要功能為:高解析錄影、高解析拍照、優質錄音、WEBCAM、隨身磁盤。
本產品具有的特點為:多功能、多用途、外觀時尚酷炫、錄影效果卓越、小巧便攜、方便使用、穩定可靠、反應快速等。
本產品適用於:記者採訪、突發事件記錄、生活片段記錄、娛樂休閒記錄、體育運動記錄、教學輔助記錄、家庭安防監控、執法刑偵取證、旅行人文風景記錄、戶外探險記錄、輔助記憶,等等。
二、結構概述編號名稱描述1 操作鍵它是一個多功能按鍵,在不同模式以及狀態下具有不同功能,包括:開始錄影、停止錄影、拍照、開始錄音、停止錄音。
2 鏡頭用於抓取影像訊號。
3 麥克風用於抓取聲音訊號。
4 狀態指示燈孔內建紅藍兩色指示燈,2種顏色的燈通過不同的組合方式指示產品的不同工作狀態。
5 模式開關“①”關機、復位模式“②”開機、拍照、錄像模式“③”錄音模式6 USB 介面連接資料線、電源線的介面。
7 Micro TF插口存儲卡插入位置三、操作說明1.開關機:1.1 開機A. 模式轉換開關由①撥到②。
B. 產品電源被打開,紅藍燈亮起,進入產品的初始化狀態。
C. 初始化完成,紅燈熄滅。
D. 開機後,設備進入預設的是拍攝功能待機狀態,藍燈長亮。
E. 完成開機。
注意:本產品的開機類似於電腦的啟動,有一個啟動過程,在此期間,請勿進行任何操作,直到開機動作完成。
1.2 關機A. 在攝錄工作完成保存的情況下,模式轉換開關由②撥到①。
B. 狀態指示燈全部熄滅,完成關機。
注意:如果您的產品正在工作中,關機時,需提前保存,否則可能會導致文件丟失或無法讀取。
2.拍照:A. 模式開關由①撥到②,開機完成後,預設進入拍攝待機模式。
录像笔的使用方法
录像笔的使用方法
录像笔的使用方法主要包括以下几个步骤:
1. 开机/关机:长按电源键约2秒,红灯长亮表示摄像笔开机进入待机状态。
再次长按电源键,红灯熄灭表示摄像笔关机。
2. 摄像/录音:开机后即进入待机状态,红灯长亮。
在待机状态下短按一下
电源键开始摄像,蓝灯长亮3秒后熄灭。
再次短按一下电源键停止并保存摄像文件,进入待机状态红灯恢复长亮。
录音则是在待机状态下连续短按两下电源键开始录音,蓝灯闪烁3次后熄灭。
再次连续短按两下电源键停止并保存录音文件,进入待机状态红灯恢复长亮。
3. 文件保存:为了保证文件的大小和安全,摄像文件体积每满约2GB大小
时自动保存一次后并继续摄像,录音文件每2小时自动保存一次后并继续录音。
4. 连接USB:将USB插入电脑后,录像笔会开始充电,且可以通过电脑查看、编辑或删除录像文件。
请注意,以上内容仅供参考,不同型号的录像笔可能有不同的操作方法,具体使用方法可查看产品说明书或咨询商家。
中英文说明书
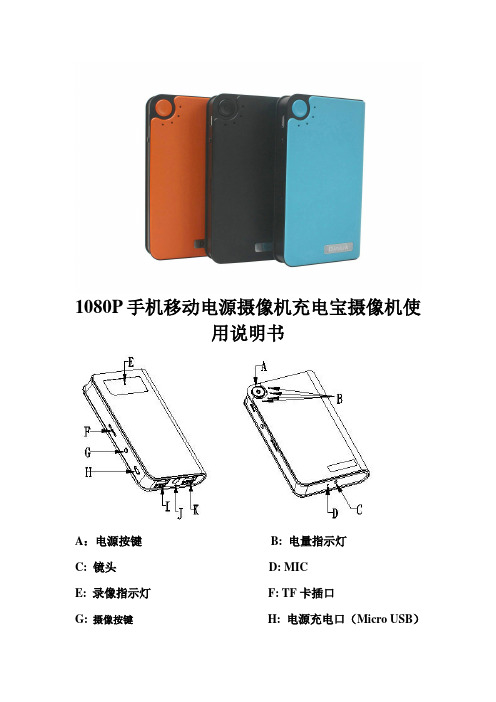
用说明书A:电源按键B: 电量指示灯C: 镜头D: MICE: 录像指示灯F: TF卡插口G:摄像按键H: 电源充电口(Micro USB)I: 摄像机数据口/充电口(DC 5V 2A)J: 照明灯K:电源输出口(DC 5V 1A)感谢您使用我公司的便携微型录像产品,在使用本产品之前,请认真阅读本使用说明书。
注意事项:1. 请不要在高,多尘和潮湿的环境中使用本机;2. 尽量避免在特别干燥的环境下使用本机,以防静电;3. 不要让本机与硬物摩擦撞击,否则会导致外观磨花或其他硬件损坏;4. 本机在格式化或正在进行文件的上传下载时请不要突然断开连接,否则可能会导致程序错误;5. 本机被作为移动磁盘时,请按正确的文件管理操作方法存储导出文件,重要数据请做好备份,任何错误操作方法导致文件丢失,本公司概不负责;6. 请不要拆解本机,本机可以通过USB口充电;一、本机特色:1. 移动电源与摄像机结合的独特设计,TF卡槽外置2. 高清晰1000万摄像头3. 高清AVI格式,音视频同步录制;4. 录像分辨率: 1920*1080 10帧 1280*720 30帧 640*480 30帧 320*240 30帧可选5. 单独拍照功能照片质量达到4032*3024,像素为1200万.6. 内置高容量可反复充电聚合物锂电池.二、操作说明:摄像部分操作说明:1、开机:短按摄像开机键一次,蓝灯长亮,机器进入待机状态。
2、录像:在待机状态下(蓝灯长亮)按下功能键一次,录像指示灯绿灯慢闪3下后熄灭进入录像状态。
录像过程中按摄像按键一次,机器保存录像文件并停止录像,录像文件每20分钟自动保存一个文件。
3、拍照:在待机状态下连按两次摄像按键,此时蓝色指示灯慢闪两次则就拍照一张。
4、录音:在待机状态下连按三次摄像按键,此时蓝色指示灯快闪三次熄灭则进入录音中,若要停止再按一次摄像按键即可。
5、移动侦测:在待机状态下连按四次摄像按键,此时蓝色指示灯均匀闪烁,检测到移动目标后蓝灯快闪三次后熄灭进入录像中,若要停止再按一次摄像按键即可。
录像笔使用说明书-中文
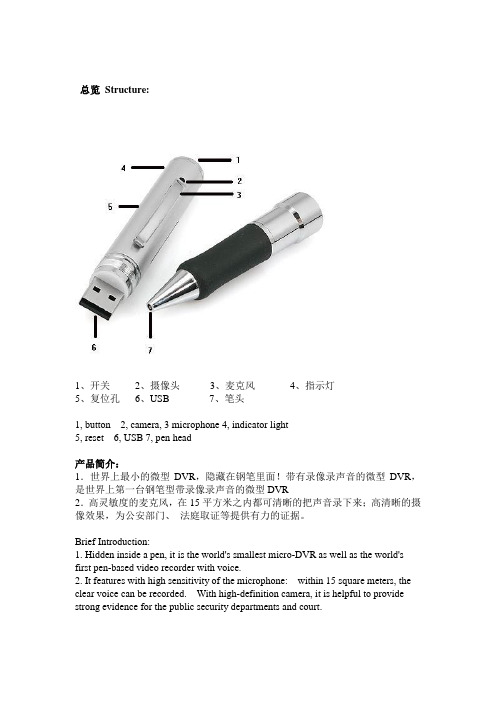
总览Structure:1、开关2、摄像头3、麦克风4、指示灯5、复位孔6、USB7、笔头1, button 2, camera, 3 microphone 4, indicator light5, reset 6, USB 7, pen head产品简介:1.世界上最小的微型DVR,隐藏在钢笔里面!带有录像录声音的微型DVR,是世界上第一台钢笔型带录像录声音的微型DVR2.高灵敏度的麦克风,在15平方米之内都可清晰的把声音录下来;高清晰的摄像效果,为公安部门、法庭取证等提供有力的证据。
Brief Introduction:1. Hidden inside a pen, it is the world's smallest micro-DVR as well as the world's first pen-based video recorder with voice.2. It features with high sensitivity of the microphone: within 15 square meters, the clear voice can be recorded. With high-definition camera, it is helpful to provide strong evidence for the public security departments and court.3.精美的外观,流畅的圆珠笔书写功能,可替换的标准笔芯,耐用环保。
4.适用于任何带USB接口的计算机及其它电子设备。
5.USB2.0标准接口,无需驱动器,无需外接电源。
6.支持WINDOWS98/98SE/ME/2000/XP/MAS OS/ LINUX并自动识别操作系统,安装相应的驱动程序,无需手动安装(WINDOWS98除外)。
7.录象格式为CIF 的352*288的AVI格式8.数据读写速度快:900K/700K字节/秒(与主机速度有关)3. Exquisite looking, smooth ball-point pen to write. The replacable cartridge isdurable and environment-friendly.4. Apply to any computer with USB and other electronic equipment.5. USB2.0 standard interface. No need drive or external power supply.6. Support WINDOWS 98/98SE/ME/2000/XP/MAS OS / LINUX operatingsystems. It may automatic identify the system to install the driver. (ExcpetWINDOWS 98 ).7. 352 x288 CIF file in A VI format8. High reading & writing speed: 900 K/700K bytes / sec (depends on theconnected computer)Applications:A. Police to take recordB. Lawyer to take evidenceC. Reporter to record in the interviewD. stealth monitorWarning: It is forbidden to use for illegal purpose.录像笔应用场合:A.公安执法过程记录B.律师取证C.记者特殊场合采访D.隐形监控录像注:严禁用于(偷拍等)非法目的。
- 1、下载文档前请自行甄别文档内容的完整性,平台不提供额外的编辑、内容补充、找答案等附加服务。
- 2、"仅部分预览"的文档,不可在线预览部分如存在完整性等问题,可反馈申请退款(可完整预览的文档不适用该条件!)。
- 3、如文档侵犯您的权益,请联系客服反馈,我们会尽快为您处理(人工客服工作时间:9:00-18:30)。
录制视频:摄像机进入摄像等待状态,此时绿灯长亮,长按按钮,绿灯闪烁三下,开始录 像;再次短按按钮,停止录像,保存文件,此时红绿恢复长亮;为了保证拍摄文件的 大小和安全,系统将每隔50分钟自动保存一次文件,并继续录像。
Recording Video: camera into the camera to wait for the state, this time a long green light, long press the button, the green light flashes three times to start video; short press the button again to stop recording, save the file, this time to restore a long bright red and green; In order to ensure shot file size and security, the system will automatically save every 50 minutes, once a file, and continue recording.
充电:连接电脑USB接口或充电器,即可对摄像机进行充电,当电池处于充电状 态时,红灯将慢速闪烁,当电池充满电后,红灯变为长亮;
Charging: Connecting a computer USB port or charger, can charge the camera, when the battery is charging state, the red light will blink slowly when the battery is fully charged, the red light into a long-Liang;
异常处理: 摄像机存储空间不足时,将在绿灯和红灯同时闪烁约5秒后,自动保存当前影像 文件并关机。如果你要继续使用摄像机,请在电脑上备份重要的影像文件,并删 除存储器内的旧文件,以腾出足够存储空间; 摄像机电池余量不足时,将在绿灯和红灯交替闪烁约5秒后,自动保存当前影像 文件并关机。如果你要继续使用摄像机,请先充电; 摄像机因偶然的不当操作或其他特殊原因停止响应时,可以用牙签等非金属细 棍伸入复位孔进行复位。 Exception handling: Camera storage space is insufficient, while in the green and red light flashes about 5 seconds later, automatically save the current image file and shut down. If you want to continue to use the camera, in the image on the computer back up important files, and delete the memory of the old files to free up enough storage space; Camera battery is insufficient margin will be alternately flashes green and red light about 5 seconds later, automatically save the current image file and shut down. If you want to continue to use the camera, please charge; The camera due to accidental causes improper operation or other special stops responding, you can use toothpicks and other non-metallic thin rod stretching reset hole to reset.
设置时间:摄像机提供了在视频文件中显示录像时间的功能,你可以根据实际需要 设置时间的值;时间显示格式为:“年.月.日 时:分:秒”,设置时间方法如下: a. 关闭摄像机——》连接电脑——》打开摄像机可移动磁盘——》在摄像机根目录 下面空白处单击鼠标右键——》把鼠标移至弹出菜单的“新建”选项上方——》选 择“文本文档”——》给该文本文档取名为“time”,需要注意它的扩展名为 “.txt” ——》时间设置文件建成;你也可以按照上述步骤在电脑桌面、其他磁盘分 区、其他文件夹下建好后再拷贝到可移动磁盘的根目录。 b. 打开“time”文本文档,在里面输入时间设置字符串,字符串由“年月日 时分秒” 几个部分组成,要设置时间,请按以下格式设置: 2009.01.01 12.01.01 Y 上述格式中的时间字符串部分为你想设置的时间值,注意年月日与时分秒中的空格。 c. 确认时间设置文件已经拷贝到根目录之后,卸载硬件,开机,时间设置完成。 d. 设置好的时间将保存到摄像机里面。
高清摄像笔使用说明书 High-definition camera pen manual
产品简介 本产品是具有高清影音拍摄功能的数码笔,可以拍摄和存储高画质有声视频。 具 有操作简便,小巧精致,美观实用,便于携带的特点,是商务、教育、安防、 媒体、 司法、旅游、医疗,生活等领域必备的实用工具,深受广大用户青睐。
Connected to a computer: In the off state or standby state, can be connected to a computer at this time, the computer will pop up a removable disk logo, image file directory as follows: * Plate \ _REC \ 100MEDIA; when the camera and computer to exchange data, the green light will blink rapidly; need to uninstall the camera, please click on the task bar bottom right corner of the mobile device management icons inside uninstall the removable storage device, to be systematically identified After the hardware can be safely pulled out, then disconnect the camera and computer connections.
Set the time: the camera provides a video file to display the time recording function, you may need to set the time according to the actual value; time display format: "year. Dated. Day: minutes: seconds", set the time as follows : a. turn off the camera——》Connect the computer ——》 Open the camera removable disk ——》 In the space below the root directory of the camera click the right mouse button ——》to move the mouse pop-up menu "New" option at the top ——》 Select "Text Document——》Select "Text Document——》to the text document named" time ", to note its extension". Txt ——》 time to set file built; you can follow the steps above on your desktop, other disks Division, completed the other folder and then copied to the removable disk root directory. b. Open the "time" a text document, enter the time settings inside the string, the string by "date when the minutes and seconds," composed of several parts, to set the time, to set the following format: 2009.01.01 12.01.01 Y The format string portion of the time you want to set time value, pay attention to date in the spaces with the minutes and seconds. c. To confirm time setting file has been copied to the root directory, uninstall the hardware, boot, time is set to complete. d. Setting a good time will be saved to the camera inside.
连接电脑:在关机状态或者待机状态时,可以连接电脑,此时,电脑将会弹出可移 动磁盘标识,影像文件保存目录为:*盘\ _REC\100MEDIA;当摄像机与电脑交 换数据时,绿灯会快速闪烁;需要卸载摄像机时,请点击任务栏右下角的可移动 设备管理图标,在里面卸载该可移动存储设备,待系统确认可以安全拔出硬件后, 再断开摄像机与电脑的连接。