YSIPro20溶解氧测定仪YSIPro20
YSI5000 5100溶解氧测量仪 说明书
YSI 5000YSI 5000/5100溶解氧测量儀操作手册目录概述: 2控制: 3356设置 6 显示设置7 报告设置7 自动稳定设置8 系统设置9校准10 溶解氧校准10 自动校准10 溶解氧校准(手动)11 气压计11 盐度11 零校准12 操作14主模式14 测量14储存15浏览15发送16应用模式17 OUR17 SOUR 18遥控20 诊断22 历史记录22 传感器22 参数复位23242425 附录B26附录C-单位换算表26附录D -遥控命令语法 27概述:5000系列溶解氧分析仪专门设计用于实验室的溶解氧及BOD 测量。
全部选单操作易于使用;内部储存器可储存100组读数;自动稳定检测使读数达到稳定时自动报读,膜检测当膜破损时自动警示。
仪器上的一切功能均可通过RS232接口由电脑直接操控。
操作软件亦可由用户自行升级。
此外,5100型还内置了OUR/SOOUR 测试软件,可快速自动测定活性污泥的活性。
5100型还内置了气压针,能够进行自动气压补偿及自动校准,更可外接条形码阅读器或电脑键盘,以便于数据输入。
控制: 面板5000/5100型控制面板如下图:显示屏键模式开/关MODE 键STORE REVIEW SEND CALIBRATE四个软键的功能显示在显示屏的下端,这些软键的功能将随模式的变化而不同。
[Mode]键和软键用于菜单间的引导,[Mode]键用于两个主操作模式间的循环,按一个软键将导出一组新的软键功能(选单)。
[Mode]键也用于返回上一级选单。
软件流程图下图是500/5100型两个操作模式软件的流程图,其中阴影的方框只适用于5100型。
背板仪器背板包括了电源插口,探头、条码阅读器/外接电脑键盘接口以及RS232串行口,如图所示,条码阅读器和外接电脑键盘共用一个接口,此功能仅5100型可用。
1.电源插头:电源输入为-4.5至5.5V AC,最小电流350ma。
2.探头接口:探头接口是一个8针小型DIN接口。
西双版纳南腊河浮游植物群落结构及其与水环境因子的关系
西双版纳南腊河浮游植物群落结构及其与水环境因子的关系朱佳志;刘明典;黄福江;刘瑞超;刘绍平【摘要】为研究南腊河浮游植物群落结构变化特征及其与水环境因子的关系,分别于2013年8月和11月对西双版纳地区南腊河的浮游植物和环境因子进行调查,运用多元分析方法分析了浮游植物在南腊河的分布情况及其与环境因子间的关系。
结果显示,南腊河上游水体的优势种群为蓝藻,下游水体的优势种群为硅藻。
浮游植物密度在季节间变化不显著,而空间分布则表现出极显著性差异。
比较浮游植物多样性指数后发现,南腊河属于α/β-中污型河流。
大部分样点的浮游植物群落结构未发生明显的季节性变化。
主成分分析(PCA)和典范对应分析(CCA)显示,总氮可能是雨季南腊河浮游植物生长的主要限制因子,而水温则是旱季影响浮游植物的主导因素,浊度和固体悬浮物浓度在旱季对浮游植物密度的抑制效果明显。
%A detailed field survey of hydrological , chemical and biological resources was conducted to find out the changes of phytoplankton community structure and the relationship with environmental factors in August and November 2013 in Nan-la River, which located in Xishuangbanna , Yunnan Province of China .Multivariate analysis method was used to calculate the distributions of phytoplankton and its relationship with environmental factors .Results showed that Cyanophyta was domi-nant population in the upstream water while Bacillariophyta was dominant population in the downstream .The cell density of phytoplankton did not change significantly among the seasons , but showed extremely significant difference in spatial distri -bution.It was found that the water body of Nanla River belonged to α/β-ms typecompared the phytoplankton biodiversity index.No obvious seasonal changes of phytoplankton community structure were found in spatial distribution .Results of principal component analysis and canonical correspondence analysis indicated that total nitrogen (TN) was likely to be a limiting factor for the growth of phytoplankton in the rainy season .And the water temperature (WT) was the main factor af-fecting phytoplankton in the dry season .Meanwhile turbidity (TUR) and suspended solids (SS) had inhibitory effect on the density of phytoplankton in the dry season .【期刊名称】《淡水渔业》【年(卷),期】2015(000)006【总页数】8页(P39-45,69)【关键词】南腊河;浮游植物;环境因子;主成分分析;典范对应分析【作者】朱佳志;刘明典;黄福江;刘瑞超;刘绍平【作者单位】华中农业大学水产学院,武汉 430070; 中国水产科学研究院长江水产研究所,武汉 430223;中国水产科学研究院长江水产研究所,武汉 430223;中国水产科学研究院长江水产研究所,武汉 430223;中国水产科学研究院长江水产研究所,武汉 430223;中国水产科学研究院长江水产研究所,武汉 430223【正文语种】中文【中图分类】S932.8浮游植物是河流生态系统的重要组成部分,能够随营养盐、温度及流域水文条件等的改变而呈现出一定的季节变化。
YSI溶氧仪说明书
YSI 550A溶氧仪使用说明Page 3-Page10YSI 550A 特点电池YSI 550A 溶氧仪由4 节3 号(C )碱性电池驱动,一组全新的碱性电池可以持续工作大约2000 小时。
当需要更换电池时,LCD 显示屏上会显示“LO BAT”信息。
当第一次出现此信息时,仪器在背景光不开时还能工作大概50 小时。
仪器外壳防水的仪器外壳是在工厂里封装好的,除了YSI 授权的技术人员外,不能打开机壳。
警告:切勿尝试把仪器前后半部的外壳打开,因为这会破坏防水密封装置并可能引起仪器损坏。
此种情况不属保修范围。
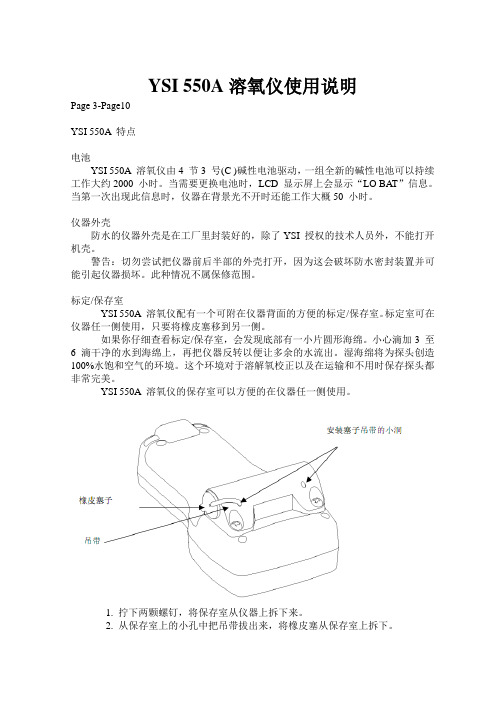
标定/保存室YSI 550A 溶氧仪配有一个可附在仪器背面的方便的标定/保存室。
标定室可在仪器任一侧使用,只要将橡皮塞移到另一侧。
如果你仔细查看标定/保存室,会发现底部有一小片圆形海绵。
小心滴加3 至6滴干净的水到海绵上,再把仪器反转以便让多余的水流出。
湿海绵将为探头创造100%水饱和空气的环境。
这个环境对于溶解氧校正以及在运输和不用时保存探头都非常完美。
YSI 550A 溶氧仪的保存室可以方便的在仪器任一侧使用。
1. 拧下两颗螺钉,将保存室从仪器上拆下来。
2. 从保存室上的小孔中把吊带拔出来,将橡皮塞从保存室上拆下。
3. 将吊带塞入保存室上相应的小洞中,重新将橡皮塞装到保存室上。
4. 用两颗螺钉将保存室重新装到仪器上。
手带手带设计可使你毫不费劲舒适地操作55 型。
若手带调节适当,整部仪器可稳固地套在你手上而不致滑掉脱手。
手带可以方便的用于仪器任一侧。
将手带从一侧移到另一侧:1. 将两条粘贴带分开。
2. 将手带从上部和下部的钩子上取下。
3. 将手带穿过仪器另一侧的钩子。
4. 调节手带的长度直至你的手可舒适地动作。
5. 把两条粘贴带粘合。
工作原理探头由一个柱状的银阳极和一个环形的黄金阴极组成。
使用时,探头末端需注满电解液,该溶液含有少量的表面活性剂以增强其湿润作用。
探头前端覆盖有一片渗透性膜,把电极与外界分隔开,但气体可进入。
YSI多参数水质分析仪Proplus 中文操作手册

用户手册
目录
质量保证 .............................................................................................................. i
简介 ........................................................ ...... ..................................................... 1
进行测量 ..................................................................................................................... 49 溶解氧 ......................................................................................................... 49 电导率 ......................................................................................................... 49 pH/氧化还原电位 ....................................................................................... 50 铵、硝酸盐、氯化物................................................................................... 50
水质检测方法如何检测水质

水质检测方法-如何检测水质水质的检测水质的分析1 方法来源西北轻工业学院《皮革分析检验》。
2 适用范围适用于井水、自来水的测定。
3 测试方法硬度单位水的硬度单位在化学分析上常以每一百万份水中所含碳酸钙的份数来表示,简写为ppm。
至于水中其它杂质如镁盐等都折合成相当于CaCO3量来计算。
硬水和软水的区分:CaCO3含量:15 ppm 极软水15~50 ppm 软水50~100 ppm 略硬水100~200 ppm 硬水>200 ppm 极硬水总硬度的测定原理乙二胺四乙酸二钠是一种溶解度好、对钙、镁离子具有优良的螯合能力的螯合剂,它与钙、镁离子形成稳定、无色可溶的螯合物。
试剂EDTA标准溶液:/L。
配制:称取分析纯乙二胺四乙酸二钠溶于300ml温蒸馏水中,冷却,稀释至1L,此溶液浓度约为/L。
标定:准确称取分析纯锌粒,溶于mL 1:1 HCl中,用蒸馏水稀释至1L,即为/L锌基准液。
用移液管吸取于250mL 锥形瓶中,加25mL蒸馏水,用分析纯氨水中和至微碱性,再加5mLNH4OH-NH4Cl缓冲溶液和5滴铬黑T指示剂,用中配制的EDTA标准溶液滴定至溶液由酒红色变为纯蓝色即为终点。
EDTA标准溶液浓度的计算按式计算EDTA标准溶液的浓度:c1 = c2×V2V …………………………………….1式中:c1 ———— EDTA标准溶液的摩尔浓度,mol/L;V1 ————滴定锌基准液消耗EDTA标准溶液的体积,mL;c2 ————锌基准液摩尔浓度,mol/L;V2 ————锌基准液体积,mL。
NH4OH-NH4Cl缓冲溶液:pH=10称取20g NH4Cl,溶于适量的蒸馏水中,加入100mL 25%的氨水,再用蒸馏水稀释至1L。
此缓冲溶液pH=10。
铬黑T指示剂溶液:%称取铬黑T,溶于40mL无水乙醇中,再加入60mL 25%的氨水,即为深蓝色铬黑T指示剂。
此溶液有效期略一个月。
用下法配制的指示剂可以较长期保存:称取铬黑T,加100g固体氯化钠,研磨均匀,紧塞备用。
YSI DO便携式溶氧仪操作维护规程

YSI DO便携式溶氧仪操作维护规程1. 目的为保证正确使用本仪器,使仪器长期有效运转,特制定本操作规程。
2. 适用范围本操作规程仅适用于YSI DO200便携式溶氧仪的使用、维护和保养。
3. 技术说明显示测量范围分辨率准确度溶解氧ppm (毫克/升) 0~20 0.01 读数之±2%或±0.2ppm(毫克/升),以较大者为准溶解氧(%空气饱和度)0~200% 0.1% 读数之±2%或±2%空气饱和度,以较大者为准温度(℃)-6~46℃0.1℃±0.3℃±1最小有效位数4. LCD显示4.1 BAT:低电指示4.2 CAL:校准模式指示4.3 SAL ppt:校准模式中显示,提示输入水体盐度(单位:千分数)4.4 mBar:校准模式中显示,提示需输入的大气压力(单位:毫巴)4.5 主显示区:显示溶解氧值4.6 %/ppm:溶解氧单位指示4.7 副显示区:显示℃温度值5.操作程序按:(开关)键打开或关闭仪器。
开机,仪器自动运行自检程序,此时显示屏上可能会出现“ovEr ”信息,这是正常现象;预热结束后,此信息会自动消失。
自检程序完成后,温度显示在显示屏右下方,此时仪器已可正常运行。
将探头浸入水体中,尽可能避免探头上的盖膜碰到溶液中的尖锐物,以免割破盖膜。
不要让气泡出现在探头周围。
仪器不使用时,关闭仪器以节省电力。
注意:在溶解氧测试过程中,水体流速或探头的搅动速率必须达到0.15 米/秒,以抵消传感器自身耗氧所需。
6.校准程序6.1将5~6滴净水(自来水、蒸馏水或去离子水)滴入校准瓶中的海绵上。
倒置校准瓶,让多余的水流出瓶子。
湿润的海绵为探头创造一个水饱和的空气环境,用于校准、运输和储存 DO200 探头。
校准时,探头应保持在一个水饱和的空气环境中,而不是浸入水中。
6.2将探头插入校准瓶,确保膜没有触到海绵。
6.3按(开关)键打开仪器,等待10~15分钟使溶解氧和温度读数稳定。
美国溶氧仪YSI-Pro20手册
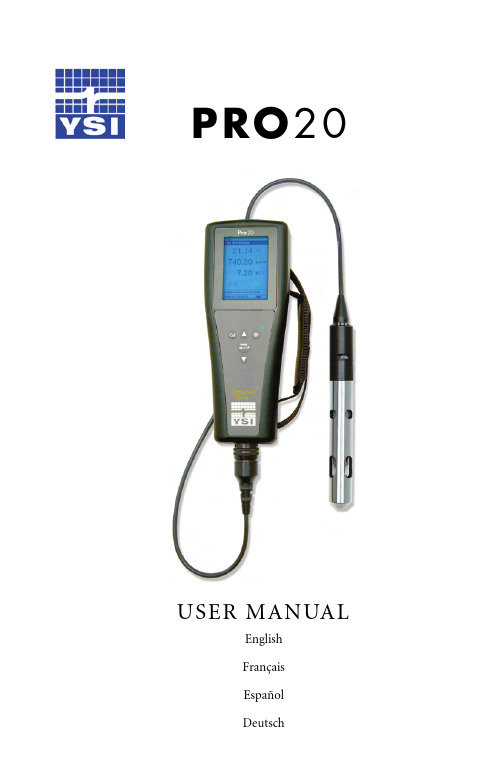
PRO20USER MANUALEnglishFrançaisEspañolDeutschItem # 605597Rev BDrawing # A605597October 2008©2008 YSI Incorporated.The YSI logo is a registered trademark of YSI Incorporated. Teflon is a registered trademark of E. I. du Pont de Nemours and Company.C O N T E N T S Warranty (1)Introduction (2)Getting Started (2)Initial Inspection (2)Battery Installation (2)Keypad (3)Connecting the Sensor and Cable (4)Membrane Installation (7)Backlight (7)Powering Off (7)Run Screen (7)Navigation (8)First Power On (9)System Setup Menu (10)DO Local% (10)Last Digit Suppression (LDS) (11)One Touch Calibration (One Touch Cal) (11)Audio (11)Contrast (11)Sensor Type (12)Membrane Type (13)Auto Stable (14)DO Units (14)Temperature Units (15)Pressure Units (15)Language (15)Auto Shutoff (15)Resetting the System Setup Menu to Factory Default (16)Exiting the System Setup Menu (17)Calibration (17)Temperature (17)Barometer (17)Dissolved Oxygen (18)Salinity Compensation Calibration (21)Taking Measurements (22)Saving and Viewing data (22)Saving Data (22)Viewing and Erasing Saved Data – Data mode (23)Principles of Operation (25)Care, Maintenance, and Storage (26)General Maintenance (26)Sensor Maintenance (28)Sensor Storage (32)Troubleshooting (33)Specifications (35)Accessories/Part Numbers (36)Declaration of Conformity (37)Recycling (38)Contact Information (39)Ordering & Technical Support (39)Service Information (39)W A R R A N T YThe YSI Pro20 Instrument is warranted for three (3) years from date of purchase by the end user against defects in materials and workmanship, exclusive of batteries and any damaged caused by defective batteries. Pro20 cables are warranted for two (2) years from date of purchase by the end user against defects in material and workmanship. Pro20 Polarographic sensors are warranted for one (1) year and Galvanic sensors are warranted for six (6) months from date of purchase by the end user against defects in material and workmanship. Pro20 instruments, cables & probes are warranted for 90 days from date of purchase by the end user against defects in material and workmanship when purchased by rental agencies for rental purposes. Within the warranty period, YSI will repair or replace, at its sole discretion, free of charge, any product that YSI determines to be covered by this warranty.To exercise this warranty, call your local YSI representative, or contact YSI Customer Service in Yellow Springs, Ohio at +1 937 767-7241, 800-897-4151 or visit (Support tab). Send the product and proof of purchase, transportation prepaid, to the Authorized Service Center selected by YSI. Repair or replacement will be made and the product returned, transportation prepaid. Repaired or replaced products are warranted for the balance of the original warranty period, or at least 90 days from date of repair or replacement.LIMITATION OF WARRANTYThis Warranty does not apply to any YSI product damage or failure caused by:1)failure to install, operate or use the product in accordance with YSI's writteninstructions;2)abuse or misuse of the product;3)failure to maintain the product in accordance with YSI's written instructionsor standard industry procedure;4)any improper repairs to the product;5)use by you of defective or improper components or parts in servicing orrepairing the product;6)modification of the product in any way not expressly authorized by YSI.THIS WARRANTY IS IN LIEU OF ALL OTHER WARRANTIES, EXPRESSED OR IMPLIED, INCLUDING ANY WARRANTY OF MERCHANTABILITY OR FITNESS FOR A PARTICULAR PURPOSE. YSI's LIABILITY UNDER THIS WARRANTY IS LIMITED TO REPAIR OR REPLACEMENT OF THE PROD UCT, AND THIS SHALL BE YOUR SOLE AND EXCLUSIVE REMED Y FOR ANY D EFECTIVE PROD UCT COVERED BY THIS WARRANTY. IN NO EVENT SHALL YSI BE LIABLE FOR ANY SPECIAL, INDIRECT, INCIDENTAL OR CONSEQUENTIAL DAMAGES RESULTING FROM ANY DEFECTIVE PRODUCT COVERED BY THIS WARRANTY.1I N T R O D U C T I O NThank you for purchasing the YSI Pro20, an instrument from the YSI Professional Series product family. The Pro20 features an impact resistant and waterproof (IP-67) case, backlit display, user-selectable sensor options, internal barometer, and a rugged, rubber over-mold case.The Pro20 provides valuable instructions and prompts near the bottom of the display that will guide you through operation and use. However, reading the entire manual is recommended for a better understanding of the Pro20’s features. The Pro20 can not communicate to a PC via a Pro Pluscommunications saddle. Connecting the Pro20 to acommunication saddle may cause erratic instrument behavior.L G E T T I N G S T A R T E D INITIAL INSPECTIONCarefully unpack the instrument and accessories and inspect for damage.Compare received parts with materials listed on the packing list. If any parts or materials are missing or damaged, contact YSI Customer Service at 800-897-4151 (+1-937-767-7241) or the Authorized YSI distributor from whom the instrument was purchased.BATTERY INSTALLATIONThis instrument requires 2 alkaline C-cell batteries. Under normal conditions, battery life is approximately 400 hours at room temperature without using theback light. A battery symbolwill blink in the lower, left corner of the display to indicate low batteries when approximately 1 hour of battery life remains.To install or replace the batteries:1) Turn the instrument off and flip over to view the battery cover on the back. 2) Unscrew the four captive battery cover screws. 3) Remove the battery cover, and remove the old batteries if necessary. 4) Install the new batteries, ensuring correct polarity alignment (Figure 1). 25) Place the battery cover on the back of the instrument and tighten the four screws. Do NOT over-tighten.The waterproof instrument case is sealed at the factory and is not to be opened, except by authorized service technicians. Do notattempt to separate the two halves of the instrument case as thismay damage the instrument, break the waterproof seal, and willvoid the warranty. KEYPADL345 612 Figure 1, Pro20 with battery cover removed. Note battery symbols indicating polarities.Figure 2, keypad3Number Key Description 1Calibrate Press and hold for 3 seconds to calibrate. Initiates One Touch Calibration.Opens Calibrate menu from the run screen if OneTouch Calibration is disabled.2 Up ArrowUse to navigate through menus, to navigate throughbox options at the bottom of the run screen, and toincrease numeric inputs.3 Power and BacklightPress once to turn instrument on. Press a secondtime to turn backlight on. Press a third time to turnbacklight off. Press and hold for 3 seconds to turninstrument off.4 MenuUse to enter the System Setup menu from the runscreen.5EnterPress to confirm entries and selections.6Down ArrowUse to navigate through menus, to navigate throughbox options at the bottom of the run screen, and todecrease numeric inputs.CONNECTING THE SENSOR AND CABLECONNECTING THE SENSOR“Sensor” refers to the removable portion or electrode sensing portion of the cable assembly, i.e. the dissolved oxygen sensor. “Bulkhead” refers to the portion of the cable with the single-pin connector (Figure 3).4The Pro20 has two compatible sensors for use with a field cable:Polarographic – This sensor has a black sensor body and is engraved with the model number 2003. Polarographic will be abbreviated Polaro in the instrument.Galvanic – This sensor has a grey sensor body and is engraved with the model number 2002.For information about the differences on the two sensor types, see Sensor Type in the System Setup menu section and/or the Principles of Operation section of this manual.If using a ProBOD sensor/cable assembly, there is no need to install a sensor because it has a built in Polarographic dissolved oxygen sensor.Before installing either sensor or connecting the cable to theinstrument, the Sensor Type must be configured for the sensor beinginstalled/connected. Failure to do this may result in damage notLcovered under warranty. The instrument will step you through thissetup the first time it is powered on. See the System Setup menusection of this manual for instructions on configuring the SensorType after the first power on.1)Ensure both the sensor connector and sensor port on the cable are clean anddry.2)Grasp the sensor with one hand and the cable bulkhead in the other.3)Push the sensor into the connector on the cable until it is firmly seated andonly 1 o-ring is visible. Failure to properly seat the sensor may result indamage.4)Twist the sensor clockwise to engage threads and finger tighten. Do NOTuse a tool. This connection is water-tight.For more detailed instructions, please refer to the sensor installation sheet that is included with each sensor.Figure 3 BulkheadSensor5CONNECTING THE CABLEThe Pro20 is designed for field and laboratory use. It is compatible with two different cable options:1) The field rugged cable is available in standard lengths of 1, 4, 10, 20, 30, and 100 meters with special lengths available between 30 and 100 meters. This cable has a built in temperature sensor and includes a port for the dissolved oxygen sensor. 2) The ProBOD is a 1 meter probe/cable assembly with built in Polarographic dissolved oxygen and temperature sensors. It has an AC powered motor for sample stirring and is designed to fit into a 300 ml BOD bottle.To connect the cable, align the keys in the cable connector to the slots in the instrument connector. Push together firmly and then twist the outer ring until itlocks into place (Figure 4). This connection is water-proof.Figure 4, Note the keyed connector. When disconnected, the sensor and cable’s sensor connectors areNOT water-proof. Do not submerge the cable without a sensorinstalled. When disconnected, the cable’s instrument connector andthe connector on the instrument maintain a waterproof, IP-67rating.L6MEMBRANE INSTALLATIONThe dissolved oxygen sensor is shipped with a dry, protective red cap that will need to be removed before using. It is very important to put a new membrane with electrolyte solution on the sensor after removing the red cap.Prepare the membrane solution according to the instructions on the bottle. After mixing, allow the solution to sit for 1 hour. This will help prevent air bubbles from later developing under the membrane. Ensure you are using the correct electrolyte solution for the correct sensor. Galvanic sensors utilize electrolyte with a light blue label and Polarographic sensors utilize electrolyte with a white label. The D issolved Oxygen sensor is supplied with cap membranes specific to the sensor type ordered (Polarographic or Galvanic). 5913 and 5914 membrane kits are for Galvanic sensors and the 5908 and 5909 membrane kits are for Polarographic sensors.Remove and discard or save the red protective cap. Thoroughly rinse the sensor tip with distilled or deionized water. Fill the cap membrane 3⁄4 full of electrolyte solution, then tap the cap with a finger to release any trapped air. Be careful not to touch the membrane portion of the cap. Thread the membrane cap onto the sensor, moderately tight. Do not use a tool. It’s typical for some of the electrolyte solution to spill over. It is best to allow the new cap to remain on a new sensor overnight before trying to calibrate. For detailed instructions on changing a membrane cap, see the Care, Maintenance, and Storage section of this manual. BACKLIGHTOnce the instrument is on, pressing power/backlight key will turn on the display backlight. The backlight will remain on until the key is pressed again or after two minutes of not pressing any key on the keypad.POWERING OFFTo turn the instrument off, press and hold the power/backlight key for three seconds.RUN SCREENPress the power/backlight key to turn the instrument on. The instrument will run through a self test and briefly display a splash screen with system information before displaying the main run screen (Figure 5). The first time the Pro20 isturned on, it will step through language, sensor, and membrane selections; see the First Power On section of this manual for more information.Figure 5, example of main run screen with Save highlighted. NAVIGATIONThe up and down arrow keys allow you to navigate through the functions of the Pro20.NAVIGATING IN THE RUN SCREENWhen in the run screen, the up and down arrow keys will move the highlighted box along the bottom options. Once a box is highlighted, press enter to access the highlighted option.Description of run screen box functions from left to right: Option Description Barometer readingHighlight and press enter to calibrate the barometer Salinity compensationvalueHighlight and press enter to adjust salinity compensation value SAVE Highlight and press enter to save current data tomemoryDATA Highlight and press enter to view and/or erase saveddata NAVIGATING IN THE SYSTEM SETUP MENUWhen in the System Setup menu, the up and down arrow keys will move the highlighted bar up and down the system setup options. See the System Setup menu section of this manual for more information about these options. FIRST POWER ONThe instrument will step through an initial configuration when powered on for the first time. This will set the language, sensor, and membrane options. Use the up or down arrow keys to highlight the appropriate language, sensor, and membrane, then press enter to confirm (Figures 6, 7, and 8). The Sensor Type must be configured for the sensor installed. Failure to do this may result in damage not covered under warranty. If an incorrect option is selected, it may be changed in the System Setup menu.Select Sensor Type: 7 Polaro (black) Galvanic (grey) Use ST to select sensor type Press to confirm Select Language: 7 English Français Español Deutsch Use ST to select Language Press to confirm Figure 6, Language selectionSelect Membrane Type: 71.25 (Yellow) 2.0 (Blue) Use ST to select membrane Press to confirmFigure 8, Membrane selection Figure 7, Sensor selectionAfter selecting a language, sensor, and membrane, the run screen will appear. The next time the instrument is powered up the run screen will appear immediately after the self check. If the sensor type or membrane type is changed, ensure that it updated in the System Setup menu.S Y S T E M S E T U P M E N UPress the menu key to access the following System Setup functions.The System Setup menu contains multiple screens which are notated as ‘pages’. The current page is indicated on the display, figure 9.DO LOCAL%DO Local% can be enabled or disabled by using the up or down arrow keys to highlight it and then pressing enter. An ‘X’ in the box next to D O Local% indicates it is enabled (Figure 9).Figure 9, DO %Local is enabled.When D O Local% is enabled, D O% values will be expressed as %L on the run screen.D O Local% allows for localized dissolved oxygen measurements. This sets the DO% calibration value to 100% regardless of the altitude or barometric pressure. When DO Local% is enabled, the Pro20 will factor in the barometric pressure on each measurement. For example, if the barometric pressure changes, the DO %L reading would remain constant in air-saturated water or in water-saturated air. Local DO is ideal for EU compliance.LAST DIGIT SUPPRESSION (LDS)Last Digit Suppression (LDS) can be enabled or disabled by using the up or down arrow keys to highlight it and pressing enter . An ‘X’ in the box next to LDS indicates it is enabled.LDS rounds the DO value to the nearest tenth; i.e. 8.25 mg/L becomes 8.3 mg/L. LDS is automatically disabled during calibrations.ONE TOUCH CALIBRATION (ONE TOUCH CAL)One Touch Calibration can be enabled or disabled by using the up or down arrow keys to highlight One Touch Cal and pressing enter . An ‘X’ in the box next to One Touch indicates it is enabled.When One Touch Cal is enabled, press and hold the calibration key for 3 seconds while in the run screen to calibrate D issolved Oxygen to the barometer reading and salinity correction value. For more information on One Touch Calibration, see the Calibration section of this manual.AUDIOAudio can be enabled or disabled by using the up or down arrow keys to highlight Audio and pressing enter . When enabled, there will be an ‘X’ in the box next to Audio.When Audio is enabled, the Pro20 will beep twice to indicate stability when Auto Stable is enabled. The instrument will also beep when a key is pressed. When Audio is disabled, the Pro20 will not beep.CONTRASTTo adjust the display Contrast, use the up or down arrow keys to highlight Contrast, then press enter . Next, use the up or down arrow keys to adjust the contrast. The up arrow will darken the contrast and the down arrow will lighten the contrast. After adjusting the contrast, press enter to save and exit the Contrast adjustment option.EMERGENCY CONTRAST ADJUSTMENTIf necessary, there is an alternate method of adjusting the contrast. To adjust the contrast, press and hold the menu key, then press the up arrow key to darken the contrast or press the down arrow key to lighten the contrast.SENSOR TYPEThe instrument’s Sensor Type must be configured for the sensorLinstalled. Failure to do this may result in damage not coveredunder warranty. If you observe readings very close to 0 orextremely high readings, i.e. 600%, your Sensor Type setting maybe set incorrectly.Sensor Type sets the type of oxygen sensor being used; either Polarographic (black) or Galvanic (grey).Use the up or down arrow keys to highlight Sensor Type, then press enter to open a submenu. Highlight the sensor type corresponding to the sensor installed on the cable and press enter to confirm. The enabled sensor type will have an ‘X’ in the box next to it. Use the down arrow key to highlight the ESC – Exit, then press enter to save changes and to close the sensor submenu.If using a ProBOD sensor/cable assembly, the sensor type should be set to polarographic.The Pro20 has two compatible sensors for use with a field cable:Polarographic – This sensor has a black sensor body and is engraved with the model number 2003. Polarographic will be abbreviated Polaro in the instrument. Galvanic – This sensor has a grey sensor body and is engraved with the model number 2002.In terms of physical configuration, membrane material, and general performance, YSI Professional Series Galvanic dissolved oxygen sensors are exactly like the Professional Series Polarographic sensors. The advantage of using Galvanic sensors is convenience. Galvanic sensors provide for an instant-on sensor without the need for warm-up time but this affects the life of the sensor. Polarographic sensors last longer and have a longer warranty but require a 5-15 minute warm-up time before use or calibration.MEMBRANE TYPEMembrane Type sets the type of membrane used on the dissolved oxygen sensor; either 1.25 PE (Yellow) or 2.0 PE (blue). Use the up or down arrow keys to highlight Membrane Type and press enter to open the membrane submenu. Highlight the membrane type corresponding to the membrane installed on the sensor and press enter to confirm. The enabled membrane type will have an ‘X’ in the box next to it. Use the down arrow key to highlight the ESC – Exit box and press enter to save changes and to close the membrane submenu.The dissolved oxygen sensor is supplied with membranes specific to the sensor type ordered and are color coded as described in the following tables.Galvanic Membrane KitsItem Color M aterial Description5913 Yellow 1.25 mil polyethylene Faster response time and less flowdependence than traditional Teflon®membranes5914 Blue 2.0 mil polyethylene Less flow dependence than 1.25 milbut somewhat slower response Polarographic Membrane KitsItem Color M aterial Description5908 Yellow 1.25 mil polyethylene Faster response time and less flowdependence than traditional Teflon®membranes5909 Blue 2.0 mil polyethylene Less flow dependence than 1.25 milbut somewhat slower response Selecting a Dissolved Oxygen MembraneMembrane Type Flow Dependence After 4 Minutes Typical Response Timeto 95% 5913, 5908 - Yellow 25% 8 seconds5914, 5909 – Blue 18% 17 secondsAUTO STABLEAuto Stable utilizes preset values to indicate when a reading is stable. The preset values are adjustable in the System Setup menu. The user can input a % change in dissolved oxygen readings (0.0 to 1.9) over ‘x’ amount of time in seconds (3-19).Highlight Auto Stable and press enter to expand the submenu. Use the up or down arrow keys to highlight the DO% Change or seconds (secs) input field, then press enter to make the highlighted field adjustable. Use the up and down arrow keys to adjust the selected value, then press enter to confirm changes. Once you have confirmed any changes, highlight the ESC-Exit box and press enter to close the Auto Stable submenu.To disable Auto Stable, set the DO% Change input to 0.0.When Auto Stable is enabled, a will display next to the dissolved oxygen value on the run screen and blink during stabilization. When the dissolved oxygen value has stabilized based on the Auto Stable settings, the will display steadily and the instrument will beep twice if Audio is turned on.DO UNITSHighlight DO Units and press enter to open a submenu that will allow you to select the dissolved oxygen units displayed on the run screen. Highlight the desired unit(s) and press enter to enable or disable. An enabled dissolved oxygen unit will have an ‘X’ in the box next to it. Highlight the ESC-Exit box and press enter to save any changes and to close the DO units submenu.There are three options for displaying dissolved oxygen:mg/L will show D O readings in milligrams per liter on a scale from 0 to 50 mg/L.ppm (parts per million) is equivalent to mg/L and will show the DO reading on a scale from 0 to 50 ppm.% will show D O readings in a percent scale from 0 to 500%.This value will be expressed %L when DO Local% is enabled.Both % or %L and mg/L or ppm can be displayed simultaneously on the screen.TEMPERATURE UNITSHighlight Temperature Units and press enter to open a submenu that will allow you to change the temperature units displayed in the run screen. Highlight the desired unit (Celsius or Fahrenheit) and press enter to enable. The enabled temperature unit will have an ‘X’ in the box next to it. Only one unit may be enabled at a time. Highlight the ESC-Exit box and press enter to save any changes and to close the Temperature Units submenu.PRESSURE UNITSHighlight Pressure Units and press enter to open a submenu that will allow you to change the units displayed on the run screen. Highlight the desired unit (mmHg, inHg, mbar, psi, or kPa) and press enter to enable. The enabled pressure unit will have an ‘X’ in the box next to it. Only one unit may be enabled at a time. Highlight the ESC-Exit box and press enter to save any changes and to close the Pressure Units submenu.LANGUAGEHighlight Language and press Enter to open a submenu that will allow you to change the language. Highlight the desired language (English, Spanish, German, or French) and press enter to enable. The enabled language will have an ‘X’ in the box next to it. Highlight ESC-Exit box and press enter to save any changes and to close the Language submenu.The text in the boxes along the bottom of the run screen will always be displayed in English regardless of the language enabled in the System Setup menu.AUTO SHUTOFFAuto Shutoff allows you to set the instrument to turn off automatically after a period of time. Use the up or down arrow keys to highlight Auto Shutoff, then press enter to open the submenu. Press enter while the minute field is highlighted to make it adjustable. Next, use the up and down arrow keys to adjust the shut off time from 0 to 60 minutes. Press enter to confirm and save the new shutoff time. Highlight ESC-Exit box, then press enter to close the Auto Shutoff submenu.To disable Auto Shutoff, set the Time in Minutes to 0 (zero).RESETTING THE SYSTEM SETUP MENU TO FACTORY DEFAULTTo reset the Pro20 settings to factory default, press the down arrow key until theReset - 4box is highlighted, then press enter. The instrument will ask you toconfirm the reset. Highlight Yes and press enter to continue with the reset orhighlight No and press enter to cancel the reset. A Factory Reset will not affectdata saved in the unit’s memory.The following will be set in the Pro20 after performing a factory reset:Defaults Parameter Reset Temperature Units o CDissolved Oxygen Units mg/L and %Pressure Units mmHgDissolved Oxygen Sensor Type Last Setting ConfirmedMembrane Type Last Setting ConfirmedSalinity Compensation Value 0.0 pptDO Local% OffOne Touch Cal OnDisplay Contrast Set to mid rangeAuto Shutoff 30 minutesAuto Stable Off (0.0 % Change and 10 secs)LDS (Last Digit Suppression) OffAudio OnLanguage EnglishDissolved Oxygen Calibration Reset to factory default, 100% forenabled membrane and sensor*Barometer Calibration Reset to factory default**It is recommended to perform a barometer and dissolved oxygen calibrationafter performing a reset.EXITING THE SYSTEM SETUP MENUTo exit the System Setup menu, press the down arrow key until the ESC - Exit box is highlighted, then press enter to return to the run screen.C A L I B R A T I O NTEMPERATUREAll cable assemblies have built-in, temperature sensors. Temperature calibration is not required nor is it available.BAROMETERThe barometer in the Pro20 is calibrated at the factory. The barometer reading must be accurate to ensure accurate % calibrations and D O readings. If your barometer requires an adjustment, use the up or down arrow keys to highlight the barometer box on the run screen, then press enter. Next, use the up or down arrow keys to adjust the barometer reading to the local, true barometric pressure. Continually depress the up or down arrow keys to change the barometer value more rapidly. Press enter to confirm and save the barometer adjustment.Do not use a barometer value that is corrected to sea level.Laboratory barometer readings are usually “true” (uncorrected)Lvalues of air pressure and can be used “as is” for barometercalibration. Weather service readings are usually not “true”, i.e.,they are corrected to sea level, and therefore cannot be used untilthey are “uncorrected”. An approximate formula for this“uncorrection” is:True BP = [Corrected BP] – [2.5 * (Local Altitude in ft above sea level/100)]Although the barometer range is 400.0 to 999.9 mmHg, you will beLunable to adjust the value across the entire range. The barometer isvery accurate and the instrument will not allow you to adjust thevalue drastically beyond what it is measuring during calibration.DISSOLVED OXYGENThe Pro20 can be easily calibrated with the press of one key by enabling One Touch Cal in the System Setup menu and following the One Touch Calibration procedure.Ensure the barometer is reading accurately before performing a One Touch Calibration, DO %, or DO Local% calibration. These calibration procedures use the barometer reading during calibration. If the barometer reading is erroneous during a calibration, your dissolved oxygen values will be inaccurate.It is not necessary to calibrate in both % and mg/L or ppm.LCalibrating in % will simultaneously calibrate mg/L and ppm andvice versa. YSI recommends calibrating dissolved oxygen in % forboth ease and accuracy.ONE TOUCH CALIBRATIONPerform this calibration procedure when One Touch Cal is enabled in the System Setup menu.If using a field cable, install the sensor guard onto the probe. Moisten the sponge in the grey calibration/storage sleeve with a small amount of water and install it over the sensor guard. The sleeve should be moist, but should not have excess water that could cause water droplets to get on the membrane. The storage sleeve ensures venting to the atmosphere.If using the ProBOD sensor/cable assembly, place the probe in 300 ml BOD bottle with a small amount of water (1/8 inch or 0.3 cm). The dissolved oxygen and temperature sensors should not be immersed in water.If the calibration/storage sleeve is not available, substitute with a chamber of 100% relative humidity, vented to the atmosphere (not completely sealed).Power the instrument on and wait approximately 5 to 15 minutes for the storage chamber to become completely saturated and to allow the sensor to stabilize if using a Polarographic sensor. If using a Galvanic sensor, wait approximately 5 to 10 minutes for the chamber to become completely saturated. Auto Shutoff time should be disabled or set to at least 20 minutes, see System Setup menu for more information on adjusting the Auto Shutoff.。
ysi操作规程

ysi操作规程YSI操作规程一、YSI操作概述YSI是一种用于测量水质参数的仪器,常用于环境监测、水源保护等领域。
YSI的正确操作能够保证测量结果的准确性和可靠性。
二、YSI操作前准备1. 检查YSI仪器是否完好无损,如有损坏应及时维修或更换。
2. 确认YSI仪器是否已经校准,若未校准应进行校准操作。
3. 检查YSI传感器是否清洁,如有污垢应进行清洗。
三、YSI操作步骤1. 打开YSI仪器电源,等待仪器启动。
2. 根据测量参数的要求,选择合适的测量模式。
3. 将YSI传感器插入待测液体中,确保传感器与液体充分接触。
4. 等待YSI仪器稳定显示测量结果。
5. 记录测量结果,并根据需要重复测量多次,取平均值作为最终结果。
6. 测量结束后,将YSI传感器从液体中取出,并用纯净水进行清洗。
7. 关闭YSI仪器电源,进行仪器的保养和维护。
四、YSI操作注意事项1. 操作YSI仪器时应佩戴手套和护目镜,以防止溅洒或触及有害物质。
2. 操作YSI仪器时应遵循仪器的使用说明,严禁随意更改参数或使用不当。
3. YSI传感器不能与强酸、强碱或有毒物质接触,以免损坏传感器。
4. YSI传感器在使用前应经过清洗和校准,以保证测量结果的准确性。
5. 在测量过程中应保持仪器和传感器的稳定,避免剧烈震动和摇晃。
6. 测量结果应及时记录并进行保存,以备后续分析和对比。
7. 操作YSI仪器时应遵守实验室的安全操作规程,确保人员和设备的安全。
五、YSI操作常见问题及解决方法1. 测量结果异常偏差大:可能是传感器受到污染或损坏,需要进行清洗或更换传感器。
2. 仪器无法启动:可能是电源供应不足或设备故障,需要检查电源和仪器是否正常。
3. 读数不稳定:可能是环境波动较大或传感器老化,需要将仪器放置稳定环境或更换传感器。
4. 仪器显示屏出现故障:可能是显示屏损坏或连接问题,需要检查显示屏和连接线路。
5. 无法进行校准:可能是仪器内部故障或校准液品质不合格,需要进行维修或更换校准液。
- 1、下载文档前请自行甄别文档内容的完整性,平台不提供额外的编辑、内容补充、找答案等附加服务。
- 2、"仅部分预览"的文档,不可在线预览部分如存在完整性等问题,可反馈申请退款(可完整预览的文档不适用该条件!)。
- 3、如文档侵犯您的权益,请联系客服反馈,我们会尽快为您处理(人工客服工作时间:9:00-18:30)。
YSI Pro20溶解氧测定仪YSI Pro20
广泛应用于江河、湖泊和海洋的水质测量;应急监测;高校、研究所教学研究,水族馆、水产养殖业水质监测;工业发酵、酿造以及污水处理等各方面。
坚固、耐用、可靠的YSI Pro20能轻松应对各种便携式溶解氧的测量需求。
可自行更换的探头和电缆、50组
数据内存、」键校准”功能使操作更简单、更方便,是实验室与野外溶解氧测量的最佳选择。
用户可自行更换探头和电缆,野外可选择极谱法或原电池法传感器,实验室可选择自带搅拌的BOD探头
快速反应时间:使用标准膜,8秒即可达到最终值的95% (目前市场上最快的反应时间)
按下』键校准”按钮即可在3秒内实现一键式溶解氧校准,并自动获得气压补偿
IP67防水等级,电池仓与仪器电路仓各自独立分隔并密封,即使电池仓进水也不影响或损坏仪器电路
MS军方接头,快速插拔,防水,连接可靠稳固电缆的接头部位可耐受30万次弯折,经久耐用夜光键盘和背景光显示屏便于在昏暗环境下操作夜光键盘和背景光显示屏便于在昏暗环境下操作不锈钢探头保护套,坚固耐撞,更易于沉入水中寿命长、耗材少,平均使用成本低
可存储50组数据,无需手动记录数据
有很多不同长度的带配重电缆可供选择,电缆整理套件更方便了较长电缆的使用
超长保修期:主机三年,电缆两年,探头一年
YSI Pro20溶解氧测定仪
YSI Pro20系统规格
主机、4米电缆和传感器规格
参数测量范围分辨率准确度
溶解氧
%空气饱和
度0 至500%
0.1% 或1%
(可选)
0至200%:读数之i2%或2%空气饱和度,以较大者为准;
200至500% :读数之圮%
溶解氧毫克/升0至50毫克/
升
0.01或0.1毫克/
升
(可选)
0至20毫克/升:读数之+2%或0.2毫克/升,以较大者为准;
20至50毫克/升:读数之d6%
温度-5 至55 °C0.1C±0.3 C
气压53至133千帕0.01千帕也.4千帕(温度变化在校准点土5C之内)
主机规格
尺寸21.6厘米(长)X8.3厘米(宽)X2.3厘米(厚)
重量475克(含电池)
电源2节2号碱性电池,可工作不低于400小时;低电量指示
电缆备有1、4、10、20、30米和100米标准电缆可供选择,特制长度可达100米保修期主机:三年;电缆:两年;极谱法传感器:一年;原电池法传感器:半年
盐度补偿0-70ppt (手动输入,自动补偿)
数据记录可存储50组数据(含日期和时间)
通过认证RoHS、CE、WEEE、IP67和1米跌落测试。