POS销售小票打印设置手册
创智_DRMS_POS_操作手册_小票格式自定义

自定义小票格式应用操作手册1、意义 (3)1. 1、收银小票的主要区域划分 (3)1. 2、收银小票的具体内容项. (3)1. 3、收银小票各项策略示例. (3)2、具体操作. (4)2. 1、配置文件的修改 (4)2. 2、小票打印内容控制 (4)2. 3、小票数值内容格式控制. (6)2. 4、小票抬头的设置 (6)2. 5、币种转换设置(港币). (6)3、小票汇总区 (7)3. 1、打印总额促销信息 (7)3. 2、打印重复购买次数 (7)3. 3、打印原价金额(折前金额) (7)3. 4、整单折让总额 (7)3. 5、打印特价金额 (8)3. 6、打印组合让利的清单 (8)3. 7、打印合计金额 (8)3. 8、打印会员折扣 (8)3. 9、打印会员积分信息 (9)3. 10、打印总额折数 (9)3. 11、打印总额折让金额. (9)3. 12、打印应收款金额 (9)3. 13、打印应收款金额的人民币大写. (9)3. 14、打印实际付款金额. (9)3. 15、打印支付币种明细. (10)3. 16、打印找零金额 (10)3. 17、打印折合港币找零金额 (10)3. 18、打印营业员信息 (10)4、个性化小票开发 (11)4. 1、配置PB连接..................................................... 1 1 4. 2、打开二次开发界面 (12)4. 3、个性化小票开发 (13)1、意义考虑到客户对收银小票的个性化需求越来越多,并且将来这块也要列到收费的二次开发项目中去,故对于小票的开发现在单独开放出一块来。
以下是讲开发好的小票如何应用到客户的实际运作中去。
1.1、收银小票的主要区域划分票据头交易明细交易汇总收款汇总尾注1.2、收银小票的具体内容项关注[公司名称][门店名称][交易类型][营业员工号][营业员名称][会员][小票号][标题行][商品号][商品原印条码][商品名称][商品简称][数量][应售价][实售价][金额][收款方式][找零][尾注]等等。
亿利达POS-FM简易操作指南

亿利达POS-FM简易操作指南一、开票前准备工作1、登录税控开票软件:第一次登录时,系统默认的操作员为“001”,密码为“001”。
进入后,用户可自行设置操作员和口令,以便下次登录时使用。
2、票样设置(行业选择):用户可根据业务需求选择相应的票样。
设置方法为:单击。
3、程可在演示版软件中进行)。
4、收费项目设置:开票前必须设置收费项目,收费项目设置完成后才能打印发票。
操作如下:单击菜单中的收费项目设置命令-单击“增加”按钮设置收费项目-[保存]。
5、发票分发:发票分发就是把用户购买的发票通过用户卡将发票的号码和张数分发到税控器和税控卡中统一管理。
操作如下:1)先插入用户卡,单击菜单中的命令或单击主界面中的快捷键;2)单击“读取发票”按钮;发票分发界面会按发票卷显示发票起始号、发票终止号、发票代码和发票使用情况(正使用或未使用),此操作只是从用户卡中将发票号读入到税控器中;3)选中要使用的发票,单击“使用发票”按钮,该卷发票的使用状况栏中会显示“正使用”,此操作是把税控器中的发票号分发到税控卡中;(一次只能使用一卷发票,不能同时使用多卷);4)发票分发完成后,退出发票分发界面。
注:①开票前必须先分发发票。
②开票时不用插入用户卡。
③分发发票时,可以一次读取多卷发票到税控器,但一次最多读取20卷。
④使用发票时,是将税控器中存有的发票分发到税控卡中,一次只能读入一卷,用完后再继续分发。
二、销售开票操作开票打印:“开票打印”就是填写付款单位、消费项目和金额等开票信息,并打印发票。
操作如下:1)单击菜单中的命令或单击主界面中的快捷键;2)填写“付款单位”;(必须填写)3)填写用户“开票项目”(必须选择)、“规格”和“数量”(可不填)和“金额”(必须填写);4)单击“开票打印”按钮,开票完成;5)开票完成后,机打票号栏中的发票号会自动向后滚动一张;当一卷发票已用完后,系统会如下提示:没有已分发但未使用的发票号(税控卡无发票)!注: 单张发票付款总额不能超过税控卡中所允许的单张发票限额,此时应分多张发票打印,使单张发票总额不超过税控卡中所允许的单张发票限额!三、发票异常情况处理1、退票登记:“退票”是指所涉及的服务在发票开出后被取消或因发票受票人、服务项目、金额等内容有误而需要做退还处理的发票。
POS的操作说明书

POS 操作说明书收银员登录收银员登录系统之前,必须先开启打印机,然后登录。
这些是作为必要的保护用户使用系统的安全而采取的措施。
HDPOS提示收银员输入“员工代码”和“口令”。
操作步骤:1、系统显示登录窗口:2、输入员工代码和口令,口令为空。
3、按<确认>键,系统验证通过后进入销售主画面。
一、销售模块在执行完收银员的登录操作之后,即进入销售流程。
操作步骤:1、系统显示销售画面和销售流水号:2、收银员输入或者扫描枪扫入商品条码或输入拼音助记码:3、按<确认>键,系统显示该商品的品名及规格,单位,数量(默认为1,可以按数量键进行修改),单价,金额,并跳到下一行;4、收银员输入下一个商品;5、按F11后可更改数量;6、收银员按<开票>键;7、系统显示本次应付总金额,并跳到付款表格中,等待输入付款方式与付款金额。
8、收银员输入付款方式与付款金额。
9、系统显示找零金额。
10、收银员再次按<开票>键,银箱自动弹出,收银员按系统显示找零;11、系统打印收银条;12、收银员将弹出的银箱推入,本交易结束。
回到1,显示新的销售流水号。
附注:4*1.如果输入的商品代码不被系统识别,叫店长处理。
8*1.如果选择的付款方式是磁卡1)系统提示输入卡号。
2)顾客刷卡,显示本次应付金额。
3)收银员按<确认>键,系统提示输入密码。
4)顾客使用密码键盘输入密码。
5)系统显示付款成功, 并在已付金额一栏中显示付款的金额。
8*2.如果要返回商品输入,按ESC<退出>键。
8*3.如在前台销售时发现有商品在“PT”栏内出现“P”字样,则表示当前商品在促销中,详细情况请关注总部促销公告。
挂帐及挂帐恢复操作步骤:1、在POS机销售或退货界面按<F4挂帐>键启动挂帐功能,如下所示:2、输入挂帐编号(数字),按<确认>键挂帐;3、在POS机销售或退货界面按<F1挂帐恢复>键启动挂帐恢复功能,如下所示:4、输入需要恢复的挂帐编号(数字),系统会将这笔挂帐恢复到销售或退货界面。
药店操作手册:POS_操作手册-门店零售业务管理

零售前台系统门店零售业务管理2017年7月目录1零售业务 (3)1.1业务流程 (3)1.2流程说明 (3)1.3业务说明 (4)1.4操作步骤 (5)1.4.1零售前台开票 (5)1.4.2零售流水查询 (6)2门店团购(含赊销) (8)2.1业务流程 (8)2.2流程说明 (8)2.3业务说明 (8)2.4操作步骤 (8)2.4.1团购申请管理 (8)2.4.2团购申请审批 (9)2.4.3零售前台开票 (9)3门店预售(待完善) (11)3.1业务流程 (11)3.2流程说明 (11)3.3业务说明 (11)3.4操作步骤 (11)4处方销售 (12)4.1业务流程 (12)4.2流程说明 (12)4.3业务说明 (12)4.4操作步骤 (12)4.4.1处方维护 (12)4.4.2零售前台开票 (13)4.4.3零售前台开票 (14)4.4.4零售明细查询 (14)5零售退货 (16)5.1业务流程 (16)5.2流程说明 (16)5.3业务说明 (16)5.4操作步骤 (17)5.4.1零售退货 (17)5.4.2零售退货 (17)1零售业务1.1业务流程1.2流程说明1.3业务说明(1)零售前台开票录入货品,根据货品所在货架、当时班次,系统自动带出默认的营业员,营业员信息可以修改;(2)如果没有设置默认营业员,第二条及以下的细单上的营业员默认为与第一条细单一致;每条细单上的营业员均可在前台开票时手工修改;(3)零售时系统会自动执行会员策略、促销策略、价格策略等销售策略;(4)对会员销售,需在前台收款完成前录入会员资料;完成零售收款后,即时更新会员积分;(5)录入会员资料时,可直接录入会员ID、会员首拼或会员手机号码;(6)零售开票时可显示营业员,会员的实时积分,相关促销活动等信息;(7)中药配剂销售时可按药方进行整剂增加或减少;(8)特殊药品销售按总单进行销售数量的限制;(9)对于手工优惠、零售退货等特殊操作,必须经过特殊授权才能进行;(10) 增加银联卡、医保卡、壹卡会、国际卡、积分消费等收款方式;(11) 货品时需指定批号、批次信息;也可通过门店参数设置,选择货品时不显示批号、批次零售开票录入货品,可直接录入货品ID、也可以录入货品首拼进行货品查询,选择信息,系统自动按先进先出原则进行出库(会造成实物批号与库存批号不一致);(12) 销售小票可重复打印:先在零售流水中找到原笔零售业务,按“CTR+P”快捷键进行打印;(13) 零售货品有促销优惠时,系统会自动提示;(14) 零售实收金额为应收金额(货品原价*数量)减去各项优惠、折扣后的金额;(15) 胶袋销售时,可根据明确的收款或不收款的条件设置促销活动;(16) 可查询现行促销活动。
POS80 热敏小票打印机使用说明书
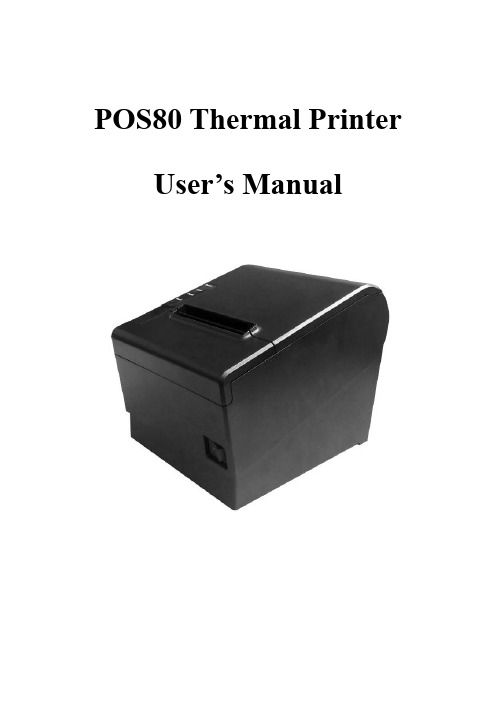
POS80 Thermal Printer User’s ManualCatalogue1.1 Brief introduction (2)1.2 Main features (2)2 specification (3)2.1 Specification (3)2.2 Printing material requirements (5)2.2.1 Paper parameters (5)2.2.2 Mark paper parameters (5)2.2.3 Paper using attention (5)2.3 Printing and paper cutting position (6)2.3.1 Printing position (6)2.3.2 Paper cut position (6)3 Appearance and components (7)3.1 Appearance and components (7)3.2 Indicator and buzzer instruction (8)4 Printer installation (9)4.1 Open the package (9)4.2 Requirements of installation position (9)4.3 Connect to power adapter (9)4.4 Connect communication cables (9)4.5 Connect to cash drawer (9)4.6 Paper roll loading (10)4.6.1 Printing paper type confirmation (10)4.6.2 Loading/change paper roll (10)4.7 Set DIP switch (12)4.8 Printer self-test (12)4.9 Set ethernet port IP address (12)5 Interface pin definition (14)5.1 Parallel interface pin definition(DB25M) (14)5.2 USB interface pin definition(standard B type female base) (14)5.3 Power interface pin definition(MPC-3-001B) (15)5.4 Cash drawer interface pin definition(RJ11-6P6C) (15)5.5 Serial port pin definition(DB9F) (16)5.6 Ethernet interface pin definition(RJ45) (16)6 Faults handling (17)6.1 Printer does not work (17)6.2 Indicator light error and buzzer warning (17)6.3 Problems when it is printing (17)6.4 Problems when cutting paper (18)6.5 Paper jam and cutter retraction troubles removal (18)1 Introduction1.1 Brief introductionPOS80 is a thermal POS printer with auto-cutter. It has good printing quality, high printing speed and high stability, which is widely used in POS system, food service industry and many other fields.POS80 connects other devices via parallel, serial or USB port. It offers drivers for WINDOWS and LINUX operating systems.The supported operating systems are as below:WINDOWS XPWINDOWS 7 32/64WINDOWS 8UBUNTU 12.04 32/64UBUNTU 14.04 32/641.2 Main features1)With auto-cutter2)Low noise and high printing speed3)Easy paper loading4)Easily use and maintain5)Support mark paper and continuous paper printing6)Compatible with many kinds of paper width7)With cash drawer interface8)Optional communication interfaces(Such as USB, parallel, serial, Ethernet)9)Optional Wireless communication function(Wi-Fi or Bluetooth, just for special models)2 Specification2.1 SpecificationItem ParameterPrinting parameter Printing method Thermal printingResolution 203DPI,8 dots/mmPrinting width 72mm(576 dots)Printing speed About 250 mm/sInterfacesStandard: cash drawer /USB interfaceOptional: serial/parallel/Ethernet portsOptional Wireless Communication: Wi-Fi or BluetoothPage mode / Support(Optional)Command set / ESC/POS compatible commandsStorageRAM RAM 8M bytes, receive buffer area 1M bytes FLASH FLASH 4M bytes, NV bitmap 256K bytescharactersChinese GB18030 24×24Words, figures ASCII 9×17,12×24User-defined SupportCode pagesOptional international character sets 45TRADITIONAL CHINESECHINESECP437 [U.S.A., Standard Europe]KatakanaCP850 [Multilingual]CP860 [Portuguese]CP863 [Canadian-French]CP865 [Nordic]WCP1251 [Cyrillic]CP866 Cyrillic #2MIK[Cyrillic /Bulgarian]CP755 [East Europe,Latvian 2]IranCP862 [Hebrew]WCP1252 Latin IWCP1253 [Greek]CP852 [Latina 2]CP858 Multilingual Latin Ⅰ+Euro)Iran IILatvianCP864 [Arabic]ISO-8859-1 [West Europe]CP737 [Greek]WCP1257 [Baltic]ThaiCP720[Arabic]CP855CP857[Turkish]WCP1250[Central Europe] CP775WCP1254[Turkish]WCP1255[Hebrew]WCP1256[Arabic]WCP1258[Vietnam]ISO-8859-2[Latin 2]ISO-8859-3[Latin 3]ISO-8859-4[Baltic]ISO-8859-5[Cyrillic]ISO-8859-6[Arabic]ISO-8859-7[Greek]ISO-8859-8[Hebrew]ISO-8859-9[Turkish]ISO-8859-15 [Latin 3] Thai2CP856Chart / Supports different density dots and images printingsSupports grating bitmap printingSupports download bitmap printing, every bitmap size should less than 256K, and the total capacity of download bitmap is 256K.Bar codes 1DUPC-A、UPC-E、EAN-8、EAN13、CODE39、ITF、CODEBAR、CODE128、CODE932D PDF417、QR CodeDetection function Sensor Paper out, cover opened, paper will be lack(optional),un-take out printed paper(optional)LED indicatorPower indicator Green Paper out indicator Red Error indicator RedPaper RequirementType Standard thermal receipt paper Width 79.5±0.5mmThickness 0.056~0.1mmDiameter 80mm(Max.)Physical characteristicsPaper loading Easy paper loadingPaper cutting Manual or automatically cut paper Operating condition -10℃~ 50℃,25% ~ 80%RH Storage condition ~40℃~ 70℃,≤93%RH(40℃)Outline dimension 145mm×195mm×144mm(W×L×H)Weight 1.1KgReliabilityTPH life 50kmCutter life 2,000,000 times Motor life 360,000 hoursSoftware function Driver procedure Windows(WIN7/WIN8/Vista/XP/2000)Ubuntu 12.04 32/64, Ubuntu 14.04 32/642.2 Printing material requirements2.2.1 Paper parameters1)Paper type: thermal receipt paper/thermal black mark paper2)Paper width:80±0.5 mm3)Paper roll diameter: 80 mm (Max.)4)Paper thickness:0.065 ~ 0.10mm2.2.2 Mark paper parametersBlack mark imprint position is on the front side of the receipt when using mark paper. The black mark reflectivity is no more than15%, the other parts of paper reflectivity should be more than 85%.There are not any patterns in black mark area, such as ad, and the mark size shall be satisfied with requirements as below:2.2.3 Paper using attentionNote:1)Please use good quality paper, otherwise, it will effect printing quality and even reduce printer head life.2)Don’t make the paper stick on axis.3)Paper will be fading out or reduced thermal sensitivity if it is polluted by chemical or oil, which will affectprinting effects.4)Don’t use nail or hard things to clash printing paper, otherwise, it will be fade out.5)Paper will be fading out if the environment temperature exceeds 70°C. So please take note the temperature,humidity and illumination effects.2.3 Printing and paper cutting position2.3.1 Printing positionL1-Paper storehouse’s width: 82±0.5mmL2-Effective printing width: 80mmL3-Distance between print head to paper storehouse’s left edge (fixed width): 3±0.3mmL4-Distance between print head to paper storehouse’s right edge (fixed width): 3±0.3mmL5-Left margin: Default is 4mmL6-Printing area width: it is set by commands (refer to programming manual). Default is 72mm. L7-Right margin: Default is 4mm.2.3.2 Paper cutting positionThe distance between print head to cutter: 12.5mm3 Appearance and components 3.1 Appearance and componentsFunction instruction of components1)Power switchPress “O” side to power off, press “I” side to power on.2)Power indicator(green)The indicator is on when power on, and it is off when power off.3)Error indicator (Red)Error indicator is on when it detects error. Such as: paper out, upper cover is open and cutter is stocked. 4)Paper indicator(red)Paper out indicator is on when it detects the paper is out. Please put a new paper roll to printer inside then.3.2 Indicator and buzzer instruction1)Function instruction of indicators and buzzerName Status InstructionPower indicator (Power) On Printer is power on Off Printer is power offError indicator (Error) On Printer is in error status Off Printer is in normal statusPaper out indicator (Paper)On Printer is in paper out status Off Printer is in normal statusDescription Power Indicator Error Indicator Paper Indicator Buzzer Open printer cover On On On It rings 6 times by 1.5s.Paper is enough On Off Off Silent Paper out On On On It rings 3 times by 1.5s.Note: Printer detects printer head temperature via thermal resistance. It will cut off print head powerand stop printing if print head is overheat. The print head protection temperature is 80℃.4 Printer installation4.1 Open the packagePlease make sure everything is in good status when you open the package. Otherwise, please contact to distributor in time.4.2 Requirements of installation position1)Put the printer on a stably place.2)Let the printer far away from water, fire, and sunlight.3)Avoid to put it on oscillatory and impassive place.4)Make sure to connect printer with ground safety4.3 Connect to power adapter1)Make sure the printer is power off.2)Connect power adapter’s DC output plug to the printer.3)Connect power adapter’s AC input plug to a power outlet.4)Please be careful to operate correctly when plug out the plug of power cord to avoid damage.4.4 Connect Communication cables1)Make sure the printer is power off.2)Connect communication cable to the printer’s port, and fix it as plug lag spike (or snap spring).3)Connect communication cable to the other side host.4.5 Connect to cash drawer1)Make sure the printer is power off.2)Connect cash drawer to cash drawer port behind the printer.Warning: The Voltage of cash drawer port is 24V. (It cannot connect to telephone cable.)4.6 Paper roll loading4.6.1 Printing paper type confirmationYou can load paper roll to print after connecting power adapter and communication cables. Please make sure the printing paper type before printing. The default paper type is continuous thermal receipt paper.4.6.2 Loading or change paper roll1)Power off the printer.2)Slide or press paper roll storehouse button, and then open storehouse cover.3)Draw out paper roll tap, and load paper roll as below.4)Draw out a printing paper, and leave some on the paper out month, then close the storehouse cover.5)The status after paper loading4.7 DIP switch settingDIP switch Switch Function On Off Default 1 Cutter Forbidden Enable Off 2 Buzzer Enable Forbidden On 3 Printing density DarkLight Off 4 Multi-byte encoding Single-byte encodingmulti-byte encodingOff 5 Max. number of Printing characters in each line42 48 Off 6 Cash drawer EnableForbiddenOn 7 Baud rate options (bps)Ref. Chart 1Off 8OffChart 1:Baud rate optionsBaud rate Switch 7 Switch 8 Default9600 On Off 19200 19200 Off Off 38400 On On 115200Offon4.8 Printing self-test page1) Make sure the printer loaded paper roll correctly.2) Press down [FEED] button and hold on, then power on the printer, the printer will print a self-test page.4.9 Set Ethernet port IP Address.The printer’s Ethernet IP address can be set directly via printer inserted web setting page. The operation steps are as below:1. Connect printer and PC in a same Ethernet LAN.2. Print a printer self-test page to get printer recent IP address (self-test page printing operation method refers to “4.8 printer self-test” instruction):You can find the printer’s IP address is same as 192.168.1.87 in self-test page “IP address: 192.168.1.87” 3. Set network card IP address in PC and printer IP address as different IP address in the same networksegment.(Such as 192.168.1.xxx, xxx is a number among 1 to 254);4. Please enter address “http://printer IP address ” in browse of PC after making sure that printer connects with Ethernet.(e.g.: If printer IP address is “192.168.1.87”, please enter “http://192.168.1.87”), then press Enter key,open Ethernet port setting page in browser as below:5. Click “Configure Interface” link in the left side, then enter the modified target IP and click “save” button tosave setting. Click “Reboot” button to reset printer if you want the setting to take effect.6. Enter the new IP address as the above step 4 procedure, and re-open printer Ethernet port setting web page, then click “Printer Status” link in the left side. And click “Printer Test Page” button to print self-test page, andcheck the IP Address contents in the self-test page is right or not.5 Interface pin definitionsThe printer has a cash drawer driver interface and many kinds of communication interfaces: parallel, serial (RS-232), USB and Ethernet ports. USB port and cash drawer interfaces are standard interfaces, and it has Ethernet, serial and parallel ports as optional.5.1 Parallel interface pin definition(DB25M)Number Signal Function Number Signal Function1 /STROBE Gate. Low level is10 /ACK Confirm. Low level is effectiveeffective2 DATA0Data bit is 011 BUSY Busy3 DATA1Data bit is 112 PE Paper out4 DATA2Data bit is 213 SEL Choose5 DATA3Data bit is 314 /AUTOFEED Change line automatically. Lowlevel is effective6 DATA4Data bit is 415 /ERROR Error. Low level is effective7 DATA5 Data bit is 516 /INIT Initialize. Low level is effective8 DATA6 Data bit is 617 /SELIN Choose input. Low level iseffective9 DATA7 Data bit is 718-25 GND Ground wire5.2 USB interface pin definition(standard B type female base)1)Pin definitionPin Number Signal name Typical wire color1 VBUS Red2 D- White3 D+ Green4 GND Black5.3 Power interface pin definition(MPC-3-001B)1)Pin definitionPin number Signal name1 +24V2 GND3 N.CSHELL F.G5.4 Cash drawer interface pin definition(RJ11-6P6C)1)Electrical specificationDriver voltage: DC24VDriver current: Max. 0.8A (within 510ms)Cash drawer status tests signal: “L” = 0~0.5 V ; “H” = 3~5 V2)Cash drawer interface socket uses RJ-11 6P type connector;3)Interface signal definitionPin number Signal function1 FG Printer cover2 DRAWER 1 Cash drawer 1 driver signal3 DRSW Cash drawer status detection signal4 VDR Cash drawer driver power5 DRAWER 2 Cash drawer 2 driver signal6 GND Common ground circuitNotes:1) Prohibit socket with power to pull out communication wire plug.2) Please avoid to parallel with strong power when wring communication cables av通讯线布线时应避免和强电并行;3) Communication cables use with shielded cables.5.5 Serial port pin definition(DB9F)Printer serial port is compatible with RS-232, the interface socket is DB9 female socket.User can check interface setting status via printing setting self-test page. Printer default serial interface is set as: baud rate 19200bps, 8 bit data bits, no parity,1 bit stop bit, and the handshakes method is DTR/DSR。
创智_DRMS_POS_操作手册_小票留底

小票留底操作手册1、意义 (2)2、小票留底参数设置 (2)2。
1、通过参数界面来设置 (2)2。
2、于收银界面快速设置 (2)3、小票留底实际操作 (2)3。
1、正常情况下,按策略进行打印 (2)3.2、每单人工决定是否留底 (3)小票留底操作手册1、意义小票正常情况都是打印商品明细清单的,以利于客户核对。
在特殊情况下:如中药不想客户看到每一味药的价格。
如客户用地报销,不希望知道具体的商品.这样就需要打印出一个总的销售,如“商品一批"等。
2、小票留底参数设置这个是每台P O S机可以定为不一样的。
2.1、通过参数界面来设置以上三个是重点设定项。
2.2、于收银界面快速设置如上图:输入701进行快速的切换.注意:701是反复键.即第一次按701设为“要留底”,再按一次701设为“不要留底”。
3、小票留底实际操作3.1、正常情况下,按策略进行打印在“要留底”模式下,交易完成,打印如下:千色店门店名称收据收据号:0100022013.06。
2010:35:23000000条码价格折扣数量金额批号有效期至生产企业--——-—-——-——------——------—-——--物品(个)119.8119。
8119。
81-——---————--—-——--—-———--—---—-—合计(R M B):19.81应收款:19.81实收款:20。
00找赎(R M B):0.19折合(H K D):0。
18*电话:25319330*我们珍视商品的品质一如珍视你我的生命!本店所售商品,十日内未经使用无理由退、换货。
您将保留好购物小票,以作退换货凭证!祝您购物愉快!3.2、每单人工决定是否留底业务量大的门店,客户有时忘记说,造成工作困难.现针对每一单交易完成时,由系统来提示“收银员”进行确认。
缺省为不留底.设定策略【小票打印】【留底人工决定】=YN-由系统预先设定的策略决定。
缺省值Y—每一单完成时,人工进行确认。
POS打印机使用手册收银员用

POS打印机使用手册收银员用
Pos 打印机使用手册(收银员用)
上海灵蛙科贸有限公司 .03
目录
结构部分……………………………………………...(1-4)
安装色带……………………………….………………(5-6)
安装打印纸…………………………..………….…….(7-8)
用卷纸轴回收打印纸.........................................(9-11)从卷纸轴上退纸 (12)
控制面板介绍………………………………………….(13-14)使用注意事项…………………..………………………(15-19)
结构部分
一.外部结构回首页
外部结构
1.打印机
2.控制面
3.打印机电源
4.电压交
5.外围单
元设备
6.并口接7.DIP开
图1. 打印机的外部结构
1. 打印机盖
主要功能是防止外部灰尘及异物进入打印机,同时也起到隔音的作用。
(在打印之前要先将打印机的盖子盖上).
2. 控制面板
控制面板上有两个控制键(FEED 和ONLINE)用于设置打印机时使用(后面将有详细介绍)
3. 打印机电源开关
给打印机通电或者断电。
4. 电压交直流转换器
用于将外部输入电压(220V)交流电转换成24±5%直流电输出.请按照要求选择合适的输入电压。
5. 外围单元设备回路连接插口
用于连接钱箱等外围设备,连接之前先关掉打印机电源.
6.并口接口
是D形的25pin接头,用于把打印机和主机相连,实现数据传输打印。
小票打印设计说明(金搏宝芝林)

TotalPayBack '找回金额
TotalNum '总数量
TotalJXNum '中药剂数
TotalSmallNum '小单位数量
PrintTime '打印时间
打印长度(@长度)的设置方法:
长度中录入数字表示该字段可打印的长度,如@15表示可打印15个字符,当超过其设定长度时系统将截断后面的字符
数字大于零表示将多余的空格将放在数据的后面,为负数表示将多余的空格将放在数据的前面.
附:各字段中英文对照表(宝芝林)
'表头
ID '单号
OPERNAME '操作员名称
CUSTCODE '客户代码
CUSTNAME '客户名称
MEMBER 'VIP代码
DIS 'VIP折扣
possmallprice '拆零售价
possmallnum '拆零数量
possmallrate '拆零兑换率
goo2code '批号
xzprc '折后单价
小票打印设计模板分为几个文件存放在软件的安装目录下,文件分别为:
Title.kb 标题文件
Head.kb 表头文件
Body.kb 表体文件
Foot.kb 表尾文件
每个数据字段的格式为 : *中文名称@对应英文字段名称@长度
xquat '基本数量
xpric '原始单价
xzhez '单项折扣
xallp '折前金额
possmallunit '拆零单位