playbook 2.0beta下设置手机蓝牙拖pb上网,支持pb安装其他qq等联网程序
黑莓PlayBookOS2.0系统正式版新功能详尽评测
黑莓PlayBookOS2.0系统正式版新功能详尽评测黑莓PlayBook OS 2.0系统正式版新功能详尽评测PlayBook OS 2.0首个正式版Rom放出后,小C也在第一时间更新了系统,正式版2.0中加强了的BlackBerry Bridge功能和非常好用+漂亮的本地邮件、日历功能让PB更加趁手。
作为一个黑莓爱好者,小C非常开心看到PB本次的2.0升级。
不过不知道为什么,总有些人愿意在购买了PB后用某些堂而皇之的名义来讽刺、挖苦这款平板;同时还不忘提提曾经不屑的iPad等产品。
不知道是不是RIM欠了他公关费还是总有人愿意特意花钱吐槽然后再故作姿态。
小C坚持这次的评测只说PlayBook OS 2.0的更细特性,不吐槽,不暗讽、作为一名立场坚定的黑莓用户,我们有自己鲜明的态度。
PlayBook OS 2.0初览本次更新可以通过设置中的检查更新无限下载新版本系统安装包,也可以通过DM桌面管理器下载,由于本次正式版Rom体积较大,达480MB左右,并且下载完成后还需要一段时间来安装、重启。
小C建议诸位PB用户充好电,找一个网络环境稳定的地方更新,以免中途遇到错误导致浪费了时间。
更新成功后,启动页面第一屏告诉你已经成功安装了正式版的OS 2.0,第二屏就建议你设置BlackBerry Bridge,说明了在PB OS 2.0中,桥接功能是重头,在使用过后,相信大部分用户都会同意PB OS 2.0上的桥接是一个非常核心、重要并且好用的功能。
建议你设置完Bridge之后还会有一个简易的PB操作指南,这个是无法跳过的,方便一些新用户熟悉PB 的主要操作方式。
在输入完BB ID,设置好WiFi等常用设置后,你就可以真正的来体验下PB OS 2.0的魅力了。
黑莓PlayBook OS 2.0系统正式版新功能详尽评测(2)本次更新的两大亮点之一-本地帐户集成,这样一来我们可以脱离黑莓手机独立的在PB上面管理邮件、日程等重要信息了。
BackBeat PRO 2 耳机用户指南说明书

BackBeat PRO 2BackBeat PRO 2 Special Edition 用户指南内容概述3音量3播放/暂停音乐3曲目选择3开始收听3有源降噪3充电3静音/取消静音4接听电话4结束通话4回拨上一通电话4电源开/关4配对模式4请注意安全4配对5设备配对5NFC 配对 (Android)5配对第二台设备5更多功能6使用传感器6重置传感器6获取 Plantronics HUB6支持7向前 (+) 或向后 (–) 旋转音量旋轮注由于您的耳机配备有传感器,如果您正在播放音乐,取下耳机时,音乐将暂停。
如果您戴上耳机,音乐将恢复播放(功能因应用程序而异,并且对基于 web 的应用程序无效)。
按前进按钮或后退按钮,可控制曲目的选择。
1要听到周围声响,在非通话时段,滑动开关以启动“开始收听”模式。
2(+) 或向后 (–) 旋转音量旋轮。
滑动开关激活或禁用 ANC ,屏蔽不必要的噪音。
耳机充满电最长需要 3 小时。
充电完成后 LED指示灯熄灭。
=====概述音量播放/暂停音乐曲目选择开始收听有源降噪充电提示要查看耳机的电池电量状态,在佩戴耳机时轻触通话态。
您的耳机具有最长可达 24 小时的收听时间。
在通话期间,选择:•轻触红色的静音按钮•在通话期间,取下/戴上耳机(需配备有源智能传感器)选择:•佩戴耳机接听来电,或者•滑动开关以开机或关机。
向蓝牙图标滑动并按住电源按钮,直到 LED 发出闪烁的红光和蓝光为止。
使用新耳机前,请阅读关于安全、充电、电池和管制等重要信息的安全指南。
静音/取消静音接听电话结束通话回拨上一通电话电源开/关配对模式请注意安全(NFC),请转至NFC 配对 (Android)。
1 LED 闪烁红灯和蓝灯。
2激活电话上的蓝牙®并将其设置为搜索新设备。
•iPhone设置 > 蓝牙 > 开启*•Android设置 > 蓝牙:开启 > 扫描设备*注* 菜单可能因设备不同而不同。
HUAWEI华为 Mate 9 用户指南 说明书

用户指南目录精彩功能玩机精选1拍照技巧3智慧生活6更多精彩功能8新机入手新机配置14手势与操作智慧识屏16智慧语音17智能搜索20智慧搜索,应用、文件、设置项,一搜即得22打开或关闭智能助手23使用指关节轻松操作手机23截屏与录屏24退出分屏模式29桌面使用最近键轻松管理后台应用30通知栏和状态栏30设置锁屏密码保护您的隐私31桌面管理31联系人名片管理35查找联系人37联系人管理38拨号通话基础功能39打开通话录音记录重要通话40信息短信基础功能41相机拍照基本功能43使用人像模式拍摄人物大片45使用大光圈模式突出照片主体45拍摄视角更宽广的全景照片46使用 3D 动态全景拍摄 360 度视角的照片46目录专业相机47流光快门49拍摄动态照片52图库自定义精彩时刻相册53浏览华为精选图片54图片管理54手机管家开启智能省电管理进行省电优化57开启和使用智能启动管理功能57邮件管理邮件帐户59一键翻译邮件内容59创建智能群组59导入重要事项到日历60设置 Exchange 邮件自动回复60日历使用日历管理个人行程61备忘录管理备忘录62实用工具统计手机使用情况64录制声音保留语音笔记64设备连接蓝牙65NFC66连接USB设备70Huawei Share74安全与隐私录入人脸并开启人脸解锁78指纹78开启或关闭定位服务80隐私空间80开启应用锁82支付保护中心82开启手机盾84更多安全设置85安全特性列表86目录备份与重置备份数据到 USB 存储88重置手机88使用华为手机助手备份数据88使用华为手机助手恢复数据89通过共享文件夹备份数据至电脑或家庭 NAS 设备89从 Android 设备导入数据90从 iPhone 或 iPad 导入数据90无线和网络WLAN92共享移动网络给其他设备93应用和通知使用应用分身同时登录两个帐号95设置应用权限95声音和显示设置免打扰模式96设置声音96通过快捷方式启动应用常用功能97存储开启清理空间98智能辅助通过悬浮导航玩转手机99系统切换输入法100无障碍100通用设置101系统更新在线升级手机系统版本104通过华为手机助手升级手机系统版本104通过 eRecovery 恢复手机系统版本105法律声明法律声明106个人信息和数据安全107获取更多信息108精彩功能玩机精选录入人脸并开启人脸解锁手机解锁或用手机进行支付时,输入锁屏密码太慢、太麻烦?华为手机为您带来堪称“慧眼识人”的人脸解锁功能,将人脸录入手机,可以用人脸代替密码快速解锁屏幕,在进行支付时,直接刷脸完成支付,让您享受便捷的同时丝毫不用担心安全问题,一起看看如何使用吧!1打开设置。
蓝牙音频接收器 BLUEDECK2 产品说明书

Rack Mountable BLUEDECK2Bluetooth Audio Receiver®1- Read these instructions thoroughly before using this item.2- Keep these instructions for future reference.3- Heed all warnings.4- Follow all instructions.5- WARNING: To prevent fire or electric shock, do not expose this equipment to rain or moisture. Do not store or operate this product near any liquids.6- Clean only with a dry cloth.7- Do not store or operate this product near any heat sources such as radiators, heat registers, stoves, or other apparatuses (including amplifiers) that produce heat.8- Do not defeat the safety purpose of the polarized or grounding-type plug. A polarized plug has two blades with one wider than the other. A grounding plug has two blades and a round grounding prong. The wide blade or third prong is provided for your safety. If the provided plug does not fit your outlet, consult an electrician for the replacement of the obsolete outlet.9- Protect the all wires connected to this unit from being walked on or pinched, particularly plugs and the point where they exit from the unit. When removing the cord from the power outlet, remove it by holding the plug not by pulling the cord.10- Unplug the unit during lightning storms or when unused for long periods of time.11- When wiring this unit and all other equipment used in connection to this unit make sure that all of your equipment is turned OFF.12- Once installation and wiring is complete power on all your equipment with the volume and level controls turned DOWN. Once all the equipment is ON slowly raise the volume or level controls to their proper positions.13- When grounding this unit, be sure to do so correctly, so as not to defeat the built-in grounding in this unit.14- Before placing, installing, rigging, or suspending any product, inspect all hardware, suspension, cabinets, transducers,brackets and associated equipment for damage. Any missing, corroded, deformed, or non-load rated component could significantly reduce the strength of the installation, placement or array. Any such condition severely reduces the safety of the installation and should be immediately corrected. Use only hardware which is rated for the loading conditions of the installation and any possible short-term, unexpected overloading. Never exceed the rating of the hardware or equipment.15- Consult a licensed, Professional Engineer regarding physical equipment installation. Ensure that all local, state and national regulations regarding the safety and operation of equipment are understood and adhered to.16- Refer all servicing to qualifie nel. Servicing is required when the apparatus has been damaged in any way,such as power supply cord or plug is damaged, liquid has been spilled or objects have fallen into the apparatus, the apparatus has been exposed to rain or moisture, does not operate normally, or has been dropped.WARNING!CAUTION: TO REDUCE THE RISK OF ELECTRIC SHOCK, DO NOT REMOVE THE COVER OF THIS UNIT. THERE ARE NOUSER-SERVICEABLE PARTS INSIDE. REFER ALL SERVICING TO A QUALIFIED TECHNICIAN.The lightning flash with arrowhead symbol within an equilateral triangle is intended to alert the user to the presenceof "dangerous" voltage within the product's enclosure that may be of sufficient magnitude to constitute a risk ofelectric shock to humans. Users should exhibit extra safety when this symbol appears in this instruction manual andfollow all precautions as they are stated.The exclamation point within an equilateral triangle is intended to alert the user to the presence of importantoperating and maintenance (servicing) instructions in this manual.IntroductionCongratulations and thank you for your purchase of this Technical Pro Bluetooth Audio Receiver , the BLUEDECK2. To get the most from your BLUEDECK2, it is recommended that you review all of the information provided in this instruction manual before operating this equipment.If you've spent any time at all in professional audio, you know the name Technical Pro and what it stands for — incredible performance & sound, and the ultimate in reliability under harsh conditions. And now, Technical Pro offers the same technology in a series of Bluetooth audio receiver bringing more of what sets Technical Pro apart from all others. ® BLUEDECK2BLUEDECK2BLUEDECK2 Front Panel1.Power: Press this button to power the unit on and off.2.Play / Pause & Pairing : Press this button to pause the signal from the bluetooth. Press this button again to play.Unpairing: Press this button and hold for several seconds to make the unit disconnect from the current bluetooth connection and go back into standby status. The Bluedeck2 will then be able to connect to another Bluetooth compatible device.3.Previous Button: Press this button to go back to the beginning of the current track or to the previous track on the bluetooth device .4.Next Button: Press this button to go to the beginning of the next track on the bluetooth device .5.Bluetooth Indicator: This indicator will light up if a bluetooth device is successfully paired and connected to the BLUEDECK2.6.Bass Control:Use this knob to adjust the bass on the main output.7.Treble Control: Use this knob to adjust the treble on the main output.8.Headphone Output: Connect your headphones here. Make sure the volume level of the unit is turned down before making the connection.9.MP3 Input: Connect your MP3 player here. The unit will play MP3 signal firstly if both MP3 and bluetooth device are connected to the unit. Remove the MP3 to play bluetooth audio signal.10.Volume: Use this knob to adjust the master volume output.BLUEDECK2 BLUEDECK2 Rear Panel1.Power Supply: Use the power cord provided with the unit. Before connecting it to the outlet, be sure the power of the BLUEDECK2 is off.2.Voltage Selector: Select between 230V AC 50Hz / 115V AC 65Hz.3.LINE Output: Connect the line output on the BLUEDECK2 to the line input on either a recording device or another amplifier / receiver. The signal from the line outputs is a passive output and cannot be connected directly to a passive speaker.BLUEDECK2 Remote1.Master Volume Control: Use these buttons to adjust themaster volume output.2.Previous & Next Track: Press either of these buttons togo to the previous or next track on bluetooth device .3.Play/Pause: Press this button to pause the signal from thebluetooth device. Press again to play.How To Make A Bluetooth Connection BLUEDECK2Turn on the BLUEDECK2 and the bluetooth function on iPhone™, then search for the device named “TPRO BLUEDECK2” and pair the device. Connect after successfully pairing. The indicator on the front panel of BLUEDECK2 will flash after iPhone™ successfully connected to the unit. You can play the tracks from iPhone™ and press the previous, next or pause button on either the front panel of the BLUEDECK2 or iPhone™ to control the playing.Connecting a device with Bluetooth (for example an iPhone™) to the BLUEDECK2 via BluetoothiPod™ & iPhone™ are registered trademarks of Apple Computers, Inc. Apple Computers, Inc. is not endorsing, sponsoring, or otherwise affiliated with this manufacturer.THIS DEVICE COMPLIES WITH PART 15 OF THE FCC RULES. OPERATION IS SUBJECT TO THE FOLLOWING TWO CONDITIONS: (1) THIS DEVICE MAY NOT CAUSE HARMFUL INTERFERENCE AND (2) THIS DEVICE MUST ACCEPT ANY INTERFERENCE RECEIVED, INCLUDING INTERFERENCE THAT MAY CAUSE UNDESIRED OPERATION.Federal Communications Commission Requirements The equipment has been tested and found to comply with the limits for Class B Digital Device, pursuant to part 15 of the FCC Rules. These limits are designed to provide reasonable protection against harmful interference in a residential installation. This equipment generates uses and can radiate radio frequency energy and, if not installed and used in accordance with the instruction, may cause harmful interference to radio communication. However, there is no guarantee that interference will not occur in a particular installation. If this equipment does cause harmful interference to radio or television reception, which can be determined by turning the equipment off and on, the user is encouraged to try to correct the interference by one or more of the following measures:●Reorient of relocate the receiving antenna.●Increase the separation between the equipment and receiver.●Connect the equipment into an outlet on a circuit different from that to which the receiver is connected.●Consult the dealer or an experienced radio/TV technician for help.THE CHANGES OR MODIFICATIONS NOT EXPRESSLY APPROVED BY THE PARTY RESPONSIBLE FOR COMPLIANCE COULD VOID THE USER’S AUTHORITY TO OPERATE THE EQUIPMENT.This device complies with Part 15 of the FCC Rules. Operation is subject to the following two conditions:(1) This device may not cause harmful interference, and (2) This device must accept any interference received, including interference that may cause undesired operation.FCC Radiation Exposure Statement The equipment complies with FCC radiation exposure limits set forth for uncontrolled equipment and meets the FCC radio frequency (RF) Exposure Guidelines in Supplement C to OET65. The equipment has very low levels of RF energy that it is deemed to comply without testing of specific absorption ratio (SAR).The Bluetooth word mark and logos are registered trademarks owned by SIG, Inc. and any use of such marks by Technical Pro is under license. Other trademarks and trade name are those of their respective owners.。
Playbook如何打开U盘模式或者wifi连接

playbook很怪异,不能直接识别U盘模式,很挑电脑,当你到手的Playbook发现不能直接像安卓一样拷贝文件时候,千万别大惊小怪。
但是没关系,可以这样进入U盘模式:(不然拷贝动作片太慢了,裤子都脱了半天撸不起来)
分为两种:①wifi分享传输模式②U盘本地访问模式。
一、打开wifi分享模式:
再打开开发模式:
(development 模式)这个是PB安装软件和后续混刷、连接电脑必备的过程。
然后,你的桌面上就会出现小人图标:(记得打开wifi)
点击那个小人标志,就会出现两个不同的IP,通常情况下,一个是:169.254.0.1 还一个是192.168.1.1XX
这两个IP 一个是设备的本地IP地址,一个是wifi访问地址。
在我的电脑菜单,运行界面,输入:
则Playbook将进入本地U盘模式。
在我的电脑菜单,运行界面,输入:
则进入wifi访问模式。
如果还是太复杂????
只要连接了黑莓助手,如下图点击,同样可以进入分享模式:。
PmodBT2 Bluetooth模块说明书
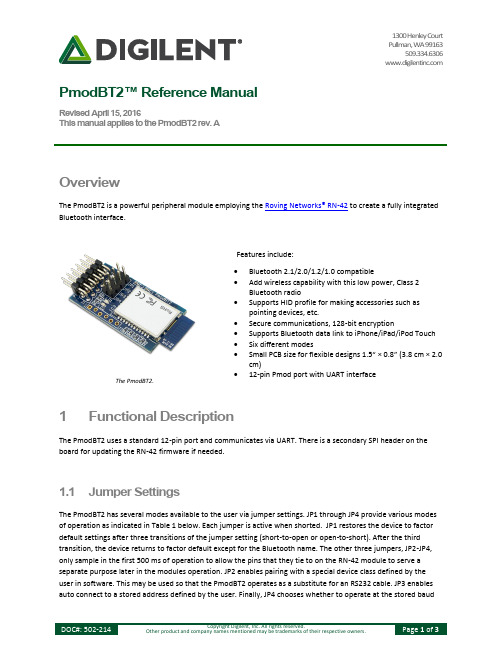
1300 Henley Court Pullman, WA 99163509.334.6306 PmodBT2™ Reference ManualRevised April 15, 2016This manual applies to the PmodBT2 rev. AOverviewThe PmodBT2 is a powerful peripheral module employing the Roving Networks® RN-42 to create a fully integrated Bluetooth interface.1 Functional DescriptionThe PmodBT2 uses a standard 12-pin port and communicates via UART. There is a secondary SPI header on the board for updating the RN-42 firmware if needed.1.1 Jumper SettingsThe PmodBT2 has several modes available to the user via jumper settings. JP1 through JP4 provide various modes of operation as indicated in Table 1 below. Each jumper is active when shorted. JP1 restores the device to factor default settings after three transitions of the jumper setting (short-to-open or open-to-short). After the third transition, the device returns to factor default except for the Bluetooth name. The other three jumpers, JP2-JP4, only sample in the first 500 ms of operation to allow the pins that they tie to on the RN-42 module to serve a separate purpose later in the modules operation. JP2 enables pairing with a special device class defined by the user in software. This may be used so that the PmodBT2 operates as a substitute for an RS232 cable. JP3 enables auto connect to a stored address defined by the user. Finally, JP4 chooses whether to operate at the stored baudThe PmodBT2.∙ Bluetooth 2.1/2.0/1.2/1.0 compatible∙ Add wireless capability with this low power, Class 2Bluetooth radio∙ Supports HID profile for making accessories such aspointing devices, etc.∙ Secure communications, 128-bit encryption∙ Supports Bluetooth data link to iPhone/iPad/iPod Touch ∙ Six different modes∙ Small PCB size for flexible designs 1.5“ × 0.8” (3.8 cm × 2.0cm)∙ 12-pin Pmod port with UART interfaceFeatures include:rate (115.2kbps default) or a baud rate of 9600 regardless of the software selected rate when shorted. For more detailed information on jumper settings and functionality, refer to the RN-42 user manual.Jumper DescriptionJP1 (PIO4) Factory DefaultJP2 (PIO3) Auto Discovery/PairingJP3 (PIO6) Auto ConnectJP4 (PIO7) Baud Rate Setting (9600)Table 1. Set jumper description.Figure 1. PmodBT2 block diagram.1.2 UART InterfaceBy default, the UART interface uses a baud rate of 115.2 kbps, 8 data bits, no parity, and a single stop bit. The startup baud rate may be customized to predefined rates or set to a specific user customized baud rate. Predefined baud rates range from 1200 to 921k.The reset pin (RST) on J1 is active low. If the RST pin is toggled, the device will undergo a hard reset. This hard reset performs similarly to a power cycling of the device. The second interface besides the standard UART signals is the STATUS pin also on J1The STATUS pin directly reflects the connection status of the device. STATUS is driven high by the device when connected and is driven low otherwise.For more information on the devices UART interface and RST and STATUS pins refer to the RN-42 user manual on the Roving Networks website.1.3 Command ModeIn order to enter the command mode, the PmodBT2 must receive "$$$" to which it will respond "CMD". When in command mode, the module will respond to a large number of commands allowing the user to customizing the module for specific applications. In order to exit command mode, send "---<cr>" (three minus signs in a row and where <cr> stands for the carriage return character) to which the device will respond "END". Remote configuration, or configuration over a Bluetooth connection, is possible through the command mode but has several restrictions. The configure time, which defaults to 60 sec, defines the time window in which the PmodBT2 may be configured remotely. Outside of this time, the PmodBT2 will not respond to any remote commands. It is important to note that any of the "set" commands available for the PmodBT2 must be followed by a power cycle to take effect in any design.Connector J1 – UART CommunicationsPin Signal Description1 RTS Ready to Send2 RX Receive3 TX Transmit4 CTS Clear to Send5 GND Power Supply Ground6 VCC Power Supply (3.3V)7 STATUS Connection Status8 ~RST Reset9 NC Not Connected10 NC Not Connected11 GND Power Supply Ground12 VCC Power Supply (3.3V)Connector J2 – SPI Connector (Firmware Update Only)1 MISO Master in/ Slave out2 MOSI Master out/ Slave in3 SCK Serial Clock4 ~CS Chip Select5 VCC Power Supply (3.3V)6 GND Power Supply GroundTable 2. Connector descriptions.The various modes of operation are accessed by using the "SM,<5,4,3,2,1,0>" command while in command mode. The PmodBT2 can be put into one of six available modes of operation. The modes in order, 0 to 5, are: slave, master, trigger master, auto-connect, auto-connect DTR, and auto-connect ANY. For more detailed information on the different modes of operation, refer to the RN-42 user manual. For the full list of device commands, how to use remote configuration, and more detailed information on the different modes of operation, see the RN-42 data.。
路由移动限量版2.0.0移动客户端手机操作指南说明书

RouteMobileMobile Client Manual for Blackberry Version: 2.0.0ContentsRequirement (3)How to use Mobile Client (4)Compose Message (6)Manage contacts (19)Distribution List: (25)Templates (28)Balance (31)Remove User Credentials (31)Important Notes (32)Auto updates (33)RequirementApplication requires two files to run successfully:∙MobileClient.jad∙MobileClient.cod(s)After successful download, click on " MobileClient.jad" file which will start installing the application on the mobile phone. After successful completion, an Icon of Mobile Client application appears on the screenHow to use Mobile ClientAfter installation you get the application icon on mobile screen like this:When user clicks on "Mobile Client" icon, user gets Login screen like thisCompose MessageAfter successful login, “Route Mobile Client” form is displayed. Here user can compose and send messages.On clicking "Attach" Icon a slid panel is opened from where user can select destinations.Select contacts:Brows text file: User can select textfile from SD -Card, which containsmobile numbers.Phone book contacts: User canselect contacts from phone book.Phone book groups: User canselect contact group from phonebook.Application groups: User can selectcontacts groups, which was created inhis application. Distribution list: Usercan select any contact list, created inhis application.Browse Text File:On clicking "Browse Text File", below screen opens, from where user can select required file.After selection of file, application read and checks all destinations. If invalid destinations found, application prompt user, for count of valid and invalid destinations. After validation of file, file name is appeared like this.Note:∙File should contain only destinations separated by “\n”.∙User can upload file containing up to 300000 destinations.On clicking "Phone Book contacts" A below screen open which show all contacts available in phone book and user can select contact(s).After selection of contacts, "Phonebook Contacts" will be appear in "To" text field.On clicking "Phone Book Groups", all groups are displayed, available or exist in phone book. Application display all contact available in selected group.After selection of contacts, selected group name will be appear in "To" text field.Application Groups:On clicking "Application Groups", all groups are displayed, created by users in the application. Application display all contact available in selected group.After selection of contacts, selected group name will be appear in "To" text field.Distribution ListOn clicking "Distribution List", all list are displayed, created by users in the application. After selection of list, selected list name will be appear in "To" text field.Senders: sender of message. If user defined allowed sender then sender list will be prompt for selection or user can enter sender.Message type: It defines type of message, user can select message type fromlist.Message Type:Text message: User can sendplain text message.Flash message: User can sendplain text message, but receiverreceive message as flash.Unicode message: User can sendmessage in any language.Unicode flash message:Receiverreceive user's message as flash. Message: Actual message to be sent to destination.User has Template option. Clicking on right corner image on Message field, user can add templates. Templates are nothing but previously sent messages log.When user clicks on “Send” button, user gets option to send message via RSL Service or SIM Service.∙If user selects RML Service, message will be sent via Route Mobile Services.∙If user selects SIM Service, message will be sent via SIM card like regular messaging app.Manage contactsCreate Group: When user click "Add Group" menu, Create group popup screenopen where user can create new group.Delete Group: For deleting group, first select group and then click "Delete Group" menu. A confirmation dialog opens for deleting the group. after confirmation, group will be deleted as well as delete all contacts associated to that group.Edit Group: Here user can create, edit and delete contact from selected group. For newly created group, "No contact present" message will appear.Add Contacts: User can create new contact in the selected group.Delete Contact: For deleting contact, first select contact and then click "DeleteContact" menu.A confirmation dialog opens for deleting the contact. after confirmation, contact will be deleted.Edit Contact: First select contact and then click "Edit Contact". A screen appears, which display contact name and number of selected contact, here user can edit name and number.Distribution List:It is a list of number(s) belongs to any specific category.Like Managers list, workers list, etc. To manage distribution list, click menu "Manage List", on manage group screen.Add List: User can create new distribution list. User can add 'n' number of destination in this list.Before list creation, application check all number/destination entered in the list.If any invalid destination found, will automatically discarded from list and only valid destination will be saved. Edit List: User can add new or delete unwanted destination form any selected list by edit it.After selection of list, click "Edit List" menu will open "Update List" screen, which display selected list name and all destination of that list. user can add new destination or delete unwanted destinations from list and updateBefore updation, application checks destination and discard invalid destination if found.Delete list: User can delete any unwanted list from application.For deleting list, first select list and then click "Delete List" menu. A confirmation dialog opens for deleting the list. After confirmation, list will be deleted as well as delete all destinations associated to that list.TemplatesUser can create new template so as to add in message field while sending message. When user sends message, that message also gets stored in templates so that next time user can use this message as template.To manage templates, click "template" menu, which open manage template screen, where user can manage templates.Add Template: User can create new template so as to add in message field or use as message, while sending message.Edit Template: User can edit or change any template as per requirement.Delete Template: User can delete any unwanted template, by selecting and click menu "Delete Template".BalanceUser can check his current balance any time. Remove User CredentialsImportant NotesFor successful delivery of message, please follow below mentioned points:1.Destination:i.Destination must be valid.ii.Destination must contain country code. Example 919856854717.iii.Destination may contain (+) sign. example +919856854717. (optional)2.Text File:i.Text file must contain each destination number in new line.ii.File will never contain characters/spaces/etc within destination.iii.File never contains blank line between two destinations.Correct File Wrong File3.Phone Book contacts: Contact number always contains country code.Auto updatesApplication automatically checks updates from server, if any updates found, then it asks for update, like this: If you select "Yes", then it starts downloading updated version of application.。
知搏Magento2移动应用构建器用户手册说明书
Mobile App BuilderUser Manual v1.0.4Contents:1.0Introduction (3)1.1Features List (4)1.2Technology for Development (4)1.3Installation Guide (4)2.0Admin Panel (5)2.1General Settings.........................................................................................5-62.2Payment Methods (7)2.3Push notification Settings (8)2.4Push Notification History (9)2.5MenuSettings (10)2.6Home Page Layout...............................................................................11-163.0Mobile App Screens (17)3.1Home Screen (17)3.2Navigation Menu (19)3.3Category Screen (20)3.4Product Screen (21)3.5Wishlist Screen (22)3.6Login Screen (23)3.7Shopping Cart Screen (24)3.8Checkout Screen (25)3.9Payment Screen (26)3.10My Account Screen (27)3.11Order Details Screen (28)1.0IntroductionWe all are aware that eCommerce mobile apps are one of the most unavoidable need for every online store.So,for all the Magento2 store owners out there who are looking for mobile shopping apps, KnowBand Mobile App Builder is the perfect tool.The Mobile App Builder extension for Magento2is a readymade& automated framework to create and publish mobile apps.All is required from the admin is to get the extension and share business requirements.Entire technical stack work from development to release on App stores will be handled.Prime highlights of the extension are mentioned below:●No coding required to launch fully native Android and iOS mobileapps.●Friendly admin panel with high-end customization control ondesigning as well as working.●Apps with almost all regular Magento functionalities withnumerous other features.●Just one time payment with3months of Free support.No hiddencharges or subscription.●Apps branded to your business only with relevant graphics andcontent.●No extra charges for app publish on Google Play Store&AppleApp Store.The store admin just need to create their own developer account and share the details.●Most effective tool to surpass surrounding competition and boostsales for your business.1.1Feature List:Customizable Home Screen Store Branded Apps Zopim&WhatsApp Chat Tablet&Mobile Support Multiple Colors&Fonts Google&Facebook Login Automatic Inventory Update Multi-lingual&RTL OTP&Fingerprint LoginAll Product Type Support Multi-currency Support All Payment Method Support Unlimited Push Notifications Wish list Functionality All Shipping Method Support Coupon/Voucher Support Multiple Filters&Sorts Simplified Checkout Screen Seamless Accordion Menu Product Social Sharing Real-time Order Tracking1.1Technology For Development:Language:PHPFrame Work:Magento1.2Installation Guide#1.Buy the extension and download the extension package of MobileApp Builder.#2.Install zipped package on your Magento2web-store.#3.Extension is now installed and ready for use.Check“Knowband Extensions>Mobile App Builder”in admin panel.2.0Admin PanelAfter installing Mobile App Builder module into your Magento2store, the plug-in will provide various interfaces in the Admin panel.Each interface is in form of a tab and each tab contains some specific settings/functionality that can be changed as per the need.Below is the explanation for each tab:2.1General Settingsa)Enable the Extension:Enable Mobile App Builder to make the mobile apps work on the user’s devices.b)Redirect to Cart Page when Add To Cart:Whenever any user clicks on Add To Cart button,it will be redirected straight to shopping cart screen.c)Display Short Description:Enable to display the short product description on the apps.d)Enable Request Log Reporting:Enable the error log on the mobile apps which can be used to identify&rectify any abnormal behavior of the mobile apps.e)Enable/Disable Fingerprint Login:Enable Fingerprint login on the Mobile Apps.f)Enable/Disable Phone Number Login:Enable Phone Number login on the Mobile Apps.g)Select Layout for Home Page:Choose the desired Home Screen layout for the mobile apps.h)Enable Live Chat Support:Enable/disable Zopim(Zendesk)chat option on mobile apps.You need to enter the chat API key provided along with the final apps.i)Enable WhatsApp Chat Support:Enable/disable WhatsApp chat option on mobile apps.j)Enable Logo:The store admin can upload the logo which will be displayed on the header of the apps.k)App Button Color:Choose button color for your apps.l)App Theme Color:Choose theme color for your apps.m)App Button Text Color:Choose button-text color for your apps. n)App Background Color:Choose background color for your apps.2.2Payment Method Settings:Mobile App Builder for Android&iOS support all types of payment methods active on the website.Additionally,two native payment options PayPal and COD are available by default in the apps.Edit Payment Methods:The store admin can configure both PayPal and COD payment methods just using the edit option.a)Status:You can enable/disable the payment method just by toggling the button in the background.b)Name:Enter the name of the payment method.c)Payment Mode:You can select the native payment environment from sandbox or live option.These settings allows the users to test the payment methods before proceeding.d)Client ID:Enter the appropriate client ID of PayPal merchant account.It identifies the account to which the Payment has to be made while placing the order.2.3Push Notification Settings:The Mobile App Builder provides unlimited push notifications for handy marketing of the products.These push notifications can be fully personalized and timed from the admin panel.a)Firebase Server Key:To configure the push notification service for the application,you will require a Google firebase server key.This key allows you to send push notification in apps.It will be provided along with the apps.b)New Order Settings:Enable/disable push notification for the new orders placed by app users.Enter the title and message for follow up Push Notification on successful order on the application. c)Order Status Change Settings:Enable/disable push notification which will be sent whenever there is any update in the order delivery status.Enter title and message for follow-up Push Notification for update in order status.d)Abandoned Cart Settings:Enable/disable push notifications for the shopping cart that has been abandoned by the user without successful purchase.Enter the title and message for follow-up push notification for cart abandoned by online shoppers.Time Interval:The time interval(in hours)for sending the Push Notification for the Abandoned Cart to the users who left items in their cart.2.4Push Notification History:Push notification history contains list of all notifications sent on the apps along with complete details.The store admin get to view the complete list.Send Notification:On clicking send notification option,a pop up window appears with option to configure the push notification.a)Title:The title of the Push Notification which is to be sent to app users.b)Message:Message being displayed on the notification.c)Select Broadcast Device Type:The store admin can choose if the notification is to be sent to Android app users or iOS app users or both.d)Select Image Type:Upload relevant image for the personalized push notification.e)Select Redirect Activity:Choose a category or specific product where you want the users to be redirected after tapping on the Push Notification.2.5Menu Settings:In this menu settings tab,the store admin can set and manage the various CMS pages of the application.2.6Home Page Layout:The Mobile App Builder extension offers a customizable Home Screen with all sorts of design elements in the module backend.You can create any layout for app Home Screen&offer an interactive and sale based interface to browse.After adding the layout,click on edit option&start configuring various designing attributes for app home screen.The store admin can configure the following designing elements under the Home Page Layout tab.Top Categories:The top categories can be used to highlight all the major brands/highlights of your store on the Home Screen.These categories can be configured from module backend as shown in the below snapshot:Square Banner:The Banner can be displayed in the square form on the app home screen.The landing page,image can be configured as shown in the below snapshot:Sliding Banner:The sliding banners can be displayed on the app Home Screen whose configuration can be done as shown in the below snapshot:Grid Banner:These banners will be displayed in the form of grid listing&can be customized as shown in the below snapshot:Countdown Timer BannerDisplay a countdown timer banner on Mobile App home screens& offer a time-based/flash sale to your users:Square Products:The products can also be listed in the square view on the App Home Screen.This element can be configured as shown in the snapshot below:Sliding Products:The products can be displayed in the slider view on the mobile app Home Screen&can be configured from backend panel.Grid Products:The products can be displayed in the grid view on the App Home Screen:Products Recently Accessed:The Mobile App Builder offers the recent products tab on the app home screen displaying recently viewed products by the user.Just add element in the layout make it work on the home screen.3.0Mobile App Screens3.1Home ScreenThe Mobile App Builder brings the complete flexibility to design the mobile app home Screen on your own.The Android&iOS mobile apps can be designed from the backend panel using the following designing attributes:-->Top Categories-->Square Banners-->Sliding Banners-->Grid Banners-->Square Products-->Sliding Products-->Grid Products-->Countdown Timer Banner-->Recently Viewed ProductsThe positioning of all the elements can be changed with a simple drag &drop.a)Dynamic Layouts:Create&save various alluring&intuitive layouts in the backend&change your app look&feel in just one click.b)Store Logo:Add your store logo image in the module backend& display the same on the header of the apps.c)Search:The apps have keyword&voice search options which allow the users to search for products without any hassle.d)Wish list:This option in mobile app let you bookmark the desired products for future purchase.e)Shopping Cart:The users can easily access the shopping cart from the top-right corner of the home screen.f)WhatsApp/Zopim Chat:This extension offers two live chat options in mobile apps with Zopim&WhatsApp.The app users can directly message you regarding any issue or query regarding purchase.3.2Navigation Menu:The Mobile AppBuilder offers anaccordion menuin the mobileapps whichdisplays thestore categorieson the MobileApps.Your appusers can easilybrowse all thecategories fromthis menu&access all CMSpages.-->My Account-->Categories-->CMS Pages-->MenuLanguage(s)Currency(s)3.3Category Screen:All categorieson your websiteare fetched onthe Mobile Appsas well.Thecategory screenof apps has twoviews:Grid&List view.Thisscreen has thefollowingoptions:-->Grid&ListView-->Sorting-->ProductFilter3.4Product Screen:The mobile app product screen is completelyclutter-free&appealing. Every product hasmultiple imagesdisplayed along with their name&price.Theproduct availability is also displayed as“In Stock”or “Out Of Stock”along withthe price discounts.The Product Screen has the following options:-->Product Options-->Short Description-->Product Info&Care-->Add To Wishlist-->Add To Cart-->Product SocialSharing3.5Wish-list Screen:The Mobile AppBuilder offers awish-list bagallowing usersto bookmarkproducts forfuturepurchase.Theapp users canview the list ofall wish listproducts here.It has thefollowingoptions:-->Add ToCart-->RemoveFrom Wish list3.6Login Screen:This extensionoffers variousone-tap loginwith thefollowingoptions:-->E-maillogin-->Google&Facebooklogin-->Phone no&fingerprintlogin3.7Shopping Cart Screen:Shopping Cartscreen of mobile appwill display all addedproducts into theshopping cart.Themobile app users’can view Productname,quantity,total price&shipping cost fromthe cart.This screenhasfollowing options:-->Apply Voucher-->Total ProductPrice-->UpdateProduct Quantity-->RemoveProduct-->ContinueShopping-->Continue ToCheckout3.8Checkout Screen:The eCommerce MobileApps has a simplified checkout approachwith a single-screen.The users can get info regarding order detailslike shipping details,billing details,order summary,ordercomment,payment summary beforemaking the actualorder.-->Shipping Address-->Billing Details-->Order Summary-->ShippingMethods-->Order Comment-->PaymentSummary-->Proceed ToPayment3.9Payment Screen:The payment screen of mobile app displays both web-view&native payment methods.These apps support your website payment methods along with PayPal&COD payment options.Moreover, various other native payment options like PayU,Apple Pay,Amazon Pay,Braintree,Stripe,etc.can also be added in the app over additional cost.3.10My Account Screen:The users to viewthe completeaccount detailsincluding list of allprevious orders.Thisscreen has thefollowing options:-->Order History-->Update Profile-->ShippingAddress(s)-->Order Details-->Re-orderFeature3.11Order Details Screen:The Mobile App Builder offers a real-time order tracking in mobile apps.Order Details screen in the app displays shipping address, product summary,shipping and payment method,and total cost summary.The users can even track the delivery of previously placed orders.------------------------------------The End------------------------------------。
- 1、下载文档前请自行甄别文档内容的完整性,平台不提供额外的编辑、内容补充、找答案等附加服务。
- 2、"仅部分预览"的文档,不可在线预览部分如存在完整性等问题,可反馈申请退款(可完整预览的文档不适用该条件!)。
- 3、如文档侵犯您的权益,请联系客服反馈,我们会尽快为您处理(人工客服工作时间:9:00-18:30)。
2.0下设置手机蓝牙拖pb上网,支持pb安装的其他
联网程序,包括暴力安装的qq、围脖等
狗屎教程
本方法只在2.0beta下测试,低版本未知,但应该是可行。
pb桥接以后,pb自带浏览器可以自动连接网络,但是其他程序,如安卓的各种软件无法联网。
本文通过连接其他手机的蓝牙,打开modem模式上网,虽然网速稍慢,但也部分解决了无wifi情况下,qq等软件上网问题。
Ps:手机卡要开通上网流量,而且,用bp上网流量较大,流量少的请慎用。
1 pb和手机蓝牙配对
因为操作和普通手机之间蓝牙配对一样,这里不详细讲解,只给出主要步骤:首先下拉手势打开主菜单,找到蓝牙:
Bluetooth connectivity是蓝牙开关,discoverable是“是否被发现”开关,默认关闭。
我这个已经有了两个蓝牙配对,第一个是我的手机CC。
如果需要新添加请点击add new device,
点击search搜索添加新的蓝牙设备,添加成功以后,请转到下一步。
2 通过蓝牙托pb上网
主菜单中找到Internet Tethering一项,右面会出现已经蓝牙成功的手机
名称
选择你自己的手机用户名,我的是CC,来到下面画面,这里需要设置一下你手机卡的类型。
在search里面输入china,当然你自己拖动下面的列表找也行。
出来这么几个选项,china mobile是移动,telecom是电信,unicom是联
通。
的页面点connect。
点击后跳出下面警告界面,不用管,点击continue,
跳出等待画面,
不成功,可以多连接几次。
小箭头。
断开连接,请点解下方的disconnect。
手机中会显示调制解调器模式以启用,当然根据手机的不同显示不一样。
不
过注意,你的手机这时候会显示连接到modem。
手机自己不能再上网。