EMC_Symmetrix_巡检操作手册
EMC存储系列巡检服务报告模板

正常
异常 说明:
主机HBA卡
正常
异常 说明:
光纤线
正常
异常 说明:
故障说明:
总结:
客户签字:年月日工程师签字:年月日
联系电话:
(签字人有效电话,便于客服回访)
客户信息
公司名称
部门
联系人
电话
手机
电子邮件
服务商信息
公司名称
地址
联系人
电话
手机
电子邮件
基本信息
产品Hale Waihona Puke 称产品序列号产品型号
业务名称
IP地址
机架位置
存储外设检查
硬件检查
序列号
存储型号
存储的容量/使用率
/
SPS(电池)上的指示灯
正常
异常 说明:
检查disk enclosure(DAE)上的指示灯
正常
异常 说明:
SPS(电池)上的指示灯
正常
异常 说明:
EMCClariiON设备可以通过指示灯判断设备的情况,EMC 高端存储Symmtrix(DMX)设备需要通过命令进一步判断。
故障说明:
链路检查
powermt display
powermt display dev=all
正常
异常 说明:
SP(FA)卡
正常
异常 说明:
便携式辐射巡检仪操作规程

便携式辐射巡检仪操作规程便携式辐射巡检仪是一种常用于辐射监测的设备,用于检测和测量环境中的辐射水平。
正确的操作规程对保证工作安全和准确性至关重要。
以下是便携式辐射巡检仪的操作规程,共计1200字:一、巡检仪准备工作1. 检查设备:在使用前,仔细检查巡检仪的各个部件是否完好无损,是否有脏污或损坏。
特别检查其探测器是否干净且无缺陷,确保设备的正常运行。
2. 校准设备:定期校准巡检仪,以确保测量结果的准确性。
根据厂商提供的校准方法和时间表进行操作。
3. 佩戴个人防护装备:在进行辐射巡检时,务必佩戴合适的个人防护装备,包括防护手套、防护眼镜和防护服等。
根据不同的辐射源和环境,选择合适的防护装备。
二、巡检仪启动和操作1. 启动巡检仪:按照设备说明书中的步骤,启动巡检仪。
待设备正常运行后,确保其能够正常检测和显示辐射水平。
2. 检查背景辐射:在开始巡检前,应当先检测当地的背景辐射水平,以便后续的巡检结果与背景辐射进行比较。
在测量背景辐射时,要保持设备的稳定和准确。
3. 设置测量范围:根据所需测量的辐射类型和水平,选择合适的测量范围。
确保选择的范围能够覆盖待测环境中的辐射水平。
4. 正确持仪器:正确持仪器是保证准确测量的关键。
在使用巡检仪时,要用手稳定地握住仪器的把手,并避免阻挡探测器。
5. 靠近测量目标:将巡检仪靠近待测目标,确保其能够接收到目标辐射的最大值。
避免和其他物体产生干扰和阻挡。
6. 设定测量时间:根据待测环境的辐射水平,选择合适的测量时间。
对于高辐射强度的环境,测量时间可减少,以提高测量效率。
7. 记录测量结果:测量过程中,及时记录测量结果和测量时间。
确保记录的准确性和完整性,以备后续分析和报告。
三、巡检结束和设备维护1. 结束巡检:完成巡检任务后,将巡检仪关闭。
确认设备处于安全状态后,可进行下一步操作。
2. 设备维护:将巡检仪清洁干净,保持其外观整洁。
特别注意探测器的清洁,避免灰尘或污物进入。
XMZ智能巡检仪说明书
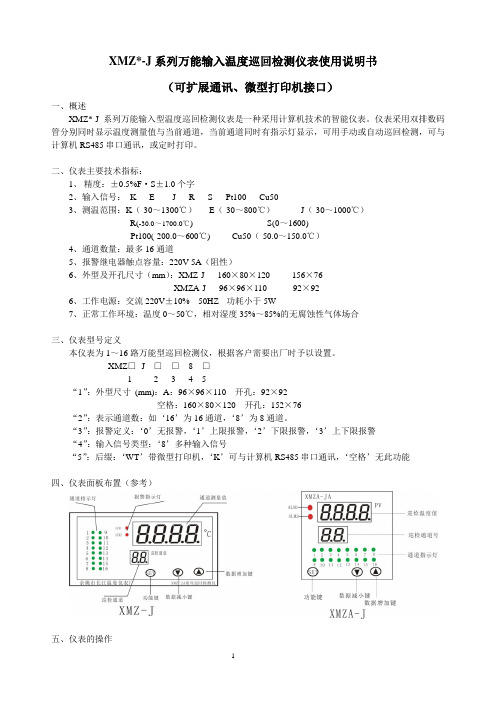
XMZ*-J系列万能输入温度巡回检测仪表使用说明书(可扩展通讯、微型打印机接口)一、概述XMZ*-J系列万能输入型温度巡回检测仪表是一种采用计算机技术的智能仪表。
仪表采用双排数码管分别同时显示温度测量值与当前通道,当前通道同时有指示灯显示,可用手动或自动巡回检测,可与计算机RS485串口通讯,或定时打印。
二、仪表主要技术指标:1、精度:±0.5%F·S±1.0个字2、输入信号:K E J R S Pt100 Cu503、测温范围:K(-30~1300℃)E(-30~800℃)J(-30~1000℃)R(-30.0~1700.0℃) S(0~1600)Pt100(-200.0~600℃) Cu50(-50.0~150.0℃)4、通道数量:最多16通道5、报警继电器触点容量:220V 5A(阻性)6、外型及开孔尺寸(mm):XMZ-J 160×80×120 156×76XMZA-J 96×96×110 92×926、工作电源:交流220V±10% 50HZ 功耗小于5W7、正常工作环境:温度0~50℃,相对湿度35%~85%的无腐蚀性气体场合三、仪表型号定义本仪表为1~16路万能型巡回检测仪,根据客户需要出厂时予以设置。
XMZ□- J □□8 □1 2 3 4 5“1”:外型尺寸(mm):A:96×96×110 开孔:92×92空格:160×80×120 开孔:152×76“2”:表示通道数:如‘16’为16通道,‘8’为8通道。
“3”:报警定义:‘0’无报警,‘1’上限报警,‘2’下限报警,‘3’上下限报警“4”:输入信号类型:‘8’多种输入信号“5”:后缀:‘WT’带微型打印机,‘K’可与计算机RS485串口通讯,‘空格’无此功能四、仪表面板布置(参考)五、仪表的操作1、正常使用中,上排显示窗显示当前通道测得的温度值,下排显示窗显示当前通道号,设置参数时下排显示参数符号,上排显示设定值。
麦格思维特安全操作及保养规程

麦格思维特安全操作及保养规程麦格思维特是一款高精度的测量设备,广泛应用于机械加工、汽车制造、电子制造和精密加工等行业。
为确保设备的使用安全和延长其使用寿命,使用者需要遵循以下安全操作和保养规程。
安全操作规程1.使用前必须检查设备,确保有无机械损坏;2.启动前必须检查供电电源,和电缆是否牢固;3.确认设备的负荷能力是否与工作任务相符,如果负荷过大容易损坏设备;4.使用前需要仔细阅读产品说明书,并按照说明上的要求进行正确使用和维护;5.在使用过程中,禁止打开和改变设备的任何部件,也禁止自己维修除非持有相关证书和执照;6.在使用过程中,必须保证所在的环境安全无隐患,同时工作人员需要穿戴防护用品;7.在进行维修或者检查设备的时候,必须断开电源,并拆除电池。
保养规程1.设备在使用前后需要仔细清洁设备,保证设备的清洁状况对于设备的寿命和准确性都有很大的影响。
用干净的棉布擦拭机身,不能使用硬物或钢丝球擦拭。
2.保养维护重点:悬挂部位,灵敏度控制,电缆连接点及电气连线。
常规保养切勿触摸灵敏部位,避免接触物质或者液体,否则会影响设备的灵敏度。
3.定期检查设备的部件,以及各部件的安定性,如果出现不稳定,及时进行维护和更换。
4.设备运行特别要注意防腐蚀,设备使用后应根据不同地域及季节调整设备保养周期,并使用合适的防护措施。
5.在设备长时间不使用时应将其拆卸并储存在干燥通风的地方,避免有潮湿的地方存放。
总结麦格思维特是细致精密的测量设备,能够提升工作准确性和效率。
但是对于设备的安全操作以及设备的保养十分关键,这关系到设备的寿命和使用效果,考虑到这一点,使用者应该严格遵照安全操作和保养规程。
EMC symmetrix系列存储命令介绍

SANSPIRE Inspired by SAN•Home•TechArticles»•Scripting»•About•ContactYou are here: Home > EMC – SYMCLIEMC – SYMCLIby sanaswati on 30/10/2012 in EMCIf I get a dollar for each time I searched for a sym command to achieve something, I would have been a one tenth of a millionaire by now Below is the cheat sheet I compiled to prevent me from becoming that one tenth of a millionaire.===================================================================================== SYMMASKDB=========Initialize the VCMDB (a device masking database)# symmaskdb -sid 1234 init -f vcmdb.dbBackup the VCMDB – backups the VCMDB database to a specified file# symmaskdb -sid 1234 -file <backup_filename> backupRestore the VCMDB – restores a database file# symmaskdb -sid 1234 -file <restore_filename> restoreRefresh the database (This is sometimes needed after masking on DMXs. It refreshes the array configuration and VCMDB)# symmask -sid 1234 refreshCheck whether devices are masked to any host# symmaskdb -sid 1234 -dev 7D5,03A4:03A7 list assignment (DMX)# symaccess -sid 1234 -dev 7D5,03A4:03A7 list assignment (VMAX)Check which devices are masked to given host# symmaskdb –sid 1234 list database# symmaskdb -sid 1234 list capacity -host hostA (DMX)# symmaskdb -sid 1234 list capacity -host hostA -dir 07a -p 1 (DMX)# symmaskdb -sid 1234 list database -wwn 10000000c979bf7e# symmaskdb -sid 1234 list database -wwn 10000000c9598ed5 -dir 07a -p 1# symmaskdb -sid 1234 list devs -wwn 10000000c9598ed5 (shows one line per device and its size, lun number etc)Check which devices are masked to given FA port# symmaskdb -sid 1234 list database -dir 11f -p 0===================================================================================== SYMDEV======List all devices within the array# symdev list# symdev -v list (will take a long time to run because of the sheer amount of output)See the detailed information about given device# symdev -sid 1234 show 0200Find out whether device is MAPPED to any ports (Note: :? indicates it is not mapped to any port; ***:* indicates it is mapped to more than one port)# symdev -sid 1234 show 513 (single device)# symdev -sid 1234 -range 6d0:6d4 list (multiple devices)# symdev -sid 1234 -range 6d0:6d4 list -multiport (multiple devices mapped to multiple ports – works with range only – could specify same device twice in the range if needed for a single device – for example 513:513)List which devices are mapped to FA ports# symdev -sid 1234 list -sa 09c -p 0List which devices (hypers/metas) are not mapped to any ports# symdev -sid 1234 -noport listHow to write disable several devices# cat devs12001201# symdev -sid 1234 write_disable -file devs -SA 8c -p 0# symdev -sid 1234 write_disable -file devs(This will disable devs on all ports)How to write disable only a single device# symdev -sid 1234 write_disable 0123 -SA all# symdev -sid 1234 write_disable 0123 -SA 3A -p 0How to change the status of device to “not_ready”# cat devs12001201# symdev -sid 1234 not_ready -file devs -SA 8c -p 0# symdev -sid 1234 not_ready -file devs (This will disable devs on all ports)# symdev -sid 1234 not_ready 0A2B -SA all (This will disable devs on all ports)# symdev -sid 1234 not_ready 0A2B -SA 3A -p 0 (This will disable devs on 3a:0 ports)================================================================================ SYMCFG======List of FA ports/WWN on given array# symcfg -sid 1234 -FA all list# symcfg -sid 1234 -FA 8C listList detailed information on a FA port# symcfg –sid 1234 -FA 11E list -vFind out the failed director (front end FA and disk DA)# symcfg -sid 1234 list -dir all => get the FA or DA number from here# symcfg -sid 1234 list -fa 5g -v | egrep "Negotiated Speed (GB/Second)" => speed should be a number# symcfg -sid 1234 list -da 5d -v | egrep "Director Status"Display details about array# symcfg –sid 1234 list -vList LUN addresses available on a given FA (and also to see which luns are mapped to which devices)# symcfg –sid 1234 list -address -available -fa 7e –p 0To find out which lun number is used to map a device for given hostOn VMAX # symaccess -sid 1234 show view hostname_vwa (Column “Host Lun” under Storage group name)On DMX # symmasksdb -sid 1234 list devs -wwn 50001234567890 (Column “HOST” under LUN)List which applications (symcfg/stpdaemon etc) are running the commands against given array # symcfg –sid 1234 -application listDisplay details (OS/IP/Hardware/hostname) about hosts that are accessing given array# symcfg –sid 1234 -connections listCheck the consumed capacity of TDEV (space consumed by a TDEV)# symcfg -sid 1234 list -pool poolname -tdev -detail -gb | grep 1C4B# symcfg -sid 1234 list -pool poolname -tdev -range 1A11:1A1B -detail -gb================================================================================ SYMDISK=======Display the summary information about diskgroups on given array# symdisk -sid 1234 list -dskgrp_summary -disk_group all# symdisk -sid 1234 list -dskgrp_summary -disk_group 1# symdisk -sid 1234 list -dskgrp_summaryDisplay details about disks in array separated by disk groups# symdisk -sid 1234 list -by_diskgroupDisplay details about disks in given diskgroup# symdisk -sid 1234 list -disk_group 1Display the list of disks configured as hotspares in the array# symdisk -sid 1234 list -hotspareDisplay the details of all hotspares in the array# symdisk -sid 1234 list -v -spare_infoDisplay the list of failed drives in the array# symdisk -sid 1234 list -failedDisplay list of all disks installed in the array# symdisk -sid 1234 listIdent Symb Int TIDVendor Type Hypr Total Free Actual------ ---- --- --- ---------- ---------- ---- ---------- ---------- ----------DF-5A 05A C 0SATAHGST C02THJK 24 953870 32940 1823565Disk ID would be 5A:C0Display the detailed information such as speed/make/model/diskgroup/hypers on disk# symdisk -sid 1234 show 5A:C0Display the gaps (available space) on given disk# symdisk -sid 1234 show 5A:C0 -gapsDisplay only the gaps (available space) on given disk# symdisk -sid 1234 show 5A:C0 -gaps_onlyHow to find out datadevs in degraded status# symdev -sid 1234 -datadev -service_state notnormal list================================================================================ SYMMASK=======Set or clear the FC ID lockdown# symmask set lockdownSet or clear visibility in masking database so that host should find all devices, even if they are noncontiguous LUNs# symmask set visibilitySet or clear LUN base/offset skip for noncontiguous LUNs# symmask set lunoffsetSet the record in the database to hold information on the host type that may differ than the current setting on the corresponding FA# symmask set heterogeneousDiscover the WWN or iSCSI names of the HBAs on the host and writes the ASCII names to the login history table, if empty# symmask discover hbaDisplay list of devices seen by WWN of given HBA for given host# symmask list hba# symmask list hba -vDisplay WWNs logged into given FA port (displays the login history table contents)# symmask -sid 1234 list logins (for the whole array)# symmask -sid 1234 list logins -dir 3a -p 0 (on given port)# symaccess –sid 1234 list logins –dirport 5e:0 (on VMAX)How to mask the devices to given WWN (Add a device to the list of devices that a WWN can access – only for DMX)# symmask -sid 1234 -dir 8a -p 0 -wwn 100000012345678 add devs 200,200:205# symmask -sid 1234 -dir 9d -p 1 -wwn 100000012345679 add devs 46a:479,4b8 -dynamic_lun (in case dynamic_lun is in use)# symaccess –sid 1234 –name hostname_sga –type storage add devs 200,200:205 –lun 2c (on VMAX – to map from lun number 2c onwards)How to unmask the devices from given WWN (Remove a device from the list of devices that a WWN can access)# symmask -sid 1234 -dir 8a -p 0 -wwn 100000012345678 remove devs 20c,201:203# symaccess –sid 1234 –name hostname_sga –type storage remove devs 200,200:205 –unmap (on VMAX – removing and unmapping)Delete the login entries for a host on FA port# symmask -sid 1234 -wwn 100000012345678 delete -dir 8a -p 0 -loginHow to assign an alias name to a wwn logged into a FA port# symmask -sid 1234 -dir 8a -p 0 -wwn 10000001234567 rename hostname/hba1 (DMX)# symaccess -sid 1234 rename -wwn 10000001234567 -alias hostname/hba1 (VMAX)How to refresh masking database after masking the new luns to a WWN or removing the luns from a WWN (refresh WWN related memory tables with the contents of VCMDB)# symmask -sid 1234 refreshTurn on the flag for different OSs (D for Solaris; C,SC3,OS2007,SPC2 for Windows/VMWare, SPC2 for linux)On DMX# symmask -sid 1234 set hba_flags on D –enable -wwn 10000001234567 -dir 8C -p 1 (DMX) # symmask –sid 1234 refreshOn VMAX# symaccess –sid 1234 –type init show hostname_ig -detail# symaccess -sid 1234 set hba_flags on C,SC3,OS2007,SPC2 -enable –wwn 100000000123456 # symaccess -sid 1234 set hba_flags on C,SC3,OS2007,SPC2 -enable –name hostname_ig –type initGlobally on FA portset port 1d:0 SCSI_3=enable,SPC2_Protocol_Version=enable,SCSI_Support1=enable;================================================================================ SYMCONFIGURE============Verify that the changes can be made to the array# symconfigure -sid <sid> -f <filename> verifyConfirm that the syntax is correct# symconfigure -sid <sid> -f <filename> previewConfirm that the change is correct# symconfigure -sid <sid> -f <filename> prepareCommit the changes to the database# symconfigure -sid <sid> -f <filename> commitCreate IO Fencing devices for cluster# symconfigure -sid 1234 -cmd "create dev count=24, size=2184 cyl, emulation=FBA,config=2-Way-Mir disk_group=3;" prepareCreate gatekeepers# symconfigure -sid 1234 -cmd "create dev count=24, size=6 cyl, emulation=FBA,config=2-Way-Mir disk_group=3;" prepareCreate raid5 (7+1) thick device (when emulation mode is disabled number of cylinders should be halved to achieve the same size)# symconfigure -sid 1234 -cmd "create dev count=64, size=49604 cyl,emulation=FBA, data_member_count=7, config=raid-5 disk_group=3;" prepare# symconfigure -sid 1234 -cmd "create dev count=64, size=24802 cyl,emulation=FBA, data_member_count=7, config=raid-5 disk_group=3;" prepareCreate new replicated tdevs on local and remote arrays, bind them to pool, srdf pairing relationship between them# symconfigure -sid 1234 -cmd "create dev count=64, size=24802, emulation=FBA,config=RDF1+TDEV, dynamic_capability=dyn_rdf, remote_config=RDF2+TDEV, ra_group=1, binding to pool=source_rep_pool, remote_pool=target_rep_pool;" prepareModify FA Port settings# symconfigure -sid 1234 –cmd ‘set port1C:1 volume_set_addressing=enabled;’ prepare (this is a setting for HP systems)How to create metas from hypers# symconfigure -sid 1234 –cmd ‘form meta from dev 001 config=striped, stripe_size=1920; add dev 002:004 to meta 001;’ prepareHow to dissolve hypers from meta# symconfigure -sid 1234 –cmd ‘dissolve meta dev 04BE;‘ prepareHow to map the devices to FA port (if devices are not contiguous, then you would need a new line for each device –you can’t use commas to separate them)# cat map_devsmap dev 0200:0202 to dir 08b:0, starting lun=06e;map dev 0200:0202 to dir 09b:1, starting lun=06e;ORmap dev 0200 to dir 08b:0, lun=06e;map dev 0200 to dir 09b:1, lun=06e;map dev 0201 to dir 08b:0, lun=06f;map dev 0201 to dir 09b:1, lun=06f;# symconfigure -sid 1234 -file map_devs prepareRule of pair mapping (rule of 17):On DMXs – Ports are [3,4,7,8,9,10,13,14][a-d]. a to d, b to c with rule of 17 and ports opposed. So 3a:0 will be partnered with 14d:1. 4b:1 will be paired with 13c:0.On VMAXs – Ports are [5-12][e-h]. e to e, f to f, g to g, h to h with rule of 17. so 5f:0 will be 12f:0, 8g:0 will be 9g:0 and so on.How to unmap devices from FA ports (if devices are not contiguous, then you would need a new line for each device –you can’t use commas to separate them)# cat unmap_devsunmap dev 0200:0204 from dir 07B:1;unmap dev 0200:0204 from dir 04B:0;unmap dev 0206 from dir all:all;# symconfigure -sid 1234 -file unmap_devs prepareHow to set device attribute dyn_rdf on/off# symconfigure -sid 1234 -cmd 'set dev 1001:1004 attribute=dyn_rdf;' prepareHow to set SCSI3-Persistent Reserve# symconfigure -sid 1234 -cmd ‘set dev 2500:2502 attribute=SCSI3_persist_reserv;’ prepareHow to reclaim wasted space from a TDEV (Zero Space Reclaim)# symconfigure -sid 1234 -cmd 'free tdev 1A1B start_cyl=0 end_cyl=last_cyl type=zero;' prepare================================================================================ SYMDG/SYMLD===========Create a device group# symdg create testdgDelete a device group# symdg delete testdg -force (if it has members, use -force)Display the list of device groups# symdg list <-sid 1234>Show the details of a particular device group# symdg show testdgDisplay all the devices in a device group# symld -g testdg listAdd the devices to a device group# symld -sid 1234 addall -range 0200:0205 -g testdg (bulk)# symld -sid 1234 add dev 0200 -g testdg(individual)Remove the devices from a device group# symld -sid 1234 rmall -range 0200:0205 -g testdg (bulk)# symld remove dev DEV001 -g testdg (individual – must be logical name)How to write_disable disks in a device group# symld -sid 1234 -g testdg -sa ALL write_disable (disables devices in DG on all FAs) # symld -sid 1234 -g testdg -sa 9c -p 0 write_disable DEV001 (device number must be DEVXXX and can be obtained by symld -g testdg list)================================================================================VMAX====Bind TDEV to pool with preallocated storage# symconfigure -sid 1234 -cmd 'bind tdev 1001 to pool fast_pool preallocate size = 24802 CYL;' prepare# symconfigure -sid 1234 -cmd 'start allocate on tdev 1001 start_cyl=0 end_cyl=<last_cyl>;' prepare (in case above command fails or to allocate the storage later)Set the maximum subscription of a pool# symconfigure -sid 1234 -cmd "set pool fast_pool, type=thin, max_subs_percent=100;" prepareHow to list the views created on the array# symaccess -sid 1234 list view [–v]How to display details of a view created# symaccess -sid 1234 show view hostname_vwa -detailHow to list the groups created on the array# symaccess -sid 1234 list -type storage|port|initiatorHow to display the details of a group created# symaccess –sid 1234 show hostname_sga -type storage# symaccess –sid 1234 show hostname_iga -type initiator# symaccess –sid 1234 show arrayname_5e0_pga -type portHow to create initiator group# symaccess -sid 1234 create -name hostname_iga -type initiator (just create)# symaccess -sid 1234 create -name hostname_iga -type initiator -wwn 100000000000001How to add (or remove) a WWN from a Initiator group# symaccess -sid 1234 add -name hostname_iga -type initiator -wwn 100000000000001# symaccess -sid 1234 remove -name hostname_iga -type initiator -wwn 100000000000001How to create Storage Group and add devs at the same time# symaccess -sid 1234 create -name hostname_sga -type storage (just create)# symaccess -sid 1234 create -name hostname_sga -type storage devs 1001:1005How to add (or remove) devices to storage group# symaccess -sid 1234 add -name hostname_sga -type storage dev 1001# symaccess -sid 1234 remove -name hostname_sga -type storage dev 1001 -unmapHow to create a port group# symaccess -sid 1234 create -name arrayname_5e0_pga -type port (just create)# symaccess -sid 1234 create -name arrayname_5e0_pga -type port -dirport 5E:0How to add (or remove) director ports to a port group# symaccess -sid 1234 add -name arrayname_5e0_pga -type port -dirport 5E:0# symaccess -sid 1234 remove -name arrayname_5e0_pga -type port -dirport 5E:0How to create a view# symaccess -sid 1234 create view -name hostname_vwa -sg hostname_sga –ig hostname_iga -pg arrayname_5e0_pgaHow to rename a group# symaccess -sid 1234 rename -name hostname_sga -type storage -new_name newhost_sgaHow to rename a view# symaccess -sid 1234 rename view -name hostname_vwa -new_name newviewname_vwaHow to delete a view (unmapping the devs at the same time)# symaccess -sid 1234 delete view -name hostname_vwa -unmapHow to delete a initiator group# symaccess -sid 1234 delete -name hostname_iga -type initiatorError: Cannot perform the requested operation because the group is not empty# symaccess -sid 1234 delete -name hostname_iga -type initiator -nop -forceHow to delete a storage group# symaccess -sid 1234 delete -name hostname_sga -type storageError: Cannot perform the requested operation because the group is not empty# symaccess -sid 1234 delete -name hostname_sga -type storage -nop -forceHow to replace a wwn in a initiator group# symaccess -sid 1234 replace -wwn 100000000000001 -new_wwn 2000000000000002How to rename (alias) for a given WWN# symaccess -sid 1234 rename -wwn 100000000000001 -alias hostname/hba_a (this can be done from local symcli server only)How to check which storage group a device belongs to# symaccess –sid 1234 list -type storage –dev 1001How to check which initiator group a wwn belongs to# symaccess –sid 1234 list -type initiator -wwn 100000000000001How to check which port group a FA port belongs to# symaccess –sid 1234 list -type port -dirport 7f:1How to list all tdevs defined on the array# symdev -sid 1234 -tdev listHow to check the consumed capacity of a given tdev# symcfg -sid 1234 list -pool poolname -tdev -detail -gb | grep 1C4B# symcfg -sid 1234 list -pool poolname -tdev -range 1A11:1A1B -detail -gbHow to list all datadevs defined on the array# symdev –sid 1234 –datadev listHow to list all tdevs not bound to any pool# symdev -sid 1234 -tdev list -unboundHow to list all tdevs bound to given pool# symcfg -sid 1234 -tdev -pool testpoolHow to list all tdevs not assigned to any host# symdev -sid 1234 -tdev list -noport -unbound# symdev -sid 1234 -tdev list -noport -boundHow to see details of a pool (or list all tdevs bound to a pool or list all datadevs constituting the pool)# symcfg -sid 1234 show -pool fast_pool -thin -detailHow to unbind a tdev from pool# symconfigure -sid 1234 -cmd 'unbind tdev 1001 from pool fast_pool;' prepare# symconfigure -sid 1234 -cmd 'unbind tdev 1001:1004 fr om pool fast_pool;’ prepareHow to check the status of device being unbound# symcfg -sid 1234 show -pool fast_pool -thin -detail | grep UnbindHow to create TDEVs# symconfigure -sid 1234 -cmd "create dev count=1000, size=32GB, config=TDEV, emulation=fba, dynamic_capability=dyn_rdf, binding to pool=poolname;" prepareHow to create VDEVs# symconfigure -sid 1234 -cmd "create dev count=24, size=24802, emulation=FBA, config=VDEV;" prepareHow to create metas from TDEVs (TDEVS should not have been bound to any pool)# symconfigure -sid 1234 -cmd 'form meta from dev 1000, config=STRIPED, stripe_size=1920; add dev 1001:100F to meta 1000;' prepareHow to list the pools created on the array# symcfg -sid 1234 list -pool -thin -GBHow to rebalance the pool after adding extra datadevs# symconfigure -sid 1234 -cmd "start balancing on pool fast_pool type=thin;" prepare# symconfigure -sid 1234 -cmd "stop balancing on pool fast_pool type=thin;" prepare===================================================================================== SYMLMF========Display the array based license# symlmf –sid 1234 list -type emclmDisplay the host based license# symlmf list –type hostDisplay host based and array based licenses that apply to Symm array# symlmf –sid 1234 list –type symDisplay the state and usage number for all activated licenses on Symm 1234# symlmf –sid 1234 query –type emclmInstall the array based license# symlmf –sid 1234 add –type emclm –file <filename> -vInstall the host based license# symlmf add –type se –license LicenseNumberDelete the license# symlmf delete –type se –license <licensename> where <licensename> is FAST, SRDF, SRDf/Async etc===================================================================================== SYMINQ & SYMPD==============To see the status of all paths# syminq -fibre hbaList the devs that the host can access from an array (to be run on the target host) # sympd list# sympd listList device ids and symmetrix serial number of devices server can see# sympinq -pdevfile===================================================================================== SYMSTAT=======To get the stats for disks# symstat -sid 1234 -type disk -disk all -i 5 -c 1To get the stats for FAs – IOPS and KBPS# symstat -sid 1234 -type port -dir all -i 5 -c 1# symstat -sid 1234 -type port -dir 5f -i 5 -c 1===================================================================================== STORDAEMON==========To see the status of daemons# stordaemon list -allTo show details of a daemon# stordaemon show <name_of_daemon>To start a daemon# stordaemon start <name_of_daemon>To stop a daemon# stordaemon shutdown <name_of_daemon>=====================================================================================cheat sheet, emc, sym commands, symcliAbout sanaswatiView all posts by sanaswati →← BASH – If statement and comparison operatorsEMC –VLUN Migration →•View Comments (2)•Submit A Comment2 Responses to “EMC –SYMCLI”1.aashok 05/06/2013 at 5:44 pm # Replysyminq -fiber hbashould besyminq -fibre hbaoKetan Patel 12/06/2013 at 2:56 am # ReplyCorrect English vs Incorrect English Changed to what syminq think is correctSANSPIRE © 2014. All Rights Reserved.。
EMC_Symmetrix_巡检操作手册

EMC Symmetrix 巡检系列巡检操作手册文档资料信息服务名称: EMC Symmetrix 巡检系列巡检操作手册客户服务代表: 文档版本号: 2.0 服务阶段: 文档版本日期:准备者: 准备日期:审定者: 审定日期:文档适用范围EMC Symmetrix DMX800/1000/2000/3000版本历史版本号: 版本日期: 修订者: 描述: 文件名:注意事项目录一、 EMC Symmetrix产品介绍(highsource维保产品) (4)1.1 DMX 800简单图示 (5)1.2 DMX1000简单图示 (11)1.3 DMX2000简单图示 (14)1.4 DMX3000简单图示 (18)二、 EMC Symmetrix巡检 (18)2.1 使用CE账号登陆SymmWin (19)2.2 key2success自检程序 (19)2.3 使用inline命令行进行查看 (22)2.4 Environmentals检测 (22)2.5 观察指示灯 (23)三、常见故障处理 (24)3.1 硬盘故障处理 (24)3.1.1 硬盘故障确认及定位 (24)3.1.2 在disk map中查看故障硬盘大小及转速 (26)3.1.3 更换故障硬盘 (27)3.2 DMX 800 SPS故障处理 (32)EMC Symmetrix 巡检系列巡检操作手册一、EMC Symmetrix产品介绍(highsource维保产品)1.1DMX 800简单图示RMS Definition of Terms•Storage Processor Enclosure (SPE ) – Symmetrix component of system with DMX director and memory boards•DAE – Disk Array Enclosure; designed by Clariion and holds 15 Fibre Channel drives•Katana – Clariion code name for DAE•FEBE – Front End / Back End board; combination of back adapters and DMX ECM/CCM•SPS – Standby Power Supply; equivalent to Symm6 battery•LCC – Link Control Card; equivalent to Symm6 PBCDMX800 is shown here with two SPE (Storage Processor Enclosure) each containing 4 directors, 2 memory boards, 2 FEBE (front-end/back-end) boards, Two 12V power supplies (PS1 & PS2) One fan module .KVM - Keyboard, View Screen & Mouse is an optional extra, management of DMX800 will normally be via CE laptop to a 1u server.DAE (Disk Array Enclosure) Contains 15 Fibre disk drives, 2 power supplies, 2 LCC (Link Control Card)1 SPS enclosure (2 SPS) (Standby Power Supply ) provides battery backup to SPE (battery on for only 90 seconds) SPS uses RS232 communication. 1 SPS enclosure (2 SPS) are provided per 2 DAE .DMX800 Storage Processor EnclosureDMX-800 - SPE Enclosure1.2DMX1000简单图示1.3DMX2000简单图示1.4DMX3000简单图示二、 EMC Symmetrix巡检2.1 使用CE账号登陆SymmWin点击login(登陆按钮),弹出loginscreen窗口,User type选择CE,Name随便输入,Password输入:sade (不区分大小写),点击登陆系统。
运维服务巡检操作手册

运维服务巡检操作手册IT 服务外包预防性巡检操作手册一、服务人员行为规范1、服务礼仪规范;1)穿着工作装或衬衣等正装,佩服服务工牌,并保持整洁、干净,及时清洗及更换;2)头发保持清洁平整,长度适中。
3)胡须每日刮净,不得蓄留。
4)手部随时维持清洁,指甲经常剪修,不得留长及有污垢。
5)随时保持愉快精神,举止大方,仪态自然,以热情诚恳的态度提供顾客满意的服务。
6)前往顾客服务,应主动打招呼,说明来访原因。
7)巡检完毕后应向顾客说明故障原因及简易处理对策。
8)与顾客言谈过程中语调力求明朗、清晰、态度和蔼、亲切、表情自然。
9)处理故障时,如影响顾客工作环境时,应尽力防止,如有影响应及时清洁。
10)工具箱严禁放置地上及机器上;11)尽量使用普通话与客户沟通与交流,并努力学习使用服务规范用语;12)不得随意拿取客户现场资料、物品等;13)不得收取客户一针一线;14)进入客户机房等机密重地,需取得客户同意,方可进入;15)不得使用服务禁语;2、服务响应规范;1)严格按巡检计划,及时到达客户现场,进行巡检工作;2)如因特殊原因,无法及时到达,必须至电客户,预约到达时间,并同步转告服务经理及相关客户人员;3)完成客户巡检,离开客户现场时,需向客户礼貌道别,并简单说明此次巡检的结果及建议;4)不得随意承诺客户时间,而无法达成;3、服务交付规范;1)按标准服务流程完成巡检、故障排除等服务事项;2)服务完毕,保持服务现场整洁、清洁;3)如需更换物料、备件,需口头及书面向客户说明,并征得客户同意;5)如在现场无法完成服务交付,需向客户说明,并告知客户,我司下次会上门服务解决的时间;6)向客户简要说明,此次巡检的结果,以及后续使用建议,并记录客户的相关需求;4、服务文档填写规范;1)完整填写客户信息栏;2)完整填写客户联系人信息栏;3)完整填写客户设备配置信息栏;4)完整填写设备巡检情况;5)完整填写设备故障排除步骤及方法;6)完整填写遗留问题,并告知服务台进行升级处理;7)完整填写物料、备件更换说明;8)按公司要求,定期呈交服务水平报告;二、巡检流程规范;1、电话预约;2、提前一周做好巡检计划表;3、与客户面对面沟通巡检计划,并取得客户同意;4、按客户信息中心的联络进度,逐步完成巡检计划;5、在巡检完毕后三个工作日内,向用户呈交巡检报告及相关工作建议;6、服务经理三日内完成现场回访;7、针对巡检过程中发现的问题,依照 SLA 协议提交方案,直至解决。
EMC使用手册
04.AND R,A A&R->R
05.CLR R 0->R
06.CLRA 0->A
R /R->R
A R /R->A
09.DAA A寄存器调整为BCD值
49.NOP 空指令
50.OR A,K A OR K->A
51.RET [堆栈顶端]-》PC
52.RETI [堆栈顶端]-》PC使能中断
53.RETL K K->A [堆栈顶端]-》PC
54.SLEP 0->WDT, 振荡器停止振荡
7 6 5 4 3 2 1 0
DH7 PH6 PH5 PH4 PH3 PH2 PH1 PH0
7.IOCE_WTD控制寄存器
7 6 5 4 3 2 1 0
WTDE EIS - ROC - - - -
8.IOCF_中断屏蔽寄存器
7 6 5 4 3 2 1 0
- - - - - EXIE ICIE TCIE
三、指令
01.ADD A,R A+R->A
02.ADD R,A A+R->R
DP7 PD6 PD5 PD4 - PD2 PD1 PD0
5.IOCC_集电极开路控制寄存器
7 6 5 4 3 2 1 0
0D7 0D6 0D5 0D4 0D3 0D2 0D1 0D0
6.IOCD_上拉控制寄存器
6.R5—R6_分别为口5、口6的输入/输出寄存器
7.RF_中断状态寄存器
7 6 5 4 3 2 1 0
- - - - - EXIF ICIF TCIF
- 1、下载文档前请自行甄别文档内容的完整性,平台不提供额外的编辑、内容补充、找答案等附加服务。
- 2、"仅部分预览"的文档,不可在线预览部分如存在完整性等问题,可反馈申请退款(可完整预览的文档不适用该条件!)。
- 3、如文档侵犯您的权益,请联系客服反馈,我们会尽快为您处理(人工客服工作时间:9:00-18:30)。
EMC Symmetrix 巡检系列巡检操作手册文档资料信息服务名称: EMC Symmetrix 巡检系列巡检操作手册客户服务代表: 文档版本号: 2.0 服务阶段: 文档版本日期:准备者: 准备日期:审定者: 审定日期:文档适用范围EMC Symmetrix DMX800/1000/2000/3000版本历史版本号: 版本日期: 修订者: 描述: 文件名:注意事项目录一、 EMC Symmetrix产品介绍(highsource维保产品) (4)1.1 DMX 800简单图示 (5)1.2 DMX1000简单图示 (11)1.3 DMX2000简单图示 (14)1.4 DMX3000简单图示 (18)二、 EMC Symmetrix巡检 (18)2.1 使用CE账号登陆SymmWin (19)2.2 key2success自检程序 (19)2.3 使用inline命令行进行查看 (22)2.4 Environmentals检测 (22)2.5 观察指示灯 (23)三、常见故障处理 (24)3.1 硬盘故障处理 (24)3.1.1 硬盘故障确认及定位 (24)3.1.2 在disk map中查看故障硬盘大小及转速 (26)3.1.3 更换故障硬盘 (27)3.2 DMX 800 SPS故障处理 (32)EMC Symmetrix 巡检系列巡检操作手册一、EMC Symmetrix产品介绍(highsource维保产品)1.1DMX 800简单图示RMS Definition of Terms•Storage Processor Enclosure (SPE ) – Symmetrix component of system with DMX director and memory boards•DAE – Disk Array Enclosure; designed by Clariion and holds 15 Fibre Channel drives•Katana – Clariion code name for DAE•FEBE – Front End / Back End board; combination of back adapters and DMX ECM/CCM•SPS – Standby Power Supply; equivalent to Symm6 battery•LCC – Link Control Card; equivalent to Symm6 PBCDMX800 is shown here with two SPE (Storage Processor Enclosure) each containing 4 directors, 2 memory boards, 2 FEBE (front-end/back-end) boards, Two 12V power supplies (PS1 & PS2) One fan module .KVM - Keyboard, View Screen & Mouse is an optional extra, management of DMX800 will normally be via CE laptop to a 1u server.DAE (Disk Array Enclosure) Contains 15 Fibre disk drives, 2 power supplies, 2 LCC (Link Control Card)1 SPS enclosure (2 SPS) (Standby Power Supply ) provides battery backup to SPE (battery on for only 90 seconds) SPS uses RS232 communication. 1 SPS enclosure (2 SPS) are provided per 2 DAE .DMX800 Storage Processor EnclosureDMX-800 - SPE Enclosure1.2DMX1000简单图示1.3DMX2000简单图示1.4DMX3000简单图示二、 EMC Symmetrix巡检2.1 使用CE账号登陆SymmWin点击login(登陆按钮),弹出loginscreen窗口,User type选择CE,Name随便输入,Password输入:sade (不区分大小写),点击登陆系统。
2.2 key2success自检程序点击“Procedures”,选择“Procedure Wizard”;选择“J RTS/CEs Services”菜单下的“A Keys To Success”,点击“Run”则开始执行health check自检完成后会界面如下:点击“OK”可以查看HealthCheck log;需要注意的地方Director Status、Device Information每次执行Keys To Success都会产生3个log文件,存放在C:\EMC\”存储SN”\symmwin\logs下:HealthCheck.log HealthCheck.logHealthCheck_A3.log HealthCheck_A3.logHealthCheck_ENV.log HealthCheck_ENV.logEMC symm查看log的工具EMC Log Browse.exe2.3 使用inline命令行进行查看点击“inlines”按钮,进入到inline命令行界面使用A7,NRWD, A7,INVD, A7,SYNC查看是否有INV ALID TRACKS产生。
¾如果没有INV ALID TRACKS存在,则说明data disk未发生异常;¾如果有INV ALID TRACKS存在,则很有可能有硬盘发生故障,需要参照HealthCheck.log进一步分析;2.4 Environmentals检测使用environments检测工具可以检测系统电源、电池工作状态,各部件温度及工作状态。
Information菜单下常用菜单:Get SPS Information:查看电池状态;SPE’s Fan and PSstatus:查看SPE风扇和电源状态;FRU Status:查看FRU部件状态;Tempersture:查看各部件温度状态;2.5 观察指示灯观察机器所有指示灯,如果有黄色灯亮起,则表示相应部件可能出现故障,需要维护;三、常见故障处理3.1 硬盘故障处理3.1.1 硬盘故障确认及定位方法一:使用Keys To Success自检确认故障硬盘Keys To Success显示有硬盘故障以上信息表示系统有8块hotspare硬盘,其中一块已经被调用,顶替的是数据盘16b:C2在inline中进一步确认故障硬盘:在DA-DIR.16b下使用“E7”命令可以看到C/02被标识为NR(NOT READY)状态,需要维护;方法二:使用inline命令行确认故障硬盘在任意DA下使用“A7,INVD”查看是否有INV ALID TRACK存在。
如下所示,如果INV ALID TRACK值不为0,则表示可能有硬盘发生故障;继续使用“A7,D5,DV#”(有的系统可能是A7,D,DV#)查看故障硬盘,如下图所示:16b:C02被标识为红色,则说明这块硬盘发生故障,在inline中进一步确认故障硬盘:在DA-DIR.16b下使用“E7”命令可以看到C/02被标识为NR(NOT READY)状态,需要维护;3.1.2 在disk map中查看故障硬盘大小及转速Configuration—》Disk Map可以查看系统内硬盘的分组情况;可以看出disk 16b:C02类型为146G 15K、数据盘说明:上图中的name中的146通常情况下表示容量为146G3.1.3 更换故障硬盘在Procedure中选择Disk Maintenance Utilities下的Repalce Disk drive进行数据盘的更换;(如果是更换hotspare硬盘,则选择Repalce Spare drive)选择更换硬盘后,首先会弹出一个关于更换硬盘的information窗口;按ESC可以退出该窗口,弹出更换硬盘的确认窗口,选择Run Script Anyway,点击OK进入换盘流程;点击YES,确认开始更换硬盘一般情况下系统会自动检测到故障硬盘的位置号,如上图所示:系统提示disk DA16b:C02故障;少数情况下,系统检测不到故障硬盘,则需要我们手动指定故障硬盘的位置号更换disk 16b:C02将受到影响的volume清单,按ESC退出,弹出如下窗口;选择Do it!稍后系统会弹出如下窗口,按照提示,到亮黄色告警灯得故障硬盘,并将其拔出,然后点击OK再按照系统提示,插入新的硬盘,并点击YES点击OK,进入unattended模式,在后台进行数据同步;此时可以在主界面看到script已经转到后台继续进行。
3.2 DMX 800 SPS故障处理点击“Procedures”,选择“Procedure Wizard”;选择F RMS Specificmaintenance utilities下的C Replace SPS,严格按照系统提示进行SPS更换;在更换与RS-232 switch连接的SPS时,需要注意:当系统提示拔出电源cable时,要将其接入到机柜的PDU上,防止switch断电后,系统无法识别而造成更换流程无法执行(右图所示连线均为监控连线,不是电源连线,请注意)。