C4300操作说明
4300用户手册

多功能打印机
用户指南
想象无穷,可能无限
感谢您购买 Samsung 产品。要享受更完善的服务,请在
/global/register
上注册您的产品。
© 2008 Samsung Electronics Co., Ltd. 保留所有权利。 本手册仅用于提供信息。本手册中的信息如有变更,恕不另行通知。 Samsung Electronics 对因本手册的使用引起的、或与本手册的使用相关的变更不负任何责任(无论 是直接的还是间接的) 。 • SCX-4300 是 Samsung Electronics Co., Ltd. 的型号名称。 • Samsung 和 Samsung 徽标是 Samsung Electronics Co., Ltd. 的商标。 • IBM 和 IBM PC 是国际商用机器公司的注册商标。 • PCL 和 PCL 6 是 Hewlett-Packard company 的商标。 • Microsoft、 Windows、 Windows 2000、 Windows XP 和 Windows Vista 是 Microsoft Corporation 的注册商标。 • TrueType、 LaserWriter 和 Macintosh 是 Apple Computer, Inc 的商标。 • 所有其他品牌和产品名称均为其各自所属公司和组织的商标。
目录
1. 介绍
特殊功能 ............................................................................................................................................................... 1.1 了解组件位置 ........................................................................................................................................................ 1.2
点胶机编程与应用指南

PMC4300点胶机控制器编程与应用指南请妥善保管本使用手册。
请确保先阅读此产品的相关资料,再按其中的要求使用此产品。
深圳市研控自动化科技有限公司本指南使用方法感谢您选用本公司控制器产品,我们将为您提供最稳定,最便捷,最智能的的控制解决方案。
本《PMC4300三轴点胶机控制器编程与应用指南》,主要用于指导点胶机用户如何正确使用本点胶机控制器。
除本《指南》外,另一本《PMC4300三轴点胶机控制器安装与设置手册》为点胶机设备的制造者提供了更为深入的安装与设置信息,而本《指南》则侧重于为点胶机设备的使用者提供了详细的点胶机的编程与应用方法。
本指南总共分为八章,其中:✧第一章主要包含了PMC4300点胶机控制器的主要特性,构造,在使用本控制器前理应了解的安全知识以及获得本点胶机控制器后所应当进行的检查验收项目。
若您之前未曾使用过本公司控制器产品,应该仔细阅读并了解本章内容。
✧第二章主要介绍了如何采用本控制器进行实际的加工。
✧第三章介绍了文件列表的功能。
✧第四章介绍了编辑及修改点胶文件的方法。
✧第五章介绍系统的手动操作功能。
✧第六章详细介绍了系统中使用的所有系统公用参数与文件参数。
✧第七章介绍了如何使用系统的优盘功能。
✧第八章详细介绍用CoreldRAW X3/AutoCAD 2004 生成“PLT”文件的步骤。
阅读本手册可能需要一些专业的知识,若有任何手册之外的专业疑问,请按照《指南》末尾的联系方式致电本公司客服人员进行解决。
目录1 产品简介 (1)1.1 产品特性 (1)1.2 产品构造 (1)1.3 开机检查 (2)1.3.1 开机检查 (2)1.3.2 输入时效密码 (3)1.3.3 移动坐标轴测试 (3)1.4 加工过程示例 (3)1.5 使用注意事项 (4)2 加工运行 (6)2.1 加工运行 (6)2.2 加工设置 (7)2.3 对针 (7)2.4 胶头测试 (8)3 文件列表 (9)3.1 文件列表 (9)4 文件编辑 (11)4.1 文件编辑 (11)4.2 快捷插入点/图形 (12)4.3 插入点/图形 (14)4.4 修改点/图形参数 (15)4.5 图形预览 (17)4.6 批量处理 (17)4.6.1 批量移动 (19)4.6.2 生成阵列 (19)4.6.3 示教阵列 (20)4.6.4 高级批量修改 (21)5 手动操作 (22)5.1 手动操作 (22)5.2 IO口测试 (22)6 设备包含的参数 (24)6.1 参数 (24)6.2 系统公用参数 (25)6.2.2 复位动作与复位参数 (28)6.2.3 空移动作与空移参数 (29)6.3 文件参数 (30)7 高级设置 (33)7.1 高级设置 (33)7.1.1 优盘功能 (33)7.1.2 控制器文件管理 (34)8 PLT图形文件导入 (36)8.1 PLT文件简介 (36)8.2 使用CoreDRAW X3生产PLT文件 (36)8.3 使用AutoCAD2004生成PLT文件 (38)8.4 使用CoreDRAW X3改变文件轨迹的方法 (43)8.4.1 曲线内部点的顺序调整 (43)8.4.2 图形排序 (46)8.5 使用CoreDRAW X3导入DXF文件的方法 (48)1 产品简介1.1 产品特性本全自动点胶机控制系统是一套三轴高精度的专用运动控制系统。
4300说明书中文

动平衡机使用说明书geodyna 43001内容提要1。
安全规则和功能2。
机器安装定位3。
电路连接4。
控制与显示5。
开机6。
装夹车轮7。
输入轮胎类型,平衡模式和轮胎尺8。
平衡车轮9。
在轮辐后放置平衡块101112/平衡块小型化131********。
安全规则和功能1,1导读手册中的一些具体图标说明有利于读者理解1,2应用概述车轮平衡机设计平衡车轮最大直径950毫米和最大车轮重量70公斤的轿车及轻型货车的车轮进行动平衡和静平衡除进行动平衡之外,本机还可以测量和改善由于轮圈和轮胎,几何尺寸误差所引起的车轮运行跳动并尽可能排除,仔细调整车轮轮圈和轮胎的匹配可以使车轮达到行车时减少跳动以降低应加的平衡块的重量,即车轮镇静性优化和平衡块小型化。
寸。
改变操作模式。
错误代码。
镇静性优化。
操作员的再调整。
重新调整。
维修。
技术参数。
电路图2图1机器一览图1按键和显示器2,轮罩3,用于测量轮圈直径和间距的测量杆4,制动器踏板5,电源开关1,3一般安全规则仅由被正确训练过人员和专业人员才能允许操作平衡机平衡机须在操作手册说明范围内进行使用对由操作人员自行决定对机器的改装或变动而引起的责任厂家不负责严禁私自拆除或关闭安全装置所有电源连接或转接工作只允许指定的专业电工进行,并符合所在国家的供电部门的有关规定工作中应注意不可预知的危险因此操作员应排除上面讲的危险下面几点应该注意:使用的技术装备仅在应用范围永远使用适合和适当的装备和工具遵循车轮平衡机制造商的说明,注解和技术参数盖上适当的保护罩和附件一些特殊的安全提示将在以下章节中给出1,4功能屏幕和键盘屏幕和键盘在前面板上屏幕和键盘在前面板上根据人体工程学排列,前面机箱3测量杆测量.轮圈直径及左侧校正面与机器的间距可以通过一个随机配带的测量杆测量或通过键盘输入.通过键盘输入时在按住菜单键的同时转动车轮,所需的输入数据将被显示出来并写入电子单元进行处理测量杆用于从左边开始确定粘块的精确位置〈安装位置准确表明〉。
HP Officejet 4300 All-in-One series 说明书

HP Officejet 4300 All-in-One series
使用手册
© Copyright 2006 Hewlett-Packard Development Company, L.P. 此处包含的信息可能会随时变动,恕不 另行通知。 除非版权法允许,否则在未经事先书面 许可的情况下,严禁转载、改编或翻译 本手册的内容。
在许多地方复印以下内容是不合法的。 如有疑问,请先咨询法律代表。 ● 政府文件或文档: – 护照 – 移民证 – 义务兵证 – 身份证、证件或勋章 政府票据: – 邮票 – 粮票 政府机关开出的支票或汇票 纸币、旅行支票或汇款单 存款单 拥有版权的作品
●
● ● ● ●ຫໍສະໝຸດ 目录1 HP All-in-One 概述.................................................................................... 3 HP All-in-One 总览......................................................................................3 控制面板功能..............................................................................................4 菜单概述......................................................................................................6 文字和符号..................................................................................................7 使用软件......................................................................................................9 查找更多信息............................................................................................11 信息源........................................................................................................ 11 使用屏幕帮助............................................................................................12 完成 HP All-in-One 的设置.......................................................................19 设置首选项................................................................................................19 连接信息....................................................................................................20 传真设置....................................................................................................22 放入原件和纸张.........................................................................................45 放置原件....................................................................................................45 为打印和复印作业选择纸张.......................................................................46 放入纸张....................................................................................................47 避免卡纸....................................................................................................52 从计算机打印............................................................................................53 从软件程序中打印......................................................................................53 更改打印设置............................................................................................54 停止打印作业............................................................................................54 使用传真功能............................................................................................57 发送传真....................................................................................................57 接收传真....................................................................................................59 打印报告....................................................................................................65 停止传真....................................................................................................66 使用复印功能............................................................................................67 复印........................................................................................................... 67 更改复印设置............................................................................................67 停止复印....................................................................................................68 使用扫描功能............................................................................................69 扫描图像....................................................................................................69 停止扫描....................................................................................................70 维护 HP All-in-One.................................................................................. 71 清洁 HP All-in-One....................................................................................71 打印自检报告............................................................................................73 使用墨盒....................................................................................................74
Hydrostar4300型双频测深仪

Hydrostar4300 型双频测深仪操作说明书(德国ELAC Nautik 公司制造)开机警示打开机器时必须切断电源!!不能带电插拔所有连接电缆!!Hydrostar4300双频测深仪按键说明“ON ---机器通电。
上一次的设置被激活。
“OFF ---按住此键3秒钟机器即被关掉。
“ MARKER---疋标。
记录纸上产生垂直线。
可记录时间、疋位数据。
---清除报警显示“DM --- ▲ 或▼ 控制键盘、记录纸和显示的背景亮度。
“ENTER -- a ”---“ ESCAPE- 进入菜单和确认转换选择功能键并改变参数或选疋参数。
--解除更改参数命令或离开所选菜单。
“RANGE--- 进行手动测深范围选择。
记录纸按50m的范围变化。
或按25m自动调节测深范围。
“GAIN ---自动增益调节。
原机器设定的缺损值为“自动”。
“PRINTER---控制记录纸速度(有快、慢、停止)三种选择。
而且可调节定标数(5、10、20、50个定标数)或转向MARKE键。
“GATE ---手动跟踪门便于数字化和底部跟踪。
可打印于记录纸。
一技术说明概述Hydrostar4300测深仪是一个微机控制的新设备。
其水深数值可以经串口输出,而且可以按三种方式记录在热敏打印纸上。
即DBK水深值:测量船底以下水深值;DBT水深值:换能器以下水深值;DBS 水深值:水平面以下水深值;LCD 显示可以显示测深值、时间、日期、定位值和报警水深值系统配置Hydrostar4300测深仪是一个可接多种频率的单、 双频测深仪。
单频可接28、30、 33、38、50、100、200KHz 等频率的换能器;双频可接 30/200KHZ 换能器。
系统配置流程图MAINSRS 2 3 2 RS 4 2 2 (需转换成 RS232)涌浪\定标NEMA RS422单、双频换能器DC9-36V ;接交流电需交直流转换器 约3 0W 0C —55C铝外壳IP53技术参数 电源要求 功率消耗 工作温度 外壳材料 防护标准探头阻抗 5 0 - 1 5 0欧姆发射脉宽0.3; 1; 3ms。
hq4300便携式多参数测定仪操作规程

hq4300便携式多参数测定仪操作规程一、引言hq4300便携式多参数测定仪是一种用于测量多个参数的便携式设备。
本文将介绍如何正确操作该仪器,以确保测量结果准确可靠。
二、仪器准备1. 在使用前,确保仪器电源充足,并连上适当的电源线。
2. 检查仪器是否完好无损,如有损坏或故障应及时修理或更换。
3. 确保仪器已校准,并具备所需的测量范围和准确度。
三、仪器操作1. 打开仪器电源,并按照仪器显示屏上的指示进行操作。
2. 选择需要测量的参数,如温度、湿度、气压等。
3. 根据需要调整仪器的测量范围和单位。
4. 将仪器的探头插入待测物体或环境中,确保探头与物体充分接触。
5. 等待仪器稳定后,记录仪器显示的测量结果。
6. 如果需要连续测量多个样品或位置,确保在每次测量前等待仪器稳定。
7. 测量完成后,关闭仪器电源,并注意保存测量结果。
四、数据处理1. 将测量结果记录在相应的数据记录表中,包括测量时间、位置等相关信息。
2. 根据需要,对测量结果进行统计分析,如计算平均值、标准差等。
3. 分析结果时,应注意排除异常值或误差较大的数据。
五、仪器维护1. 使用完毕后,将仪器探头清洁干净,并保持干燥。
2. 定期对仪器进行校准和维护,确保仪器的测量准确度和稳定性。
3. 仪器长时间不使用时,应存放在干燥、通风的环境中,避免受潮或受损。
六、注意事项1. 在操作仪器时,应严格遵守相关安全规定,如穿戴防护设备、避免触电等。
2. 避免将仪器暴露在极端环境下,如高温、低温、潮湿等。
3. 在测量过程中,应注意操作轻柔,避免对待测物体或环境造成影响或损害。
4. 如遇到仪器故障或操作问题,应及时联系专业人士进行检修或咨询。
七、总结hq4300便携式多参数测定仪是一种方便实用的测量设备,正确操作该仪器可以确保测量结果的准确性和可靠性。
在仪器操作过程中,我们需要注意仪器准备、操作步骤、数据处理和仪器维护等方面,以保证仪器的正常运行和长期可靠性。
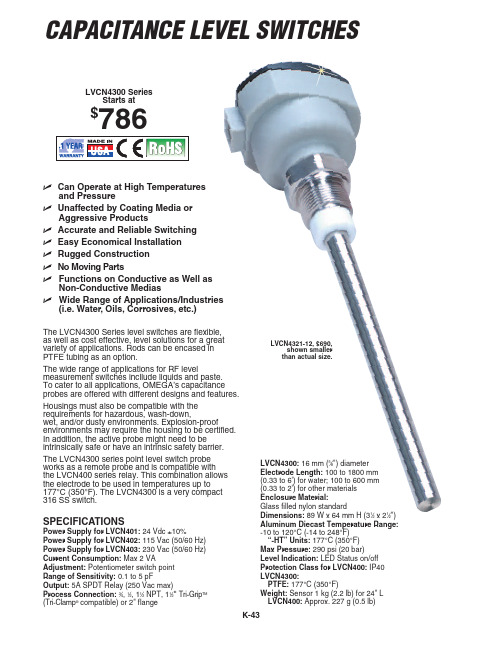
Omega LVCN4300级别开关产品说明书
LVCN401
252 24 Vdc relay electronics for LVCN4300 Series, 83 H x 44 W x 111 D mm (3.25 x 1.75 x 4.37")
LVCN402
264 115 Vac relay electronics for LVCN4300 Series, 83 H x 44 W x 111 D mm (3.25 x 1.75 x 4.37")
“-HT” Units: 177°C (350°F) Max Pressure: 290 psi (20 bar) Level Indication: LED Status on/off Protection Class for LVCN400: IP40 LVCN4300:
PTFE: 177°C (350°F) Weight: Sensor 1 kg (2.2 lb) for 24" L
LVCN403
264 230 Vac relay electronics for LVCN4300 Series, 83 H x 44 W x 111 D mm (3.25 x 1.75 x 4.37")
Accessories Model No. TX4-100 PSU-93
Price $35 40
LVCN400: Approx. 227 g (0.5 lb)
K-43
LVCN4321-24-PTFE, $846, shown smaller than actual size.
Recommended Reference Book: Water Wells and Septic Systems Handbook, FW-300, $100
Nikon COOLPIX 4300 说明书

0-360 Instructions for Nikon COOLPIX 43001) For best results, mount camera on tripod with mirror at eye level.2) Attach 0-360 to lens threads on camera. Optic points vertically. Adjust to Level.A note about Aperture, Depth of Field, and Field of ViewAperture- a mechanism behind the camera lens similar to the iris of your eye,opening and closing to adjust the amount of light entering the camera. The apertureopening also determines the Depth of Field of the image.Depth of Field- describes the objects in the image which are in focus, in terms oftheir distance from the camera. For example, a camera focused at 30m, with a Depthof Field of 8m, will have objects from 26-34m from the camera in focus. Objectscloser than 26m or further than 34m will start to become blurry.Field of View- the vertical Field of View (vFOV) of the 0-360 attachment. The 0-360has a vFOV of 100+ degrees, meaning it will “see” from 50º+ abovethe horizon to50º+ below the horizon.A smaller Aperture opening (higher F-Stop number) allows less light to enter thecamera, but yields a higher Depth of Field. With a high F-Stop, the shutter speedneeds to be slowed down to allow more light (else a dark photo), but will have moreDepth of Field in focus.A larger Aperture opening (lower F-Stop number) allows more light to enter thecamera, but a lower Depth of Field. This means the shutter speed can be faster, butfewer objects will be in focus. (With slower shutter speeds, moving objects mayblur.)The 0-360 is designed to operate with a camera F-Stop of F8.0 or higher (preferably 9or 10). This provides a high enough Depth of Field to allow the entire mirror to be infocus. With lower F-stops, the shutter speed can be increased, but the upper or lowerportions (or both) of the mirror may not be entirely in focus. This means the imagefar above or far below the horizon may not be sharply focused. This may not be aproblem, as many times the sky or the ground may not need to be sharply focused.For best results, shoot a well-lit scene! With high F-Stops, you need good lighting, orlonger exposure times.0-360 Panoramic Optic Setup for Nikon COOLPIX 4300MENU2) First-time setup... Press and use 4-way controller to set the following:---Qual > Image Quality > "FINE"---Qual > Image Size > "2272x1704"---Focus Options > AF Area Mode > "Manual"---Focus Options > Auto Focus Mode > "Single"---EXPosure Options > Exposure Mode > "Manual"3) Adjust Zoom until circular image just fills frame from top to bottom (see below).(Note: depending on your camera's threads, the image may be slightly off center. This is normal. A trick is to place athin piece of paper or tape, as a shim, between the camera and the optic to align more closely.)---Aperture to F8 or higher. (see below).---Exposure to acceptable setting. This may require some experimentation to make surethe image is properly exposed. Try going into the menu and turning Auto Bracketing(BKT) on. This will allow the camera to take 3 images at once, each at different exposures.6) Press 2-3 times, until focus switches to Macro ( ), and timer is set to On ( ).d i v.o f Be l l i s s i mo,I n c.2483S i mon sC t.C a r s onC i t y,NV89703s a l e s@0-360.c omI n s t r u c t i on s f o ru s ew i t hN i konCOOL P I X43IMPORTANT!P l e a s e r e a d t h eC a r e I n s t r u c t i o n so nb ac kp a g e.Qu i c kS t a r tGu i deWhen you are ready to shoot, the monitor should appear like this:IMPORTANT!Ca r e I n s t r u c t i on sT h a n ky ou f o rpu r c h a s i ngt h e0-360P a no r am i cOp t i c!Wi t hp r op e r c a r ea ndh a nd l i ng,h eOp t i cs hou l dg i v ey ouy e a r so fs e r v i c e.He r ea r eaf ewi mpo r t a n th a nd l i ngi n s t r u c t i on s:1Don o t t o u c h,h a n d l e,o rp o l i s ht h em i r r o r!Wh i l et h em i r r o rd oe sh a v eap r o t e c t i v eo a t i n g,t o u c h i n go r r u bb i n go ni t ss u r f a c ec a nc a u s es c r a t c h e s.U s et h ed u s tb l owe rr o v i d e dt or emo v ed u s tb e f o r es h o o t i n g.U s e l e n sc l e a n i n gp a p e ro r l e n sc l o t ho n l y i fb s o l u t e l yn e c e s s a r y,a n d r u bg e n t l y.NE V E Ru s eap a p e r t owe l o r o t h e rma t e r i a l t oc l e a n.2)A v o i dd r opp i ngo rm i s h a nd l i ngt h eun i t,a s i t i s a s e n s i t i v eg l a s sop t i c a l d e v i c e.3)S t o r et h eun i t i n i t sc a r r y i ngc a s ewh e nno t i nu s e,i na nup r i gh tpo s i t i ona nd i naoo l,d r ye n v i r onme n t.WARRANTYT h e0-360P a no r am i cOp t i c i swa r r a n t e da g a i n s td e f e c t s i nma t e r i a l a ndwo r kma n s h i po r ap e r i odo f on ey e a r f r omd a t eo fpu r c h a s e.T h i swa r r a n t ydo e sno t c o v e rd ama g ec a u s e db ya c c i d e n t,a bu s e,m i s u s e,e x po s u r et ot h ee l eme n t s,o rs c r a t c h e st ot h em i r r o r s u r f a c e.I f ad e f e c t i nwo r kma n s h i po rma t e r i a l i sd i s c o ve r e d,0-360.c omw i l l,a ti t sop t i on,r e p a i ro r r e p l a c et h eOp t i cf r e eo fc h a r g e.P u r c h a s e rmu s t f i r s tob t a i nae t u r nAu t ho r i z a t i onf r om0-360.c om,a ndr e t u r nt h eun i tp r op e r l yp a c k a g e da ndr e i gh tp r e p a i d.0-360.c om's l i a b i l i t y i s l i m i t e dt or e p a i ro r r e p l a c eme n to f t h eOp t i cn l y.T h i swa r r a n t y s up e r s e d e sa l l o t h e rwa r r a n t i e s,e x p r e s so r i mp l i e d.ENJOY!。
- 1、下载文档前请自行甄别文档内容的完整性,平台不提供额外的编辑、内容补充、找答案等附加服务。
- 2、"仅部分预览"的文档,不可在线预览部分如存在完整性等问题,可反馈申请退款(可完整预览的文档不适用该条件!)。
- 3、如文档侵犯您的权益,请联系客服反馈,我们会尽快为您处理(人工客服工作时间:9:00-18:30)。
A p e o s P o r t-I I C4300/C3300/C2200 D o c u C e n t r e-I I C4300/C3300/C2200 Q u i c k R e f e r e n c e N o t e s–C O P Y簡易操作-複印C O N T E N T S目錄Page頁碼1 : Copy Work Flow 複印操作流程 (2)2 : Copy Procedure 複印步驟 (3)2.1 Loading Documents 放置原稿 (3)2.2 Selecting Features (Copy) 選擇功能(複印) (4)2.3 Entering the Quantity 輸入複印份數 (5)3 : Copy Features 複印 (6)3.1 Paper Supply 紙張選擇 (6)3.2 Reduce/Enlarge 倍率選擇 (7)3.3 Lighten/Darken 複印濃度 (7)3.4 2 Sided Copying 雙面/單面選擇 (8)3.5 Multiple-Up 多張合一 (N 合 1) (9)3.6 Original Type 原稿畫質 (10)3.7 Book Copying 頁連寫 (11)3.8 Mixed Size Originals 不同尺寸原稿 (12)3.9 Finishing 輸出形式 (分頁/堆疊/裝訂/打孔) (13)4 : Operations during Copying 複印期間的操作 (14)4.1 Changing the Number of Copies 變更複印份數 (14)4.2 Stopping the Copy Job 停止複印 (15)4.3 Load the next document 放置下一份原稿 (17)4.4 Interrupting the Copy Job 中斷複印 (18)5 : Appendix A. - Product Overview 機器簡介 (19)5.1 Machine Components 機器組件 (19)5.2 Powering On/Off 電源開關 (20)5.3 Exiting the Power Saver Mode 退出節電模式 (20)5.4 Control panel 操作面板 (21)6 : Appendix B. - English Features Menu 工能選擇畫面(英文) (22)7 : Appendix C. - Chinese Features Menu 工能選擇畫面(中文) (24)1 : C O P Y W O R K F L O W 複印操作流程COPY複印功能Stop the CopyJob See Page 5. S2.3Entering the Quantity 輸入複印份數START1)2:C O P Y P R O C E D U R E複印步驟2.1 Loading Documents 放置原稿2.1.1 DocumentFeeder自動送稿裝置1. Adjust the document guides to match the size of thedocument loaded.1. 調整原稿調整桿至符合紙張尺寸。
2. Place the document face up in the center of the document feeder. The <Confirmation> indicator lights up. 2. 將原稿面朝上放入送稿器中央。
<確認>指示燈會亮起。
2.1.2 DocumentGlass玻璃面板1. Open the document cover. 1. 開啟原稿外蓋。
2. Place the document face down and align it against the top left corner of the document glass. 2. 將原稿的複印面向下,對準玻璃面板的左上角放置並關閉原稿外蓋。
2.2 Selecting Features (Copy) 選擇功能(複印)1. Press the <All Services> button.1.按一下<All Services>鍵。
2. Select [Copy].2. 選擇[複印]。
COPY3. Select the features from each tab as necessary.To see all features, please refer to Appendix B. – English Features Menu, page 22.3. 可利用各個標籤設定複印功能。
詳列請參閱第24頁, Appendix C - 工能選擇畫面(中文)。
ee2.3 Entering the Quantity 輸入複印份數Enter the number of copies using the numeric keypad. The number of copies entered appears on the upper right of the touch screen.使用數字鍵輸入複印頁數。
輸入的複印份數將顯示於顯示幕的右上角。
If you enter an incorrect value, press the <C> button and enter the correct value. 如果輸入數值錯誤,按<C>鍵並輸入正確的數值。
Note: You can enter up to 999 for the number of copies.補充:最多可輸入999複印數。
3 : C O P Y F E A T U R E S 複印3.1 Paper Supply 紙張選擇Auto自動Based on the original document size and set ratios, the machine automatically selects the tray loaded with the appropriate paper and makes copies.根據原稿尺寸設定倍率自動選擇紙張進行複印。
More...其他紙盤...Select the paper tray in the [Paper Supply] screen. 顯示[紙張選擇]畫面。
選擇紙盤。
1. Bypass: The [Tray 5 (Bypass)] screen is displayed.1. 手送紙盤: 顯示 [紙盤 5(手送紙盤)]畫面。
2. Select the [Paper Size] or/and [Paper Type].2. 選擇[紙張尺寸]或/及[紙張種類]。
fffX f XfY fY3.2 Reduce/Enlarge倍率選擇100%100%Copies are made at the same size as the original document.原稿相同的尺寸複印。
Auto% 自動%The copy ratio is automatically set based upon the paper sizes, and fit in the selected paper. 本功能根據原稿與紙張的尺寸自動設定複印倍率,使原稿複印至選擇的紙張。
More...其他倍率...Display the [Reduce/Enlarge] screen.顯示[固定倍率]畫面。
Proportional %: You can select from preset standard copy ratios.[固定倍率] 您可以選擇預設的標準複印倍率。
Entering the Ratio: Touch the window displaying a value, and then use the numeric keypad to specify a ratio within the range of 25 to 400% in 1% increments.輸入倍率: 觸摸顯示數值的螢幕,然後在25-400% 範圍內以1%為設定單位。
3.3 Lighten/Darken 複印濃度Use [e ] and [f ] to select from 7 density levels.使用[e ]和[f ]選擇7種濃度等級。
ffffff3.4 2 Sided Copying 雙面/單面選擇1Æ1 Sided單面→單面Makes a copy of a 1 sided document on one side of the paper.將單面原稿複印於紙張的單面。
1Æ2 Sided 單面→雙面Makes a copy of a 1 sided document on both sides of the paper.將單面原稿複印於紙張的兩面。
2Æ2 Sided 雙面→雙面Makes a copy of a 2 sided document on both sides of the paper.將雙面原稿複印於紙張的兩面。
2Æ1 Sided 雙面→單面Makes a copy of a 2 sided document on one side of the paper.將雙面原稿複印於紙張的單面。
3.5 Multiple-Up 多張合一 (N 合 1)When the machine is equipped with a document feeder, 2, 4, or 8 sheets of documents can be copied together onto a single sheet of paper.本機安裝有送稿裝置時,可將二、四或八張原稿一複印在同一張紙上。
1 Page Up無Multiple Up is not applied.不使用 [多張合一(N 合1)] 功能。
2 Pages Up2張 →1張 (2 合1)Two pages are copied together onto a single page將2 張原稿複印於同一張紙上。
4 Pages Up4張→1張(4 合1)Four pages are copied together onto a single page將4張原稿複印於同一張紙上。
8 Pages Up8 張→1張 (8 合1)Eight pages are copied together onto a single page將8張原稿複印於同一張紙上。