Linux内核通用链表 linuxlist.h阅读
list_head 用法

list_head 用法list_head是Linux内核中用于表示链表节点的数据结构,它提供了一些方便的方法来操作链表。
在Linux操作系统中,list_head通常用于表示一个链表的头部,链表的每个节点包含一些数据,而list_head仅包含对链表中下一个节点的指针引用。
list_head的用法非常简单,它主要有以下几个常用的成员变量和方法:1.list_head的成员变量:成员变量包括list_head的next指针和前一个节点的指针prev。
当list_head指向链表的最后一个节点时,prev通常为NULL。
2.list_add方法:用于将一个节点添加到链表的末尾。
该方法需要传入要添加的节点和链表的头节点。
3.list_del方法:用于从链表中删除一个节点。
该方法需要传入要删除的节点。
4.list_empty方法:用于判断链表是否为空。
如果链表为空,则返回TRUE,否则返回FALSE。
5.list_entry方法:用于获取链表中指定索引的节点。
该方法需要传入索引号和头节点。
使用list_head可以方便地遍历链表中的所有节点,也可以方便地添加、删除和查找节点。
下面是一个简单的示例代码,演示了如何使用list_head:```c#include<linux/list_head.h>#include<linux/module.h>structnode{intdata;structlist_headlist;};intmain(void){structnode*node1=kmalloc(sizeof(structnode),GFP_KERNEL);structnode*node2=kmalloc(sizeof(structnode),GFP_KERNEL);structnode*head=NULL;unsignedinti;/*初始化链表头部*/list_add(&head->list,&node1->list);list_add(&node2->list,&head->list);node2->data=1;node1->data=2;/*遍历链表*/printk("Listhead:%p\n",head);printk("Listelements:\n");for(i=0;i<2;i++){printk("Node%d:%d\n",i,list_entry(head->list.next,structnode,list)->data);list_del(&head->list);/*删除头节点*/head=list_entry(head->list.next,structnode,list)->list;/*移动到下一个节点*/}printk("Afterdeletion:\n");printk("Node%d:%d\n",i,head->data);/*打印最后一个节点*/ kfree(node1);kfree(node2);return0;}```在上面的示例代码中,我们首先创建了一个链表,并使用list_add方法将两个节点添加到链表中。
Linux内核中的算法和数据结构

Linux内核中的算法和数据结构算法和数据结构纷繁复杂,但是对于Linux Kernel开发⼈员来说重点了解Linux内核中使⽤到的算法和数据结构很有必要。
在⼀个国外问答平台的Theoretical Computer Science⼦板有⼀篇讨论实际使⽤中的算法和数据结构,Vijay D做出了详细的解答,其中有⼀部分是Basic Data Structures and Algorithms in the Linux Kernel对Linux内核中使⽤到的算法和数据结构做出的归纳整理。
详情参考。
下⾯就以Vijay D的回答作为蓝本进⾏学习总结。
测试⽅法准备由于需要在内核中进⾏代码测试验证,完整编译安装内核⽐较耗时耗⼒。
准备采⽤module形式来验证。
Makefileobj-m:=linked-list.oKERNELBUILD:=/lib/modules/$(shell uname -r)/builddefault:make -C ${KERNELBUILD} M=$(shell pwd) modulesclean:rm -rf *.o *.cmd *.ko *.mod.c .tmp_versionslinked-list.c#include <linux/module.h>#include <linux/init.h>#include <linux/list.h>int linked_list_init(void){printk("%s\n", __func__);return 0;}void linked_list_exit(void){printk("%s\n", __func__);}module_init(linked_list_init);module_exit(linked_list_exit);MODULE_AUTHOR("Arnold Lu");MODULE_LICENSE("GPL");MODULE_DESCRIPTION("Linked list test");安装modulesudo insmod linked-list.ko查找安装情况lsmod | grep linked-list执⾏log<4>[621267.946711] linked_list_init<4>[621397.154534] linked_list_exit删除modulesudo rmmod linked-list链表、双向链表、⽆锁链表, , .有⼀篇关于内核链表《》值得参考。
struct list_head的定义

struct list_head的定义struct list_head是Linux内核中一个非常重要的数据结构,其主要作用是实现双向链表,是Linux内核实现链表的基础。
本文将详细介绍struct list_head的定义、使用方法及其重要性。
一、struct list_head的定义struct list_head是一个重要的数据结构,它定义在include/linux/list.h文件中,其定义如下:struct list_head {struct list_head *prev, *next;};其中,prev和next分别表示前一个节点和后一个节点的指针,因此struct list_head可以实现双向链表。
二、struct list_head的使用struct list_head主要用于实现链表,其使用方法如下:1. 初始化链表初始化链表的方法是通过定义一个struct list_head类型的变量,然后将其prev和next指针都指向自己,代码如下:struct list_head my_list = LIST_HEAD_INIT(my_list);2. 插入节点在链表中插入一个节点的方法是通过list_add函数,该函数将新节点插入到链表头部,代码如下:list_add(&new_node->list, &my_list);其中,new_node为新节点的指针,&new_node->list为新节点的struct list_head成员,&my_list为链表头的struct list_head 成员。
3. 删除节点从链表中删除一个节点的方法是通过list_del函数,该函数将节点从链表中删除,代码如下:list_del(&node->list);其中,node为要删除的节点的指针,&node->list为节点的struct list_head成员。
list_for_each_safe的用法

list_for_each_safe的用法list_for_each_safe是Linux内核中的一个宏,用于在遍历一个双向链表时确保遍历过程中的链表修改不会导致出现问题。
在本文中,将详细讨论list_for_each_safe的使用方法以及相关的背景知识。
1. 引言(介绍链表和链表遍历的重要性)链表是计算机科学中常用的数据结构之一,它由一系列节点组成,每个节点包含数据和指向下一个节点的指针。
链表的遍历是对链表中的每个元素进行操作或访问的过程。
在操作系统中,特别是在Linux内核中,链表的使用非常广泛。
因此,高效且线程安全的链表遍历方法变得至关重要。
2. 理解安全遍历的需求链表是一个动态数据结构,在遍历链表时,可能会有其他线程或处理器修改链表的结构,比如添加、删除或移动节点。
如果不采取措施来处理这种情况,就可能导致指针丢失或访问无效的节点。
这对于操作系统内核来说是一个严重的问题,因为它们需要保证数据的一致性和稳定性。
list_for_each_safe宏就是为了解决这个问题而设计的。
3. list_for_each_safe的定义和参数在Linux内核源代码中,list_for_each_safe的定义如下:c#define list_for_each_safe(pos, n, head) \for (pos = list_first_entry(head, typeof(*pos), member), \ n = list_next_entry(pos, member); \&pos->member != (head); \pos = n, n = list_next_entry(n, member))在这个宏中,pos表示当前遍历节点的指针,n表示pos的下一个节点的指针,head是链表的头节点。
4. list_for_each_safe的实现原理list_for_each_safe的实现原理非常巧妙。
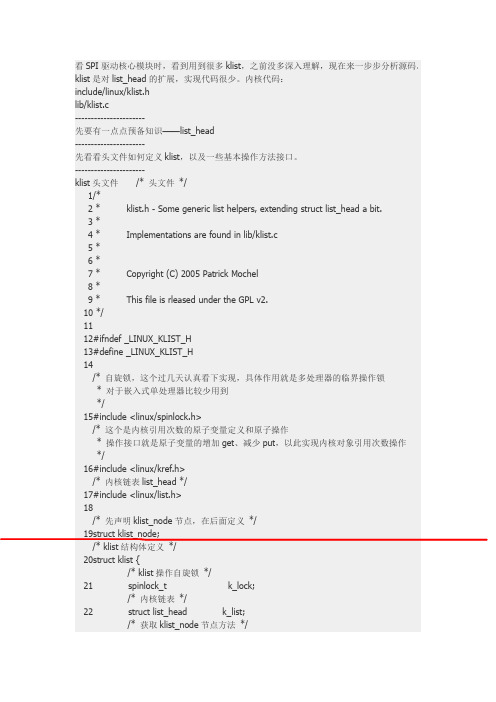
Linux内核链表list_head扩展---klist
142/**143*klist_add_after-Init a klist_node and add it after an existing node 144*@n:node we're adding.145*@pos:node to put@n after146*//*在节点pos后面插入节点n*/147void klist_add_after(struct klist_node*n,struct klist_node*pos)148{149struct klist*k=knode_klist(pos);150151klist_node_init(k,n);152spin_lock(&k->k_lock);153list_add(&n->n_node,&pos->n_node);154spin_unlock(&k->k_lock);155}156EXPORT_SYMBOL_GPL(klist_add_after);157158/**159*klist_add_before-Init a klist_node and add it before an existing node 160*@n:node we're adding.161*@pos:node to put@n after162*//*在节点pos前面插入节点n*/163void klist_add_before(struct klist_node*n,struct klist_node*pos)164{165struct klist*k=knode_klist(pos);166167klist_node_init(k,n);168spin_lock(&k->k_lock);169list_add_tail(&n->n_node,&pos->n_node);170spin_unlock(&k->k_lock);171}172EXPORT_SYMBOL_GPL(klist_add_before);173/*等待者结构体,用于删除节点,删除完成唤醒进程*/174struct klist_waiter{175struct list_head list;176struct klist_node*node;177struct task_struct*process;178int woken;179};180/*定义并初始化klist节点移除自旋锁*/181static DEFINE_SPINLOCK(klist_remove_lock);/*定义一个等待器的链表*/182static LIST_HEAD(klist_remove_waiters);183184static void klist_release(struct kref*kref)185{186struct klist_waiter*waiter,*tmp;187struct klist_node*n=container_of(kref,struct klist_node,n_ref);188189WARN_ON(!knode_dead(n));/*删除链表中的节点入口*/190list_del(&n->n_node);191spin_lock(&klist_remove_lock);/*内核链表操作宏include/linux/list.h,遍历klist节点移除等待链表*/192list_for_each_entry_safe(waiter,tmp,&klist_remove_waiters,list){/*是要删除链表节点的等待器*/193if(waiter->node!=n)194continue;195/*等待者唤醒标志*/196waiter->woken=1;197mb();/*唤醒等待进程*/198wake_up_process(waiter->process);/*删除链表入口*/199list_del(&waiter->list);200}201spin_unlock(&klist_remove_lock);/*设置节点n指向的klist为空*/202knode_set_klist(n,NULL);203}204/*减引用次数并删除节点*/205static int klist_dec_and_del(struct klist_node*n)206{/*n->nref减引用次数,若引用次数减完不为0,调用klist_release清除节点对象,返回1;为0,则返回0*/207return kref_put(&n->n_ref,klist_release);208}209/*带锁操作的节点删除,不判断是否成功,减引用次数*/210static void klist_put(struct klist_node*n,bool kill)211{/*获取节点的put方法*/212struct klist*k=knode_klist(n);213void(*put)(struct klist_node*)=k->put;214215spin_lock(&k->k_lock);/*“需要杀死节点”==*/216if(kill)217knode_kill(n);/*节点对象引用次数为0了,则不需要调用put方法*/218if(!klist_dec_and_del(n))219put=NULL;220spin_unlock(&k->k_lock);/*调用put方法*/221if(put)222put(n);223}224225/**226*klist_del-Decrement the reference count of node and try to remove. 227*@n:node we're deleting.228*//*删除节点“杀死死节点*/229void klist_del(struct klist_node*n)230{231klist_put(n,true);232}233EXPORT_SYMBOL_GPL(klist_del);234235/**236*klist_remove-Decrement the refcount of node and wait for it to go away. 237*@n:node we're removing.238*/239void klist_remove(struct klist_node*n)240{/*定义一个等待者,并加入等待者加入移除等待者链表*/241struct klist_waiter waiter;242243waiter.node=n;244waiter.process=current;245waiter.woken=0;246spin_lock(&klist_remove_lock);247list_add(&waiter.list,&klist_remove_waiters);248spin_unlock(&klist_remove_lock);249/*清除节点,并设置等待者*/330*First grab list lock.Decrement the reference count of the previous 331*node,if there was one.Grab the next node,increment its reference 332*count,drop the lock,and return that next node.333*//*“预下”链表中下一节点*/334struct klist_node*klist_next(struct klist_iter*i)335{336void(*put)(struct klist_node*)=i->i_klist->put;337struct klist_node*last=i->i_cur;338struct klist_node*next;339/*抢占锁*/340spin_lock(&i->i_klist->k_lock);341/*获取下一节点*/342if(last){343next=to_klist_node(last->n_node.next);/*减上一节点引用次数*/344if(!klist_dec_and_del(last))345put=NULL;346}else347next=to_klist_node(i->i_klist->k_list.next);348349i->i_cur=NULL;/*链表中有节点“没死”,增加引用次数*/350while(next!=to_klist_node(&i->i_klist->k_list)){351if(likely(!knode_dead(next))){352kref_get(&next->n_ref);353i->i_cur=next;354break;355}356next=to_klist_node(next->n_node.next);357}358/*丢弃锁*/359spin_unlock(&i->i_klist->k_lock);360361if(put&&last)362put(last);363return i->i_cur;364}365EXPORT_SYMBOL_GPL(klist_next);366----------------------/*使用迭代查找下一链表节点*/1124struct klist_node*n=klist_next(i);1125struct device*dev=NULL;1126struct device_private*p;11271128if(n){/*根据节点入口获取该节点上的设备*/1129p=to_device_private_parent(n);1130dev=p->device;1131}1132return dev;1133}/*-------------------------------------------------------------------------------*//*其中device_private是设备私有数据结构,一下代码不难看出*想要由链表节点迭代查找设备非常容易*/66/**67*struct device_private-structure to hold the private to the driver core portions of the device structure.68*69*@klist_children-klist containing all children of this device70*@knode_parent-node in sibling list71*@knode_driver-node in driver list72*@knode_bus-node in bus list73*@driver_data-private pointer for driver specific info.Will turn into a74*list soon.75*@device-pointer back to the struct class that this structure is76*associated with.77*78*Nothing outside of the driver core should ever touch these fields.79*/80struct device_private{81struct klist klist_children;82struct klist_node knode_parent;83struct klist_node knode_driver;84struct klist_node knode_bus;85void*driver_data;86struct device*device;87};88#define to_device_private_parent(obj)\89container_of(obj,struct device_private,knode_parent)90#define to_device_private_driver(obj)\91container_of(obj,struct device_private,knode_driver)92#define to_device_private_bus(obj)\93container_of(obj,struct device_private,knode_bus) 94driver_attach()函数driver_attach()函数2009-04-2114:39:03|分类:linux kernel|字号订阅最近在看一个mpc8315CPU上的驱动程序发现在使用spi_register注册完成后没有调用到相应的probe函数,分析后发现在driver_attach()函数执行时没有找到匹配的device,在网上狗狗后找到关于这部分的分析,引用如下:个浅析linux2.6.23驱动自动匹配设备driver_attach()函数文章来源:int driver_attach(struct device_driver*drv){return bus_for_each_dev(drv->bus,NULL,drv,__driver_attach);}调用该函数,那么drv驱动程式会和drv所在总线上连接了的物理设备进行一一匹配,再来看看下面:int bus_for_each_dev(struct bus_type*bus,struct device*start,void*data,int(*fn)(struct device*,void*)){struct klist_iter i;//专门用于遍历的链表结构体,其中i_cur是遍历移动的关键struct device*dev;int error=0;if(!bus)return-EINVAL;klist_iter_init_node(&bus->klist_devices,&i,(start?&start->knode_bus:NULL));//i->i_klist=&bus->klist_devices;//i->i_head=&bus->klist_devices.k_list;//i->i_cur=NULL;//表示从最前端开始遍历挂接到bus总线上的整个设备链条.while((dev=next_device(&i))&&!error)//dev为该bus总线链表上的一个设备,[就像一根藤条上的一朵小花gliethttp_20071025] //这些device设备把自己的&device->knode_bus链表单元链接到了bus->klist_devices 上//这也说明名字为knode_bus的list单元将是要被挂接到bus->klist_devices的链表上//同理&device->knode_driver将是这个device设备链接到drivers驱动上的list节点识别单元//见driver_bound()->klist_add_tail(&dev->knode_driver,&dev->driver->klist_devices);error=fn(dev,data);//调用__driver_attach函数,进行匹配运算klist_iter_exit(&i);return error;//成功匹配返回0}struct klist_iter{struct klist*i_klist;struct list_head*i_head;struct klist_node*i_cur;};void klist_iter_init_node(struct klist*k,struct klist_iter*i,struct klist_node*n){i->i_klist=k;//需要被遍历的klisti->i_head=&k->k_list;//开始的链表头i->i_cur=n;//当前位置对应的klist_node节点,next_device()会从当前n 开始一直搜索到//链表的结尾,也就是i_head->prev处停止if(n)kref_get(&n->n_ref);//引用计数加1}static struct device*next_device(struct klist_iter*i){struct klist_node*n=klist_next(i);return n?container_of(n,struct device,knode_bus):NULL;//因为n是device->knode_bus的指针,所以container_of将返回device的指针}struct klist_node*klist_next(struct klist_iter*i){struct list_head*next;struct klist_node*lnode=i->i_cur;struct klist_node*knode=NULL;//赋0,当next==i->i_head时用于退出void(*put)(struct klist_node*)=i->i_klist->put;spin_lock(&i->i_klist->k_lock);if(lnode){next=lnode->n_node.next;if(!klist_dec_and_del(lnode))//释放前一个i_cur对象的引用计数put=NULL;//klist_dec_and_del成功的对引用计数做了减1操作,那么失效用户定义put}elsenext=i->i_head->next;//如果lnode=0,那么从链表头开始,所以head->next指向第1个实际对象if(next!=i->i_head){//head并不链接设备,所以head无效//当next==i->i_head时,说明已遍历到了head牵头的链表的末尾,回环到了head, //所以knode将不会进行赋值,这时knode=0,while((dev=next_device(&i))&&!error)因为0而退出knode=to_klist_node(next);//调用container_of()获取klist_node->n_node中klist_node地址kref_get(&knode->n_ref);//对该node的引用计数加1}i->i_cur=knode;//记住当前遍历到的对象,当next==i->i_head时,knode=0spin_unlock(&i->i_klist->k_lock);if(put&&lnode)put(lnode);return knode;}static int klist_dec_and_del(struct klist_node*n){return kref_put(&n->n_ref,klist_release);//对该node的引用计数减1,如果引用计数到达0,那么调用klist_release}static void klist_release(struct kref*kref){struct klist_node*n=container_of(kref,struct klist_node,n_ref);list_del(&n->n_node);//从节点链表上摘掉该node节点complete(&n->n_removed);//n->n_klist=NULL;}void fastcall complete(struct completion*x){unsigned long flags;spin_lock_irqsave(&x->wait.lock,flags);//关闭中断,防止并发x->done++;//唤醒因为某些原因悬停在klist_node->n_removed等待队列上的task们//这种现象之一是:__device_release_driver()删除挂接在设备上的driver时,会出现//删除task小憩在node的wait上__wake_up_common(&x->wait,TASK_UNINTERRUPTIBLE|TASK_INTERRUPTIBLE,1,0,NULL);spin_unlock_irqrestore(&x->wait.lock,flags);//恢复中断}static void__wake_up_common(wait_queue_head_t*q,unsigned int mode,int nr_exclusive,int sync,void*key){struct list_head*tmp,*next;list_for_each_safe(tmp,next,&q->task_list){//遍历以head牵头的链表上的task们wait_queue_t*curr=list_entry(tmp,wait_queue_t,task_list);unsigned flags=curr->flags;if(curr->func(curr,mode,sync,key)&&//调用wait上准备好了的回调函数func (flags&WQ_FLAG_EXCLUSIVE)&&!--nr_exclusive)break;}}//抛开链表上的head,当最后一个post==head时,说明链表已遍历结束(gliethttp_20071025) #define list_for_each_safe(pos,n,head)\for(pos=(head)->next,n=pos->next;pos!=(head);\pos=n,n=pos->next)void klist_iter_exit(struct klist_iter*i){if(i->i_cur){//对于正常遍历的退出,i->i_cur会等于0,如果找到了匹配对象,提前退出了,那么就会在这里对引用进行释放klist_del(i->i_cur);i->i_cur=NULL;}}static int__driver_attach(struct device*dev,void*data){struct device_driver*drv=data;//data就是打算把自己匹配到bus上挂接的合适设备上的driver驱动if(dev->parent)down(&dev->parent->sem);//使用信号量保护下面的操作down(&dev->sem);if(!dev->driver)//如果当前这个dev设备还没有挂接一个driver驱动driver_probe_device(drv,dev);//那么尝试该dev是否适合被该drv驱动管理up(&dev->sem);if(dev->parent)up(&dev->parent->sem);return0;}int driver_probe_device(struct device_driver*drv,struct device*dev){int ret=0;if(!device_is_registered(dev))//设备是否已被bus总线认可return-ENODEV;if(drv->bus->match&&!drv->bus->match(dev,drv))//调用该driver驱动自定义的match函数,如:usb_device_match(),查看//这个设备是否符合自己,drv->bus->match()返回1,表示本drv认可该设备//否则,goto done,继续检测下一个device设备是否和本drv匹配goto done;pr_debug("%s:Matched Device%s with Driver%s\n",drv->bus->name,dev->bus_id,drv->name);//这下来真的了,ret=really_probe(dev,drv);done:return ret;}static inline int device_is_registered(struct device*dev){return dev->is_registered;//当调用bus_attach_device()之后,is_registered=1}static int really_probe(struct device*dev,struct device_driver*drv){int ret=0;atomic_inc(&probe_count);pr_debug("%s:Probing driver%s with device%s\n",drv->bus->name,drv->name,dev->bus_id);WARN_ON(!list_empty(&dev->devres_head));dev->driver=drv;//管理本dev的驱动指针指向drvif(driver_sysfs_add(dev)){//将driver和dev使用link,链接到一起,使他们真正相关printk(KERN_ERR"%s:driver_sysfs_add(%s)failed\n",__FUNCTION__,dev->bus_id);goto probe_failed;}if(dev->bus->probe){//总线提供了设备探测函数ret=dev->bus->probe(dev);if(ret)goto probe_failed;}else if(drv->probe){//驱动自己提供了设备探测函数//因为drv驱动自己也不想管理那些意外的非法设备//所以一般drv都会提供这个功能,相反//比如:usb_bus_type没有提供probe,而usb驱动提供了usb_probe_interface//来确认我这个driver软件真的能够管理这个device设备ret=drv->probe(dev);if(ret)goto probe_failed;}driver_bound(dev);ret=1;pr_debug("%s:Bound Device%s to Driver%s\n",drv->bus->name,dev->bus_id,drv->name);goto done;probe_failed:devres_release_all(dev);driver_sysfs_remove(dev);dev->driver=NULL;if(ret!=-ENODEV&&ret!=-ENXIO){printk(KERN_WARNING"%s:probe of%s failed with error%d\n",drv->name,dev->bus_id,ret);}ret=0;done:atomic_dec(&probe_count);wake_up(&probe_waitqueue);return ret;}static void driver_bound(struct device*dev){if(klist_node_attached(&dev->knode_driver)){//本dev已挂到了某个driver驱动的klist_devices链条上了//感觉不应该发生printk(KERN_WARNING"%s:device%s already bound\n",__FUNCTION__,kobject_name(&dev->kobj));return;}pr_debug("bound device’%s’to driver’%s’\n",dev->bus_id,dev->driver->name);if(dev->bus)blocking_notifier_call_chain(&dev->bus->bus_notifier,BUS_NOTIFY_BOUND_DRIVER,dev);//将本dev的knode_driver链表结构体节点挂接到该driver->klist_devices上//这样driver所管理的device设备又多了1个,//也能说又多了1个device设备使用本driver驱动管理他自己(gilethttp_20071025).klist_add_tail(&dev->knode_driver,&dev->driver->klist_devices);}Linux内核中的klist分析分析的内核版本照样是2.6.38.5。
linux核心函数

linux核心函数Linux 内核是操作系统的核心部分,它提供了操作系统的核心功能,包括进程管理、内存管理、文件系统等。
Linux 内核的源代码中包含了大量的函数,用于实现各种操作系统的功能。
以下是一些Linux 内核中常见的核心函数,它们扮演着关键的角色:1.进程管理函数:–fork():创建一个新的进程。
–exec():在当前进程中执行一个新的程序。
–wait():等待子进程结束。
–exit():终止当前进程。
2.调度和任务管理函数:–schedule():进行进程调度。
–yield():主动让出CPU,将当前进程移动到就绪队列的末尾。
–wake_up_process():唤醒一个等待中的进程。
3.内存管理函数:–kmalloc():在内核中分配内存。
–kfree():释放内核中的内存。
–vmalloc():在虚拟地址空间中分配内存。
4.文件系统函数:–open():打开一个文件。
–read():从文件中读取数据。
–write():向文件中写入数据。
–close():关闭文件。
5.设备驱动函数:–register_chrdev():注册字符设备。
–unregister_chrdev():注销字符设备。
–request_irq():注册中断处理函数。
6.网络函数:–socket():创建套接字。
–bind():将套接字与地址绑定。
–listen():侦听传入连接请求。
–accept():接受传入的连接请求。
7.定时器和时钟函数:–timer_create():创建一个定时器。
–timer_settime():设置定时器的时间。
–gettimeofday():获取当前时间。
8.同步和互斥函数:–spin_lock():获取自旋锁。
–spin_unlock():释放自旋锁。
–mutex_lock():获取互斥锁。
–mutex_unlock():释放互斥锁。
这些函数仅仅是Linux 内核中众多函数的一小部分,Linux 内核的源代码非常庞大而复杂,包含了各种各样的功能和模块。
Linux内核分析及编程
其中基于sparc64平台的Linux用户空间可以运行32位代码,用户空间指针是32位宽的,但内核空间是64位的。
内核中的地址是unsigned long类型,指针大小和long类型相同。
内核提供下列数据类型。
所有类型在头文件<asm/types.h>中声明,这个文件又被头文件<Linux/types.h>所包含。
下面是include/asm/types.h文件。
#ifndef _I386_TYPES_H#define _I386_TYPES_H#ifndef __ASSEMBLY__typedef unsigned short umode_t;// 下面__xx类型不会损害POSIX 名字空间,在头文件使用它们,可以输出给用户空间typedef __signed__ char __s8;typedef unsigned char __u8;typedef __signed__ short __s16;typedef unsigned short __u16;typedef __signed__ int __s32;typedef unsigned int __u32;#if defined(__GNUC__) && !defined(__STRICT_ANSI__)typedef __signed__ long long __s64;typedef unsigned long long __u64;#endif#endif /* __ASSEMBLY__ *///下面的类型只用在内核中,否则会产生名字空间崩溃#ifdef __KERNEL__#define BITS_PER_LONG 32#ifndef __ASSEMBLY__#include <Linux/config.h>typedef signed char s8;typedef unsigned char u8;typedef signed short s16;typedef unsigned short u16;typedef signed int s32;typedef unsigned int u32;typedef signed long long s64;typedef unsigned long long u64;/* DMA addresses come in generic and 64-bit flavours. */ #ifdef CONFIG_HIGHMEM64Gtypedef u64 dma_addr_t;#elsetypedef u32 dma_addr_t;#endiftypedef u64 dma64_addr_t;#ifdef CONFIG_LBDtypedef u64 sector_t;#define HAVE_SECTOR_T#endiftypedef unsigned short kmem_bufctl_t;#endif /* __ASSEMBLY__ */#endif /* __KERNEL__ */#endif下面是Linux/types.h的部分定义。
list head 数据结构
1. 双向链表(list)linux内核中的双向链表通过结构 structlist_head来将各个节点连接起来,此结构会作为链表元素结构中的一个参数:structlist_head {structlist_head *next, *prev;};链表头的初始化,注意,结构中的指针为NULL并不是初始化,而是指向自身才是初始化,如果只是按普通情况下的置为NULL,而不是指向自身,系统会崩溃,这是一个容易犯的错误:#define LIST_HEAD_INIT(name) { &(name), &(name) }#define LIST_HEAD(name) \structlist_head name = LIST_HEAD_INIT(name)#define INIT_LIST_HEAD(ptr) do { \(ptr)->next = (ptr); (ptr)->prev = (ptr); \} while (0)最常用的链表操作:插入到链表头:voidlist_add(structlist_head *new, structlist_head *head);插入到链表尾:voidlist_add_tail(structlist_head *new, structlist_head *head);删除链表节点:voidlist_del(structlist_head *entry);将节点移动到另一链表:voidlist_move(structlist_head *list, structlist_head *head);将节点移动到链表尾:voidlist_move_tail(structlist_head *list,structlist_head *head);判断链表是否为空,返回1为空,0非空intlist_empty(structlist_head *head);把两个链表拼接起来:voidlist_splice(structlist_head *list, structlist_head *head);取得节点指针:#define list_entry(ptr, type, member) \((type *)((char *)(ptr)-(unsigned long)(&((type *)0)->member)))遍历链表中每个节点:#define list_for_each(pos, head) \for (pos = (head)->next, prefetch(pos->next); pos != (head); \pos = pos->next, prefetch(pos->next))逆向循环链表中每个节点:#define list_for_each_prev(pos, head) \for (pos = (head)->prev, prefetch(pos->prev); pos != (head); \pos = pos->prev, prefetch(pos->prev))举例:LISH_HEAD(mylist);structmy_list{structlist_head list;int data;};staticintini_list(void){structmy_list *p;int i;for(i=0; i<100; i++){p=kmalloc(sizeof(structmy_list), GFP_KERNEL);list_add(&p->list, &mylist);}}在内存中形成如下结构的一个双向链表:+---------------------------------------------------------------+| || mylist 99 98 0 || +----+ +---------+ +---------+ +---------+ |+->|next|--->|list.next|--->|list.next|--->...--->|list.next|---+|----| |---------| |---------| |---------|+--|prev|<---|list.prev|<---|list.prev|<---...<---|list.prev|<--+| +----+ |---------| |---------| |---------| || | data | | data | | data | || +---------+ +---------+ +---------+ || |+---------------------------------------------------------------+知道了链表头就能遍历整个链表,如果是用list_add()插入新节点的话,从链表头的next方向看是一个堆栈型。
linux 数据结构书籍
linux 数据结构书籍Linux 数据结构书籍导读:本文将介绍几本关于Linux数据结构的优秀书籍,这些书籍涵盖了Linux操作系统内核中常用的数据结构及其应用。
通过深入学习这些书籍,读者可以更好地理解Linux内核的设计原理和实现机制。
一、《深入理解Linux内核》《深入理解Linux内核》是一本经典的Linux内核教材,其中包含了大量关于Linux内核的数据结构的介绍。
书中详细讲解了Linux 内核中常用的数据结构,如链表、哈希表、红黑树等,以及它们在Linux内核中的具体应用。
此外,本书还介绍了Linux内核中的进程管理、内存管理、文件系统等重要模块,读者通过学习这些模块的实现原理,可以更进一步理解Linux内核中各种数据结构的使用方法和效果。
二、《Linux内核设计与实现》《Linux内核设计与实现》是一本面向Linux内核开发者的权威指南,其中包含了大量深入的数据结构讲解。
该书从Linux内核的整体架构出发,一步一步地介绍了Linux内核中常用的数据结构,如链表、队列、栈等,以及它们在Linux内核中的应用场景。
此外,书中还详细讲解了Linux内核的进程管理、内存管理、文件系统等关键模块,读者通过学习这些模块的实现原理,可以更好地掌握Linux内核中各种数据结构的使用技巧和性能优化方法。
三、《Linux内核源代码情景分析》《Linux内核源代码情景分析》是一本通过实例分析Linux内核源代码的书籍,其中涵盖了大量关于Linux内核数据结构的讲解。
该书以实际的源代码为例,从整体到细节,逐步讲解了Linux内核中的数据结构及其应用。
通过学习这本书,读者可以深入了解Linux 内核中各种数据结构的实现原理和使用方法,并通过阅读和分析源代码,掌握Linux内核的开发技巧和调试方法。
四、《Linux设备驱动开发详解》《Linux设备驱动开发详解》是一本面向Linux设备驱动开发者的实用指南,其中包含了丰富的数据结构讲解。
linux list.h 用法
在Linux系统中,list.h是一个非常重要的头文件,它提供了许多用于处理链表的数据结构。
链表是一种常见的数据结构,它允许我们以线性方式访问元素,同时还可以添加和删除元素。
list.h头文件提供了许多有用的函数和宏,可以轻松地创建和管理链表。
首先,要使用list.h头文件,需要在代码中包含它。
通常,使用"#include <list>"语句将其包含在源文件中。
接下来,我们可以使用list.h头文件中的函数和宏来创建链表对象。
链表通常由节点组成,每个节点包含数据和指向下一个节点的指针。
我们可以使用list_node结构来定义链表节点,并在代码中使用list_init()函数初始化链表对象。
创建链表后,我们可以使用list_push_back()函数向链表中添加元素。
该函数将一个元素添加到链表的末尾。
同样地,可以使用list_pop_front()函数从链表的开头删除并返回一个元素。
该函数会更新指针以确保链表的完整性。
此外,我们还可以使用list_empty()函数检查链表是否为空。
该函数会返回一个布尔值,指示链表是否包含任何元素。
我们还能够使用list_for_each()宏遍历链表中的所有元素,并使用其他函数来访问每个节点的数据。
总的来说,list.h头文件提供了一种简单而有效的方法来处理链表数据结构。
通过使用这些函数和宏,我们可以轻松地创建和管理链表对象,并在代码中遍历和处理它们。
这是一个非常有用的库,对于开发人员来说是一个非常有用的工具。
总的来说,使用Linux list.h头文件可以方便地处理链表数据结构。
它提供了许多有用的函数和宏,使我们能够轻松地创建和管理链表对象,并在代码中遍历和处理它们。
通过正确使用这些函数和宏,我们可以提高代码的可读性和可维护性,同时提高开发效率。
总的来说,list.h头文件是一个非常有用的库,对于Linux系统开发人员来说是一个非常值得使用的工具。
- 1、下载文档前请自行甄别文档内容的完整性,平台不提供额外的编辑、内容补充、找答案等附加服务。
- 2、"仅部分预览"的文档,不可在线预览部分如存在完整性等问题,可反馈申请退款(可完整预览的文档不适用该条件!)。
- 3、如文档侵犯您的权益,请联系客服反馈,我们会尽快为您处理(人工客服工作时间:9:00-18:30)。
Linux内核通用链表 <linux/list.h>阅读2008-10-23 22:43#ifndef _LINUX_LIST_H#define _LINUX_LIST_H //宏定义,不做过多解释,就是检查是否包含了linux/list.h#ifdef __KERNEL__#include <linux/stddef.h>#include <linux/prefetch.h>#include <asm/system.h>/** These are non-NULL pointers that will result in page faults* under normal circumstances, used to verify that nobody uses* non-initialized list entries.*/这些非空的指针会导致页错误,在正常环境下,用来验证无人使用为初始化的链表节点,入口.也有解释说能引起中断,或者关于这个地址的处理内核处理的很简单,要么打印日志信息报错,要么直接不处理.#define LIST_POISON1 ((void *) 0x00100100)#define LIST_POISON2 ((void *) 0x00200200)/** Simple doubly linked list implementation.** Some of the internal functions ("__xxx") are useful when* manipulating whole lists rather than single entries, as* sometimes we already know the next/prev entries and we can* generate better code by using them directly rather than* using the generic single-entry routines.*/entry似乎应该翻译成表或者节点。
简单的双向链表实现:一些内部函数在熟练操作整个链表比单个入口更有用,当我们已经知道next/prev入口,通过使用直接它们比使用一般的单入口程序产生更好的代码。
struct list_head {struct list_head *next, *prev;};#define LIST_HEAD_INIT(name) { &(name), &(name) }#define LIST_HEAD(name) \struct list_head name = LIST_HEAD_INIT(name)如果一开始没有看懂LIST_HEAD_INIT宏定义的话,上面这个应该可以让人豁然开朗,初始化一个name链表,让头和尾都指向自己。
#define INIT_LIST_HEAD(ptr) do { \(ptr)->next = (ptr); (ptr)->prev = (ptr); \} while (0)/** Insert a new entry between two known consecutive entries.** This is only for internal list manipulation where we know* the prev/next entries already!*/在已知的连续节点中间插入一个新的节点static inline void __list_add(struct list_head *new,struct list_head *prev,struct list_head *next){next->prev = new;new->next = next;new->prev = prev;prev->next = new;}/*** list_add - add a new entry* @new: new entry to be added* @head: list head to add it after** Insert a new entry after the specified head.* This is good for implementing stacks.*/在制订head节点之后插入一个新的节点,这个适用于栈static inline void list_add(struct list_head *new, struct list_head *head){__list_add(new, head, head->next);/*** list_add_tail - add a new entry* @new: new entry to be added* @head: list head to add it before** Insert a new entry before the specified head.* This is useful for implementing queues.*/在指定节点前插入一个新节点,适用于队列static inline void list_add_tail(struct list_head *new, struct list_head *head){__list_add(new, head->prev, head);}/** Insert a new entry between two known consecutive entries.** This is only for internal list manipulation where we know* the prev/next entries already!*/此函数仅供内置链表操作,就是只用于此头文件中所有的关于链表操作的函数就是要已知 prev/next 节点static inline void __list_add_rcu(struct list_head * new,struct list_head * prev, struct list_head * next){new->next = next;new->prev = prev;smp_wmb();next->prev = new;prev->next = new;}/*** list_add_rcu - add a new entry to rcu-protected list* @new: new entry to be added* @head: list head to add it after** Insert a new entry after the specified head.* This is good for implementing stacks.* The caller must take whatever precautions are necessary* (such as holding appropriate locks) to avoid racing* with another list-mutation primitive, such as list_add_rcu()* or list_del_rcu(), running on this same list.* However, it is perfectly legal to run concurrently with* the _rcu list-traversal primitives, such as* list_for_each_entry_rcu().*/调用必须提供任何的必要的防范措施(比如固定适当的锁)来避免在运行于同一个链表时和另一个原始的链表操作竞争,比如 list_add_rcu() * orlist_del_rcu(), 但是和_rcu 原始的链表遍历同时运行是完全合法的。
static inline void list_add_rcu(struct list_head *new, struct list_head *head){__list_add_rcu(new, head, head->next);}/*** list_add_tail_rcu - add a new entry to rcu-protected list* @new: new entry to be added* @head: list head to add it before** Insert a new entry before the specified head.* This is useful for implementing queues.** The caller must take whatever precautions are necessary* (such as holding appropriate locks) to avoid racing* with another list-mutation primitive, such as list_add_tail_rcu() * or list_del_rcu(), running on this same list.* However, it is perfectly legal to run concurrently with* the _rcu list-traversal primitives, such as* list_for_each_entry_rcu().*/static inline void list_add_tail_rcu(struct list_head *new,struct list_head *head){__list_add_rcu(new, head->prev, head);}/** Delete a list entry by making the prev/next entries* point to each other.* This is only for internal list manipulation where we know* the prev/next entries already!*/看不懂此函数可以看下面就明白了,删除已知节点,需要知道节点的后继和前趋static inline void __list_del(struct list_head * prev, struct list_head * next){next->prev = prev;prev->next = next;}/*** list_del - deletes entry from list.* @entry: the element to delete from the list.* Note: list_empty on entry does not return true after this, the entry is* in an undefined state.*/static inline void list_del(struct list_head *entry){__list_del(entry->prev, entry->next);entry->next = LIST_POISON1;entry->prev = LIST_POISON2;}常规的方法是entry->next 置空,这里做什么为了什么还有待于参考。