Linux内核链表list_head扩展---klist
详解Linux内核之双向循环链表
详解Linux内核之双向循环链表本文详解了内核中面向对象的list结构的原理,以及如何以list为内嵌对象来构造自己的链表结构,如何从内嵌list对象获得自定义的对象指针;探讨了各种宏或者函数的详细使用方法及怎样以通用list结构来操作自定义对象。
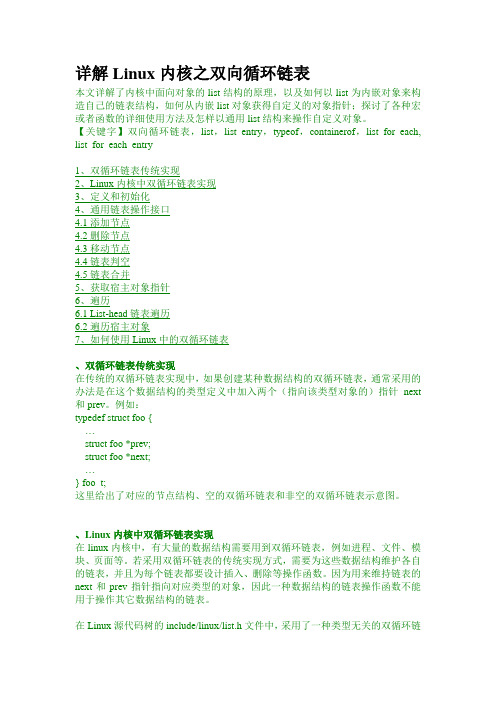
【关键字】双向循环链表,list,list_entry,typeof,containerof,list_for_each, list_for_each_entry1、双循环链表传统实现2、Linux内核中双循环链表实现3、定义和初始化4、通用链表操作接口4.1添加节点4.2删除节点4.3移动节点4.4链表判空4.5链表合并5、获取宿主对象指针6、遍历6.1 List-head链表遍历6.2遍历宿主对象7、如何使用Linux中的双循环链表、双循环链表传统实现在传统的双循环链表实现中,如果创建某种数据结构的双循环链表,通常采用的办法是在这个数据结构的类型定义中加入两个(指向该类型对象的)指针next 和prev。
例如:typedef struct foo {…struct foo *prev;struct foo *next;…} foo_t;这里给出了对应的节点结构、空的双循环链表和非空的双循环链表示意图。
、Linux内核中双循环链表实现在linux内核中,有大量的数据结构需要用到双循环链表,例如进程、文件、模块、页面等。
若采用双循环链表的传统实现方式,需要为这些数据结构维护各自的链表,并且为每个链表都要设计插入、删除等操作函数。
因为用来维持链表的next和prev指针指向对应类型的对象,因此一种数据结构的链表操作函数不能用于操作其它数据结构的链表。
在Linux源代码树的include/linux/list.h文件中,采用了一种类型无关的双循环链表实现方式。
其思想是将指针prev和next从具体的数据结构中提取出来构成一种通用的"双链表"数据结构list_head。
linux的bus、device、driver介绍

linux的bus、device、driver介绍 linux 通过device和driver分别管理系统中的设备和驱动,⽤bus将设备和驱动关联起来,bus可以看成是设备和驱动的媒介,可以匹配设备和驱动。
这样设备和驱动可以独⽴加载,互不影响。
sysfs是⼀个基于内存的⽂件系统,它的作⽤是将内核信息以⽂件的⽅式提供给⽤户程序使⽤。
我们都知道设备和对应的驱动都是由内核管理的,这些对于⽤户空间是不可见的。
现在通过sysfs,可以在⽤户空间直观的了解设备驱动的层次结构。
⼀、bus注册过程bus_type结构体代表⼀条总线,如下所⽰:struct bus_type {const char *name; //名称const char *dev_name;struct device *dev_root;struct device_attribute *dev_attrs; /* use dev_groups instead */const struct attribute_group **bus_groups;const struct attribute_group **dev_groups;const struct attribute_group **drv_groups;int (*match)(struct device *dev, struct device_driver *drv); //device和driver的匹配函数int (*uevent)(struct device *dev, struct kobj_uevent_env *env);int (*probe)(struct device *dev);int (*remove)(struct device *dev);void (*shutdown)(struct device *dev);int (*online)(struct device *dev);int (*offline)(struct device *dev);int (*suspend)(struct device *dev, pm_message_t state);int (*resume)(struct device *dev);const struct dev_pm_ops *pm;const struct iommu_ops *iommu_ops;struct subsys_private *p; struct lock_class_key lock_key;};struct subsys_private {struct kset subsys; //对应/sys/bus⽬录struct kset *devices_kset; //对应/sys/bus/devices⽬录struct list_head interfaces;struct mutex mutex;struct kset *drivers_kset; //对应/sys/bus/drivers⽬录struct klist klist_devices; //该bus下的所有devicestruct klist klist_drivers; //该bus下的所有driverstruct blocking_notifier_head bus_notifier;unsigned int drivers_autoprobe:1;struct bus_type *bus;struct kset glue_dirs;struct class *class;};向系统添加⼀条bus_type总线时,改总线会⾃动添加到/sys/bus⽬录下,bus⽬录是系统⾃动创建的,这个bus⽬录为static struct kset *bus_kset,定义在kernel/drivers/base/bus.c中。
Linux内核的等待队列
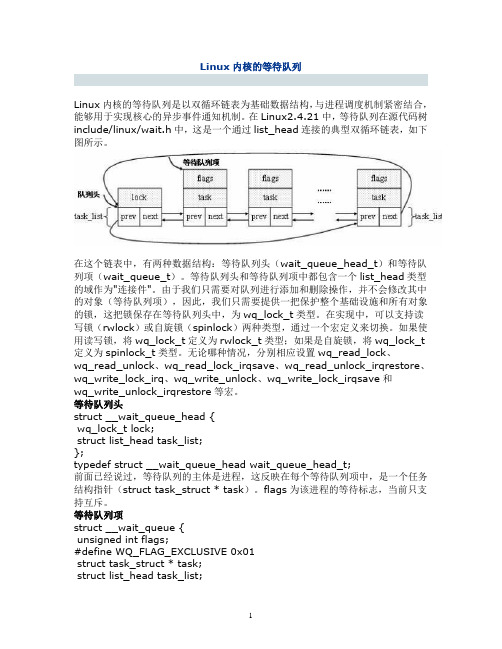
Linux内核的等待队列Linux内核的等待队列是以双循环链表为基础数据结构,与进程调度机制紧密结合,能够用于实现核心的异步事件通知机制。
在Linux2.4.21中,等待队列在源代码树include/linux/wait.h中,这是一个通过list_head连接的典型双循环链表,如下图所示。
在这个链表中,有两种数据结构:等待队列头(wait_queue_head_t)和等待队列项(wait_queue_t)。
等待队列头和等待队列项中都包含一个list_head类型的域作为"连接件"。
由于我们只需要对队列进行添加和删除操作,并不会修改其中的对象(等待队列项),因此,我们只需要提供一把保护整个基础设施和所有对象的锁,这把锁保存在等待队列头中,为wq_lock_t类型。
在实现中,可以支持读写锁(rwlock)或自旋锁(spinlock)两种类型,通过一个宏定义来切换。
如果使用读写锁,将wq_lock_t定义为rwlock_t类型;如果是自旋锁,将wq_lock_t 定义为spinlock_t类型。
无论哪种情况,分别相应设置wq_read_lock、wq_read_unlock、wq_read_lock_irqsave、wq_read_unlock_irqrestore、wq_write_lock_irq、wq_write_unlock、wq_write_lock_irqsave和wq_write_unlock_irqrestore等宏。
等待队列头struct __wait_queue_head {wq_lock_t lock;struct list_head task_list;};typedef struct __wait_queue_head wait_queue_head_t;前面已经说过,等待队列的主体是进程,这反映在每个等待队列项中,是一个任务结构指针(struct task_struct * task)。
list_head 用法

list_head 用法list_head是Linux内核中用于表示链表节点的数据结构,它提供了一些方便的方法来操作链表。
在Linux操作系统中,list_head通常用于表示一个链表的头部,链表的每个节点包含一些数据,而list_head仅包含对链表中下一个节点的指针引用。
list_head的用法非常简单,它主要有以下几个常用的成员变量和方法:1.list_head的成员变量:成员变量包括list_head的next指针和前一个节点的指针prev。
当list_head指向链表的最后一个节点时,prev通常为NULL。
2.list_add方法:用于将一个节点添加到链表的末尾。
该方法需要传入要添加的节点和链表的头节点。
3.list_del方法:用于从链表中删除一个节点。
该方法需要传入要删除的节点。
4.list_empty方法:用于判断链表是否为空。
如果链表为空,则返回TRUE,否则返回FALSE。
5.list_entry方法:用于获取链表中指定索引的节点。
该方法需要传入索引号和头节点。
使用list_head可以方便地遍历链表中的所有节点,也可以方便地添加、删除和查找节点。
下面是一个简单的示例代码,演示了如何使用list_head:```c#include<linux/list_head.h>#include<linux/module.h>structnode{intdata;structlist_headlist;};intmain(void){structnode*node1=kmalloc(sizeof(structnode),GFP_KERNEL);structnode*node2=kmalloc(sizeof(structnode),GFP_KERNEL);structnode*head=NULL;unsignedinti;/*初始化链表头部*/list_add(&head->list,&node1->list);list_add(&node2->list,&head->list);node2->data=1;node1->data=2;/*遍历链表*/printk("Listhead:%p\n",head);printk("Listelements:\n");for(i=0;i<2;i++){printk("Node%d:%d\n",i,list_entry(head->list.next,structnode,list)->data);list_del(&head->list);/*删除头节点*/head=list_entry(head->list.next,structnode,list)->list;/*移动到下一个节点*/}printk("Afterdeletion:\n");printk("Node%d:%d\n",i,head->data);/*打印最后一个节点*/ kfree(node1);kfree(node2);return0;}```在上面的示例代码中,我们首先创建了一个链表,并使用list_add方法将两个节点添加到链表中。
linux内核数据结构.
linux内核数据结构.本⽂是在以上基础上转载⽽成,内核基础内容,就不必浪费时间重新写了.========================================================内核数据结构贯穿于整个内核代码中,这⾥介绍4个基本的内核数据结构。
利⽤这4个基本的数据结构,可以在编写内核代码时节约⼤量时间。
主要内容:链表hash 链表队列映射红⿊树1. 链表链表是linux内核中最简单,同时也是应⽤最⼴泛的数据结构。
内核中定义的是双向链表。
1.1 头⽂件简介内核中关于链表定义的代码位于: include/linux/list.hlist.h⽂件中对每个函数都有注释,这⾥就不详细说了。
其实刚开始只要先了解⼀个常⽤的链表操作(追加,删除,遍历)的实现⽅法,其他⽅法基本都是基于这些常⽤操作的。
1.2 链表代码的注意点在阅读list.h⽂件之前,有⼀点必须注意:linux内核中的链表使⽤⽅法和⼀般数据结构中定义的链表是有所不同的。
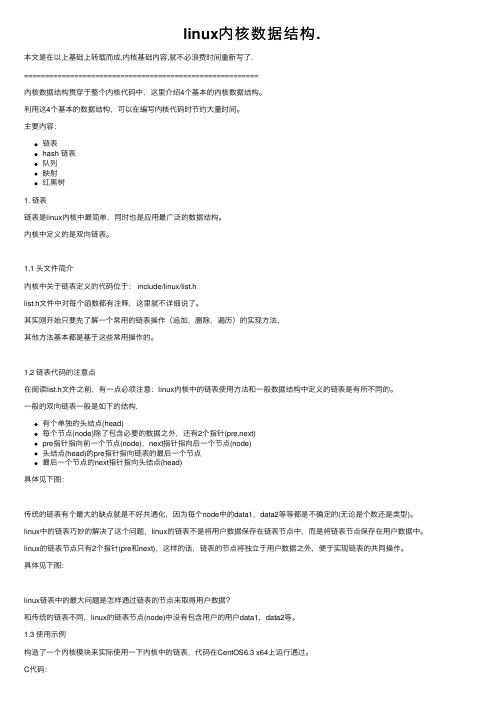
⼀般的双向链表⼀般是如下的结构,有个单独的头结点(head)每个节点(node)除了包含必要的数据之外,还有2个指针(pre,next)pre指针指向前⼀个节点(node),next指针指向后⼀个节点(node)头结点(head)的pre指针指向链表的最后⼀个节点最后⼀个节点的next指针指向头结点(head)具体见下图:传统的链表有个最⼤的缺点就是不好共通化,因为每个node中的data1,data2等等都是不确定的(⽆论是个数还是类型)。
linux中的链表巧妙的解决了这个问题,linux的链表不是将⽤户数据保存在链表节点中,⽽是将链表节点保存在⽤户数据中。
linux的链表节点只有2个指针(pre和next),这样的话,链表的节点将独⽴于⽤户数据之外,便于实现链表的共同操作。
具体见下图:linux链表中的最⼤问题是怎样通过链表的节点来取得⽤户数据?和传统的链表不同,linux的链表节点(node)中没有包含⽤户的⽤户data1,data2等。
内核链表

内核链表在Linux内核中使用了大量的链表结构来组织数据,包括设备列表以及各种功能模块的数据组织。
这些链表大多采用在【include/linux/list.h】实现一个相当精彩的链表数据结构。
Linux2.6多了两种功能,链表的读拷贝更新(rcu)和HASH链表(hlist)。
这两种功能都是基于list结构的。
1链表的定义Struct list_head{Struct list_head *next, *prev;};List_head结构包含两个list_head结构的指针prev和next。
由此可见,实际上,通常他们都组织成双向循环链表。
这里的list_head 没有数据域。
在Linux内和链表中,不是在链表结构中包含数据,而是在数据结构中包含链表节点。
在Linux内核链表中,需要用链表组织起来的数据通常都包含一个struct list_head成员。
例如在【include/linux/netfilter.h】中定义了了一个nf_socket_ops结构来描述netfilter摸一个协议族准备的getsocket/setsocketopt接口。
其中就有一个struct list_head list 成员,各个协议族的nf_sockopt_ops结构都通过这个list成员组织在一个链表中,表头是定义在【net/core/netfilter.c】中的nf_sockopts(struct list_head),从下图可以看到,这种通用的链表结避免了为每个数据项类型定义自己链表的麻烦,Linux的简捷实用,不求完美和标准的风格,在这里体现的相当充分。
2 链表的操作接口2.1声明和初始化实际上Linux只定义了链表节点,并没有专门定义链表头,那么一个链表结构是如何建立起来的呢?让我们来看看LIST_HEAD()这个宏。
#define LIST_HEAD_INIT(name) {&(name), &(name)}#define LIST_HEAD(name)struct list_head name=LIST_HEAD_INIT(name) 当我们用LIST_HEAD(nf_sockopts)声明一个名为nf_sockopts的链表头时,它的next, prev指针都初始化为指向自己。
list_head小解析
[Linux内核] post by 陈俊生/ 2012-1-13 17:17 FridayList_head下面的一些内容是我在学习linux内核中list.h文件中list_head时为了更好的理解而找的一些资料,我把它们整理一下发上来以供今后参考一下。
其中也有部分是我自己在学习中的体会。
下面的代码是我从list.h中复制过来的,是源码来的,没有改变,主要是为了大家能清楚的知道list.h的源码。
List_head这个结构体在list.h中的主要作用不是保存数据而是作为一个链表的一个节点来保存地址,为另一个结构体的数据能够获取作铺垫。
具体的情况看完了下面的一些资料就清晰明白了。
list.h头文件集中定义了双链表(struct list_head结构体)的相关操作。
比如这里的一个头文件中就有大量的struct list_head型的数据。
下面先介绍list_head的具体构成Struct list_head{Struct list_head *next;Struct list_head *prev;};List_head中的两个成员分别为两个指针,这个两个指针分别是双向链表的两个不通指向的指针。
从这个结构体的形式可以看出它是不能存放数据的。
所以也只能用来作别人的链接。
下面介绍一下list.h各个函数的具体实现。
1.链表的初始化其实可以从后往前看,这样更容易理解。
INIT_LIST_HEAD函数形成一个空链表。
这个list变量一般作为头指针(非头结点)。
static inline void INIT_LIST_HEAD(struct list_head *list){list->next = list;list->prev = list;}LIST_HEAD_INIT(name)将name的地址直接分别赋值给next和prev,那么它们事实上都指向自己,也形成一个空链表。
现在再回头看宏LIST_HEAD(name),它其实就是一个定义并初始化作用。
Linux内核链表list.h的使用
Linux内核链表list.h的使⽤Linux 内核链表 list.h 的使⽤C 语⾔本⾝并不⾃带集合(Collection)⼯具,当我们需要把结构体(struct)实例串联起来时,就需要在结构体内声明指向下⼀实例的指针,构成所谓的“链表”。
⽽为了实现对链表的操作,我们需要另外实现⼀系列的函数,例如添加、删除、搜索、复制等等。
⽽利⽤ Kernel 源代码中⾃带的 list.h,则可以⽅便地实现任意类型结构体的串联。
编程需求假设我有⼀个表⽰学⽣资料的结构体:#define MAX_STRING_LENGTH 50typedef struct student {char first_name[MAX_STRING_LENGTH];char last_name[MAX_STRING_LENGTH];unsigned int age;} student_t;传统的做法,当我们需要将⼀系列学⽣的数据串联起来,那我们需要在该结构体内部添加⼀枚指针:typedef struct student {char first_name[MAX_STRING_LENGTH];char last_name[MAX_STRING_LENGTH];unsigned int age;struct student *next; /* Look at dis ;p */} student_t;⼏乎每位 C 语⾔学习者都有在教科书中见过此类实现⽅法。
但是这样做的缺点是:我们需要额外编写⼀系列函数,实现对该类型链表的操作。
然⽽,稍微复杂点的项⽬内,有个⼗⼏个结构体那是很平常的事情。
如果我们想为它们都实现链表功能,那我们就需要为每个类型的结构体编写⼀套函数,然后我们就累 shi 了。
有没有⼀种更为通⽤的办法呢?不需要顾及结构体本⾝的类型,就可以简简单单地把它们串起来。
有点类似 Java 中的 LinkedList,如果我需要把⼀堆 Student 类的对象管理起来,那就很简单:LinkedList<Student> lstStudents = new LinkedList<Student>();完事⼉!接着直接把对象往 lstStudents ⾥⾯放就可以了。
【IT专家】linux内核入门之list介绍(1)
本文由我司收集整编,推荐下载,如有疑问,请与我司联系linux内核入门之list介绍(1)2013/11/01 0 1.介绍linux内核中双向链表的核心数据结构struct list_head如下:linux/list.h struct list_head { struct list_head *next, *prev;};从上面定义可以看出,linux将双向链表关系关系抽离成单独的数据结构,只要包含了list_head类型成员的对象都能成为链表节点,这样就可以将具体的数据类型与数据之间的关系解耦合。
如果把包含list_head的对象称为节点,那么:next指向下个节点的list_head;prev指向上个节点的list_head。
使用list_head时,一般将list_head嵌套到自己的结构体中。
如下:struct my_struct { struct list_head list; void *data};链表使用前需要初始化,有两种初始化方式:a.动态初始化,则运行时初始化struct my_struct *p;p = (struct my_struct *)kmalloc(sizeof(struct my_struct), GFP_KERNEL);INIT_LIST_HEAD( p- list);p- data = NULL;INIT_LIST_HEAD是一个inline函数。
b.静态初始化,即编译时初始化struct my_struct mine = { .list = LIST_HEAD_INIT(mine.list), .data = NULL};LIST_HEAD_INIT是一个宏。
使用LIST_HEAD(list)直接创建一个list节点.2.链表操作如果把head当作头节点,则head- next为first节点,head- prev为last节点。
--------------------------------------------------------------------- | ----------- ----------- ---------- | -----| prev | -----| prev | --- ---| prev | --- ----------- ----------- ---- ---------- --- | next | ----- | next |--- --- | next | ---- | ----------- ----------- ---------- | --------------------------------------------------------------------- head first lasta.添加新节点list_add(struct list_head *new, struct list_head *head);list_add_tail(struct list_head *new, struct list_head *head);list_add将new节点添加在head与head- next之间;而list_add_tail则添加在head- prev与head之间。
Linux 内核里的数据结构——双向链表
双向链表Linux 内核中自己实现了双向链表,可以在 include/linux/list.h 找到定义。
我们将会首先从双向链表数据结构开始介绍内核里的数据结构。
为什么?因为它在内核里使用的很广泛,你只需要在 检索一下就知道了。
首先让我们看一下在 include/linux/types.h 里的主结构体:struct list_head {struct list_head *next,*prev;};你可能注意到这和你以前见过的双向链表的实现方法是不同的。
举个例子来说,在 glib 库里是这样实现的:structGList{gpointer data;GList*next;GList*prev;};通常来说一个链表结构会包含一个指向某个项目的指针。
但是Linux 内核中的链表实现并没有这样做。
所以问题来了:链表在哪里保存数据呢?。
实际上,内核里实现的链表是侵入式链表(Intrusive list)。
侵入式链表并不在节点内保存数据-它的节点仅仅包含指向前后节点的指针,以及指向链表节点数据部分的指针——数据就是这样附加在链表上的。
这就使得这个数据结构是通用的,使用起来就不需要考虑节点数据的类型了。
比如:struct nmi_desc {spinlock_t lock;struct list_head head;};让我们看几个例子来理解一下在内核里是如何使用 list_head 的。
如上所述,在内核里有很多很多不同的地方都用到了链表。
我们来看一个在杂项字符驱动里面的使用的例子。
在 drivers/char/misc.c 的杂项字符驱动API 被用来编写处理小型硬件或虚拟设备的小驱动。
这些驱动共享相同的主设备号:#define MISC_MAJOR 10但是都有各自不同的次设备号。
比如:ls-l /dev |grep10crw-------1 root root 10,235Mar2112:01 autofsdrwxr-xr-x 10 root root 200Mar2112:01 cpucrw-------1 root root 10,62Mar2112:01 cpu_dma_latencycrw-------1 root root 10,203Mar2112:01 cusedrwxr-xr-x 2 root root 100Mar2112:01 dricrw-rw-rw-1 root root 10,229Mar2112:01 fusecrw-------1 root root 10,228Mar2112:01 hpetcrw-------1 root root 10,183Mar2112:01 hwrngcrw-rw----+1 root kvm 10,232Mar2112:01 kvmcrw-rw----1 root disk 10,237Mar2112:01 loop-controlcrw-------1 root root 10,227Mar2112:01 mcelogcrw-------1 root root 10,59Mar2112:01 memory_bandwidthcrw-------1 root root 10,61Mar2112:01 network_latencycrw-------1 root root 10,60Mar2112:01 network_throughputcrw-r-----1 root kmem 10,144Mar2112:01 nvrambrw-rw----1 root disk 1,10Mar2112:01 ram10crw--w----1 root tty4,10Mar2112:01 tty10crw-rw----1 root dialout 4,74Mar2112:01 ttyS10crw-------1 root root 10,63Mar2112:01 vga_arbitercrw-------1 root root 10,137Mar2112:01 vhci现在让我们看看它是如何使用链表的。
- 1、下载文档前请自行甄别文档内容的完整性,平台不提供额外的编辑、内容补充、找答案等附加服务。
- 2、"仅部分预览"的文档,不可在线预览部分如存在完整性等问题,可反馈申请退款(可完整预览的文档不适用该条件!)。
- 3、如文档侵犯您的权益,请联系客服反馈,我们会尽快为您处理(人工客服工作时间:9:00-18:30)。
142/**143*klist_add_after-Init a klist_node and add it after an existing node 144*@n:node we're adding.145*@pos:node to put@n after146*//*在节点pos后面插入节点n*/147void klist_add_after(struct klist_node*n,struct klist_node*pos)148{149struct klist*k=knode_klist(pos);150151klist_node_init(k,n);152spin_lock(&k->k_lock);153list_add(&n->n_node,&pos->n_node);154spin_unlock(&k->k_lock);155}156EXPORT_SYMBOL_GPL(klist_add_after);157158/**159*klist_add_before-Init a klist_node and add it before an existing node 160*@n:node we're adding.161*@pos:node to put@n after162*//*在节点pos前面插入节点n*/163void klist_add_before(struct klist_node*n,struct klist_node*pos)164{165struct klist*k=knode_klist(pos);166167klist_node_init(k,n);168spin_lock(&k->k_lock);169list_add_tail(&n->n_node,&pos->n_node);170spin_unlock(&k->k_lock);171}172EXPORT_SYMBOL_GPL(klist_add_before);173/*等待者结构体,用于删除节点,删除完成唤醒进程*/174struct klist_waiter{175struct list_head list;176struct klist_node*node;177struct task_struct*process;178int woken;179};180/*定义并初始化klist节点移除自旋锁*/181static DEFINE_SPINLOCK(klist_remove_lock);/*定义一个等待器的链表*/182static LIST_HEAD(klist_remove_waiters);183184static void klist_release(struct kref*kref)185{186struct klist_waiter*waiter,*tmp;187struct klist_node*n=container_of(kref,struct klist_node,n_ref);188189WARN_ON(!knode_dead(n));/*删除链表中的节点入口*/190list_del(&n->n_node);191spin_lock(&klist_remove_lock);/*内核链表操作宏include/linux/list.h,遍历klist节点移除等待链表*/192list_for_each_entry_safe(waiter,tmp,&klist_remove_waiters,list){/*是要删除链表节点的等待器*/193if(waiter->node!=n)194continue;195/*等待者唤醒标志*/196waiter->woken=1;197mb();/*唤醒等待进程*/198wake_up_process(waiter->process);/*删除链表入口*/199list_del(&waiter->list);200}201spin_unlock(&klist_remove_lock);/*设置节点n指向的klist为空*/202knode_set_klist(n,NULL);203}204/*减引用次数并删除节点*/205static int klist_dec_and_del(struct klist_node*n)206{/*n->nref减引用次数,若引用次数减完不为0,调用klist_release清除节点对象,返回1;为0,则返回0*/207return kref_put(&n->n_ref,klist_release);208}209/*带锁操作的节点删除,不判断是否成功,减引用次数*/210static void klist_put(struct klist_node*n,bool kill)211{/*获取节点的put方法*/212struct klist*k=knode_klist(n);213void(*put)(struct klist_node*)=k->put;214215spin_lock(&k->k_lock);/*“需要杀死节点”==*/216if(kill)217knode_kill(n);/*节点对象引用次数为0了,则不需要调用put方法*/218if(!klist_dec_and_del(n))219put=NULL;220spin_unlock(&k->k_lock);/*调用put方法*/221if(put)222put(n);223}224225/**226*klist_del-Decrement the reference count of node and try to remove. 227*@n:node we're deleting.228*//*删除节点“杀死死节点*/229void klist_del(struct klist_node*n)230{231klist_put(n,true);232}233EXPORT_SYMBOL_GPL(klist_del);234235/**236*klist_remove-Decrement the refcount of node and wait for it to go away. 237*@n:node we're removing.238*/239void klist_remove(struct klist_node*n)240{/*定义一个等待者,并加入等待者加入移除等待者链表*/241struct klist_waiter waiter;242243waiter.node=n;244waiter.process=current;245waiter.woken=0;246spin_lock(&klist_remove_lock);247list_add(&waiter.list,&klist_remove_waiters);248spin_unlock(&klist_remove_lock);249/*清除节点,并设置等待者*/330*First grab list lock.Decrement the reference count of the previous 331*node,if there was one.Grab the next node,increment its reference 332*count,drop the lock,and return that next node.333*//*“预下”链表中下一节点*/334struct klist_node*klist_next(struct klist_iter*i)335{336void(*put)(struct klist_node*)=i->i_klist->put;337struct klist_node*last=i->i_cur;338struct klist_node*next;339/*抢占锁*/340spin_lock(&i->i_klist->k_lock);341/*获取下一节点*/342if(last){343next=to_klist_node(last->n_node.next);/*减上一节点引用次数*/344if(!klist_dec_and_del(last))345put=NULL;346}else347next=to_klist_node(i->i_klist->k_list.next);348349i->i_cur=NULL;/*链表中有节点“没死”,增加引用次数*/350while(next!=to_klist_node(&i->i_klist->k_list)){351if(likely(!knode_dead(next))){352kref_get(&next->n_ref);353i->i_cur=next;354break;355}356next=to_klist_node(next->n_node.next);357}358/*丢弃锁*/359spin_unlock(&i->i_klist->k_lock);360361if(put&&last)362put(last);363return i->i_cur;364}365EXPORT_SYMBOL_GPL(klist_next);366----------------------/*使用迭代查找下一链表节点*/1124struct klist_node*n=klist_next(i);1125struct device*dev=NULL;1126struct device_private*p;11271128if(n){/*根据节点入口获取该节点上的设备*/1129p=to_device_private_parent(n);1130dev=p->device;1131}1132return dev;1133}/*-------------------------------------------------------------------------------*//*其中device_private是设备私有数据结构,一下代码不难看出*想要由链表节点迭代查找设备非常容易*/66/**67*struct device_private-structure to hold the private to the driver core portions of the device structure.68*69*@klist_children-klist containing all children of this device70*@knode_parent-node in sibling list71*@knode_driver-node in driver list72*@knode_bus-node in bus list73*@driver_data-private pointer for driver specific info.Will turn into a74*list soon.75*@device-pointer back to the struct class that this structure is76*associated with.77*78*Nothing outside of the driver core should ever touch these fields.79*/80struct device_private{81struct klist klist_children;82struct klist_node knode_parent;83struct klist_node knode_driver;84struct klist_node knode_bus;85void*driver_data;86struct device*device;87};88#define to_device_private_parent(obj)\89container_of(obj,struct device_private,knode_parent)90#define to_device_private_driver(obj)\91container_of(obj,struct device_private,knode_driver)92#define to_device_private_bus(obj)\93container_of(obj,struct device_private,knode_bus) 94driver_attach()函数driver_attach()函数2009-04-2114:39:03|分类:linux kernel|字号订阅最近在看一个mpc8315CPU上的驱动程序发现在使用spi_register注册完成后没有调用到相应的probe函数,分析后发现在driver_attach()函数执行时没有找到匹配的device,在网上狗狗后找到关于这部分的分析,引用如下:个浅析linux2.6.23驱动自动匹配设备driver_attach()函数文章来源:int driver_attach(struct device_driver*drv){return bus_for_each_dev(drv->bus,NULL,drv,__driver_attach);}调用该函数,那么drv驱动程式会和drv所在总线上连接了的物理设备进行一一匹配,再来看看下面:int bus_for_each_dev(struct bus_type*bus,struct device*start,void*data,int(*fn)(struct device*,void*)){struct klist_iter i;//专门用于遍历的链表结构体,其中i_cur是遍历移动的关键struct device*dev;int error=0;if(!bus)return-EINVAL;klist_iter_init_node(&bus->klist_devices,&i,(start?&start->knode_bus:NULL));//i->i_klist=&bus->klist_devices;//i->i_head=&bus->klist_devices.k_list;//i->i_cur=NULL;//表示从最前端开始遍历挂接到bus总线上的整个设备链条.while((dev=next_device(&i))&&!error)//dev为该bus总线链表上的一个设备,[就像一根藤条上的一朵小花gliethttp_20071025] //这些device设备把自己的&device->knode_bus链表单元链接到了bus->klist_devices 上//这也说明名字为knode_bus的list单元将是要被挂接到bus->klist_devices的链表上//同理&device->knode_driver将是这个device设备链接到drivers驱动上的list节点识别单元//见driver_bound()->klist_add_tail(&dev->knode_driver,&dev->driver->klist_devices);error=fn(dev,data);//调用__driver_attach函数,进行匹配运算klist_iter_exit(&i);return error;//成功匹配返回0}struct klist_iter{struct klist*i_klist;struct list_head*i_head;struct klist_node*i_cur;};void klist_iter_init_node(struct klist*k,struct klist_iter*i,struct klist_node*n){i->i_klist=k;//需要被遍历的klisti->i_head=&k->k_list;//开始的链表头i->i_cur=n;//当前位置对应的klist_node节点,next_device()会从当前n 开始一直搜索到//链表的结尾,也就是i_head->prev处停止if(n)kref_get(&n->n_ref);//引用计数加1}static struct device*next_device(struct klist_iter*i){struct klist_node*n=klist_next(i);return n?container_of(n,struct device,knode_bus):NULL;//因为n是device->knode_bus的指针,所以container_of将返回device的指针}struct klist_node*klist_next(struct klist_iter*i){struct list_head*next;struct klist_node*lnode=i->i_cur;struct klist_node*knode=NULL;//赋0,当next==i->i_head时用于退出void(*put)(struct klist_node*)=i->i_klist->put;spin_lock(&i->i_klist->k_lock);if(lnode){next=lnode->n_node.next;if(!klist_dec_and_del(lnode))//释放前一个i_cur对象的引用计数put=NULL;//klist_dec_and_del成功的对引用计数做了减1操作,那么失效用户定义put}elsenext=i->i_head->next;//如果lnode=0,那么从链表头开始,所以head->next指向第1个实际对象if(next!=i->i_head){//head并不链接设备,所以head无效//当next==i->i_head时,说明已遍历到了head牵头的链表的末尾,回环到了head, //所以knode将不会进行赋值,这时knode=0,while((dev=next_device(&i))&&!error)因为0而退出knode=to_klist_node(next);//调用container_of()获取klist_node->n_node中klist_node地址kref_get(&knode->n_ref);//对该node的引用计数加1}i->i_cur=knode;//记住当前遍历到的对象,当next==i->i_head时,knode=0spin_unlock(&i->i_klist->k_lock);if(put&&lnode)put(lnode);return knode;}static int klist_dec_and_del(struct klist_node*n){return kref_put(&n->n_ref,klist_release);//对该node的引用计数减1,如果引用计数到达0,那么调用klist_release}static void klist_release(struct kref*kref){struct klist_node*n=container_of(kref,struct klist_node,n_ref);list_del(&n->n_node);//从节点链表上摘掉该node节点complete(&n->n_removed);//n->n_klist=NULL;}void fastcall complete(struct completion*x){unsigned long flags;spin_lock_irqsave(&x->wait.lock,flags);//关闭中断,防止并发x->done++;//唤醒因为某些原因悬停在klist_node->n_removed等待队列上的task们//这种现象之一是:__device_release_driver()删除挂接在设备上的driver时,会出现//删除task小憩在node的wait上__wake_up_common(&x->wait,TASK_UNINTERRUPTIBLE|TASK_INTERRUPTIBLE,1,0,NULL);spin_unlock_irqrestore(&x->wait.lock,flags);//恢复中断}static void__wake_up_common(wait_queue_head_t*q,unsigned int mode,int nr_exclusive,int sync,void*key){struct list_head*tmp,*next;list_for_each_safe(tmp,next,&q->task_list){//遍历以head牵头的链表上的task们wait_queue_t*curr=list_entry(tmp,wait_queue_t,task_list);unsigned flags=curr->flags;if(curr->func(curr,mode,sync,key)&&//调用wait上准备好了的回调函数func (flags&WQ_FLAG_EXCLUSIVE)&&!--nr_exclusive)break;}}//抛开链表上的head,当最后一个post==head时,说明链表已遍历结束(gliethttp_20071025) #define list_for_each_safe(pos,n,head)\for(pos=(head)->next,n=pos->next;pos!=(head);\pos=n,n=pos->next)void klist_iter_exit(struct klist_iter*i){if(i->i_cur){//对于正常遍历的退出,i->i_cur会等于0,如果找到了匹配对象,提前退出了,那么就会在这里对引用进行释放klist_del(i->i_cur);i->i_cur=NULL;}}static int__driver_attach(struct device*dev,void*data){struct device_driver*drv=data;//data就是打算把自己匹配到bus上挂接的合适设备上的driver驱动if(dev->parent)down(&dev->parent->sem);//使用信号量保护下面的操作down(&dev->sem);if(!dev->driver)//如果当前这个dev设备还没有挂接一个driver驱动driver_probe_device(drv,dev);//那么尝试该dev是否适合被该drv驱动管理up(&dev->sem);if(dev->parent)up(&dev->parent->sem);return0;}int driver_probe_device(struct device_driver*drv,struct device*dev){int ret=0;if(!device_is_registered(dev))//设备是否已被bus总线认可return-ENODEV;if(drv->bus->match&&!drv->bus->match(dev,drv))//调用该driver驱动自定义的match函数,如:usb_device_match(),查看//这个设备是否符合自己,drv->bus->match()返回1,表示本drv认可该设备//否则,goto done,继续检测下一个device设备是否和本drv匹配goto done;pr_debug("%s:Matched Device%s with Driver%s\n",drv->bus->name,dev->bus_id,drv->name);//这下来真的了,ret=really_probe(dev,drv);done:return ret;}static inline int device_is_registered(struct device*dev){return dev->is_registered;//当调用bus_attach_device()之后,is_registered=1}static int really_probe(struct device*dev,struct device_driver*drv){int ret=0;atomic_inc(&probe_count);pr_debug("%s:Probing driver%s with device%s\n",drv->bus->name,drv->name,dev->bus_id);WARN_ON(!list_empty(&dev->devres_head));dev->driver=drv;//管理本dev的驱动指针指向drvif(driver_sysfs_add(dev)){//将driver和dev使用link,链接到一起,使他们真正相关printk(KERN_ERR"%s:driver_sysfs_add(%s)failed\n",__FUNCTION__,dev->bus_id);goto probe_failed;}if(dev->bus->probe){//总线提供了设备探测函数ret=dev->bus->probe(dev);if(ret)goto probe_failed;}else if(drv->probe){//驱动自己提供了设备探测函数//因为drv驱动自己也不想管理那些意外的非法设备//所以一般drv都会提供这个功能,相反//比如:usb_bus_type没有提供probe,而usb驱动提供了usb_probe_interface//来确认我这个driver软件真的能够管理这个device设备ret=drv->probe(dev);if(ret)goto probe_failed;}driver_bound(dev);ret=1;pr_debug("%s:Bound Device%s to Driver%s\n",drv->bus->name,dev->bus_id,drv->name);goto done;probe_failed:devres_release_all(dev);driver_sysfs_remove(dev);dev->driver=NULL;if(ret!=-ENODEV&&ret!=-ENXIO){printk(KERN_WARNING"%s:probe of%s failed with error%d\n",drv->name,dev->bus_id,ret);}ret=0;done:atomic_dec(&probe_count);wake_up(&probe_waitqueue);return ret;}static void driver_bound(struct device*dev){if(klist_node_attached(&dev->knode_driver)){//本dev已挂到了某个driver驱动的klist_devices链条上了//感觉不应该发生printk(KERN_WARNING"%s:device%s already bound\n",__FUNCTION__,kobject_name(&dev->kobj));return;}pr_debug("bound device’%s’to driver’%s’\n",dev->bus_id,dev->driver->name);if(dev->bus)blocking_notifier_call_chain(&dev->bus->bus_notifier,BUS_NOTIFY_BOUND_DRIVER,dev);//将本dev的knode_driver链表结构体节点挂接到该driver->klist_devices上//这样driver所管理的device设备又多了1个,//也能说又多了1个device设备使用本driver驱动管理他自己(gilethttp_20071025).klist_add_tail(&dev->knode_driver,&dev->driver->klist_devices);}Linux内核中的klist分析分析的内核版本照样是2.6.38.5。