HYP-3系列消化炉说明书.
沛欧红外消化炉XMTP段程序控制仪表使用说明

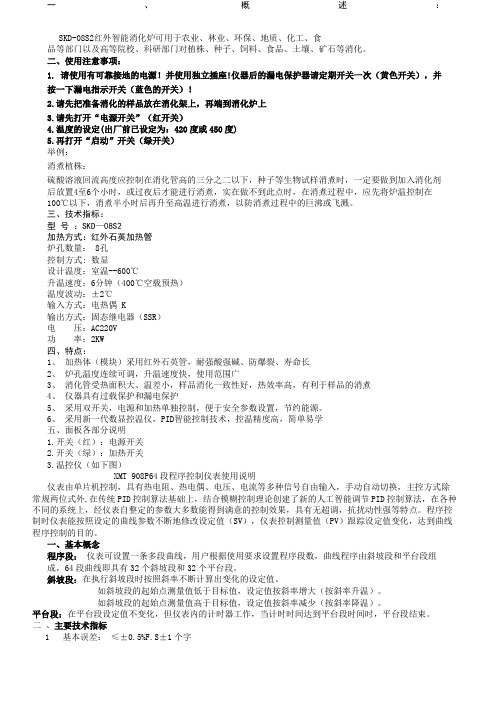
沛欧红外消化炉X M T P 段程序控制仪表使用说明 The final edition was revised on December 14th, 2020.一、概述:SKD-08S2红外智能消化炉可用于农业、林业、环保、地质、化工、食品等部门以及高等院校、科研部门对植株、种子、饲料、食品、土壤、矿石等消化。
二、使用注意事项:1. 请使用有可靠接地的电源!并使用独立插座!仪器后的漏电保护器请定期开关一次(黄色开关),并按一下漏电指示开关(蓝色的开关)!2.请先把准备消化的样品放在消化架上,再端到消化炉上3.请先打开“电源开关”(红开关)4.温度的设定(出厂前已设定为:420度或450度)5.再打开“启动”开关(绿开关)举例:消煮植株:硫酸溶液回流高度应控制在消化管高的三分之二以下,种子等生物试样消煮时,一定要做到加入消化剂后放置4至6个小时,或过夜后才能进行消煮,实在做不到此点时,在消煮过程中,应先将炉温控制在100℃以下,消煮半小时后再升至高温进行消煮,以防消煮过程中的巨沸或飞溅。
三、技术指标:型号:SKD—08S2加热方式:红外石英加热管炉孔数量: 8孔控制方式: 数显设计温度:室温--600℃升温速度:6分钟(400℃空载预热)温度波动:±2℃输入方式:电热偶 K输出方式:固态继电器(SSR)电压:AC220V功率:2KW四、特点:1、加热体(模块)采用红外石英管,耐强酸强碱、防爆裂、寿命长2、炉孔温度连续可调,升温速度快,使用范围广3、消化管受热面积大、温差小,样品消化一致性好,热效率高,有利于样品的消煮4、仪器具有过载保护和漏电保护5、采用双开关,电源和加热单独控制,便于安全参数设置,节约能源。
6、采用新一代数显控温仪,PID智能控制技术,控温精度高,简单易学五、面板各部分说明1.开关(红):电源开关2.开关(绿):加热开关3.温控仪(如下图)XMT 908P64段程序控制仪表使用说明仪表由单片机控制,具有热电阻、热电偶、电压、电流等多种信号自由输入,手动自动切换,主控方式除常规两位式外,在传统PID控制算法基础上,结合模糊控制理论创建了新的人工智能调节PID控制算法,在各种不同的系统上,经仪表自整定的参数大多数能得到满意的控制效果,具有无超调,抗扰动性强等特点。
高压灭菌锅资料Hirayama全
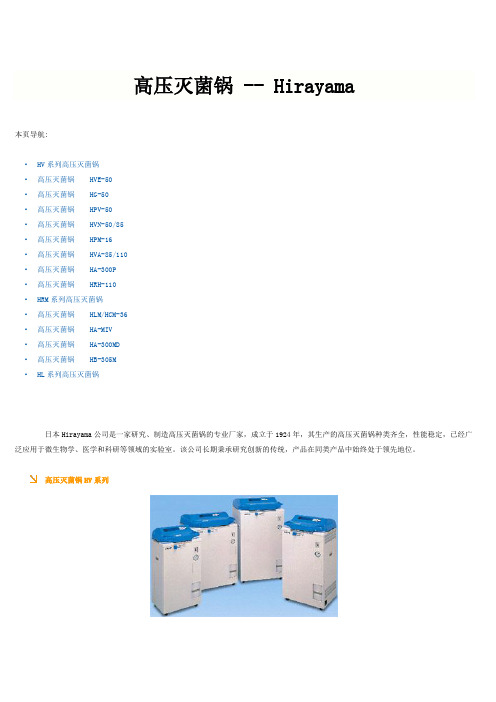
高压灭菌锅 -- Hirayama本页导航:·HV系列高压灭菌锅·高压灭菌锅HVE-50·高压灭菌锅HG-50·高压灭菌锅HPV-50·高压灭菌锅HVN-50/85·高压灭菌锅HPM-16·高压灭菌锅HVA-85/110·高压灭菌锅HA-300P·高压灭菌锅HRH-110·HRM系列高压灭菌锅·高压灭菌锅HLM/HCM-36·高压灭菌锅HA-MIV·高压灭菌锅HA-300MD·高压灭菌锅HB-305M·HL系列高压灭菌锅日本Hirayama公司是一家研究、制造高压灭菌锅的专业厂家,成立于1924年,其生产的高压灭菌锅种类齐全,性能稳定,已经广泛应用于微生物学、医学和科研等领域的实验室。
该公司长期秉承研究创新的传统,产品在同类产品中始终处于领先地位。
高压灭菌锅HV系列●主要特点:·电动锁系统:仅用触摸控制器就可以轻易和安全地开启箱盖·安全双向检测(显示)联锁装置:通过检测内压力和箱内温度,该安全系统才能锁住箱盖;该系统确保使用时,具有更大的安全性·双向传感系统监控空气排除状态:为了避免残留空气影响到灭菌结果,本仪器采用双向传感器检测灭菌器内是否有残留空气·自动排气装置:采用最新的自动排除蒸汽的装置以达到不用沸腾就能对液体基质进行灭菌;在灭菌完成后,蒸汽可以预先设定速率逐渐地释放蒸汽·琼脂处理方法:允许使用者更大幅度地加快融化琼脂或对箱内进行预热·自动编排启动程序:内置定时器可设定一段时间程序,以使高压灭菌锅自动启动一个灭菌周期(最长可维持一个星期)·记忆(储存)支持系统:可以改变各种参数(如灭菌、排气、加热等参数),且一旦发生改变(甚至发生停电故障)上述参数仍能被保留下来·节省空间的设计:采用垂直向上打开箱盖,节省空间(相对铰链式水平打开箱盖的型号而言)·多种任选附件:提供多种相关附件供选购(如SUS灭菌吊筐,药物废物处理筐)·过程状况显示:通过一组闪光灯指示出当前灭菌过程的多种情况·功能延伸选配件:有浮标感应器、数字打印机、自动供水单元和冷却单元。
沛欧红外消化炉XMTP段程序控制仪表使用说明
一、概述:SKD-08S2红外智能消化炉可用于农业、林业、环保、地质、化工、食品等部门以及高等院校、科研部门对植株、种子、饲料、食品、土壤、矿石等消化。
二、使用注意事项:1. 请使用有可靠接地的电源!并使用独立插座!仪器后的漏电保护器请定期开关一次(黄色开关),并按一下漏电指示开关(蓝色的开关)!2.请先把准备消化的样品放在消化架上,再端到消化炉上3.请先打开“电源开关”(红开关)4.温度的设定(出厂前已设定为:420度或450度)5.再打开“启动”开关(绿开关)举例:消煮植株:硫酸溶液回流高度应控制在消化管高的三分之二以下,种子等生物试样消煮时,一定要做到加入消化剂后放置4至6个小时,或过夜后才能进行消煮,实在做不到此点时,在消煮过程中,应先将炉温控制在100℃以下,消煮半小时后再升至高温进行消煮,以防消煮过程中的巨沸或飞溅。
三、技术指标:型号:SKD—08S2加热方式:红外石英加热管炉孔数量: 8孔控制方式: 数显设计温度:室温--600℃升温速度:6分钟(400℃空载预热)温度波动:±2℃输入方式:电热偶 K输出方式:固态继电器(SSR)电压:AC220V功率:2KW四、特点:1、加热体(模块)采用红外石英管,耐强酸强碱、防爆裂、寿命长2、炉孔温度连续可调,升温速度快,使用范围广3、消化管受热面积大、温差小,样品消化一致性好,热效率高,有利于样品的消煮4、仪器具有过载保护和漏电保护5、采用双开关,电源和加热单独控制,便于安全参数设置,节约能源。
6、采用新一代数显控温仪,PID智能控制技术,控温精度高,简单易学五、面板各部分说明1.开关(红):电源开关2.开关(绿):加热开关3.温控仪(如下图)XMT 908P64段程序控制仪表使用说明仪表由单片机控制,具有热电阻、热电偶、电压、电流等多种信号自由输入,手动自动切换,主控方式除常规两位式外,在传统PID控制算法基础上,结合模糊控制理论创建了新的人工智能调节PID控制算法,在各种不同的系统上,经仪表自整定的参数大多数能得到满意的控制效果,具有无超调,抗扰动性强等特点。
HYP-3系列消化炉说明书

目录一、概述二、工作原理三、技术指标四、安装使用五、控温仪操作说明六、消化炉示意图七、消化炉接线图八、故障及处理方法九、消化建议十、注意事项十一、随机附件版本号:20121126一、概述上海纤检仪器有限公司生产的“华烨”牌定氮仪,是依据经典凯氏定氮法设计的样品消化装置和自动测氮蒸馏装置,该仪器安装、操作简单;使用安全、可靠、省时、省力;自动化程度高,适用于植物养份、水、沉淀物测试、粮油、食品、饲料、氮肥,医药、制糖、乳制品、化工、煤炭、橡胶等行业的分析、教学和研究,也可以作为提取其他元素的仪器,是实验室操作人员的理想工具。
HYP-3系列消化炉有两种导热方式,一种为陶瓷炉芯,一种为铝锭。
陶瓷炉芯的有4孔8孔两种,可单排分组使用,省电节能。
本产品特点:炉内温度连续可调,控温精度高,控温稳定。
铝锭一体加热,温差小,样品消化均匀。
控制面板与炉体散热隔离,杜绝炉体高温辐射对控制系统的影响。
过热保护:铝锭超温自动切断加热电源并报警。
限温保护:可设置温度上限,若实际温度超过上限温度,仪器会自动报警并切断加热电源,防止控温系统失灵后温度不断上升而报废样品。
2.5寸蓝屏显示:同时显示实际温度与保温时间,并倒计时,到时后自动停止加热并报警。
一定范围内可调节升温速度,适用范围更广。
毒气罩排气,可不用将仪器置于通风橱中使用。
完善的周边附件配置,方便使用者称样,摆放等工作。
“华烨”品牌的产品还有脂肪测定仪、粗纤维测定仪、黄曲霉毒素测定仪;详细内容请访问公司主站二、工作原理蛋白质是含氮的有机化合物。
样品与硫酸和催化剂一同加热消化,使氮分解,分解的氮与硫酸结合生成硫酸铵,然后碱化蒸馏使氨游离,用硼酸吸收,再用已知摩尔浓度盐酸的标准溶液滴定,根据酸的消耗量计算氮的含量,再乘以换算系数,即为蛋白质含量。
注解:消化过程的目的是要打破样品中的氮的有机结合, 并使所有类型的氮都转换成铵离子。
硫酸是最佳选择,但是当单独使用硫酸时,消化速度很慢。
消化器使用操作手册
这三个特性是紧密相关的,也就是说,生石灰晶体颗粒越小,生石灰的比表面积越大,
孔隙率越高。而这些特性的实现很大程度上取决于煅烧温度和生石灰在烧窑内的停留时间。
锻烧温度越高,生石灰在窑里的停留时间越长,生石灰的消化反应速度将越慢。
氧化钙转化为氢氧化钙是液态反应。
C
2+ a
和
OH
+
离子在溶液中形成过饱和时,氢氧化
第 1 页,共 26 页
消化器控制系统使用说明书
设 1 mol 的 CaO 完全消化所需用于转移热量的蒸汽为 X mol,根据热量平衡:
(X+1)×Q3+X×Q4+Q2=Q1 X=1.12 (mol)
由上可推出,在不考虑散热损失和生石灰纯度的情况下,每消化 1kg 的氧化钙理论上
须要加入(1+1.12)×18/56=0.71kg 的水,产生 0.36kg 的蒸汽来移出消化反应产生的热量。
钙以结晶形式析出。
用轻烧方式生成的生石灰,由于有很大的比表面积和高孔隙率,反应时溶液浓度能很
快增加,很快达到过饱和状态。结晶析出过程中,强过饱和状态必然会带来单晶体快速生
成。
第 2 页,共 26 页
消化器控制系统使用说明书
相反,如果消化生石灰为过烧的生石灰,溶液浓度增加缓慢,过饱和结晶析出速度也 将双倍降低,粗颗粒晶体生成速度增加,就只能得到粗颗粒消石灰。
检查皮带秤的传感器是否积灰或卡住,皮带秤内有否积料等。
第 4 页,共 26 页
消化器控制系统使用说明书
检查称量系统的安装和接线是否正确。检查称量系统量程是否设置如下: DH04L12 量程: 0~8T/H (吨/小时) DH10L12 量程: 0~15T/H (吨/小时)
HYP-304四孔智能消化炉和四孔智能消化炉价格

KDN-08C消化炉
标题:KDN-08C消化炉
产品特点ProductCharacteristics KDN-04、08、12、16、20消化炉是专为需批量进行样品蛋白质沉淀消化的用户而设计的,可同时进行4(8、12、16、20)个样品的加热消化。本装置使用方便、消化效率高,是用户理想的消化装置。本装置采用井式消化炉加热,增加了消化管的受热面积且受均匀性较好,加热效率高。在消化时加入硒片作为催化剂。则可大大缩短消化时间。在消化过程中逸出的SO2等有害气体,可通过消化管上的排污管经抽气三通排入下水道。技术指标Specifications工作电压:交流220V,50Hz消化时间:小于1小时含氮量0.05%-90%的样品均可进行消化型号Modl消化数量功率体积KDN-04 4孔1200 650×220×150mm KDN-08 ...
厂家:南北炉
标题:KXL-1010控温消煮炉
KXL-1010型控温消煮炉是凯氏法定氮的辅助设备,主要用于被测样品中有机氮转化为无机氮的高温消煮处理。加热炉采用碳化硅远红外加热板加热,具有升温快的特点;双温度控制器显示,使温度监控更为直观、方便。技术指标:1、控温范围:300℃—450℃。2、消煮样品量:16/批(φ40mm管)仪器使用条件:1、供电:交流220V/50HZ。2、耗电功率:2千瓦。...
HYP-304四孔智能消化炉和四孔智能消化炉价格
HYP-304四孔智能消化炉
标题:HYP-304四孔智能消化炉
主要特点:炉内温度连续可调,控温精度高,控温稳定。陶瓷炉芯加热,样品消化完全。控制面板与炉体散热隔离,减少炉体高温辐射对控制系统的影响。限温保护:更多保护仪器与样品。2.5寸蓝屏显示:同时显示实际温度与保温时间,并倒计时,到时后自动停止加热并报警。程序控制:曲线升温与直线升温两种方式,仪器将自动按顺序完成。更适于牛奶等易产生泡沫的样品。毒气罩排气,可不用将仪器置于通风橱中使用。完善的周边附件配置,方便使用者称样,摆放等工作。技术参数:(★表示本公司产品特点)1.测定范围:0.1mg~240mg氮;2.测定数量:4个/批.;3.消化管容量:300ml;4.控温范围:室温~600℃;5.控温精度:±1℃;6.平均升温速度:30℃/min;7.★控温方...
氧气烹饪设备用户指南与维护说明书

Page 1INSTALLATION INSTRUCTIONSAND OWNER’S MANUALINSTALLER:Leave this manual with the appliance.CONSUMER:Retain this manual for future reference.NOTICE: Ceramic fiber logs may differ in appearance from those shown in this manual.Page 237708-1-061737708-1-0617Page 3LOG PLACEMENTThe positioning of logs is critical to safe and clean operation of this fireplace. Sooting and other problems may result if the logs are not properly and firmly positioned in the fireplace. BEFORE BEGINNING THE INSTALLATION:1. Remove barrier screen and glass door on fireplace usinginstructions from the fireplace manual.2. Remove the burner cover. Using a screwdriver push up pins6, 7 and 8 for both model applications. See Figures 2 and 3.3. Place burner cover into fireplace.4. Place logs in position as shown in Figure 1 and the followingpages. DO NOT force holes into the logs. Install using theholes located in each log.NOTICE:Log Index Letter (G) only used on LS42. See Figure 1.EMBER AND COAL PLACEMENTAfter placing logs into position, place dime-sized pieces of glowing embers over the burner surface. A single layer is sufficient; do not over-apply. See Figure 4.PIN LOCATIONS FOR THE LS3236FFFigure 2PIN LOCATIONS FOR THE LS42FFFigure 3GLOWING EMBERS (place in shaded area only)Figure 4COAL PLACEMENT (place in shaded area only)Figure 5NOTICE: For step by step instructions with images for model LS3236FF (See Pages 5-12). For step by step instructions with images for model LS42FF (See Pages 13-21).12345786ABCGEFDFigure 1 - LS(3236,42)FF1234578637708-1-0617 Page 4STEP 1.Push up pins 6, 7 and 8 as shown in Figure 2. Replace burner cover inside fireplace.Top ViewFront View37708-1-0617Page 5STEP 2.Place (Log Index Letter B) onto pins 1 and 2 on the burner. See image below.Top ViewFront ViewPage 637708-1-0617STEP 3.Place (Log Index Letter F) onto pins 6 and 8 on the burner. See image below.Top ViewFront View37708-1-0617Page 7STEP 4.Place (Log Index Letter C) onto pin 3 and pin on log B. See image below.Top ViewFront ViewPage 837708-1-0617STEP 5.Place (Log Index Letter D) onto pin on log C and to left side of pilot. See image below.Top ViewFront View37708-1-0617Page 9STEP 6.Place (Log Index Letter A) onto pins 4 and 5 on the log support bracket. See image below.Top ViewFront ViewPage 1037708-1-0617STEP 7.Place (Log Index Letter E) onto pin 9 and the pin on log A. See image below.Top ViewSTEP 8.This completes the placement of the logs. Place Glowing Embers in locations indicated in Figure 4 along the circular ports. Use dime-shaped size embers. Place ember sticks and coal in area shown in Figure 5. Replace glass door and barrier screen as indicated in fireplace manual.Top ViewSTEP 1.Push up pins 6, 7 and 8 as shown in Figure 3. Replace burner cover inside fireplace.Top ViewSTEP 2.Place (Log Index Letter B) onto pins 1 and 2 on the burner. See image below.Top ViewSTEP 3.Place (Log Index Letter F) onto pin 6 on the burner. See image below.Top ViewSTEP 4.Place (Log Index Letter C) onto pin 3 and pin on log B. See image below.Top ViewSTEP 5.Place (Log Index Letter D) onto pin on log C and to left side of pilot. See image below.Top ViewSTEP 6.Place (Log Index Letter G) onto pin 7 and on to the side of log D. See image below.Top ViewSTEP 7.Place (Log Index Letter A) onto pins 4 and 5 on the log support bracket. See image below.Top ViewSTEP 8.Place (Log Index Letter E) onto pin 8 and the pin on log A. See image below.Top ViewTop ViewFront ViewSTEP 9. This completes the placement of the logs. Place Glowing Embers in locations indicated in Figure 4 along thecircular ports. Use dime-shaped size embers. Place ember sticks and coal in area shown in Figure 5. Replaceglass door and barrier screen as indicated in fireplace manual.To Order Parts Under Warranty, please contact your local Empire dealer. See the dealer locator at . To provide warranty service, your dealer will need your name and address, purchase date and serial number, and the nature of the problem with the unit.To Order Parts After the Warranty Period, please contact your dealer or one of the Master Parts Distributors listed below. This list changes from time to time. For the current list, please click on the Master Parts button at .Please note: Master Parts Distributors are independent businesses that stock the most commonly ordered Original Equipment repair parts for Heaters, Grills, and Fireplaces manufactured by Empire Comfort Systems Inc. Parts Not Under WarrantyParts can be ordered through your Service Person, Dealer, or a Master Parts Distributor. See this page for the Master Parts Distribu-tors list. For best results, the service person or dealer should order parts through the distributor. Parts can be shipped directly to the service person/dealer .Warranty PartsWarranty parts will need a proof of purchase and can be ordered by your Service Person or Dealer. Proof of purchase is required for warranty parts.All parts listed in the Parts List have a Part Number. When ordering parts, first obtain the Model Number and Serial Number from the name plate on your equipment. Then determine the Part Number (not the Index Number) and the Description of each part from the fol-lowing illustration and part list. Be sure to give all this information . . .Appliance Model NumberPart Description Appliance Serial NumberPart Number Type of Gas (Propane or Natural)Do not order bolts, screws, washers or nuts. They are standard hardware items and can be purchased at any local hardware store. Shipments contingent upon strikes, fires and all causes beyond our control.Dey Distributing 1401 Willow Lake BoulevardVadnais Heights, MN 55101Phone: 651-490-9191Toll Free: 800-397-1339Website: Parts: Heater, Hearth and Grills F. W. Webb Company 200 Locust Street Hartford, CT 06114Phone: 860-722-2433Toll Free: 800-243-9360Fax: 860-293-0479Toll Free Fax: 800-274-2004Websites: & Parts: Heater, Hearth and GrillsEast Coast Energy Products 10 East Route 36West Long Branch, NJ 07764Phone: 732-870-8809Toll Free: 800-755-8809Fax: 732-870-8811Website: Parts: Heater, Hearth and GrillsEmpire Comfort Systems Inc.Belleville, ILIf you have a general questionabout our products, please e-mail**************************.If you have a service or repairquestion, please contact your dealer.。
Vulcan-Hart VSX3, VSX4, VSX5 电子反流蒸汽煮食器操作手册说明书

Installation, Operation, and Care ofMODELS VSX3, VSX4, VSX5ELECTRIC COUNTER CONVECTION STEAMERSKEEP THIS MANUALGENERALThe VSX 3, 4, and 5 Steamers are single compartment electric pressureless steam cookers with an internal electric steam generator that maintains water temperature at approximately 205°F. VSX3 is rated 7.5kw as standard; 10kw is optional. VSX4 is rated 10kw. VSX5 is rated 15kw.At high altitude locations a lower temperature is required to achieve atmospheric steaming. Contact your Vulcan-authorized service office to have the thermostat adjusted if the steamer will be operated at high altitudes.INSTALLATIONUNPACKINGImmediately after unpacking the steamer, check for possible shipping damage. If the steamer is found to be damaged, save the packaging material and contact the carrier within 15 days of delivery.Prior to installation, verify that the electrical service agrees with the specifications on the machine data plate which is located on the left side panel.LOCATIONAllow space for plumbing and electrical connections. Minimum clearances are 2" on the sides and 6" on the back for proper air circulation. Allow adequate access for operating and servicing the steamer (36" at the front of the steamer and 15" above the steamer).LEVELING FEET (Standard) OR 4"ADJUSTABLE LEGS (Optional)Thread the four 2" leveling feet shipped in a bag inside the steamer cabinet into the threaded holes on the bottom corners of the steamer. Or, thread the four optional 4" adjustable legs into the threaded holes on the bottom corners of the steamer.LEVELINGUsing a spirit level or pan of water in the bottom of the steamer, adjust the leveling feet or the feet on the adjustable legs to level the steamer front-to-back and side-to-side. After the drain is connected, check for level by pouring water onto the floor of the compartment. All water should drain through the opening at the back of the compartment cavity.1.Place steamer in the desired location on theleveled counter top and mark four corners.Remove the steamer and drill 1/2" holes asindicated in Fig. 1.2.Apply a bead of RTV or other equivalent sealantaround the bottom perimeter edge of the steamer.If anchoring the steamer, this bottom seal isnecessary to meet NSF requirements.3.Set steamer on counter and bolt down securelywith 3/8 - 16 bolts (not supplied).STACKING KITFollow instructions in the stacking kit when installingstacked convection steamers.Fig. 1ELECTRICAL CONNECTIONWARNING: ELECTRICAL AND GROUNDING CONNECTIONS MUST COMPLY WITH APPLICABLE PORTIONS OF THE NATIONAL ELECTRICAL CODE AND/OR OTHER LOCAL ELECTRICAL CODES. WARNING:DISCONNECT ELECTRICAL POWER SUPPLY AND PLACE A TAG AT THE DISCONNECT SWITCH INDICATING THAT YOU ARE WORKING ON THE CIRCUIT.PLUMBING CONNECTIONSWARNING: PLUMBING CONNECTIONS MUST COMPLY WITH APPLICABLE SANITARY, SAFETY AND PLUMBING CODES.Connect the water supply line to the 3/8" NPT (internal thread) copper tube inlet. The 3/8" water line supplies water to both the generator tank and the cooling system where steam is condensed before entering the drain line. Install the line strainer provided. A manual shutoff valve must be provided convenient to the steamer.DRAIN CONNECTIONSThe drain connection (Fig. 2) must be 1" IPS down, preferably with one elbow only, maximum length of 6 feet, and piped to an open gap type drain. CAUTION: In order to avoid any back pressure in the steamer, do not connect solidly to any drain connection.PL-50880GAP DRAINBY CUSTOMER DRAIN VENTFig. 2WATER QUALITYThe water supply connected to this steamer should contain no more than 2.0 grains of hardness per gallon with pH from 6.5 to 8.0. This degree of hardness and pH can easily be obtained with the use of a properly maintained water softener.Water supplies vary from one location to another. A local water treatment specialist should be consulted before installing any steam generating equipment.Untreated water contains scale producing minerals which can precipitate onto the surfaces in the boiler. Due to the temperatures in the boiler, the minerals can bake onto the surfaces and components. This can result in early component failure and reduced product life.Mineral scale on components causes several problems:1.The surfaces of the heating devices become coated with scale, reducing the heat transferefficiency. This can produce hot spots on the heating elements and result in premature failure.2.The water level probes become coated with scale. Scale will bridge across the probe insulator fromthe metal extension which senses the water level in the boiler shell. Once this scale becomes wet, the water level control is unable to maintain the proper water level in the boiler. This situation may cause an electric heating element to fail if the element is not adequately covered by water. Strainers and filters will NOT remove minerals from the water.Refer to REMOVAL OF LIME SCALE DEPOSITS, page 12.VENT HOODSome local codes may require the steamer to be located under an exhaust hood. Information on the construction and installation of ventilating hoods may be obtained from Vapor Removal from Cooking Equipment, NFPA standard No. 96 (latest edition).TESTING PROCEDUREWARNING:THE STEAMER AND ITS PARTS ARE HOT. USE CARE WHEN OPERATING, CLEANING OR SERVICING THE STEAMER. THE COOKING COMPARTMENT CONTAINS LIVE STEAM. STAY CLEAR WHILE OPENING THE DOOR.Once the steamer is installed and all mechanical connections have been made, thoroughly test the steamer before operation.1.Check that proper water, drain, and electrical connections have been made.2.Open water valve. Turn main power switch ON. After approximately 15 minutes, the READY lightshould come on, indicating that the water temperature is 205°F.3.When the READY light comes on, turn the dial timer to 5 minutes. With door open, observe thatno steam is entering the compartment and the COOKING light is not lit.4.Close compartment door. The COOK ING light is lit and steam should be heard entering thecompartment.5.Check drain line to ensure that water from the cold water condenser is flowing through the drainline.6.Open compartment door and observe that steam supply to the chamber is cut off. The READY lightshould come on; the COOKING light goes off.7.Close compartment door and let cooking cycle finish. When timer returns to 0, a buzzer will soundsignalling the end of the cooking cycle. To silence the buzzer, turn the dial timer to OFF.8.To turn the steamer off, turn the main power switch OFF — the steam generator will drain. Leavethe door open to allow the inside to dry out.OPERATIONWARNING: THE STEAMER AND ITS PARTS ARE HOT. USE CARE WHEN OPERATING, CLEANING OR SERVICING THE STEAMER. THE COOKING COMPARTMENT CONTAINS LIVE STEAM. STAY CLEAR WHEN OPENING DOOR.CONTROLSMain Power switchON The boiler will automatically fill and begin heating to the preset temperature.OFF The boiler will drain.DELIME Closes the drain valve while CLR liquid is being poured into the generatorduring the Delime procedure.Ready light Indicates the temperature has reached 205°F and that the steamer is readyto begin cooking.Cooking light Indicates that a cooking cycle is in progress.Timer Set the cooking time (0 to 60 minutes) — steam cooking will begin when thedoor is closed. The cooking cycle will be interrupted if the door is openduring the cooking cycle; resume cooking by closing the door.When done, a buzzer sounds and steam stops being supplied to the cookingchamber. Turn the timer OFF to stop the buzzer.Delime Generator light Indicates that lime scale deposits have accumulated in the steam generatorand that a DELIME procedure should be performed at the next convenientopportunity. See Maintenance, page 12.PREHEATTurn the main power switch ON. When the READY light comes on, set the timer to 1 minute to preheat the compartment. This should be done when the steamer is first used for the day or whenever the chamber is cold. The door should be closed during the preheat cycle. COOKING light is lit.When the buzzer sounds, turn the timer to OFF. The steamer is now ready to cook.COOKAfter the preheat cycle, the READY light should be ON.Place pans of food in the cooking chamber. Close the door. Set the timer. Steam flows into the compartment and the COOKING light is lit. Opening the door will interrupt cooking; resume by closing the door.At the end of the cooking cycle, the COOKING light goes off, the buzzer sounds and steam stops being supplied to the cooking chamber. To stop the buzzer, turn the timer to OFF.SHUTDOWNTurn the main power switch OFF — the boiler will automatically blow down. Leave the compartment door open to allow the inside to dry out.For an extended shutdown, turn the main power switch OFF; turn power and water supply OFF.COOKING HINTSThe steamer efficiently cooks vegetables or other foods for immediate serving. Steam cooking should be carefully time controlled. Keep hot food holding-time to a minimum to produce the most appetizing results. Prepare small batches, cook only enough to start serving, then cook additional amounts to meet demand.PreparationPrepare vegetables, fruits, meats, seafood and poultry normally by cleaning, separating, cutting, removing stems, etc. Cook root vegetables in a perforated pan. Other vegetables may be cooked in a perforated pan unless juices are being saved. Liquids can be collected in a solid 12" x 20" pan placed under a perforated pan.Perforated pans are used for frankfurters, wieners and similar items when juices do not need to be preserved. Solid pans are good for cooking puddings, rice, and hot breakfast cereals. Vegetables and fruits are cooked in solid pans in their own juice. Meats and poultry are cooked in solid pans to preserve their juice or retain broth.Canned foods can be heated in their opened cans (cans placed in 12" x 20" solid pans) or the contents may be poured into solid pans. DO NOT place unopened cans in the steamer.Frozen Food ItemsSeparate frozen foods into smaller pieces to allow more efficient cooking.Use a pan cover for precooked frozen dishes that cannot be cooked in the covered containers in which they are packed if they require more than 15 minutes of cooking time. When a cover is used, approximately one-third additional cooking time is necessary.Cooking time for frozen foods depends on the amount of defrosting required. If time permits, allow frozen foods to partially thaw overnight in a refrigerator. This will reduce their cooking time. Acceptable Pan SizesThe steamer accommodates combinations of 12 x 20" pans, solid or perforated.Model Number of Pans AccommodatedDepth of Pan1" 2.5"4"6"VSX3 VSX4 VSX56810345223122DRAINING THE BOILERDrain the boiler after each day's use to flush out minerals and minimize scale build-up. The boiler drains automatically for approximately 4 – 6 minutes after the main power switch is turned OFF.CLEANINGAt the end of each day, or between cooking cycles if necessary . . .Turn main power switch OFF.Remove pans and racks from compartment and wash in sink.Wash compartment interior with clean water. Never use steel wool or abrasive scouring pads as they will scratch and ruin the general surface appearance of the steamer.Use warm soapy water with a cloth or sponge to clean the door gasket, rinse with warm clear water, and wipe with a dry cloth.Wipe surfaces which touch the door gasket with a cloth or sponge and warm soapy water, rinse with warm clear water and wipe with a dry cloth. CAUTION: Do not allow the door gasket to come in contact with food oils, petroleum solvents, or lubricants.Keep the cooking compartment drain working freely. After cooking grease producing foods, operate the steamer with the compartment empty for 30 minutes at the end of the day, or pour 1/2 gallon of warm soapy water down the drain, followed by 1/2 gallon of warm clear water.Use a clean damp cloth to wipe down the exterior of your steamer.Leave the door slightly open when the steamer is not in use to allow the inside to dry out. Weekly, or more often if necessary . . .Clean exterior with a damp cloth and polish with a soft dry cloth.Use a non-abrasive cleaner to remove discolorations.COOKING GUIDELINESThe steamer steam cooks vegetables, frankfurters, eggs in their shells, and certain other meats or food items at atmospheric pressure.These cooking guidelines are suggestions only. You should experiment with your food products to determine the cooking times that will give you the best results. Variables which affect cooking time include size, weight, thickness of foods, temperature, density, previous condition of the foods (fresh, pre-blanched or frozen) and degree of doneness desired.COOK IN SOLID PANSPRODUCT TIME (minutes)WEIGHT PER PANEggs, Scrambled10 – 128 Doz.Rice, Long Grain25 2 Lb.(Cover with 4 cups water per pound.)Pasta (Place perforated pan insidesolid pan, cover pasta with cold water)Spaghetti, Regular/Vermicelli12 – 15Macaroni, Shells/Elbows15 – 18Noodles, 1/2" wide12 – 15Lasagna Noodles15 – 18Frozen Casseroles, Lasagna35Full PanMeat Loaf, 3 – 5 pound each4015 Lb.BeefGround Chuck20 – 2510 Lb.Sliced as Purchased35 – 4010 Lb.Shrimp, Frozen, 10 per pound5 4 Lb.BeansBaked910 Lb. Can Refried910 Lb. CanCanned Vegetables610 Lb. CanPrunes, Dried12 – 15COOK IN PERFORATED PANSPRODUCT TIME (minutes)WEIGHT PER PAN SEAFOODClamsFrozen10 – 12 3 Doz. Fresh, Cherrystone 5 – 6 3 Doz.King Crab, FrozenClaws421/2 Lb.Legs 4 –641/2 Lb.Lobster Tail, Frozen610 Lb.Lobster, Live, 10 – 12"5 4 Per PanSalmon Fillets, Frozen, 8 ounce each571/2 Lb.Scallops, Fresh4 3 Lb.Scrod Fillets, Fresh 3 – 5 4 Lb.EggsHard Cooked15 4 Doz.Soft Cooked9 – 10 4 Doz.Soft Yoke for Caesar Salad 6 – 8 4 Doz.Chicken — Breasts, Legs, Thighs2015 Lb.Turkey, FrozenBreasts (2)90 6 – 7 Lb. Each Cut Lengthwise5520 – 25 Lb.Corned Beef40 – 75 6 – 8 Lb.Hot Dogs or Wieners380 – 100 Count VEGETABLESAsparagus SpearsFrozen10 – 12 3 Doz. Fresh5 5 Lb.BeansGreen, 2" Cut, Frozen / Fresh6 5 Lb. Lima, Frozen8 5 Lb.Baby Lima, Frozen5 5 Lb.Brussel Sprouts, Frozen6 5 Lb.COOK IN PERFORATED PANSPRODUCT TIME (minutes)WEIGHT PER PAN VEGETABLES, (Cont'd.)BroccoliSpears, Frozen8 4 Lb. Spears, Fresh6 5 Lb. Flowerettes, Frozen6 5 Lb.Cabbage, Fresh, 1/6 Cut8 5 Lb.CarrotsBaby Whole, Frozen87 Lb. Crinkle Cut, Frozen7–8 4 Lb. Sliced, Fresh119 Lb .Cauliflower, FlowerettesFrozen6 4 Lb.Fresh7–8 5 Lb.Celery, 1" Diagonal Cut7 5 Lb.CornYellow Whole Kernal, Frozen5 5 Lb. Cobbettes, Frozen827 Ears16–1880 EarsCorn-On-Cob, Fresh10–1218 Ears16–1854 EarsPeas, Green6 5 Lb.Potatoes, Whole Russet5540 Lb.SpinachChopped, Frozen17 6 Lb. Defrosted5 6 Lb.Fresh Cut3 2 Lb.Squash, Acorn Halves2510 HalvesZucchini, Slices810 Lb.Frozen Mixed Vegetables6–7 5 Lb.FRUITFruit, Blanch for Peeling,Grapefruit, Oranges3Pineapple, Whole for Cutting4MAINTENANCEWARNING: THE STEAMER AND ITS PARTS ARE HOT. USE CARE WHEN OPERATING, CLEANING OR SERVICING THE STEAMER. THE COOKING COMPARTMENT CONTAINS LIVE STEAM. STAY CLEAR WHEN OPENING DOOR.REMOVAL OF LIME SCALE DEPOSITSThe steamer should be delimed at a convenient time after the DELIME GENERATOR light comes on. Use the CLR TREATMENT K IT available from your Vulcan-authorized service office. Follow the instructions in the Kit to delime the steam generator.COLD WATER CONDENSERThe steamer is equipped with a cold water condenser in the rear of the cooking chamber which helps to condense the steam prior to discharge into the drain. The steamer freely vents itself by the negative pressure created by the condensate water drainage. This negative pressure prevents steam leakage around the door gasket and helps draw the steam through the cooking compartment. Steam leakage at the door may indicate a plugged or improperly installed drain.SERVICEContact your local Vulcan-authorized service office for any repairs or adjustments needed on this equipment.。
- 1、下载文档前请自行甄别文档内容的完整性,平台不提供额外的编辑、内容补充、找答案等附加服务。
- 2、"仅部分预览"的文档,不可在线预览部分如存在完整性等问题,可反馈申请退款(可完整预览的文档不适用该条件!)。
- 3、如文档侵犯您的权益,请联系客服反馈,我们会尽快为您处理(人工客服工作时间:9:00-18:30)。
HYP-340
40个
3000W
150ml
四、安装使用
1. 仪器和用具:
1.1 分析天平:感量0.0001g
1.2 实验室用粉碎机或研钵
1.3 酸式滴定管:25ml或10ml
1.4 锥形瓶:容积250ml
1.5 分样筛:孔径0.45mm(40目)
2. 试剂:
2.1 盐酸(HCI):分析纯(GB/T622)0.05mol/L标准液,(4.2ml盐酸,注入1000ml蒸馏水)碳酸钠法标定盐酸。
1.催化剂量不足
2.温度不够
1.按说明书要求足量配置催化剂
2.提高消化温度
短促报警
实际温度大大高于设置温度
1.达上限温度
2.可控硅坏加热不停
1.上限温度设置过低,重新设置
2.更换可控硅
长鸣报警
铝锭温度超过500度
1.可控硅坏加热不停。更换。
炉芯导热的消化炉显示温度上不去,但炉体温度很高。
加热丝断
将温度设到480度,查看炉芯内不发红发热的即为加热丝断,需更换。
一、概 述
二、工作原理
三、技术指标
四、安装使用
五、控温仪操作说明
六、消化炉示意图
七、消化炉接线图
八、故障及处理方法
九、消化建议
十、注意事项
十一、随机附件
版本号:20121126
一、概述
上海纤检仪器有限公司生产的“华烨”牌定氮仪,是依据经典凯氏定氮法设计的样品消化装置和自动测氮蒸馏装置,该仪器安装、操作简单;使用安全、可靠、省时、省力;自动化程度高,适用于植物养份、水、沉淀物测试、粮油、食品、饲料、氮肥,医药、制糖、乳制品、化工、煤炭、橡胶等行业的分析、教学和研究,也可以作为提取其他元素的仪器,是实验室操作人员的理想工具。
2)“+ -”:数值调整键,在工作时按“+”键,可查看设定的时间,再按一次返回。按“-”键终止当前阶段,进入后一阶段。
3) :
A.功能1:开始键,开始运行程序;
B.功能2: 光标移位键:设定数值时可直接将光标移到十位或百位,再调整数值。
4)PV:显示实际温度。
5)SV:
A.显示设置温度。
B.到温后显示保温时间并倒计时。
10.★安全功能:限温保护,铝锭过温保护;
11.★显示:2.5寸液晶屏,同时显示实际温度与保温时间,并倒计时,到时后自动停止加热并报警;
12.电 源:220(V)±10% 50~60HZ;
13. 使用环境:室温<35℃
功率、测定数量、尺寸、重量、消化管容量等指标如下:
规格
每批测定数量
额定功率
外型尺寸
AL2
无作用
SC
修正温差
0-100℃
修正温度差值
0
P
比例带
不得修改项
|
积分时间
不得修改项
d
阶段
不得修改项
HL
斜率
不得修改项
OUt
输出功率限制
0-100
设置输出功率百分比
100
LCy
权限锁
不得修改项
2
六、HYP-3系列消化炉示意图
七、HYP-3系列消化炉接线图
铝锭消化炉接线图
HYP-308接线图
当使用单排时,关闭扁开关即可(在仪器控制面板侧面)。
3.2 液体试样,必须有代表性,取样后,先放在消化管内浓缩至体积三分之一,再加入加速剂及硫酸进行消化。
4 操作步骤:
4.1 安装
a. 将吸气泵的螺口同水龙头的内螺纹连接牢固,(吸气泵所适配为外径20mm标准水龙头,如无标准水龙头,可联系厂家进行特殊规格定制)然后把毒气罩(8)的胶管接在吸气泵(16)的横向出口处。吸气泵下端连接胶管并通往下水道(注:出水胶管长度不得超过30cm,并不能弯曲),必须在加热前开足水龙头,使吸气泵有足够的吸力。(可参见本公司主站视频教程——吸气泵安装)
b. 将装有试样的消化管(6)放在消化炉支架(5)上,套上毒气罩,压下毒气罩(8)锁住二面拉钩。
c. 把支架连同装有试样的消化管一起移到电热炉上保持消化管在电炉中心,先设定低温(如200℃)保温一段时间后再提高到420℃保持消化管中液体连续沸腾,沸酸在瓶颈部下冷凝回流。待溶液消煮至无微小碳粒、呈兰绿色时,再继续消煮一段时间。(由于样品的不同,消化时无固定温度时间,客户根据样品需要,可自行设置,也可联系厂家进行咨询)
2.更换铝锭
加热不停
可控硅坏
更换可控硅
数字乱跳
热电偶坏
更换热电偶
整体不加热
1.保险丝烧断
2.控温仪坏
更换保险丝
更换控温仪
毒气罩小白管有液体流出
1.自来水抽气压力不足
2.吸气泵坏
1.加大自来水压力
2.更换吸气泵
3.或者减慢升温速度
毒气罩缝隙中有废气冒出
毒气罩内排气管破损
更换排气管
消化时间长或消化不彻底
水/污水/污泥
依据来源的不同,这三类样品的特性会有很大的差异。分析方法的选择是由官方制定的,因为它们是环境保护计划中的一部分。在无污染水中的含氮量很低,所以要加大取样体积。在消化期间水分必须预先蒸发掉,所以为了避免暴沸,必须使用沸腾杆或其他方法。在消化的初期,在某些污水中高含量的表面活性剂会产生大量泡沫。在使用自动流动分析系统时,在消化的初期,控制酸的浓度是重要的。在许多流行的流动分析方法中样品与样品间酸度的变化以及样品与标准样品间的酸度的变化都可能引起误差。对氮的消化一般也可以用来测量磷。
b. 检查电源开关在关闭状态,接通电源,再打开电源开关,按需要设定预置温度(见本书“控温仪操作”),按运行键即开始加热。
4.2 消化操作(根据说明书配合本公司主站视频教程,更容易理解)
a. 称取0.3~1g试样、液体2~5ml准确至0.0002g,干净无损失地转入清洗干净的消化管中、加入加速剂(5~16g)再加入浓硫酸(8~25ml).
2.5 硫酸铜(CuSO4·5H2O)分析纯(GB/T665)10g;硫酸钾(K2SO4)(HG3—920)分析纯150g,分别研磨至粉状,仔细混匀过40目筛,放入瓶中备用(加速剂)。
2.6 浓硫酸(H2SO4)化学纯(GB/T625)(含量98%、无氮)。
3 样品制备:
3.1 选取有代表性的样品,挑拣干净,按四分法缩减取样,粉碎至40目筛通过,装于密封容器中。(取样不少于200g)。
九、样品消化建议
(内容仅供参考各行业依照官方要求为准)
农业
饲料
标准凯氏分析过程测试。对于干饲料,可以使用盘式磨或旋风磨直接制备。对于罐装的宠物饲料,高的水分含量不宜使用平常的磨制备样品。此时,刀式磨是最好的选择。为了得到可靠和重复性好的结果,控制每一个样品的水分是极其重要的。
土壤
标准凯氏分析过程测试。为了得到可靠和重复性好的结果,控制每一个样品的水分是极其重要的。样品不能烘干,否则氨可能会被蒸发。高有机物含量的样品在消化的开始可能产生泡沫。升温要慢。
所有参数出厂时均已设置好,用户不必重新设置,只需设定所需温度和保温时间即可。
3. 操作举例:
1).第一阶段需要50℃保温22分钟;
2).然后第二阶段110℃保温60分钟;
步骤:
1安装完毕后打开电源出现开机界面;
开机画面
2大约2秒后停止在初始界面;
初始界面
3按一下SET键;
4利用 键和“+ -”键将数值调到50;
V′—试样分解液蒸馏用体积(ml)
C —酸标准溶液的mol/L浓度
K —氮换算成粗蛋白质的系数6.25
W —试样6.2 平行测定的结果用算术平均值表示,保留小数后二位。
五、控温仪操作说明
1. 面板介绍:
2. 按键介绍:
1)SET:设置键
按一次设定温度,30秒内按第二次设定保温时间。
5再按一次SET键;
6利用 键和“+ -”键将数值调到22;
7再按SET键;
8
9利用 键和“+ -”键将数值调到100;
10再按SET键;
11
12利用 键和“+ -”键将数值调到60;
13按上述方法可设置6个阶段。如不满六个阶段,需将后几个不用的阶段的时间都设置为“0”;
14设置完毕后按住SET保持3秒以上,直至回到初始界面;
5. 菜单列表
字符
名称
设定范围
说明
出厂设定值
一级菜单
C-01
设置阶段温度
0-500℃
设置所需温度
e-01
设定阶段保温时间
0-999分钟
设定保温时间
二级菜单
AL1
上限温度
0-50℃
20
此温度为限定加热最高温度。到此温度报警,并停止加热。低于此温度后自动恢复。此数值是叠加数值。比如设置为5,设置温度是100,那么上限温度为105。
限温保护:可设置温度上限,若实际温度超过上限温度,仪器会自动报警并切断加热电源,防止控温系统失灵后温度不断上升而报废样品。
2.5寸蓝屏显示:同时显示实际温度与保温时间,并倒计时,到时后自动停止加热并报警。
一定范围内可调节升温速度,适用范围更广。
毒气罩排气,可不用将仪器置于通风橱中使用。
完善的周边附件配置,方便使用者称样,摆放等工作。
注意:更换传感器时,传感器顶端应接触到炉芯。
HYP-304接线图
当只使用一组时,关闭扁开关即可(在仪器控制面板侧面)。
注意:更换传感器时,传感器顶端应接触到炉芯。
八、故障及处理方法
故障现象
原因
方法
铝锭消化炉有一排消化速度慢
1.放在通风橱中,吸风影响。
2.其中一根加热管坏
1.不要将消化炉放在通风橱里。
2.2 氢氧化钠(NaOH):分析纯(GB/T629)、40%水溶液(m/v)。