MYS600 系列
S600 流量计算机中文手册
1.4 CONFIG 600 LITE
Config 600 Lite 软件(可选)是 Config 600 专业软 件的一个子软件, 用于上载和下载预先开发好的组态文 件及应用程序。 Config 600 Lite 通过 Config 600 软件可实现如下功能:
2001 年 4 月
关于本手册
(1-4)概述
16
数字输入
12
数字输出
3
频率输入
2
双脉冲输入
4 单脉冲输入
5
可编程脉冲输出
Daniel FloBoss S600
图 1-3 智能 I/O 板
FloBoss S600 包括下列软件特性:
• 编辑批量控制功能:设定一个批量值,通过组态完成批量结束报警和批量 到达报警。
• 最多可以提供 12 个用户定义的周期报告。同时还可提供维护、批处理和瞬 时(即时)报告。气体,液体和标定等应用采用不同的报告格式。报告可以 在本地打印。
• 每个用户都可以从 10 个安全级别中得到一个密码并获得相应的操作权限。
• 在启动过程中进行限流功能,防止出现电流尖脉冲导致过载电流。
• S600 的外壳是由点焊镀锌低碳钢制造的。其电源接线端子内置于外壳的后 面。
Daniel FloBoss S600
vi
2001 年 4 月
Daniel FloBoss S600
概述(1-1)
概述
1.1 关于本手册
本手册介绍了 FloBoss S600 流量计算机(FloBoss S600 )、IPL 600 软件(用于 向 FloBoss S600 传输应用程序)以及 Config 600 软件(用于开发 FloBoss S600 应用)。本手册介绍了如何安装程序并说明了如何操作该系统,包括输入和修 改数据。同时还提供了基本的维护和故障处理等内容。
佳能打印机硒鼓对照表

303
鼓粉一体
LBP2900/LBP3000
U鼓
鼓粉一体2500
MF3112/MF3220/MF3222/MF5630/MF5650/MF5730/MF5750/MF5770
N鼓
鼓粉一体3500
D620/895
W鼓
鼓粉一体5000
D323/D383/FAXL-L390/FAX-L398/L408S
EP-72
鼓
LBP-3260可打印20000页
EP-83
鼓
CLBP-460S用的硒鼓及四色碳粉
EP-A
鼓粉一体
LBP-460/660激光打印机(通用于06F)
FX-1
鼓粉一体
L-770传真机/L700/L730/L760/L765
FX-2
鼓粉一体
L-500/550/600传真机
FX-3
鼓粉一体
L-380/250/200传真机/280/388/L350/L220/L360/L240
只用一直硒鼓2710/5700
EP87C/M/Y
4000页/支
301墨粉
5000页
LBP-5200/8180C随机黑色5000彩色2000页硒鼓彩色5000
黑色20000页只用一直硒鼓
301C/M/Y
4000页/支
302墨粉盒
10000页
LBP5960
302彩粉盒
C/M/Y6000页
302硒鼓
BK/C/M/Y40000页
3C/M/6/EC/EM/EY/BJC3000/6000/6200/6500/S400/S450/S4500
BC-32(E)
三照彩
3PC/PM/PBK/E+PC/PM/PBK/BJC3000/6000/6200/6500/S400/S4500
FloBoss S600 Update(产品手册)

艾默生过程艾默生过程控制有限公司控制有限公司控制有限公司丹尼尔丹尼尔丹尼尔计计量与控制控制部门中国办事机构部门中国办事机构 北京 电话:010-5821 1188 上海 电话:021-2892 9000 广州 电话:020-8348 6098 成都 电话:028-8661 0618Daniel ® S600 流量计算机丹尼尔公司主要提供用于石油和天然气行业的贸易交接、流量控制、组分分析等工业产品,同时也向客户提供售前售后服务以及系统集成的解决方案,是该领域的领导者。
Daniel S600作为新一代流量计算机中的代表作,其研发的目的是为了满足全球贸易计量的需要,它不仅在易于使用方面达到了新的标准,而且代表了综合性能和灵活性的最高水平。
Daniel S600在石油和天然气领域都可以应对自如,它的强大功能可以帮助您在减少成本的同时提高了生产率。
不管您未来的需求是什么,S600的功能都能快速、轻松地满足您的要求,而且还可以为您节约成本。
适用于: ■ 贸易交接 ■ 传输系统 ■ 批量控制 ■ 仪表校验 ■ 多回路计量多处理器的性能Daniel S600装有一个50MHz 的Intel 486微处理器和数字协处理器,每块I/O 板上有6个微处理器,它有一条强制执行线,以提供快速、准确的计算。
它的模块化设计和出色的通用性将给您的维护工作带来极大的方便。
减少支持成本S600既可以作为一个独立的解决方案,也可以作为一个系统组件来使用。
智能I/O 板不但适合气体和液体的计量,而且还支持两个回路和汇管。
使用相同的板卡,用任何类型的常用流量计,例如孔板、超声波、涡轮、容积式和科里奥利可以配置多达六个回路和两个汇管。
对于不同应用不需要多个插件。
特性:■ Intel 486性能 ■ 高精确度 ■ 基于Windows 的界面 ■ 模块化的I/O, 易于扩展■ 出色的通讯能力 ■ 结构紧凑 ■ 远程I/O 性能 ■ 一台计算机可同时用于液体和气体领域 ■ 多达六个回路■ 可以与任何类型的常用流量计相连接 ■ 检验能力 ■ 内置API 和ISO 计量标准艾默生过程艾默生过程控制有限公司控制有限公司控制有限公司丹尼尔丹尼尔丹尼尔计计量与控制控制部门中国办事机构部门中国办事机构 北京 电话:010-5821 1188 上海 电话:021-2892 9000 广州 电话:020-8348 6098 成都 电话:028-8661 0618Daniel™ S600 高性能、精密测量■计算速度高■ 所有通用计算类型 ■ 换算成美国/欧洲标准 ■ 自校正■快速PID 回路在今天的石油和天然气工业中,速度、精确度和稳定性是最主要的指标 — 这也是我们为什么要使用当今最先进的技术来开发Daniel S600的原因。
JBL AW566高功率轻量级2路全范围扬声器系统说明书

Key Features:᭤Weather-Resistant, All Fiberglass Enclosure᭤60° x 60° Coverage᭤ 2265H Differential Drive®Low-Frequency Driver᭤ 2432H High Frequency Compression Driver᭤Large PT™ Progressive Transition waveguide for excellent pattern control and low distortion᭤Available in Gray and Black finish᭤400 W, 70/100V Transformer Included ᭤U-type Mounting Bracket Included Applications:᭤Sports Facilities᭤Themed Entertainment Venues᭤Outdoor Entertainment Centers᭤Cruise Ships᭤Water ParksThe AW566 is a high power, lightweight, 2-way, full-range loudspeaker system comprised of the JBL Differential Drive dual voice coil and dual magnetic gap 2265H 380mm (15 in) low-frequency driver and 2432H high-frequency 38 mm (1.5in) exit, 75 mm (3 in) voice-coil compression driver. The large format Progressive Transition wave-guide provides excellent 60° x 60° coverage. The loudspeaker system can used in either the vertical or horizontal orientation. The enclosure is constructed of multilayer glass composite and is heavily braced to maximize low-frequency performance. The 16-gauge stainless steel grille, backed with open cell foam and stainless steel mesh, provides excellent protection in the harshest environments. The system is equipped with a 400 W 70/100V transformer.A corrosion-resistant extra-thick zinc-plated polyester powder coated U-type mounting bracket is included.The AW566 is part of JBL’s AE Series, a versatile family of loudspeakers intended for a wide variety of applications.Specifications:System:Frequency Range (-10 dB):35 Hz – 20 kHzFrequency Response (±3 dB):54 Hz – 18 kHzCoverage Pattern:60° x 60°, rotatable waveguideDirectivity Factor (Q):15.8Directivity Index (DI):12 dBCrossover Frequency: 1.1 kHzLong-Term System Power Rating (IEC):600 W (2400 W peak), 100 hrsMaximum SPL:128 dB-SPL cont avg (134 dB peak)System Sensitivity (1W @ 1m):100 dB SPL70V/100V Transformer Taps:70V: 400 W, 200 W, 100W100V: 400W, 200WTransducers:Low Frequency Driver: 1 x JBL 2265H 380 mm (15 in) Differential Drive driver with 75 mm(3 in) dual voice coilNominal Impedance:8 ohmsSensitivity(1W @ 1m, 98 dB SPLwithin operational band):High Frequency Driver:JBL 2432H, 38 mm (1.5 in) exit compression driver, 75 mm (3 in) voice coil Nominal Impedance:8 ohmsSensitivity(1W @ 1m):113 dB SPLWaveguide:PT-H66HF-1Physical:Enclosure:Hand-Laminated Fiberglass, gray gelcoat (similar to Pantone 420C),available in black (-BK)Suspension Attachment: 2 x M10 for Included U-Bracket, 2 x M6 for aiming stabilization,1x M10 on rear for safety.Grille:Three layer grille assemblies consisting of 16-gauge powder coatedstainless steel, backed with open cell foam and stainless steel mesh.Input Connector:CE-compliant covered barrier strip terminals. Barrier terminals acceptup to 5.2 sq mm (10 AWG) wire or max width 9 mm (.375 in) spadelugs.Environmental Specifications:IP56 per IEC 529Dimensions (H x W x D in 485 x 810 x 478 mmhorizontal cabinet orientation):(19.1 x 31.9 x 18.8 in)Net Weight:28.3 kg (62.5 lb)IEC standard, full bandwidth pink noise with 6 dB crest factor, 100 hours.Calculated based on power rating and sensitivity, exclusive of power compression.Anechoic sensitivity in free field, no additional sensitivity gain from boundary loading.JBL continually engages in research related to product improvement. Changes introduced into existing products without notice are an expression of that philosophy.Professional SeriesAW566High Power 2-Way All Weather Loudspeakerwith 1 x 15" LF & Rotatable Horn᭤AW566 High Power 2-Way All Weather Loudspeaker with 1 x 15" LF & Rotatable HornHorizontal 1/3 Octave Polars᭤AW566 High Power 2-Way All Weather Loudspeaker with 1 x 15" LF & Rotatable HornVertical 1/3 Octave Polars5017361SS AW566CRP09/12 JBL Professional8500 Balboa Boulevard, P.O. Box 2200Northridge, California 91329 U.S.A.© Copyright 2012 JBL Professional。
ISGTM Summit Series S600热敏打印机说明说明书

ISGTM Summit Series S600 —High performance and productionA powerful, full featured, high performance printer, the ISGTM Summit Series S600 thermal printer offers excellent value. Its low profi le handles an 8” outer diameter label roll and delivers fast throughput. You do not need to experience any “down time” either; just plug in a standard keyboard to print wristbands or labels when your main HIS system is unavailable. The S600 is perfect for healthcare applications, including patient wristbands and a variety of labels (pharmacy, laboratory, materials management and more). ISG Summit Series thermal printers feature Printer Application Language (PALTM). Now you don’t need to get a different software-specifi c printer for every application in your facility. Replace your old dot-matrix, thermal, inkjet, laser, embosser or line printers with a PAL-enabled ISG Summit Series printer today.Industrial-Strength Construction• All metal construction to withstand tough productionenvironments• Designed for ease of use - (ribbon and label loading) • Easily adjustable printhead pressure and media sensors • Full 8” Outer Diameter (OD) roll media capacityStandard Features• Powerful and versatile “PAL” plus other popular emulations • Easy to read LCD display • Parallel, serial, and USB ports • Both 203 and 300 dpi models •Internal LAN optionThe Power of PAL TMPrinter Application Language (PAL) is a dynamic, fully functional programminglanguage that interprets and accepts existing data streams from a host system without host reprogramming. A custom PAL program can be prepared for each of your unique applications and then preloaded into your ISG Summit Series thermal printer.PAL programs enable label printing by fi lling in the variable fi elds using your current data stream — allowing you to update legacy labels/wristbands with bar codes, lines, graphics or scaled fonts to meet newcompliance standards.PRINTER SPECIFICATIONS:Printer Model S600Print Speed203 dpi 2 to 6 ips 300 dpi 2 to 4 ips Resolution203 dpi (8 dots/mm) 300 dpi (12 dots/mm) Command Set 203 dpi: PAL, EZPL, DPL300 dpi: PAL, EZPLResident Fonts San Serif and OCRB with smooth Scaling Font and BarcodeRotation0, 90, 180, 270 degreesBar CodeSymbologies Code 39, Code93, Code 128UCC, Code 128subsets A.B.C., Codabar, Interleaved 2 of 5,EAN-8, EAN-13, EAN-128,UPC-A, UPC-E,EAN and UPC 2(5) digits add-on, RSS2-D Bar CodeSymbologies PDF-417, DataMatrixMax Print Width 203 dpi 0.25” (6mm) to 4.25” (108mm)300 dpi 0.25” (6mm) to 4.09” (104mm) Print Length 203 dpi (max.) 39” (990mm)300 dpi (max.) 18” (457mm)Printing Method Thermal transfer and Direct thermalMedia Size Min width: 1” (25.4mm)Max width: 4.4” (116mm)Media Diameter (max.): 8” OD (203mmOD) with 1”, 3” core (25mm, 76mm)Media Thickness: 0.002” - 0.01” (0.06mm -0.25mm)Media Type Roll and label (continuous, die-cut, fan-fold,ticket etc, tag is option)Sensors Label gap, paper end, ribbon near end, blackmark, peel-off (option)R ibbon Max Length: 984 ft. (300m)Width: 1” - 4.33” (25.4mm - 110mm) Memory2MB DRAM, 2MB Flash(1MB onboard Flash optional)Software PAL Windows driversCommunicationInterface RS232 and Centronics Parallel Ports, USB Physical/Electrical Dimension: 11.85” (W) x 16.54” (D) x9.49” (H)(301mm (W) x 420mm (D) x 241mm (H))Net Weight: 29 lbs (13kg)Electrical: 100-240V universal switchingpower supply Cabinet Metal constructionwith view windowOperation Panel LCD display (122 x 32 pixel), LED(power, error, online), switch (pause, feed,menu)Operating Temp. 40° to - 104°F (-5° to - 40°C)Storage Temperature14° to - 140°F (-10° to - 60°C)Agency Approval CE, FCC Class A, UL, CUL, TUVStand-Alone KDU KU-007 plus keyboard display unit Options Flash memory expansion module up to8MB, Peeler, Cutter, Internal LAN, Realtime clockWarranty One year Parts and Labor, Return to DepotSix months PrintheadAccessories Warranty One Year parts, Includes CD,Ribbon for TT, USB cable and Quick StartGuideIdentification Systems Group:Nationwide Network of ID Systems ExpertsIdentification Systems Group (ISG) Dealers are experts inidentification and card personalization applications. An elitegroup of professionals, ISG Dealers understand the changingidentification market and products – and will help you deliver asuccessful ID program. Experienced technical experts and salesteams provide local service and support – responding quicklyto your unique personalization needs. For expert advice andoutstanding support (before and after sale), the ISG Dealer inyour area can help!ISG is a trademark of Identifi cation Systems Group. Names and logos on samples are fictitious. Any similarity to actual names, trademarks or tradenames is coincidental. Specifications subject to change without notice.© 2007 Identification Systems Group. All rights reserved. S600-0907。
S600 用户手册.pdf_1697476651.985484说明书
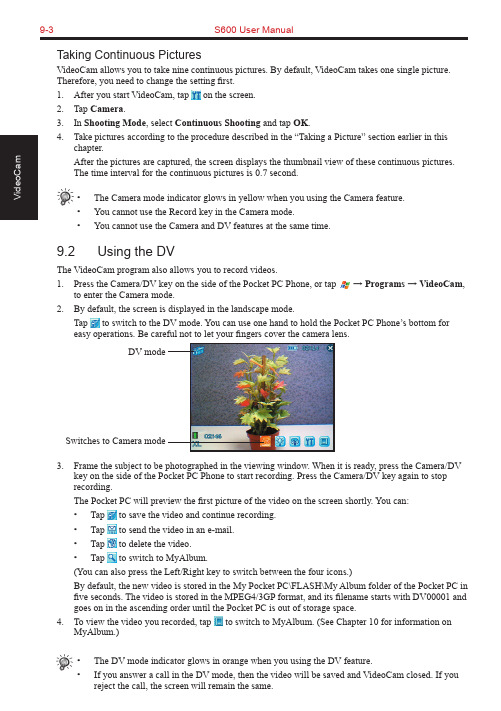
9-3S600 User ManualTaking Continuous PicturesVideoCam allows you to take nine continuous pictures. By default, VideoCam takes one single picture. Therefore, you need to change the setting first.1. After you start VideoCam, tap on the screen.2. Tap Camera.3. In Shooting Mode, select Continuous Shooting and tap OK.4. Take pictures according to the procedure described in the “Taking a Picture” section earlier in thischapter.After the pictures are captured, the screen displays the thumbnail view of these continuous pictures.The time interval for the continuous pictures is 0.7 second.• The Camera mode indicator glows in yellow when you using the Camera feature.• You cannot use the Record key in the Camera mode.• You cannot use the Camera and DV features at the same time.9.2 Using the DVThe VideoCam program also allows you to record videos.1. Press the Camera/DV key on the side of the Pocket PC Phone, or tap → Programs → VideoCam,to enter the Camera mode.2. By default, the screen is displayed in the landscape mode.Tap to switch to the DV mode. You can use one hand to hold the Pocket PC Phone’s bottom foreasy operations. Be careful not to let your fingers cover the camera lens.3. Frame the subject to be photographed in the viewing window. When it is ready, press the Camera/DVkey on the side of the Pocket PC Phone to start recording. Press the Camera/DV key again to stop recording.The Pocket PC will preview the first picture of the video on the screen shortly. You can:• Tap to save the video and continue recording.• Tap to send the video in an e-mail.• Tap to delete the video.• Tap to switch to MyAlbum.(You can also press the Left/Right key to switch between the four icons.)By default, the new video is stored in the My Pocket PC\FLASH\My Album folder of the Pocket PC in five seconds. The video is stored in the MPEG4/3GP format, and its filename starts with DV00001 and goes on in the ascending order until the Pocket PC is out of storage space.4. To view the video you recorded, tap to switch to MyAlbum. (See Chapter 10 for information onMyAlbum.)• The DV mode indicator glows in orange when you using the DV feature.• If you answer a call in the DV mode, then the video will be saved and VideoCam closed. If youreject the call, the screen will remain the same.DV modeSwitches to Camera modeS600 User Manual 9-49.3 Changing VideoCam Settings In the Camera/DV mode, you can tap on the screen to access the setting items.Standard SettingsOn the Setting screen, tap Standard .ItemDescription Backlight for PreviewSets whether to turn on the backlight for picture/video preview.Preview Image or VideoSets whether to keep the preview for five seconds before the next shooting.Glitter Frequency While using VideoCam, please setup Glitter Frequency according to your environment for improving the preview quality of the VideoCam.Camera SettingsOn the Setting screen, tap Camera .ItemDescription Scene ModeSelects the desired scene mode: Standard, Nightshot, Portrait, Grayscale, Sepia, or Document.ResolutionSelects the desired image resolution: 1280*1024 (High), 640*480 (Normal), 320*240 (Basic), or 176*144 (Compact).Self-TimerSets the time lag between releasing the shutter and shooting the picture. The options are 5 sec, 10 sec or 15 sec.FlashTurns on or off the flash.White BalanceChanges the setting for white balance.Shooting ModeSelects the single or continuous shooting.Filename recountResets the filename counter, starting from DSC00001.FolderSelects the storage location for the picture.9-5S600 User ManualDigital Video SettingsOn the Setting screen, tap Digital Video.Item DescriptionScene Mode Selects the desired scene mode: Standard, Nightshot, Grayscale or Sepia. Resolution Selects the desired image resolution: Large, High Quality; Large, Long Time;Small, High Quality; Small, Long Time.Self-Timer Sets the time lag between releasing the shutter and shooting the picture. Theoptions are 5 sec, 10 sec or 15 sec.Format Selects the desired video format: MP4:MPEG4+ACC, MP4:MPEG4+AMR,3GP:MPEG4+AMR, or 3GP:H.263+AMR.Silent Shooting Allows you to record only images without sounds.Filename recount Resets the filename counter, starting from DV00001.Image size setting Allows you to set the size limit for recorded videos.FolderSelects the storage location for the videos.Chapter 10Using MyAlbum10.1 Starting MyAlbum10.2 Opening a Picture or Video10.3 Editing Pictures10.4 Using the FaceMagic Feature10.5 Using Effects10.6 Tools Options10.7 View Modes10-2S600 User Manual10.1 Starting MyAlbumThe MyAlbum program is very useful for viewing picture and video files. The supported formats include: .bmp, .png, .wpng, .jpeg, .gif, .3gp and .mpeg4.To start MyAlbum, you can:⏹ Tap → Programs → MyAlbum .⏹ Tap in the Camera/DV mode.The startup screen of MyAlbum displays the file list.The top of the screen displays the name of the current folder (the default setting is the My Pocket PC\FLASH\My Album folder) and the sorting method (the default setting is Name ). The middle of the screen displays the information about the picture: the preview of the pictures on the left; the filename, resolution, saving time, file format and file size on the right.In this mode, you can tap on the command bar to switch to the Camera/DV mode.• You can tap the options on the command bar for advanced features. See the later sections in the chapter.10.2 Opening a Picture or VideoTo have a closer view of a picture or video, tap the specific thumbnail view in the Report mode of MyAlbum.Below is the screen of an opened picture:Total number of filesNumber of current fileS600 User Manual10-3In this mode, you can:⏹ Press the Left/Right key to browse for the previous/next file of the current folder, press the Up/Down key to zoom in/out of the image.⏹ Tap to zoom in on the picture.⏹ Tap to zoom out on the picture.⏹ Tap to zoom the picture to best fit the screen.⏹ Tap to rotate the picture at 90 degrees.⏹ Tap to switch to full screen.⏹ Tap to return to the Report mode.• You can tap the options on the command bar for advanced features. See the later sections in the chapter.10.3 Editing PicturesTap Edit on the command bar to cut, copy, paste, rename or deletethe selected or opened file.10.4 Using the FaceMagic FeatureTap Face → FaceMagic on the command bar allows you to createspecial changes on the person’s expression. On the positioning screen, tap Reset , and follow the screen tips to perform positioningon the person’s face.After positioning, tap FaceMagic → Morph (as an example). Thescreen displays the expression items and the adjustment bar for you to customize and create special effects.You can also tap FaceMagic → Comic or Avatar for more specialexpression effects.10-4S600 User Manual10.5 Using EffectsTap Effect on the command bar to create special effects on the selected or opened picture. The picture with effects will be saved as a new file with “-1” added to the filename.Painting1. Tap Effect → Painting.2. You can paint on the picture.Or, tap A to add text on the picture. Tap the screen, and a editing cursor will appear. You can start to enter the texts and change the text’s font, font size and color.3. Press the OK key or tap OK to save the changes as a new file.Effect1. Tap Effect → Effect.2. Tap the desired effect: Normal, Black/White, Sepia, Emboss,Blue or Mosaic.3. Press the OK key or tap OK to save the changes as a new file.Selecting Normal will not save the picture as a new file.Frame1. Tap Effect → Frame.2. Tap the desired picture frame from the option bar at the bottomof the screen. The screen will display the applied picture forviewing immediately. You can tap the arrows on both sides ofthe option bar for more frame options.3. Press the OK key or tap OKto save the changes as a new file.S600 User Manual10-5Stamp1. Tap Effect → Stamp .2. Tap the desired stamp from the option bar at the bottom of the screen. The screen will display the applied picture for viewing immediately. You can tap the arrows on both sides of the option bar for more stamp options.3. Press the OK key or tap OK to save the changes as a new file.Adjustment1. Tap Effect → Adjustment .2. Tap the list to select the item for adjustment: Brightness, Contrast, Saturation, Smart Color, Portrait, Landscape and Document.3. Adjust the value by tapping and draging on the adjustment bar. Tap Edit → Apply to apply the change.Tap Default restores the default values.4. Tap OK to save the changes.Note1. Tap Effect → Note .2. You can enter note text in the box, or tap the recording button to create a recording as a note. The added text or recording will be saved as a stand-alone file.3. Tap OK to save the note.4. The in the list mode indicates that a note has been added tothe picture.10-6S600 User Manual10.6 Tools OptionsTap Tools on the command bar to:⏹MMSSend an MMS message including the selected picture.⏹E-MailSend an email message including the selected picture.⏹IRUses the infrared to beam information.⏹WallpaperSets the selected picture as the theme picture on the Today screen.10.7 View ModesMyAlbum provides four view modes for viewing picture and video files.⏹Large mode⏹Middle mode⏹Small mode⏹Report mode (default mode)Chapter 11 Media Content11.1 Starting Media Content11.2 Media Content Items11-2S600 User Manual11.1 Starting Media ContentA Media hot key is located on your Pocket PC Phone. Press this key to access Media Content for games, music, Album, Windows Media Player, Java program and wallpaper setting function.The main page of Media Content is shown to the right.11.2 Media Content ItemsGAMEOn the main page of Media Content, tap GAME to quickly access the game list.Tap the desired item to start playing the game.For information on games, see Section 12.12.MUSICOn the main page of Media Content, tap MUSIC to quickly access the contents in the My Pocket PC\FLASH\My Music folder.Tap the desired item for playback. Your Pocket PC Phone will use Windows Media Player to play the selected item.For information on Windows Media Player, see Section 12.5.S600 User Manual11-3ALBUMOn the main page of Media Content, tap ALBUM to quickly startMyAlbum.For information on MyAlbum, see Chapter 10.MEDIA PLAYEROn the main page of Media Content, tap MEDIA PLAYER toquickly start Windows Media Player.For information on Windows Media Player, see Section 12.5.JAVAOn the main page of Media Content, tap JA V A to quickly start theJava program.For information on Java, see Section 12.7.11-4S600 User ManualWALLPAPEROn the main page of Media Content, tap WALLPAPER to quickly access the setting items of the Today screen.⏹Tap Appearance to change the theme picture of the Todayscreen.⏹Tap Items to set the items to be diaplayed on the Todayscreen. You can also set the time for the Pocket PC Phone to automatically return to the Today screen after a period of inactivity (3 hours by default).For information on Settings, see Chapter 6.Chapter 12 More Programs12.1 Microsoft ActiveSync12.2 Pocket Word12.3 Pocket Excel12.4 MSN Messenger12.5 Windows Media Player12.6 Pictures12.7 JA V A12.8 File Explorer12.9 Calculator12.10 Pocket MSN12.11 IE Favorites12.12 Games12-2S600 User Manual12.1 Microsoft ActiveSyncWith Microsoft ActiveSync on both your desktop computer and Pocket PC Phone, you can exchange information between a desktop computer or server and your Pocket PC Phone. To synchronize your Pocket PC Phone with your desktop computer, you must install ActiveSync on the desktop computer. Using ActiveSync, you can:⏹ Synchronize information between your Pocket PC Phone and desktop computer or server so that you have the latest information in all locations.⏹ Change synchronization settings and synchronization schedule.⏹ Copy files between your Pocket PC Phone and desktop computer.⏹ Back up and restore device information.⏹ Add/remove programs to/from your Pocket PC Phone.Installing Microsoft ActiveSyncAn Microsoft Companion CD is supplied with your Pocket PC Phone. You need to use the CD to install ActiveSync on the desktop computer before perfoming synchronization.Follow this procedure:1. Turn on the desktop computer.2. Insert the Companion CD into the CD-ROM drive of the desktop computer.3. On the first screen, click the arrow to enter the main screen and click Start Here .4. On the next screen, click Install ActiveSync 3.x on the left column.5. On the next screen, click Install to start installation.6. When prompted, connect one end of the USB cable to the converter, and then connect the converter to the USB port on the bottom of your Pocket PC Phone.7. Connect the other end of the USB cable to the USB port of the desktop computer.8. The Add New Hardware Wizard should automatically install the USB driver. (If you need to specify the location of the driver, click Browse and select the CD-ROM drive containing the Companion CD.)9. Follow the on-screen instructions to establish a partnership between your Pocket PC Phone and your desktop computer. Select the types of information for synchronization. After your first synchroniza-tion, the data you have stored on your desktop computer such as Calendar, Contacts and Tasks arecopied to your Pocket PC Phone. → → →→ → • If you do not establish a standard partnership with the desktop computer, then you cannot perform synchronization between two devices, and you will need to select a desired partnershipevery time you connect to the desktop computer.S600 User Manual12-3Connecting to Your Desktop ComputerYou can connect your Pocket PC Phone to a desktop computer in several ways:⏹ Use the USB cable or an optional cradle.⏹ Use the IR port in place of using a cable. (For complete instructions on connecting to your desktop computer by infrared, see the ActiveSync Help on your desktop computer.)⏹ Use a network or dial-up connection.Synchronizing with Your Desktop Computer1. Connect your Pocket PC Phone to your desktop computer.2. On your Pocket PC Phone, tap → ActiveSync .3. Tap to start synchronization.Setting up Remote SynchronizationSynchronizing Remotely with a Desktop Computer1. Make sure that the desktop computer is powered on.2. Connect to the corporate network. (See Chapter 13 for more information.)3. On the Pocket PC Phone, tap → ActiveSync .4. Tap Tools → Options → PC .5. In When syncing remotely with a PC , select your computername in the Use this PC list.6. Select one or both of the items: Use mobile schedule to sync with this PC and Sync with this PC during manual sync .7. Tap OK.12-4S600 User ManualSynchronizing Remotely with a Server1. Make sure that the server is powered on.2. Connect to the Internet. (See Chapter 13 for more information.)3. On the Pocket PC Phone, tap → ActiveSync .4. Tap Tools → Options → Server .5. Select the types of information, such as Calendar, Contacts, or Inbox, that you want to synchronize with the server.6. To change synchronization settings, such as the amount synchronized, select the type of information and tap Settings . Note that there are no synchronization settings for Contacts.7. In Sync with this server , enter the name of the Microsoft Exchange server to which you want to connect.8. Tap Options → Connection .9. Enter your user name, password, and domain name. If you want to perform automatic synchronization, select Save password .10. Tap OK .Synchronizing AutomaticallyWith ActiveSync, you can schedule automatic synchronization between your Pocket PC Phone and a server every time when an item arrives or is changed at the server. Your Pocket PC Phone is informed of that event and synchronizes automatically to retrieve those items, making your device always ing ActiveSync, you can schedule synchronization of your device on two separate schedules.⏹ Use the peak times schedule to synchronize during working hours or other times when you have higher mail volumes.⏹ Use the off-peak schedule to synchronize during times when you have lower mail volumes.⏹ When you are roaming, you can synchronize manually to reduce roaming charges, or you can synchronize using the mobile schedules.To set up the schedule for automatic synchronization:1. Make sure not to connect your Pocket PC Phone to the desktop computer.2. On the Pocket PC Phone, tap → ActiveSync .3. Tap Tools → Options → Mobile Schedule .4. To synchronize periodically during peak times, select the frequency of synchronization in the Peak times list.To synchronize periodically during off-peak times, select the frequency of synchronization in the Off-peak times list. To synchronize while roaming, select a frequency in the Roaming list.5. To set the days and hours for peak times, tap Peak Times .6. Tap OK.。
IPX S6000 操作手册-V2.1
Simton Technologies Ltd.
Simton IPX-S6000 操作手册
V2.1
三通科技有限公司
2011 年 12 月
CONFIDENTIAL - © 2003 Simton Technologies Ltd
Revision Date: 12/28/2011
CONFIDENTIAL - © 2003 Simton Technologies Ltd
Revision Date: 12/28/2011
IPX-S6000 操作手册
Page 1 of 2
目
前 1.
录
言........................................................................................................................................................... I 1 IPX-S6000 简介.................................................................................................................................... ....................................................................................................................................1 1.1 产品概述........................................................
MD-S600压力控制器说明手册
智能型压力开关/压力控制器Intelligent Pressure switch/controller产品使用手册版本号201312(01)智能数显压力开关使用说明该款数显压力开关通过高精度仪表放大器放大压力信号,通过高速MCU采集并处理数据,内置温度传感器进行温度补偿,是检测压力、液位信号,实现压力、液位监测和控制的高精度设备。
广泛使用在化工、机械、水文、电力、环保等测量气体、液体压力的自动化系统中。
因为调节方便灵活,安装简单,可以替代大部分使用液位开关的场合。
一、特点:1.采用高精度AD和高速微处理器,全数字化设计;2.4位数码管显示当前压力或液位;压力或液位可以根据自己的需要设置;3.三个单位可以根据客户需要选择:Bar,KP,MPa/PSI;4.可以设置高低压力或液位报警点,并通过继电器或光耦输出给控制设备;5.输出双路继电器(单刀双掷)开关量;6.带4-20mA/0-10V/输出/基于RS485的MODBus通信可以选择。
7.采用高精度压力传感器,比机械压力开关精度高,迟滞小,稳定可靠;8.调节无死区,可以在整个量程范围内任意设定继电器动作压力点;9.防护等级:IP65,可以用在环境恶劣的场合;二、技术参数:量程范围-1bar~1000bar供电电压12~35V DC(24V DC校准电压)输出继电器容量220VAC/3A,24VDC/5A精度±0.5%FS负载电阻(电流输出)≥250Ω报警点设置范围全量程段可以设置监测点,防波动回差设置使用温度-20℃—85℃采样速率10次/秒(可以根据客户需要定制要求的速度)接口螺纹M20*1.5或客户定制三、操作说明:1、面板说明面板示意图如下:增加/×键:E键:减少/Ø键Bar:压强单位KPa:压强单位MPa/PSI:压强单位OUT1:第一路报警指示(AH)OUT2:第二路报警指示(AL)2、字符说明:(AH)第1路报警(高位报警设置)(AL)第2路(低位报警设置)(Unit)单位转换(oA)密码设置(ALo1)第1路(高位报警点报警方式)(ALo2)第2路低位报警点报警方式(HYA1)第1路高位报警点报警灵敏度(回差值)(HYA2)第2路低位报警点报警灵敏度(回差值)(dELy)继电器测试(QUIT)退出菜单选项(oooo)零点AD值校准设置(FULL)量程上限对应AD值校准设置(--FU)量程下限对应AD值校准设置(-_Ad)校准量程下限对应AD值设置(FUAd)校准量程上限对应AD值设置(i_--)量程下限对应的电流输出设置(i_FU)量程上限对应的电流输出设置(UP-0)高于零点显示为零点范围设置(dn-0)低于零点显示为零点范围设置(oo)零点AD保存值查看(oS)量程上限AD保存值查看(n-oo)量程下限AD保存值查看(U-SL)MP/PSI单位选定(in-d)显示小数点位置选择(u-r)测量量程下限(F-r)测量量程上限(in-A)零点修正设定值(Fi)满度修正设定值(FLtr)数字滤波时间常数值(oA1)报警设定值受密码控制选择(bout)故障代用值(oP)变送输出信号选择(bA-L)变送输出下限设置(bA-H)变送输出上限设置(bA-A)零点变送输出设定(bAFi)量程上限变送输出设定(nAFi)量程下限变送输出设定(ErrL)传感器零点故障变送输出设定值(ErrH)传感器满度故障变送输出设定值(oL)传感器检测值过高或过压显示(Err)传感器检测值过低或欠压显示(E2rr)读写存储器数据错误提示(addr)MODBus通信从机地址设置(bAUd)MODBus通信波特率设置3、按键说明:①:长按”E”键两秒为进入或退出各设置选项菜单功能键,如果进入某选项只是查看而不进行设置,则可长按“E”键两秒退出该选项的设置。
- 1、下载文档前请自行甄别文档内容的完整性,平台不提供额外的编辑、内容补充、找答案等附加服务。
- 2、"仅部分预览"的文档,不可在线预览部分如存在完整性等问题,可反馈申请退款(可完整预览的文档不适用该条件!)。
- 3、如文档侵犯您的权益,请联系客服反馈,我们会尽快为您处理(人工客服工作时间:9:00-18:30)。
MYS600系列
★高可靠性
★全球电网宽范围输入
★100%满负载老化
★保护功能:过压、过流、短路保护
★外型尺寸:235×175×80
★重量:2.3Kg
★可根据用户要求定制特殊规格电源
输入电压………………………. AC110/220V±20%
可定制输入交流电压380V
输入频率………………………. 47 ~ 63HZ
待机功耗 ……………………... 5W
输入冲击电流…………………. 25A/110V AC、50A/220V AC(冷态时)
电网调整率……………………. ≤0.5%(满载时)
输出电压可调范围……………. 额定电压的15% ~ 100%
输出过载保护………………….. 100% ~ 105%
过热保护 ……………………… +70℃过热保护启动
上升、保持…………………….. 50ms、20ms
工作效率……………………….. 80% ~ 91%
纹波噪声………………………..≤输出电压的1%
绝缘强度………………………. I / P-O/P:1.5KV AC/1min
I / P-F/G:1.5KV AC/1min
O/ P-F/G:0.5KV AC/1min
工作环境温度…………………. -10℃ ~ + 50℃,20% ~ 93%RH(无凝霜)
储存温度…………………….... -20℃ ~ + 85℃,20% ~ 95%RH(无凝霜)
冷却方式…………………….... 智能温控风扇散热(+45℃风机开启)
Model DC Output Load regul Efficiency MYS600-12 12V 50A 0.5% 80%
MYS600-24 24V 25A 0.5% 82%
MYS600-48 48V 12A 0.5% 85%
MYS600-110 110V 5A 0.5% 87%
MYS600-220 220V 3A 0.5% 89%
MYS600-300 300V 2A 0.5% 91%
★ 可定制电压、电流从0V起调(由电位器或0 ~ 5V信号控制)。