中继器介绍 英文版
一篇文章掌握中继器的使用(附案例教程及原型下载)

一篇文章掌握中继器的使用(附案例教程及原型下载)在Axure中,中继器可以与自建部件库搭配着来使用,中继器的优点是可以添加交互事件来实现想要的动效,缺点则是制作起来相对复杂。自建部件库则能很好的解决这个缺点,因为可以将添加了交互事件的中继器制作成自建部件,这样就只需要复杂一次,以后在需要使用的时候就可以直接引用。
本文主要分为以下四部分,中继器案例、中继器是什么、中继器的基本构成以及中继器的案例实践。
中继器案例中继器是Axure中相对而言比较复杂的元件,上手难度相对较高,但是中继器的功能也是比较强大的,除了可以直接进行复用和数据的批量操作,还可以对数据进行增加、删除、筛选、修改等操作,掌握了中继器之后,能够做出很多我们常见的一些动效,先简单的看几个利用中继器做出来的效果。
简单列表页下图是利用中继器做出来的一个列表页,列表页在App中使用的情况非常多,比如图文列表(常见于各种App,如微信聊天列表、今日头条列表、商品列表等)、文字列表(个人信息、地址、商品详情)、二级列表菜单等。利用中继器制作列表页之后,可以将中继器做成自建部件,这样在进行列表页创建的时候就能够直接拿来复用,另外利用中继器创建的列表页也无需进行重复排版,直接在中继器里修改数据即可。
添加与删除数据下图为一个数据列表的添加与删除数据效果图,在实际的使用中可能是某一列表的添加与删除,比如用户信息的添加与删除、比如外卖的地址信息的添加与删除等,除了纯文本的添加与删除,中继器也能够实现图文列表的添加与删除。排序与筛选下图为简单的排序与筛选效果,Axure中继器中支持日期、数字和文本的排序,筛选则需要使用函数,利用中继器可以实现条件筛选的效果,比如在App中通过距离、价格、销量等数据来进行筛选。
分页与页面跳转分页与切换是将列表页进行分页设置每页显示的数据量,然后进行上一页、下一页、首页、尾页等这些页面之间的跳转操作。动态搜索动态搜索在一些搜索的页面用到的比较多,比如各种搜索框中都会通过关键字的匹配来实现动态的搜索,从而减少用户的输入,以达到更好的用户体验,在Axure中就可以利用中继器实现这样的效果。
电子商务第03讲---网络互连设备

节点出现故障时,不会影响网上其他节点的正常工作。集线 器可分为无源(Passive)集线器、有源(Active)集线器和 智能(Intelligent)集线器。
集线器工作原理及分类
集线器及其在网络的应用
牢记安全之责,善谋安全之策,力务 安全之 实。2020年10月16日 星期五6时2分44秒Fri day, October 16, 2020
相信相信得力量。20.10.162020年10月 16日星 期五6时2分44秒20.10.16
谢谢大家!
辅助端口
图 Cisco 2611后面板图
(2) 路由器软件概述
(1).路由器操作系统 (2).配置文件 (3).实用管理程序
路由器操作系统
Cisco网络互连操作系统(Internetworking Operating System, IOS)。
IOS配置通常是通过基于文本的命令行接口 (Command Line Interface,CLI)进行的。
安全象只弓,不拉它就松,要想保安 全,常 把弓弦 绷。20.10.1606:02:4406:02Oc t-2016- Oct-20
加强交通建设管理,确保工程建设质 量。06:02:4406:02:4406:02Fri day, October 16, 2020
安全在于心细,事故出在麻痹。20.10.1620.10.1606:02:4406:02:44October 16, 2020
箱体式Hub如图所示。
已插模块
背板插座
背板插头
集线器模块
箱体式Hub示意图
箱体式Hub实例
3. 网桥( Bridge)
介绍电器元件英语作文

Electrical Components: The Backbone ofModern ElectronicsIn the world of electronics, electrical componentsserve as the fundamental building blocks that power our modern-day devices. These components, ranging fromresistors and capacitors to transistors and integrated circuits, are essential for the operation of everythingfrom smartphones and computers to industrial machinery and spacecraft.Resistors are one of the most basic electrical components. They are devices that oppose the flow ofelectric current, reducing the voltage or current in a circuit. Resistors are used in a wide range of applications, from limiting the current in a circuit to adjusting the volume of an audio signal.Capacitors, on the other hand, store electrical charge. They are often used to smooth out fluctuations in voltageor to provide a temporary source of energy. Capacitors are found in many electronic devices, including power supplies, cameras, and even some types of memory.Transistors, introduced in the 20th century, revolutionized electronics. These small devices control the flow of electrical current, acting as switches or amplifiers. Transistors are essential for the operation of computers, cell phones, and other digital devices.Integrated circuits (ICs) are another crucial component of modern electronics. ICs are tiny chips that contain multiple electronic components, such as transistors and resistors, that are interconnected to perform a specific function. These chips are found in every electronic device, from watches and calculators to computers and servers.The importance of these electrical components cannot be overstated. Without them, our modern world would not exist. From the smallest smartphone to the largest industrial machine, all rely on these components to function properly. As technology continues to advance, so too will the demand for more complex and capable electrical components.**电器元件:现代电子设备的支柱**在电子世界中,电器元件是构成现代设备基础的重要构建块。
给长辈介绍路由器英语作文

给长辈介绍路由器英语作文Title: Introducing Your Next Wi-Fi Hub: The Chatgpt Router Experience。
1. Unleash the Future of Connectivity。
Imagine stepping into your living room, not just a space, but a hub of seamless technology. Say hello to "Chatgpt Router," the embodiment of modern convenience. This isn't just any router; it's a smart, intuitive device that's about to revolutionize your digital life.2. The Smartest Router You've Ever Known。
Imagine a router that learns your habits, not just connects your devices. "Chatgpt Router" is your personal assistant, always ready to adapt to your needs. It's not just about speed, but about understanding your browsing patterns and optimizing your network for optimal performance.3. Effortless Setup, Anytime, Anywhere。
No more fumbling with manuals or complicated set-ups. "Chatgpt Router" simplifies the process. With voice commands, you can have it up and running in no time, just like your favorite AI. It's user-friendly, even for those who prefer a hands-off approach.4. Security and Privacy, at Your Fingertips。
TP-LINK TL-WA850RE 无线中继器使用说明书
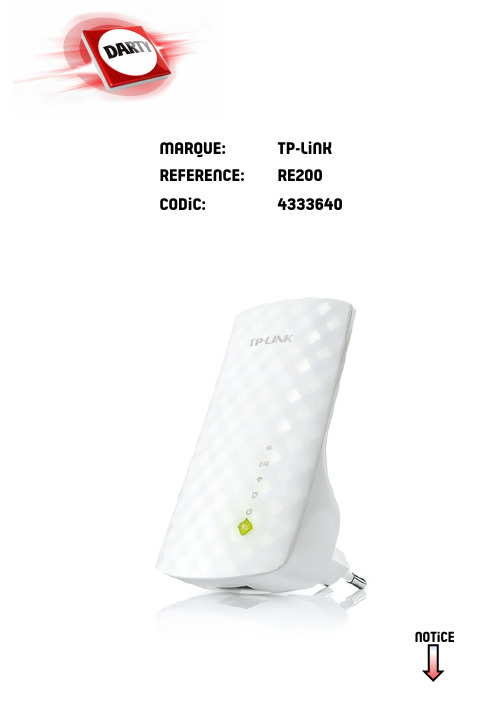
NOTICEMARQUE: TP-LINKREFERENCE: RE200CODIC: 4333640User GuideAC750 Wi-Fi Range ExtenderRE200REV2.0.0 1910012003ContentsAbout This Guide (1)Chapter 1. Get to Know About Y our Extender. . . . . . . . . . . . . . . . . . . . . . . . .2 1. 1. Product Overview. . . . . . . . . . . . . . . . . . . . . . . . . . . . . . . . . . . . . . . . . . . . . . . . . . . . . . . . . . . . 3 1. 2. Appearance . . . . . . . . . . . . . . . . . . . . . . . . . . . . . . . . . . . . . . . . . . . . . . . . . . . . . . . . . . . . . . . . . 31. 2. 1. L ED Explanation. . . . . . . . . . . . . . . . . . . . . . . . . . . . . . . . . . . . . . . . . . . . . . . . . . . . . . . 41. 2. 2. P ort and Button Description. . . . . . . . . . . . . . . . . . . . . . . . . . . . . . . . . . . . . . . . . . . 4 Chapter 2. Set Up Internet Connection . . . . . . . . . . . . . . . . . . . . . . . . . . . . . . .5 2. 1. Quick Setup . . . . . . . . . . . . . . . . . . . . . . . . . . . . . . . . . . . . . . . . . . . . . . . . . . . . . . . . . . . . . . . . . 62. 1. 1. M ethod One: Via the WPS Button. . . . . . . . . . . . . . . . . . . . . . . . . . . . . . . . . . . . . . 62. 1. 2. M ethod Two: Via a Web Browser. . . . . . . . . . . . . . . . . . . . . . . . . . . . . . . . . . . . . . . 72. 1.3. M ethod Three: Via the TP-Link T ether App . . . . . . . . . . . . . . . . . . . . . . . . . . . .10 2. 2. Position Y our Extender. . . . . . . . . . . . . . . . . . . . . . . . . . . . . . . . . . . . . . . . . . . . . . . . . . . . . .11 Chapter 3. Customize Y our Network. . . . . . . . . . . . . . . . . . . . . . . . . . . . . . . . 13 3. 1. Check Internet Status. . . . . . . . . . . . . . . . . . . . . . . . . . . . . . . . . . . . . . . . . . . . . . . . . . . . . . .14 3. 2. Configure Wireless Network . . . . . . . . . . . . . . . . . . . . . . . . . . . . . . . . . . . . . . . . . . . . . . . .14 3. 3. Change LAN Settings. . . . . . . . . . . . . . . . . . . . . . . . . . . . . . . . . . . . . . . . . . . . . . . . . . . . . . .16 3.4. Specify DHCP Server Settings. . . . . . . . . . . . . . . . . . . . . . . . . . . . . . . . . . . . . . . . . . . . . .17 3.5. Adjust Wi-Fi Coverage . . . . . . . . . . . . . . . . . . . . . . . . . . . . . . . . . . . . . . . . . . . . . . . . . . . . . .18 3.6. Set Access Control . . . . . . . . . . . . . . . . . . . . . . . . . . . . . . . . . . . . . . . . . . . . . . . . . . . . . . . . .18 Chapter 4. More Features of Y our Extender. . . . . . . . . . . . . . . . . . . . . . . . . 21 4. 1. Use Y our Extender as a Wireless Adapter. . . . . . . . . . . . . . . . . . . . . . . . . . . . . . . . . . . .22 4. 2. Transform Y our Existing Wired Network to a Wireless One . . . . . . . . . . . . . . . . . . .224. 2. 1. T o Set Up the Extender as an Access Point . . . . . . . . . . . . . . . . . . . . . . . . . . .224. 2. 2. T o Connect Y our Wireless Devices to the Extender via WPS. . . . . . . . . . .24 Chapter 5. Manage Y our Extender . . . . . . . . . . . . . . . . . . . . . . . . . . . . . . . . . 26 5. 1. Set Up System Time . . . . . . . . . . . . . . . . . . . . . . . . . . . . . . . . . . . . . . . . . . . . . . . . . . . . . . . .27 5. 2. Control LEDs . . . . . . . . . . . . . . . . . . . . . . . . . . . . . . . . . . . . . . . . . . . . . . . . . . . . . . . . . . . . . . .27 5. 3. Power Schedule . . . . . . . . . . . . . . . . . . . . . . . . . . . . . . . . . . . . . . . . . . . . . . . . . . . . . . . . . . . .28 5. 4. Upgrade the Firmware . . . . . . . . . . . . . . . . . . . . . . . . . . . . . . . . . . . . . . . . . . . . . . . . . . . . . .29 5. 5. Backup and Restore Configuration Settings. . . . . . . . . . . . . . . . . . . . . . . . . . . . . . . . .30 5. 6. Change Login Password . . . . . . . . . . . . . . . . . . . . . . . . . . . . . . . . . . . . . . . . . . . . . . . . . . . .31 5. 7. System Log. . . . . . . . . . . . . . . . . . . . . . . . . . . . . . . . . . . . . . . . . . . . . . . . . . . . . . . . . . . . . . . . .31 FAQ (33)About This GuideThis guide is a complement to Quick Installation Guide. The Quick Installation Guide provides instructions for quick internet setup, while this guide contains details of each function and demonstrates how to configure them.When using this guide, please notice that features of the extender may vary slightly depending on the model and software version you have, and on your location, language, and internet service provider. All screenshots, images, parameters and descriptions documented in this guide are used for demonstration only. ConventionsMore InfoThe latest software, management app and utility are available from the Download Center at /support.The Quick Installation Guide can be found where you find this guide or inside the package of the range extender.Specifications can be found on the product page at .A T echnical Support Forum is provided for you to discuss our products at .Our T echnical Support contact information can be found at Contact T echnical Support page at /support.1Chapter 1Get to Know About Y our ExtenderThis chapter introduces what the extender can do and its appearance. It contains the following sections:• Product Overview• Appearance1. 1. Product OverviewBring Dead Zones Back to LifeTired of Wi-Fi “dead zones”? The TP-Link extender is connected to your router wirelessly, strengthening its signal and expanding its coverage into areas that could not otherwise be reached. The device also reduces signal interference to ensure reliable Wi-Fi coverage throughout your home or office.Easy Installation & Quick PositionThe extender works with any standard wireless router. Instantly connect the extender to a router by pressing the router’s WPS button (if available) followed by the extender’s RE/WPS button. Alternatively, follow the Quick Setup instructions on the extender’s web management page.Once the extender is connected to a router, you can relocate it to your preferred location with no further configuration required. The intelligent signal light can help to find the best location.Easy Management with the TP-Link T ether AppT ether provides a simple, intuitive way to access and manage your extender with your smart devices.1. 2.Appearance31. 2. 1. LED Explanation4Chapter 2Set Up Internet ConnectionThis chapter informs you how to boost your host wireless coverage. Please follow the step-by-step instructions to set up the internet connection.It contains the following sections:• Quick Setup• Position Y our Extender62. 1. Quick SetupPower on Plug the extender into an electrical outlet next to your host router , and then wait until the LED is solid on.Connect to the host network There are three ways to connect to the host network: via the WPS button, via a web browser or via the TP-Link T ether app. Using the WPS button is the easiest way toextend your host network. We recommend you to use this way if your router has a WPS button. The button might look like one of these: | | .2. 1. 1. Method One: Via the WPS Button 1. Press the WPS button on your host router, and then press the button on the extender within 2 minutes.Tips:• Some ISP gateways disable the WPS function by default. If the WPS connection fails, please refer to Method Two: Via a Web Browser .• For more information about using WPS button on your host router, please refer to the router manufacturer’s user guide.2. Wait until the LED changes to solid on, which indicates that the WPS connection is successful. If it doesn’t, please refer to Method Two: Via a Web Browser . 3. If you are connecting the extender to a dual-band router but only the 2.4G or 5G LED is on, repeat Step 1 and 2 to connect to the other band.4. Enjoy! Connect to the extended network and enjoy the internet. Both extended networks share the same SSIDs (network names) and passwords as those of your host networks.Tips: Since the performance of the extended networks will be affected by the distance between the extender and the host router, we recommend that you relocate your extender by referring to Position Y our Extender .WPS72. 1. 2. Method Two: Via a Web Browser 1. Connect your computer to the extender's wireless network.Tips: Before connecting, please find the SSID (network name) on the label of the extender.• For Windows Users 1 ) Unplug the Ethernet cable from your computer (if any).2 ) Click the Wi-Fi icon on the taskbar and connect to the extender’s wireless network: TP-Link_Extender_2.4GHz or TP-Link_Extender_5GHz .• For Mac OS X Users 1 ) Unplug the Ethernet cable from your computer (if any).2 ) Click the Wi-Fi icon in the top right corner of the screen, and connect to the extender’s network: TP-Link_Extender_2.4GHz or TP-Link_Extender_5GHz .2. Follow the instructions of the Quick Setup wizard to connect the extender to your host router.1 ) Launch a web browser, enter or http://192.168.0.254 in the address field, and then create a password for future login attempts, and click Start .Tips: If the login window does not appear, please refer to FAQ.2 ) Select your host router’s 2.4GHz SSID (network name), enter its password (NOT the password you just created for management), and click Next.3 ) Select your host router’s 5GHz SSID (network name), enter its password (NOT the password you just created for management), and click Next.Tips: If your host router does not support 5GHz wireless network, please click Skip to continue.4 ) Either keep the default SSIDs (network names) or customize them for the extended networks, and then click Next.5 ) Verify your wireless settings and click Save. The corresponding LED(s)(2.4G or 5G) should turn on.6 ) Enjoy! Connect to the extended network and enjoy the internet. Both extended networks share the same wireless passwords as those of your host networks, but may have different network names if you have customized the SSIDs duringthe configuration.Tips: Since the performance of the extended network will be affected by the distance between the extender and the host router, we highly recommend you to relocate your extender referring to Position Y our Extender .2. 1.3. Method Three: Via the TP-Link T ether App1. Launch the Apple App Store or Google Play Store and search TP-Link T ether or simplyscan the QR code to download and install the app.OR2. Go to Wi-Fi Settings and connect your device to the extender’s wireless network: TP-Link_Extender_2.4GHz or TP-Link_Extender_5GHz .3. Launch T ether and select your extender from the Local Device list.4. Create a password for future logins and click Create.5. Follow the on-screen instructions to complete the configuration.Tips: Y ou can manage your extender via T ether, such as controlling LEDs, sharing passwords of your networks and blocking devices.2. 2. Position Y our ExtenderPlease follow the instructions below to achieve optimal performance of the extender.1. Plug the extender into an electrical outlet between your host router and the Wi-Fi “dead“ zone. The location you choose must be within the range of your existing host network.2. Wait until the 2.4G/5G LED is lit and solid green. If not, relocate it closer to the host router to achieve better signal quality.Router ClientsIdeal Extender PlacementTips: T o minimize signal interference, please choose a location which is far away from Bluetooth devices and other household electronic devices, such as cordless phones, microwave ovens and baby monitors.Chapter3Customize Y our NetworkThis chapter guides you on how to configure network settings that are available for this extender.It contains the following sections:• Check Internet Status• Configure Wireless Network• Change LAN Settings• Specify DHCP Server Settings• Adjust Wi-Fi Coverage• Set Access Control3. 1. Check Internet StatusY ou can view the internet status of your extender to check whether you have successfully set up the extended network(s).1. Visit , and log in with the password you set for the extender.2. Go to Settings > Status to view the internet status of your extender.• The extender is functioning normally.• The extender is not connected to the host networks. Please go to Settings > Wireless > Connect to Network to check the passwords of the host networks. If the problem still exists, please refer to the FAQ section.• The extender is connected to the host network, but is not transmitting data. Please check your router’s internet connection.• The extender is connected to the router abnormally. Please go to Settings > Network and try setting your extender to obtain an IP address automatically.Click the Internet/Router/Range Extender/Clients icon to view corresponding information.3. 2. Configure Wireless NetworkIf you want to extend another host network after Quick Setup, you can refer to thisVisit , and log in with the password you set for the extender. Note: Here we take the configuration of the 2.4GHz network as an example. If the 5GHz network is available on your extender, please refer to the instructions to set your 5GHz network.¾T o extend another host network:1. Go to Settings > Wireless > Connect to Network.2. Enable Connect to 2.4GHz Network and click Wireless Scanner to find all available networks.3. Select the 2.4GHz host network you want to extend.Note:If the network you want to extend is on but not listed, please try the following steps.• Move the extender closer to your router, and click Rescan in the top-right corner of the list.• Y ou can manually enter the SSID (network name) and password of the network you want to extend, and click Save.4. Once a host network is selected, the SSID and security type will be automatically filled in. If the selected network is encrypted, enter the password in the Password field.5. Click Save.¾T o enable or disable the extended network:1. Go to Settings > Wireless > Extended Network.2. Extended networks are enabled by default. If you want to disable the wireless function of a certain band, just clear the Enable checkbox. In this case, all the wireless settings of this band will be invalid.3. Click Save.¾T o change the wireless network name (SSID):1. Go to Settings > Wireless > Extended Network.2. Create a new SSID in Extended 2.4GHz SSID or click Copy Host SSID. The value is case-sensitive.3. Click Save.Note: If you have changed the wireless settings via a wireless device, you will be disconnected after the settings are applied. Please write down the new SSID for future use.¾T o hide the SSID of the extended network:1. Go to Settings > Wireless > Extended Network.2. Select Hide SSID broadcast, and the corresponding SSID will not be displayed when wireless devices scan for local wireless networks. Devices must join the network manually in order to connect.3. Click Save.3. 3. Change LAN SettingsThe extender is preset with a default LAN IP 192.168.0.254, with which you can log in to the web management page. The LAN IP address, together with the Subnet Mask, also defines the subnet that the connected devices are on. If the IP address conflicts with another device on your local network or your network requires a specific IP subnet, you can change it.1. Visit , and log in with the password you set for the extender.2. Go to Settings > Network.3. Select Use the following IP address.4. Enter a new IP address as needed and leave the Subnet Mask as the default settings and enter the gateway that is in the same subnet as the IP address. The gateway is usually the LAN IP address of your extender.5. Click Save.3. 4. Specify DHCP Server SettingsBy default, the DHCP (Dynamic Host Configuration Protocol) Server is enabled and the extender acts as a DHCP server; it dynamically assigns TCP/IP parameters to client devices from the IP Address Pool. Y ou can change the settings of the DHCP Server if necessary.1. Visit , and log in with the password you set for the extender.2. Go to Settings > Network.¾T o specify the IP address that the extender assigns:1. Select Auto (recommended) or On to enable the DHCP Server.2. Enter the starting and ending IP addresses in the IP Address Pool.3. Enter other parameters if the ISP requires them. The Default Gateway is automatically filled in and is the same as the LAN IP address of the extender.4. Click Save.¾T o view the DHCP Client List:Y ou can view the information of the DHCP clients connected to the extender in the DHCP Client List.3. 5. Adjust Wi-Fi CoverageY ou can set the extender’s Wi-Fi coverage depending on how large you want your Wi-Fi area to be.1. Visit and log in with the password you set for the extender.2. Go to Settings > Advanced Settings > Wi-Fi Coverage.3. Select Min, Mid or Max to adjust your Wi-Fi coverage of the extender.4. Click Save.3. 6. Set Access ControlAccess Control allows you to permit or block specific devices from accessing the internet for a specific period.1. Visit and log in with the password you set for the extender.3. Enable Access Control.¾T o block specific device(s):Note: Devices connected to the extender via an Ethernet cable cannot be blocked.1. Select Blacklist and click Save.2. Select the device to be blocked in the Online Devices table by ticking the corresponding checkbox.3. Click Block and the selected device(s) will be added to the Devices in Blacklist table.4. Click in the Devices in Blacklist table to set the Effective Time for a certain entry as needed.5. Click OK.¾T o permit specific device(s):1. Select Whitelist and click Save.2. Click Add in the Devices in Whitelist table. Enter the Device Name and MAC Address. And you can set the Effective Time for a certain entry as needed.3. Click OK.Chapter 4More Features of Y our ExtenderThis chapter explains how to use the extender as a wireless adapter and as an access point.It contains the following sections:• Use Y our Extender as a Wireless Adapter• Transform Y our Existing Wired Network to a Wireless One4. 1. Use Y our Extender as a Wireless AdapterThe extender can be used as a wireless adapter to connect any wired-only device, such as a Blu-ray player, game console, DVR, or smart TV, to your wireless network. After configuration, you can connect an Ethernet-enabled device to the extender via an Ethernet cable.Note: Extenders that have no Ethernet port do not support this feature.By default, the Ethernet port of the extender is connected to the 5GHz wireless netwok. ¾T o change the connected wireless frequency:1. Visit , and log in with the password you set for the extender.2. Go to Settings > Network.3. Select 2.4GHz or 5GHz and click Save.4. 2. Transform Y our Existing Wired Network to aWireless OneThe extender can work as an access point, transforming your existing wired network to a wireless one.4. 2. 1. T o Set Up the Extender as an Access Point1. Visit , and log in with the password you set for the extender.2. Click Mode in the top right corner of the page. Select Access Point and click Save. The extender will reboot and switch to Access Point mode.3. After rebooting, connect the extender to your modem or wired router via an Ethernet cable.4. Visit , and log in with the password you set for the extender.5. Go to Quick Setup to configure your extender.1 ) Configure your wireless settings and click Next.2 ) Confirm the information and click Finish. Now, you can enjoy Wi-Fi.4. 2. 2. T o Connect Y our Wireless Devices to the Extender via WPS Wi-Fi Protected Setup (WPS) provides an easier way to set up a secure Wi-Fi connection. Wireless devices that support WPS, including Android phones, tablets and most USB network cards, can be connected to your extender through this method (not supported by iOS devices).1. Visit , and log in with the password you set for the extender.2. Go to Settings > Wireless > WPS.3. Enable WPS.4. Connect via WPS:• AP’s PIN: Enable AP’s PIN and enter the PIN on your device. Y ou can click Generate to get a new PIN or click Default to restore the PIN to its factory one.• Push Button (Recommended): Click Connect and push the WPS button on the client device.• PIN code: Enter the client’s PIN, and click Connect.Chapter 5 Manage Y our Extender This chapter presents how to manage and maintain your extender.It contains the following sections:• Set Up System Time• Control LEDs• Power Schedule• Upgrade the Firmware• Backup and Restore Configuration Settings• Change Login Password• System LogChapter 5Manage Y our Extender 5. 1. Set Up System TimeThe System Time of the extender will be used for time-based functions such as the Power Schedule function. If you have enabled the Daylight Saving Time feature, the system time will be sychronized with the daylight saving time you configure.1. Visit , and log in with the password you set for the extender.2. Go to Settings > System T ools > Time Settings.¾T o get system time:1. Select your local Time Zone from the drop-down list.2. Click Save.¾T o set up Daylight Saving Time:1. Select Enable Daylight Saving Time.2. Select the Start and End date and time of the daylight saving time at your local time zone.3. Click Save.5. 2. Control LEDsThe LEDs of the extender indicate its activities and status. Y ou can enable the Night Mode feature to specify a time period during which the LEDs are off.1. Visit , and log in with the password you set for the extender.2. Go to Settings > System T ools > LED Control.¾T o specify a time period when LEDs are off:1. Select Night Mode.2. Specify a time period in the LED Off Time field, and the LEDs will be off during this period.3. Click Save.5. 3. Power ScheduleThe Power Schdule feature allows you to specify a time period during which the extender is off.1. Visit , and log in with the password you set for the extender.2. Go to Settings > Advanced Settings > Power Schedule.¾T o specify a time period when the extender is off:1. Select Enable Power Schedule.2. Specify a time period in the Power-Off Time field and days in the Day(s) field, and the extender will be off during this period.3. Click Save.5. 4. Upgrade the FirmwareTP-Link is committed to improving product features, giving you a better network experience. Y ou can upgrade the firmware online or download the latest firmware file from the Support page at our website and upgrade the extender to the latest firmware version.Note:• Make sure the latest firmware file is matched with the hardware version (as shown in the download section of the Support page).• Make sure that you have a stable connection between the extender and your computer. It is NOT recommended to upgrade the firmware wirelessly.• Backup your extender configuration.• Do NOT power off the extender during the firmware upgrade.¾T o upgrade the firmware online:1. Visit , and log in with the password you set for the extender.2. Go to Settings > System T ools > Firmware Upgrade, and click Check for upgrade to see whether a new firmware is released.3. Focus on the Online Upgrade section, and click Upgrade.4. Wait a few minutes for the firmware upgrade to complete and the extender to reboot.¾T o upgrade the firmware locally:1. Download the latest firmware file for the extender from our website .2. Visit , and log in with the password you set for the extender.3. Go to Settings > System T ools > Firmware Upgrade.5. Wait a few minutes for the firmware upgrade to complete and the extender to reboot.5. 5. Backup and Restore Configuration SettingsThe configuration settings are stored as a configuration file in the extender. Y ou can backup the configuration file and restore the extender to the previous settings from the backup file when needed. Moreover, if necessary, you can erase the current settings and reset the extender to the default factory settings.1. Visit , and log in with the password you set for the extender.2. Go to Settings > System T ools > Backup & Restore.¾T o backup configuration settings:Click Backup to save a copy of the current settings to your local computer. A ‘.bin’ file of the current settings will be stored on your computer.¾T o restore configuration settings:1. Click Browse to locate the backup configuration file stored on your computer, and click Restore.2. Wait a few minutes for the restore and reboot.Note: During the restore process, do not power off or reset the extender.¾T o reset the extender to factory default settings:1. Click Factory Restore to reset the extender.2. Wait a few minutes for the reset and reboot.Note:• During the reset process, do not power off or reset the extender.• We strongly recommend you backup the current configuration settings before resetting the extender.5. 6. Change Login PasswordThe account management feature allows you to change your login password of the management webpage.1. Visit , and log in with the password you set for the extender.2. Go to Settings > System T ools > Admin Account.3. Enter the old password, then the new password twice (both case-sensitive) and click Save.4. Use the new password for future logins.5. 7. System LogIf the extender is not working normally, you can save the system log and send it to our technical support team.1. Visit , and log in with the password you set for the extender.2. Go to Settings > System T ools > System Log.¾T o save the system log locally:2. Click Save Log to save the system logs to a local disk.FAQQ1. How do I reset the extender to its factory default settings?• With the extender powered on, use a pin to press the Reset button until all the LEDs turn on momentarily and then release the button.• Log in to the extender’s web management page. Go to System T ools > Restore & Backup and click Factory Restore.Q2. What should I do if I forget my login password?Refer to FAQ > Q1 to reset the extender, and create a password to log in.Note: The extender must be reconfigured after a reset to access the internet. Please note down your login password for future use.Q3. What should I do if I forget my wireless password?The factory default wireless password is printed on the label of the extender.If the password has been altered, please connect your computer to the extender using an Ethernet cable and follow the steps below:1. Visit , and log in with the password you set for the extender.2. Go to Settings > Wireless> Wireless Settings to retrieve or reset your wireless password.Q4. What should I do if I cannot access the web management page? This can happen for a variety of reasons. Please try the following to log in again.• If your computer is wirelessly connected, make sure that you have connected to the extender’s SSID.• If your computer is connected via an Ethernet cable, please make sure that the connection is stable.• Make sure your computer is set to obtain an IP address and DNS server address automatically.• Verify that or http://192.168.0.254 is correctly entered in the web browser and press Enter.• Use the IP address to access the extender. The default IP is 192.168.0.254. If the extender is connected to the router, you should go to your router’s DHCP client list to obtain the extender’s current IP address.• Reset the extender and try again.Q5. I have enabled wireless MAC filter, wireless access control, or access control list (ACL) on my router. What should I do before configuring。
adam4000与6000产品介绍

寄存器地址:在英文手册的附录 模拟量40001~40008 数字量00001~00008
Modscan测试modbus
Adam utility测试 ASCII
Adam6000的编程和组态
组态
–
使用modbusTCP驱动
编程
–
–
提供例程 ( class library) 提供VS6.0、java、delphi例程( 附在5000TCP-6000的demo中)
通讯协议
UDP协议——ASCII指令 TCP协议——modbusRTU 如何测试
–
Utility/modscan/网络助手
modbusTCP
模块地址 功能码
起始地址 起始地址 寄存器个 寄存器个 高字节 低字节 数高字节 数低字节
请求指令:01 04 00 01 00 02 响应为: 01 04 04 7F FF A6 65
可改变每个通道的输出量程,并设置输出值
DIO 设置
用户可读取DI状态并控制DO值
通讯协议
PC机与模块的通讯协议
– –
研华协议 ASCII指令 modbusRTU 协议 utility /protocol 参数
如何更改协议
–
如何测试
–
utility/串口助手/modscan
通讯协议 ASCII
ADAM-6520 ADAM-6520 UNO 系列
ADAM-6500 通讯控 制器 ADAM-6022 PID 控制器
ADAM-6000W 系列
ADAM-6000 I/O
ADAM-6000 I/O
IAG
模块命名规则
网络互连设备

中继器简介中继器(Repeater),用于连接同类型的两个局域网或延伸一个局域网。
当我们安装一个局域网而物理距离又超过了线路的规定长度时,就可以用它进行延伸;中继器也可以收到一个网络的信号后将其放大发送到另一网络,从而起到连接两个局域网的作用。
中继器属于OSI模型中的物理层。
中继器不仅功能有限,而且作用范围也有限。
一个中继器只包含有一个输入端口和一个输出端口,如下图所示,所以它就只能接收和转发数据流。
此外,中继器只适用于总线拓扑结构的网络(总线形网络)。
使用中继器的好处是扩展网络的成本较低廉。
中继器工作原理中继器使用在网络的物理层,可以用于拓展网络的有效范围,那么更多的用户可以共享网络。
中继器只负责把接收到的信号过滤、放大,然后再把信号送回到网络上。
但由于中继器工作在物理层,所以它没有任何的机制用于检测数据包,没有任何的智能。
所以说中继器在拓展网络的有效范同时,也增大了网络的广播域和冲突域,这是它的缺点。
集线器简介集线器称为HUB,是一种集中完成多台设备连接的专用设备,提供了检错能力和网络管理等有关功能。
HUB有三种类型:对被传送数据不做任何添加的PassiveHUB,被称为被动集线器;能再生信号,监测数据通讯的Active HUB,被称为主动集线器;能提供网络管理功能的Intelligent HUB,被称为智能集线器。
集线器组网示意图集线器工作原理(一)•集线器HUB–以太网 HUB的基本工作原理是广播(broadcast)技术,也就是HUB从任何一个端口收到一个Ethernet包时,它都将此Ethernet包广播到所有其它端口,所谓广播,是指HUB将该Ethernet包发送到所有其它端口。
–Ethernet包中带有源MAC地址(NIC中带的Ethernet地址,48位长)和目的MAC地址。
MAC地址与Ethernet包中的目的MAC地址相同的计算机执行该包中所要求的动作集线器工作原理(二集线器工作原理(二))•HUB原理–1. HUB从某一端口A将收到的包发送到所有端口–2.非广播包时,地址与包目的MAC地址相同的站响应用户A–3.广播包时,所有用户都响应用户A集线器组网示意图集线器的分类•HUB有4端口、8端口、12端口和24端口,一个用作网络连接,其余接计算机;•当接入的计算机比较多时,可以用几个集线器进行级联。
路由器、交换机、中继器(转发器)、集线器的区别

路由器、交换机、中继器(转发器)、集线器的区别:转发器、集线器、网桥、交换机、路由器和网关比较转发器、集线器、网桥、交换机、路由器和网关都是网络互连设备。
转发器(Repeater)又被称为中继器或放大器,执行物理层协议,负责第一层(物理层)的数据中继,实现电气信号的“再生”。
用于互连两个相同类型的网段,主要功能是延伸网段和改变传输媒体,从而实现信息位的转发。
它本身不执行信号的过滤功能。
集线器(HUB)是一种典型或称为特殊的转发器。
它的作用可以简单的理解为将一些机器连接起来组成一个局域网。
它不具有智能处理能力,处理的数据只是电流而已,它采用共享带宽的工作方式,附接端口的所有计算机采用CSMA/CD方式竞争带宽的使用,任一时刻只能由两台计算机之间进行通信。
网桥(Gate Bridge)负责第二层(数据链路层)的数据中继。
互连两个独立的、仅在低两层实现上有差异的子网。
交换机(Switch)是一种简化的网桥,互连相同类型的网络。
它采用独享带宽的工作方式。
它比集线器智能,网络上的数据是MAC地址的集合,它能分辨出帧中的源MAC地址和目的MAC地址,因此可以在任意两个端口之间建立联系,但交换机并不懂得IP地址。
路由器(Router)负责第三层(网络层)的数据中继。
它能理解数据中的IP地址,如果它接收到一个数据包,就检查其中的IP地址,如果目标地址是本地网络的就不理会,如果是其他网络的,就将数据包转发出本地网络。
它的作用在于连接相同或不同类型网络,并且能找到网络中数据传输最合适的路径即路由选择。
网关(Gateway)负责第三层(网络层)以上的数据中继,实现不同体系结构的网络协议转换,它通常采用软件的方法实现,并且与特定的应用服务一一对应。
比如:OSI的文件传输服务FTAM和TCP/IP的文件传输服务FTP,尽管二者都是文件传输但是由于所执行的协议不同不能直接进行通信,而需要网关将两个文件传输系统互连,达到相互进行文件传输的目的。
- 1、下载文档前请自行甄别文档内容的完整性,平台不提供额外的编辑、内容补充、找答案等附加服务。
- 2、"仅部分预览"的文档,不可在线预览部分如存在完整性等问题,可反馈申请退款(可完整预览的文档不适用该条件!)。
- 3、如文档侵犯您的权益,请联系客服反馈,我们会尽快为您处理(人工客服工作时间:9:00-18:30)。
REPEATERS AND LINKING
WHAT IS A REPEATER?
A normal radio conversation takes place from one unit to the next. This is usually accomplished with both stations being on the same channel or frequency. This is known as simplex(单工), or single frequency operation.
A repeater is a special radio station set up with the sole(唯一的)purpose of relaying(中继转发)the radio signals of other stations. It is normally set up in a high location. A repeater works by receiving a signal on one frequency and retransmitting(转播)it instantaneously(立即)on another frequency.
To use a repeater a user station(用户终端)must use a different transmit frequency (发射频率)than receive frequency(接收频率). This is a form of duplex(双工), or two frequency operation. It is known as half-duplex as you do not receive and transmit at the same time but normally use the push-to-talk button on your microphone to switch between the two.
WHY USE A REPEATER?
Repeaters in the amateur radio service are used on all bands above 28 megahertz. By far the most repeaters are used in the 144 to 148 megahertz band, known as two meters, with use on the 440 to 450 megahertz band (70 centimeters or cm) coming in second.
On the 2 meters band, a typical modern mobile station will have a range of about 10 miles to other mobile stations. This varies with terrain, vegetation, buildings, and other conditions. This range increases for mobile to base operations, and even more for base to base operations. Conversely, it dwindles rapidly for hand held walkie talkies (handles or HTs).
Since a repeater is located at a high location, it is the same situation as a mobile to base operation. Or better, since repeater antennas tend to be placed even higher than home station antennas. This range is now closer to 30-50 miles from the repeater. This applies to all mobiles using the repeater, no matter in which direction. So by using the repeater as a relay two mobile stations can be up to 60-100 miles apart, and still communicate!! And of course repeaters extend the usable distance for base stations and HTs too. The only limits are:
∙Ability to hear and be heard by the repeater, based on range, power, etc.
∙Ability of the other station to do the same.
WHAT IS A REPEATER LINK?
A repeater has a nominal range which can be drawn on a map as a circle with the center of the circle the repeater location. For this explanation let's say the repeater has a range of 30 miles. You would draw this on the map as a circle with a radius of 30 miles and a center at the repeater site, in this case the center of city A.
Now let's fill in some other cities. Again to make it easy let's put our cities 30 miles apart. City B is 30 miles west of City A, City C is 30 miles east of City A, and City D is 30 miles east of city C.
So we have a repeater in city A, wiht a range of 30 miles. The range circle just touches cities B and C. Any mobile station within the circle can talk to any other mobile within the circle. So a mobile in B can just talk to a mobile in C. But none of the can talk to anyone in D.
So Fred puts up a repeater in D with a 30 mile range. It cannot be on the same frequency pair (one receive, one transmit) as the repeater in A due to interference problems.
Now the mobile in C can talk to the mobile in B, or change channel and talk to Fred in D. But not both at the same time. And Fred in D still cannot talk to B. So what are we going to do.
Well, what a some groups, including the SouthEast Iowa Technical Society, have done is to link repeaters in various locations together. To do this without interfernce problems, SEITS made use of the 70cm band to link 2 meter repeaters.
AND THE RESULT
Since each linked repeater shares information with all the others, the range is greatly improved. As a mobile station leaves the coverage area of one repeater in the system, the operator simply changes his frequency to the next repeater and continues his conversation. It resembles most closely a manual switched cellular system, where each individual repeater is a cell. In the SEITS LINK system, the ranges of most of the repeaters overlap that of their neighbor, thereby providing almost continuous coverage over the entire system area.。