c语言串口通信范例
c语言 串口发送数据排队例程 -回复
c语言串口发送数据排队例程-回复串口发送数据排队例程是一种常见的编程技巧,用于解决串口发送数据时可能存在的冲突和延迟问题。
在实际应用中,特别是在嵌入式系统中,串口通信是非常重要的一种通信方式。
本文将从介绍串口发送数据的原理开始,逐步解析串口发送数据排队的实现过程,并给出相应的代码示例。
第一步:了解串口发送数据的原理在开始编写串口发送数据排队例程之前,我们需要先了解串口发送数据的原理。
串口通信是通过发送和接收两个方向的数据信号来实现的。
发送数据的时候,需要将待发送的数据按照一定的格式封装成数据帧,然后通过串口发送出去。
在发送的过程中,需要注意避免发送数据的冲突,同时也需要考虑数据的延迟。
第二步:实现串口发送数据排队的基本原理为了解决串口发送数据的冲突和延迟问题,我们可以采用队列的数据结构来实现串口发送数据排队功能。
队列是一种先进先出(FIFO)的数据结构,适合用来组织需要按照先后顺序处理的数据。
我们可以将待发送的数据按照一定的顺序加入到队列中,然后通过轮询的方式从队列中取出数据进行发送。
第三步:创建串口发送队列首先,我们需要定义一个结构体来表示队列中的每一个数据项,这个结构体包含了待发送的数据以及其他需要的信息。
然后,我们可以使用数组或者链表等数据结构来表示队列,并定义相应的指针变量指向队列的头部和尾部。
同时,我们还需要定义一些辅助函数来对队列进行初始化、入队和出队等操作。
第四步:发送数据在发送数据之前,我们需要先判断队列是否为空,如果队列为空则表示没有待发送的数据。
否则,我们从队列头部取出一个数据项,并将其中的数据发送出去。
发送完成之后,我们需要释放掉这个数据项所占用的内存空间,并更新队列的头部指针。
第五步:整合代码并测试最后,我们将上述的功能代码进行整合,并编写一个简单的测试程序进行测试。
测试程序中,我们可以通过串口接收来模拟接收到的数据,并将其加入到发送队列中。
然后,通过定时器或者其他方式,不断地发送队列中的数据。
用c语言实现串口读写程序
用c语言实现串口读写程序一、前言串口通信是一种常见的通信方式,它可以实现单片机与计算机之间的数据传输。
在嵌入式系统中,使用串口通信可以方便地进行调试和数据传输。
本文将介绍如何使用C语言实现串口读写程序。
二、硬件准备在进行串口通信之前,需要准备好相应的硬件设备。
一般来说,需要一台计算机和一个串口转USB模块(或者直接使用带有串口接口的计算机)。
同时,在单片机端也需要连接一个串口模块。
三、C语言编程实现1. 打开串口在C语言中,可以通过打开文件的方式来打开串口设备。
下面是一个示例代码:```#include <stdio.h>#include <fcntl.h>#include <termios.h>int open_serial_port(const char *device_path, int baud_rate) {int fd;struct termios options;fd = open(device_path, O_RDWR | O_NOCTTY | O_NDELAY); if (fd == -1) {perror("open_serial_port: Unable to open device");return -1;}fcntl(fd, F_SETFL, 0);tcgetattr(fd, &options);cfsetispeed(&options, baud_rate);cfsetospeed(&options, baud_rate);options.c_cflag |= (CLOCAL | CREAD);options.c_cflag &= ~PARENB;options.c_cflag &= ~CSTOPB;options.c_cflag &= ~CSIZE;options.c_cflag |= CS8;options.c_lflag &= ~(ICANON | ECHO | ECHOE | ISIG);options.c_oflag &= ~OPOST;tcsetattr(fd, TCSANOW, &options);return fd;}```在上述代码中,open_serial_port函数用来打开串口设备,并设置相应的参数。
C语言实现串口通信
C语言实现串口通信在使用系统调用函数进行串口通信之前,需要打开串口设备并设置相关参数。
打开串口设备可以使用open(函数,设置串口参数可以使用termios结构体和tcsetattr(函数。
以下是一个简单的串口通信接收数据的示例代码:```c#include <stdio.h>#include <stdlib.h>#include <fcntl.h>#include <unistd.h>#include <termios.h>int mainint fd; // 串口设备文件描述符char buff[255]; // 存储接收到的数据int len; // 接收到的数据长度//打开串口设备fd = open("/dev/ttyS0", O_RDONLY);if (fd < 0)perror("Failed to open serial port");return -1;}//设置串口参数struct termios options;tcgetattr(fd, &options);cfsetspeed(&options, B1200); // 设置波特率为1200 tcsetattr(fd, TCSANOW, &options);//接收数据while (1)len = read(fd, buff, sizeof(buff)); // 从串口读取数据if (len > 0)buff[len] = '\0'; // 将接收到的数据转为字符串printf("Received data: %s\n", buff);}}//关闭串口设备close(fd);return 0;```这段代码首先通过open(函数打开串口设备文件"/dev/ttyS0",然后使用tcgetattr(函数获取当前设置的串口参数,接着使用cfsetspeed(函数设置波特率为1200,最后使用tcsetattr(函数将设置好的串口参数写回。
iar c语言 通讯例程
iar c语言通讯例程摘要:本文将介绍如何使用IAR Embedded Workbench(IAR EW)开发环境中的C语言编写一个简单的串口通讯例程。
我们将使用IAR EW的GUI设计器来创建和配置项目,然后编写和调试代码。
最后,我们将测试所开发的串口通讯例程在实际的硬件平台上。
1. 安装和配置IAR Embedded Workbench首先,访问IAR Systems官方下载并安装IAR Embedded Workbench最新版。
安装完成后,启动IAR EW,然后创建一个新的项目。
2. 创建新项目在IAR EW主界面上,点击“新建”按钮,在弹出的对话框中,选择“C”作为项目类型,填写项目名称和位置,然后点击“确定”按钮。
3. 配置通讯接口在项目向导中,选择“通信”作为项目类型,然后选择“串行”作为通信方式。
在“硬件”选项卡下,选择合适的开发板和串口模块。
点击“下一步”按钮。
4. 编写串口通讯代码在项目向导的“代码”选项卡下,选择“C”作为编程语言。
点击“下一步”按钮。
在“高级”选项卡下,勾选“添加头文件和库文件”复选框,然后点击“完成”按钮。
现在,我们可以在项目工作区中看到刚刚创建的串口通讯例程。
首先,我们创建一个名为`serial_communication.c`的新源文件,然后在其中编写以下代码:```c#include <stdio.h>#include <stdbool.h>#include "peripheral_serial.h"void UART0_ISR(void) {uint16_t event = UART0_GET_EVENT();if (event == UART_EVENT_STOPPED) {printf("UART0 STOPPED\\n");} else if (event == UART_EVENT_READY) {printf("UART0 READY\\n");} else if (event == UART_EVENT_TXEMPTY) {printf("UART0 TX EMPTY\\n");} else if (event == UART_EVENT_RXFULL) {printf("UART0 RX FULL\\n");} else {printf("UART0 EVENT: 0x%04X\\n", event);}}int main(void) {UART0_Config_t config = {.baudrate = 9600, // Baud rate: 9600 bps.parity = UART_PARITY_NONE, // Parity: None.stopbits = UART_STOPBITS_1, // Number of stop bits: 1.bitmode = UART_BITMODE_8_N_1, // Data size: 8 bits, 1 stop bit};UART0_Start(&config);bool running = true;while (running) {uint8_t data;if (UART0_GetChar(&data)) {printf("%d\\n", data);} else {printf("Error reading data\\n");}}UART0_Stop(); // Stop UART communication to prevent overflow in event looprunning = false; // Set flag to false to exit the while loop and main functionreturn 0;}```这个简单的例程首先配置UART0模块,然后在一个无限循环中接收和发送数据。
51单片机的串口通信程序(C语言)
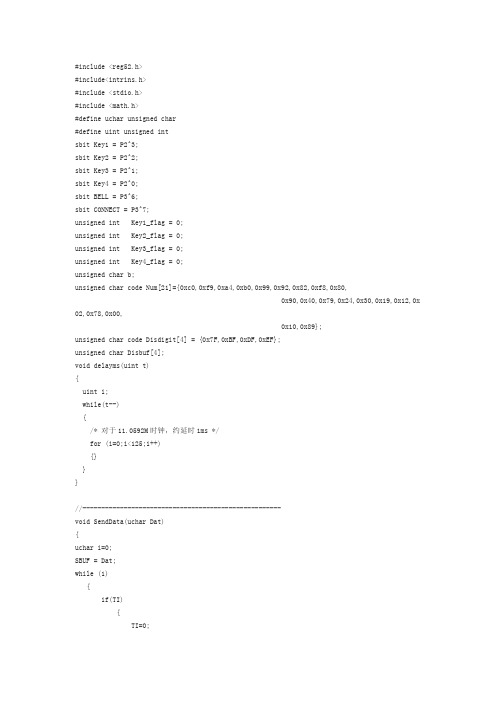
#include <reg52.h>#include<intrins.h>#include <stdio.h>#include <math.h>#define uchar unsigned char#define uint unsigned intsbit Key1 = P2^3;sbit Key2 = P2^2;sbit Key3 = P2^1;sbit Key4 = P2^0;sbit BELL = P3^6;sbit CONNECT = P3^7;unsigned int Key1_flag = 0;unsigned int Key2_flag = 0;unsigned int Key3_flag = 0;unsigned int Key4_flag = 0;unsigned char b;unsigned char code Num[21]={0xc0,0xf9,0xa4,0xb0,0x99,0x92,0x82,0xf8,0x80,0x90,0x40,0x79,0x24,0x30,0x19,0x12,0x02,0x78,0x00, 0x10,0x89};unsigned char code Disdigit[4] = {0x7F,0xBF,0xDF,0xEF};unsigned char Disbuf[4];void delayms(uint t){uint i;while(t--){/* 对于11.0592M时钟,约延时1ms */for (i=0;i<125;i++){}}}//-----------------------------------------------------void SendData(uchar Dat){uchar i=0;SBUF = Dat;while (1){if(TI){TI=0;break;}}}void ScanKey(){if(Key1 == 0){delayms(100); if(Key1 == 0){Key1_flag = 1; Key2_flag = 0; Key3_flag = 0;Key4_flag = 0;Key1 = 1;}else;}if(Key2 == 0){delayms(100);if(Key2 == 0){Key2_flag = 1; Key1_flag = 0; Key3_flag = 0;Key4_flag = 0;Key2 = 1;}else;}if(Key3 == 0){delayms(50);if(Key3 == 0){Key3_flag = 1; Key1_flag = 0; Key2_flag = 0;Key4_flag = 0;Key3 = 1;}else;}if(Key4 == 0){delayms(50);if(Key4 == 0){Key4_flag = 1;Key1_flag = 0;Key2_flag = 0;Key3_flag = 0;Key4 = 1;}else;}else;}void KeyProc(){if(Key1_flag){TR1 = 1;SendData(0x55);Key1_flag = 0; }else if(Key2_flag){TR1 = 1;SendData(0x11); Key2_flag = 0;}else if(Key3_flag) {P1=0xff;BELL = 0;CONNECT = 1;Key3_flag = 0;}else if(Key4_flag){CONNECT = 0;BELL = 1;Key4_flag = 0;}else;}void Initdisplay(void){Disbuf[0] = 1;Disbuf[1] = 2;Disbuf[2] = 3;Disbuf[3] = 4;}void Display() //显示{unsigned int i = 0;unsigned int temp,count;temp = Disdigit[count]; P2 =temp;temp = Disbuf[count];temp = Num[temp];P0 =temp;count++;if (count==4)count=0;}void time0() interrupt 1 using 2 {Display();TH0 = (65535 - 2000)/256;TL0 = (65535 - 2000)%256;}void main(){Initdisplay();TMOD = 0x21;TH0 = (65535 - 2000)/256;TL0 = (65535 - 2000)%256;TR0 = 1;ET0 = 1;TH1 = 0xFD; //11.0592MTL1 = 0xFD;PCON&=0x80;TR1 = 1;ET1 = 1;SCON = 0x40; //串口方式REN = 1;PT1 = 0;PT0 = 1;EA = 1;while(1){ScanKey();KeyProc();if(RI){Disbuf[0] = 0;Disbuf[1] = 20;Disbuf[2] = SBUF>>4;Disbuf[3] = SBUF&0x0f;RI = 0;}else;}}51单片机串口通信C语言程序2**************************************************************; 平凡单片机工作室;ckss.asm;功能:反复向主机送AA和55两个数;主机使用一个串口调试软件设置19200,n,8,1***************************************************************/#include "reg51.h"#define uchar unsigned char#define uint unsigned int//延时程序//////////////////由Delay参数确定延迟时间*/void mDelay(unsigned int Delay){ unsigned int i;for(;Delay>0;Delay--){ for(i=0;i<124;i++){;}}}//////////////////// 主程序////////////////////void main(){ uchar OutDat; //定义输出变量TMOD=0x20; //TMOD=0TH1=0xf3; //12MHZ ,BPS:4800,N,8,1TL1=0xf3;PCON=0x80; //方式一TR1=1; //?????????????????????????????SCON=0x40; //串口通信控制寄存器模式一OutDat=0xaa; //向串口发送固定数据值for(;;) //循环程序{SBUF=OutDat;//发送数据for(;;){ if(TI) //发送中断位当发送停止位时置1,表示发送完成break;}mDelay(500);TI=0; //清零中断位OutDat=~OutDat; //显示内容按位取反}}。
linux c语言编写modbus rtu例程 -回复

linux c语言编写modbus rtu例程-回复如何使用C语言在Linux下编写Modbus RTU例程,以实现数据的读取和写入。
Modbus是一种通信协议,用于在工业自动化系统中实现设备之间的数据通信。
RTU是Modbus协议的一种传输格式,其中数据以二进制形式传输。
在Linux系统中,我们可以使用C语言来编写Modbus RTU例程。
下面将一步一步回答如何实现数据的读取和写入。
第一步:设置串口参数在Linux中,我们可以使用串口来与Modbus设备进行通信。
首先,我们需要设置串口的波特率、数据位、停止位和校验位。
这可以通过C语言中的termios库函数来实现。
c#include <termios.h>int set_serial_port(int fd, int baudrate) {struct termios options;tcgetattr(fd, &options);cfsetispeed(&options, baudrate);cfsetospeed(&options, baudrate);options.c_cflag = (CLOCAL CREAD);options.c_cflag &= ~CSIZE;options.c_cflag = CS8;options.c_cflag &= ~PARENB;options.c_cflag &= ~CSTOPB;options.c_cflag &= ~CRTSCTS;tcsetattr(fd, TCSANOW, &options);}以上代码中,`set_serial_port`函数用于设置串口参数。
`fd`参数为串口文件描述符,`baudrate`参数为波特率。
其中,`cfsetispeed`和`cfsetospeed`函数用于设置输入和输出速度,`CLOCAL`和`CREAD`标志用于使串口工作在本地模式和可读模式,`CS8`标志用于设置8位数据位,`PARENB`标志用于禁用奇偶校验,`CSTOPB`标志用于设置停止位为1位,`CRTSCTS`标志用于禁用硬件流控制。
c语言串口编程实例
c语言串口编程实例摘要:1.串口编程基础2.C 语言串口编程步骤3.C 语言串口编程实例4.实例详解5.总结正文:一、串口编程基础串口编程是指通过计算机串行接口进行数据通信的编程方式。
串口(Serial Port)是一种计算机硬件接口,可以通过串行通信传输数据。
与并行通信相比,串行通信只需一条数据线,传输速度较慢,但具有线路简单、成本低的优点。
因此,串口编程在电子设备、计算机外设、通信设备等领域有广泛的应用。
二、C 语言串口编程步骤1.包含头文件:在使用C 语言进行串口编程时,首先需要包含头文件`<reg52.h>`或`<intrins.h>`。
2.配置串口:配置串口包括设置波特率、数据位、停止位、奇偶校验等参数。
3.初始化串口:初始化串口主要是初始化串口硬件,如配置UART(通用异步收发器)等。
4.打开串口:打开串口是指使能串口通信功能,以便数据传输。
5.读写串口:通过`in`和`out`语句实现数据的输入输出。
6.关闭串口:在数据传输完成后,需要关闭串口以节省资源。
7.串口通信:通过循环寄存器、缓存寄存器或FIFO(先进先出)等方法实现数据的收发。
三、C 语言串口编程实例以下是一个简单的C 语言串口编程实例,该实例通过串口发送数据“Hello, World!”:```c#include <reg52.h>#include <intrins.h>sbit UART_TXD = P3^1; // 配置UART TXD 引脚void init_uart(); // 初始化UART 函数void send_data(unsigned char dat); // 发送数据函数void main(){init_uart(); // 初始化UARTsend_data("H"); // 发送字符"H"send_data("e"); // 发送字符"e"send_data("l"); // 发送字符"l"send_data("l"); // 发送字符"o"send_data(" "); // 发送空格send_data("W"); // 发送字符"W"send_data("o"); // 发送字符"r"send_data("r"); // 发送字符"l"send_data("d"); // 发送字符"d"while(1); // 循环等待}void init_uart() // 初始化UART 函数{TMOD = 0x20; // 设置定时器1 为工作状态TH1 = 0xfd; // 设置定时器1 的计数值TL1 = 0xfd; // 设置定时器1 的计数值TR1 = 1; // 使能定时器1SCON = 0x40; // 设置串口工作状态ES = 0; // 开总中断EA = 1; // 开总中断允许}void send_data(unsigned char dat) // 发送数据函数{SBUF = dat; // 将数据存入缓存寄存器while(!TI); // 等待发送缓存清空TI = 0; // 清空发送缓存}```四、实例详解1.配置串口:通过设置UART TXD 引脚为P3.1,确定波特率、数据位、停止位和奇偶校验等参数。
c语言 串口发送数据排队例程
C语言串口发送数据排队例程在C语言中,串口发送数据通常需要使用特定的库函数。
以下是一个简单的例子,展示如何使用Windows API中的WriteFile函数向串口发送数据。
c#include <windows.h>#include <stdio.h>int main() {HANDLE hSerial;char szSerialName[] = "COM1"; // 串口名称char szWriteData[] = "Hello, world!"; // 要发送的数据DWORD dwBytesWritten; // 写入的字节数// 打开串口hSerial = CreateFile(szSerialName, GENERIC_READ | GENERIC_WRITE, 0, NULL, OPEN_EXISTING, FILE_ATTRIBUTE_NORMAL, NULL);if (hSerial == INVALID_HANDLE_VALUE) {printf("无法打开串口%s\n", szSerialName);return 1;}// 设置串口参数DCB dcbSerialParams = {0};dcbSerialParams.DCBlength = sizeof(dcbSerialParams);if (!GetCommState(hSerial, &dcbSerialParams)) {printf("无法获取串口状态\n");CloseHandle(hSerial);return 1;}dcbSerialParams.BaudRate = CBR_9600; // 设置波特率为9600dcbSerialParams.ByteSize = 8; // 设置数据位为8位dcbSerialParams.StopBits = ONESTOPBIT; // 设置停止位为1位if (!SetCommState(hSerial, &dcbSerialParams)) {printf("无法设置串口参数\n");CloseHandle(hSerial);return 1;}// 发送数据if (!WriteFile(hSerial, szWriteData, strlen(szWriteData), &dwBytesWritten,NULL)) {printf("无法写入串口\n");} else {printf("已发送%lu 字节数据\n", dwBytesWritten);}// 关闭串口CloseHandle(hSerial);return 0;}在这个例子中,我们首先使用CreateFile函数打开一个名为"COM1"的串口。
一个c语言的串口通信程序范例
#include 〈stdio.h>#include <dos。
h>#include <conio。
h〉#include <string。
h〉#define COM232 0x2f8#define COMINT 0x0b#define MaxBufLen 500#define Port8259 0x20#define EofInt 0x20static int comportaddr;static char intvectnum;static unsigned char maskb;static unsigned char Buffer[MaxBufLen];static int CharsInBuf,CircIn,CircOut;static void (interrupt far *OldAsyncInt)();static void interrupt far AsyncInt(void);void Init_COM(int ComPortAddr, unsigned char IntVectNum, int Baud, unsigned char Data, unsigned char Stop, unsigned char Parity){unsigned char High,Low;int f;comportaddr=ComPortAddr;intvectnum=IntVectNum;CharsInBuf=0;CircIn=0;CircOut=0;f=(Baud/100);f=1152/f; High=f/256;Low=f-High*256;outp(ComPortAddr+3,0x80);outp(ComPortAddr,Low);outp(ComPortAddr+1,High);Data=(Data-5)|((Stop-1)*4);if(Parity==2) Data=Data|0x18;else if(Parity==1) Data=Data|0x8;outp(ComPortAddr+3,Data);outp(ComPortAddr+4,0x0a);outp(ComPortAddr+1,0x01);disable();OldAsyncInt=getvect( IntVectNum ); setvect( IntVectNum, AsyncInt );enable();maskb=inp(Port8259+1);if(IntVectNum==0x0c)outp(Port8259+1,maskb&0xef); else outp(Port8259+1,maskb&0xf7);}static void interrupt far AsyncInt(void){disable();if(CharsInBuf<MaxBufLen)Buffer[CircIn]=inp(comportaddr);if(CircIn〈MaxBufLen-1) CircIn++;else CircIn=0;if(CircIn==CircOut) CircOut++;else CharsInBuf++;enable();outp(Port8259,EofInt);}void Restore(void){setvect(intvectnum,OldAsyncInt);outp(Port8259+1,maskb);}int GetCharInBuf(unsigned char *Char)int Flag;Flag=—1;if(CharsInBuf>0){(*Char)=Buffer[CircOut];if(CircOut<MaxBufLen—1)CircOut++;else CircOut=0;CharsInBuf—-;Flag=0;}return Flag;}int SendChar(unsigned char Char){if((inp(comportaddr+5)&0x20)==0) return —1; outp(comportaddr,Char);return 0;}main(){int i,c;unsigned char InChar;Init_COM(COM232,COMINT,1200,8,1,0); while(1){if(kbhit()){if((InChar=getch())==27)break;else while(SendChar(InChar));}if(GetCharInBuf(&InChar)==0)printf("%c",InChar);}Restore();}。
模拟串口的三种方法及C语言
模拟串口的三种方法及C语言模拟串口是软件中模拟实现串口通信的一种方法,它是在电脑上通过软件模拟两个串口之间的传输,用来测试、调试串口相关的应用程序。
本文将介绍三种常见的模拟串口的方法,并提供C语言代码示例。
1.使用虚拟串口软件虚拟串口软件是一种用于模拟串口通信的应用程序。
它创建了虚拟的串口设备,使其在电脑上模拟出真实的串口通信环境。
通过虚拟串口软件,可以实现串口的模拟收发数据,可以连接到串口测试工具、串口调试工具或者自己编写的串口通信程序上。
以下是一个使用虚拟串口软件模拟串口通信的C语言代码示例:```c#include <stdio.h>#include <windows.h>int mai//打开虚拟串口//检测串口是否成功打开printf("Error in opening serial port\n");return 1;}//进行串口通信操作,如发送、接收数据//关闭串口return 0;```在这个示例中,我们使用了Windows操作系统的函数`CreateFile`来打开一个虚拟串口,这里的串口名称是"COM1"。
然后可以调用相关函数进行串口通信操作,最后用`CloseHandle`函数关闭串口。
2.使用串口驱动模拟在一些情况下,可以通过修改电脑的串口驱动程序来模拟串口通信。
这种方法需要更深入的了解操作系统的底层机制,并进行驱动程序的开发和修改。
通过修改串口驱动程序,可以模拟出一个虚拟的串口设备,通过这个设备进行串口通信。
以下是一个简单的C语言代码示例,用于修改串口驱动程序来模拟串口通信:```c#include <stdio.h>#include <fcntl.h>#include <unistd.h>int maiint fd;//打开串口设备fd = open("/dev/ttyS0", O_RDWR);//检测串口是否成功打开if (fd < 0)printf("Error in opening serial port\n");return 1;}//进行串口通信操作,如发送、接收数据//关闭串口设备close(fd);return 0;```在这个示例中,我们使用了Linux操作系统的函数`open`来打开一个串口设备,这里的设备名称是"/dev/ttyS0"。
- 1、下载文档前请自行甄别文档内容的完整性,平台不提供额外的编辑、内容补充、找答案等附加服务。
- 2、"仅部分预览"的文档,不可在线预览部分如存在完整性等问题,可反馈申请退款(可完整预览的文档不适用该条件!)。
- 3、如文档侵犯您的权益,请联系客服反馈,我们会尽快为您处理(人工客服工作时间:9:00-18:30)。
c语言串口通信范例 This manuscript was revised by the office on December 22, 2012一个c语言的串口通信程序范例标签:分类:最近接触一个项目,用HL-C1C激光位移传感器+易控组态软件完成生产线高度跳变检测,好久没有接触c c#,一些资料,找来做个记录,也许大家用的着#include <>#include <>#include <>#include <>#define COM232 0x2f8#define COMINT 0x0b#define MaxBufLen 500#define Port8259 0x20#define EofInt 0x20static int comportaddr;static char intvectnum;static unsigned char maskb;static unsigned char Buffer[MaxBufLen];static int CharsInBuf,CircIn,CircOut;static void (interrupt far *OldAsyncInt)();static void interrupt far AsyncInt(void);void Init_COM(int ComPortAddr, unsigned char IntVectNum, int Baud, unsigned char Data, unsigned char Stop, unsigned char Parity) {unsigned char High,Low;int f;comportaddr=ComPortAddr;intvectnum=IntVectNum;CharsInBuf=0;CircIn=0;CircOut=0;f=(Baud/100);f=1152/f; High=f/256;Low=f-High*256;outp(ComPortAddr+3,0x80);outp(ComPortAddr,Low);outp(ComPortAddr+1,High);Data=(Data-5)|((Stop-1)*4);if(Parity==2) Data=Data|0x18;else if(Parity==1) Data=Data|0x8; outp(ComPortAddr+3,Data);outp(ComPortAddr+4,0x0a);outp(ComPortAddr+1,0x01);disable();OldAsyncInt=getvect( IntVectNum ); setvect( IntVectNum, AsyncInt ); enable();maskb=inp(Port8259+1);if(IntVectNum==0x0c)outp(Port8259+1,maskb&0xef); else outp(Port8259+1,maskb&0xf7);}static void interrupt far AsyncInt(void){disable();if(CharsInBuf<MaxBufLen)Buffer[CircIn]=inp(comportaddr);if(CircIn<MaxBufLen-1) CircIn++;else CircIn=0;if(CircIn==CircOut) CircOut++;else CharsInBuf++;enable();outp(Port8259,EofInt);}void Restore(void){setvect(intvectnum,OldAsyncInt);outp(Port8259+1,maskb);}int GetCharInBuf(unsigned char *Char) {int Flag;Flag=-1;if(CharsInBuf>0){(*Char)=Buffer[CircOut];if(CircOut<MaxBufLen-1)CircOut++;else CircOut=0;CharsInBuf--;Flag=0;}return Flag;}int SendChar(unsigned char Char){if((inp(comportaddr+5)&0x20)==0) return -1; outp(comportaddr,Char);return 0;}main(){int i,c;unsigned char InChar;Init_COM(COM232,COMINT,1200,8,1,0);while(1){if(kbhit()){if((InChar=getch())==27)break; else while(SendChar(InChar)); }if(GetCharInBuf(&InChar)==0)printf("%c",InChar);}Restore();}接收程序:#include <>#include <>#include <>#include <>#include <>#include <>#define RXD 0 .);void putb(unsigned char ch).){unsigned char ch;ch=inportb(portaddr+RXD);putb(ch);incount++; n");exit(1);}else{printf("The used port is :COM%d\n",ComNum); };Getportaddr(port); .#else#define __CPPARGS#endif#define SER_RBF 0#define SER_THR 0#define SER_IER 1#define SER_IIR 2#define SER_LCR 3#define SER_MCR 4#define SER_LSR 5#define SER_MSR 6#define SER_DLL 0#define SER_DLH 1#define SER_BAUD_1200 96 #define SER_BAUD_2400 48 #define SER_BAUD_9600 12 #define SER_BAUD_19200 6 #define SER_GP02 8#define COM_1 0x3F8#define COM_2 0x2F8 /*/ base port address of port 1*/#define COM_3 0x3E8#define COM_4 0x2E8#define SER_STOP_1 0 /*/ 1 stop bit per character*/#define SER_STOP_2 4 /*/ 2 stop bits per character*/#define SER_BITS_5 0 /*/ send 5 bit characters*/#define SER_BITS_6 1 /*/ send 6 bit characters*/#define SER_BITS_7 2 /*/ send 7 bit characters*/#define SER_BITS_8 3 /*/ send 8 bit characters*/#define SER_PARITY_NONE 0 /*/ no parity*/#define SER_PARITY_ODD 8 /*/ odd parity*/#define SER_PARITY_EVEN 24 /*/ even parity*/#define SER_DIV_LATCH_ON 128 /*/ used to turn reg 0,1 into divisor latch*/ #define PIC_IMR 0x21 /*/ pic's interrupt mask reg.*/#define PIC_ICR 0x20 /*/ pic's interupt control reg.*/#define INT_SER_PORT_0 0x0C /*/ port 0 interrupt com 1 & 3*/#define INT_SER_PORT_1 0x0B /*/ port 0 interrupt com 2 & 4*/#define SERIAL_BUFF_SIZE 128 /*/ current size of circulating receivebuffer*/void interrupt far (*Old_Isr)(__CPPARGS); /*/ holds old com port interrupt handler*/char ser_buffer[SERIAL_BUFF_SIZE]; /*/ the receive buffer*/int ser_end = -1,ser_start=-1; /*/ indexes into receive buffer*/int ser_ch, char_ready=0; /*/ current character and ready flag*/int old_int_mask; /*/ the old interrupt mask on the PIC*/int open_port; /*/ the currently open port*/int serial_lock = 0; /*/ serial ISR semaphore so the buffer*//*/ isn't altered will it is being written*//*/ to by the ISR*//*-------------写串口-----------------*/void interrupt far Serial_Isr(__CPPARGS){serial_lock = 1;ser_ch = inp(open_port + SER_RBF);if (++ser_end > SERIAL_BUFF_SIZE-1)ser_end = 0;ser_buffer[ser_end] = ser_ch;++char_ready;outp(PIC_ICR,0x20);serial_lock = 0;}int Ready_Serial(){return(char_ready);}/*--------------读串口--------------*/ int Serial_Read(){int ch;while(serial_lock){}if (ser_end != ser_start){if (++ser_start > SERIAL_BUFF_SIZE-1)ser_start = 0;ch = ser_buffer[ser_start];printf("%x",ch);if (char_ready > 0)--char_ready;return(ch);}elsereturn(0);}/*--------------写串口-----------------*/ Serial_Write(char ch){while(!(inp(open_port + SER_LSR) & 0x20)){}asm clioutp(open_port + SER_THR, ch);asm sti}/*-----------初始化串口---------------*/Open_Serial(int port_base, int baud, int configuration) {open_port = port_base;disable();outp(port_base + SER_LCR, SER_DIV_LATCH_ON);outp(port_base + SER_DLL, baud);outp(port_base + SER_DLH, 0);outp(port_base + SER_LCR, configuration);outp(port_base + SER_MCR, SER_GP02);outp(port_base + SER_IER, 1);if (port_base == COM_1 || port_base==COM_3){Old_Isr = _dos_getvect(INT_SER_PORT_0);_dos_setvect(INT_SER_PORT_0, Serial_Isr);printf("\nOpening Communications Channel Com Port #1/3...\n");}else{Old_Isr = _dos_getvect(INT_SER_PORT_1);_dos_setvect(INT_SER_PORT_1, Serial_Isr);printf("\nOpening Communications Channel Com Port #2/4...\n");}old_int_mask = inp(PIC_IMR);outp(PIC_IMR, (port_base==COM_1) (old_int_mask & 0xEF) : (old_int_mask & 0xF7 ));enable();/*-------------关闭串口--------------*/Close_Serial(int port_base){outp(port_base + SER_MCR, 0);outp(port_base + SER_IER, 0);outp(PIC_IMR, old_int_mask );if (port_base == COM_1){_dos_setvect(INT_SER_PORT_0, Old_Isr);printf("\nClosing Communications Channel Com Port #1.\n"); }else{_dos_setvect(INT_SER_PORT_1, Old_Isr);printf("\nClosing Communications Channel Com Port #2.\n");}/*-------------发送应用----------------*/ void main(int argc,char *argv[]){char ch,press;int done=0;FILE *fp;argc=2;//argv[1]="c:\\";if(argc<2){printf("\nUsage:display !!!");// exit(1);}if((fp=fopen(argv[1],"r+b"))==NULL)printf("cannot open the file\n");// exit(0);}fseek(fp, 0, SEEK_SET);Open_Serial(COM_1,SER_BAUD_9600,SER_PARITY_EVEN| SER_BITS_8 | SER_STOP_1); printf("com:1;bps:9600;parity:even;bits:8;stop bit:1");printf("press any key to begin sending");getch();//Serial_Write(''); //该语句可用于发送单个字符while(!done&&ch != EOF) //发送文件开始{ch = fgetc(fp);//if(ch==EOF) Serial_Write(27);Serial_Write(ch);delay(30);if (kbhit()){press=getch();if (press==27){Serial_Write(27);done=1;}}}Close_Serial(COM_1);fclose(fp);}下面介绍最重要的MFC:CWnd:窗口,它是大多数“看得见的东西”的父类(Windows里几乎所有看得见的东西都是一个窗口,大窗口里有许多小窗口),比如视图CView、框架窗口CFrameWnd、工具条CToolBar、对话框CDialog、按钮CButton,etc;一个例外是菜单(CMenu)不是从窗口派生的。
