
MWAN3配置手册
1 MWAN3配置手册
目录
MWAN3配置手册......................................................................................................................... 1
1. 说明 ................................................................................................................................ 2
2. 准备虚拟接口 ................................................................................................................ 2
2.1. 命令行登陆路由器创建虚拟网卡 ......................................................................... 2
2.2. WEB管理界面中添加新WAN接口 ..................................................................... 3
3. 配置MWAN3 ............................................................................................................... 7
3.1. 进入MWAN3管理界面 ......................................................................................... 7
3.2. 配置MWAN3的接口 ............................................................................................. 7
3.3. 配置MWAN3的Members .................................................................................. 10
3.4. 配置MWAN3的Policies ..................................................................................... 11
3.5. 配置MWAN3的Rule .......................................................................................... 14
3.6. 重启MWAN3服务 ............................................................................................... 14
4. MWAN3的效果 ......................................................................................................... 16
W.O.R.K.E.R
2
1. 说明
此文档适用于本人在恩山论坛所发帖子http://www.right.com.cn/forum/thread-152506-1-1.html所对应的固件版本。其他
版本的openwrt固件可以参考,但不保证完全一样。
此文档是基于我对MWAN3的理解而做,难免有不对的地方,欢迎指正。
2. 准备虚拟接口
2.1. 命令行登陆路由器创建虚拟网卡
1. 用SecureCRT或putty登录路由器
2. 编辑/etc/rc.local
vi /etc/rc.local
在“exit 0”之前添加以下内容: ip link add link eth0.2 name macvlan0 type macvlan
ifconfig macvlan0 hw ether FE:BC:51:C4:0A:23
ifconfig macvlan0 up
ip link add link eth0.2 name macvlan1 type macvlan
ifconfig macvlan1 hw ether E1:AC:B8:71:E9:B0
ifconfig macvlan1 up
exit 0
说明: 1) 为多拨至少要创建2个虚拟网卡
W.O.R.K.E.R
3 2) macvlan0和macvlan1为虚拟网卡的名字,可以随意命名
3) mac地址FE:BC:51:C4:0A:23和E1:AC:B8:71:E9:B0自己随意指定
3. 让虚拟网卡生效
1) 方法1:reboot
2) 方法2:sh /etc/rc.local
3) 验证:ifconfig –a
2.2. WEB管理界面中添加新WAN接口
1. 关闭默认WAN口
登陆WEB管理页面后,选择“网络->接口”
2. 点WAN口的修改
3. 在协议处选择不配置协议,并点“切换协议”按钮,再点“保存&应用”按钮
W.O.R.K.E.R
4
4. 添加第一个基于虚拟网卡的新WAN:VWAN0
1) 返回“网络->接口”页面,点“添加新接口”按钮
2) 填写新接口参数并提交
² 接口名称:VWAN0 --名字自己随便起
² 协议:
PPPoE W.O.R.K.E.R
5 ² 以太网适配器:macvlan0 --前面创建好的虚拟网卡 3) 自动进入接口设置页面
填写必要的基本参数,先别提交,再点“防火墙设置”页面
防火墙设置,点“wan”区,之后点“保存&应用”按钮
4) 如果你的ADSL线路正常此时网络已经可以连通了,可以在“网络->接口”
页面中看到
W.O.R.K.E.R
6 5. 按照上面的步骤添加第二个基于虚拟网卡的新WAN:VWAN1
一点重要配置,在接口VWAN1的“高级设置”页面中将“使用网关跃点”
改为非0的数值,且与VWAN0的该值不同,如果你打算陪着多个wan口,
该值必须全都不同。
添加好如果线路支持多播后可以在“网络->接口”页面中看到
W.O.R.K.E.R
7 3. 配置MWAN3
3.1. 进入MWAN3管理界面
选择“网络->Load Balancing”页面
3.2. 配置MWAN3的接口
1. 在总览页面选择“配置”标签
W.O.R.K.E.R
8
2. 删除一切默认接口,并添加新的接口VWAN0
3. 自动进入VWAN0的细节设置
填写完毕后点“保存&应用”
W.O.R.K.E.R
9
说明:此页其实需要填写的就是Tracking IP,也就是mwan3判断该接口是否online的外ping IP,我们至少要填写一个,可以写多个,我这里选用了:
114.114.114.114和223.5.5.5这两个国内DNS的IP
4. 同样的步骤添加另一接口VWAN1,完成之后如下图
W.O.R.K.E.R
10 3.3. 配置MWAN3的Members
1. 点击“Members”标签进入Members配置页面
删除全部默认的Members,在添加框内写入第一个新的Member:vwan0_m1_w1,并按添加按钮
2. 自动进入Member细节配置页面
W.O.R.K.E.R
11
1) 接口选择VWAN0
2) 跃点数:1
3) Weight:1
4) 点“保存&应用”
3. 如上述步骤添加另一Member:vwan1_m1_w1
3.4. 配置MWAN3的Policies
1. 点击“Policies”标签进入Policies配置页面,删除balanced之外的其他全部
策略,并点击balance策略的“修改”按钮
W.O.R.K.E.R
12 2. 修改balance策略
1) Member used按顺序分别选取:vwan0_m1_w1,vwan1_m1_w1
2) 点击“保存&应用”按钮
3. 添加第一个新策略vwan0_only
在添加框内写入策略vwan0_only并按“添加按钮”
W.O.R.K.E.R
13 4. 自动进入vwan0_only的详细配置页面
1) Member used只选vwan0_m1_w1
2) 点击“保存&应用”
5. 同上添加另一策略
vwan1_only W.O.R.K.E.R
14 3.5. 配置MWAN3的Rule
点击“Rule”标签进入规则配置页面,如果你自己不知道哪种协议从那个链路走
的话或者是你配置的WAN口非常多的话,仅保留default_rule,剩下的奇偶规则
全部删除就可以了。
3.6. 重启MWAN3服务
到此全部配置完毕,但是有可能你在状态页面看到的两个链路都是offline的,没
关系,重启下MWAN3服务就可以了。
W.O.R.K.E.R
15 1. 点击Advanced标签进入高级配置页面
2. 点击“网络诊断”标签进入网络诊断页面
点击“Restart MWAN” 3. 回到总览页面查看状态
W.O.R.K.E.R
《配置管理手册》

配置管理手册
Version 1.0
北京紫光捷通公司
工程软件部
目录
1引言 ................................................................................................................................................... 3
1.1编写目的 ................................................................................................................................ 3
1.2 阅读指导 ............................................................................................................................... 3
2基本约定 ........................................................................................................................................... 3
2.1定义 ........................................................................................................................................ 3
2.2适用的标准、条例和约定 ..................................................................................................... 5
MQ03-LTE-M-FIRE 蜂窝通信器安装和操作手册说明书
MQ03-LTE-M-FIRECellular Communicator with Dial Capture interfaceInstallation and Operation ManualDoc. No. 03002 V 1.1 08/2020© M2M Services1 Kukush Str, building M8Sofia 1309, About this documentThis document was developed and wholly owned by M2M Services. It is intended to assist trained personnel with the installation of MQ03-LTE-M-FIRE. M2M Services reserves the right to modify and revise this manual without notice. Agency Listings and ApprovalsThese listings and approvals apply only to the module specified in this document. In some cases, the listing may be in process.FCC StatementThis equipment complies with FCC rules Part 15, FCC registration No. XMR201707BG96 and operation is subject to the following conditions:- This device may not cause harmful interference, and- This device must accept any interference received.ETL No. 5013005, conforms to the following UL standards:CAL FIRE OSFM BML No. 7300-2329:0500UL 864 – Control Units and Accessories for Fire Alarm SystemsUL 1610 – Central-Station Burglar Alarm UnitsLimited LiabilityThe user agrees that despite the Device could reduce the risk of fire, theft, burglary or other dangers, it does not guarantee against such events. M2M Services will not take any responsibility regarding personal, property or revenue loss while using the Device. M2M Services responsibility according to local laws does not exceed the value of the purchased system. M2M Services is not affiliated with GSM operators providing cellular services, therefore is not responsible for network services, coverage or its operation.Manufacturer WarrantyThe Device carries a non-transferable hardware limited warranty by the manufacturer M2M Services. This warranty does not cover any postal or labor costs for the removal and reinstallation of the Device. This warranty does not cover any subscriber agreements or failure of services provided under the terms of such subscriber agreements, or failure of cellular, GPRS, LAN or other related networks functions and services. The warranty does not apply to any Device that has been modified or used in a manner contrary to its intended purpose and does not cover damage to the Device caused by installation or removal of the Device or any of its components. This warranty is voided if the Device has been damaged by improper maintenance, SIM card removal, accident or unreasonable use, negligence, acts of God, neglect, improper service or other causes not arising out of defect in materials or construction. This warranty does not cover the elimination of externally generated static or noise, or the correction of antenna problems or weak signal reception, damage to software, accessories or alarm system external components, cosmetic damage or damage due to negligence, misuse, abuse, failure to follow operating instructions, accidental spills or customer applied cleaners, damage due to environmental causes such as floods, airborne fallout, chemicals, salt, hail, windstorms, moisture, lightning or extreme temperatures, damage due to fire, theft, loss or vandalism, damage due to improper storage and connection to equipment of another manufacturer, modification of existing equipment, faulty installation or short circuit. In no event will M2M Services be liable for any incidental, special or consequential damages (including loss of profits), and the Client shall have no claim against M2M Services for termination of contracts, indemnification, compensation for loss of customers, loss of profits, prospective profits, distribution rights, market share, goodwill, investments made or any similar losses that may result from any faults in the operation of the Device and the services provided by M2M Services.Safety InstructionsThis unit must be checked by a qualified technician once a year.LTE CAT M1 communicator MQ03-LTE-M-FIRE (the Device) contains a radio transceiver operating in LTE CAT M1 bands.Do not use the Device with medical devices, or where it can interfere with other devices and cause any potential danger.Do not expose the Device to high humidity, chemical environment or mechanical impacts.Do not use the Device in a hazardous environment. Don’t store or install the Device in overheated, dusty, wet or overcooled places.The Device is mounted in limited access areas. Any system repairs must be done only by qualified, safety aware personnel. Don’t disassemble or refit the Device. Do not attempt to personally repair it.Mains power must be disconnected before any installation or tuning work starts. The device installation or maintenance must not be done during stormy conditions.The device must be powered by DC 12-29V, 200mA power supply.Blown fuses or any other components of the Device must not be replaced by the user.Keep the Device dry. Any liquid, i.e. rain, moisture, may destroy or damage the inside circuitry. Handle carefully. Don’t vibrate or shake it violently. Please read the user manual carefully before installation and operation of the Device. Otherwise, it may not work properly or be destroyed. Technical SupportFor support in the USA and Canada, contact M2M Services Technical Support at:Telephone: 1-800-403-7029Email: support@ Website: Product DescriptionThe MQ03-LTE-M-FIRE is a digital cellular communicator with a dial capture interface. It represents the latest communication technology for the security industry. The new LTE CAT M1 connectivity brings better indoor signal penetration and greater stability. The communicator is equipped with dual-SIM sand supports multiple cellular networks. This communication solution is a complete communication platform for data transfer from alarm systems at remote sites to Central Monitoring Stations (CMS). The platform allows bi-directional data transmission by using LTE CAT M1 networks and/or LAN. Main Features• Universal Panel Compatibility – Dial capture interface supporting Contact ID and SIA• Exceptional Redundancy – Dual-SIM, supporting AT&T and Verizon LTE CAT M1 networks.• Connection monitoring – default 5 min polling of the cellular connection.• High reliability due to multiple transmission channels (LTE CAT M1/LAN) and redundant servers;• Web-based software and smartphone app for device configuration and administration. Remote firmware updates. • End-user smartphone app – supports push notifications.
维宏手柄说明书NK105-3MS用户手册-R3

上海维宏电子科技有限公司 Shanghai WeiHong Electronic Technology Co., Ltd.
热线:400-882-9188 传真:021-33587519 网址: 第1页 地址:上海市都会路2338弄29号(201108) E-mail:support_weihong@ 感谢您选择了本公司的产品! 本手册能帮助您熟悉本公司的产品,了解系统组成、设置、使用等方面的信息。 本资料详细介绍系统安装过程及系统的各项功能,在使用本软件系统及相关的机床设备之前,请您详细阅读本手册。这将有助于您更好地使用本公司产品。 由于软件、硬件的不断更新,您所收到的软硬件在某些方面可能与本手册的陈述有所出入。在此谨表歉意。 上海维宏电子科技有限公司 Shanghai WeiHong Electronic Technology Co., Ltd.
第2页 热线:400-882-9188 传真:021-33587519 网址: 地址:上海市都会路2338弄29号(201108) E-mail:support_weihong@ 注意以下事项: 1) 不可带电插拔与NK105控制盒相连接的并行电缆。 2) NK105控制盒应接地线以保证安全并防止干扰。 3) 机器不工作时请及时关掉电源。 4) 长期不使用时请拔下电源插头。 5) 主轴电机轴承寿命与其转速成反比。 6) 雕刻刀十分锋利,运行时禁止用手触摸,以防伤害。也不要用手帕,丝巾接触,以防卷入造成伤害或损坏设备。 上海维宏电子科技有限公司 Shanghai WeiHong Electronic Technology Co., Ltd.
热线:400-882-9188 传真:021-33587519 网址: 第3页 地址:上海市都会路2338弄29号(201108) E-mail:support_weihong@ 目 录 1. NK105系统特性..........................................................................................1 2. 系统安装.......................................................................................................3 2.1. NCSTUDIO™的系统基本配置.................................................................................................................3 2.2. NCSTUDIO™系统的恢复.........................................................................................................................3 2.2.1. 更新配置.........................................................................................................................................3 2.2.2. 更新系统镜像.................................................................................................................................3 2.2.3. 更新系统应用程序.........................................................................................................................4 3. NK105基本概念..........................................................................................5 3.1. 操作模式与状态.....................................................................................................................................6 3.1.1. 操作模式.........................................................................................................................................6 3.1.2. 操作状态.........................................................................................................................................6 3.2. 机床坐标系.............................................................................................................................................7 4. 面板按键的功能和操作方法.......................................................................9 4.1. 简述.........................................................................................................................................................9 4.2. 单键按键功能介绍...............................................................................................................................10 4.3. 组合键功能介绍...................................................................................................................................11 4.4. 回机械原点...........................................................................................................................................12 4.4.1. 回机械原点参数设置...................................................................................................................12 4.4.2. 回机械原点操作方式...................................................................................................................15 上海维宏电子科技有限公司 Shanghai WeiHong Electronic Technology Co., Ltd.
eyeos配置手册
eyeos安装配置手册
一、前言 eyeos是一种新型态的操作系统,它的一切都通过Web浏览器展示。通过
eyeOS ,您将始终可以享用您的桌面,应用程序和文件,从您的家,学校,办公
室或邻居的房子,您只需打开一个Web浏览器,连接到您的eyeOS系统,便可以
像上一次离开时一样的使用您的个人桌面和一切相关材料。
eysos代码使用php5开发,数据库采用mysql,是完全开源的在线操作系统,
源代码可以到官方网站上下载。运行服务器采用apache。
许多人通过他们自己的经验认识到安装 apache 服务器是件不容易的事儿。
如果想添加 MySQL、PHP 和 Perl,那就更难了。而XAMPP 是一个易于安装且包
含 MySQL、PHP 和 Perl 的 Apache 发行版。XAMPP非常容易安装和使用:只需
下载,解压缩,启动即可。
二、详细步骤
XAMPP部分:
1. 下载XAMPP
(1).到/zh_cn/xampp.html,选择适用于windows的
xampp安装。
(2).我们选择安装包进行安装,是安装XAMPP最简单的方法。
2. XAMPP安装过程
注意:若电脑上有开启IIS服务,需要关闭,否则会和apache服务冲突(控
制面板—管理工具—IIS管理器进行关闭)
下面是一些安装过程的截图:
安装成功后,会提示可立即使用XAMPP控制面板。 下图即为XAMPP控制面板:
我们可以使用 XAMPP 控制面板来启动/停止所有服务或安装/卸载所有服
务。
3. 测试XAMPP
apache 服务启动后,在浏览器中输入地址 http://localhost 或
http://127.0.0.1,检测所有的 XAMPP 样例和工具。
4. 安全问题
背景:XAMPP 并不是为生产环境准备的,它只为开发者服务。为了方便开发者,
XAMPP 被默认配置为所有功能全部开启。对于开发环境来说,这是非常好的,但
Sennheiser G3 无线电话系列产品说明说明书
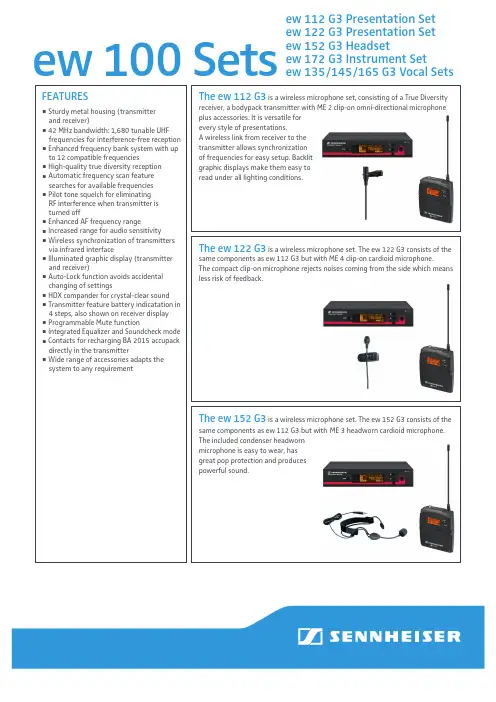
ew 100 Setsew 112 G3 Presentation Setew 122 G3 Presentation Setew 152 G3 Headset
ew 172 G3 Instrument Set
ew 135/145/165 G3 Vocal Sets
The ew 122 G3 is a wireless microphone set. The ew 122 G3 consists of the
same components as ew 112 G3 but with ME 4 clip-on cardioid microphone.
The compact clip-on microphone rejects noises coming from the side which means
less risk of feedback.
The ew 152 G3 is a wireless microphone set. The ew 152 G3 consists of the
same components as ew 112 G3 but with ME 3 headworn cardioid microphone.
The included condenser headworn
microphone is easy to wear, has
great pop protection and produces
powerful sound.FEATURES
Sturdy metal housing (transmitter and receiver)42 MHz bandwidth: 1,680 tunable UHF frequencies for interference-free receptionEnhanced frequency bank system with up to 12 compatible frequenciesHigh-quality true diversity reception Automatic frequency scan feature searches for available frequenciesPilot tone squelch for eliminating RF interference when transmitter is turned offEnhanced AF frequency range Increased range for audio sensitivity Wireless synchronization of transmitters via infrared interfaceIlluminated graphic display (transmitter and receiver)Auto-Lock function avoids accidental changing of settingsHDX compander for crystal-clear sound Transmitter feature battery indicatation in 4 steps, also shown on receiver displayProgrammable Mute function Integrated Equalizer and Sound check mode Contacts for recharging BA 2015 accupack directly in the transmitterWide range of accessories adapts the system to any requirementThe ew 112 G3 is a wireless microphone set, consisting of a True Diversity
Magico M3用户手册说明书

MAGICO M3 USER’S GUIDE
A MESSAGE FROM ALON WOLF:
THANK YOU FOR PURCHASING THE MAGICO M3 LOUDSPEAKERS.
THE M3 INCORPORATES ALL WE HAVE LEARNED IN THE PAST 23 YEARS ABOUT
LOUDSPEAKER DESIGN AND MANUFACTURING. LIKE ALL MAGICO LOUDSPEAKERS, THE
M3 IS A PRECISION INSTRUMENT FOR MUSIC REPRODUCTION. PROPERLY SET UP AND
MAINTAINED, IT WILL PROVIDE YOU WITH A GREAT MUSICAL EXPERIENCE FOR MANY
YEARS.
BEFORE UNPACKING AND PLAYING YOUR SPEAKERS, PLEASE READ THE FOLLOWING
MANUAL FULLY. IT WILL PROVIDE YOU WITH DIRECTIONS FOR PROPERLY SETTING UP,
POSITIONING, CONNECTING, AND CARING FOR YOUR SPEAKERS. FOLLOWING THESE
INSTRUCTIONS WILL ENSURE A SMOOTH INSTALLATION AND OPTIMUM SPEAKER
PERFORMANCE.
IF YOU HAVE ANY QUESTIONS, PLEASE CONTACT YOUR AUTHORIZED MAGICO DEALER.
MAGICO MAINTAINS A NETWORK OF DEDICATED DISTRIBUTORS WHO WILL BE ABLE TO
MSRM3用户手册说明书
MSRM3
多交换机路由器监控3
用户手册
版本:
3.20.x.x
MSRM3用户手册
2目录
第一章MSRM3基本概述3页
第二章MSRM3系统说明4页
1.系统组成说明4页
2.系统运行环境要求4页
第三章MSRM3部署实施6页
1.第一次启动6页
2.再次启动(已配置完成Web主机头)6页
3.调试运行7页
4.自动产生的文件说明8页
5.MSRM3系统服务的注册、删除、启动、停止8页
第四章MSRM3用户的基本操作使用说明10页
附录关于及获取帮助15页
MSRM3用户手册
3第一章MSRM3基本概述
MSRM3是一款适用于各类企业、院校、政府及通讯维护业的网络设备的监
控管理软件。主要用于监控局域网、城域网上的各类型交换机和路由器的工作
状态和流量数据,以直观、可矢量缩放的拓扑图及流量图来表现设备和端口的实
时工作状态及流量。
MSRM3不挑设备品牌,只要设备支持SNMPv2c协议,就可加入到MSRM3
的监控中。MSRM3完全自主研发,不依赖其他软件运行。MSRM3的整个系统仅
由一个EXE文件构成,系统无须安装,绿色小巧,仅简单配置即可运行工作,实
现了对设备的数据采集、数据的存储分析,提供Web访问服务等功能。MSRM3
性能强大,在主流的Windows平台的计算机上可同时监控上千台网络设备的工
作状态、上万个接口的流量数据。
MSRM3用户管理操作简单,在任意平台上使用主流浏览器访问MSRM3系
统提供的Web服务就可完成管理。系统Web前端采用最新的HTML5技术,所
有的操作在仅一个页面内的应用完成,仅一次性加载,不跳转页面切换各项管理
功能,实时更新设备状态,真正实现类似并超越传统C/S模式客户端管理软件的
功能和界面。
MSRM3用户手册
4第二章MSRM3系统说明
1、系统组成说明
MSRM3系统仅由一个EXE文件构成,源文件名为:
MSRM3-ConsoleService.exe。文件大小仅1.9兆字节(MB)(随版本更新,
文件大小有所不同)。仅这一个EXE文件就实现了MSRM3系统的环境配置、
WiebeTech 鼠标晃动器 MJ-3 快速启动指南说明书
WiebeTech®
Mouse Jiggler™ MJ-3
Quick Start Guide
Features• Overrides a computer’s screensaver and sleep mode settings• No cables, drivers, or software needed• Just as portable as a USB thumb drive• Works with Windows, macOS, and other HID-compliant operating systems• Customize the Mouser Jiggler MJ-3’s behavior with our Mouse Jiggler software available at /mj3Mouse Jiggler MJ-3 Quick Start Guide
1 LED BehaviorThis chart indicates the factory-default settings only. The Activity LED’s color and behavior are also user-programmable (see Section 3).LEDColorStateDescription
ActivityRedHolds on Amber, then cycles through Red, Amber, and then GreenThe Mouse Jiggler MJ-3 is starting up.GreenAmberGreenBlinks Once Per MinuteIndicates that the Mouse Jiggler MJ-3 is active and working.
2 Operating Your Mouse Jiggler MJ-3
深圳万讯MVP3300阀门定位器说明书
MVP3300智能电气阀门定位器
Intelligent Electropneumatic valve Positioner
用户手册
User Manua
1 用户须知......................................................................................................................................................1
1.1 安全指示..............................................................................................................................................1
1.2 开箱清单..............................................................................................................................................1
1.3 重要信息提示......................................................................................................................................1
2 概述..............................................................................................................................................................1
N32WB03x系列蓝牙芯片 数据手册说明书
1 / 56 N32WB03x系列蓝牙芯片 数据手册
N32WB03x系列采用32位ARM Cortex-M0内核,最高工作主频64MHz, 支持BLE 5.1,发射电流4.2mA, 接收电
流3.8mA, 最大发射功率
+6dBm,接收灵敏度-94dBm @BLE 1Mbps, 支持SIG Mesh 关键特性 内核CPU 32位ARM Cortex-M0内核 最高主频64MHz 存储 256K/512K字节Flash 48K字节SRAM 功耗 接收电流:********** 发射电流:4.2mA @0dBm/3.3V Sleep模式(48KB RAM保持):1.4μA@3V PD模式:130nA 射频规格 BLE 1Mbps接收灵敏度:-94dBm BLE 2Mbps接收灵敏度:-91dBm 可编程的发射机功率,最大+6dBm 单端天线口 时钟 HSE:32MHz外部高速晶体 LSE:32.768KHz外部低速晶体 HSI:内部高速RC64MHz LSI:内部低速RC32KHz 支持1路时钟输出,可配置为不同的时钟,4分频后输出 复位 支持上下电/外部引脚复位
2 / 56 支持看门狗复位 通信接口 2个USART接口,最高速率4 Mbps(可配置为ISO7816,IrDA,LIN) 1个LPUART接口,支持低功耗特性,Sleep模式下最高通讯速率9600bps,支持低功耗唤醒 2个SPI接口,最高速率16MHz,主从模式可配,可配置为I2S 1个I2C接口,最高速率1 MHz,主从模式可配 定时计数器 1个16位高级定时计数器,支持输入捕获、输出比较、PWM输出以及正交编码输入等功能;有4个独立的通道,其中3个通道支持6路互补PWM输出 1个16位通用定时计数器,支持输入捕获、输出比较、PWM输出、单脉冲输出,有4个独立的通道 1个16位基本定时计数器 1个24位系统时间定时器 1个7位窗口看门狗(WWDG) 1个12位独立看门狗( IWDG) 模拟接口 1个10位1.33Msps ADC(可配置为16位16Ksps),支持5路外部单端通道,1路差分MIC通道,2路内部通道 内置PGA,支持最大128倍放大 MIC BIAS电压支持1.6V-2.3V可调 21个支持复用功能的GPIO 1个高速5通道DMA控制器 1个IR发送控制器,支持可配置红外遥控协议 1个KEYSCAN模块,支持8/10/13个GPIO可配置为44/65/104个按键功能 RTC实时时钟,支持闰年万年历,闹钟事件,周期性唤醒 支持硬件CRC16、CRC32运算 工作条件 工作电压范围:1.8V/2.32V~3.6V 工作温度范围:-40℃~85℃ ESD:±2KV(HBM) 封装